

Oftentimes the biggest obstacle to integrating Salesforce with an External Service is the first step: configuring secure designated access to that service. Below are step-by-step instructions on using OAuth 2.0 to grant Salesforce the ability to post a message in Slack:
[Slack] App & App Credentials
Tell Slack about the Salesforce app that will need access your Slack workspace, and that it needs permissions to write messages.
1.Log into Slack as the administrator of the workspace you want to integrate with Salesforce.
2. In the Apps page, click on “App Directory” in the upper right hand corner.


3. In the App Directory, click on “Build” in the upper right hand corner, which should take you to api.slack.com.


4. Click on “Start Building”.


5. In the “Create a Slack App” modal:
a. App Name: enter an app name
b. Development Slack Workspace: select the workspace you want to Salesforce to access
c. Click “Create App”


6. Modal will close, and you will see the Settings -> Basic Information page for your newly configured app. In the “Building Apps for Slack” section, under “Add features and functionality”, click “Permissions”.


7. In the Features -> OAuth & Permissions page, scroll down to the “Scopes” section. For Bot Token Scopes, click “Add an OAuth Scope”, and choose “chat:write”.


8. Scroll up to the “OAuth Tokens & Redirect URLs” section, and click “Install App to Workspace”.


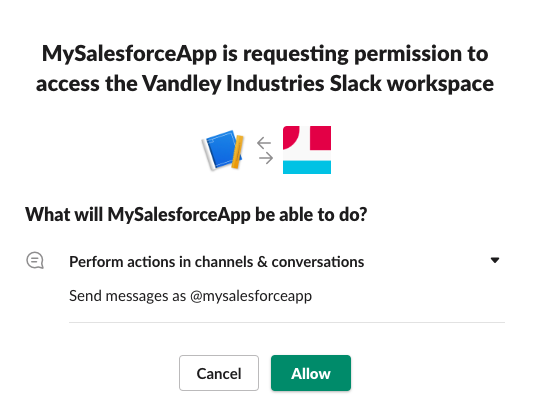
9. Click “Allow” to confirm you want this app to access your Slack workspace.

[Slack] Client ID and Secret
Retrieve the shared secret that Salesforce needs to use to access Slack:
10. In the Settings -> Basic Information page for your app in Slack, scroll down to the “App Credentials” section, and copy the values for the “Client ID” and “Client Secret” fields.


[Salesforce] Auth. Provider
Configure Salesforce to request access to Slack using the shared secret:
11. Log into Salesforce as an administrator for your org.
12. In the Setup -> Auth. Providers page, click “New” to configure a new auth. provider.
13. Configure the new Auth. Provider as follows:
a. Provider Type: Open ID Connect
b. Name: (choose a name for the Auth Provider)
c. URL Suffix: (choose a suffix to be used in client configuration URLs)
d. Consumer Key: (paste in the Client ID from step #10 above)
e. Consumer Secret: (paste in the Client Secret from step #10 above)
f. Authorize Endpoint URL: https://slack.com/oauth/v2/authorize
g. Token Endpoint URL: https://slack.com/api/oauth.v2.access
h. Default Scopes: chat:write
i. (Leave all other fields with their default values)
j. Click Save


[Salesforce] Callback URL -> [Slack] Redirect URL
Whitelist the Salesforce Salesforce Callback URL in Slack:
14. From Salesforce’s Setup -> Auth. Provider page, click to view the details of your newly configured Auth. Provider.
15. Scroll down to the “Salesforce Configuration” section, and copy the value from the “Callback URL” field.


16. In Slack, go back to the “Features -> OAuth & Permissions” page for the app from step #7 above.
17. In the “Redirect URLs” section, click “Add New Redirect URL”.
18. Paste in the Callback URL from step #15 above.
19. Click “Save URLs”.


[Salesforce] Named Credentials
Configure the Slack callout endpoint and authentication parameters.
20. Go back to Salesforce.
21. From the Setup -> Named Credentials page, click “New Named Credential”.
22. Configure the new Named Credential as follows:
a. Label: (choose a label for the Named Credential)
b. Name: (choose a name for the Named Credential)
c. URL: https://slack.com
d. Identity Type: Named Principal
e. Authentication Protocol: OAuth 2.0
f. Authentication Provider: (choose Auth. Provider you configured in step #13 above.
g. Scope: chat:write
h. Start Authentication Flow on Save: checked / selected
i. (Leave all other fields with their default values)


j. Click Save. The Authentication Flow will start.


k. Click “Allow”.

