

Do check out the existing possibilities to make changes to the appointment review screen before trying this out.
When you look at a Salesforce Scheduler flow, there’s a core action called saveAppointment. Did you ever wonder what it does, what the inputs are and whether you can tailor it?

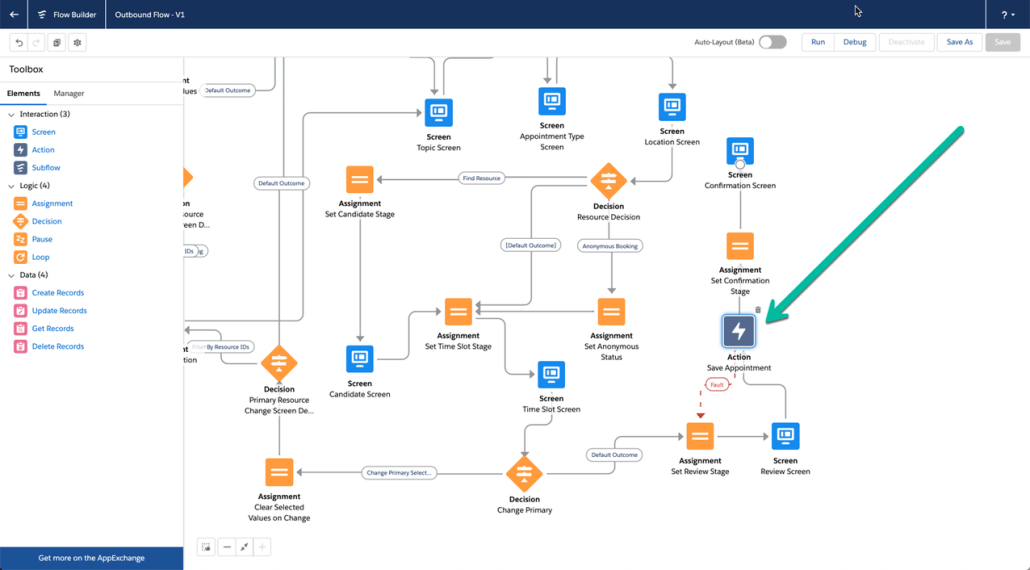
What does it do?
It takes the values gathered during the flow interview and creates or updates a ServiceAppointment record and an associated AssignedResource record. If you provide optional attendees, it will also create AssignedResource records for each optional service resource id provided.
The help and training article is locate here, but let’s look at what’s inside the inputs provided this action.
What is contained in the input fields?
The easiest way to see what is passed into the Save Action is to run the flow in debug mode. There you will see the values that are stored into each field passed into the Save Action.

- Look in the right hand panel of the debugger. You can see the value of each field.
- On a given screen, you will have to press next to see what the values are for that screen.
- You can scroll up and down in the debug details panel to review the values and every step.
After you press finish, scroll up and check out what is in the Save Appointment step.


What do we see here?
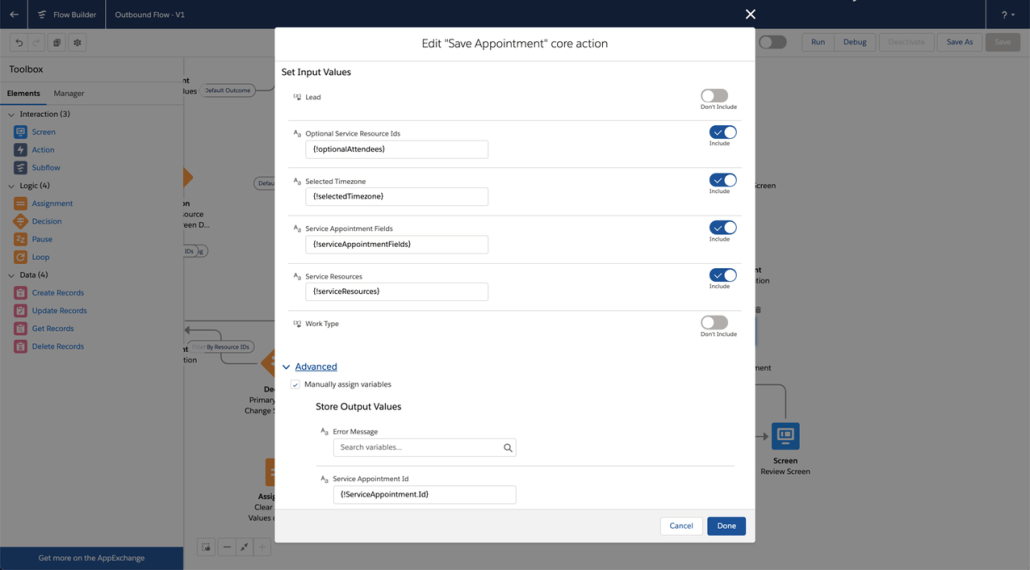
Inputs:
- optionalAttendees = a list of comma separate values of Service Resource Ids.
- serviceAppointmentFields = a JSON string of the Service Appointment fields, including fields such as:
- start and end times
- service territory id
- Service Resource ID for the service resource the appointment is for
- ParentRecordId = the Account Id (or the opportunity or lead id)
- other fields on the page layout – there’s a custom field I added to the Service Appointment object and page layout called My_Custom_Field
- selectedTimezone – the timezone selected by or defaulted for the user
Output:
- the Service Appointment Id
How do these values get set?
In a Salesforce Scheduler flow, the Screen steps each have components on them that save values to variables in the flow. For example, the Select Location screen has a screen component that saves the Service Territory Id and Address fields to the corresponding fields in the ServiceAppointment variable, as you can see in the screen shot below.

But how does the serviceAppointmentFields variable get set?
This field is the bulk of what is passed into the Save Action.
It gets set by the Review Screen component that is located on the Review Screen.
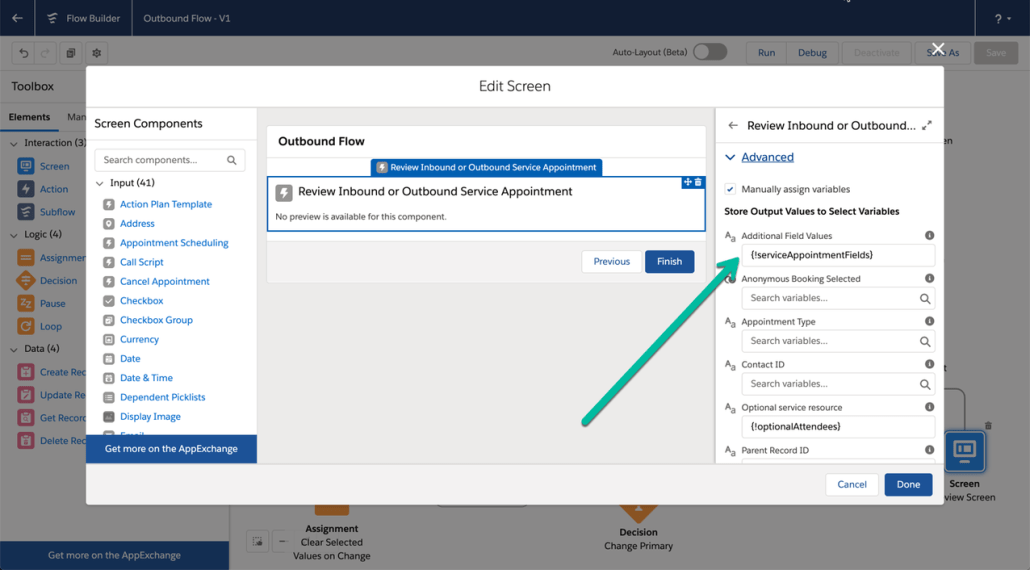
- This component is located in the Review Screen.
- It gives the user the ability to review the appointment prior to saving. For example, they can enter a value into the Subject field or other fields, including custom ones.
- But this component is really a black box.
What if I wanted to set the values for the serviceAppointmentFields variable myself?
So as I have written above, the Review Screen component is really a black box. It takes the fields from the review screen along with other fields in the ServiceAppointment object variable and the WorkTypeGroupId variable and creates a JSON string from them.
What is JSON you ask? You’ve probably heard of it and you can definitely Google it and find out more, but it’s essentially a collection of name:value pairs, and you see that in the debugger output above. It’s very powerful and allows you to store lots of rich information, including arrays, in a text field.
You can create your own JSON string using a formula field. You can pass that formula field into the Save Appointment action. Or you can assign it to the serviceAppointmentFields variable in an assignment step.
Here’s an example of a formula field that I have used to pass into the Save Appointment action:
'{"Description":"' &{!ServiceAppointment.Description}&
'",'& '"SchedStartTime":"' & substitute(substitute(text({!ServiceAppointment.SchedStartTime}),' ','T'),'Z','.000Z')&
'",'& '"SchedEndTime":"' & substitute(substitute(text({!ServiceAppointment.SchedEndTime}),' ','T'),'Z','.000Z')&
'",'& '"Subject":"' & {!ServiceAppointment.Subject}&
'",'& '"AdditionalInformation":"' & {!ServiceAppointment.AdditionalInformation}&
'",'& '"AppointmentType":"' & text({!ServiceAppointment.AppointmentType})&
'",'& '"Comments":"' & {!ServiceAppointment.Comments}&
'",'& '"ParentRecordId":"' & {!ServiceAppointment.ParentRecordId}&
'",'& '"Street":"' & {!ServiceAppointment.Street}&
'",'& '"City":"' & {!ServiceAppointment.City}&
'",'& '"State":"' & {!ServiceAppointment.State}&
'",'& '"PostalCode":"' & {!ServiceAppointment.PostalCode}&
'",'& '"Country":"' & {!ServiceAppointment.Country}&
'",'& '"WorkTypeGroupId":"' & {!WorkTypeGroupId}&
'",'& '"ServiceTerritoryId":"' & {!ServiceAppointment.ServiceTerritoryId}&
'",'& '"ServiceResourceId":"' & {!ServiceResourceId}&
'",'& '"Phone":"' & {!ServiceAppointment.Phone}&
'",'& '"Email":"' & {!ServiceAppointment.Email}&
'",'& '"IsAnonymousBooking":"' & if({!ServiceAppointment.IsAnonymousBooking},"True","False")&
'",'& '"isSlotChanged":"' & "False"&
'"}'
What do you see in the field above?
Lot’s of care taken to make sure each name:value pair is enclosed in double quotes and that each pair has a colon between it and is separated by a comma from the next pair. And the whole string is wrapped in curly braces {}. Note the added complexity of the SchedStartTime and SchedEndTime fields, to convert them from datetime data types to a text type in a “”yyyy-MM-dd’T’HH:mm:ss.SSSZ”” format. I’ve also had to use a text() function to convert the picklist field called AppointmentType to a string value.
Can I replace the out of the box review screen with my own review screen?
Yes you can! You can display whatever content you like using standard flow components such as Display Text and you and capture user input using standard flow components such as Input Text or Date.
You just need to make sure you create the JSON string to pass into the Save Appointment action.
Minimum values required: make sure the at least the following fields are passed in order to get the desired results :
{"ParentRecordId": "001xx0000000000000",
"ServiceTerritoryId": "0Hhxx0000000000000",
"ServiceResourceId": "0Hnxx0000000000000",
"WorkTypeGroupId": "0VSxx0000000000000", (for new)
"WorkTypeId":"08qxx0000000000000" (for modify)
"SchedStartTime": "2021-02-21T20:30:00.000Z",
"SchedEndTime": "2021-02-21T21:00:00.000Z",
"IsAnonymousBooking": <VALUE SET IN FLOW VARIABLE>,
"isSlotChanged": <false for new, true for modify>,
"schedulingPolicyName": "<same policy name set in flow>"
}
Details of the Save Appointment inputs
- Lead – use this for guest inbound flows (unauthenticated) only. This is a record (single) variable containing the new Lead record created for the guest user running the flow.
- Optional Service Resource Ids – comma separated list of Service Resource Ids. This represents the optional resources for the service appointment, if present.
- Selected Timezone – the timezone selected by or defaulted for the user – see this article for the list and use the value for the Timezone (the part of the TIME ZONE NAME field in parenthesis, such as America/Los_Angeles).
- Service Appointment Fields – a single text field containing the JSON for the Service Appointment – extensively described above. For guest inbound flows, do not provide a value for parentRecordId, as this will be provided via the Lead object described above.
- Service Resources – if using Multi-Resource scheduling – this is a single text field containing the JSON for the list of Service Resources and Territory Members selected, including the primary resource. Example below (record ids are obfuscated in this example).
- [{“UserPhoto”:”https://
xxxx–c.documentforce.com/profilephoto/729B0000XXXXXXXX/F”,”ServiceTerritoryMemberId”:”0HuB0000000XXXXXXXX”,”IsActive”:true,”ResourceType”:”T”,”RelatedRecordId”:”005B000000XXXXXXXX”,”Id”:”0HnB0000000XXXXXXXX”,”Name”:”Connie Ruiz”,”sobjectType”:”ServiceResource”,”AttendanceType”:”Primary”},
{“UserPhoto”:”https://xxxx–c.documentforce.com/profilephoto/729B0000XXXXXXXX/F”,”ServiceTerritoryMemberId”:”0HuB0000000XXXXXXXX”,”IsActive”:true,”ResourceType”:”T”,”RelatedRecordId”:”005B000000XXXXXXXX”,”Id”:”0HnB0000000XXXXXXXX”,”Name”:”Anita Gonzalez”,”sobjectType”:”ServiceResource”,”AttendanceType”:”Required”},
{“UserPhoto”:”https://xxxx–c.documentforce.com/profilephoto/729B0000XXXXXXXX/F”,”ServiceTerritoryMemberId”:”0HuB0000000XXXXXXXX”,”IsActive”:true,”ResourceType”:”T”,”RelatedRecordId”:”005B000000XXXXXXXX”,”Id”:”0HnB0000000XXXXXXXX”,”Name”:”Mark Mayo”,”sobjectType”:”ServiceResource”,”AttendanceType”:”Required”}] - WorkType – if using a Modify flow, this is a record (single) variable containing the Work Type for the Service Appointment being rescheduled. It is not used for new appointments.