

This is the first post of a 2-part series. Here, we go over how to build an Orchestration. In Part 2, we actually run this Orchestration and show the different features available to admins and end users during runtime.
Overview
Orchestrator (GA Spring 2022) is a new product from Salesforce that allows you to orchestrate processes with multiple flows and multiple users to automate sophisticated business processes without code.
In this tutorial, we will build a Record-Triggered Orchestration for a case management process. We will cover all of the features available to customers while building their Orchestrations.
How do I activate Orchestrator?
Orchestrator is by default activated in every production salesforce Org. As pricing is done using a freemium consumption-based model, you can build and test your orchestration for free, given that you have not exceeded the default 600 runs provided to every org (Please reach out to your Service Cloud AE regarding further Orchestrator pricing). So, you shouldn’t have to do anything special in order to activate and use orchestrator.
To ensure you have Orchestrator in your Salesforce org, you can navigate to the setup menu. From there:
- Click Process Automation > Flows
- Click New Flow
- Click All + Templates
If you see a tab for Orchestrator, that means you can use Orchestrator!


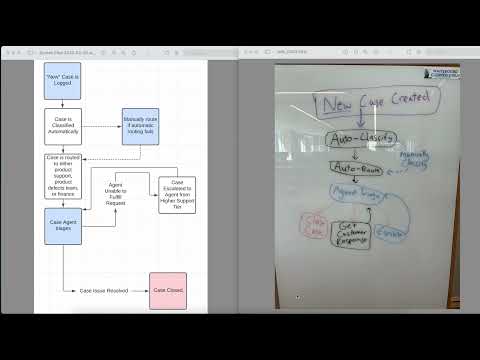
Flowchart (model it out)
Before creating your orchestration, it can be useful to visualize your entire end-to-end process in order to understand which parts you’d like to model within salesforce, which parts will need intervention from third-party systems, which parts should occur in the background, which parts need user input, etc.
Getting Started
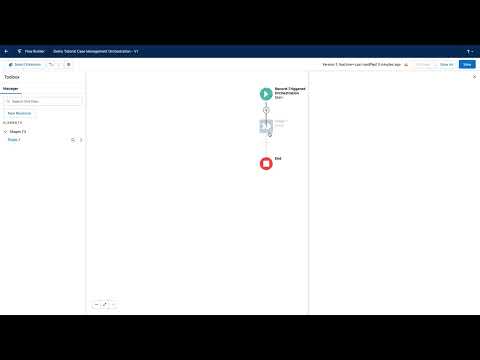
To create a new orchestration, you’ll need to navigate to the set up menu. From here, click on Process Automation > Flows, and then “New Flow”. This will take you to the flow set up modal. From here, click “All + Templates”, and then “Orchestrator”. You now have the option of building either an auto-launched orchestration (invoked by Apex, REST API, or other custom code) or a record-triggered orchestration (invoked similarly to a record-triggered flow). We are going to build a record-triggered orchestration.
We are now taken to the Orchestration Builder UI. It’s pretty empty since we haven’t added anything yet. What we do see is the Orchestration trigger. Here, we can modify when we want our Orchestration to be triggered.

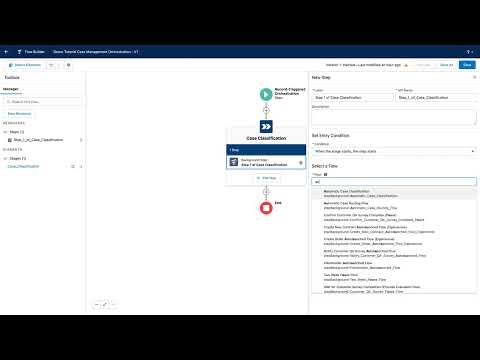
Add Stages
Let’s add a stage to our Orchestration. Stages are how Orchestrator groups related steps together. Stages are useful for visualizing Orchestrations in terms of larger subprocesses. Also, you can run multiple steps in parallel if they share a stage, so if you’ve got a number of steps that need to be run in parallel, you’ll want to put them in the same stage.
Add Flows
Each stage will consist of steps. Before we can add a step, we need to create a flow for each step we want our Orchestration to have. These flows will be doing the low-level work (record updates, screens for user tasks, etc.) for our Orchestration.

Background Steps
The first type of step is a background step, which calls an autolaunched flow when it is run. Background steps are great for repetitive background work: record updates, invocable action calls, and sending notifications to users are all examples of background work for which these steps should be used.
Interactive Steps
The second type of step is an interactive step. This step should be used whenever a user needs to give their input on something: approval steps, pricing quotes, and collecting feedback through a form are three examples of how interactive steps might be used.

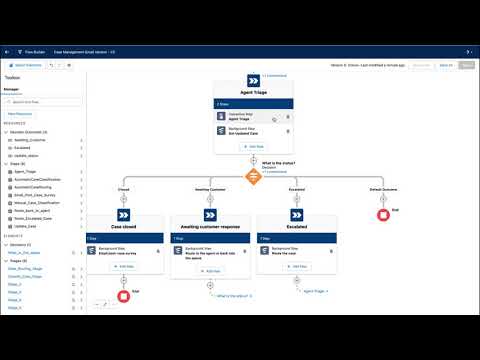
Logic Elements
Orchestrator currently supports 2 types of logic elements: decisions and go-to connectors. Decision elements allow you to have branching paths that execute on certain conditions, while go-to elements let you loop back to previous elements of your Orchestration. You may have multiple paths in your Orchestration which lead to the same rejection stage; a go-to element allows you to reuse the same stage to handle all of these outcomes.

Evaluation Flows
Evaluation flows give you greater control over the entry and exit criteria of your steps and stages. If you don’t wanna start a step until a certain condition has been met on a record field for example, you’ll want to use an evaluation flow to check for this. Additionally, maybe you want to end a stage before completing all of its steps, because an important criteria has already been met. An evaluation flow fits this use case as well.

Before You Run: Do These 3 Things
Before you can run your orchestration, you need to set up the work guide on any relevant record pages, set the process automation email, and activate your orchestration. This video shows you how to do all three.

Important Consideration: $Record Refresh
A current limitation to be aware of is how Orchestrator saves the context record for a Record-Triggered Orchestration.
In a nutshell, you can circumvent this by always calling a “Get Record” element at the start of every flow to ensure you’re getting the most up to date information on the context record.
This video will help you ensure you don’t run into any problems related to this limitation.

Next Steps
In Part 2, we will go over how you can run this Orchestration and take advantage of our monitoring features to get more information on your running Orchestrations.