
Connect your Service Agent to a Messaging Channel
Below are experiences of the authors, and referencing features in pilot and actively updating every month
So you’ve built a new Agentforce Agent and wondering how to connect it up to a communication channel and get it talking to customers?
Key note, Agentforce at GA will support all Enhanced Messaging channels, including SMS, WhatsApp, Web (MIAW), and others. For the first pilot customers, and almost every demo video you’ve seen, the focus has been on our Web experience, but you can connect it up to any of them. **(See notes below on limitations in the pilot for different channels)
In the future we also plan to support Email and Voice, but for now we’re starting with Messaging channels.
Basic instructions
You’ll create an Omni Flow, build some rules on whether you want to route to the Agentforrce Agent or not, and then add it on the Messaging channel. The routing type in the Route Work Action (for now) is Bot, so the setup steps are exactly the same as for a Bot. In fact, under the covers, it’s the same code as with Bots, so connecting up Agentforce is exactly the same steps.
Simple 😀
….but if you want to learn the detailed steps, here they are below:
Detailed Setup steps
What we need to do is take the Messaging Channel that we want, and configure an Omni Flow on it to Route to the ASA.
Step 1: Create an Omni Flow (or edit your existing one)
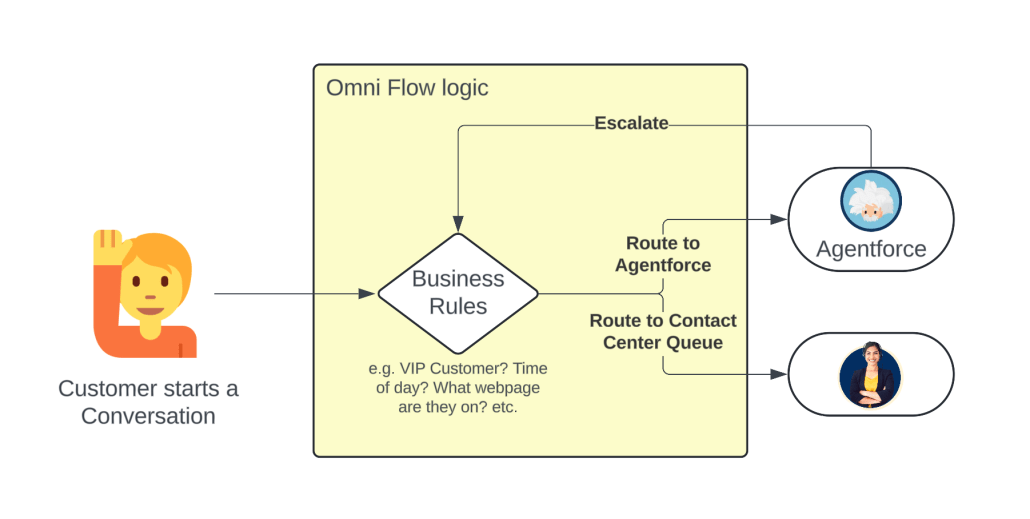
The Omni Flow is where you build all of the business rules for what will happen to the conversation when the customer sends in the first message. It might Identify the Contact and Create a Case, it might Route to an Agent, to an Einstein Bot, or (now) to an Agentforce Agent. Some customers have a lot of logic in here, perhaps they go to the queue during business hours and the Agentforce Agent after. Others keep it simple and just send every customer to the same place. That’s up to you, but there are some examples of both below.
Key thing is to add a Route Work action, and point it to the ASA you want to connect to.
To do this, select the Bot routing option, and then select the Agent you’ve created. (At GA we’ll have Agentforce as a separate option on here).
Step 1.1 Create the Flow

Step 1.2 Build the logic on where to send the Conversation
This might be super easy, just add a Route Work action and send everything to the ASA, or maybe more complex with some business rules. See some examples below.
Simple example: Send everything to the ASA

Advanced example: Automation, Routing logic, etc.
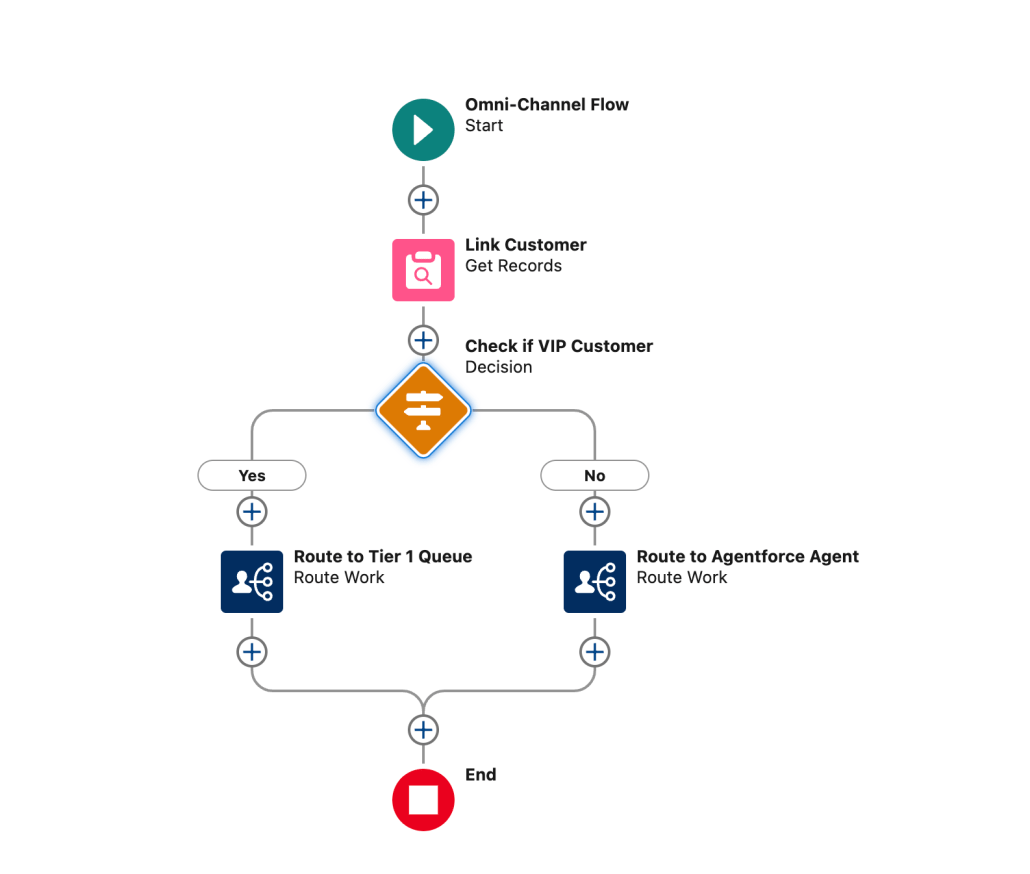
Step 1.3 Add the Route Work action to point to the Agentforce Agent
Note: In the pilot the Route to option says Bots, for GA we’ll be renaming this to something that sounds more like Agentforce 😀

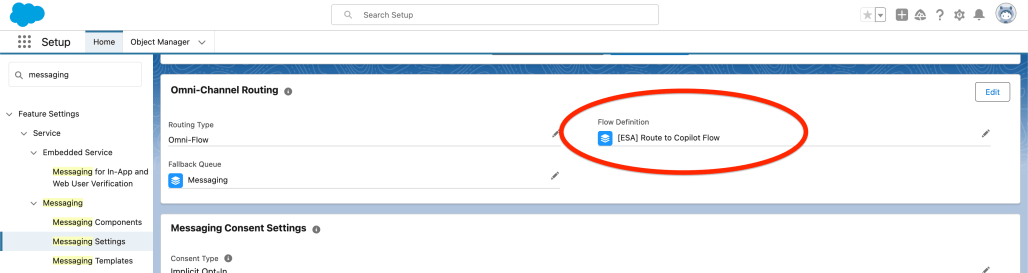
Step 2: Connect the Omni Flow to the Messaging Channel
Find the Messaging channel that you want to connect. In my org below I have three, a Web chat, an SMS, and a WhatsApp number. Open it up in settings, scroll down to the Omni-Channel part, and set the Omni Flow you created in there.
Once you’ve done that, you’re good to go!!!
Send in a message as a customer, and your Agentforce Agent should reply 🚀

Step 3 – Test your exciting new Service Channel
Start a Chat/Conversation as the customer and see that the Agentforce Agent is now replying 🎉🎉🎉