I’ve released a new version of the Datatable component (4.3.5).
In addition to the Remove Row Action, I’ve added a new Standard Row Action and improved reactivity with a new single “Actioned Row” output. When a row is “actioned”, you can fire off other reactive screen components like Flow Launcher or Screen Actions. This lets you now do almost anything you want when clicking on a row action.
The action can be configured as a clickable icon or a full button and can be put in the first or last column of the datatable.
Some flow elements such as Transform and Filter are still not directly referenceable in the resource picker so I’ve updated the picker and the Datatable CPE to allow manual entry of flow attributes for the record and pre-selected record collections. For example: “{!MyFilter}”
Other Datatable changes include increasing the maximum column width from 1000px to 1500px.
I’ve addressed a few bugs as well.
Date field values that get adjusted by the timzoneoffset now are stored as YYYY-MM-DD. Prior versions stored these as a datetime which caused issues with collection processors and action buttons.
The SelectedRowKeyValue output now gets cleared when no rows are selected.
When both pagination and single row selection are enabled, the prior selection will be cleared before setting the new selection.
Fixed search/filter errors when using special characters by escaping special characters in filter and search terms.
The correct url for record hyperlinks will be generated when running in a playground org.
Edited ApexDefined rows will be output as soon as changes are saved. (Issue #1565)
If multiple preselected rows are provided and single row selection is enabled, only the first record in the collection will be marked as preselected.
I released an Auto-Navigate component for flow screens and added some new reactive collection processors. By adding reactive conditional visibility to the Auto-Navigate component you gain full control over navigating between flow screens without the user needing to click a Next or Previous button. The UpsertRecordByKey action lets one upsert a record into a record collection by matching the value of a key field.
For certain types of reactive screens, some components are designed to react to the outputs of other components on the same screen. However, the first time a screen loads, these components may not have a value available. The Reactive Record and Reactive Record Collection components are designed to “seed” a component with a starting value before it can react to a change in another component. Think of these like the flow formula function BLANKVALUE where you can assign an optional value to use if the primary value is null or blank.
Updates to the Flow Screen Components Base pack include an updated combobox which means that Action Button and Screen Action outputs can now be directly referenced by other custom components from unofficialsf.com. CPE developers can take advantage of a new feature that lets users manually reference flow attributes that can’t be selected natively by the component. QuickChoice was updated to support default values for dependent picklists on initial screen load. A Master Label and a Required attribute were added to the Object and Field picker. The Rich Text Input screen component is now reactive.
The Flow Actions Base Pack and the Collection Actions were updated to have all entries be at API 45.0 or later which avoids any issues enabling the ICU Locale Formats which is being enforced in Spring ‘25.
Be sure to Subscribe to updates by clicking on any Blog post on this page and entering your email address and clicking Subscribe.
https://unofficialsf.com/wp-content/uploads/2022/09/largeUCSF-300x133.png00Eric Smithhttps://unofficialsf.com/wp-content/uploads/2022/09/largeUCSF-300x133.pngEric Smith2025-01-28 13:17:442025-01-28 13:17:47What’s new for Datatable and other UnofficialSF components
Datatable with Row Actions calling a pop-up Screen Flow
Recently I wrote an article on how datatable row actions could be used to execute a Screen Action. This is a great feature if you need to perform some unattended actions on a record in the datatable.
But what if you need to provide some additional input or interact with the data in the actioned record? Action Buttons and Screen Actions can only run auto-launched flows, not screen flows.
I was able to work with Josh Dayment to enhance his new Flow Launcher action to launch a screen flow reactively instead of just from a button. We also added the capability of passing records and record collections in and out of the launched flow.
There will be many different use cases for this new capability, but this article highlights how you could combine Datatable and Flow Launcher to edit fields that aren’t natively supported for inline editing such as Lookup and Multi-Select Picklist fields.
Here’s the flow in action. Each time the row action button is clicked, a screen flow pops up allowing the user to edit some of the fields in the actioned record. When they click Save Changes, the datatable gets refreshed with the changed record.
This is a simple flow where you get a collection of Account records and present them in a Datatable on a reactive screen.
The reactive screen displays a Datatable with row actions enabled. 4 additional reactive actions are added to handle the additional processing. Each of these will be explained in more detail later.
CP – Get First Record Extract the single record from the collection of actioned rows provided by the datatable.
Flow Launcher – Sobject Launch a screen flow that will allow the user to edit fields in the record provided by the Get First Record action.
CP – Upset Record By Key Upsert the updated record from the screen flow into the current record collection.
CP – Reactive Record Collection Provide the active record collection to be displayed in the Datatable and used by the Upsert action. If nothing has been processed yet, seed the flow with the original Get Records collection. Otherwise, return the collection provided by the Upsert Record By Key action.
When you first build this flow, set the input collection for the Datatable to be the collection of Accounts from the Get Records. You will come back later and update this once you add the other reactive actions to the screen.
Next, define the Row Action for the Datatable. Currently, there is only a Remove Row action so select that and restrict the number of actioned rows to 1.
The Remove Row action in the Datatable outputs a collection of records actioned by the user. In this case, the Datatable is configured to restrict the user to a single action at a time. The Get First Record component extracts the first record from the collection of Removed (Actioned) Rows from the Datatable so you have the single record you need to pass to the screen flow.
The Flow Launcher will fire by reacting to any changes in the record output by the Get First Record action which fires any time a new record is provided by the Datatable row action.
To configure the Flow Launcher component to launch the flow reactively, set the “Hide Launch Button” attribute to True (1). To have the flow pop-up in front of the Datatable, set the “Show Flow in Modal” attribute to True (2). You can select the size of the modal with the “Modal Size” attribute (3). Identify the flow to be launched by providing the active flow’s API name in the “Flow API Name” attribute (4). Identify which resource in the launched flow to pass the record to with the name of the input variable in “Subflow Input Variable Name” (5) and the record you are passing to that variable in “Launched Flow Input Attribute – Record” (6). You can force the user to complete the called flow instead of closing the modal manually, by setting the “Disable Close Icon” attribute to True (7).
The flow being launched takes the values in the input record and displays a screen with inputs for some of the record’s fields.
The field values from the input record are used as defaults for the inputs on the screen.
The Flow Launcher action is looking for an output attribute from the flow with a special name of OUTPUT_Record. You should create that as an output attribute in your screen flow and assign the values from the screen inputs to the OUTPUT_Record fields.
NOTE: You still want the calling flow to refresh even if the user doesn’t make any changes. You can force this by having a custom checkbox field on your record. The called flow will always change this value by setting it using this formula (fToggleChange).
The Upsert Record By Key component takes the modified record from the screen flow and upserts it back into the record collection by replacing the matching record in the collection with the new record values from the screen flow. The key field API name defaults to Id. Like you did with Datatable, you first need to configure this by referencing the original Get Records collection. This will be changed after you add the Reactive Record Collection component to the screen.
Finally, the Reactive Record Collection component acts like a reactive BLANKVALUE function for record collections. If the Input Record Collection hasn’t been populated yet, it uses the Alternate Record Collection to “seed” the original output from the component. In this flow, the collection is first seeded with the results of the Get Records flow element. After that, the record collection is the output from the Upsert Record By Key component. This output is used to provide the reactive record collection to both the Datatable component and the Upsert Record By Key component.
Now that the Reactive Record Collection component has been added to the screen, go back to the Datatable and Upsert Record By Key and change the Get Records collection to the output collection from the Reactive Record Collection component.
NOTE: CP – Get First Record, CP – Upsert Record By Key and CP – Reactive Record Collection are new actions I created and are available in version 1.0.3 or later of Reactive Screen Components. These also require version 3.2.4 or later of the Collection Processors.
I hope this example gives you some ideas for some other use cases for components like Datatables with Row Actions or Autolaunched Screen Flows or Reactive Collection Processors. Add your ideas to the comments.
https://unofficialsf.com/wp-content/uploads/2025/01/Datatable-Row-Action-to-Screen-Action.gif7201280Eric Smithhttps://unofficialsf.com/wp-content/uploads/2022/09/largeUCSF-300x133.pngEric Smith2025-01-09 15:47:082025-01-09 15:47:16Datatable with Row Actions calling a pop-up Screen Flow
Welcome to the next major release of Datatable. There are a couple of amazing new features along with a few minor bug fixes.
• There is now a new Remove Row Action available that allows the removal of individual rows from the Datatable. This can be useful in scenarios such as using the Datatable to display a list of items in a shopping cart and needing to provide users with the ability to remove items from the list.
In addition to setting a maximum number of records, you can specify the icon and color to be used for the action and put the action column on the left or the right of the Datatable.
New outputs are the collection of removed records, the collection of remaining records and the number of records removed. This functionality works for both Salesforce objects and Apex Defined records.
You can even use this action to “select” records and specify a limit on the number of records that can be acted on. This allows you to remove records from the Datatable once they have been selected.
Remove Row Action – Used for Selections with a Limit on the Number of Row Actions
As a time-saving bonus, even if you are not including a remove row action, the new Remaining Rows output collection will contain all the Datatable records including all Edits that were made to the records. You no longer must add extra steps to your flow to combine the edited records with the original records. (How to use both the Selected and the Edited records in a Datatable)
Remaining Rows attribute can be used to output All Records with Edits
• There is a new option to display the number of Selected Records in the table header. Even better, with this release, selected records are now PERSISTENT once selected. Performing table actions such as Pagination, Sorting, Searching, Filtering and Removing Rows will always persist all previously selected records.
Selected Record Persistence with Pagination, Sort, Search, Filter, and Remove Row
• To help with debugging flows where you have multiple Datatables on the same screen, the Console Log outputs will identify the Datatable Header value for each console log statement. To help protect sensitive information, record and field values will no longer show in the console log or debug log outputs. You can still choose to override this behavior in your sandboxes with a couple simple attribute changes in the source code.
Override behavior showing record dataDefault behavior with data hidden
https://unofficialsf.com/wp-content/uploads/2024/07/RR.png11241343Eric Smithhttps://unofficialsf.com/wp-content/uploads/2022/09/largeUCSF-300x133.pngEric Smith2024-07-22 11:49:472024-07-22 13:03:39Check out the latest Datatable improvements!
I’ve added 4 new Collection Processor Actions as Reactive Screen Components. The original actions were Extract Field to Collection and Calculate Field Summary. The latest additions are Filter Collection, Find Common and Unique Records, Join Collections and Sort Collections.
This means you can now do multiple types of collection processing without having to leave the flow screen. And the amazing thing is that these components are all reactive to each other and any other flow screen components that support reactivity.
Read this article to see different use cases for these actions and to get the installation links to install them in your own org.
https://unofficialsf.com/wp-content/uploads/2022/09/largeUCSF-300x133.png00Eric Smithhttps://unofficialsf.com/wp-content/uploads/2022/09/largeUCSF-300x133.pngEric Smith2023-10-23 06:34:442023-10-23 06:34:53Four New Collection Processor Actions added as Reactive Screen Components
How Playworks used Flow to replace multiple Visualforce pages and 1000s of lines of Apex code
The use case comes from a pro bono project for Playworks. Playworks is the leading national nonprofit leveraging the power of play to transform children’s social and emotional health. They’re a great organization, and I encourage you to learn more about what they do and consider supporting their work.
The Old Architecture
Playworks has a custom object called NCES Data, which contains information about 115,000 schools and 15,000 districts in the United States. The data is released by the National Center for Education Statistics each year, which the Playworks team then loads into their Salesforce org.
As Playworks establishes their presence at a new school, reps use a wizard to create an account for the school, along with a child record that stores the school’s current demographic information. The demographic information is important for various grants and funding. Districts are also represented with account records. School accounts, district accounts, and their respective demographic information records are created from data residing in the NCES Data object.
Reps interact with a Visualforce page embedded in a custom tab called Create New School, or they click an Add School button on the partner organization related list. Partner Organization is a junction object that allows Playworks to attach multiple account records to opportunities, where appropriate. A separate Visualforce page with its own controller is launched from the Add School button. When this occurs, a partner organization record is created in addition to the school or district account record.
The rest of the logic remains the same. The search functionality is handled by Apex classes, and an Apex trigger creates the demographic information. Whether invoked by the Create New School tab or the Add New School button, each Visualforce page finishes with a redirect handled by a third Visualforce page with its own controller.
That’s a lot of custom dev work, and a lot of tech debt.
9 Apex classes
8 Apex test classes
3 Visualforce pages
1 Apex trigger
The good news is the code was written by highly competent developers, and has held up for nearly a decade. The bad news is that even a minor update requires the code to be modified.
The New Architecture
Speaking in terms of business logic, there are 5 possible outcomes when a user searches the NCES Data for a school or district.
NCES record is a school or district that already has an account record.
NCES record is a district that does not have an account record.
NCES record is a school that not have an existing account record. The school has an NCES record for the district, but there is no account record for the district.
NCES record is a school that not have an existing account record. There is no NCES record for the district. (This can happen with some private schools.)
NCES record is a school that not have an existing account record. There is an account record for the district.
Each of these outcomes has slightly different requirements, depending on if it was invoked by the Add New School button or the Create New School tab.
Regardless of the eventual path for each of the 5 possible outcomes, all flows begin the same way.
First, since there are multiple account record types, the school record type is retrieved. Next, a flow screen gathers the necessary information to perform the search.
After failed attempts to recreate the Apex search functionality using a Get Records element with filter logic, a decision is made to go with code. A small portion of the existing code base is refactored into an invocable method. The method accepts the search parameters from the previous screen, and returns a list of NCES records.
public class CreateNewSchoolOrDistrictSearch {

    private static String maxresults = '25';

    @InvocableMethod(label='Search for NCES Data')
    public static List<Results> searchForNCESData(List<Requests> requests){

        Requests request = Requests[0];

        String queryString = generateNCESDataQuery(request.schoolNCESId, request.schoolName, request.schoolCity, request.schoolState, request.schoolZip);

        Results result = new Results();
        result.ncesRecords = Database.query(queryString);
        System.debug('NCES Records: ' + result.ncesRecords);
        List<Results> results = new List<Results>();
        results.add(result);

        return results;
    }

    public static String generateNCESDataQuery(String schoolNCESId, String schoolName, String schoolCity, String schoolState, String schoolZip){
        return generateNCESDataQuery(schoolNCESId, schoolName, schoolCity, schoolState, schoolZip, false, false);
    }

    public static String generateNCESDataQuery(String schoolNCESId, String schoolName, String schoolCity, String schoolState, String schoolZip, Boolean exactIdMatch, Boolean isDistrict){

        String ncesDataQuery = 'SELECT Id, Existing_Organization_in_Salesforce__c, School_Level__c, NCES_Id__c, School_Name__c, School_Mailing_Street__c, School_Mailing_City__c, School_Mailing_State__c, School_Mailing_Zip__c, School_Physical_Street__c, School_Physical_City__c, School_Physical_State__c, School_Physical_Zip__c, NCES_District_ID__c, District_Name__c, District_Mailing_Street__c, District_Mailing_City__c, District_Mailing_State__c, District_Mailing_Zip__c FROM NCES_Data__c ';

        if(!isDistrict){
            ncesDataQuery += ' WHERE NCES_ID__c != NULL AND NCES_ID__c != \'0\' ';
        }else{
            ncesDataQuery += ' WHERE NCES_ID__c = NULL AND NCES_District_ID__c != NULL AND NCES_District_ID__c != \'0\' ';
        }

        if(!String.isBlank(schoolNCESId)){
            if(!isDistrict){
                if(exactIdMatch){
                    ncesDataQuery += ' AND (NCES_ID__c = \'' + schoolNCESId + '\') ';
                }else{
                    ncesDataQuery += ' AND (NCES_ID__c = \'' + schoolNCESId + '\' OR NCES_ID__c LIKE \'%' + schoolNCESId + '%\') ';
                }
            }else{
                if(exactIdMatch){
                    ncesDataQuery += ' AND (NCES_District_ID__c = \'' + schoolNCESId + '\') ';
                }else{
                    ncesDataQuery += ' AND (NCES_District_ID__c = \'' + schoolNCESId + '\' OR NCES_District_ID__c LIKE \'%' + schoolNCESId + '%\') ';
                }
            }
        } else {
            if(!String.isBlank(schoolName)){
                ncesDataQuery += ' AND (School_Name__c LIKE \'%' + encodeForQuery(schoolName) + '%\')';
            }
            if(!String.isBlank(schoolCity)){
                ncesDataQuery += ' AND (School_Mailing_City__c LIKE \'%' + encodeForQuery(schoolCity) + '%\')';
            }
            if(!String.isBlank(schoolState)){
                ncesDataQuery += ' AND (School_Mailing_State__c LIKE \'%' + encodeForQuery(schoolState) + '%\')';
            }
            if(!String.isBlank(schoolZip)){
                ncesDataQuery += ' AND (School_Mailing_Zip__c LIKE \'%' + encodeForQuery(schoolZip) + '%\')';
            }
        }

        ncesDataQuery += ' ORDER BY Name LIMIT ' + maxresults;

        return ncesDataQuery;
    }

    private static String encodeForQuery (String inputVal) {
        return String.escapeSingleQuotes(inputVal.trim());
    }

    public class Requests{

        @invocableVariable(label='NCES Id')
        public String schoolNCESId;

        @invocableVariable(label='School Name')
        public String schoolName;

        @invocableVariable(label='School City')
        public String schoolCity;

        @invocableVariable(label = 'School State')
        public String schoolState;

        @invocableVariable(label='School Zip Code')
        public String schoolZip;
    }

    public class Results{

        @invocableVariable(label = 'NCES Records')
        public List<NCES_Data__c> ncesRecords;
    }
}
Next, the search results are displayed in a table, and a school or district is selected. Remember the results are a list of NCES data records returned by the invocable Apex. The selected NCES data record is used to create the necessary school account, district account, and corresponding demographic information record. If the school account or district account record already exists, the user is redirected.
Recall the 5 possibilities.
NCES record is a school or district that already has an account record.
NCES record is a district that does not have an account record.
NCES record is a school that not have an existing account record. The school has an NCES record for the district, but there is no account record for the district.
NCES record is a school that not have an existing account record. There is no NCES record for the district. (This can happen with some private schools.)
NCES record is a school that not have an existing account record. There is an account record for the district.
Each one of these is represented by a path in the flow. For example, if a school or district already exists as an account record, the user is redirected to that record. Before that happens, if the flow is launched from the Add School button, a partner organization is created. If the flow is launched from the Create New School tab, then it simply redirects to the school or district.
Each of the 5 possibilities is accounted for, in different branches of the flow. The programmatic complexity of the Visualforce and Apex are replaced by the flow. While complicated in its own right, the solution is now declarative.
Conclusion
While we fell short of a completely declarative solution, the logic of the search functionality is unlikely to change. By refactoring the Visualforce pages and 95% of the Apex logic into flow, the Playworks team can safely make changes in the future, without having to hire a developer.
https://unofficialsf.com/wp-content/uploads/2023/06/channels4_profile.jpg900900Andy Andersonhttps://unofficialsf.com/wp-content/uploads/2022/09/largeUCSF-300x133.pngAndy Anderson2023-06-23 07:58:352023-06-26 17:17:11Replacing Programmatic Tech Debt with Flow
When Winter ’23 release arrived, it brought with it Data Table and IN operator. I was excited to use them and wrote a blog on how it helped me solve a use case that was not possible to achieve with standard reports. I was happy with the 7 steps flow I created to achieve this Now, a few releases later, Summer ‘23 is around the corner, and with it comes reactive screens and reactive formulas. I went back to my solution and was able to get the same result and reduce a 7 step flow to 1 screen. How awesome is that!!!
Reactive screens are currently in beta and you can try them out in a prerelease org running Summer ‘23 (don’t forget to opt in to the reactive screens beta under process automation settings in setup)
Here is how I did it
Reminder use case: display all open opportunities where the selected user is on the account team. Then display the account team role this user has for these accounts.
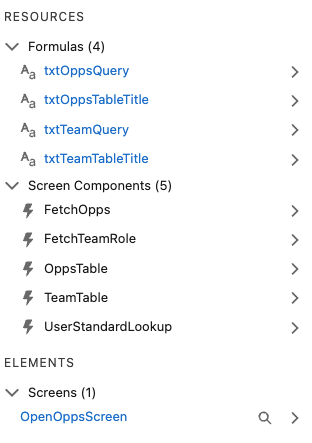
I used the new Data Fetcher component from Josh Dayment, and combined it with some complex SOQL queries that output the results into a Data Table.
To select the user, I added a lookup to the screen. This is currently the only reactive lookup element available. In order to get a list of users, you can point the component to any CreatedById lookup field from any object. I used the Account object.
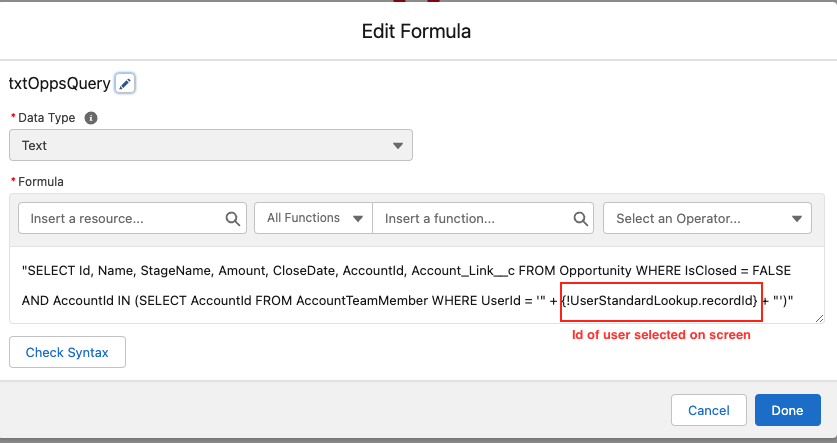
My first formula (and make sure to use a formula resource, and not a variable or text template for this, as only formulas are reactive. Don’t ask me how I know 😉) queried the records for open opportunities
I fed this formula into the first data fetcher, and used a merge field to get the currently selected user from the screen.
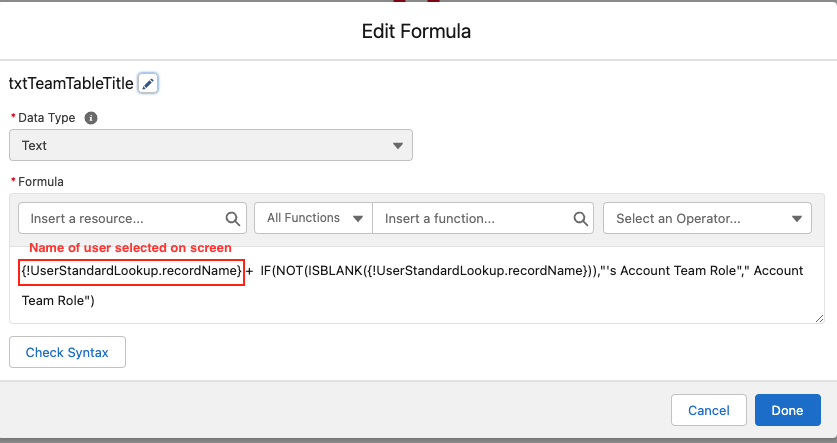
The data fetcher queried records are displayed on screen using the Data Table component (Data Table is now GA, and also got some new enhancements in the summer release). The lookup component outputs the selected value and the selected label so I used another little formula to dynamically display the selected user name in the table title.
A similar process followed for the second table and showing the account team role
Look what I could achieve with just 4 formulas and one screen. Here is a demo of the finished flow and reactive functionality.
I can’t wait for this to be generally available to help us simplify multiple flows. For now this is only available in prerelease orgs and soon in sandboxes.
https://unofficialsf.com/wp-content/uploads/2022/09/largeUCSF-300x133.png00Tamar Erlichhttps://unofficialsf.com/wp-content/uploads/2022/09/largeUCSF-300x133.pngTamar Erlich2023-05-01 05:17:162023-05-01 05:17:23Reactive Screens: How to Turn a 7 Element Flow Into 1
Data Fetcher is a Lightning Web Component for Screen Flows that will query records based on a SOQL string, then provide an output of records (or single record) to be used on the same screen. What is so special about that you might ask? Well, let me tell you! With the reactive components beta for Screen Flows, you can now have components on a single screen react based on input from other components without ever leaving the screen. Data Fetcher was featured at TDX ’23 as part of a session on reactive screen components.
Let’s take an example using components from here on UnofficialSF. With Data Fetcher I can accept the selected choice value from Quick Choice* as my SOQL string and return records into a Data Table without having to click next. The records in the data table change depending on the choice I select – instantly. Before getting started ensure you have opted into the Reactive Screens Beta in Automation settings in your org instructions can be found here.
Before reactive screens, this would have been accomplished using Lightning Messaging Service and Lightning Web Components, increasing the time to develop and go to market for this type of use case along with the costly maintenance of that LWC. With Data Fetcher an admin or developer can dynamically retrieve records on one screen without much additional lift, greatly enhancing the overall user experience and freeing up time for the admin or developer to work on other features for more important tasks.
In Summer ’23 formula resources will be reactive in flows – making this component significantly more powerful. With reactive formulas, Data Fetcher’s SOQL query string can now reference multiple components on the same screen which will create a truly dynamic experience. Pre-release orgs have already been enabled if you want to start testing now. Let’s look at a couple of examples.
The first example will use two Quick Choice components to help build my query utilizing a reactive formula. I will use the Quick Choice components to have the user select the Industry and Account Type of the Accounts I want to return on the Datatable those values will be used in a formula to return my SOQL string. (I am not doing it in this example but there is a really great video walkthrough on how you could use Quick Choice as a dependent picklist on the original post that could really enhance this use case)
//You can use this example to get started on your own formula//

 "SELECT BillingCity, Id, Name, Phone, Industry, Type FROM Account WHERE Industry =" + {!choice.value} +" AND Type = " + {!Type.value}
In the below video, I am using the out-of-the-box lookup component to pass an Account Id to a SOQL string to populate all of the related contacts in a data table. A couple of years ago I presented on Automation Hour about using SOQL and SOSL in flow if you watch this video I had to build a SOQL query across multiple screens and decisions in order to perform the query inside of the flow. This Summer that will no longer be needed! Soon, an admin or developer will be able to add multiple components onto a single screen and use a formula variable to build a SOQL statement that then passes back the records on the screen as the user is interacting and/or changes different parts of the query and see the results as the changes are happening.
Note: Choices are not yet reactive as part of the beta. You will need to use Quick Choice if you want to bake choices (like a Picklist) into Data Fetcher queries.
For more information and to install Data Fetcher visit the AppExchange Listing here.
Learn more about the Reactive Screen Components Beta on Trailhead!
https://unofficialsf.com/wp-content/uploads/2022/09/largeUCSF-300x133.png00Josh Daymenthttps://unofficialsf.com/wp-content/uploads/2022/09/largeUCSF-300x133.pngJosh Dayment2023-04-17 11:47:292023-07-19 06:31:52Data Fetcher on the AppExchange
If you are building a form, you may want to make some screen components read only. In those cases, you can use this custom screen component that displays fields in read only mode.
How to Use the Component
1- Install the component using the installation links below.
2- Add a screen element and search for ReadOnlyScreenComponent. This is the name of the component that you installed.
3- This component can display 5 different data types: string (text), integer (number), checkbox, date, date/time. Enter the data type that you want to display. Valid values are string, integer, checkbox, date, and datetime.
Then provide the field label that the users will see.
Lastly, enter the value that you want it to display. Make sure that the value matches the data type that you entered.
4- Look and feel of the component changes according to the data type that you selected. Here is a read only screen that is built with ReadOnlyScreenComponent. Data types used in this flow are string, integer, date, datetime, and checkbox, respectively.
https://unofficialsf.com/wp-content/uploads/2022/09/largeUCSF-300x133.png00Yumi Ibrahimzadehttps://unofficialsf.com/wp-content/uploads/2022/09/largeUCSF-300x133.pngYumi Ibrahimzade2023-03-27 10:48:532023-03-27 10:48:56A Screen Component That Displays Fields in Read Only Mode
You can only approve or reject but cannot add an approval comment.
I wanted to see if I can improve on that by using a screen flow in Slack. This blog will not cover the initial setup and connection of Salesforce to Slack. You can find details on how to do this in the official documentation.
My solution was inspired by two blogs
Alex Edelstein created an invocable action for processing approval requests that includes sending an approval comment
Yumi Ibrahimzade demonstrated how to copy an approval comment from the approval history related list to a field on the record
In order to send a screen flow to Slack you have to create two separate flows that will work together.
A screen flow – this is what will surface to the user in Slack and process the user inputs there. This flow has to be marked as available in Slack. Marking a flow as ‘Available in Slack’ generates a separate ‘launcher’ invocable action that can be used in other flows
A record triggered flow – This flow will act as a dispatcher and will use the launcher action, we created in step 1, to send the screen flow to Slack when record conditions are met. Slack actions can only be processed asynchronously, after the record is saved.
To test this, I setup a simple one step approval process, with simple actions that update an approval status picklist field on the record
I then created my screen flow which has only one screen. The screen displays an approval request to the user, along with some record details, and captures the responses. The flow will then use those responses to process the approval using the invocable action, and update the record with the approval comment. The flow has some input variables that will get their value from the dispatching flow. I marked this screen flow as available in Slack. I was not successful in passing a record link to the screen flow. Slack uses a special markup language to format links, which works well when sending a Slack message using the “Send Slack Message” core flow action, but it did not work when sending in the screen flow action.
The next step was to create the record triggered flow that will send to Slack. My trigger was based on a custom Approval status field set to submitted, when a user will submit the record for approval. This will work well for a single step approval process but if you have a multi step process, additional conditions may be needed to determine the current approval step. This flow gets the most recent approval process instance, work item, and approver userId for the triggering record and passes this information, along with the record Id, to the screen flow action.
When both flows are combined, I was able to send an approval request to Slack, process the response, and update the record with the most recent approval comment. Here is a short video of the complete process.
This is a simple use case for a single step approval process with a single approver. It can be enhanced to handle more complex approval processes.
If there are multiple approvers, the dispatching flow will need to get a collection of all the work items and loop through to send the screen flow to all of them.
If a queue is set as the approver, the the dispatching flow will need to get a collection of all members of the queue to find their userId
The screen flow can be updated to add a recall action
https://unofficialsf.com/wp-content/uploads/2022/09/largeUCSF-300x133.png00Tamar Erlichhttps://unofficialsf.com/wp-content/uploads/2022/09/largeUCSF-300x133.pngTamar Erlich2022-12-27 06:09:362022-12-27 06:09:40Process approvals using a screen flow in Slack
MuleSoft Robotic Process Automation (RPA) gives you the power to automate business processes that usually require human input and interact with systems that don’t have an API, extending the reach of Salesforce’s process automation capabilities by integrating these RPA processes into flows in Salesforce as of Winter ’23!
Use MuleSoft RPA Manager to publish REST APIs for your RPA processes to Anypoint Exchange, which you can then register as External Services in Salesforce and invoke from low-code tools like Flow Builder.
Step 2:Create an Authentication Provider – Use the ID and the secret from your MuleSoft Anypoint Platform connected app to create an authentication provider.
Step 3: Create a Legacy Named Credential (Retrieve APIs) – Create a legacy named credential to access/authenticate into your MuleSoft Anypoint Platform connected app from Salesforce and retrieve the APIs published to MuleSoft Anypoint Exchange. The legacy named credential stores the URL for MuleSoft Anypoint Platform. External Services uses the legacy named credential when listing the MuleSoft APIs available for import.
Note: the ability to create a ‘Legacy’ named credential is still supported, although it will be discontinued in a future release, at which point, this portion of the instructions will be updated to reflect the new capability.
Salesforce: Named Credentials Home Page
Step 4: Create a Named Credential (Runtime) and External Credential
Note: MuleSoft RPA authenticates clients invoking RPA processes through API keys. The Salesforce Winter ’23 release includes new functionality in Named Credentials and External Credentials that supports this type of authentication.
Create a second named credential that stores the endpoint for MuleSoft RPA Manager. External Services uses the second named credential when invoking “runtime” the MuleSoft RPA process in a flow.
External credential:
Before creating a second named credential, first create an external credential.
Create an external credential to capture the API key and other authentication details.
Then create a named credential to store the actual endpoint.
This allows for multiple endpoints to be addressed with the same authentication configuration.
After entering the details for the external credential, click Save. You’re taken to the Named Credentials screen. Now you need to create a permission set mapping for this new external credential. This mapping ensures that only the correct users get access to these credentials.
Permission set mappings:
Click External Credential and select the external credential you created.
Scroll to Permission Sets Mappings so you can link the external credential to a user’s permission set.
Click New to create a permission set mapping for this external credential using the details below for an external credential that uses ‘Custom’ as the authentication protocol.
Custom headers:
Lastly, create a custom header for this external credential using the the details below as guidance for how to create a custom header.
Example Salesforce: External Credentials Detail Page
Now that you have an external credential, create a named credential and then link it to the external credential you just created in the previous step. As mentioned before, this second named credential stores the endpoint for MuleSoft RPA Manager. External Services uses the second named credential when invoking “runtime” the MuleSoft RPA process in a flow. Use the details below for how to create a named credential.
Example
Salesforce: New Named Credential Window
Verify that the external credential and the named credential you just created are linked
From the Named Credentials page, click External Credentials.
Click the name of the external credential from this list and confirm that the named credential you just created appears in the Related Named Credentials area shown in the example below.
As a reminder:
The Named Credential stores the MuleSoft RPA Endpoint
The External Credential stores the MuleSoft RPA API Key + Authentication details
Example Salesforce: External Credentials Detail Page
As you are configuring the external service, recall that you created two named credentials.
Legacy named credential (Retrieve APIs) – this named credential stores the MuleSoft Anypoint platform URL and is used to retrieve the APIs published to MuleSoft Anypoint Exchange. Use this named credential in the “Select a MuleSoft Anypoint Platform Account” screen.
Example
Named credential (Runtime) – this named credential stores the MuleSoft RPA Manager URL and is used when invoking “runtime” the MuleSoft RPA process in a flow. Use this named credential in the “Configure your MuleSoft Anypoint Platform Service” screen.
Now you are ready to start and check the status of the MuleSoft RPA process from a flow.
If you follow the steps outlined in the help docs Invoke a MuleSoft RPA Process in a Flow, listed below are a few additional tipsto help guide you through the flow configuration.
Create Resource for RPA Process Input Variables
Tip: In step 2, when creating a New Resource to store the input variables for the RPA process, you can obtain the External Service Name and Apex Class Name from the External Services Detail Page to help configure the New Resource
Salesforce: External Services Detail Page
Assign Values to RPA Process Input Variables
Tip: In step 3, you can obtain the information about each variable/input parameter that needs to be defined in the above Apex class from the External Services Detail Page as well as the OpenAPI specification (a few examples shown below).
https://unofficialsf.com/wp-content/uploads/2022/09/largeUCSF-300x133.png00Andrea Guzmanhttps://unofficialsf.com/wp-content/uploads/2022/09/largeUCSF-300x133.pngAndrea Guzman2022-11-08 14:50:162022-11-15 10:32:58Invoke a MuleSoft RPA Process from Flow using External Services