In Spring’21 Salesforce Scheduler introduced a feature to preset the timezone for the appointment time slots . This feature sets the default time zone for all time slot pages, using the provided DefaultTimeZone flow variable.
We can use this feature to dynamically set the time zone in which guest users load time slots i.e. browser timezone.
This will only work for the Salesforce supported time zones, you can find the complete list here.
Preset browser timezone
We will fetch the browser timezone through the lightning component that will be exposed to the flow builder. And to validate the browser time zone i.e. supported in salesforce or not, we will write an apex controller.
All the code is bundled at https://github.com/ruchi2994/browserTimeZone. It contains the lightning component, apex class, and updated flow. After code deployment, enable TimeZoneController apex class access for the guest user profile.
Let’s look at how to use the lightning component in the flow to preset the browser timezone.
The default time zone for all times shown in a Salesforce Scheduler flow would be the timezone set for the user scheduling the appointment. See more details on how this would work for the various flows here.
In Spring 21 feature, a feature provided an ability to (pre)set the timezone across multiple screens on the Outbound, Inbound & Guest User flows (Create & modify) across mobile & desktop.
One common scenario this helps you to cover is, when a Customer care agent is booking an “On-behalf” appointment and wants to see the time-slots in the timezone of their selected territory.
Now, this is easy to achieve with Clicks, not code!
Imagine a customer care agent based in Chicago (Central time) is booking an appointment for a customer who wants to meet a banker in the Denver branch (Mountain time) of Cumulus bank.
Wouldn’t the customer care agent wants to see the time slots in Mountain time automatically and book the appointment?
With Salesforce Scheduler, now the agent can easily look at the available time slots in the bank operating hours timezone by default and book the appointments. Don’t worry about the Timezone in which the territory is operating and all; it is taken care of!! All the timings shown in my flow are configured to Cumulus Bank (Denver) operating timezone.
Question: What if some other bank is at a different location or any Service Territory for that matter? Will my flow behave like it is configured to that Service Territory dynamically?
Answer: Oh Yes!!
Let’s look at how it is done,
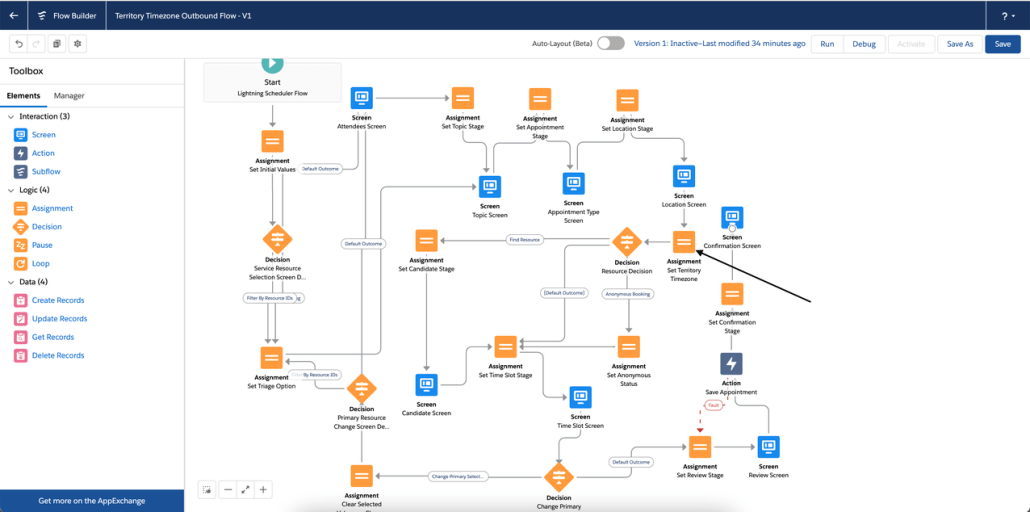
Configuration is the same for Outbound, Inbound, and Guest flows, illustrating for Outbound Flow.
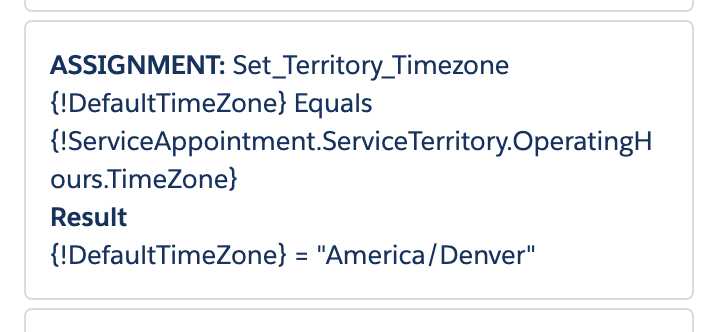
Add a new Assignment Element called Set Territory Timezone, after the Location Screen.
Set the DefaultTimeZone variable to Timezone from ServiceTerritory Operating Hours.
Save the flow.
— Now the flow is configured to the timezone based on the Service Territory chosen —
Screens that have an impact :
Candidate Screen now shows Next Availability in the Service Territory Timezone.
Flow Time Slot Screen, now by default shows Time Slots in Territories Timezone.
Flow Review Screen shows the selected time slot in the timezone in which Territory Operates.
For Inbound and Guest Flow., Next Availability and Time Slots are configured to Territory Timezone on Resource Time Slot Screen, and it looks like,
These are some of the use-cases that can be solved but not limited to,
Agents booking on-behalf appointments, want to see all time-slots in territory timezone by default.
Branch Managers and above, no matter from where customer books an appointment, he/she visits our site and tries to book appointment and all time-sots should be shown in my Territory supported Timezone by default.
Guest appointment booking, are you sending out an email to customer to book an appointment using the link and wants him to see time-slots in your territory timezone?
Your customer will never miss his/her appointment time, when booked with Territory timezone!
https://unofficialsf.com/wp-content/uploads/2022/09/largeUCSF-300x133.png00Akshayhttps://unofficialsf.com/wp-content/uploads/2022/09/largeUCSF-300x133.pngAkshay2021-06-21 22:32:432021-06-21 22:33:32From: Saikiran Gogurla: Spring 21 Feature: Preset the Territory’s Timezone on the timeslot screen
Resource Priority and Filtering gives you an easy way to control and influence what resources are considered when scheduling an appointment. Up to this point it was the required skills of the Work Type and the Service Territory Membership that defined the pool of resources. Now you can layer on another filter. What are some use cases for this?
Gold/Silver/Platinum tiered service
Preferred Language
Fair distribution of work to resources (think Round Robin Lite)
Prioritized distribution of work (today I want all of my appointments to go to Connie)
It helps you address these requirements while, at the same time, keeps the number of Work Type Groups down to a minimum.
Check this out below write up and also this quick demo video.
Work Type Groups, Work Types and Service Territories
Let’s say you’re a bank and you offer appointment scheduling for general banking, lending and retirement and investing services. And let’s also say that you provide differentiated services based on the customer’s investments with the bank, where customers with lots of investments are serviced by ‘gold’ advisors, customers with a good amount are serviced by ‘silver’ advisors and everyone else is serviced by ‘bronze’ advisors.
By now you’ve probably figured out that for a given Service Territory, you can only have 1 work type from a given work type group. Let’s look at a example:
Service Territory = Market Street Branch
Work Type Group = General Banking
Work Types = General Banking Gold, General Banking Silver, General Banking Bronze
If you want to offer Gold, Silver and Bronze General Banking Services, you might think you could add those 3 Work Types to the Market Street Branch. Well, you can’t because you can only pick 1 from the the General Banking Work Type Group. So you could create Work Type Groups for General Banking Gold, General Banking Silver and General Banking Bronze. And if you want to offer the same for Lending and Retirement Services you would wind up with 9 Work Type Groups when you really want 3.
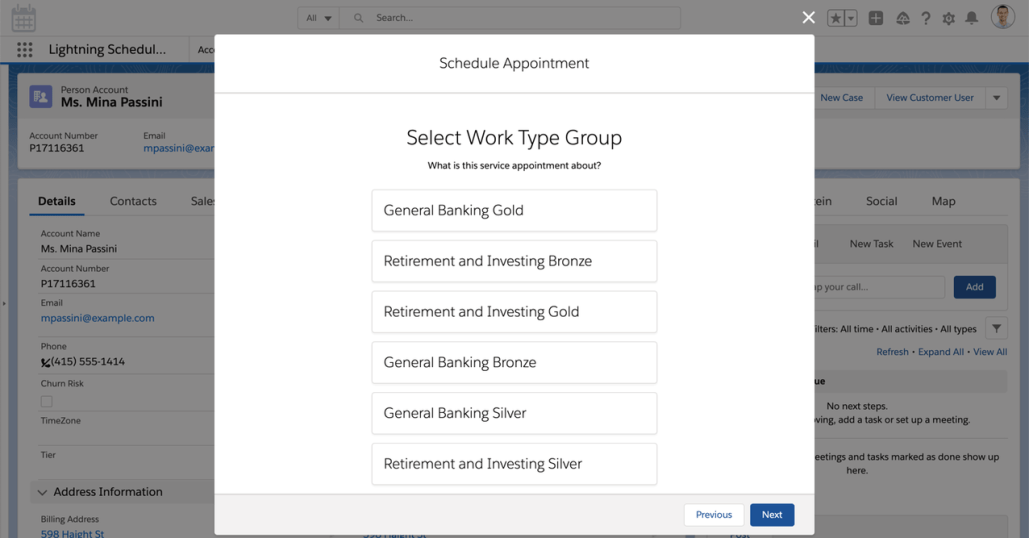
What you want the user to see – 3 Work Type Groups
What they will see – 9 Work Type Groups
Resource Priority and Filtering to the Rescue
Resource Priority and Filtering allows you to offer only the 3 Work Type Groups but still ensure that Gold customers are serviced by gold bankers, silver by silver bankers, and bronze by bronze bankers.
What do you need to do? Leverage the Resource Priority and Filtering Feature – see the help and training article. There is a new parameter the Resource Selection screen that allows you to filter the list of resources above and beyond what the required skills and service territory provide. Check out my example below for how to set this up.
Example
When running the scheduling flow, use the Filter by Resource Ids parameter to consider only resources whose Tier matches the customer’s Tier.
New fields
To the account object, I’ve added a picklist field called Tier, with values of Gold, Silver and Bronze. And to the service resource object a picklist field called Tier, with values of Gold, Silver and Bronze. I’ve also created a formula field on the service territory member object which equals serviceresource.tier__c. (this helps make the flow easier)
Flow Changes
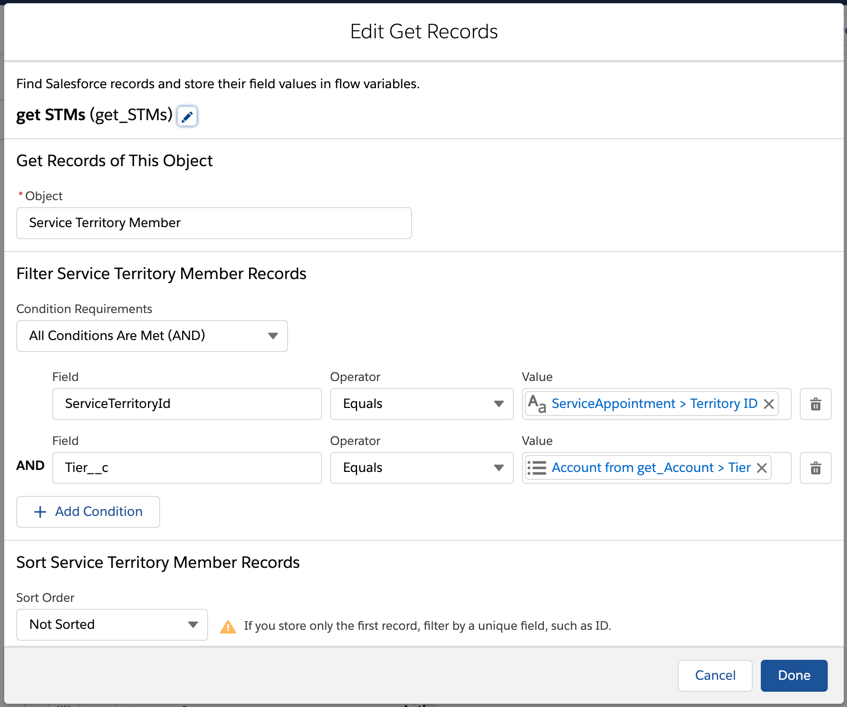
In the flow, add a step to retrieve the customer’s tier. Also add a step to retrieve all of the service territory member records where the tier matches. Make sure that you retrieve the STMs after the location step, since we need to know the territory id. In the screen shot below, you can see that after the Location Screen, I’ve added the 2 get records, the loop and the 2 assignment steps.
Then loop through all of the STMs you find to concatenate them together in a string. Here’s what’s inside the add SR ids to string assignment step in the screenshot above.
Since there’s an extra comma at the end of this, I created a formula field to which excludes the last character of the string.
And then assign the formula to the FilterByResourcesId string.
Results!
Only 3 Work Type Groups are needed yet we can still provide Gold, Silver and Bronze service. In the screen shot to the right, 5 resources would have been returned without this feature, but I was able to limit the list to just the 2 gold bankers.
Resource Priority and Filtering Guidelines
Like everything else in Salesforce, there are best practices, guidelines and limits to consider. For Resource Priority and Filtering, 50 and 10 are the magic numbers. 50 is the maximum number of Service Resource Ids that can be passed into the filter, BUT, you want to make sure that after the application of the relevant skills, territory and availability checks, the resulting number of service resources with availability is no greater than 10.
Part II – Using Skills and APEX to power Resource Priority and Filtering
Check this out to learn how to further extend this feature using Apex.
In the example above, we used a service resource custom picklist field to identify which resources had the Gold/Silver/Bronze “skill”. What if we wanted to use the skill object itself. In other words, we have set up skills for Gold, Silver and Bronze and we have assigned those to bankers accordingly. We want the flow to consider only those resources that have the both the skills needed through the work type group (and related work type) as well as the skill needed from the account tier.
Getting Records from 1 object where Service Resource Ids are in another object
Normally, I would say do this all in flow but in reality we need to do a loop inside of a loop – Find all resources in the territory who also possess the desired tier skill. Unfortunately, we cannot do this type of query in flow. As you might have seen with a simple web search, flow does not support the equivalent of a SOQL “IN” condition. But we can do this with an APEX class with an invocableMethod, and we can do it with just a few lines of code.
Create an invocableMethod
As you’ve probably seen in other blogs, invocableMethods extend the power of flow with Apex code. In my Apex class below, I’m accepting a list of service territory member records (the resources in the territory) and a skill record and returning a string which is a comma separated list of service resource ids of only those service resources with the skill.
Remember with invocableMethods, you pass in a list of something and it returns a list of something. In this example, we’re passing in a list of a user-defined type called ResourceFilter, which consists of a List of Service Territory Member records and a Skill record and the method returns a list of strings.
Apex class example
//this class returns a common separated string of service resource ids
//it accepts a list of service territory member records and filters those with the required skill
public with sharing class PriorityResources {

    @invocableMethod
    public static list<string> getResources(list<ResourceFilter> rfList) {
        if (rfList==null) return new list<string>{''};
        set<string> setResource = new set<string>();
        set<string> setResourcewithSkill = new set<string>();
        ResourceFilter rf = rfList[0];
        //create a set of service resource ids from the stmlist passed in
        for(serviceterritorymember stm : rf.stmList) setResource.add(stm.serviceresourceid);
        try {
            datetime dt = datetime.now();
            //create a set of service resource ids that have the skill passed in
            for(serviceresourceskill srskill : [select serviceresourceid from serviceresourceskill where serviceresourceid in :setResource and skillid = :rf.skillRequired.id and effectivestartdate <= :dt and (effectiveenddate = null or effectiveenddate >= :dt) ])
                setResourcewithSkill.add(srskill.serviceresourceid);
        }
        catch(system.exception e) {
            return new list<string>{''};
        }
        //convert the set of resource ids into a comma separated string
        return new list<string>{String.join(new list<string>(setResourcewithSkill),',')};
    }

    public class ResourceFilter {
        @invocableVariable(required=true)
        public list<serviceterritorymember> stmList;
        @invocableVariable(required=true)
        public Skill skillRequired;
    }
}
Flow Example
Like in the previous example, in the flow, add a step to retrieve the customer’s tier. Also add a step to retrieve all of the service territory member records where the territory matches. And also retrieve the skill record that matches the customer’s tier. Make sure that you retrieve the STMs after the location step, since we need to know the territory id. In the screen shot below, you can see that after the Location Screen, I’ve added the 3 get records and the Apex action. You can also see how the Apex action is setup: I’m passing in the skill object and the STM objects (this is a list) and the Apex class will return the CSV string of Service Resources into the variable FilterByResourcesId. That’s it, you will have a list of Service Resources who work in the Territory who have the Tier Skill and these will be passed to the resource selection screen. This screen will further filter out only those resources which also have the skills needed for the selected Work Type Group (and work type).
https://unofficialsf.com/wp-content/uploads/2022/09/largeUCSF-300x133.png00Akshayhttps://unofficialsf.com/wp-content/uploads/2022/09/largeUCSF-300x133.pngAkshay2021-04-22 22:26:432023-04-02 19:56:19From Chris Albanese: Spring 21 Feature: Resource Priority and Filtering