In Spring ’22 Salesforce Release – Scheduler Product introduced the Manage Service Resource Availability by Using Shifts feature which gave flexibility for service resources to work flexible hours instead of the Service Territory Operating Hours. This feature was extended in Winter ’23 with the flexibility to create Recurring Shifts – which gave an easy way for Territory Managers and Service Resources to create multiple shifts with a single record data entry.
This was made possible by capturing the recurring pattern of the shift during data entry.
And Salesforce saves this recurring shift as a single record with Type field as “Recurring”.
Salesforce Scheduler saves the recurrence pattern when the original recurrence shift record is saved. The information is saved in “RecurrencePattern” field on the same Shift record. An example pattern as saved on the record
This information corelates to what gets saved as shown in the screenshot – Weekly recurring Event which occurs every Monday, Wednesday and Friday for the next 4 occurrences and repeats every week.
NOTE: Salesforce Scheduler considers the recurrence period in the service territory’s timezone. The period of recurrence is limited to 120 days. For example, you create a recurring shift on July 1, 2022. You can choose an end date that’s either less than or equal to 120 days from July 1, 2022, or the number of occurrences that are repeated within 120 days from July 1, 2022.
Cloning Shift Records
Scheduler product also gave the option to clone shift records. When a user tries to clone a Shift record with the Type field value set to Recurring, the new record creation screen that opens, Salesforce prepopulates the Start and End Times of the Shift, Status, Service Territory, Service Resource and the Time Slot Type fields. You will notice, it does NOT prepopulate the recurring Pattern (at this point of time).
This is a limitation in the current scheduler product, until this feature gets included in future (Roadmap).
In this blog we are going to look at an option to clone the Shift along with its recurring Pattern using Apex
Cloning Shift Records with Recurring Pattern
We want to keep it simple here in this blog. This is just a quick and dirty work around, but feel free to take it to the next level. As you have noticed when using the Clone button on the Shift (with type as recurring) – the new shift screen that opens has all the information from the previous record copied, except for the Recurrence pattern.
The copying of recurrence pattern is handled in the trigger which will copy it from the Original Shift where we are cloning the record from.
Use the sample trigger code below on the Shift Object to copy the recurrence pattern
trigger CloningRecurringShift on Shift (Before insert) {
    for(Shift sh : Trigger.New){
        if(sh.Type =='Recurring' && sh.IsClone()==true && sh.RecurrencePattern=='RRULE:INTERVAL=1;'){
             String sourceId = sh.getCloneSourceId();
             Shift orginalShift = [Select RecurrencePattern  from shift where ID=:sh.getCloneSourceId()];
             System.debug('Orginal Shift recurring patternt ' + orginalShift.RecurrencePattern);
                sh.put('RecurrencePattern',orginalShift.RecurrencePattern);

        }
        }
    }
Note: If updating the other fields (not the recurrence type section) that were copied over when you tried to Clone, the saved record will consider the new updated values.
If you use Salesforce Scheduler with the Event Management feature and you use Einstein Activity Capture to sync the Salesforce Event Calendar to Outlook or Google Calendar, you can easily control the information that is written from the Scheduler Service Appointment to your Outlook/GCal event.
With a simple flow configuration, you can write your own information to the ServiceAppointment.Comments field. This field is automatically synced to the Event.Description field, which in turn shows up in your Event in Outlook/GCal.
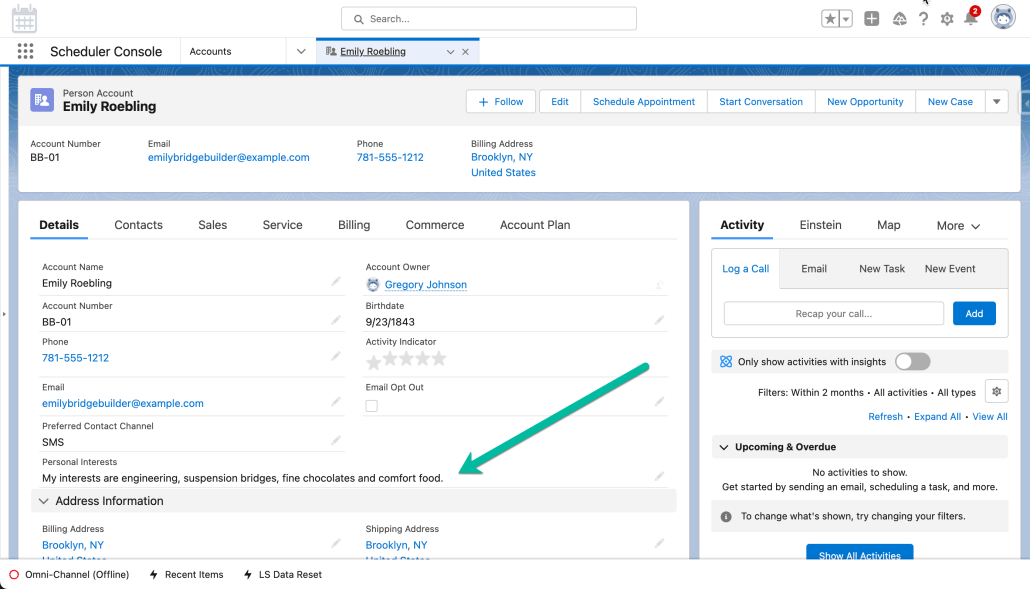
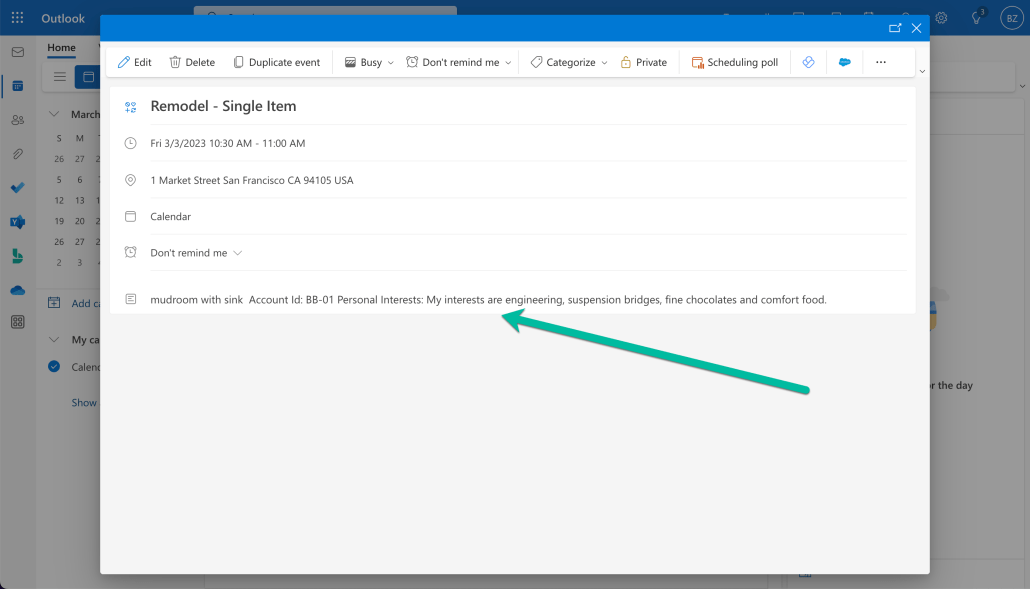
In the 2 screen shots below you can see how account information about our Account for Emily Roebling shows up in the Outlook calendar event for Connie Ruiz, our Service Resource.
Solution Overview
While you can control some of the mapping within the Einstein Activity Capture’s (EAC) settings, I decided to do something with simple flow configurations. Since the Event Description field is already mapped to the Outlook Calendar Notes(body) field, I simply update the event description field in Salesforce, by modifying the Scheduler Flow, and allow EAC to do the rest.
Flow Changes
In summary all I did was add an update records step in the flow to update the Event record with the desired information.
After the Service Appointment (SA) is saved, I added steps to update the SA’s Comments field with a concatenation of what’s already in the field and information I selected from the Account. I also updated the Event’s Description field with the SA Additional Information plus the updated SA’s comments field.
Just as a reminder, Scheduler already maps Additional Information + Comments to the Salesforce Event Description. You might remember that SA.AdditionalInformation contains the WorkTypeGroup.AdditionalInformation that is selected by the user and SA.Comments contains any information entered in the Other field.
In my example, I added a custom field to the Account object called Personal Interests. I updated the Service Appointment Comments and the Event Description with the Account Number field and the Personal Interest field.
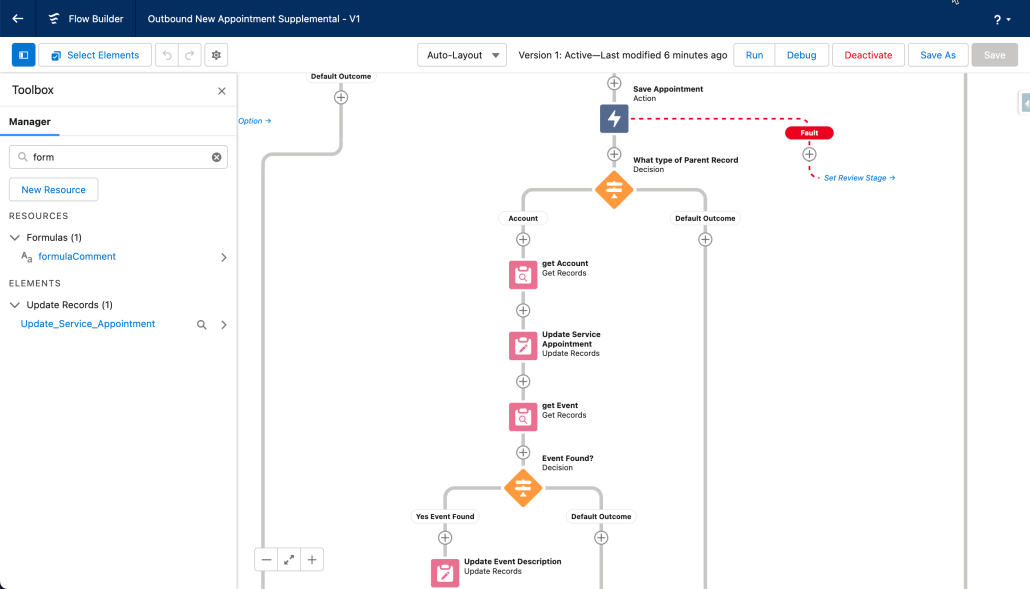
Birds eye view: I modified the Outbound New Appointment flow to add several steps after the Save.
Details:
Verify the SA is owned by an Account
Get the Account
Update the SA Comment Field
Get the Event
If found, update it’s Description field
Updating the SA Comments field
In the Update Service Appointment Step I update the SA Comment (api name = Comments) field using this formula. Since the maximum size for the Event Description field is 32000, I include a LEFT function to truncate the field at 32000 characters.
Remember that get_Account comes from the name I used for the get records step on the Account object. Yours should reflect whatever you named this step.
Updating the Event Description field
Since Event Description is a concatenation of ServiceAppointment.AdditionalInformation and ServiceAppointment.Comments, I use a slightly different formula, so we don’t lose the AdditionalInformation field content.
where formulaComment is the name of the formula field in the code block above this one.
https://unofficialsf.com/wp-content/uploads/2022/09/largeUCSF-300x133.png00Sunilhttps://unofficialsf.com/wp-content/uploads/2022/09/largeUCSF-300x133.pngSunil2023-02-14 21:14:002023-02-14 21:14:03From Chris Albanese: Scheduler: Add to the information that gets saved to your Outlook / Google Calendar event
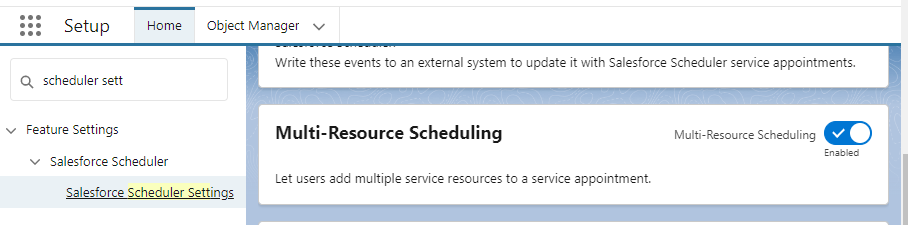
Often times customers who use Multi-resource scheduling would like to default or automatically select the additional resource(s). For example, when scheduling a meeting with your portfolio advisor, you would like her assistant automatically added to every appointment and you want the available time slots to reflect this.
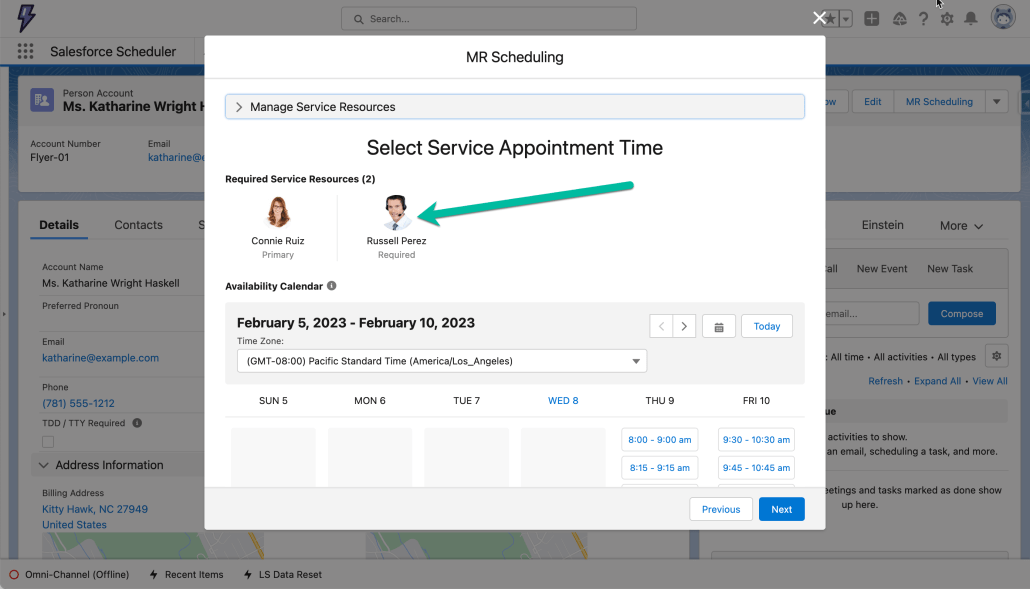
With a few simple flow configurations and a formula field, you can easily default the additional resource selection by setting a value for a variable called serviceResources. In the 2nd screen shot below, Russell was automatically selected because serviceResources had a value in it.
The variable called serviceResources is usually empty at this point. If you set a value for it, you can default the multi-resource selections.
Russell is pre-selected when entering this screen.
Video of it in action
Check out a quick demo video
Solution Overview
In this solution, a Service Resource can optionally have an Assistant Service Resource assigned to their record. If there is a value defined here, this Assistant SR will be defaulted as an additional required resource in the Multi Resource section of the time slot selection screen.
A few get records steps are added as well as a formula field to set the value for the serviceResources variable in the flow.
Object Model Changes
Add a new lookup field on the Service Resource object to itself. This field is called Assistant (Assistant__c). There are so many ways to tackle this, such as defining Primary and Secondary Resources on the Account object, or creating a junction object between Account and Service Resource or Service Resource and Service Resource to provide a more flexible design, as well as other designs. For simplicity sake, I added the lookup field on the Service Resource object to itself. In the second screenshot below, Connie has an assistant named Russell.
Flow Changes
Added Steps
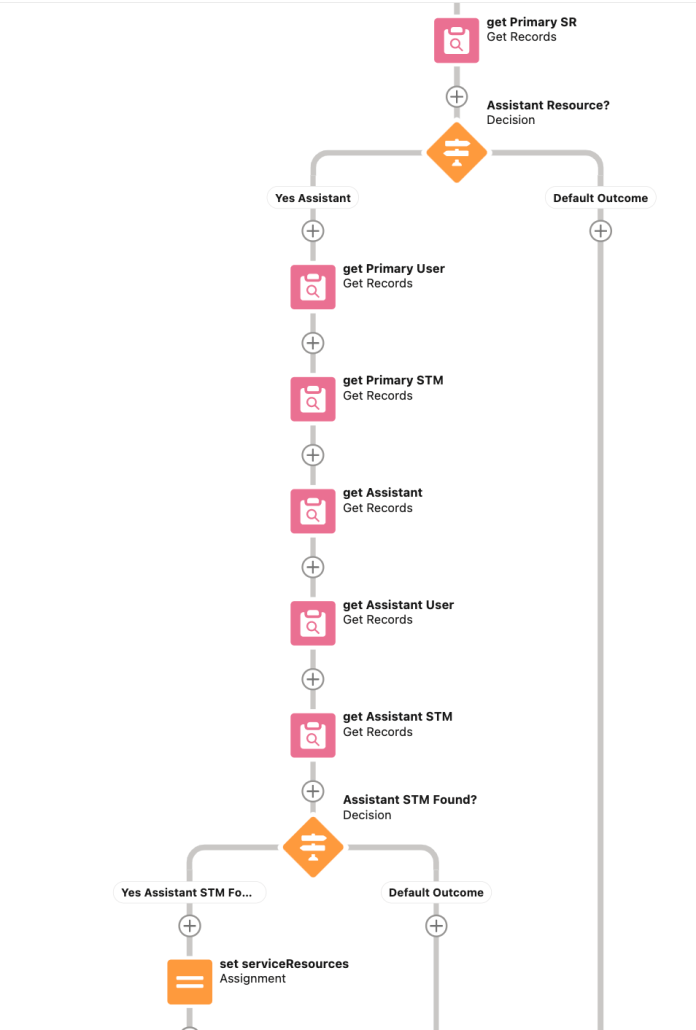
If the selected Resource has an Assistant Service Resource, then using get Record steps, fetch the Resource’s record, related User Record and relevant Service Territory Member Record. For the Assistant Service Resource, fetch the same records.
Using a formula field, assign a value to the serviceResources variable.
Birds eye view – additional steps added after the candidate screen.
Zoomed in a little more – get SR, User and STM records for selected Candidate and Assistant. If the Assistant exists, use a formula field to set the value used by Multi-Resource Scheduling.
Formula field used in the set serviceResources assignment step
The formula is pretty simple – you just need to be particular with the open and closed quotes.
Let’s examine the elements in the formula
The variable called serviceResources is a JSON payload and for multi resource scheduling it contains 2 or more elements, with the first one being the primary resource and the second one (and possibly the third through fifth ones) being the additional resource(s). The bold text are comments I added for this blog and should not be in the formula you create.
‘[ {“UserPhoto”:”‘&{!get_Primary_User.FullPhotoUrl}&'”, Primary Resource Photo “ServiceTerritoryMemberId”:”‘{!get_Primary_STM.Id}&'”, Primary Resource STM Id “IsActive”:true, True “ResourceType”:”‘&text({!get_Primary_SR.ResourceType})&'”, Primary Resource Type “RelatedRecordId”:”‘&{!get_Primary_SR.RelatedRecordId}&'”, Primary Resource User Id “Id”:”‘&{!get_Primary_SR.Id}&'”, Primary Resource Id “Name”:”‘&{!get_Primary_SR.Name}&'”, Primary Resource Name “sobjectType”:”ServiceResource”, Service Resource “AttendanceType”:”Primary”}, Primary {“UserPhoto”:”‘&{!get_Assistant_User.FullPhotoUrl}&'”, Assistant Resource Photo “ServiceTerritoryMemberId”:”‘&{!get_Assistant_STM.Id}&'”, Assistant Resource STM Id “IsActive”:true, True “ResourceType”:”‘&text({!get_Assistant.ResourceType})&'”, Assistant Resource Type “RelatedRecordId”:”‘&{!get_Assistant.RelatedRecordId}&'”, Assistant Resource User Id “Id”:”‘&{!get_Assistant.Id}&'”, Assistant Resource Id “Name”:”‘&{!get_Assistant.Name}&'”, Assistant Resource Name “sobjectType”:”ServiceResource”, Service Resource “AttendanceType”:”Required”} Required ]’
Notes about the formula
If you use AttendanceType = Required, the additional resource’s availability is reflected in the time slots. If you make it “Optional”, then only the primary resource’s availability is reflected.
If you have additional resources, just add additional elements for them in the formula, modeled after the Assistant Resource. You may choose to do this in a loop to provide some flexibility
If you use Asset Service Resources, then there will be no photo
If you want to mandate that there is at least 1 secondary resource, you can test in a decision element that serviceResources contains either the word “Required” or “Optional” and redirect the user back to this screen if this is not true
Consider a bank with Operating hours 9AM to 5PM and a wealth manager Sam who works flexible hours 8AM to 6PM. During regular operating hours Sam is available to take any type of appointments, however for “Privileged” customers he doesn’t mind talking to them as early as 8AM and as late as up to 6PM (additional 2 hours – beyond the operating hours).
How do we let Privileged customers book appointments that ignore operating hours? The answer might look simple – we do NOT want to use the Operating hours when it comes to privileged customers – instead use the service resources shifts.
But at the same time we should let normal customers to book appointments during regular hours, which means we need to use the Scheduler features of Shifts & Operating hours at the same time.
That’s exactly the reason for this blog – to explain how to achieve this by understanding the basics of scheduling policies, which are like the rules used by the Scheduling engine.
For every standard Scheduling Flow that does help with Appointment scheduling it is mandatory to use a scheduling policy (if ignored, the default one that is shipped with the product out of the box is used) – which is a way to define the rules we want to run the scheduling flow with. In certain business use cases it is necessary to use different combinations of these rules within a scheduling flow.
Lets try to understand some commonly used rules of scheduling policies before we solution the problem
What are Scheduling Policies?
Scheduling policies enforce one or more rules that help you find the best service resources for appointments. Rules that are used by the Scheduling Engine while calculating Time Slots are explained in detail in our help here. Combinations of these Rules define the policy that can be used for a specific appointment booking experience.
Here are 3 rules on the scheduling policy we will try to understand
Use ONLY Operating Hours and Do NOT use Shifts
Use Service Territory Member’s Shifts
Use Service Territory Operating hours with Shifts
OPTION 1 – Consider ONLY Operating Hours and Do NOT consider Shifts
Operating Hours represent the time slots during which appointments can be scheduled. Administrators can define these timeslots specific to a timezone. Scheduler provides the flexibility to specify the Operating hours at a Service Territory or at a Service Territory Member level. Administrators have to mention either or both of them to let the Scheduler Engine calculate the precise availability of resources and timeslots.
Rules to use when we want to consider Service Territory Operating Hours as setup in the Scheduling Policy
If we use these rules on the Scheduling policy – every customer will ONLY see time slots from 9AM to 5PM. Even our advisor Sam will be ONLY available 9AM to 5PM.
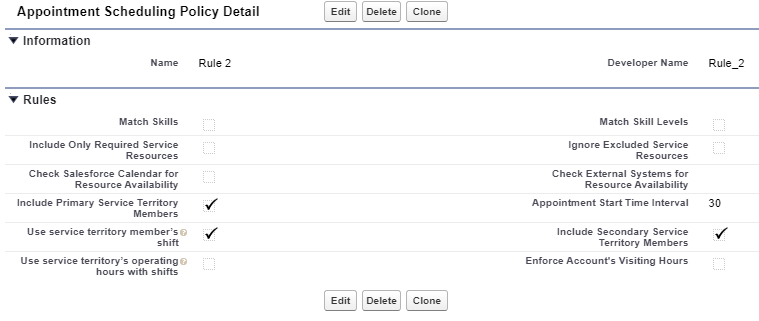
OPTION 2 – Use Service Territory Member’s Shifts
Rules to use when we want to consider Service Territory Member’s Shifts INSTEAD of the Operating Hours
When the “Use service territory member’s shift” is checked alone on a scheduling policy – the scheduling engine will totally SKIP considering the Operating Hours set for the Service Territory Member (either at the service territory or the service territory member record level).
If we use these rules on the Scheduling policy – our advisor Sam will be available to take appointments from 8AM to 6PM. This is the rule we should be using for privileged customers.
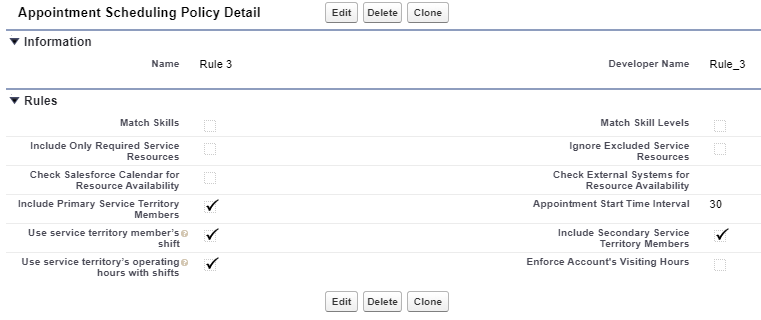
OPTION 3 – Use service territory’s operating hours with shifts
Rules to use when we want to consider Service Territory’s Operating Hours ALONG with the Member’s Shifts.
When the “Use service territory member’s shift” is checked along with “Use service territory’s operating hours with shifts” on a scheduling policy – the scheduling engine will totally consider the intersection of shifts and service territory operating hours when determining the availability of service resources.
If we use these rules on the Scheduling policy – our advisor Sam will be available to ALL Customers from 9AM to 5PM. We can use this scheduling policy as default.
Using multiple scheduling policies in the same flow
Standard Scheduler Flow templates come with a global flow variables which can be customized as per our business use case and needs.
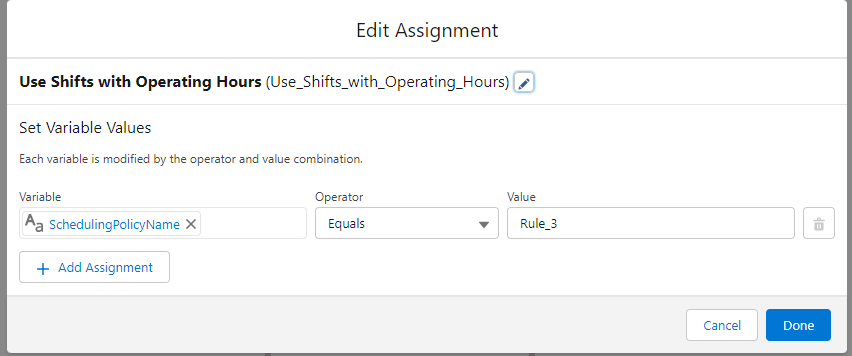
SchedulingPolicyName flow variable lets you specify the scheduling policy we intend to invoke from the flow.
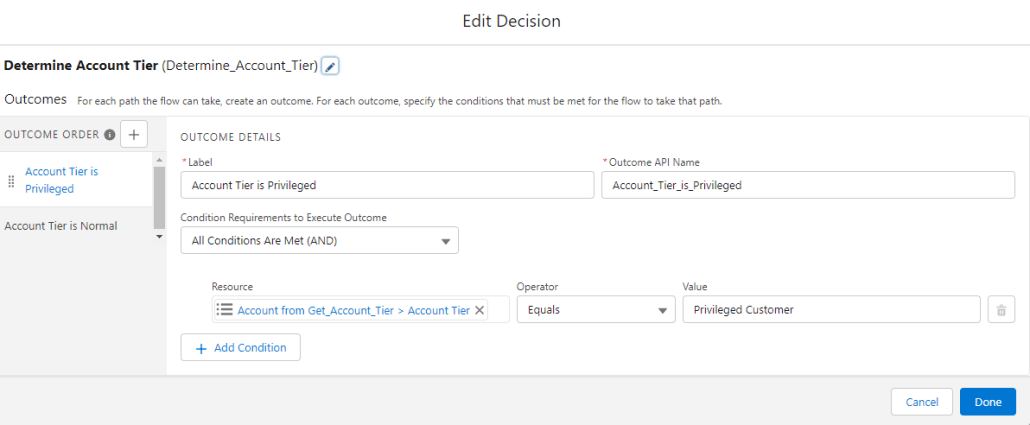
Since in our example we want to use 2 different scheduling policies we can validate the customer tier (a custom field on the account object that maintains the customer tier information) and based on the tier information, we can specify the scheduling policy name in the flow.
Extending availability for Privileged Customers
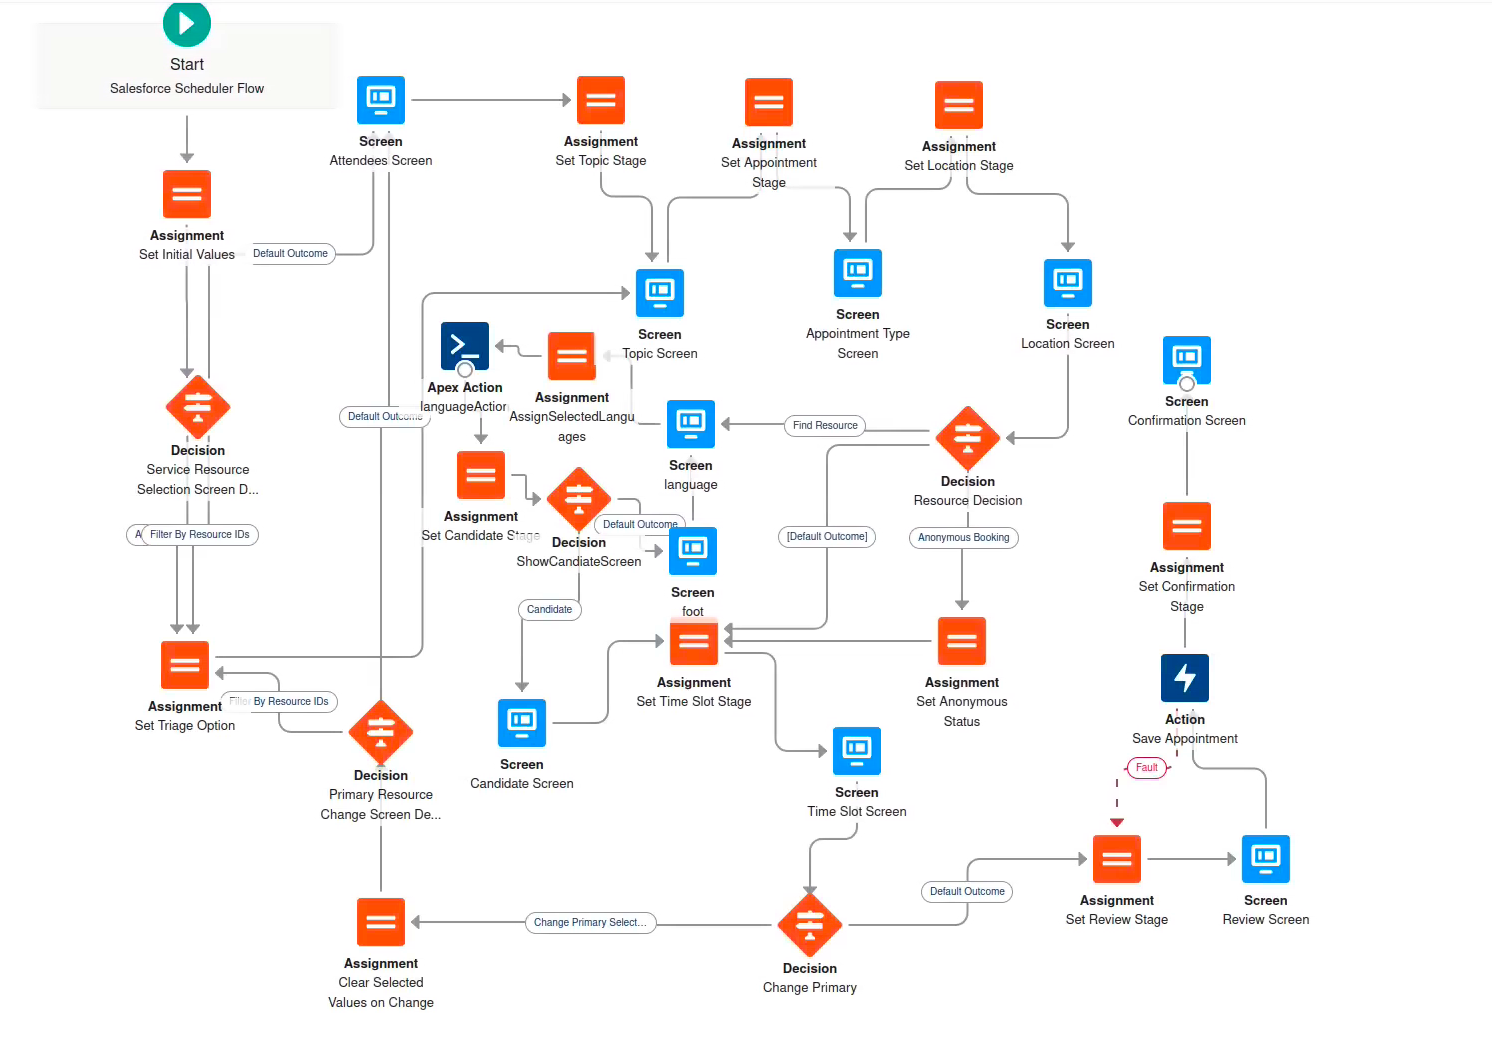
This is how a customized scheduling flow (outbound new appointment in this example here) looks like and the steps 1 to 4 are the customizations done to update the flow (Details with screenshots for the 4 steps are shared below)
1. Get Records: Get Account Tier
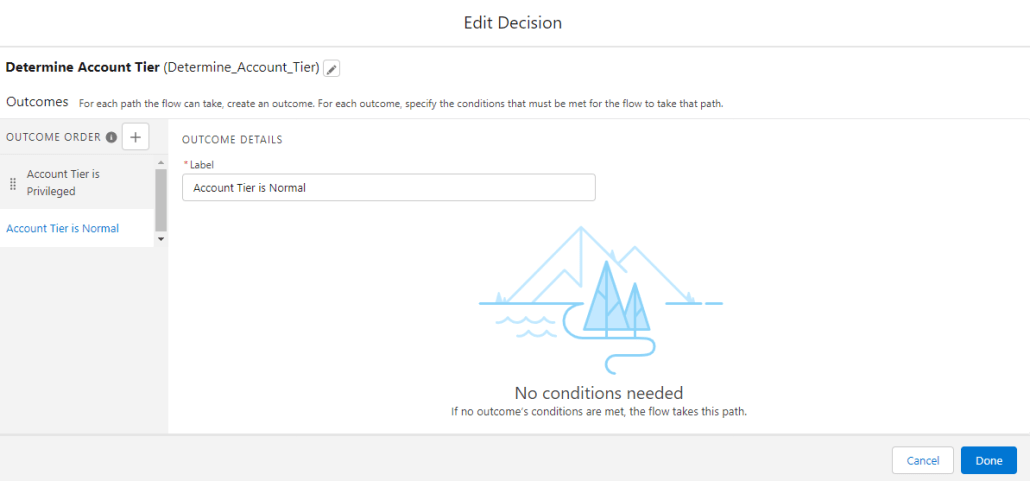
2. Decision: Determine Account Tier
3. Assignment: Use Shifts – Account Tier is Privileged
4. Assignment: Use Shifts with Operating Hours – Account Tier is Normal
https://unofficialsf.com/wp-content/uploads/2022/09/largeUCSF-300x133.png00Sunilhttps://unofficialsf.com/wp-content/uploads/2022/09/largeUCSF-300x133.pngSunil2023-01-30 07:59:552023-02-06 02:14:52Extended Working Hours for Privileged Customers
This blog suggests a way that allows appointment booking with service resources who have support for a set of languages. Thus, we will be adding language support to our existing Appointment Booking flows.
Problem Statement:
Let’s say we have a Service Resource who can speak only a certain set of languages, say Hindi and English and another who can speak in only Chinese. Even though each of the resources have all the relevant skills for attending a Work Type, he/she will not be able to drive the appointment since they cannot speak a certain language.
By introducing language support we will try to eliminate this problem.
Solution Approach:
We manage a multi-select pick-list custom field on the Service Resource Object which will store the list of languages the resources can support
Add a selection to the flow that will display the languages – so that requestor can opt for languages he/she prefers to get the service in
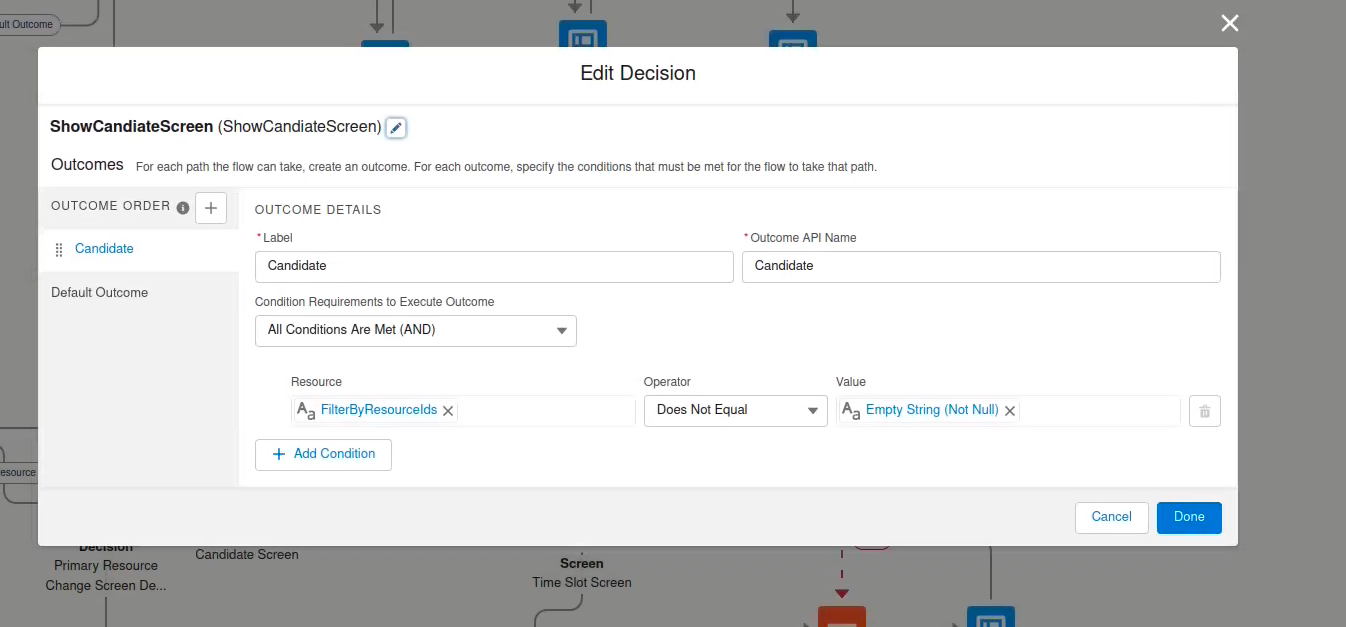
After selection of languages in flow, the FilterByResourceIds is populated by intersection of ( getAppointmentCandidates API call and SOSL to fetch resources supporting the list of languages)
List the available service resources by filtering out those who know a specific language by leveraging “filterByResources”
Setup Steps:
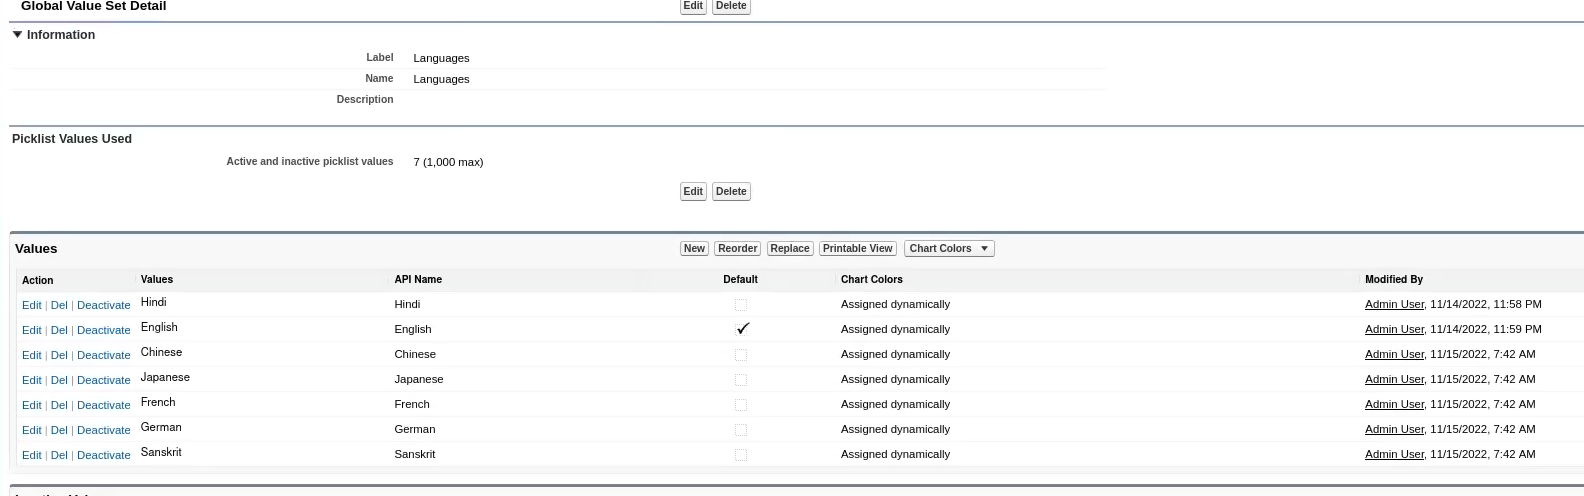
Create a Global Value Set
Create a new Global Value Set , with a defined set of language values.
Add a Multi-Select Picklist Field on Service Resource
Add a multi-select picklist field on Service Resource which takes values from the earlier defined global value set.
Create an Apex Class
Add following code to create an Apex Class ( Note that this class method will be used to set the FilterByResourceIds parameter):
There are two ways in which we can create this action.:
When there are many STM records for the selected ServiceTerritory, an extra API call can be used to reduce the scope of our query.
public class MultiLanguage {
@InvocableMethod(label=’Get Service Resource Ids’)
public static List<String> getServiceResourceIds(List<Input> inputs){
lxscheduler.GetAppointmentCandidatesInput input = new lxscheduler.GetAppointmentCandidatesInputBuilder()
String languages = inputs.get(0).languagesSelected;
List<String>languagesList = languages.split(‘;’);
languages = ‘(\” + String.join(languagesList, ‘\’,\”) + ‘\’)’;
List<ServiceResource> resources = DataBase.query(‘select id from ServiceResource where Languages__c includes ‘ + languages + ‘and id in :test1 and IsActive = true’);
List<String> list2 = new List<String>();
for(ServiceResource r:resources){
list2.add(r.id);
}
return new List<String>{String.join(list2, ‘,’)};
}
public class Input{
@InvocableVariable
public String serviceTerritoryId;
@InvocableVariable
public String workTypeGroupId;
@InvocableVariable
public String accountId;
@InvocableVariable
public String languagesSelected;
}
}
In cases when the count of STM is not that large we can directly query without an extra API call.
public class MultiLanguage2 {
@InvocableMethod(label=’Get Service Resource Ids2′)
public static List<String> getServiceResourceIds(List<Input> inputs){
String languages = inputs.get(0).languagesSelected;
List<String>languagesList = languages.split(‘;’);
languages = ‘(\” + String.join(languagesList, ‘\’,\”) + ‘\’)’;
List<ServiceTerritoryMember> resources = DataBase.query(‘select ServiceResource.Id from ServiceTerritoryMember where ServiceResource.Languages__c includes’ + languages + ‘and ServiceResource.IsActive = true and ServiceTerritory.Id =:serviceTerritoryId’);
List<String> list2 = new List<String>();
for(ServiceTerritoryMember r:resources){
list2.add(r.ServiceResource.Id);
}
return new List<String>{String.join(list2, ‘,’)};
}
public class Input{
@InvocableVariable
public String serviceTerritoryId;
@InvocableVariable
public String workTypeGroupId;
@InvocableVariable
public String accountId;
@InvocableVariable
public String languagesSelected;
}
}
Flow:
Clone the existing Outbound New Appointment Flow.
Add following Elements:
Variable : selectedLanguages of type Text.
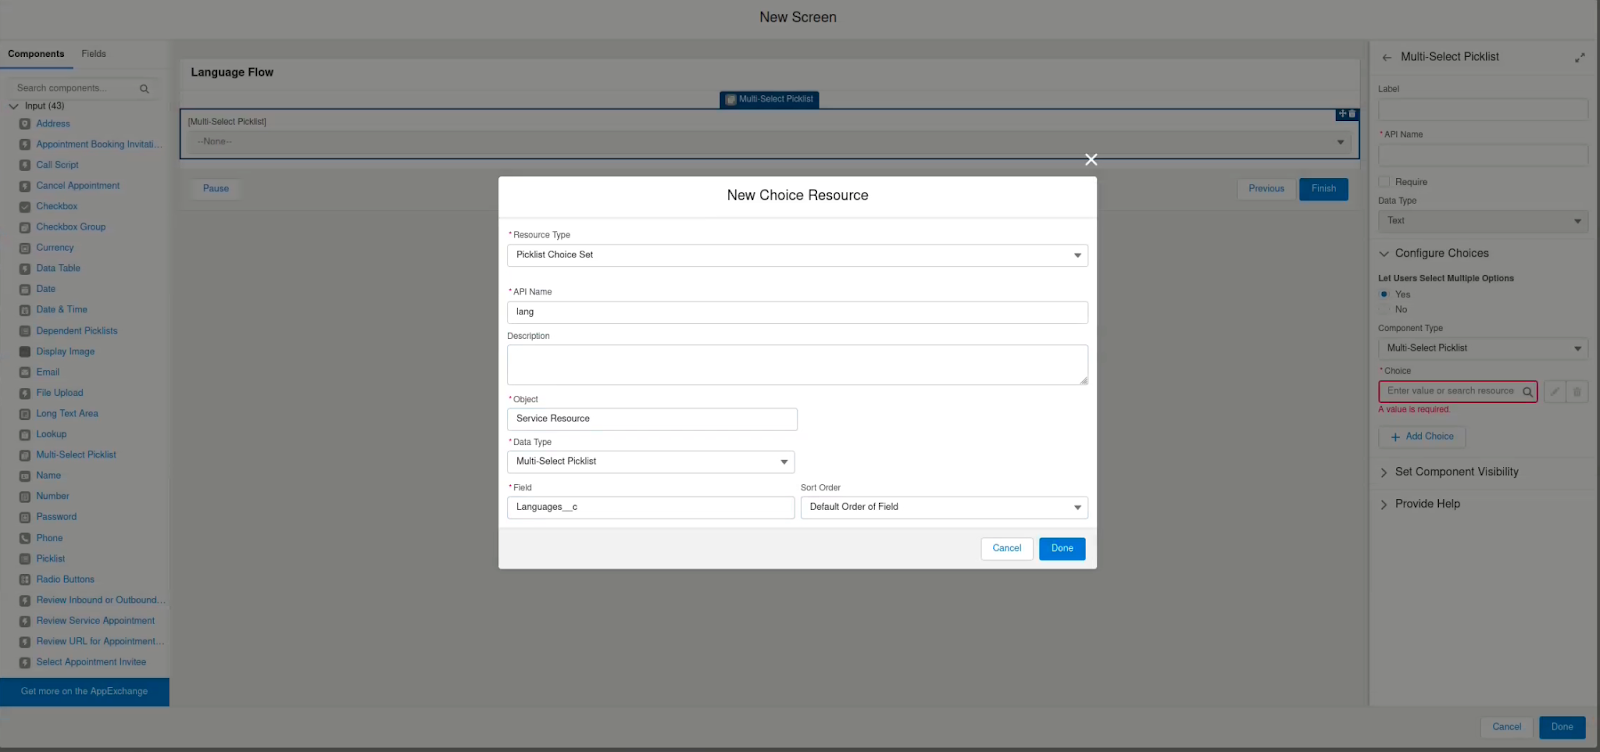
Screen : Language Screen ( This screen will show the picklist values of Global Value Set to choose from set of languages )
Add a Multi-Select Picklist Component to the Screen
Under the Choice setup, add a New Choice Resource with theses values
Add Label and API Names to this screen
Assignment( Assign Selected Languages):
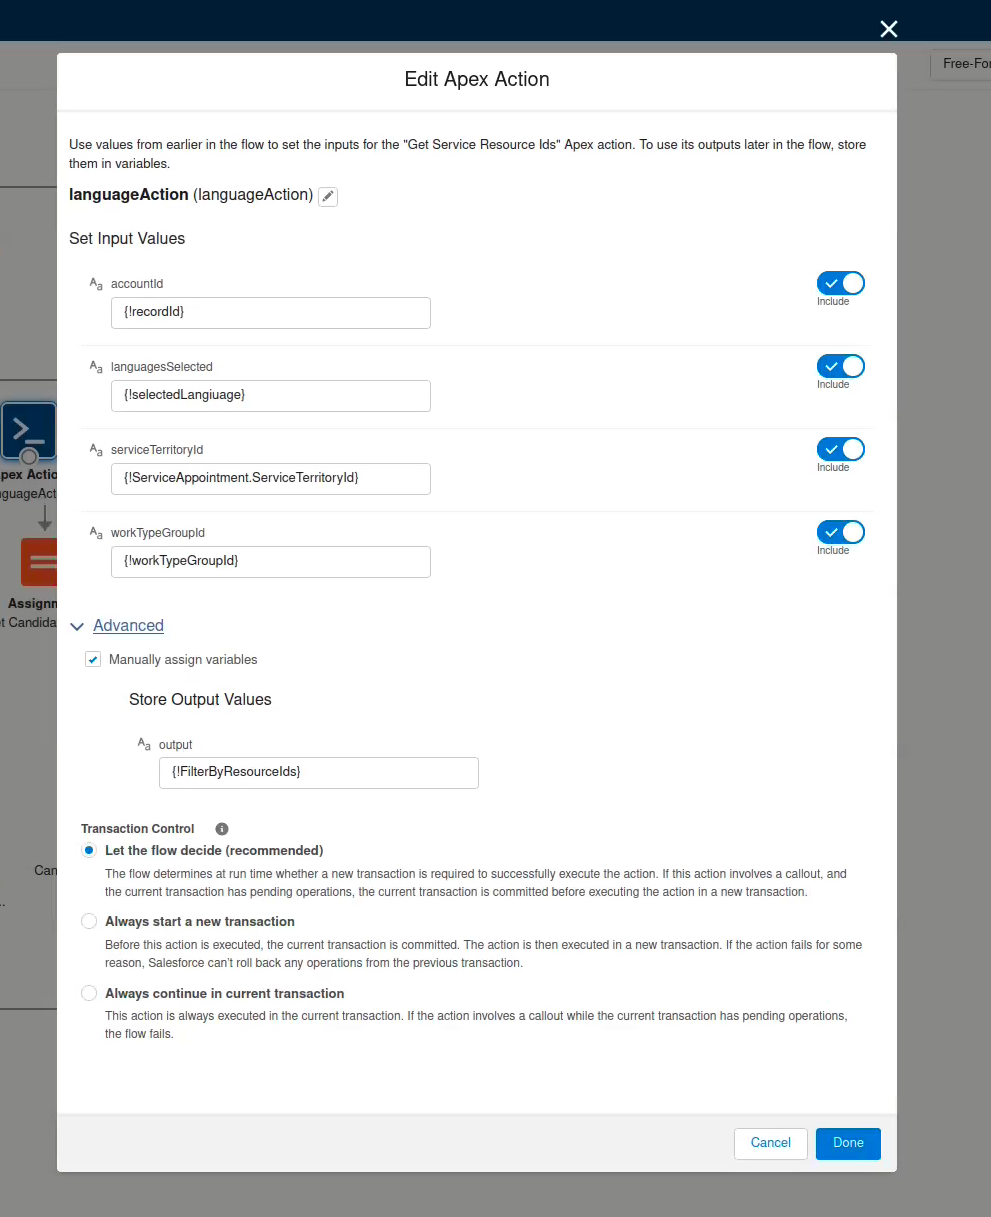
Apex Action ( languageAction )
Choose Uncategorized under Filter By Category
Add the apex action which was created earlier i.e “Get Service Resource Ids”
Decision : (ShowCandidateScreen)
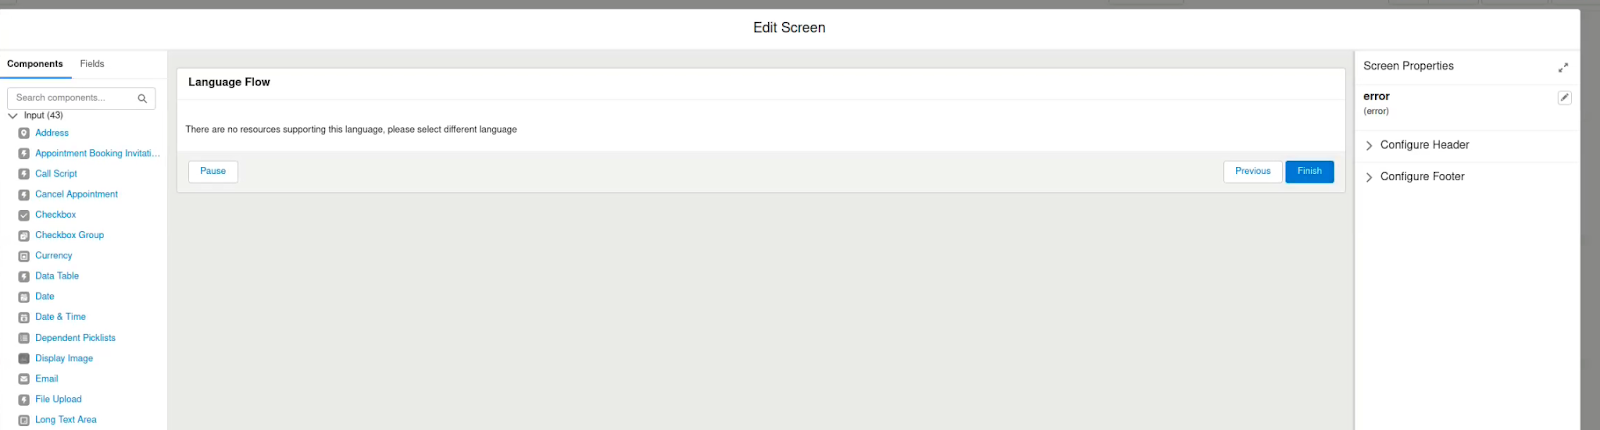
Screen(Error) : This will show error if there exists no resource which supports the languages selected.
Order the flow as suggested in the image below
Video: (Working Solution)
https://unofficialsf.com/wp-content/uploads/2022/09/largeUCSF-300x133.png00Sunilhttps://unofficialsf.com/wp-content/uploads/2022/09/largeUCSF-300x133.pngSunil2022-12-21 03:49:202022-12-21 03:52:09From Pratyush Kumar : Orchestrate Appointment Experience based on Language selected
Salesforce Scheduler provides a precision scheduling experience, powered by flow that allows your prospective customers, customers, and employees to schedule appointments with ease and allows you to build stronger relationships with your customers.
Often times, a customer would like to schedule or is required to schedule more than 1 appointment. For example, in one scheduling session, a customer might want to schedule an initial consultation and a follow up appointment 2 weeks later – in other words, schedule the 2 appointments together.
The .gif above depicts scheduling 2 appointments during 1 scheduling session using the customized flow described in this document
Current Situation / Challenge
Product Capability
Scheduler only schedules 1 appointment at a time. Your customer might schedule the first appointment only to find out that the second appointment is not available. Or they might forget to schedule the second appointment.
Complexity of Custom Development
The good news is that Salesforce Scheduler has a robust API available, allowing customers to create their own scheduling experiences to meet their needs. The not so good news in this is that if you use the API to find available appointments, you need to build your own screen to display those to the user. In other words, the Time Slot Selection screen that comes with Scheduler cannot be customized.
The screen above cannot be customized. For example, you cannot allow a user to select 2 time slots.
A Lower Complexity Custom Solution
You can build a custom scheduling solution which can provide options to select two timeslots by leveraging a few things which are mentioned below.
And this solution really has a basic UI. In its current form it is best suited for an internal user. For external use, you should extend the solution to provide more natural calendar controls (like the out of the box timeslot selection component that Scheduler provides). That, of course, will require more complexity, but certainly worth if to deliver a superior user experience.
Scheduler LX namespace / Apex Methods
Use the Scheduler LX namespace to easily get available time slots. For example, call the GetAppointmentCandidates method to get 2 lists of available times slots. Create an @invocableMethod that will allow you to call this from a Flow.
Use the power and flexibility of Flow to connect both of these together as well as leverage existing Scheduler flow screen components such as Select Territory to create a custom scheduling experience.
Installation / Technical Details
Using the above mentioned custom options, here is a version of the custom solution that we built to attain the experience we discussed.
You can Install this package in your sandbox and check it out for yourselves. Use it to jump start your own custom scheduling solution for booking more than 1 appointment at the same time.
Flow Datagrid Pack – this solution uses the DataGrid Pack – Tiles screen component to provide a user interface for selecting a time slot. The package link above contains the Tiles component already and does not need to be installed from the appexchange.
Apex Classes
LXGetSlots – a class with an @invocableMethod. This class calls the getAppointmentCandidates API to fetch available time slots. This class will format the results so they can be rendered in the DataGrid Pack – Tiles component.
schedulerCandidates – represents a time slot returned from the API
LXGetSlotsTest, TestUtility – Test class and test class helper
Flows
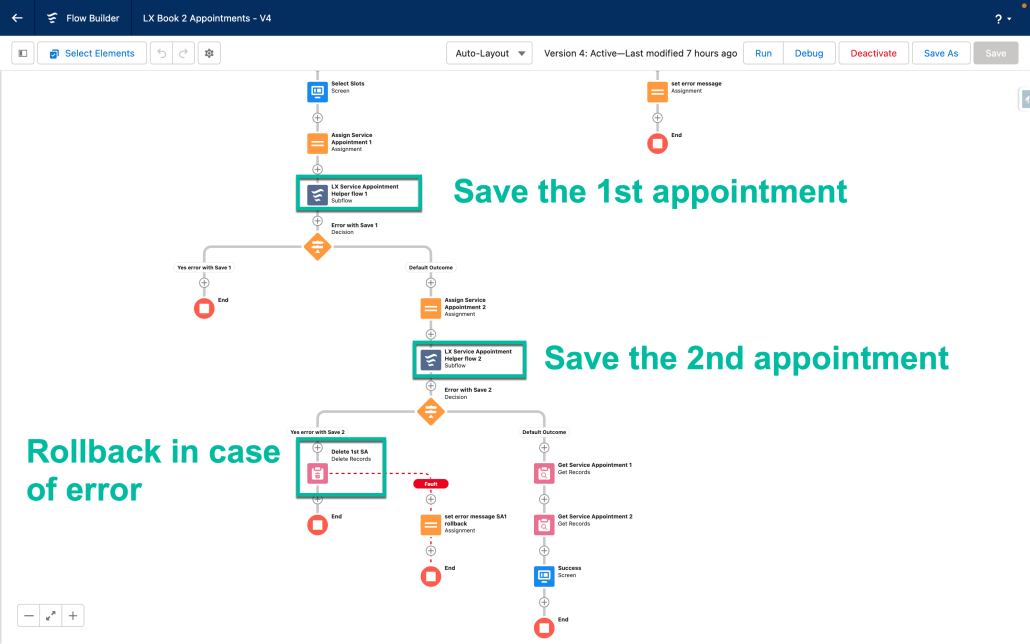
LX Book 2 Appointments – this flow is set up to allow booking of 2 appointments
LX Get Slots Helper Flow – this flow is called by LX Book 2 Appointments. It calls the LXGetSlots apex class to get time slots
LX Service Appointment Helper flow – this flow is called by LX Book 2 Appointments. Its purpose is to create a service appointment for a selected time slot. It uses the Scheduler Save action and it has a formula field to construct the JSON needed for the Save action
LX Book 2 Appointments flow – calling the API
LX Book 2 Appointments flow – creating 2 appointments
Customize it!
If you want to book 3 or more appointments instead of 2, add additional steps to the LX Book 2 Appointments Flow.
Any variable that ends with a ‘2’ should be replicated and end with a ‘3’
Formula fields that you replicate should also have 2’s replaced with 3’s
Replicate the pattern you see in the flow to find slots for the 3rd appointment
Add a Datagrid Pack – Tiles screen component for the 3rd appointment to the Select Slots screen
Replicate the pattern you see in the flow for the saving of the appointment
Replicate the LX Get Slots Helper Flow 2 step. Note the pattern to determine if slots were found and replicate those
Replicate the LX Service Appointment Helper Flow 2 step and related steps. Note the pattern to determine if slots were found and replicate those
When replicating a step, make sure to update any input/output variables from ‘2’ to ‘3’.
Add Datagrid Pack – Tiles component for the 3rd appointment, make sure to update any input/output variables from ‘2’ to ‘3’.
https://unofficialsf.com/wp-content/uploads/2022/09/largeUCSF-300x133.png00Sunilhttps://unofficialsf.com/wp-content/uploads/2022/09/largeUCSF-300x133.pngSunil2022-10-20 00:40:172022-10-24 22:41:09From Chris Albanese: Scheduler – Book multiple appointments using Flow and the LxScheduler namespace
With Salesforce Scheduler, it’s easy to embed appointment scheduling into standard Salesforce workflows, such as leads and referrals, opportunities, accounts (and person accounts in the B2C Model) and ALSO cases (as of Winter ’23 release).
But NOT for Contacts (with B2B model).
In this blog, we will look at options to schedule a contact.
Note: Field Service Lightning Product extends this to additional objects – Work Order, Work Order Line Item and Asset.
Understand Scheduler OOTB Behavior
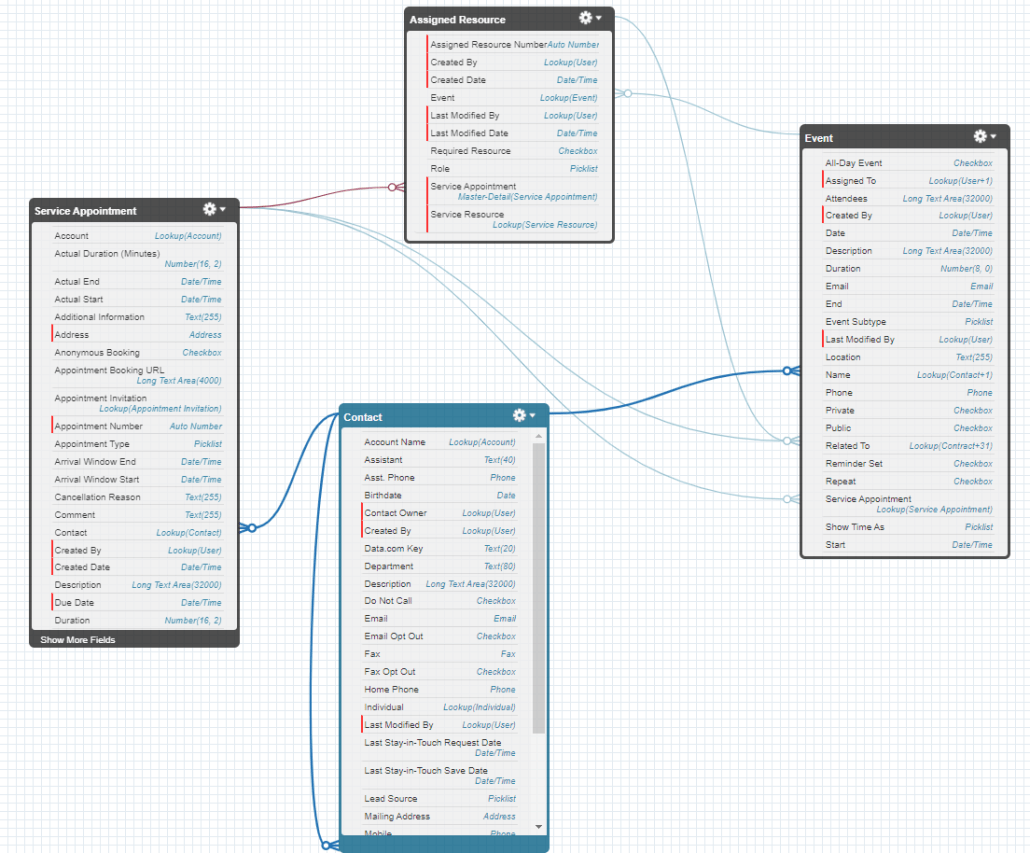
Before we start looking at an option how we can customize the experience for scheduling around a contact, lets try to understand the core objects we have from Salesforce Scheduler that capture a booked appointment using the OOTB behavior and how we can reuse the existing OOTB available references.
Service Appointment
Assigned Resources
Event
We will keep our focus understanding the relationships and the references
Object
Field
Data Type
Usage
Service Appointment
ParentRecord
Lookup(Account, Opportunity, Lead, Case)
Using Salesforce Scheduler we can create a Service Appointment only around Account, Opportunity, Lead or Case.
Service Appointment
Account
Lookup(Account)
Defaults to the Customer account’s for inbound, Left blank for a Lead, Case and related account if booking around an opportunity.
Service Appointment
Contact
Lookup(Contact)
Defaults to the user’s contact record when requesting from a customer community via an inbound authenticated user booking scenario. Left blank otherwise.
We will use this standard field to Stamp the Contact ID – during Service Appointment creation when doing an Outbound Scheduling from Internal Salesforce in this blog.
Assigned Resource
ServiceAppointment
Master-Detail(Service Appointment)
Service Appointment object does NOT hold the service resource information, it is primarly stored in the Assigned Resource object. This is the reference to Service Appointment.
Assigned Resource
ServiceResource
Lookup(Service Resource)
Service Resource reference (can be either a user or an asset)
Service Resource
RelatedRecord
Lookup(User)
Service resource object reference to a User – which can be either a Platform Starter / Partner Community / Customer Community Plus / Salesforce license type user
Event
WhoId
Lookup(Contact,Lead)
Events are like your calendar events. The person who will attend this event is captured here.
Event
WhatId (Related To)
Except Lead and Contact, Other objects
And this event is related to what in Salesforce
Event
ServiceAppointment
Lookup(Service Appointment)
When Event Management is turned ON on the Scheduler settings, every time a service appointment is created, it creates a related Event – this is to hold that references
Event
Owner (Assigned To)
Lookup(User,Calendar)
Represents the owner of the record (internal user or an external calendar)
Customization Guidance to schedule a Contact
Having looked at the above objects and references, it is pretty much clear that we CAN reuse the existing Contact lookup on Service Appointment. When using Events, we WILL have to make sure the related EVENT gets created with this Contact reference as well.
To achieve this we need to modify the existing template slightly. Try these steps outlined below
Start with a cloned flow from the template (In this example we have cloned the “Outbound New Appointment” template to create a flow called “Outbound New Appointment for Contact”)
Since we plan to launch this from a Contact record, the recordId will be the Contact.Id that will be passed to the Flow. So we need to make sure we capture the Contact.AccountId as well. Create a variable to capture the AccountId. Service Appointment ParentID field can only accept records from Lead, Account and Opportunity, so lets make sure we pass the account information from the Contact
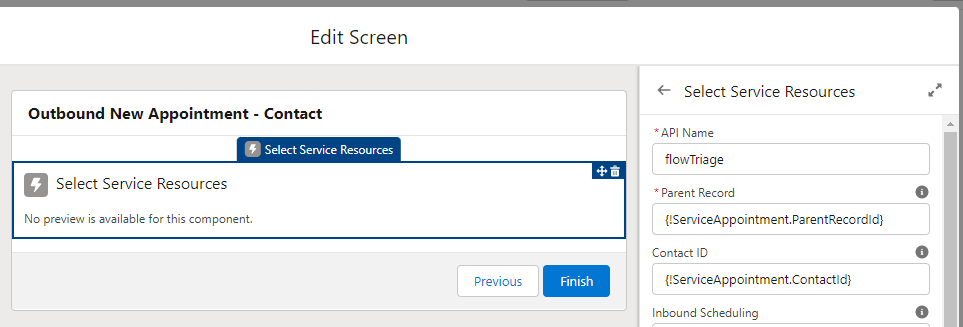
Assignment – Set Initial Values :: make sure the recordId is assigned to ServiceAppointment.ContactId
Screen – Attendees Screen :: ensure the Contact ID assignment is NOT empty – change it to {!ServiceAppointment.ContactId}
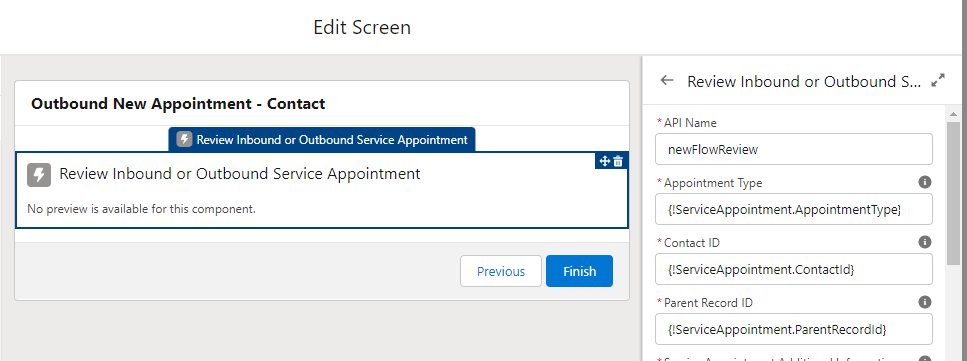
Screen – Review Screen :: ensure the Contact ID and Parent Record ID assignments are correct
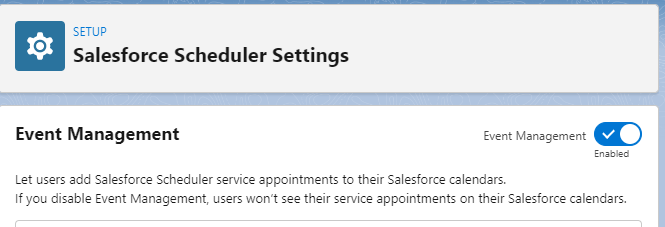
Finally make sure the Event Management is turned ON
Save the Flow and Activate it
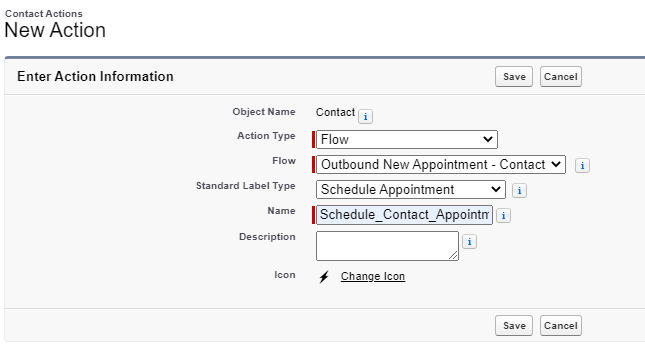
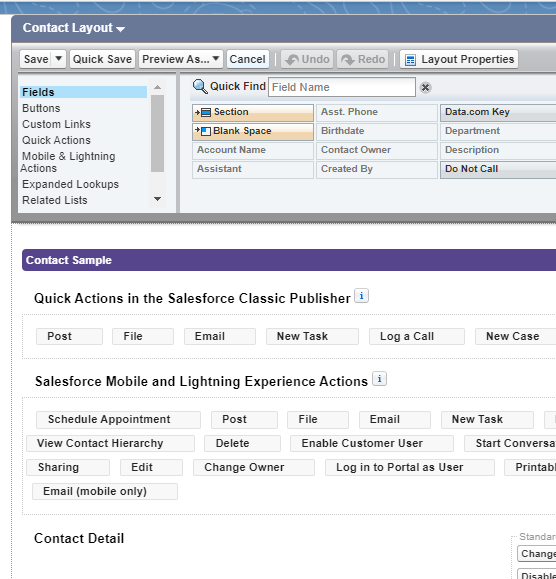
Add a Lightning Action to Launch this flow
Add this Lighting Action to your Contact Page Layout
Finally, test it for yourself. Here is a demo of the same configuration tested on a developer trial org
Considerations when using with Field Service
As mentioned in the preface – Scheduling an appointment gets extended to additional Objects which are NOT supported by Salesforce Scheduler when using Salesforce Field Service product (Earlier Field Service Lightning).
Especially with both the products (Scheduler and Field Service) in the same org, ensure you take extra care around Event Management using a custom route rather than turning ON the Event Management option as mentioned above.
https://unofficialsf.com/wp-content/uploads/2022/09/largeUCSF-300x133.png00Sunilhttps://unofficialsf.com/wp-content/uploads/2022/09/largeUCSF-300x133.pngSunil2022-08-04 20:29:162022-11-10 00:14:17From Sunil Nandipati: Scheduling a Contact
The Summer ’22 release of Salesforce Scheduler introduces an amazing new feature called Share Service Resource Availability by Using an Invitation URL. This feature allows a service resource to easily generate a URL that their customers and prospects can use to schedule appointments with them.
Above: Help and Training Article describing the new feature
At the heart of this feature is a new object called Appointment Invitation. When a service resource generates their URL, a record is created in this object.
Like most objects in Salesforce, you can add custom fields to this object.
Why would you do this?
This allows the service resource to personalize the invitation, meaning you could do something as simple as displaying information to the customer while they are scheduling an appointment from this invitation. Additionally, you can perform more complex processes such as writing the information to the service appointment that is created.
Example Configuration – Basic
Let’s look at a simple example.
We are going to allow the Service Resource to enter a friendly message that they want the customer to see when the run the scheduling flow.
Add a new field to the Appointment Invitation object. In my example, I added a text field called additional info.
Grant field level security to the service resources that will use this and the community/guest community profiles that will be viewing this information.
Modify the Generate Appointment Invitation flow to prompt the service resource for the additional information and then save that to the Appointment Invitation object, as depicted in the screens below.
Seeing the Results
Here we see our Service Resource entering a message while running the flow to create the invitation URL.
Displaying the additional information message to the Service Resource on the confirmation screen.
Here we see the customer running the flow. They received an email with the URL (not depicted), clicked on it and landed here, with the additional information message displayed to the user.
Example Configuration – just a smidge more configured than the basic example above
What if we wanted our Service Resource to select a related Marketing Campaign and then send an invite. All service appointments created from that invite should be linked to that campaign.
Data Model, Security and Sharing Changes
Add a lookup relationship field on Appointment Invitation to the Campaign object
Add a lookup relationship field on Service Appointment to the Campaign object
Grant field level security on these fields to community/guest community users
Create sharing rule on Campaign object to share campaign data with community/guest community users
Data model changes depicted below
Flow Changes
Generate Invitation Flow
Add a Campaign picklist and related Record Choice Set
Save the selected Campaign to the Appointment Invitation Object
Generation Invitation changes depicted below
Book Appointment from Invitation Flow
Add an Update Record Step after the Save Appointment step to save the Campaign Id to the Service Appointment
For guest users, make sure you run this flow in the System Context without Sharing – Access All Data
Book Appointment from Invitation changes depicted below
Running the Flow
Service Resource
Service Resource running the Generate Appointment Invite flow and selecting a Campaign
Customer/Prospect
Their experience has no change. But when the schedule an appointment, the service appointment stores the campaign id.
Service Resource
Service Resource reviewing Service Appointment. Note Campaign is associated with the service appointment.
https://unofficialsf.com/wp-content/uploads/2022/09/largeUCSF-300x133.png00Sunilhttps://unofficialsf.com/wp-content/uploads/2022/09/largeUCSF-300x133.pngSunil2022-07-15 05:37:442022-07-15 05:39:09From Chris Albanese: Enhancing the Share Availability Feature with Appointment Invitation configurations
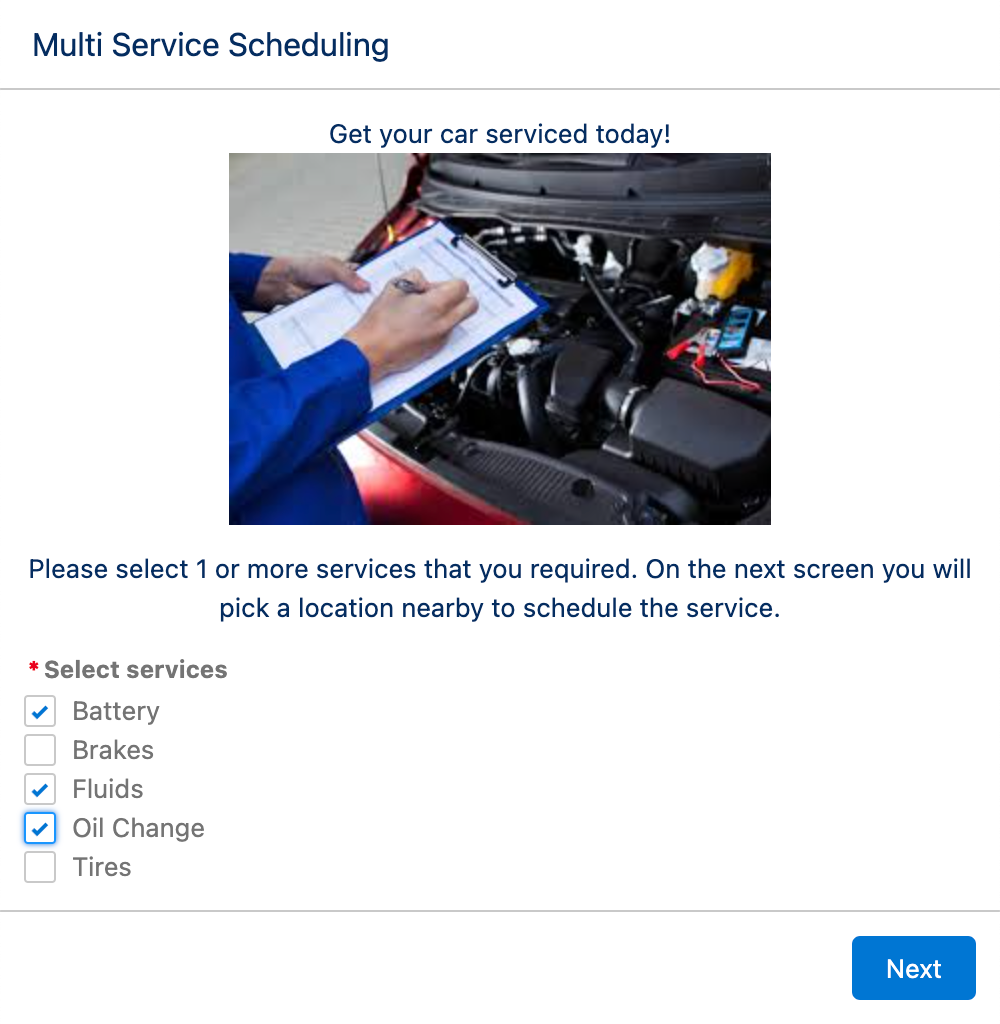
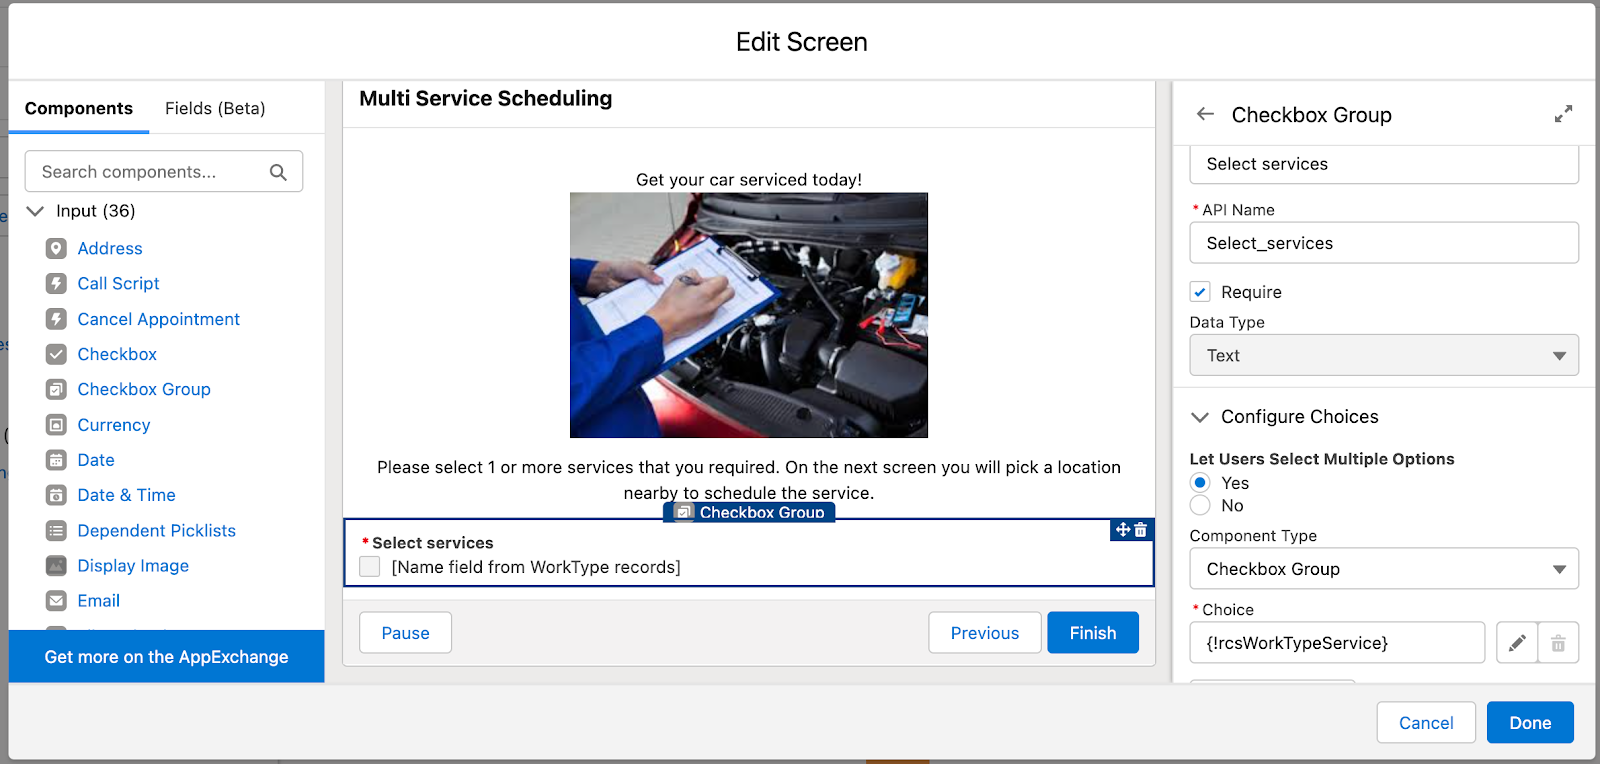
What if your business offers appointment booking for multiple services with a single appointment. For example, you offer auto services and allow customers to select from a menu of options, such as oil change, tire rotation, brake service and others. The customer may select 1 service or multiple services, and depending on the services selected, the duration of the appointment should be long enough enough to accommodate the selected services.
Above: Example of a flow screen prompting a user to select 1 or more auto services
What if you also had many store locations, and each store might offer a different menu of options. For example, the Wakefield store offers all services but the Reading store does not offer brake services.
With Salesforce Scheduler, you can accommodate this out of the box by creating many Work Type Groups to represent the combinations of services.
Consider the following table of Work Type Groups with its limitless number of combinations
Services
Duration
Oil Change
30
Brakes
60
Tire Rotation
30
Wiper Service
15
Oil Change and Brakes
90
Brakes and Tire Rotation
90
Tire Rotation and Wiper Service
45
Oil Change and Wiper Service
45
Brakes and Wiper Blades
75
…and many more combinations
But, this is probably not the most practical way to offer a menu of services. This document describes an alternative approach which includes 2 custom fields and a small bit of Apex code. Check out the details below.
Solution Overview
This solution allows you to run the Scheduler flows with a few minor configurations and an Apex @invocableMethod, allowing the user to select the desired services and perform precision scheduling without all of the permutations of work type groups.
The solution consists of custom fields on the Work Type object and Service Appointment object, an Apex Class, Work Type Group and Work Type data organized in a specific way and a configured flow. The flow makes use of the FilterByResourceIds parameter to ensure only those resources who have the skills needed are returned.
Objects
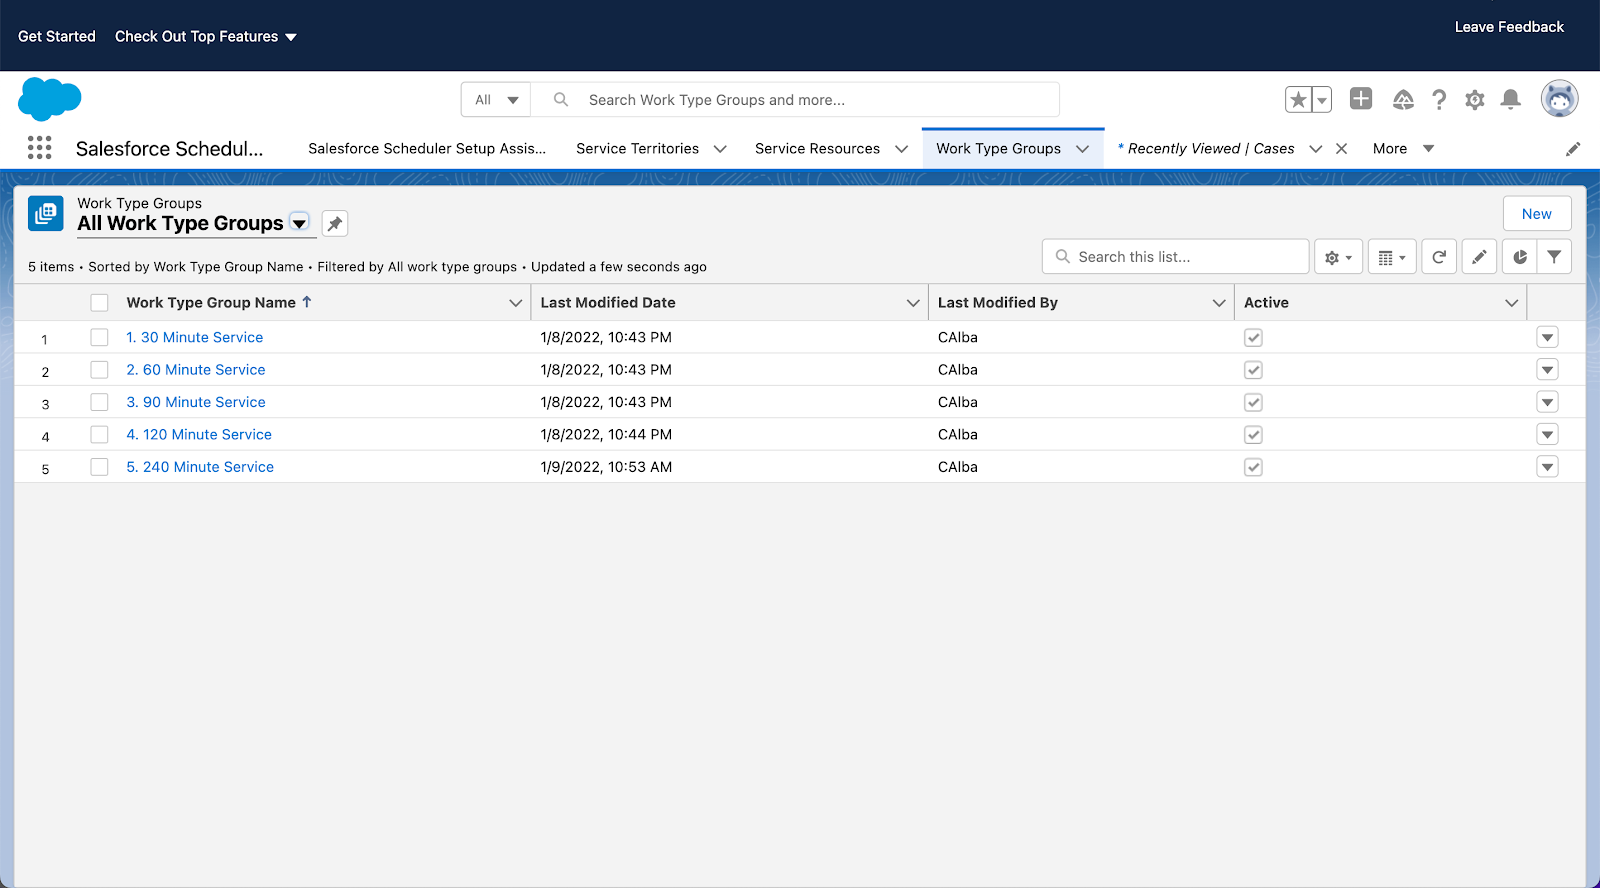
Work Type Groups
Create Work Type Groups only to reflect the duration of the services required. For example, Work Type Groups called 30 Minutes, 45 Minutes, 60 Minutes, 90 Minutes, etc. These are tied to Work Types with the respective durations.
Skills
Create Skills for each service required. For example, create an Oil Change Skill, a Brake Service Skill, a Tire Rotation Skill and so on.
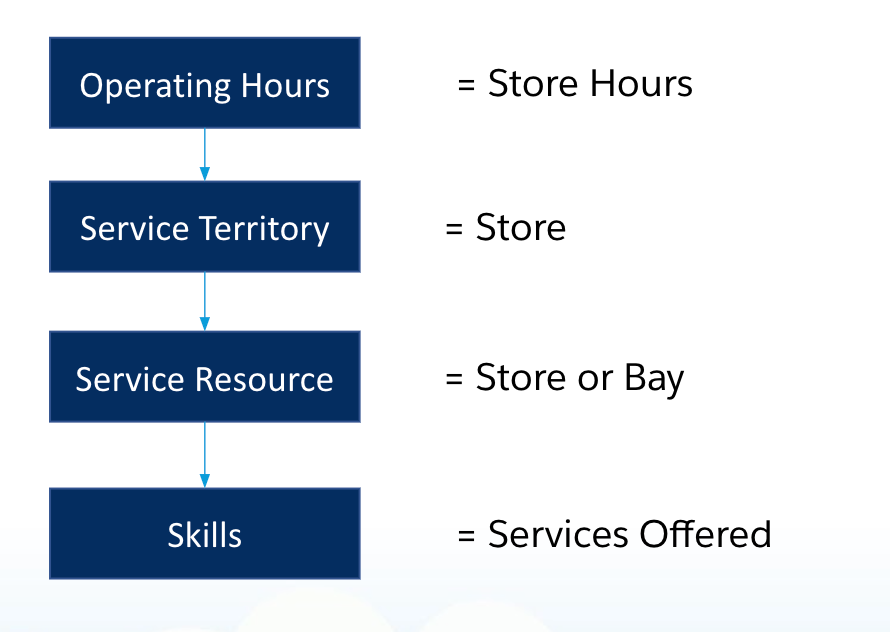
Service Resources and Service Territories
Create Service Territories to represent the store locations and create 1 resource for each service lane or bay present in the store. Assign skills to service resources to define the services offered. For example, if the store offers oil changes and brake service, but no other services, then assign only those 2 skills to the service resources associated with the store.
Service Appointment
Add a custom text (255) field called Selected Services. This will store the id’s of the work types that were selected by the user. This can be used by a rescheduling flow (not described in this document).
Work Types
Add a custom picklist field called Service Type, with values of Service and Scheduling.
Create 2 types of Work Types:
Service Work Types
These are work types that represent each service, the skill required and the expected duration. For example,
WT Name = Oil Change, Skill Required = Oil Change, Duration = 30 Minutes, Service Type = Service
WT Name = Brakes, Skill Required = Brake Service, Duration = 60 Minutes, Service Type = Service
These work types are not assigned to any work types groups or service territory work types.
Scheduling Work Types
These are work types that represent a total duration, have no skills required and the expected duration. For example,
WT Name = 30 Minute Service, Duration = 30 Minutes, Service Type = Scheduling
WT Name = 60 Minute Service, Duration = 60 Minutes, Service Type = Scheduling
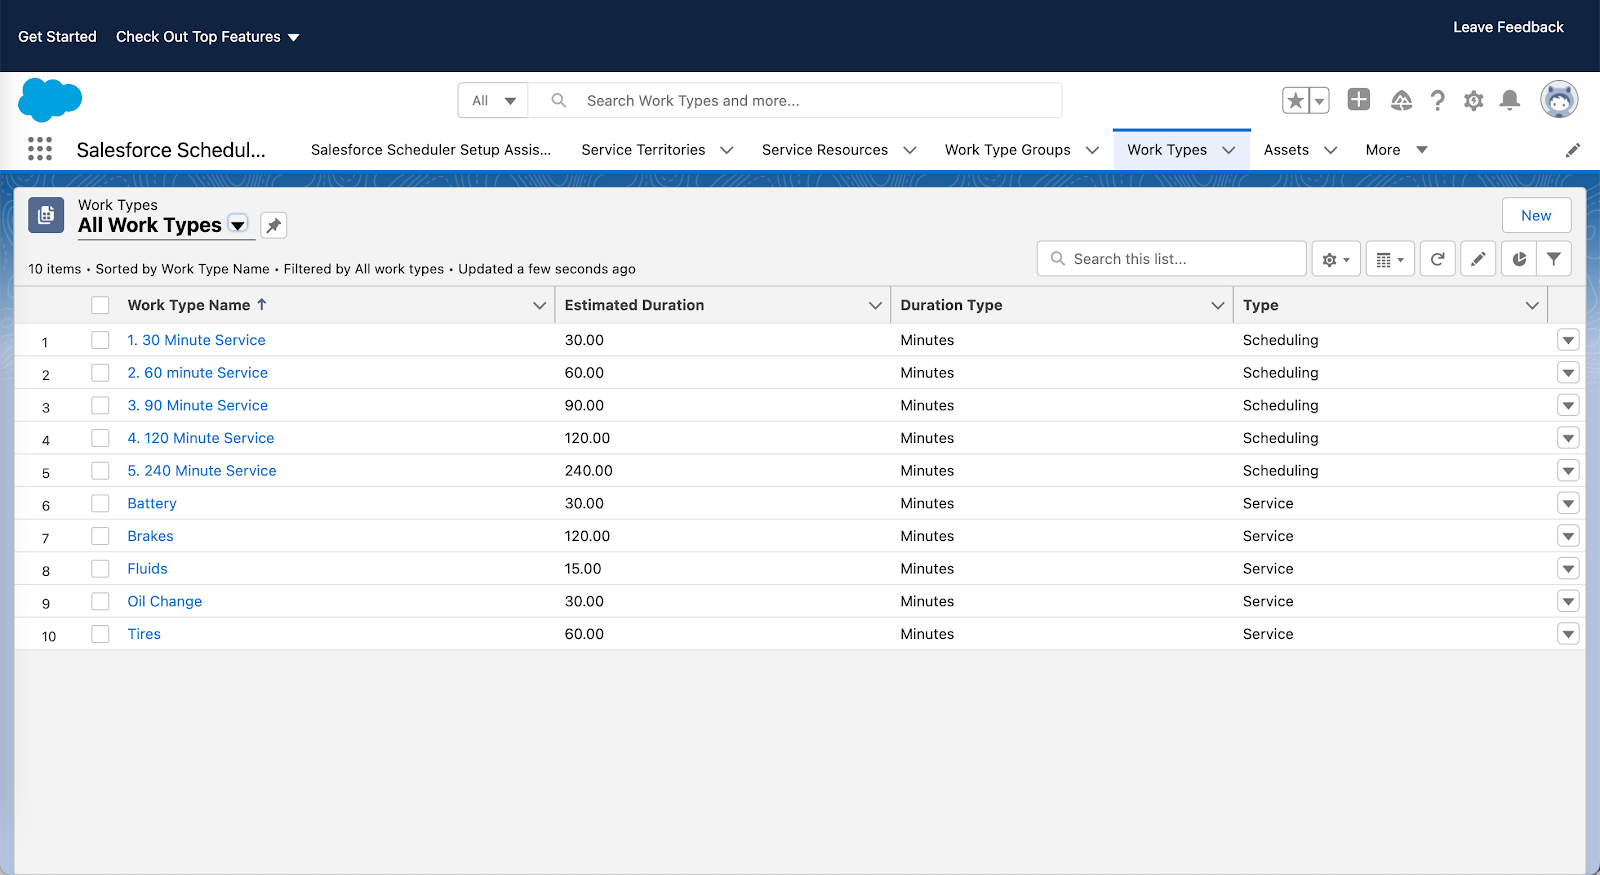
These work types are assigned to Work Type Groups (see screenshot below) and they are assigned to service territory work types.
Pic above: Work types for Service (with Skills required) and work types for Scheduling (no Skills required)
Pic Above: Work Type Groups just for Scheduling
Apex Class
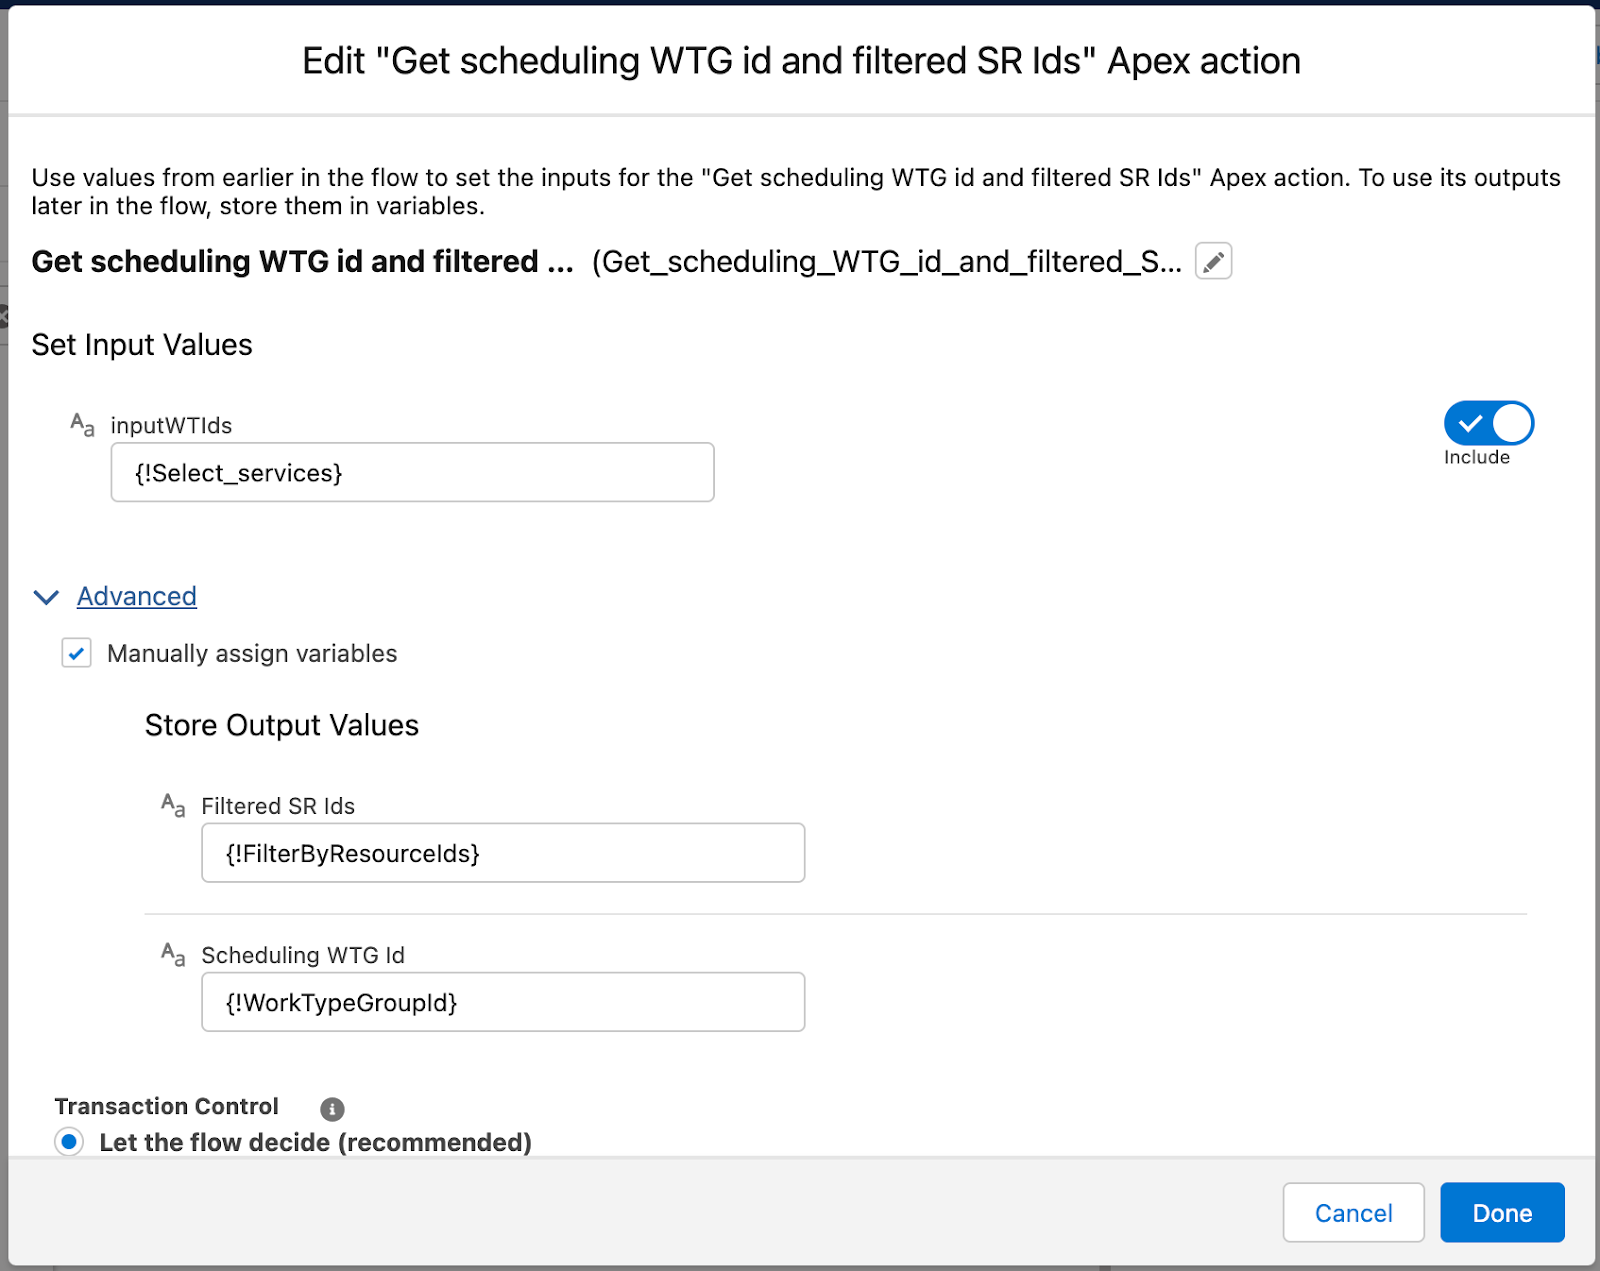
An Apex class is used to determine the scheduling Work Type Group which is just large enough to cover the list of input Services. It accepts a list of Work Type ids and returns a Work Type Group id and a text field containing a comma separated list of Service Resource ids who have the skills required for the input Services.
The code for the apex class and a test class is contained in the package file at the end of this document.
Flow
Modify the Inbound New Guest Appointment flow to prompt for the services required (service work types), call the apex class and then present the list of time slots available.
Pic Above: Flow with new steps added to prompt for services and call the apex class.
Pic Above: New Screen which prompts for services. Select services is a picklist tied to a record choice set which selects only Work Types where Service Type = Service.
Call to Apex which returns the applicable work type group id with the duration large enough to accommodate the selected services. Also set the FilterByResourceIds field, which will be used in the select location and select time slots screens.
Video of it in action
Check out the short video below.
Package
Try it yourself in your own sandbox. The custom fields, Apex Class, Test Classes and an example of a configured Inbound New Guest Appointment flow are included in this repo.
Since FilterbyResourceIds is limited to 50 service resource ids, you should ensure that you pass in a service territory id to the Apex Method so as not to exceed this limit.
Modify line 24 of the Apex code to select the specific service territory selected by the user.
listST = [select id from serviceterritory where isactive = true];
Lines 50-56 contain code to limit the total number of service resource ids to a maximum of 50. If the limit of 50 changes in a future release, you should change this code to reflect the new limit.
Rescheduling Flow
A rescheduling flow is not included here. If rescheduling is part of your use case, use the Service Appointment custom field created in this package to retrieve the services selected by the user when the appointment was scheduled. Add the custom screen and call to the Apex method to retrieve the corresponding scheduling Work Type Group, similar to how the flow in the package has been configured.
https://unofficialsf.com/wp-content/uploads/2022/09/largeUCSF-300x133.png00Sunilhttps://unofficialsf.com/wp-content/uploads/2022/09/largeUCSF-300x133.pngSunil2022-05-24 21:34:002022-05-25 02:24:39From Chris Albanese and Chris Hartt – Scheduling 1 appointment with multiple work types
The use case is fairly straightforward, as a customer of a bank, I want to schedule an online meeting with my advisor and discuss my accounts. The technology the bank wants to use is MS Teams.
The technology usage behind this particular demo is to simply create a meeting in MS Teams via an API which returns a URL that parties can click on to launch Teams( either browser or desktop ) and have a meeting. There is a lot more that can be done, but this integration is to show the possibilities with the connection
Technology Utilized
Listened below are the main technologies and configurations used in the demo preparation.
Main SaaS Tech Stacks
Salesforce Scheduler
MS Teams Online Meeting
MS Graph Rest API’s
Demo Setup Technology
MS Azure Development Account – Needed to setup a MS Teams Environment
Salesforce Org
Postman – To easily test the setup and API’s
<optional>MS Visual Studio – Used to write and deploy code
Apex Classes
Invocable Methods setup to make available in Flows
Test Classes
Auth Provider Setup in Salesforce
Named Credentials
Salesforce Flows – To provide the screen navigation, call Azure to get the meeting, and update the appropriate records.
Demo Flow High Level
This section describes the general flow of the demo from start to finish when showing to the customer. This is a specific flow for the customer this demo was prepared for. You can tailor or make your own flow(s) for your customer.
Customer goes to the portal to schedule a meeting, leveraging the Salesforce Scheduler.
This demo has an authenticated flow, there is a person account associated with the demo.
Enter the required information from the screen
Click by previously scheduled service appointments or search for a banker.
Click Next
Click on a Work Type Group → Select the type => Click Next
Select Video Call
Enter a address → San Francisco → Select a branch
Choose a date in scheduler
The call to MS Teams is done at this point and a URL is returned to the “Additional Information” Section. Note, this could be put anywhere but for the purpose of the meeting we chose here.
Click on next and a new Service Appointment is created with the Meeting URL in a custom field that can be accessed to launch a teams meeting.
The integration behind the scene created a MS Team meeting valid link that can be clicked on to start a team meeting. This utilized the MS Graph API, OAuth/Open ID authentication/authorization, and Apex Callout to create and return the meeting.
Demo Details
This section will describe the setup needed to execute the demo. What is described is the particular flow used to validate and test the integration. The entire section for Postman is completely optional, but it is suggested to do this to validate and debug. In our case, it was invaluable in determining the exact headers to place into the API. In the initial development, Postman was first used outside of Salesforce to ensure the API format was correct and the authentication/auth was setup correctly in Azure.
Microsoft Azure Setup
The first piece that is needed is a Microsoft Developer Account to be able to setup a new Azure environment. We won’t go into the details here on all of the steps, the directions are straightforward. When it gets to the point of asking what features you want to add, make sure you add in the MS Teams option that will be available.
Specific API format for the Online Meeting API’s. Note: We are using Delegated API but the Application API could be used as well with more customer setup for permissions.
Setup Salesforce/Postman Application in Azure
The first thing needed is to setup a new custom application in Azure AD that will be used to generate the authentication and authorization needs for Salesforce connections and optionally Postman Connections. You can create two apps, or in my case, I just created one to handle both.
App Setup
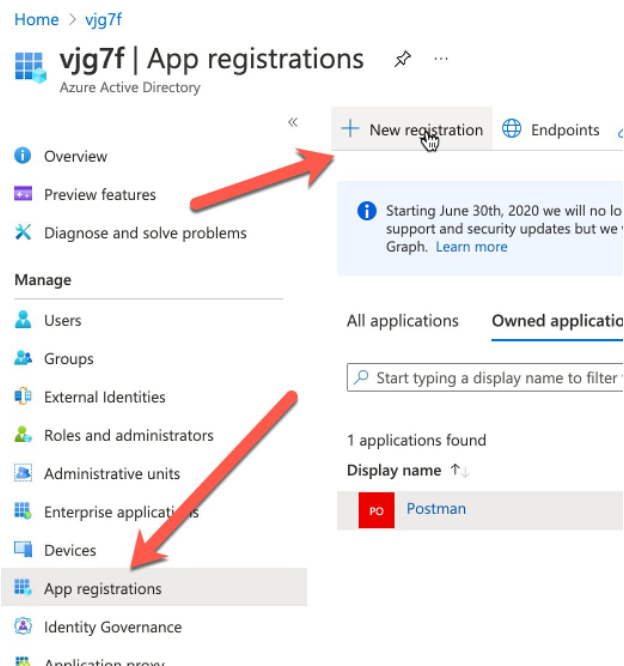
Create a new App from the App Registrations link along the left hand side and click on New Registration
Fill out the form and leave the defaults as they are. We will fill in multiple redirect URI in a later step.
API Permissions Setup
Click on the API Permissions from the left-hand side of the application you have created. (Click the application from the previous step)
Create the API Permissions needed for MS Teams Online Meetings. In addition, add a few extra permissions to ensure the token can be refreshed. The permissions can be found in the Graph API docs. We added a generic one for read and Mail.Read for testing purposes, they are not fully required. Once the permissions are added click on the “Grant Admin Context for … ”. The status will be red until this is done.
In this section we will create the client key and secret which will be used in the Postman and Salesforce integrations to authenticate into Azure and Teams.
Click on the Certificates & Secrets Menu item on the left hand side.
Click on New client secret
Enter a new description and the expiration of the secret. You can choose whatever you like or keep the default.
Copy the Secret Key Value for use later when setting up the authentication sections of Salesforce and Postman
The Secret ID is an Azure ID, it will not be used anywhere. The ID that is used is the Application(client) ID from the application you created. We will show this in detail later.
Authentication Setup
This section covers the Authentication Setup that will be needed. This section will be done when you are ready to setup either Salesforce and/or Postman to Authenticate and setup the redirect URI authorization from the client request. Additionally, the Endpoints needed for authorization and token endpoints locations are covered in this section. If this is the first time through the setup, you most likely won’t have the redirect URI’s available but for document cleanliness, we are keeping the Azure setup all in one section.
Click on the Authentication menu item on the left hand side.
Click on Add a Platform link to add a platform.
Click on Web Platform
Add the redirect URI from your application( the location of these URI’s from Salesforce and Postman will be shown later ).
The image below is an example where the Postman and Salesforce API’s have been added. In this case, 1 Postman and 2 Salesforce Demo Environments are part of this application.
The Endpoints needed for the configuration of the applications can be found on the overview section of the application you have configured. Click on the Endpoints link from the overview and the first two endpoints are used when configuring the authentication.
Salesforce Setup
This section describes the Salesforce Setup needed to access MS Teams. It is strongly advised to setup Postman first to validate and test the API as well as get familiar with the API before jumping into Apex coding setup. This section will consist of Authentication setup, the Named Credential, and the Apex code needed to create a Teams meeting and retrieve a URL. Additionally, this will provide the callback referenced in the Azure section which will be needed to complete the Authentication section in Azure.
Auth. Provider Setup
The first step is to create the Authorization Provider configuration to connect to Azure. You will need the Secret Key(Value) from the Certificate setup in Azure as well as the application id.
Enter Salesforce Setup→Auth.Providers→New
Choose Open ID Connect from the Provider Type drop-down.
Name the Auth Provider.
URL Suffix → Can make the same as the name.
Consumer Key → This is the Application ID from Microsoft Azure. This is found in the Overview Section of your App in MS Azure.
Consumer Secret → This is the Secret Value from the Certificate setup done previously in MS Azure.
Authorization Endpoint URL – This is the OAuth 2.0 Endpoint given in the Azure Setup Above
Token Endpoint URL – This is the OAuth 2.0 token endpoint given in the Azure Setup above.
Default Scopes<optional> – We set the scopes in the named credentials but they could also be set here. In this example we just set the online meeting read/write. When setting the scope, the values are delimited with a space.
Make sure all 3 options are checked for Send Access token in Header, Send client credentials in header, and include customer secret in API response.
Use the defaults for the remainder.
Save
Click on the newly defined Auth Provider to open it up
Copy the Callback URL that is shown in the Salesforce Configuration. If you have Experience Cloud setup and you are using those domains, then add those callback URLs as well to the Azure configuration.
Take the callback URL you copied above and back in the MS Azure AD setup for your application, add this to the redirect section. Do this by clicking on Add URI.
Named Credential
Creating a named credential will perform the authentication to MS Azure and do the Oath validation. Here is where the MS Authenticator is used( I set mine to auto approve ) to validate the OAuth connection. It will prompt you to login to your instance of Azure. The login will be the MS Azure login/id that was created during the setup of the developer instance.
A couple of notes for this setup. The example shown only accesses the one API for creating an online meeting in MS Teams. This could be a general named credential to just the Graph root level and you can append the rest of the API in the code. Alternatively, you can create a named credential for each of the API’s or perhaps the most commonly used ones.
In Setup→Named Credentials click on New
Enter the label and the URL of the API Endpoint you wish to access. In this case, the full API is used for the onLineMeeting for Delegated access. The application access has a different signature.
Identify Type will be Named Principal.
Auth Protocol will be be OAuth 2.0
Select the Auth Provider created in the previous step.
Scope: very important! The scope here will match the scope you created in MS Azure for the application. It is space delimited.
Click Save and this will trigger the actual connection to Azure and validate the Authentication
When you Save, the Oauth flow will initiate.
If successful, you will see Authenticated in the Authentication Status in Salesforce. If it fails, you will get a failure screen from MS Azure.
Common Issue: Used the wrong secret key or id. Double check in the Auth. Provider those are correct.
URL Endpoint is in valid: Check your URL Endpoint. (one reason to use Postman first)
Salesforce Application Code
This section will review the Apex application code needed to make the Rest API call to set up a teams meeting and retrieve the meeting URL from the Teams Server. The code is not production quality but instead is a sample to prove the concepts. The current iteration does not accommodate error handling in a meaningful way nor does it do much more than create a meeting. The goal of this good is to demonstrate the basic connection for customers and proof of concept the meeting invite is ready. The sample code will be in two parts, the first part is a test class that can be used to validate the connection and result. Once that is working, then the 2nd class uses @InvocableMethod so that it can be used in flows. Obviously this can be tailored however desired.
This section does not instruct how to set up command line tools, deploy the source, or other development tasks. It is assumed the reader understands how to deploy, run the developer tools/debugger in Salesforce.
Test Apex Class – Simple Class to Create the Meeting utilizing Named Credentials
public class TestAzure {
/* Test Method for Unit Testing Connection */
public static String getMeetingUrl()
{
HttpRequest req = new HttpRequest();
Http http = new Http();
//Setup the Endpoint and append the name of the file
if ((parser.getCurrentToken() == JSONToken.FIELD_NAME) &&
(parser.getText() == ‘joinWebUrl’)) {
parser.nextToken();
webLink = parser.getText();
System.debug(‘joinWebUrl= ‘ + webLink);
}
}
return webLink;
}
}
Common Issues/Errors
MS Teams will return a 201 in the HTTP Response. This is a success. It is documented in the API
HTTP Error 500 – Internal Server Error
Notice the headers that are set. The MS Graph documentation does not state it explicitly, but in our testing we found that the 2 accept lines need to be in the header when sending the request. You need to add the gzip, etc and the “*/*” accept lines.
401 – The 401 unauthorized generally means the scope is incorrect in the Named Credential or both in the Named Credential or the Azure setup. Make sure the permissions are correct and the scope is space delimited.
403 – Forbidden – This occurs when the secret keys are incorrect. You should have fixed this when you saved the name credential so it shouldn’t show up.
Note: When using the Apex Debugger – Look for the debug line to joinWebURL populated with a long string for the meeting. It will start with something like this: 12:40:52:477 USER_DEBUG [37]|DEBUG|joinWebUrl= https://teams.microsoft.com/l/meetup-join/19%3am
Salesforce InvocableMethod Class Utilizing the Apex Code and Callout
This is the actual code used in the demonstration. This code is accessible in the Flow Builder inside of Salesforce as an Apex Action.
global class GetTeamsMeetingURL {
@InvocableMethod(label=’Get MS Teams Meeting URL’ description=’Returns a meeting URL For MS Teams’)
global static List<String> makeApiCallout(List<List<String>> inputTeamsParms)
{
// Setup the HTTP Initial Request
HttpRequest req = new HttpRequest();
Http http = new Http();
//Setup the Headers, format the body, and call the MS Graph API
if ((parser.getCurrentToken() == JSONToken.FIELD_NAME) &&
(parser.getText() == ‘joinWebUrl’)) {
parser.nextToken();
webLink = parser.getText();
System.debug(‘joinWebUrl= ‘ + webLink);
}
}
// Apex Actions Return. The method signature for invocable method requires a List of Strings to be returned.
return new List<String>{webLink};
}
}
Salesforce User Experience Setup
This section is optional but describes how the above code can be accessed in the low-code building tools inside of Salesforce.
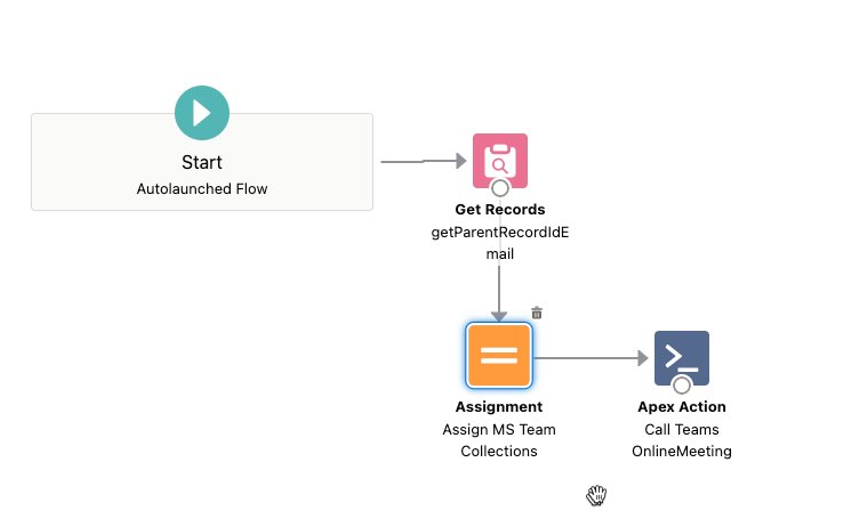
This section in a flow shows how this action is called to retrieve a URL for the MS Team Meeting and then assigns it to a Record in Salesforce. A larger flow will then do further processing as part of a full scheduling flow. The takeaway is that the Apex Code above is an option to drag and drop into the low code builder and use it when running a flow. It could also be embedded within a Lightning Web Component(LWC) and used in other places. Lastly, it can always be accessed from another Apex Class to get the required information.
Postman Setup
This section describes how to setup Postman to access MS Graph API and test the API integration outside of Salesforce in a developer-centric manner. This is completely optional, but oftentimes if it works in Postman and not in another application or Salesforce, you can see what is different in Postman versus the other applications. This tutorial assumes the reader is familiar with Postman and has downloaded the application or is using the web version. This document will use the desktop installation for reference. This section does not require knowledge of the Salesforce Setup. We recommend starting with Postman before the setup in Salesforce.
To make life easier, download the Postman Collection already created for MS Graph. It does not contain the Teams integration unfortunately, but it does have a big chunk of other API’s that can be used to make sure the authorization is all setup as well as plenty of examples. To do so:
Click on Explore on the Menu at the Top of Postman
Search for MS Graph Workspace
It will be either MS Graph or MS Graph Fork Workspace
You can also find it by clicking on Workspaces and scrolling to it.
Create a new Fork from either the Graph or the Fork Graph – Right click on the Microsoft Graph Space to get the Fork Option
You should end up with something like this in your My Workspace or wherever you saved the forked Graph Collection to.
What this provides is a whole list of MS Graph APIs broken up into folders. In our testing, we used Delegated to validate with.
Setup Postman Authentication
Setting up Authentication is straightforward and will require the client id and secret key from the MS Azure setup done previously. Additionally, you will need to add the callback URL to the Authentication section in MS Azure. You also need to set up Environment variables as part of this step.
Setup Environment Variables
Postman needs to pass in environment variables to the headers in the API. To set these up, create a new environment to be used with MS Graph.
Click on Environments on the left hand side of Postman and click the Plus sign at the top of the environment list
Name your Environment and add in the 3 values needed
ClientID – This will be the Application ID of the App you created in MS Azure.
Client Secret – This will be the Secret Value created in the Client Secret step of Azure
TenantID – This is the tenant id found in the overview of your app.
Now that you have set up the environment variables – make sure to make that environment your active environment. It should show up here. You can access it from the drop down as well.
Setup Authentication
Click on the Delegated Folder in the MS Graph Collection on the left hand side of Postman. This will bring up the Authorization Screen.
Selection OAuth2.0 from the drop down.
Select Add Auth data to the Request Headers
Access Token → Available Tokens ( this will get filled in later )
Header Prefix – Bearer
Configure New Token Section
Token Name – Fill in something for this
Grant Type – Authorization Code
Leave the rest defaulted.
3. It will look much like this after filling out.
Set the Callback URL in MS Azure – Note: This step must be done or your auth will fail. Take the Callback URL above with the oauth URL for Postman and add it to the Callback URLs in your application in MS Azure.
Get a New Access Token – Use this to debug whether you can get authorized or not and once authorized use the token.
Click on the Get New Access Token at the bottom of this screen in Postman on the Authorization screen.
This will kick off the OAuth Flow, which will have you login to MS Azure and Authenticate. I used the Microsoft Authenticator download to my phone for MFA purposes which makes this more automatic.
Note: This is where if you have an incorrect setup, you’ll get a bunch of errors. Check your setup against the above, do you have the right token id?
You will go through the screens until you get a very long access token. Click on the Use Token button.
Create and Run the MS Graph Online Meeting API
Although there are several Teams APIs in the Team Folder, they are chat related versus the Online Meeting. We need to create a new API for the OnlineMeeting to be accessed. In this section we will cover creating the new API, adding parameters, and testing the API.
Navigate to the Teams Folder
Click New at the Top( or right click to add a request ) and add a new Web HTTP Request
Switch the type from GET to POST
Put in the name of the method in the POST
On the Body, use the JSON application type.
Add the body in JSON format, Subject was added for the example.
Click Send
Results are shown below from the meeting when successful.
https://unofficialsf.com/wp-content/uploads/2022/09/largeUCSF-300x133.png00Sunilhttps://unofficialsf.com/wp-content/uploads/2022/09/largeUCSF-300x133.pngSunil2022-05-24 05:57:032022-05-24 06:35:14From Brad Shively: Create MS Team Meetings from Salesforce (with Salesforce Scheduler)