From Chris Albanese: VRA Scheduling – Use Salesforce Scheduler and Visual Remote Assistant to provide virtual meetings
Salesforce Visual Remote Assistant (VRA) allows you to provide immediate assistance to your customers and employees over video chat. You can find much more information on VRA on Salesforce’s website at https://www.salesforce.com/products/service-cloud/features/visual-remote-assistant/
With the Winter ’22 release, VRA introduced a new feature to facilitate the scheduling of virtual appointments between agents or mobile workers and customers with Visual Remote Assistant. This means that if you are using Salesforce Field Service (SFS) or Salesforce Scheduler (Scheduler) you can now have VRA meetings automatically generated and shared with your customer at the time of appointment scheduling. For example, your customer can create an appointment today for a meeting next Tuesday at 9:00AM. When the appointment is created, the customer is sent a link for the Virtual Meeting that they will use at the time of the meeting.
Check out some more details on this below.
What comes in the VRA Scheduling package?
For customers who have purchased VRA and either SFS or Scheduler or both:
- A separate managed package installed on top of VRA that contains the VRA Scheduling capabilities
- Experience Cloud Lobby Component
- for the user to await the start of the meeting
- Service Appointment Component for VRA Scheduling
- generates pop up reminder at time of appointment when the agent opens the Service Appointment
- Custom Notification
- to remind the Service Appointment Assigned Resource (agent) of their upcoming meeting
- Session Lobby Invite object
- Additions to the Visual Configuration setup screens to manage this feature
- Experience Cloud Lobby Component
- See VRA Installation and Configuration Manual and VRA Admin Manual for more info
Quick Video of it in action
See this video which illustrates what it can look like after a few simple configuration steps
Setting up VRA Scheduling for Salesforce Scheduler
Preliminary Things
- Make sure Scheduler is enabled in your org
- Determine when you want to generate VRA Scheduled Appointments
- For example, if a user selects an Appointment Type of Video this would trigger the creation of the VRA Lobby Link
- Plan a confirmation and reminder strategy
- VRA Scheduling comes with a flow that you can use to send the initial confirmation via email
- You may want to also send a reminder notification to your customer prior to the meeting, such as 1 hour before
- Enable Digital Engagement so you can send SMS messages for the confirmation and reminder notifications
- Install the latest versions of the packages
- VRA package – https://sfdc.co/visualremoteassistant-install
- VRA Scheduling package – https://sfdc.co/VRA-scheduling
Object Model Changes
I made 2 small changes to the Service Appointment Object to add 2 text fields. This was done to simplify the sending of an SMS Message to the customer when scheduling a new virtual Service Appointment.
- First Name – this text field stores the first name of the contact associated with the Service Appointment
- Lobby Link – this text field stores the Session Lobby Invite url
Flow Setup
VRA Manage Lobby Invites
Configure the flow called VRA Manage Lobby Invites to meet your needs. This flow is configured out of the box to create, update and delete Session Lobby Invites based on the life cycle of a Service Appointment. You need to tailor the trigger criteria and the decision criteria to meet your needs.
Trigger Criteria
The flow triggers on Service Appointment and provides criteria that you can tailor. For Scheduler, I removed the work type criteria that is present and replaced it with Appointment Type = Virtual. Whenever a Service Appointment with Appointment Type = Virtual, this flow will fire.

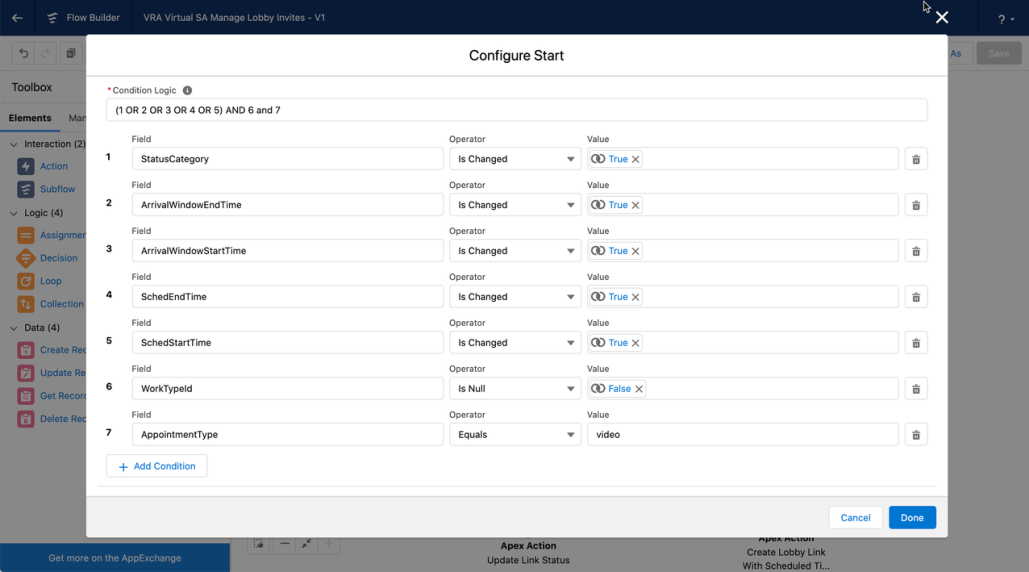
My criteria which is based on Appointment Type. Only Service Appointments with Appointment Type = video (this is the API value for Virtual meetings) will trigger this flow
Decision Criteria
The out of the box flow will create Session Lobby Link records when the Service Appointment is Dispatched. This applies nicely for Salesforce Field Service. For Scheduler, this may or may not apply, so edit this accordingly. I left this as is and created a supplemental flow (below this screen shot).

Supplemental Flow
I created an additional flow to accomplish 2 things: 1) make sure the SA has an email and phone saved to it and 2) change the status to Dispatched. This is to trigger the VRA Manage Lobby Invites flow.

It’s a triggered flow on SA whenever the SA is created and the Contact Id is present but the email address is not
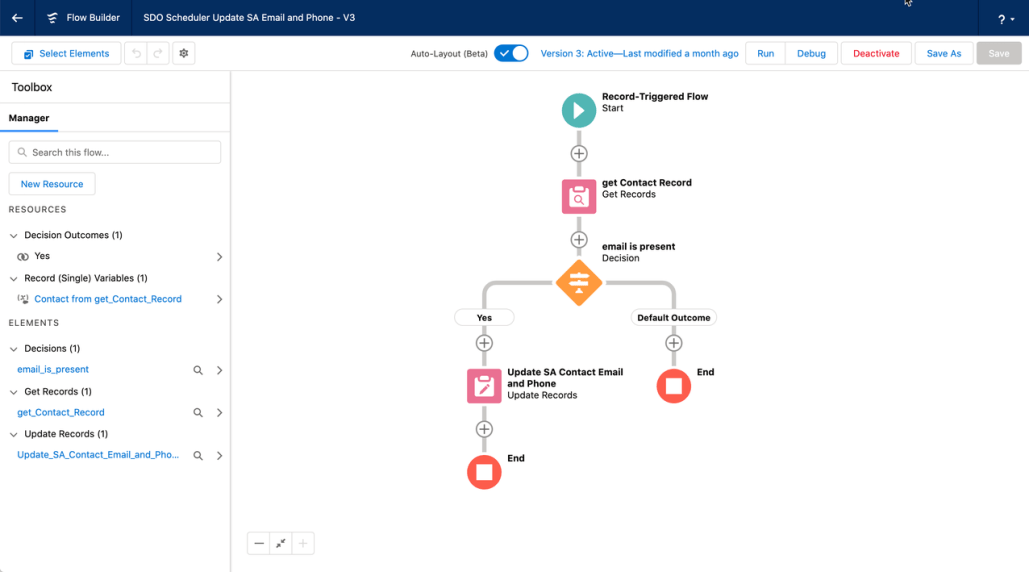
Overview of flow. It retrieves the contact record from the SA and then updates the SA’s status, email and phone.

Update the SA status, email and phone
Session Lobby Link update flow
This is an additional flow which updates the lobby link to precisely share with the customer the experience site page containing the Lobby component. Out of the box, the link generated points to the experience site home page. This flow allowed me to put the Lobby component on a specific experience site page. This is not required, but it provided me with flexibility to put the lobby component on any page.

Overview of flow. Note that the last step is a Messaging Notification action to send an SMS message to the customer.

Updating the Lobby Link to the desired experience site page

Details of the formula used. It’s a simple text substitution to insert the specific experience site page. In my example, I placed the lobby component on a page called vra-lobby, so I’ve inserted that value into the url.
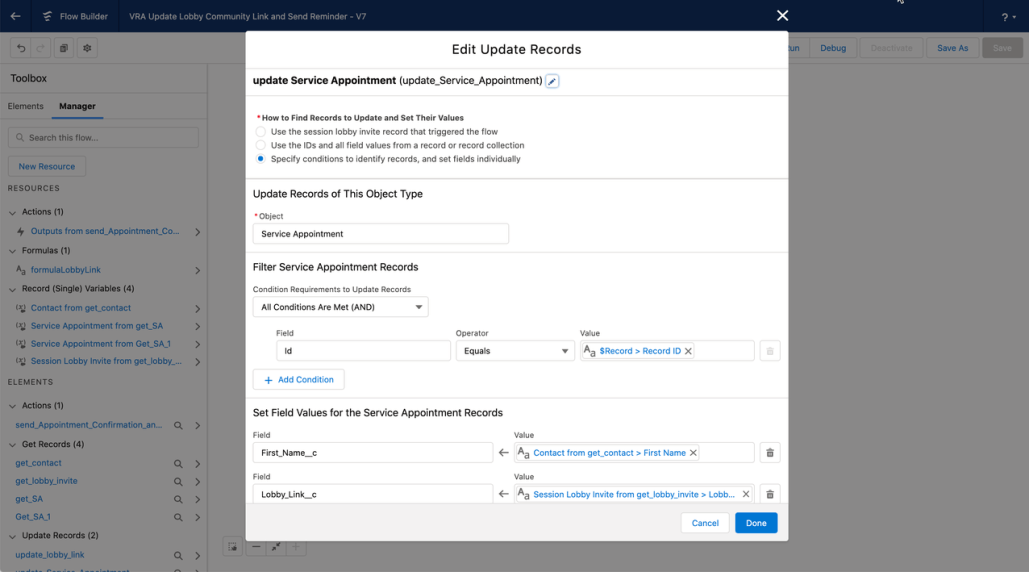
Updating the Service Appointment. In this step, I retrieve the Service Appointment using the Session Lobby Invite field called Record Id (not to be confused with Id). I’m updating my 2 custom fields to make the SMS messaging template easier to construct.
Messaging Template
This is the template I used. You can see I’m using the custom fields I created for First Name and the Lobby Link as well as the appointment start time.

Experience Cloud Changes
This was a simple change. I added a new page to my experience site called vra-lobby. I placed the Lobby Component on that page. I made sure that the page was accessible to a guest user.

Service Appointment Page Reminder Component
Add the Service Appointment reminder component to the Service Appointment page. This component requires no parameters. It generates a pop up notification when opening the SA to remind the user there is a virtual session that needs to start.

Summary
VRA Scheduling makes it easy to provide customers with links to a 2 way video session when scheduling an appointment.
Additional Notes about this Example
This is just a concept illustrator. You may want to add additional logic to your flows to send reminders to the customer along the channel of their choice. I’ve used SMS in my example, but making this more generic to support additional channels is recommended.
Appointment Reminders for the customer are not depicted in this example, but these would be easy to set up with a flow.