
How to Include Chatter Posts on Printable Views
![]()
In Spring ’19 Salesforce added a Printable View button to many Standard and all Custom Objects. The Printable View includes the current user’s page layout and related lists. What it does not include are any Posts that users have added to the Chatter Feed.
In this Blog Post, I’ll show you how to add a button to your Lightning Record Page that will create your Printable View including Chatter Posts.

This post covers how to add this capability to the Case object. You can apply all of these same steps to support this feature in other objects of your choice.
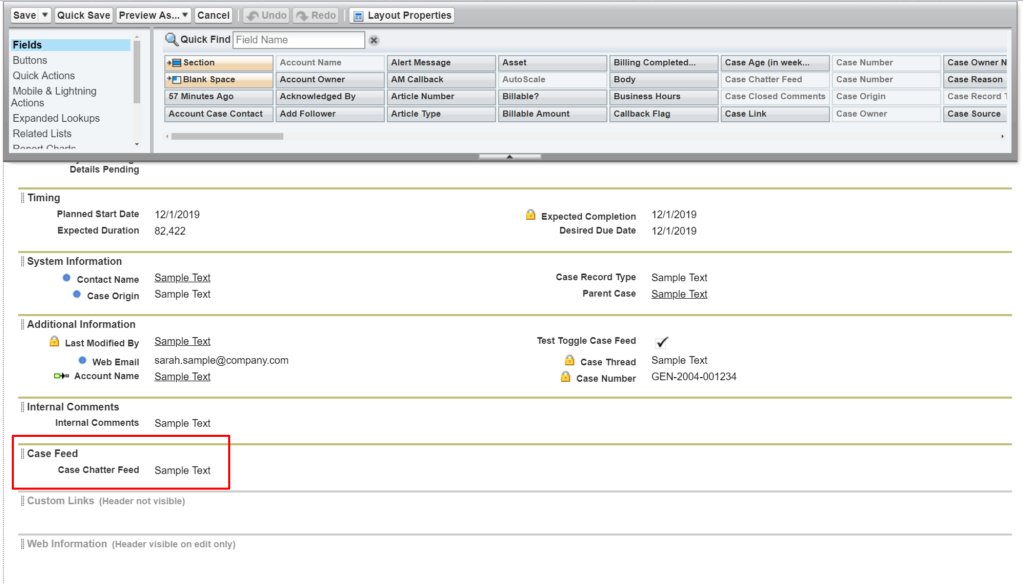
The first step is to add a custom field to Case to store the details from the Chatter Posts.
Here I create a Rich Text field called Case Chatter Feed with a default length of 32,768 characters.

The next step is to update my Page Layout to include this new field. In this example, I have also added a new Section to put it in.
Now, when I want to create a new Printable View of my record, I must first populate this field with the current content of the record’s Chatter Feed. I can handle this step by running a Flow. The only attribute I need to pass into this Flow is the record ID (varCaseId) from the Case page.

In this body of this Flow I get all of the user created Chatter Posts and Comments and insert them into my new custom field. Later in this post I will show you how the first and last steps in this Flow tie everything together.

In the first Get Records step, I get all Feed Item records related to the Case and specify the fields I will be using later in the Flow.


I then Loop through each of those Feed Items by referencing the collection variable {!Get_Feed_Item_Records} that was automatically created by the Get Records step. Here I also create a new single Record variable {!loopFeedItem} to store each record inside of the loop.


In the Decision step, I skip any Feed Items records with a blank body. This way I’m only processing user created posts. You can modify this logic if you want to include more details.


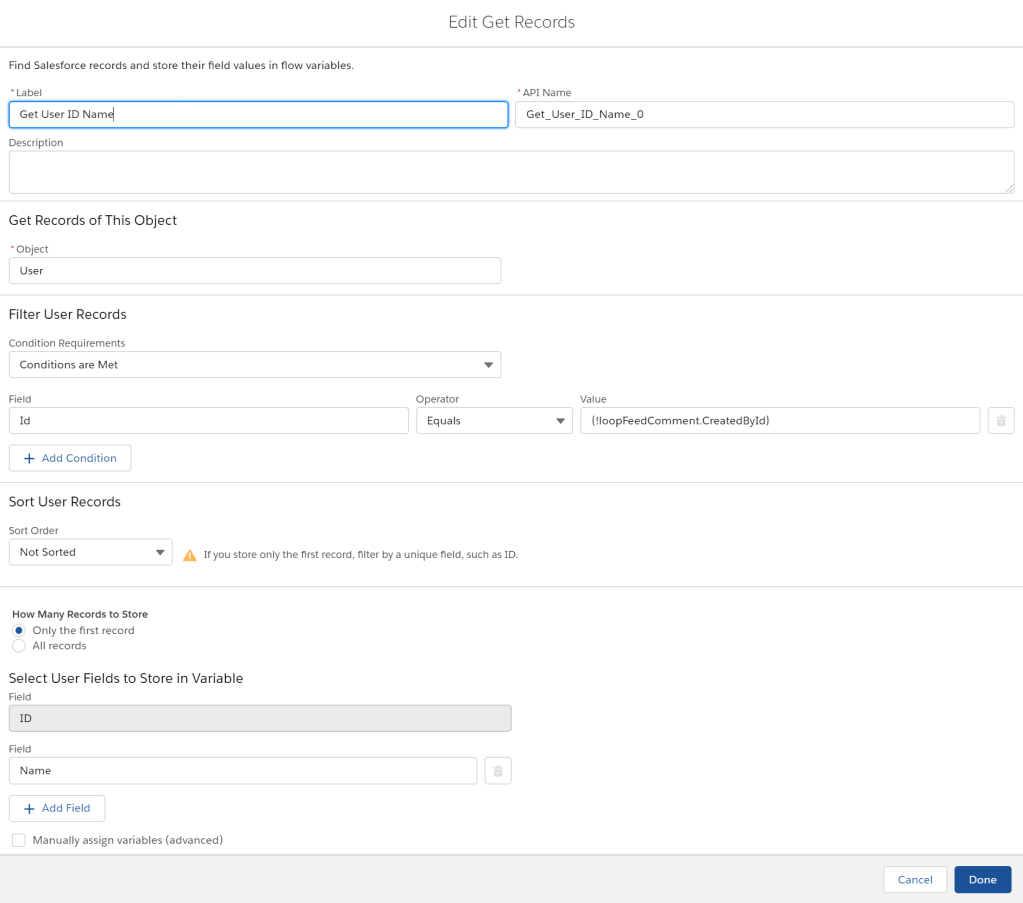
Because the Feed Item records only include the user’s ID, I use a Get Records step to get the user’s name to include in my Chatter Feed field.


In the Assignment step, I build out each of the Feed Item fields I want to show as part of the Post as well as the formatting of the information. This is done by using the Add operator to build out the full feed one piece at a time.

We end up turning this from the Chatter Feed:

Into this in our custom field:

I’ve used a combination of Formula resources and Text Template resources to build out each post.
- ttLineSeparator (Text Template)
- ~
~
- ~
- fSpaceSeparator (Text Formula)
- ” | “

For each Feed Item I do another Get Records to find any Feed Comments associated with the current Feed Item.


I then Loop through each of those Feed Comments by referencing the collection variable {!Get_Feed_Comment_Records} that was automatically created by the previous Get Records step. Here I also create a new single Record variable {!loopFeedComment} to store each record inside of the loop.


Just like I did with Feed Items, I skip any Feed Comments with a blank body in the Decision step.


Because the Feed Comment records only include the user’s ID, I use a Get Records step to get the user’s name to include in my Chatter Feed field.

I continue to build out my chatter posts field by adding Feed Comments and formatting in the Assignment step.

Here I’ve used some additional formatting variables.
- ttCommentSeperator (Text Template)
- .
- fCommentIndent (Text Formula)
- ” —– “

After the Feed Comment Loop is completed, I add one more Assignment step to add a separator before the next Feed Item.

- ttItemSeparator (Text Template)
- ______________________________________________________________________________________________

After the outer Feed Item Loop is finally completed, I add one more Assignment step to cleanup the separations between the lines.
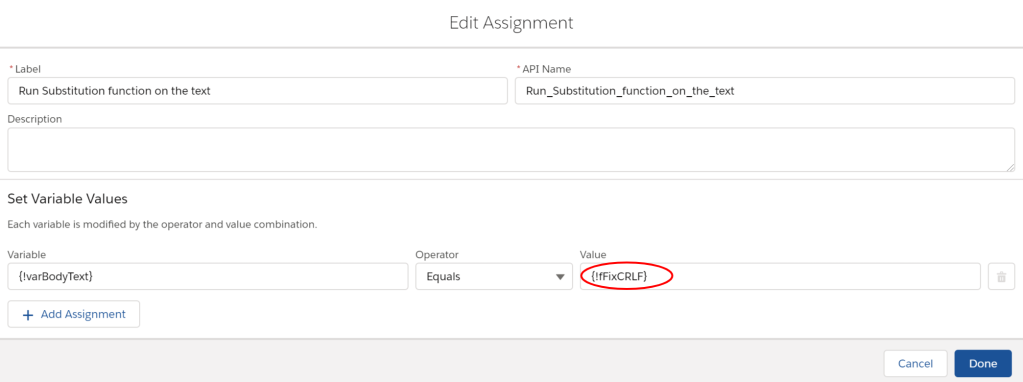
This is a little trick you can use to put line separators (Carriage Return, Line Feed) inside of a text field. Text Templates support separate lines but they can’t contain just a single separator so my ttLineSeparator Text Template includes a single special character on each line that get removed by my fFixCRLF Formula.
- ttLineSeparator (Text Template)
- ~
~
- ~
- fFixCRLF (Text Formula)
- SUBSTITUTE({!varBodyText},”~”,””)

The last piece needed to get my Chatter Posts into the Case record so they can be displayed is to add an Update Records step to save the record with the newly built Chatter Feed details.

Now I will show you how to add a couple more pieces to this Flow so we can use it on a Lightning Record Page and have it open a new Tab with the Printable View.
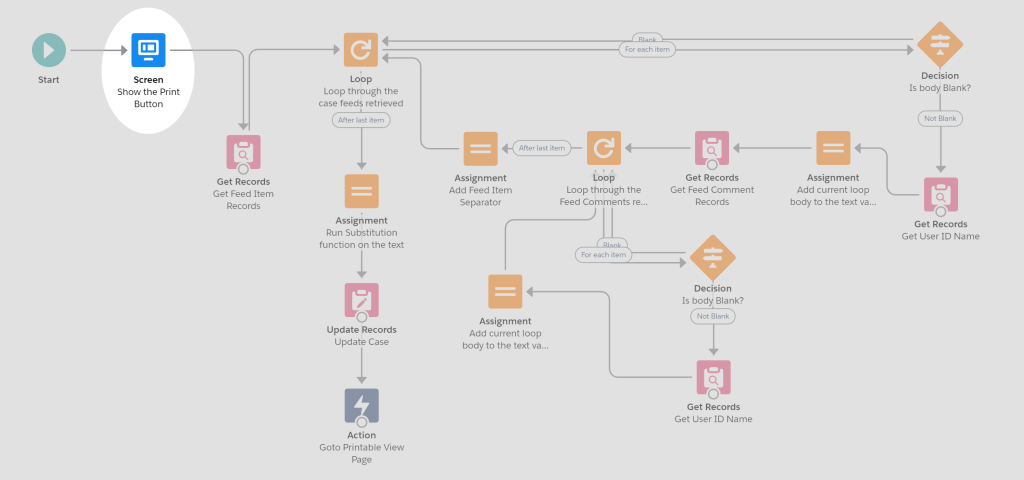
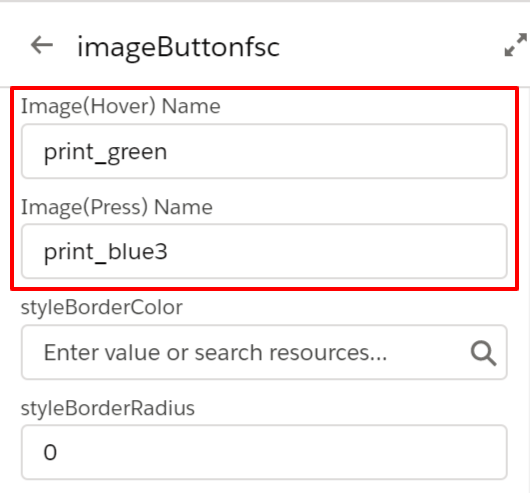
I want to put this Flow on the Case Lightning Record Page but I don’t want it to run until selected by the user. I handle this by adding a Screen to the beginning of the Flow that displays a custom image and waits until the user clicks on it before continuing with the rest of the Flow. Here I’m using the Image Button Flow Screen Component from unofficialsf.com. I’ve added the display, hover and pressed images for the button as Static Resources to my org so they can be referenced by the Image Button component. (Follow the Image Button link for complete documentation on this component)


The final step in my Flow is an Action that opens a new Tab with the URL for the Printable View of the Case record. Here I’m using another component from unofficialsf.com. This one is the Open URL Flow Action. (Follow the Open URL link for complete documentation on this component)

The URL for the Printable View is created with a formula that combines the Base URL for the running org with the Case Record Id and the Printable View URL identifier.
- fPrintableViewURL (Text Formula)
- LEFT({!$Api.Partner_Server_URL_340}, FIND(‘/services’, {!$Api.Partner_Server_URL_340})) & {!varCaseId} & “/p”
All I need to do now is to activate then add this Flow to the Case Lightning Record Page and configure it to pass in the recordId to my varCaseId input variable.

I’ve created a couple of Installation Packages for those who want to try this out in their orgs. The first package includes both the Image Button and Open URL components. That package will only install in your org if you have neither of those components already installed. The second package does not include those components and the provided Flow must be edited to access them. I’ve provided instructions in the Flow showing how to do that.
1 – Install Package with Custom Case Field, Components, Image Static Resources and Sample Flow
Post Package Install Instructions
- Add the new field ( Case Chatter Feed ) to the Case Page Layout
- Activate the Flow ( Case – Printable View with Chatter Posts )
- Add the Flow to the Case Lightning Record Page
2 – Install Package with Custom Case Field, Image Static Resources and Sample Flow (No Components)
Post Package Install Instructions
- Make sure you have the current version installed for the Image Button component
- Make sure you have the current version installed for the Open URL component
- Add the new field ( Case Chatter Feed ) to the Case Page Layout
- Edit the Flow ( Case – Printable View with Chatter Posts – Template )
- See the instructions in the 2 Flow Screen elements
- Activate the Flow
- Add the Flow to the Case Lightning Record Page

