
Screen Actions: The Final Piece of the Screen Flow Reactivity Journey
I thought I would take the time to do a writeup about Screen Actions just in case anybody has missed the latest innovation in Screen Flows.
When my team started the journey to create more dynamic screen flows with reactivity, we knew that when we were done, we’d be unlocking a staggering amount of power for people at a development speed unheard of elsewhere in the industry.

Reactivity Couldn’t Get Data When Needed Without Help from LWCs
After many years in development and a long pilot, we finally launched reactivity in the Winter ’24 release. With it, you could for the first time watch formulas calculate in real time and create more modular LWCs thanks to inter-component communication. Woot!
What it lacked, though, was the ability to retrieve data from outside of the screen. This meant you couldn’t do things like search for records and display the results in real time, show dependent records, perform complex validation against other records, or make callouts to external systems and display the results in the same screen.
Below is an illustration I put together for Dreamforce that shows our reactivity journey so far.

Screen Actions Use Autolaunched Flows to Bring Data Into Your Screen
Action Buttons (GA in Winter ’25)
The Action Button component, first introduced as a beta in the Summer ’24 release, allows you to run autolaunched flows directly from flow screens at the press of a button. This means you can perform actions, like retrieving data or making calculations, without navigating away from the current screen. It vastly simplifies the user experience by keeping everything in one place – reducing cognitive load and making form completion a breeze.

But what if you didn’t want to have to press a button? Enter Reactive Screen Actions.
Reactive Screen Actions (Beta in Spring ’25)
Thanks in large part to the wild success of Josh Dayment’s Data Fetcher screen component, we decided to prioritize a buttonless variant of our powerful Action Button feature.
Coming soon, you will no longer need a button to trigger these powerful screen actions!
How to Add a Reactive Screen Action in the Upcoming Spring ’25 Release
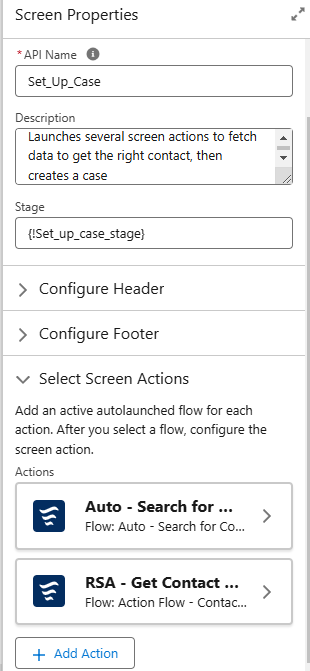
If you’ve set up an Action Button, the process for creating a buttonless flavor of this will be nearly identical. You will find your screen action list in the Screen Properties panel.
From here, the process will be nearly identical to action buttons. Salesforce Support put together a great little video showing it off: https://www.youtube.com/watch?v=GS5GAFHpVGk
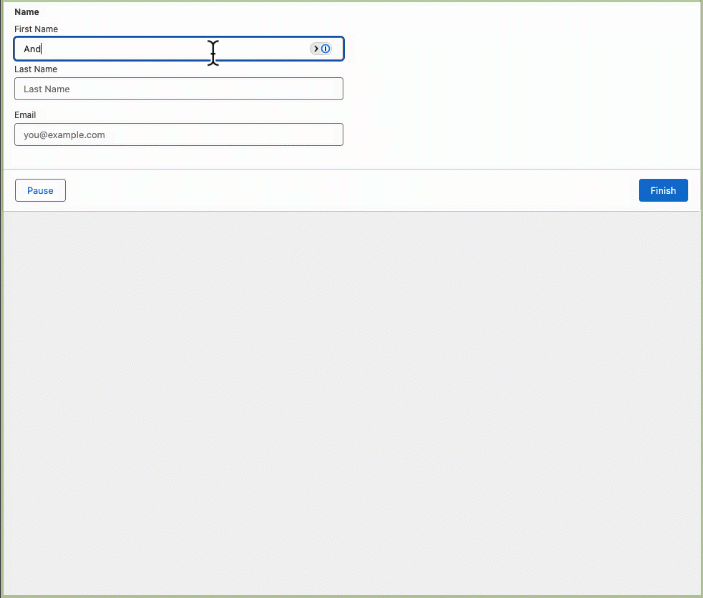
Below you can see a configured screen action that uses a text input as its input. Whenever a user types into the text input, it will trigger the flow to run.

Here you can see a configured screen action that uses a text input as its input. Whenever a user types into the text input, it will trigger the flow to run.
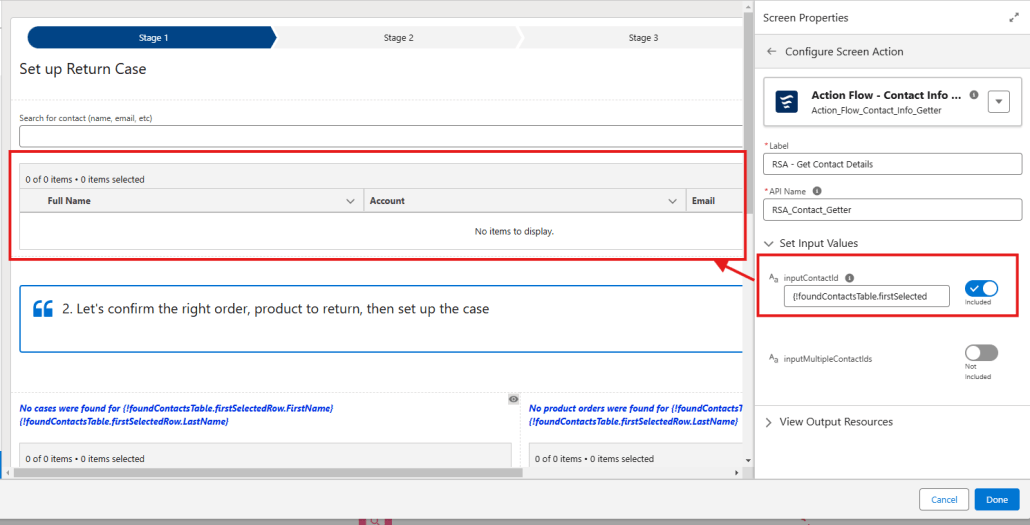
Similarly in the example below, when a change in a data table’s selected row happens, the reactive screen action fires off and its outputs are then available anywhere in the screen to be used.
Reactive Screen Actions GA Feature Target List
Below are some things we are targeting for GA (safe harbor, of course):
- Conditions for Firing: Currently these actions will always fire whenever an input into the action changes values. That’s not always desirable, so we will be adding the ability for you to set when these should be allowed to fire using the same condition-building experience UI as Conditional Visibility.
- Revisited Screen Behavior Config: Currently when you go back a screen, then forward, reactive screen actions are fired when the screen loads. This new setting will allow you to configure whether to fire the action when this new setting is checked.
- Chaining of Actions: We’ll be adding better support for chaining reactive screen actions together – having the output for one reactive screen actions be the input of another
- Error Messaging: Displaying a toast message and an error at the top of the screen when an error is encountered. The goal is to also be able to configure whether you want to show an error or not.
- Descriptions for Screen Actions: For both Action Buttons and these new reactive screen actions, we’ll be adding a description field to enable you to describe the role each of these actions has on your screen. As many of you know, descriptions are also critical for AI training so this is an important addition.
When to use Action Buttons vs Reactive Screen Actions
Use Action Buttons when:
- You need to conditionally execute screen actions, typically through disabling the button until the expected inputs are ready or by using conditional visibility on the button itself
- Perform callouts or execute flows that may take an unknown amount of time to complete
Use Reactive Screen Actions when:
- Form completion speed is top priority (i.e. you don’t want a button)
- You expect execution time will be quick, typically less than 2 seconds
- You don’t need progress indicators shown to your user
Data Safety in Reactive Screens
We worked hard to put together thorough documentation on good data safety practices when working with screen flows – especially screen actions. Make sure you read through these two articles, ESPECIALLY if you are enabling system context:
Data Safety When Running (Help) Screen and Autolaunched Flows in System Context
Building Secure Screen Flows For External User Access
Use Cases
There are far too many use cases for screen actions to list here, but here are just a small, small sample of use cases to inspire you.
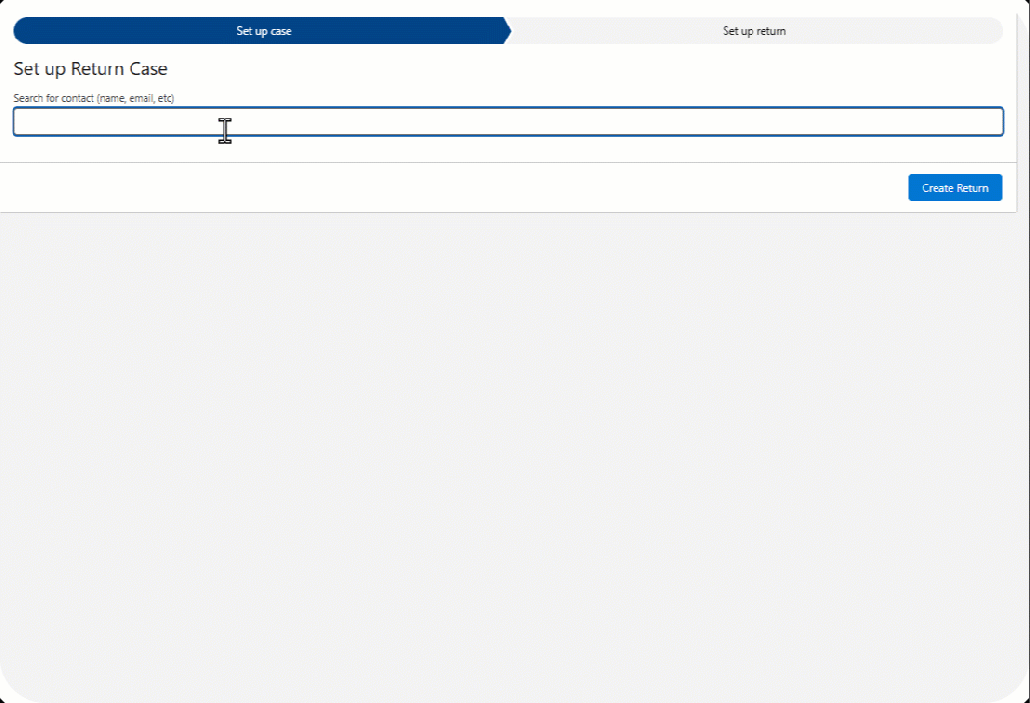
Search for Records
Automatically search for records a Data Table of knowledge base articles, contacts, or cases based on somebody typing in a search term or selecting filter criteria (i.e Case status or Case Owner)
Perform Complex Validation Based on Records
Run an action to compare and validate the user-entered data to data outside of the screen. Common examples include scanning for duplicates on a provided email address or validating addresses.
Run an action to compare and validate the user-entered data to data outside of the screen. Common examples include scanning for duplicates on a provided email address or validating addresses.
Create Your Own Dependent Picklists Based on Records
Automatically retrieve and display related records when a parent or parent records are selected in a Data Table or Choice component.

Make Callouts to External Systems and Keep People on the Same Screen
Trigger an autolaunched flow that makes a callout using our standard HTTP Callout action, transform it, then put the results back into the same screen.

Summarize Selections in a Data Table
Perform math, logic, or honestly anything you want based on the selected rows in a data table. Watch as we calculate an amount, the earliest date selected, and even related records for the retrieved opportunities – all in a single flow.
