
Build your first Omni Flow
So, you’re ready to build your first Omni Flow? Here’s a quick blog post to walk you through some of the basics. We’ll set up routing for a Case, but the fundamentals here will be true for other channels like Voice, Chat, SMS, Leads, Custom objects, or whatever you want to route.
In your Omni Flow, you’ll see we’ve exposed all of the Omni inputs as Actions on the left hand pallet. Now you’ll have complete flexibility to use any logic you like to determine what those inputs to the routing engine are, Queue/Skills/Agent, Priority, Size, you name it. Plus also, because it’s a flow, you can encapsulate all of your other business logic for the channel in here as well, like Creating a Case or linking the Contact.
You’ll also see some exciting new features that are only available in Omni Flow, like routing Direct to an Agent, or defining Screen Pop rules.
Either follow the steps below, or watch the video guide at the bottom of the post. Either way, you should be up and running in less than 10 minutes!
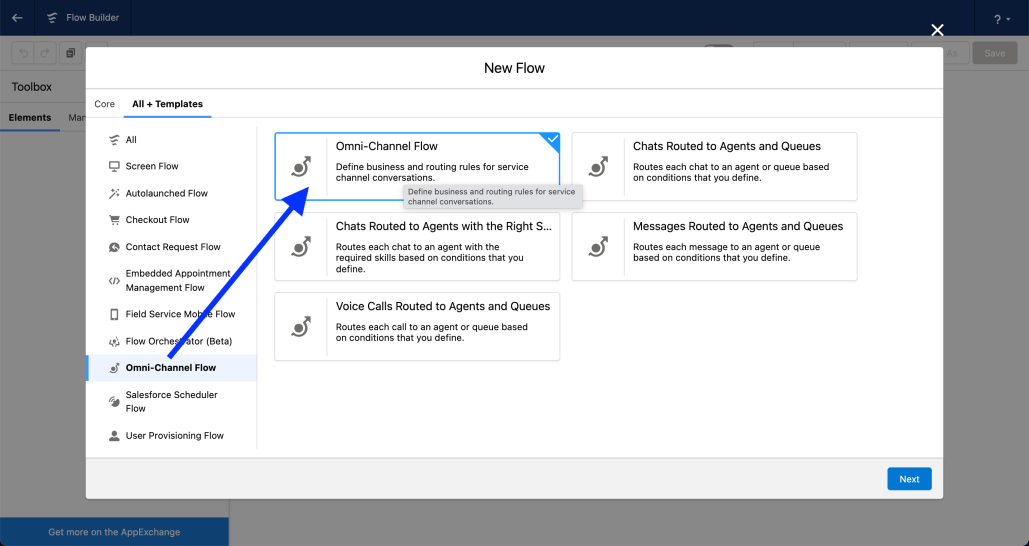
Create the Flow
Let’s start with the basics. There’s now a dedicated Flow type of Omni Flow to help you get started. (though some of the actions we’re about to see can be used in other Flows like autolaunched, record-changed, or screen flows).
Go to Setup→Flows, hit new Flow, then in All+Templates section create a new/blank Omni-Channel Flow.

Overview of the Actions
There are three key actions on the left hand-side (with more to come, and access to all other standard Flow actions)
- Route Work – This is where you define the routing requirements:
- What Queue, Skills, Agent to go to,
- What the size or priority of the work is,
- etc.
- Add Skill Requirements – Helps you to build up a list of Skill requirements for Skills-based routing
- Add Screen Pop – Define what records will open on the screen when the agent accepts the work
Quick Guide
I’ll write other posts on more complex scenarios, but just to get you started we’ll show how to build a quick bit of Queue based routing logic. In this scenario we’ll check for some keywords in the Case.
Step 1: Define Flow input variables
Once created, you’ll need to define an input variable to get in the ID of the work item that you plan to route. Optionally, you can also pass in the record itself. These aren’t critical for Case routing as you could manually grab the ID if you wanted, but for the real-time channels like Voice or Chat they’re passed in and so you’ll need to define them to be able to use them later.
- recordId – type Text
- input_record – type Record

Step 2: Add some routing logic to the Flow
Let’s grab a decision node and check the Case subject. Here I made one that looks for some keywords like Billing or Tech Support.

Step 3: Route the work
Herein lies the fun part. Drag on the Route Work action where we’ll see a whole range of inputs to decide where we want to route the Case, and it’s priority.
Some key things to define:
- Record ID – this is the ID of the Work Item to route
- use the recordId variable from before
- Service Channel – the object type that we’re routing
- select ‘Cases’ or whatever you’ve named your Case Service Channel
- Route to – the type of routing you want to use (Queue, Skills, Direct to Agent)
- select Queue here
- Queue – the name of the Queue that you want
- Use the lookup and pick a Queue from your org to route to

Step 4 (last one): Invoke the Omni Flow
For real-time channels like Chat, Messaging, or Voice you can define the Omni Flow to run from their setup screens.
For other objects like Cases, Leads, or Custom-objects though you can invoke routing at any point, so here we’ll just use a trigger flow to kick it off whenever the case is created. Alternatively you might build a screen flow for transfer, or another record triggered flow to route whenever a customer re-opens the case. The world is your oyster.
We can kick off the Omni Flow as a sub-flow, just make sure to pass in the Case ID to the recordId input variable!

Finished
And with that, you’re good to go. Create a Case and test it. Then come back and share what you built, or read some other posts for more advanced scenarios like Skills-based routing, or the exciting new Direct to Agent routing options!
Video Guide