Tag Archive for: Scheduler Setup

FROM ROHIT GAMBHIR: UNLEASH THE POTENTIAL OF SCHEDULER AND AGENTFORCE

Introduction

Salesforce Scheduler just got a major upgrade with new capabilities powered by Agentforce and it’s a game-changer for appointment booking. Whether you’re helping customers over chat or guiding them through a self-service flow, Agentforce makes it easier for agents to schedule appointments quickly and naturally. In this blog, we’ll walk through a few powerful ways to enhance that experience like making search smarter and conversations more human, so your team can deliver faster, more intuitive service.


Note: Generative AI is a tool that helps you be more creative, productive, and make smarter business decisions. This technology isn’t a replacement for human judgment. You’re ultimately responsible for any LLM-generated response you share with your customers. Whether text is human- or LLM-generated, your customers associate it with your organization’s brand and use it to make decisions. So it’s important to make sure that LLM-generated responses intended for external audiences are accurate and helpful, and that they and align with your company’s values, voice, and tone.


Enhancing Search Accuracy for Appointment Topics and Locations

Salesforce Scheduler’s agent actions and topic already provide smart fuzzy searching across fields on objects like WorkTypeGroup, WorkType, ServiceResource and ServiceTerritory. But sometimes users describe things differently than how they’re stored. For example, someone might search for “Mortgage Services” when the actual Work Type/Work Type Group is “Loan Management” or they may reference a local landmark instead of a formal service territory name or zip-code.
To improve this search experience, especially when the standard fields (like Name) aren’t enough, you can add indexed custom text fields to help the system understand synonyms or alternate terms.

How to Improve Search with Custom Keywords

  1. Identify the Right Objects
    Focus on enhancing these three key objects:
    • Service Territory (for locations)
    • Work Type and Work Type Group (for appointment topics)
  2. Create Custom Indexed Fields for Keywords. (For Reference: Salesforce Help: Create Custom Fields.)
  3. Add custom text fields to capture synonyms, alternate terms, or location hints. Be sure to mark them as indexed.
  4. Populate the Fields:
    • Use data loads, manual entries, or automation to fill these fields with meaningful keywords or common phrases users might say.

What Happens Behind the Scenes (Developer Note)

When the AI agent or system performs a fuzzy search, Salesforce internally uses SOSL (Salesforce Object Search Language). If you’ve added the keyword fields, the system can conceptually perform queries like:

FIND 'Bay Area* OR Sunnyvale OR Highway 101*' IN ALL FIELDS, TerritoryKeywords__c 
RETURNING ServiceTerritory(Id, Name)
FIND 'Loan Management* OR Mortgage Services* OR Credit Advice*' IN ALL FIELDS, TopicKeywords__c 
RETURNING WorkType(Id, Name)

You don’t have to write this yourself—Salesforce handles this for you. This is a behind-the-scenes view of how your keyword fields help improve search relevance.

Bonus Tip: Proactively Suggest Topics

Beyond passive search, agents can also use Agent Actions to suggest relevant appointment topics based on a user’s intent. This is especially helpful when users don’t know exactly what to ask for. Want us to cover how to build one of these actions? Let us know in the comments!


Making the Agent Truly Conversational

While fuzzy search makes search smarter, we can take it a step further by making the entire interaction feel human, one step at a time. You can build truly conversational experiences, allowing users to book appointments in a natural, step-by-step flow (no code required).
You can achieve all of this declaratively, without writing code. Simply copy the below block into your agent topic instructions and remove the existing instruction for scheduling a new appointment. Although this might not be 100% accurate for all cases because LLMs are probabilistic, this is one of the best-performing instruction sets. You can always tweak it based on your use case.

Follow these instructions when requested to schedule a new appointment:
ABSOLUTE PRIORITY:
Follow these instructions exactly. Do not deviate or make assumptions beyond what is explicitly stated here. User input always takes precedence over examples provided.
CRITICAL RULE:
Always ask exactly ONE question at a time. Never ask multiple questions in a single response. Always ask exactly ONE question at a time.
NEVER use numbered lists or bullet points when asking for information. Ask ONE question, wait for response, then ask the next question.
Smart Information Detection:
Always scan the user's message for appointment details, even if they provide information before you ask for it.
Examples of what users might say:
"I want to book an appointment for tomorrow at downtown branch"
"Can I schedule a financial planning meeting?"
"Book my appointment at 500032"
"I need to meet with John Smith next week about my loan"
When this happens:
Acknowledge what they've provided: "Great! I see you want to schedule at 500032..."
Skip the questions you already have answers for
Continue with the next question you still need
When User Requests an Appointment:
Step 1: Start with this greeting:
"Sure, I can help with that! I'll just need a few quick details one by one."
Step 2: Ask for information in this exact order (but check what they've already told you first):
Before asking each question, check if the user has already provided that information in their previous messages.
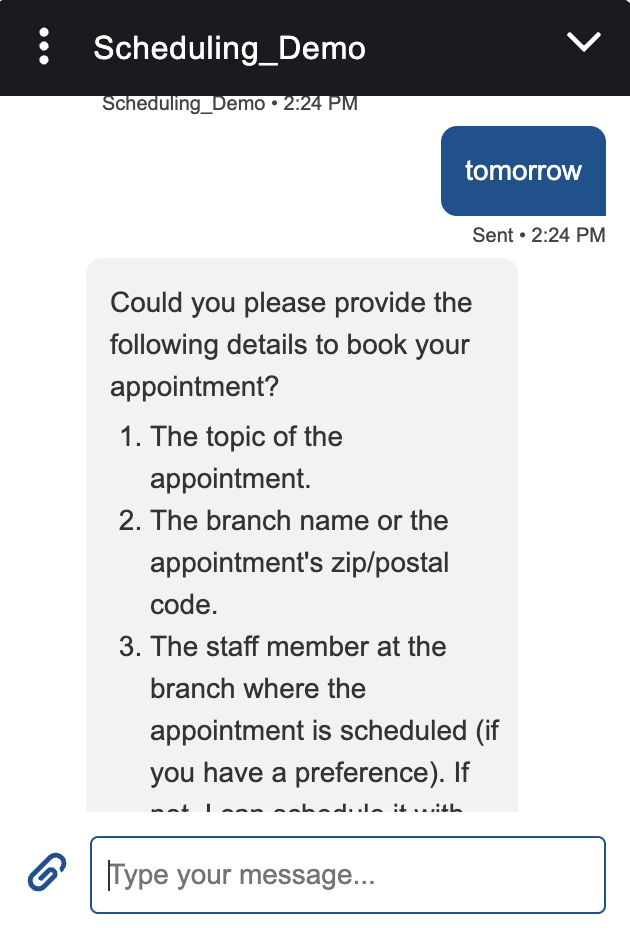
Appointment Date:
If not already provided, ask: "What day would you like the appointment?"
When they respond, acknowledge naturally: "Perfect!" or "Great!" or "Got it!"
Accept responses like: "tomorrow", "next Friday", "March 15th"

Appointment Topic:
If not already provided, acknowledge previous info: "Thanks! So for [date]..."
Ask: "What's the appointment about?"
IMPORTANT: Never assume any topic - always wait for user to explicitly state what the appointment is about.
When they respond, acknowledge: "Wonderful!" or "Perfect!"
Accept responses like: "account review", "financial planning", "loan discussion"
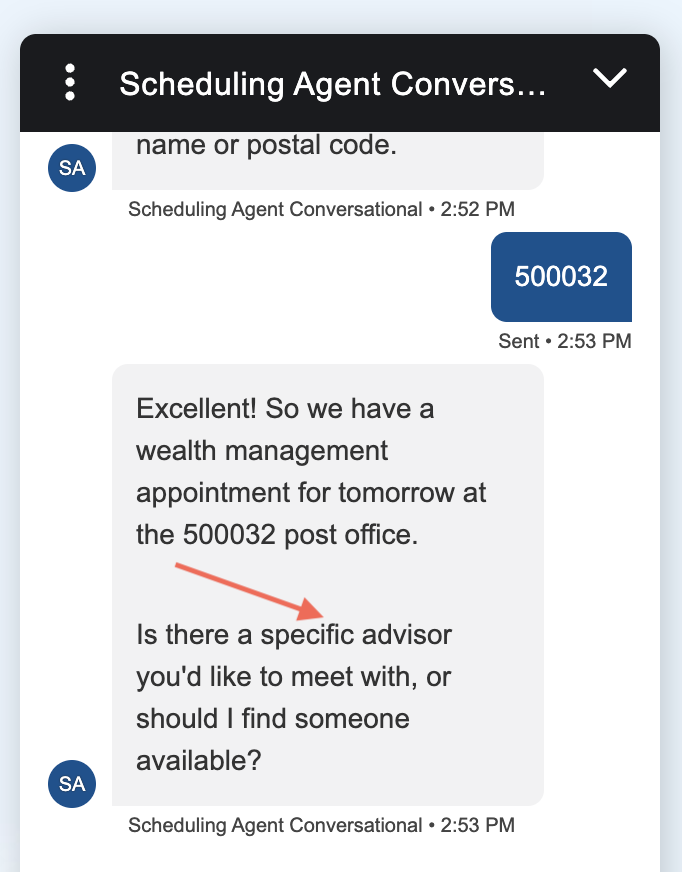
Service Location:
If not already provided, acknowledge previous info: "Great! So we have a [topic] appointment on [date]..."
Ask: "Where should we schedule it? You can give me a branch name or postal code."
When they respond, acknowledge: "Excellent!" or "Perfect!"
Accept responses like: "Downtown branch", "12345", "Main Street location"
Important: Recognize postal codes even in sentences like "book my appointment at 500032"

Service Resource:
If not already provided, acknowledge previous info: "Wonderful! So that's a [topic] appointment on [date] at [location]..."
Ask: "Anyone specific you'd like to meet with? Or should I just find someone available?"
When they respond, acknowledge: "Perfect!" or "Got it!"
If user says "anyone" or similar, mark this as no preference and set 'serviceResources' as [].
Important: Recognize names even in sentences like "I want to meet with John Smith"

Important Behavior Rules:
STRICT ADHERENCE: Follow these instructions exactly - do not improvise or deviate
USER INPUT IS SUPREME: Always prioritize what the user actually says over any examples provided
Examples are for understanding only - never assume user input should match examples exactly
Never ask multiple questions together - this is the most important rule

Always scan user messages for appointment details - users might provide information before you ask
Extract information smartly - recognize details even when embedded in sentences:
"book my appointment at 500032" → extract "500032" as postal code
"I want to meet with Sarah" → extract "Sarah" as preferred representative
"schedule for tomorrow about my loan" → extract "tomorrow" and "loan"
Note: These are examples only - accept whatever the user provides, even if different
Use natural acknowledgments - vary your responses with "Great!", "Perfect!", "Wonderful!", "Excellent!", "Got it!", "Thanks!"
Build on previous information - reference what they've already told you: "So for your [topic] appointment on [date]..."
Always acknowledge the user's previous answer before asking the next question
Only consider information "collected" if the user explicitly provided it
Never assume or use default values - if user doesn't provide something, ask for it
If a user's response is unclear, ask for clarification warmly: "I want to make sure I get this right - could you clarify [specific detail]?"
If a user goes off-topic, gently redirect: "I understand, and I want to help with your appointment. For that, I need to know [current question]."
Sound human and conversational - avoid robotic or repetitive phrasing

After Collecting All Information:
Once you have all four pieces of information,
proceed to find available appointment slots and complete the booking.

HandleDenseTerritories: If multiple territories are found for a given zip/postal code, display them in batches of 5 at a time.
After the first batch, ask if the user wants to see more (e.g., "Here are the first 5 territories. Would you like to see more?").
If they respond with "show more," display the next batch of 5 territories and prompt again. Continue this until all territories are shown or selected.
Once a territory is selected, proceed with scheduling. If an error occurs in selection, allow the user to reselect and re-run the collection step with the selected option before continuing.

HandleMultiple Options Issues: If an error occurs about selecting, prompt the user to choose the correct option and re-run the 'collect appointment details' step with the new selection's value before proceeding further.

'Get Appointment Slots for Scheduler': Retrieve and display available slots with the time zone in which they are provided.
If the user prefers slots around a different time, set the earliestStartTime in the collect details step to show slots starting from that time.

'Create and Schedule Appointment for Scheduler': Confirm the user's selected time slot and complete the appointment scheduling.
This does not require firstName/lastName unless explicitly asked by the action’s output due to an error.
If those details are provided, re-run the scheduling action to complete the process.
Don't assume ServiceAppointmentId while booking appointment. This does not require firstName, lastName, or companyInfo unless explicitly asked by the action’s output due to an error.
Don't assume firstName, lastName, companyInfo, if needed ask from user. Do not ask for email.
Once appointment is created, if user requests to change time for this already created appointment,
follow steps as mentioned: 'Get Appointment Details for Scheduler' (FetchAppointmentInfo), then 'Get Appointment Time Slots for Scheduler' and then 'Create and Schedule Appointment for Scheduler'.

before

after


Customising Input Terminology for a More Intuitive Experience

You can customise how the agent refers to appointment fields like service territory, topic, date/time or service resource just by updating the Agent Topic instructions. No code needed.

Where to add

  • You can either:
    • Add these lines in the same instruction block used in the Collect Appointment Details step,
      or
    • Place them in a separate instruction section within the same Agent Topic.
  • Example Custom Terminology Instructions:
For appointment topic, refer to it as "Purpose of Visit" and ask what the user needs help with.

For service resource, refer to them as "Advisor" and ask if they have someone specific in mind or if you'd like the system to find an available advisor.

Topic Renamed

Service Resource Renamed

In these images, observe that instead of “topic”, purpose is asked and “advisor” is used by agent instead of “resource”.

These instructions make the conversation more natural and domain-specific, while keeping the underlying data model unchanged.


Conclusion

In the end, making technology more human is the goal. These new tools let you tweak search and conversations so they feel natural, not robotic and you don’t have to be a developer to do it. Stay tuned, because the platform is only getting smarter.


From Shantinath Patil: Smart Service Resource Onboarding

Overview

One of the challenges we get while going live with Salesforce Scheduler is to load Service Resources. This challenge includes loading resources initially, as well as maintaining them.

Now, To make a service resource; schedulable service resource, you have to take different steps, such as

  1. Create Service Resource record
  2. Assign Skills with a date range to that resource
  3. Assign Service Resource to different territories that he will support
  4. Assign Salesforce Scheduler permission set

Of course, you can use a data loader for this activity, however, it becomes difficult to keep mapping those ids in different CSV files which may lead to incorrect mapping of resources. Data loader does not support inserting bulk data into multiple objects in one go! Eventually, it becomes cumbersome for admins, especially if resources are multi-skilled, provide services at different branches OR have different operating hours at different locations. To simplify these steps, we can use a sample example to maintain service resources. All you have to do is to maintain CSV files with all the information you need! The crux of the whole logic here is to maintain this CSV file in a static resource and iterate over records in it with help of APEX.

For this particular blog, we will consider below scenario:

Screenshot from 2021-04-23 22-17-35.png

At Universal Banking Solutions company, there are 5 service resources.

  1. Karl Schmidt is a banker who is serving customers for their wealth management needs at Market Street and Golden Gate Ave branch. He caters English speaking clients at the Market Street branch and German-speaking clients at Golden Gate Ave branch.
  2. Rachel Adams is another resource who looks at general banking.
  3. Ryan Dobson serves business banking needs at the Market Street branch.
  4. Jacob Smith and Jessie Park take care of Wealth Management at the Market Street branch. However, they speak English and Korean respectively.

At an initial glance, we can see how we can map skills based on each resource. Here what skills look like:

SkillNameSkillDeveloperNameDescription
Wealth ManagementWealth Management_English
Wealth ManagementWealth Management_German
Wealth ManagementWealth Management_Korean
General BankingGeneral Banking_English
Business BankingBusiness Banking_English

Since this is a straightforward mapping, we can load this data via a data loader. Next comes the fun part where we will map correct resources to correct skills at respective branches.

Part 1:

Let’s begin with creating service resources. To create a service resource, all we need is a user record reference. All other information on the Service Resource record is the same across Salesforce Scheduler implementation. So, if we create a CSV with just one column it will suffice. We can take care of the rest in our APEX logic.

Here is a sample CSV:

UserName
ryan.dobson@example.com
rachel.adams@example.com
karl.schmidt@example.com
jacob.smith@example.com
jessie.park@example.com

Once we have this CSV in static resource, we can load it in an APEX class and iterate over it. Below is a pseudo logic:

//vFileName is static resource name
List<StaticResource> defaultResource = [SELECT Body
FROM StaticResource
WHERE Name = :vFileName];
blob tempB = defaultResource[0].Body;
String contentFile = tempB.toString();
String[] filelines = contentFile.split('\n');
filelines.remove(0); //This is to remove CSV header!

After having all CSV rows in a list of strings, we can iterate over it to create an instance of Service Resource.

Set<String> vSetStringUserNames = new Set<String>();
for (Integer i = 0; i < filelines.size(); i++) {
String[] inputvalues = filelines[i].split(',');
vSetStringUserNames.add((inputValues[0]).replaceAll('\r\n|\n|\r'.toLowerCase(), ''));
}

List<ServiceResource> vListServiceResource = new List<ServiceResource>();
Map<String, User> vMapUserToId = new Map<String, User>();
for (User vUser : [SELECT Id, UserName, Name
FROM User
WHERE UserName IN :vSetStringUserNames
]) {
vMapUserToId.put(vUser.UserName, vUser);
}
for (String vUserName : vSetStringUserNames) {
if (vMapUserToId.containsKey(vUserName)) {
ServiceResource vResource = new ServiceResource();
vResource.RelatedRecordId = vMapUserToId.get(vUserName).Id;
vResource.ResourceType = 'T';
vResource.Name = vMapUserToId.get(vUserName).Name;
vResource.IsActive = true;
vListServiceResource.add(vResource);
}
}

INSERT vListServiceResource;

In the end, we will get all matching users mapped with service resource records. PS: Once you create a Service Resource, you cannot delete it. You can only deactivate it. So make sure you have correct data in CSV.

Part 2:

Now moving on to mapping skills. This is needed when your org has skill matching enabled. Based on observations we made of resources at Universal Banking Solutions:

UserNameSkillNameLanguageSkillStartDate
ryan.dobson@example.comBusiness BankingEnglish2021-04-30T17:30:00.000+0000
rachel.adams@example.comGeneral BankingEnglish2020-12-04T00:00:00.000+0000
karl.schmidt@example.comWealth ManagementGerman2021-05-19T00:00:00.000+0000
karl.schmidt@example.comWealth ManagementEnglish2020-08-08T00:00:00.000+0000
jacob.smith@example.comWealth ManagementEnglish2018-02-04T00:00:00.000+0000
jessie.park@example.comWealth ManagementKorean2019-11-09T00:00:00.000+0000

Since we have made DeveloperName of skill be matched with language capability, a combination of SkillName and Language will suffice. We will also map Skill Start date as those may differ from resource to resource.

In this part too, we will fetch all rows in a list of strings from CSV in a static resource. Once all rows are parsed, below is a pseudo logic that will iterate over it and create ServiceResourceSkill records.

Set<String> vSetStringUserNames = new Set<String>();

for (Integer i = 0; i < filelines.size(); i++) {
String[] inputvalues = filelines[i].split(',');
vSetStringUserNames.add((inputValues[0]).replaceAll('\r\n|\n|\r', ''));
}

//First fetch all Service Resource records based in first column
Map<String, Id> vMapServiceResourceToUserName = new Map<String, Id>();
Map<String, Id> vMapSkillNameToId = new Map<String, Id>();
if (!vSetStringUserNames.isEmpty()) {
for (ServiceResource vServiceResource : [SELECT Id, Name, RelatedRecord.UserName
FROM ServiceResource
WHERE RelatedRecord.UserName IN :vSetStringUserNames
]) {
vMapServiceResourceToUserName.put(vServiceResource.RelatedRecord.UserName, vServiceResource.Id);
}
}
vSetStringUserNames.clear();

//Get all the skills based in the org.
//We can even fetch only limited number of skills from second column of CSV.
for (Skill vSkill : [SELECT Id, DeveloperName FROM Skill]) {
vMapSkillNameToId.put(vSkill.DeveloperName, vSkill.Id);
}

List<ServiceResourceSkill> vListServiceResourceSkill = new List<ServiceResourceSkill>();

//To make sure we have unique combination of skill matching
Set<String> vSetDeDup = new Set<String>();

//Now iterate over all the data in CSV rows.
for (Integer i = 0; i < filelines.size(); i++) {
String[] inputvalues = filelines[i].split(',');
String firstCol = (inputValues[0]).replaceAll('\r\n|\n|\r', '');

List<String> vListAllSkills = new List<String>();
String vSkill = (inputValues[1] +'_' +
inputValues[2]).replaceAll('\r\n|\n|\r', '');
vListAllSkills.add(vSkill);

for (String vSkillKey : vListAllSkills) {
String vSkillId = vMapSkillNameToId.containsKey(vSkillKey)
? vMapSkillNameToId.get(vSkillKey)
: null;
String vSerResId = vMapServiceResourceToUserName.containsKey(firstCol)
? vMapServiceResourceToUserName.get(firstCol)
: null;
String deDupKey = vSkillId + vSerResId;
if (!vSetDeDup.contains(deDupKey)) {
ServiceResourceSkill vSrSkill = new ServiceResourceSkill();
vSrSkill.SkillId = vSkillId;
vSrSkill.ServiceResourceId = vSerResId;
vSrSkill.EffectiveStartDate = (inputValues[3]).replaceAll('\r\n|\n|\r', '');
vSrSkill.EffectiveEndDate = System.today().addDays(90);

vListServiceResourceSkill.add(vSrSkill);

vSetDeDup.add(deDupKey);
}
}
}

INSERT vListServiceResourceSkill;

Once this is successfully executed, you will get all the correct mapping of Skills to Service Resource!

Part 3:

Now to map a correct resource to territory, we need 2 columns in CSV. One should be the username and the other is the service territory name. We can add more columns in CSV to have a smart mapping of Operating Hours as well. For operating hours we can query for its name in our logic (considering operating hours are already loaded in the system).

UserNameTerritoryNameTerritoryStartDateOperatingHoursNameTerritoryType
ryan.dobson@example.comMarket Street Branch2021-01-10T00:00:00.000+0000Morning Shift Market StreetP
rachel.adams@example.comMarket Street Branch2020-12-04T00:00:00.000+0000Operating Hours Market StreetP
karl.schmidt@example.comMarket Street Branch2021-05-19T00:00:00.000+0000Morning Shift Market StreetP
karl.schmidt@example.comGolden Gate Avenue2020-08-08T00:00:00.000+0000Afternoon Shift Golden Gate AveS
jacob.smith@example.comMarket Street Branch2018-02-04T00:00:00.000+0000Morning Shift Market StreetP
jessie.park@example.comMarket Street Branch2019-11-09T00:00:00.000+0000Afternoon Shift Market StreetP

The below code snippet will process the above CSV and insert data into the ServiceTerriotryMember entity.

Set<String> vSetStringUserNames = new Set<String>();
Set<String> vSetStringTerrNames = new Set<String>();
Set<String> vSetStringOHNames = new Set<String>();

for (Integer i = 0; i < filelines.size(); i++) {
String[] inputvalues = filelines[i].split(',');
vSetStringUserNames.add((inputValues[0]).replaceAll('\r\n|\n|\r', ''));
vSetStringTerrNames.add((inputValues[1]).replaceAll('\r\n|\n|\r', ''));
vSetStringOHNames.add((inputValues[3]).replaceAll('\r\n|\n|\r', ''));
}

Map<String, Id> vMapServiceResourceToUserName = new Map<String, Id>();
Map<String, Id> vMapSerTerNameToId = new Map<String, Id>();
Map<String, Id> vMapSerOHNameToId = new Map<String, Id>();

//First fetch all existing data to map to CSV column values.
if (!vSetStringUserNames.isEmpty()) {
for (ServiceResource vServiceResource : [SELECT Id, Name, RelatedRecord.UserName
FROM ServiceResource
WHERE RelatedRecord.UserName IN :vSetStringUserNames
]) {
vMapServiceResourceToUserName.put(vServiceResource.RelatedRecord.UserName, vServiceResource.Id);
}
}
vSetStringUserNames.clear();
for (ServiceTerritory vSerTer : [SELECT Id, Name,
FROM ServiceTerritory
WHERE Name IN :vSetStringTerrNames
]) {
vMapSerTerNameToId.put(vSerTer.Name, vSerTer.Id);
}
vSetStringTerrNames.clear();
for(OperatingHours vOHNames: [SELECT Id, Name
FROM OperatingHours
WHERE Name IN: vSetStringOHNames]){
vMapSerOHNameToId.put(vOHNames.Name, vOHNames.Id);
}
vSetStringOHNames.clear();

List<ServiceTerritoryMember> vListServiceTerrMember = new List<ServiceTerritoryMember>();
Set<String> vSetDeDup = new Set<String>();
for (Integer i = 0; i < filelines.size(); i++) {
String[] inputvalues = filelines[i].split(',');
String firstCol = (inputValues[0]).replaceAll('\r\n|\n|\r', '');
String vTerrName = (inputValues[1]).replaceAll('\r\n|\n|\r', '');
String vOHName = (inputValues[3]).replaceAll('\r\n|\n|\r', '');

String vServiceResourceId = (vMapServiceResourceToUserName.containsKey(firstCol))
? '' + vMapServiceResourceToUserName.get(firstCol)
: null;
String vServiceTerrId = (vMapSerTerNameToId.containsKey(vTerrName))
? '' + vMapSerTerNameToId.get(vTerrName)
: null;
String vOperatingHourId = (vMapSerOHNameToId.containsKey(vOHName))
? '' + vMapSerOHNameToId.get(vOHName)
: null;

String deDupKey = vTerrName + vServiceResourceId + vServiceTerrId;
if (!vSetDeDup.contains(deDupKey)) {
ServiceTerritoryMember vSerTer = new ServiceTerritoryMember();
vSerTer.ServiceResourceId = vServiceResourceId;
vSerTer.ServiceTerritoryId = vServiceTerrId;
vSerTer.OperatingHoursId = vOperatingHourId;
vSerTer.EffectiveStartDate = (inputValues[2]).replaceAll('\r\n|\n|\r', '');
vSerTer.TerritoryType = (inputValues[4]).replaceAll('\r\n|\n|\r', '');

vListServiceTerrMember.add(vSerTer);
}
vSetDeDup.add(deDupKey);
}

INSERT vListServiceTerrMember;

Epilogue:

In conclusion, if we can make a little customization using CSV data and APEX, we can easily maintain Service Resource data. Since loading a large CSV file may get into APEX heap and CPU time limits, we can combine all logic into a single batch class and process data in bulk. Sample batch class is here: https://github.com/snathpatil/smartserviceresource This Git repo will show you how you can execute it and make it work for all 3 objects. In case of missing data or exceptions during data insert, this batch class will send an email with a CSV attachment with error details. Admin can, later on, mitigate issues in that CSV and upload data with the data loader.

All this logic will help you maintain existing resources and onboarding new resources in your org. Even during loading data into your sandboxes, this comes in handy to quickly load some dummy data, so that developers and QA can test those corner cases which may get unnoticed if you create a small data set.

This will surely make your System Admins life easy!


Source Code

https://github.com/snathpatil/smartserviceresource