
From Brad Shively: Create MS Team Meetings from Salesforce (with Salesforce Scheduler)
Introduction
The use case is fairly straightforward, as a customer of a bank, I want to schedule an online meeting with my advisor and discuss my accounts. The technology the bank wants to use is MS Teams.
The technology usage behind this particular demo is to simply create a meeting in MS Teams via an API which returns a URL that parties can click on to launch Teams( either browser or desktop ) and have a meeting. There is a lot more that can be done, but this integration is to show the possibilities with the connection
Technology Utilized
Listened below are the main technologies and configurations used in the demo preparation.
Main SaaS Tech Stacks
- Salesforce Scheduler
- MS Teams Online Meeting
- MS Graph Rest API’s
Demo Setup Technology
- MS Azure Development Account – Needed to setup a MS Teams Environment
- Salesforce Org
- Postman – To easily test the setup and API’s
- <optional>MS Visual Studio – Used to write and deploy code
- Apex Classes
- Invocable Methods setup to make available in Flows
- Test Classes
- Auth Provider Setup in Salesforce
- Named Credentials
- Salesforce Flows – To provide the screen navigation, call Azure to get the meeting, and update the appropriate records.
Demo Flow High Level
This section describes the general flow of the demo from start to finish when showing to the customer. This is a specific flow for the customer this demo was prepared for. You can tailor or make your own flow(s) for your customer.
- Customer goes to the portal to schedule a meeting, leveraging the Salesforce Scheduler.
- This demo has an authenticated flow, there is a person account associated with the demo.
- Enter the required information from the screen
- Click by previously scheduled service appointments or search for a banker.
- Click Next
- Click on a Work Type Group → Select the type => Click Next
- Select Video Call
- Enter a address → San Francisco → Select a branch
- Choose a date in scheduler
- The call to MS Teams is done at this point and a URL is returned to the “Additional Information” Section. Note, this could be put anywhere but for the purpose of the meeting we chose here.
- Click on next and a new Service Appointment is created with the Meeting URL in a custom field that can be accessed to launch a teams meeting.
The integration behind the scene created a MS Team meeting valid link that can be clicked on to start a team meeting. This utilized the MS Graph API, OAuth/Open ID authentication/authorization, and Apex Callout to create and return the meeting.
Demo Details
This section will describe the setup needed to execute the demo. What is described is the particular flow used to validate and test the integration. The entire section for Postman is completely optional, but it is suggested to do this to validate and debug. In our case, it was invaluable in determining the exact headers to place into the API. In the initial development, Postman was first used outside of Salesforce to ensure the API format was correct and the authentication/auth was setup correctly in Azure.
Microsoft Azure Setup
The first piece that is needed is a Microsoft Developer Account to be able to setup a new Azure environment. We won’t go into the details here on all of the steps, the directions are straightforward. When it gets to the point of asking what features you want to add, make sure you add in the MS Teams option that will be available.
- Click on the Manage Azure Active Directory “View” Button. All of the configuration you will do is from this particular screen
- Microsoft Graph – https://docs.microsoft.com/en-us/graph/
- Note: You can use the Graph Explorer as well instead of Postman to test. I preferred Postman since you are more on hands with the auth side.
- Microsoft Graph API Specification – https://docs.microsoft.com/en-us/graph/api/overview?view=graph-rest-1.0
- This is the full set of API documentation.
- Microsoft Graph API Online Meeting – https://docs.microsoft.com/en-us/graph/api/resources/onlinemeeting?view=graph-rest-1.0
- Specific API format for the Online Meeting API’s. Note: We are using Delegated API but the Application API could be used as well with more customer setup for permissions.
Setup Salesforce/Postman Application in Azure
The first thing needed is to setup a new custom application in Azure AD that will be used to generate the authentication and authorization needs for Salesforce connections and optionally Postman Connections. You can create two apps, or in my case, I just created one to handle both.
App Setup
- Create a new App from the App Registrations link along the left hand side and click on New Registration
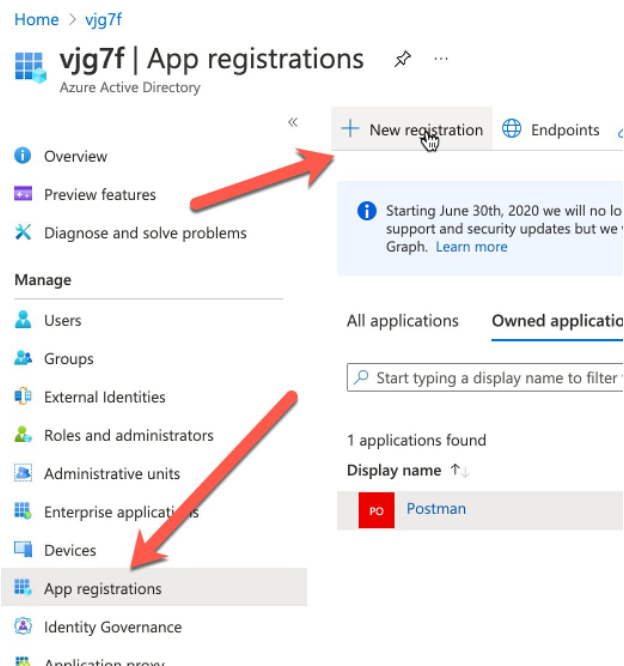
- Fill out the form and leave the defaults as they are. We will fill in multiple redirect URI in a later step.
API Permissions Setup
- Click on the API Permissions from the left-hand side of the application you have created. (Click the application from the previous step)
- Create the API Permissions needed for MS Teams Online Meetings. In addition, add a few extra permissions to ensure the token can be refreshed. The permissions can be found in the Graph API docs. We added a generic one for read and Mail.Read for testing purposes, they are not fully required. Once the permissions are added click on the “Grant Admin Context for … ”. The status will be red until this is done.
- Mail.Read offline_access OnlineMeetings.ReadWrite OnlineMeetings.ReadWriteAll User.Read

Certificate Setup
In this section we will create the client key and secret which will be used in the Postman and Salesforce integrations to authenticate into Azure and Teams.
- Click on the Certificates & Secrets Menu item on the left hand side.
- Click on New client secret
- Enter a new description and the expiration of the secret. You can choose whatever you like or keep the default.

- Copy the Secret Key Value for use later when setting up the authentication sections of Salesforce and Postman
- The Secret ID is an Azure ID, it will not be used anywhere. The ID that is used is the Application(client) ID from the application you created. We will show this in detail later.
Authentication Setup
This section covers the Authentication Setup that will be needed. This section will be done when you are ready to setup either Salesforce and/or Postman to Authenticate and setup the redirect URI authorization from the client request. Additionally, the Endpoints needed for authorization and token endpoints locations are covered in this section. If this is the first time through the setup, you most likely won’t have the redirect URI’s available but for document cleanliness, we are keeping the Azure setup all in one section.
- Click on the Authentication menu item on the left hand side.
- Click on Add a Platform link to add a platform.
- Click on Web Platform
- Add the redirect URI from your application( the location of these URI’s from Salesforce and Postman will be shown later ).
- The image below is an example where the Postman and Salesforce API’s have been added. In this case, 1 Postman and 2 Salesforce Demo Environments are part of this application.

- The Endpoints needed for the configuration of the applications can be found on the overview section of the application you have configured. Click on the Endpoints link from the overview and the first two endpoints are used when configuring the authentication.

Salesforce Setup
This section describes the Salesforce Setup needed to access MS Teams. It is strongly advised to setup Postman first to validate and test the API as well as get familiar with the API before jumping into Apex coding setup. This section will consist of Authentication setup, the Named Credential, and the Apex code needed to create a Teams meeting and retrieve a URL. Additionally, this will provide the callback referenced in the Azure section which will be needed to complete the Authentication section in Azure.
Auth. Provider Setup
The first step is to create the Authorization Provider configuration to connect to Azure. You will need the Secret Key(Value) from the Certificate setup in Azure as well as the application id.
- Enter Salesforce Setup→Auth.Providers→New
- Choose Open ID Connect from the Provider Type drop-down.
- Name the Auth Provider.
- URL Suffix → Can make the same as the name.
- Consumer Key → This is the Application ID from Microsoft Azure. This is found in the Overview Section of your App in MS Azure.

- Consumer Secret → This is the Secret Value from the Certificate setup done previously in MS Azure.
- Authorization Endpoint URL – This is the OAuth 2.0 Endpoint given in the Azure Setup Above
- Token Endpoint URL – This is the OAuth 2.0 token endpoint given in the Azure Setup above.
- Default Scopes<optional> – We set the scopes in the named credentials but they could also be set here. In this example we just set the online meeting read/write. When setting the scope, the values are delimited with a space.
- Make sure all 3 options are checked for Send Access token in Header, Send client credentials in header, and include customer secret in API response.
- Use the defaults for the remainder.
- Save
- Click on the newly defined Auth Provider to open it up

- Copy the Callback URL that is shown in the Salesforce Configuration. If you have Experience Cloud setup and you are using those domains, then add those callback URLs as well to the Azure configuration.
- Take the callback URL you copied above and back in the MS Azure AD setup for your application, add this to the redirect section. Do this by clicking on Add URI.

Named Credential
Creating a named credential will perform the authentication to MS Azure and do the Oath validation. Here is where the MS Authenticator is used( I set mine to auto approve ) to validate the OAuth connection. It will prompt you to login to your instance of Azure. The login will be the MS Azure login/id that was created during the setup of the developer instance.
A couple of notes for this setup. The example shown only accesses the one API for creating an online meeting in MS Teams. This could be a general named credential to just the Graph root level and you can append the rest of the API in the code. Alternatively, you can create a named credential for each of the API’s or perhaps the most commonly used ones.
- In Setup→Named Credentials click on New
- Enter the label and the URL of the API Endpoint you wish to access. In this case, the full API is used for the onLineMeeting for Delegated access. The application access has a different signature.
- Identify Type will be Named Principal.
- Auth Protocol will be be OAuth 2.0
- Select the Auth Provider created in the previous step.
- Scope: very important! The scope here will match the scope you created in MS Azure for the application. It is space delimited.
- Values: OnlineMeetings.ReadWrite User.Read Mail.Read offline_access
- Check on Start Auth Flow on Save
- Generate Auth Header is checked
- Click Save and this will trigger the actual connection to Azure and validate the Authentication

- When you Save, the Oauth flow will initiate.

- If successful, you will see Authenticated in the Authentication Status in Salesforce. If it fails, you will get a failure screen from MS Azure.
- Common Issue: Used the wrong secret key or id. Double check in the Auth. Provider those are correct.
- URL Endpoint is in valid: Check your URL Endpoint. (one reason to use Postman first)
Salesforce Application Code
This section will review the Apex application code needed to make the Rest API call to set up a teams meeting and retrieve the meeting URL from the Teams Server. The code is not production quality but instead is a sample to prove the concepts. The current iteration does not accommodate error handling in a meaningful way nor does it do much more than create a meeting. The goal of this good is to demonstrate the basic connection for customers and proof of concept the meeting invite is ready. The sample code will be in two parts, the first part is a test class that can be used to validate the connection and result. Once that is working, then the 2nd class uses @InvocableMethod so that it can be used in flows. Obviously this can be tailored however desired.
This section does not instruct how to set up command line tools, deploy the source, or other development tasks. It is assumed the reader understands how to deploy, run the developer tools/debugger in Salesforce.
Test Apex Class – Simple Class to Create the Meeting utilizing Named Credentials
public class TestAzure {
/* Test Method for Unit Testing Connection */
public static String getMeetingUrl()
{
HttpRequest req = new HttpRequest();
Http http = new Http();
//Setup the Endpoint and append the name of the file
req.setEndpoint(‘callout:MS_Azure_OnlineMeeting’);
req.setMethod(‘POST’);
req.setHeader(‘Content-Type’,’application/json’);
req.setHeader(‘Accept’,’*/*’);
req.setHeader(‘Accept-Encoding’,’gzip, deflate, br’);
//Setup the JSON Body – in the test just set a subject, can add more through Postman or other tests
req.setBody(‘{“subject”:”Delegated User Test Meeting”}’);
System.debug(‘Body: ‘ + req.getBody());
System.debug(‘Endpoint Value: ‘+ req.getEndpoint());
System.debug(‘Request: ‘ + req);
HTTPResponse res = http.send(req);
System.debug(‘Response Body: ‘+res.getBody());
/* Parse Response */
JSONParser parser = JSON.createParser(res.getBody());
String webLink;
webLink = ‘MSTeamsNotSetup’;
while (parser.nextToken() != null) {
if ((parser.getCurrentToken() == JSONToken.FIELD_NAME) &&
(parser.getText() == ‘joinWebUrl’)) {
parser.nextToken();
webLink = parser.getText();
System.debug(‘joinWebUrl= ‘ + webLink);
}
}
return webLink;
}
}
Common Issues/Errors
- MS Teams will return a 201 in the HTTP Response. This is a success. It is documented in the API
- HTTP Error 500 – Internal Server Error
- Notice the headers that are set. The MS Graph documentation does not state it explicitly, but in our testing we found that the 2 accept lines need to be in the header when sending the request. You need to add the gzip, etc and the “*/*” accept lines.
- 401 – The 401 unauthorized generally means the scope is incorrect in the Named Credential or both in the Named Credential or the Azure setup. Make sure the permissions are correct and the scope is space delimited.
- 403 – Forbidden – This occurs when the secret keys are incorrect. You should have fixed this when you saved the name credential so it shouldn’t show up.
- Note: When using the Apex Debugger – Look for the debug line to joinWebURL populated with a long string for the meeting. It will start with something like this: 12:40:52:477 USER_DEBUG [37]|DEBUG|joinWebUrl= https://teams.microsoft.com/l/meetup-join/19%3am
Salesforce InvocableMethod Class Utilizing the Apex Code and Callout
This is the actual code used in the demonstration. This code is accessible in the Flow Builder inside of Salesforce as an Apex Action.
global class GetTeamsMeetingURL {
@InvocableMethod(label=’Get MS Teams Meeting URL’ description=’Returns a meeting URL For MS Teams’)
global static List<String> makeApiCallout(List<List<String>> inputTeamsParms)
{
// Setup the HTTP Initial Request
HttpRequest req = new HttpRequest();
Http http = new Http();
//Setup the Headers, format the body, and call the MS Graph API
req.setEndpoint(‘callout:MS_Azure_OnlineMeeting’);
req.setMethod(‘POST’);
req.setHeader(‘Content-Type’,’application/json’);
req.setHeader(‘Accept’,’*/*’);
req.setHeader(‘Accept-Encoding’,’gzip, deflate, br’);
/* Setup the Parameters for Meetings, subject, etc. */
// Note: The initial demo only utilized title, further development can use other inputs.
system.debug(‘Array size =’ + inputTeamsParms.get(0).size());
String inTitle = ‘”‘ + inputTeamsParms.get(0).get(0) + ‘”‘;
system.debug(‘inTitle =’ + inTitle);
String inAgenda = ‘”‘ + inputTeamsParms.get(0).get(0) + ‘”‘;
system.debug(‘inAgenda =’ + inAgenda);
String inPwd = ‘”‘ + inputTeamsParms.get(0).get(1) + ‘”‘;
system.debug(‘inPwd =’ + inPwd);
String inStart = ‘”‘ + inputTeamsParms.get(0).get(2) + ‘”‘;
system.debug(‘inStart =’ + inStart);
String inEnd = ‘”‘ + inputTeamsParms.get(0).get(3) + ‘”‘;
system.debug(‘inEnd =’ + inEnd);
// Setup the Body
String reqHTTPString = ”;
reqHTTPString = ‘{“subject”:’ + inTitle +’}’;
req.setBody(reqHTTPString);
/* Send request to MS Teams Server */
HTTPResponse res = http.send(req);
/* Parse Response from MS Team Server */
JSONParser parser = JSON.createParser(res.getBody());
String webLink;
webLink = ‘MSTeamsNotSetup’;
while (parser.nextToken() != null) {
if ((parser.getCurrentToken() == JSONToken.FIELD_NAME) &&
(parser.getText() == ‘joinWebUrl’)) {
parser.nextToken();
webLink = parser.getText();
System.debug(‘joinWebUrl= ‘ + webLink);
}
}
// Apex Actions Return. The method signature for invocable method requires a List of Strings to be returned.
return new List<String>{webLink};
}
}
Salesforce User Experience Setup
This section is optional but describes how the above code can be accessed in the low-code building tools inside of Salesforce.
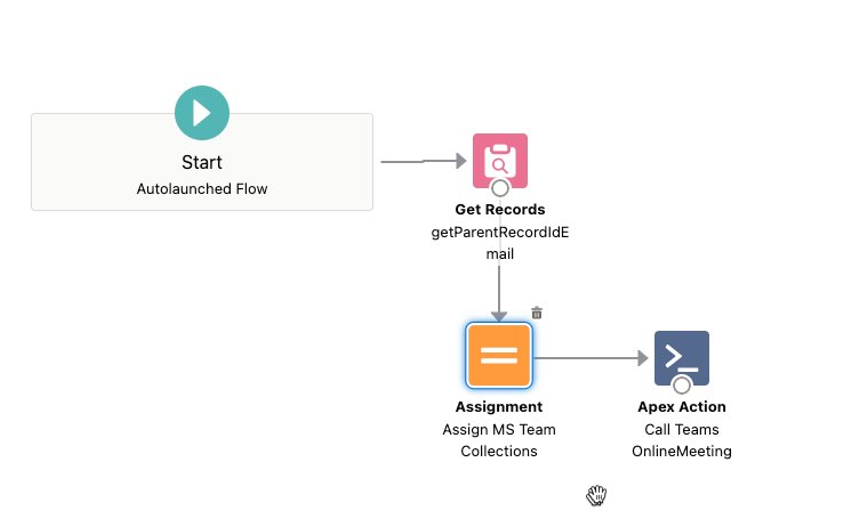
This section in a flow shows how this action is called to retrieve a URL for the MS Team Meeting and then assigns it to a Record in Salesforce. A larger flow will then do further processing as part of a full scheduling flow. The takeaway is that the Apex Code above is an option to drag and drop into the low code builder and use it when running a flow. It could also be embedded within a Lightning Web Component(LWC) and used in other places. Lastly, it can always be accessed from another Apex Class to get the required information.
Postman Setup
This section describes how to setup Postman to access MS Graph API and test the API integration outside of Salesforce in a developer-centric manner. This is completely optional, but oftentimes if it works in Postman and not in another application or Salesforce, you can see what is different in Postman versus the other applications. This tutorial assumes the reader is familiar with Postman and has downloaded the application or is using the web version. This document will use the desktop installation for reference. This section does not require knowledge of the Salesforce Setup. We recommend starting with Postman before the setup in Salesforce.
Microsoft Link on Postman Setup: https://docs.microsoft.com/en-us/graph/use-postman
Download the MS Graph Postman Collection
To make life easier, download the Postman Collection already created for MS Graph. It does not contain the Teams integration unfortunately, but it does have a big chunk of other API’s that can be used to make sure the authorization is all setup as well as plenty of examples. To do so:
- Click on Explore on the Menu at the Top of Postman
- Search for MS Graph Workspace
- It will be either MS Graph or MS Graph Fork Workspace
- You can also find it by clicking on Workspaces and scrolling to it.
- Create a new Fork from either the Graph or the Fork Graph – Right click on the Microsoft Graph Space to get the Fork Option

- You should end up with something like this in your My Workspace or wherever you saved the forked Graph Collection to.

What this provides is a whole list of MS Graph APIs broken up into folders. In our testing, we used Delegated to validate with.
Setup Postman Authentication
Setting up Authentication is straightforward and will require the client id and secret key from the MS Azure setup done previously. Additionally, you will need to add the callback URL to the Authentication section in MS Azure. You also need to set up Environment variables as part of this step.
Setup Environment Variables
Postman needs to pass in environment variables to the headers in the API. To set these up, create a new environment to be used with MS Graph.
- Click on Environments on the left hand side of Postman and click the Plus sign at the top of the environment list
- Name your Environment and add in the 3 values needed
- ClientID – This will be the Application ID of the App you created in MS Azure.
- Client Secret – This will be the Secret Value created in the Client Secret step of Azure
- TenantID – This is the tenant id found in the overview of your app.


- Now that you have set up the environment variables – make sure to make that environment your active environment. It should show up here. You can access it from the drop down as well.

Setup Authentication
- Click on the Delegated Folder in the MS Graph Collection on the left hand side of Postman. This will bring up the Authorization Screen.
- Selection OAuth2.0 from the drop down.
- Select Add Auth data to the Request Headers
- Access Token → Available Tokens ( this will get filled in later )
- Header Prefix – Bearer
- Configure New Token Section
- Token Name – Fill in something for this
- Grant Type – Authorization Code
- Leave the rest defaulted.
3. It will look much like this after filling out.

- Set the Callback URL in MS Azure – Note: This step must be done or your auth will fail. Take the Callback URL above with the oauth URL for Postman and add it to the Callback URLs in your application in MS Azure.

- Get a New Access Token – Use this to debug whether you can get authorized or not and once authorized use the token.
- Click on the Get New Access Token at the bottom of this screen in Postman on the Authorization screen.
- This will kick off the OAuth Flow, which will have you login to MS Azure and Authenticate. I used the Microsoft Authenticator download to my phone for MFA purposes which makes this more automatic.
- Note: This is where if you have an incorrect setup, you’ll get a bunch of errors. Check your setup against the above, do you have the right token id?
- You will go through the screens until you get a very long access token. Click on the Use Token button.
Create and Run the MS Graph Online Meeting API
Although there are several Teams APIs in the Team Folder, they are chat related versus the Online Meeting. We need to create a new API for the OnlineMeeting to be accessed. In this section we will cover creating the new API, adding parameters, and testing the API.
- Navigate to the Teams Folder
- Click New at the Top( or right click to add a request ) and add a new Web HTTP Request
- Switch the type from GET to POST
- Put in the name of the method in the POST
- On the Body, use the JSON application type.
- Add the body in JSON format, Subject was added for the example.
- Click Send
- Results are shown below from the meeting when successful.
