These are the slides and embedded animations I presented at Dreamforce ’19. There was no video recording but an audio recording may be published by Salesforce in the next few months.
The session synopis was: The focus of this presentation is to encourage and excite creativity in how you can improve the user experience in your Salesforce orgs. I will demonstrate how 10 different Lightning Components can be used to do some very interesting things in both Lightning Record pages and screen-based Flows. I have either created or enhanced most of these components and they are all available, with source code, for free online. They range from simple to complex, but all of them can be used in ways you may not have thought of before to bring out the best in your users’ experiences. The components are designed to be generic. No coding is required, and all can be customized and configured with built-in parameters.
https://unofficialsf.com/wp-content/uploads/2022/09/largeUCSF-300x133.png00Eric Smithhttps://unofficialsf.com/wp-content/uploads/2022/09/largeUCSF-300x133.pngEric Smith2019-11-29 10:31:402019-11-29 10:31:41Dreamforce Slides - 10 Ways to Get Creative with Lightning Components
These are the slides I presented for this developer track session. Here’s the video.
The session synosis was: As a developer, you can leverage Flow and Next Best Action to multiply the impact of your code. Learn how you can turn your work into declarative building blocks, and how you can delegate management and configuration not just to your organization’s admins, but out into the business units themselves. See state-of-the-art sample apps featuring invocable actions, and get a preview of developer-oriented automation tools coming in 2020.
Did you present at Dreamforce? If so, you’re encouraged to create a post like this, which you can link back to your own site/blog/company. If you need an account on this site to blog, contact a site admin or use the feedback form on the home page.
https://unofficialsf.com/wp-content/uploads/2022/09/largeUCSF-300x133.png00Alex Edelsteinhttps://unofficialsf.com/wp-content/uploads/2022/09/largeUCSF-300x133.pngAlex Edelstein2019-11-28 09:01:072019-12-05 12:06:03Dreamforce Slides - Enterprise Application Development With Flow and Next Best Action
These slides are from Alex Edelstein’s flow session for admins. A recording will be published officially by Salesforce in the next 1-2 months.
The presentation synopsis was: Ready to drink from the firehose? We’ll cover multi-flow application development, scalable “decision tree” patterns that enable non-Admin management of flows, lightning web component use in Flow screens, batch-mode scheduled flows, dynamic screens with conditional field visibility, dynamic flow launchers that let users pick which flow to run next, rich email sending, embedded decisioning automation, powerful integration with Web API’s and rich JSON web data, and look at some sneak previews of 2020 Flowtech. Warning: Alex talks fast.
Sometimes you just want to make a certain field stand out on your page layout.
The standard detail section for a Record Page shows all fields the same way.
Quick – Where’s the Case Number?
I wanted to be able to see, at a quick glance, what the Case # was on my internal Software Development Case record page. How could I make it stand out better while keeping it a part of the standard detail section?
Is this better?
WOW, how did I make that happen?
With a new custom field and a simple update to my Case Process Builder I’m able to display a formatted version of the Case #.
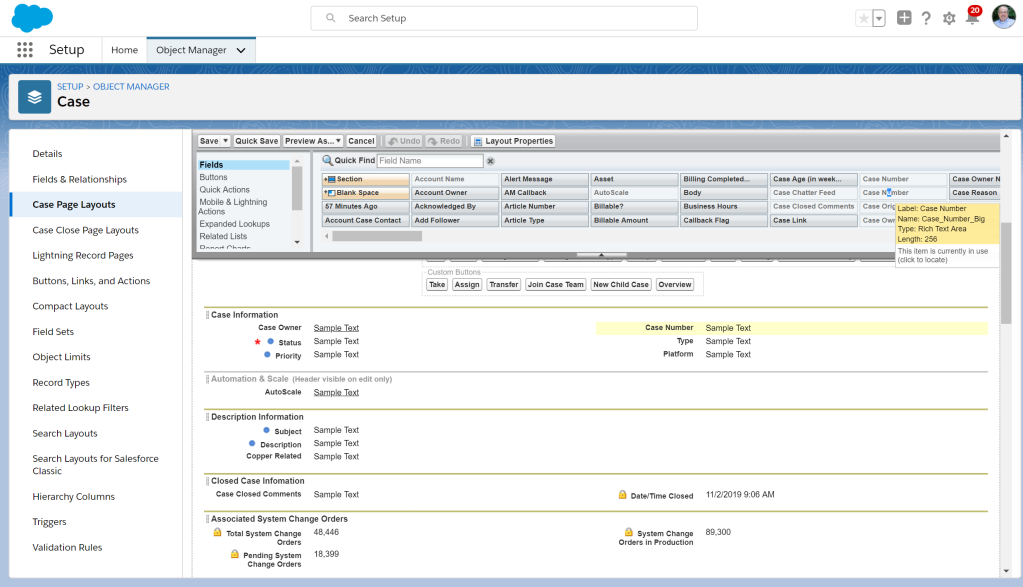
Start with a new Rich Text Area field. I gave mine the same “Case Number” label as the standard field (be sure to make the field API name unique) and the minimum values of 256 characters and 10 lines visible.
To update the value in the new Case Number field, I added a node to my Case Process Builder. (Best practice is to always have a single Process Builder per object)
Any time a new Case record is created, I update the Rich Text field to contain the Case Number along with the HTML tags to display it with a size 22pt bold font. (You can modify these tags to format the field any way you wish)
The final step is to replace the standard Case Number field on your Page Layout with the new Rich Text Case Number field.
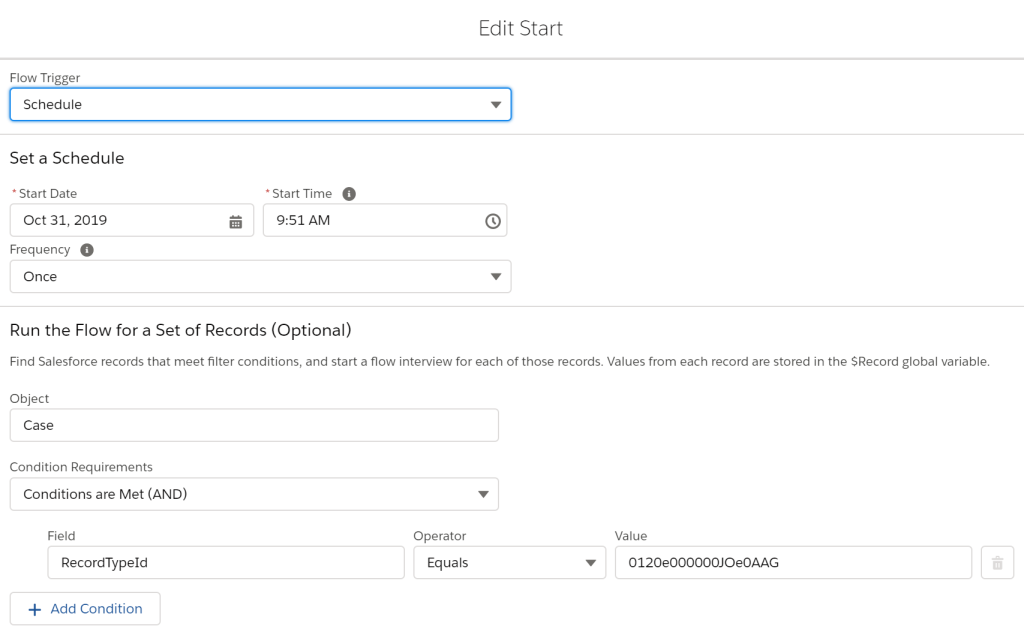
Since this new feature only updates the field for new Case records, I created a simple Flow to run once to set the field value for all existing records.
The Flow is designed to update a single record based on the $Record Id that gets passed to it. By configuring the Start node as a 1-time scheduled Flow, it can select and pass all existing records one at a time through the Flow. (I have multiple Case Record Types in my org so I’m only selecting the one I want to use this feature on)
The Get Records node reads the Case record with the $Record.Id passed in by the scheduler.
I created a Variable with the formatting I wanted for my Rich Text value.
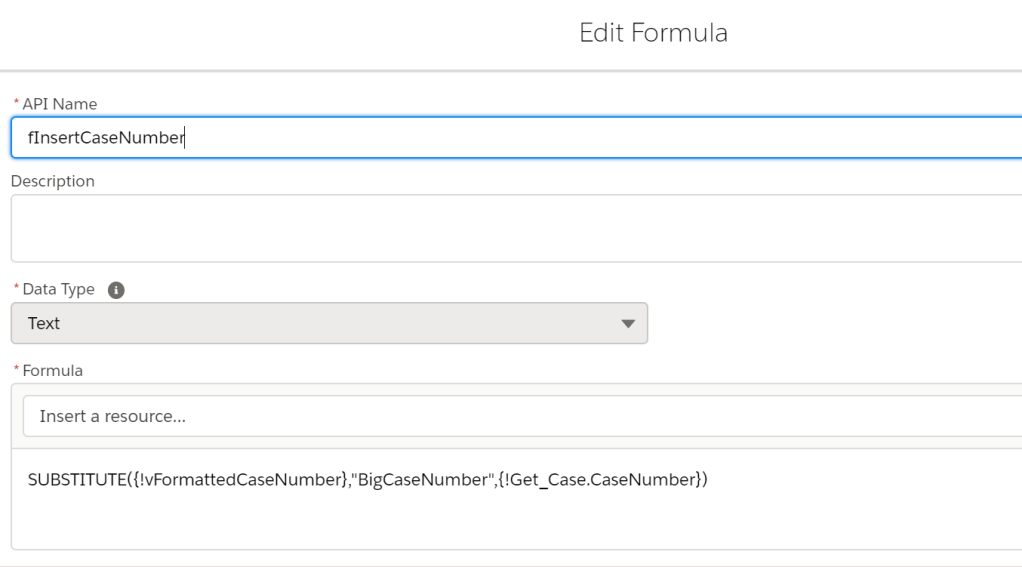
I also created a Formula to insert the record’s Case Number value into my HTML styling.
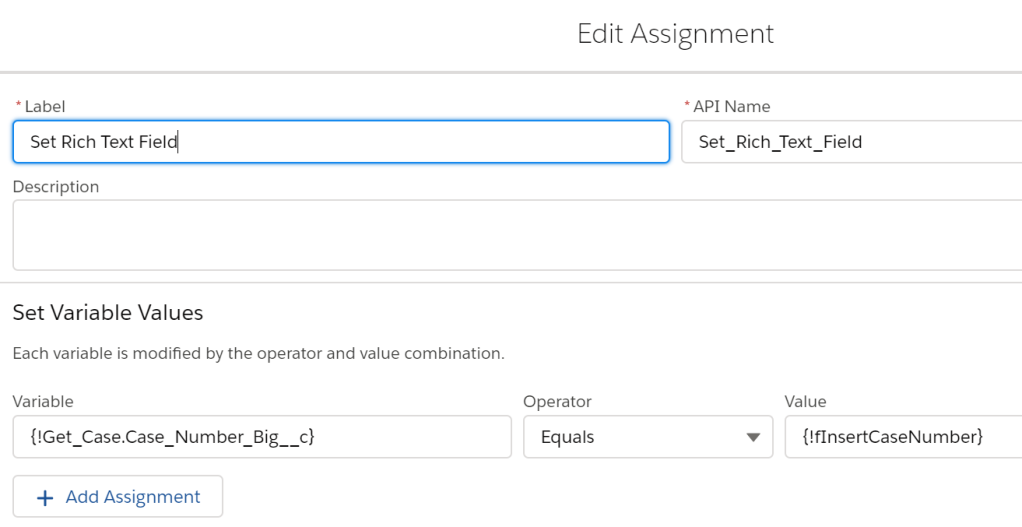
The Assignment node updates the custom Rich Text field in the Case record.
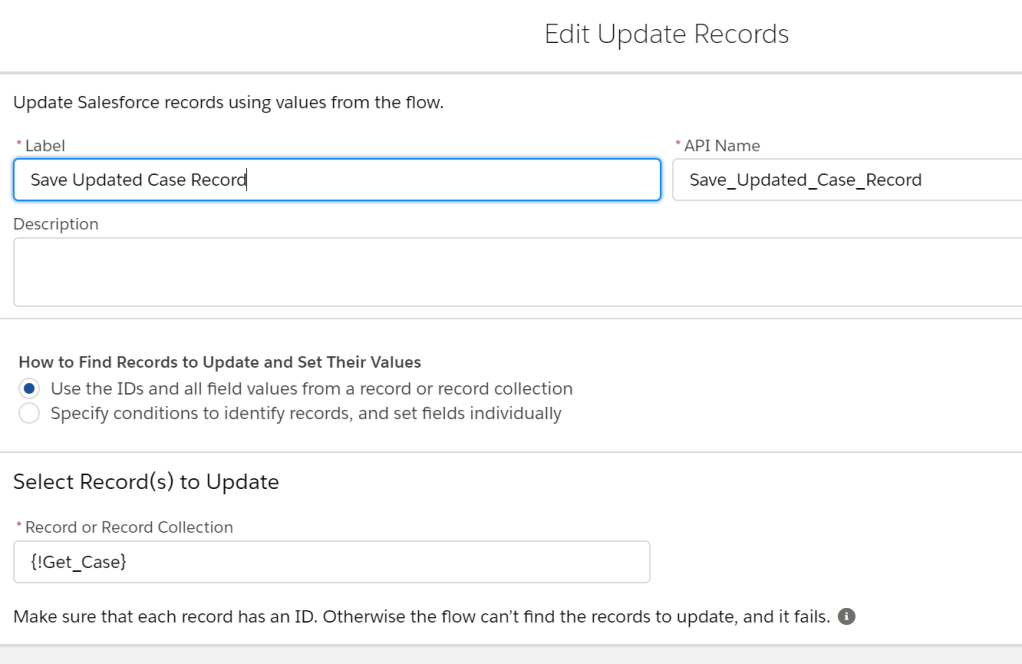
Finally, the Update Records node saves the changed record.
Now, just save and activate your Flow and wait until the scheduled time for it to do its updating.
If you want to get even more creative in how you implement this feature, you could even update your Process Builder to fire on certain field changes and do things like:
Set the color based on whether or not the Case is open or closed
Add a unique icon if the Contact is an internal user vs an external customer
Change the font size based on the Case priority
… you get the idea, be creative
https://unofficialsf.com/wp-content/uploads/2022/09/largeUCSF-300x133.png00Eric Smithhttps://unofficialsf.com/wp-content/uploads/2022/09/largeUCSF-300x133.pngEric Smith2019-11-27 08:51:592019-11-27 08:52:00How to make a field POP on the page
In one week I got these two requests from different flow users:
Need to get the value from an Email field and turn it into text to pass into the new Send HTML Email action, which expects email addresses as strings.
Need to get the value of a picklist field in a specified record.
These are both solved by this simple action. Just pass it a recordId and the name of the field you want to target and it should be able to return the value of that field as a string. Tested so far only on picklists and email fields, though.
https://unofficialsf.com/wp-content/uploads/2022/09/largeUCSF-300x133.png00Alex Edelsteinhttps://unofficialsf.com/wp-content/uploads/2022/09/largeUCSF-300x133.pngAlex Edelstein2019-11-26 21:28:372019-11-26 21:29:34Extract Text from Email fields, Picklist fields and More with the ExtractTextFromNonTextField Action
https://unofficialsf.com/wp-content/uploads/2022/09/largeUCSF-300x133.png00Alex Edelsteinhttps://unofficialsf.com/wp-content/uploads/2022/09/largeUCSF-300x133.pngAlex Edelstein2019-11-26 19:58:442019-11-26 19:58:45Kristi Dellinger on Pre-populating New Records and then Sending the User to the Record Page in Edit Mode
This updates the Summer ’19 Update with information about HTML support, rich text, and text template usage.
Background
The Flow Team has been updating internal Flow components and switching from various proprietary code solutions to more standardized Salesforce components. This started with the release of Flow Builder in Spring ’19, continued with the addition of rich text in Summer ’19 and continues now with changes to Text Template in Winter ’20.
In Summer ’19, the ability to create and format rich text via toolbar was added to Flow Builder’s Display Text component and the Help Text and Error Text fields found on most screen fields. However, we didn’t have time to get it done in Text Templates. That was completed in Winter ’20.
Winter ’20 Changes to Text Template
In Winter ’20, the Text Template resource in Flow gains the ability to Edit as Rich Text and defaults to this mode (the other mode is Edit as Plain Text). Salesforce rich text editors generate HTML output, and if a Text Template that has HTML in its Body is passed to a downstream consumer like Post to Chatter Flow Action or Send Email Flow Action that doesn’t handle HTML, the HTML tags will be visible in the plain text version. Therefore, if you are using inputs that do not handle HTML, you’ll want to make sure that your Text Templates do not deliberately or inadvertently add any HTML to the Body. (Note: This unofficial Flow Action sends HTML email and can accept rich text output from a Text Template)
How HTML Tags Can Get Into a Text Template Body Field
Text template are always stored as text in flow metadata but that plain text may have html tags in it. These tags get added in the following ways:
1) if you are viewing the text template in Rich Text mode, any formatting you apply using the toolbar will cause html tags to be added to the underlying text.
In some circumstance HTML tags are automatically added even when you don’t obviously apply a format. Simply clicking on the body of the text while in Rich Text mode will automatically cause the underlying editor to add some <p> tags if they are not already there. And if you hit the return key, the editor will automatically add </br> ad <p> tags.
Preventing HTML Tags From Being Saved in a Text Template Body Field
The only way to be sure that your flow metadata will not contain tags that would become visible if the text template was passed to a plain text consumer like the existing Send Email or Post to Chatter actions is to either:
1) Set the text template to Plain Text before entering any text or
2) Change the text template to Plain Text and hand-remove any resulting tags that become visible.
Removing Unwanted HTML Tags
If you have accidentally created a Text Template set to Rich Text but actually want Plain Text, follow these steps to change it:
1) Select your current Body text and Copy it. Then delete it from the Body field
2) Use the Text Type menu (see image below) to specify Plain Text
3) Paste the text back from the Clipboard into the Body field
Switch between the two Edit modes using this new menu:
Adding HTML Directly to a Text Template
The addition of Edit in Rich Text mode to the Text Template resource provides Flow Builder users with a way to add HTML to their flow screens similar to how it has traditionally been done with Cloud Flow Designer.
You can paste or type HTML tags into a Text Template set to Edit in Plain Text mode, and then switch to Rich Text mode to see the effect.
When a user edits a text template with older html, a conversion takes place that strips out some of it.
Two conversions:
1) quill doesn’t understand some of the tags that CFD was able to handle. These tend to be obsolete tags. We filter these out.
2) quill then does its own conversion to change html to its internal rich text format. Quill ignores some html tags but we don’t currently know which ones.
Basic HTML can be pasted into Text Templates and will render properly when the Flow is run
When you switch the entry menu from Plain Text mode to Rich Text mode, you will see on the Text Template screen the rendered version of any HTML you have typed in. Switching from Plain Text to Rich Text does not result in any actual changes to the underlying text. If you edit the text while it’s in Rich Text mode (even if you just click on it), then any HTML tags are converted to internal rich text representations, and unsupported HTML tags are stripped out. Note that it is not always the case that switching in the other direction from Rich Text to Plain Text does not result in changes, because the Rich Text mode will insert </br> and <p> tags in certain cases.
Some unsupported HTML could be added to Cloud Flow Designer but can not be added to Flow Builder. This includes <style>.Flows with these tags can continue to be used and will run unchanged, but editing the text in Flow Builder will cause these unsupported HTML tags to be stripped out. This is discussed in Flow Rich Text Edit Summer ’19 Update and includes tags like <style>. Flows containing this set of tags can continue to be used. However, the Flow runtime will eventually be updated to use the same modern, standardizes rich text control that Flow Builder uses, which will cause these unsupported HTML tags to stop working. Our recommendation is to begin converting away from these tags. (See “Recommendations”, below)
Some HTML is supported in Flow Builder but not in running flows, and should generally be avoided
There are some HTML tags, like <table>, <td>, <tr>, that have the following characteristics:
If you paste them into Text Template when it’s in Plain Text mode and then switch to Rich Text mode, you will see them rendered in the Screen Builder. However when the flow is run, they currently are ignored.
Rich HTML with full styling can be added via Lightning Components
If you want to use complex or unsupported HTML in Flow Screens, we recommend creating or installing a Lightning Component. Lightning Components can access all standard HTML used by modern browsers.
HTML from Flows created in Cloud Flow Designer will continue to render unchanged if you don’t try to edit it
Older Flows containing templates or display text with unsupported HTML can still be used, to a degree.
If you open an older Flow that uses unsupported HTML in a text template or display text field, you can continue to use it as long as you do not click, while in Rich Text mode, on the body of the text field or otherwise attempt to edit it. (Doing that results in a conversion process that strips unsupported HTML. That’s discussed in more detail here.). Keep in mind that :
1) when the browsers stop supporting Flash, Cloud Flow Designer will no longer work, so if you have important content in HTML forms that are not supported in the ‘Basic HTML’ list above, we recommend that you either reformat using the rich text formatting toolbar or use Lightning Components in your Flow screens..
2) the Flow runtime will eventually stop supporting these unsupported HTML tags
Salesforce generally discourages the use of direct HTML in Flow screens and recommend that you use the formatting toolbar found in Text Templates and Display Text fields.
https://unofficialsf.com/wp-content/uploads/2022/09/largeUCSF-300x133.png00Alex Edelsteinhttps://unofficialsf.com/wp-content/uploads/2022/09/largeUCSF-300x133.pngAlex Edelstein2019-11-24 18:02:242019-11-24 18:02:28Flow, Rich Text, HTML and Text Templates Winter ’20 Update
A great survey of the ins and outs of our first generation Lookup flow screen component. Check it out.
https://unofficialsf.com/wp-content/uploads/2022/09/largeUCSF-300x133.png00Alex Edelsteinhttps://unofficialsf.com/wp-content/uploads/2022/09/largeUCSF-300x133.pngAlex Edelstein2019-11-18 17:58:582019-11-18 17:58:59Learn about the Lookup Component - By Jen Lee
https://unofficialsf.com/wp-content/uploads/2022/09/largeUCSF-300x133.png00Alex Edelsteinhttps://unofficialsf.com/wp-content/uploads/2022/09/largeUCSF-300x133.pngAlex Edelstein2019-11-17 19:07:542019-11-18 09:32:002 Great Blog Posts on Assigning Permission Sets With Flow
Salesforce rolled out the new Customer 360 messaging this week. Here’s the new Flow page.
https://unofficialsf.com/wp-content/uploads/2022/09/largeUCSF-300x133.png00Alex Edelsteinhttps://unofficialsf.com/wp-content/uploads/2022/09/largeUCSF-300x133.pngAlex Edelstein2019-11-15 14:50:362019-11-15 14:50:38See the New Official Salesforce Flow Page