Narender Singh form ForcePanda wrote a two blog series about using map collections in flows. The second blog makes good use of the new generic sObject support in flows coming in the Spring ’20 release
https://unofficialsf.com/wp-content/uploads/2022/09/largeUCSF-300x133.png00Tamar Erlichhttps://unofficialsf.com/wp-content/uploads/2022/09/largeUCSF-300x133.pngTamar Erlich2019-12-18 05:51:502019-12-18 06:56:59How to create a Map collection in Flows by Narender Singh
This package contains new Flow actions that are designed to manipulate any SObject or collection of SObjects. This means that in one Flow you might use them with a collection of Accounts and in another flow a collection of Leads.
This Post was most recently updated on: 3/18/24
Current Version 3.2.2
Fixed intermittant test class error (index out of bounds) from the ReturnNRandomRecords component
v3.2.2 – 3/18/24 – Eric Smith – ProductionSandbox Fixed intermittant test class error (index out of bounds) from the ReturnNRandomRecords component
Added a new Return N Random Records action (Derek Camp)
Added a new Convert to/from CSV String and Text Collection (Eric Smith) *also available as a reactive screen component
9/13/23 – Eric Smith – Reactive Screen Components I am making some of the actions also available as reactive screen components. See this article for more information.
Extract Strings From Collection (With Dedupe)
Collection Calculate
10/22/23 – Eric Smith – Added 4 new Collection Actions as Reactive Screen Components
Filter Collection
Find Common and Uncommon Records
Join Collections
Sort Collection
12/14/23 – Eric Smith – Added new Collection Action as a Reactive Screen Component
Note: If you are defining record collection variables in your flow and do not assign any value to them, many of these actions will fail with a “Missing required input parameter” when called from the flow. If there is a chance that your flow logic could bypass any assignment to the variable, be sure to add an Assignment element setting the collection variable to nothing before calling the action.
Keep in mind that you can insert mergefields as dynamic inputs in these actions. A mergefield takes the form of a reference name surrounded by braces and an exlamation point: {!myUpstreamVar}. So for example, you can use Map Collection like this:
To get the syntax right, use this rule: Flow Builder will replace everything between braces before passing the inputs to the invocable action.
Add or Insert Record
Takes as input a collection of records and a single record, and an optional index value. Returns the combined collection. If the index value is specified and is less than the length of the inputCollection, the
Inputs
List<SObject> inputCollection;
SObject inputRecord
Integer index
Outputs
List<SObject> outputCollection;
*Collection Calculate
Allows Add, Multply, and Average aggregate operations across a collection of records.
Takes as input a collection of records and returns the collection as output, allowing a new variable or reference to have the same value
Inputs
List<SObject> inputCollection;
Outputs
List<SObject> outputCollection;
Count Records And Fields
Takes a collection of records and returns a count. Optionally also takes a field name and a field value, and then also counts the number of records that have that particular value for that particular field. Returns both the number of matches and the total number of records. Added in V
Inputs
List<SObject> inputCollection;
String fieldName;
String fieldValue;
Outputs
Integer totalNumber
Integer matchedNumber
String errors
Dedupe Record Collection
Returns a set of de-duped records based on the field you specify. More Information
DeepClone
Clones a record and one or more sets of its child related records. More Information
*Extract Strings From Collection (with Dedupe)
Takes a collection and a field name, and returns a list of strings reflecting the values of those fields for the records. For example, if you pass in a list of Contacts and a fieldName of “Id”, you’ll get back a list of recordIds for the contacts.
Features
Extract a text collection or comma-separated string of any field for each record in a Record Collection
Particularly useful for Ids, Picklists, Multi-select picklists
Optionally de-dupe the values returned from all of the records.
Supports Multi-select picklists across all records in the collection
Useful when paired with the new AddQuotesToFields and ExecuteSOQL actions to pass in a set of strings wrapped in quotes
Ex. Select Name, Email from Contact where Id in (‘003023044333sDl’, ‘003023044333sKF’)
Inputs
inputRecordCollection
List of records to extract field values from
fieldAPIName;
API Name of the field you want returned
dedupeValues;
If true only unique values will be returned. The default value is true
Outputs
fieldValueCollection
Extracted fields in a text collection
fieldValueString;
Extracted fields in a comma-separated text variable
*Filter Collection
Filters a collection against a formula string which can be created by an included Expression Builder Flow Screen Component.
Inputs
List<SObject> inputCollection;
String formula;
Outputs
String errors; List<SObject> outputCollection;
Details
For each member of the inputCollection, this action will evaluate the provided formula and add the member to the outputCollection if the formula is true.
The formula must be a string that can be processed by the Salesforce formula engine. The actual engine that evaluates this string is written in Apex and is included in the Collection Processors package.
It will use the recordId of the current member as context, replacing expressions in the formula string of the form $Record.fieldname. For example, if the formula is ‘$Record.Age__c > 21’ and the input Collection is a collection of Student__c, the evaluator will do the following:
Loop through the collection of Student records. For each record:
use its ID and retrieve the record
retrieve the values of any fields present in the formula string
use the formula evaluator to evaluate the formula
If the formula evaluates to true, add the current record to the output collection
Also see ‘Notes on Dynamic Inputs‘ at the top of this post.
Find Record in Collection
Returns all records from the inputCollection that have a field with name targetField that has a value of targetValue. Pass in the name of the object in targetObject (for example, if the inputCollection is a List of Contacts, set targetObject to Contact. There’s probably a way to determine this automatically but it’s not implemented in the action at this time). If there’s just a single result, the result is returned as singleOutputMember. Otherwise it’s returned as multipleOutputMembers. Version 1.20+: MultipleOutputMembers returns null if there are no results
Inputs
List<SObject> inputCollection;
String targetObject
String targetField
String targetValue
Outputs
SObject singleOutputMember;
List<SObject> multipleOutputMembers
*Find Common and Uncommon Records
Compares & Contrats two record collections – even different sObject Types!
Given a collection and a comma-separated list of field names, generates a string that includes all of the field values for every member of the collection. There are now two modes you can use. displayMode ‘simple’ simply throws the information out in simple groups. Useful for some debugging. displayMode ‘table’ generates HTML table markup that’s great for insertion into emails:
For full information on this action, see this post.
Inputs
List<SObject> inputCollection;
String shownFields
a comma-separated list of the fields you want to show in the table. Make sure to use the full api names, including ‘__c’ for custom fields.
displayMode
‘simple’ or ‘table’. defaults to simple
tableStyleString
will be inserted into the table html as a style attribute: <table style=”[tableStyleString]”>
headerStyleString
will be inserted into the <th> tags as a style attribute
rowStyleString
will be inserted into individual row tags (<tr>) as a style attribute
showHeader
Boolean
Outputs
String reportString
Get Child Collection
Takes a record and returns a specified collection of child records related to the input record.
Pass in either a record or a recordID (as a string), but not both. Specify the childRelationshipName, which should be the name of the child Object. Example. If you have an Opportunity and want to retrieve all of the OpportunityContactRoles associated with the input, specify a childRelationshipName of OpportunityContactRole. Note that this should also be specified as the Output Collection.
In childRecordFieldsCSV, specify the fields you want returned as a comma-delimited string. Example: Id,Name
Returns the first member of the inputCollection. The inputCollection is not modified by this action. Make sure that the types of your inputCollection and outputMember match.
Inputs
List<SObject> inputCollection;
Outputs
SObject outputMember;
Get Lookup Collection
Takes a collection of records and the name of an object related via a Lookup, and returns a collection of objects.
Pass in either a collection of records or a collection of string record ID’s. Pass in the name of the related object. Example: You start with a collection of OpportunityContactRoles and you want to get the Contacts associated with your OpportunityContactRoles via the ContactId Lookup field. In this case you would set lookupObjectName to Contact.
In lookupRecordFieldsCSV, specify the fields you want returned as a comma-delimited string. Example: Id,Name
The Collection Actions package of utility actions now has a new action that takes a collection of recordIds (i.e. a List of Strings) and returns the corresponding records. It carries out a SOQL query and obtains the fields that you specify by name. The records are returned both as a collection of records and a serialized (JSON) string.
Takes two collections (of the same type, please!) and returns their union as a single collection.
Inputs
List<SObject> inputCollection1;
List<SObject> inputCollection2;
Outputs
List<SObject> outputCollection;
Map Collection
Takes a collection and a set of key value pairs. Example:
“Rating” : “Warm”, “Industry” : “Banking“
Goes through the collection and changes each field with a name matching the key to the specified value.
Note that dynamic inputs are supported: “Rating” : “Warm”, “Industry” : “{!myUpstreamVar}“. See above for more.
NOTE: this currently only works for string values.
Inputs
List<SObject> inputCollection;
String keyValuePairs;
Outputs
List<SObject> outputCollection;
String errors;
Map Collection supports mapping of Time fields.
Example: The Account object has a time field, and you want to use that time field on every case created. You can get the time variable from the Account and convert that to a string by using a formula, TEXT(Account.TIME). Then use that formula variable to assign that to the case.
Remove Record from Collection
Takes a collection and an index integer. Uses the Apex List class remove method to remove the member of the collection at the index location.
Inputs
List<SObject> inputCollection;
Integer index;
Outputs
List<SObject> outputCollection;
Return First N Records from Collection
Takes a collection and an integer count and returns that count of records from the beginning of the collection. The entire collection will be returned if it doesn’t contain more records than the record count attribute.
Takes a collection and an integer count and returns that count of records randomly from the collection. The entire collection will be returned if it doesn’t contain more records than the record count attribute.
Inputs
List<SObject> Input Collection;
Integer Record Count;
Outputs
List<SObject> Output Collection;
Integer Return Count;
*Sort Collection
Takes a collection and a sortKeys string formatted as key value pairs (example:
“Name”:”ASC”,”Rating”:”Warm”
Known Issues:
1. Picklist fields are not supported. 2. If some of the records in your collection have a blank value for the field you’re sorting on, it will display the blank ones first no matter which direction you sort 3. The sorting priority is reversed from what I would have thought. It sorts first on the last key pair and then works backwards to the first.
Inputs
List<SObject> inputCollection;
String sortKeys;
Outputs
List<SObject> outputCollection;
Upsert
Upsert will either save or update a collection, depending on whether the collection already has ID’s
Attribute
Type
inputCollection
List<SObject>
inputRecord
SObject
externalIdFieldName
String
allOrNone
Boolean
serializedRecordData
String. This should be a JSON string of key value pairs where the keys are the names of fields on a single object. for example: {‘AnnualRevenue’: ‘400000’, ‘Rating’: ‘Hot’}
objectName
String. the name of the object that the serialized key value pairs belong to. Example ‘Case’. Only used to classify a passed in serializedRecordData
Looking for a fun project? Consider one of these requested enhancements!
Name
What it Does
What should the inputs be?
What should the outputs be?
Suggested By
Discussion
EXAMPLE: Change Owner
Similar to Map Collection, but specialized for changing the owner field, and so a little easier to configure
Besides the input collection, a string that can either be a username or a user recordId
standard success vs. error return values
Limit X
Similar to the First collection, but allow user to specify how many records to return from the collection. For example, they can pass an sobject collection and have up to X number of records returned in a new collection.
record collection
updated record collection
Chris Van der Merwe
IN Clause
Pass two object collections and do IN comparison
record collection, record collection2, field to check from record collection, field to compare against record collection 2
record collection with records as result on IN Clause
Chris Van der Merwe
This comes up all the time, and is challenging for governor limits in flwo.
Object API Name From Record Id
Pass in a record id of any object and get back the Object API Name
record id
Object Name
Patrick Loughran
The code for this is written if it makes sense to publish.
optional filter for folder id, report type, last view, last run
return report name, report format,
Record List from Report
Return a sobject collection of all the records on a specified report
input report id
sobject collection of records and fields on the report
Goal is to allow end-user to select a report of records that they defined using a report and perform a screen flow against those records. For example, mass create child records, mass update, mass delete etc
Record List from ListView
Return a sobject collection of all the records on a specified list view
input listview id
sobject collection of records and fields on the list view
Goal is to allow end-user to select a report of records that they defined using a list view and perform a screen flow against those records. For example, mass create child records, mass update, mass delete etc
Compare Collections and return unique and common values
Functionality to be the same as here, but for record collections.
Two collections
Three collections (common, unique to coll1, unique to coll2)
Peter Kaszas
I am using the datable from unofficialsf.com and would like to be able to get the difference between the total list and the selected list.
Slice A big collection (Take first N Records)
It takes an input sobject collection and spits out 2 collections based on the first N records of a number you provide, and puts the rest in another collection
One sObject Collection
Two sObject Collections
Adam White
Many times it is useful to chunk out operations to abide by Salesforce limits – it’s especially useful in Screen flows when its easy to maintain limits by keeping tabs on your DML and then letting the user hit ‘Next’ if Flow detects you’re approaching a limit. This would be a handy action to have for that
Output formula value for each record in Collection
1. Return value from a formula input using available columns in an sObject Collection Variable 2. Add values to a Collection Variable 3. Optional: output unique values
One sObject Collection Variable
One Collection Variable
Rick Haag
Formulas fields are often created for the purpose supporting automation and are not shared via the UI to users. This option can reduce the overhead of multiple formula fields in place soley for the purpose of automation.
Support Apex Defined Objects
Update the processors to support Apex Defined Objects in addition to SObjects
One Apex Defined Collection Variable
One Apex Defined Collection Variable
Eric Smith
Map more than strings
Add at least number and date to the mapping.
I suppose the tricky bet is how to describe the value of the mapping pair. I suggest leaving it as text and converting to number and converting to date inside the map code.
Terry Cole
Mapping of text area works. Mapping of picklist value works (from string). Mapping of long text area seems to generate fault. Mapping of number (from string) and date (from string) runs but does not make changes.
Count Records and Fields
Documentation says field and value are optional, but screen configuration shows them as required
Just wants a quick count. Can so with collection count feature of assign, however. Just wanted cleaner solution.
Minimum date
Insert a list of dates, and returns the minimum. Quite cumbersom via formulas, seems easier in apex
Collection of dates
Strip Nulls
Remove null records from a record collection
Collection of sObject records
New collection of sObjects with null records removed
Charles Thompson
Anything you can do to avoid a loop is great! As it is, to remove null records, it appears you have to compare each record against a single record variable (of the same sObject) that has not been initialised.
Get Child Collections
Pass in a *collection of records* and get a single collection of *the children of all of the input records* of a particular object type
1) Collection of object records (or list of IDs) 2) Name of child object
Collection of records of the object type specified
Rachel Beach
Basically “Get Child Collection” but you can pass in a list of records rather than having to create a loop and call the action for each parent record
Get Records where Field in Collection
Get all records where a field is equal to one of the values in a collection (select * from [object] where [field] IN [input collection])
1) Name of object 2) Name of lookup field 3) Collection of record IDs
Collection of records of the object type specified
Rachel Beach
Not sure if this needs to be different for lookup fields vs other types of fields but I personally want it for a lookup field
Installation
Install Prerequisites
Before installing this component, you need to have in your org the Screen Component and Action Base Packs. Install those here
Current Release
v3.2.2 – 3/18/24 – Eric Smith – ProductionSandbox Fixed intermittant test class error (index out of bounds) from the ReturnNRandomRecords component
Old Versions
v3.2.1 12/20/23 ProductionSandbox Contains additional tests and cleanup courtesy of Jeroen Burgers
There has been a simple Show Toast action available on unofficialsf.com that you could use in a Flow to display a pop-up toast panel with a message of your choice. Recently I’ve seen users asking for things like being able to control the display time or including a clickable link in their message.
I decided to add those options to the component along with additional features such as the display mode, custom icons and a title.
Read on to see how you can install and use this enhanced component in your own org.
Dismissible will display the toast message until the close button is clicked or the duration time has elapsed.
Pester will display until the duration time has elapsed. No close button will be available.
Sticky will remain displayed until the close button is pressed
Duration – The default is 10 seconds and the minimum is 5 seconds.
The duration attribute only applies to Dismissible and Pester modes
URL Label – This is the Label for the link in your message
To include a clickable link in the message, place the characters {url} in your message. At run-time the message will be updated to replace {url} with the value of your URL Label parameter and it will link to the address you specified in the URL Link parameter.
URL Link – This is the URL for the link in your message
Sample Usage
This first example shows how a Toast Message can be activated with just a message and defaults.
This example generates a Warning message with a Title, 15 second duration and no close button.
This example generates a Toast Message with a Custom Icon and will be displayed until the close button is clicked.
This last example includes a Link to a newly created record from the Flow.
{!vContactId} holds the record ID of the new ContactIn the message, {url} will be replaced with a Link defined by URL Label and URL LinkThis is the URL LabelThis is the URL Link
fContactRecordURL is a special formula you can use to combine the correct URL with the currently running domain name and the recordId you want to display.
I’m pleased to share some of the upcoming highlights of Spring ’20.
Trigger on Record Change Events
Flow Builder now allows you to trigger on record changes, but there’s a catch: in Spring ’20, our support extends to “Before Save” triggers but not “After Save” triggers. The practical ramification of this is that when you trigger on a record change in Spring ’20, you’re going to be limited in the Flow elements you have access to. Here’s what the palette looks like:
Note the absence of Update Records and Create Records. “Before Save’ triggers require a bit of a shift in thinking. The best way to think about “Before Save” triggers is that they allow you to do one thing really well: modify the record that caused the trigger to fire. The key is understanding what’s implied by the words “Before Save”: Flow gets notified when the triggering record is starting to get saved, giving you a chance to make changes to that specific record before the save actually happens. The saving will happen automatically after the flow ends, and so there’s no Update Records.
Because of this special location in the save order, you get positive and negative effects. The main positive effect is performance: Before-Save triggers carry out field updates 10x faster than the standard Process Builder trigger (which is an ‘After-Save’ trigger). The downside is that you don’t get access to Actions and Subflows and you can’t update related (or unrelated) records.
Access the new triggers by double clicking on the Start element in Autolaunched Flows:
We’re working on building out additional triggering capability for delivery in 2020.
Flow Simplification – Automatic Field Discovery and Automatic Output Handling for Actions and Create Record
Flow Simplification is a major multi-release campaign that focuses on making flows easier and faster to build. In Spring ’20, the big announcement is the elimination of the much disliked requirement to specify, in the Get Records element, the entire set of fields that you want to use later in the Flow. That’s over now. Flow automatically detects the fields you use and makes sure to retrieve them. Note that you can still choose to specify these fields manually, and for existing flows, we stay in this new ‘manual’ mode rather than try to do any conversions.
Automatic Output Handling was introduced in Winter ’20 for Get Records and screen components. It is now supported in Actions and Create Records as well.
Invocable Actions can use Generic SObjects with Flow
This enabling technology allows the construction of invocable actions that are designed to operate on any sObject, or any collection of sObjects, that are passed in to them. As a non-developer, you’ll experience the benefit of this in the form of a range of highly-useful new Flow Actions that work on any collection you throw at them. Here are some unofficial actions that we’re experimenting with:
Note that in the image above, although some of the actions are labeled with the word “Account”, those actions are actually called things like Sort Collection and Remove First Record, and can be used in the next flow over against Leads, or your custom objects. In most cases, you _can_ already do these things in Flow, but you often have to set up loops, assignments and updates, and these actions eliminate all of those steps.
As a user of these actions, you play an important role in declaring which specific Sobject or SObject type you’re going to use for this particular action.
For example, in the Flow above, the Sort action has been configured to sort accounts. Suppose that you want to use it to sort a custom object called BakedGoods__c. When you drag it onto the canvas, you start by declaring the specific objects you’re going to assign to each generic attribute. You initially see this:
The declaration has to be completed before the rest of the inputs and outputs are displayed:
Invocable Actions can provide Custom Property Editors (PILOT)
You will be able to request from Support that your org be enabled for this pilot, which allows invocable actions to use custom property editors. In the slide below, you can compare the baseline, one-size-fits-all property editor that is provided to all actions with a custom property editor built for an Update Field action:
Internal Salesforce teams are already working on sophisticated applications of this, such as this specialized Email action being built for a marketing application that uses Flow:
Run Flows in System Mode
Set your flow to run in system context with sharing. The flow still respects org-wide default settings, role hierarchies, sharing rules, manual sharing, teams, and territories, but it ignores object permissions, field-level access, and other permissions of the running user.
Additional Goodies
Multi-level Field Traversal
You can now traverse through multiple levels of related records/lookups in Flow Builder popup menus:
Deactivate from inside of Flow Builder
Conditional Field Visibility now immediately detects newly created screen fields
Improvements to Keyboard Shortcuts – Click on the canvas and type ‘/’ to see the updated list of available shortcuts
Jason Teller, Sr. Director, Product Management, Salesforce; Adam Dalton, Applicaiton Product Manager, Facebook; Kristy Wong, Business Value Services Director, Salesforce
Platform
Breakout
Advanced Flow for Admins: Become A Salesforce Developer Using Clicks
Phil Weinmeister, VP, Product Management, 7Summits; Jarrod Kingston, Director of Solution Engineering, 7Summits; David Litton, Director, Solutions Architecture, Ad Victoriam Solutions
https://unofficialsf.com/wp-content/uploads/2022/09/largeUCSF-300x133.png00Tamar Erlichhttps://unofficialsf.com/wp-content/uploads/2022/09/largeUCSF-300x133.pngTamar Erlich2019-12-11 12:06:532019-12-11 12:06:54Creating a unique collection in flow by GORAV SETH
This Post was most recently updated on: 7/6/23 Current Version: 1.9.1
The RecordDetail component provides new ways to display record fields in Flow screens. Flow excels in providing fine control over field combinations, but sometimes you just want to show a bunch of fields from a record in one place without a lot of configuration. This component handles all the formatting, provides 2 column layout, and takes advantage of additional goodies that the platform provides.
If you don’t provide a specific set of fields, this component will show the entire record:
But you can pass in a specific list of field names:
…and you’ll get just the fields you asked for:
If you set the mode attribute to ‘edit’, you can make changes inline and save them immediately with a save button. Note that unlike everything else in Flow, changes you make inside of this component do not get output for use downstream in the flow. In other words, this component will not output a full record. So if you want to use the data that has just been entered and saved, you’ll need to add a separate downstream Get Records element to pull the full record ‘back’ into Flow.
Earlier versions displayed the fields without any separation between lines.
This update adds underlines when in View Mode to improve readability. This more similar to a standard record detail view.
The underlines will not appear when you are in Edit Mode.
Styling Options
You can apply SLDS classes to the MAIN BOX of this Screen Component.
The major classes for themes are: slds-box slds-theme_default slds-box slds-theme_shade slds-box slds-theme_shade slds-theme_alert-texture
The default values is “slds-box slds-theme_default”
But not limited to these classes but you can also add other classes like padding, margin, grid, alignment, visibility, and custom CSS classes as well (especially if you’re using this screen component in Lightning Flow within a community)
Attributes
recordId
Input – This is the ID of the record to display or Output – The ID of a newly created record.
If you pass in no recordId, an Object API Name, and mode of Edit, the component will open in edit mode and create a new record on save.
mode
Mode (View or Edit)
fields
A comma-separated list of field names from the recordId’s object type. If this is not provided, this component will display all fields accessible to the running user’s profile.
flowNavigationOnCancelDirection
Specify Previous or Next for the flow navigation direction after the Cancel button is clicked.
flowNavigationOnCancel
Check if you would like the flow to navigate to the Previous or Next screen when clicking Cancel. For best results, hide the page footer in the flow screen.
flowNavigationOnSave
Check if you would like the flow to navigate to the Next screen (or Finish) when clicking Save. For best results, hide the page footer in the flow screen.
isCancelButton
Output – This value will be set to True is the user selected the Cancel button.
showCancelButton = false;
Can suppress the Cancel button
suppressToast = false;
Provides a way to suppress the toast that normally displays
suppressUnderline = false
Provides a way to suppress gridlines
SaveBtnLabel = ‘Save’;
Allows changing the label for Save
CancelBtnLabel = ‘Cancel’;
Allows changing the label for Cancel
columnsize = 2;
Sets custom width, out of 12
boxclass
applies css classes to the frame of thecomponent. The default values is “slds-box slds-theme_default” See “Styling Options” above
version
Used only to display the current version of the component. No entry is required.
Installation
This component requires that you first install the Flow Base Packs
FlowActionsBasePack Version 3.15 or later FlowScreenComponentsBasePack Version 3.2.0 or later
You can have RecordDetail automatically display the subset of fields that’s tied to a particular combination of profile and record type by using actions like:
This component uses the recordEditForm and recordViewForm base components and is constrained by their limitations. It doesn’t support all Salesforce standard objects. For example, the Event and Task objects are not supported. This limitation also applies to any record that references a field that belongs to an unsupported object. The list of supported objects is here.
If you are creating a new record and don’t select a list of fields, the component will include some system fields a required such as Created Date and Date Last Modified.
This component responds to your Display Density settings (“Comfy”, “Compact”, etc…).
For behavior like Required and Validation, think of this component as ‘listening’ to the object and field manager in Setup instead of to Flow Builder. I.e. if the field is configured in Setup required in Setup it will be required in this component. If there’s a validation rule on the field in Setup, it will run on save here.
In Spring ’19 Salesforce added a Printable View button to many Standard and all Custom Objects. The Printable View includes the current user’s page layout and related lists. What it does not include are any Posts that users have added to the Chatter Feed.
In this Blog Post, I’ll show you how to add a button to your Lightning Record Page that will create your Printable View including Chatter Posts.
This post covers how to add this capability to the Case object. You can apply all of these same steps to support this feature in other objects of your choice.
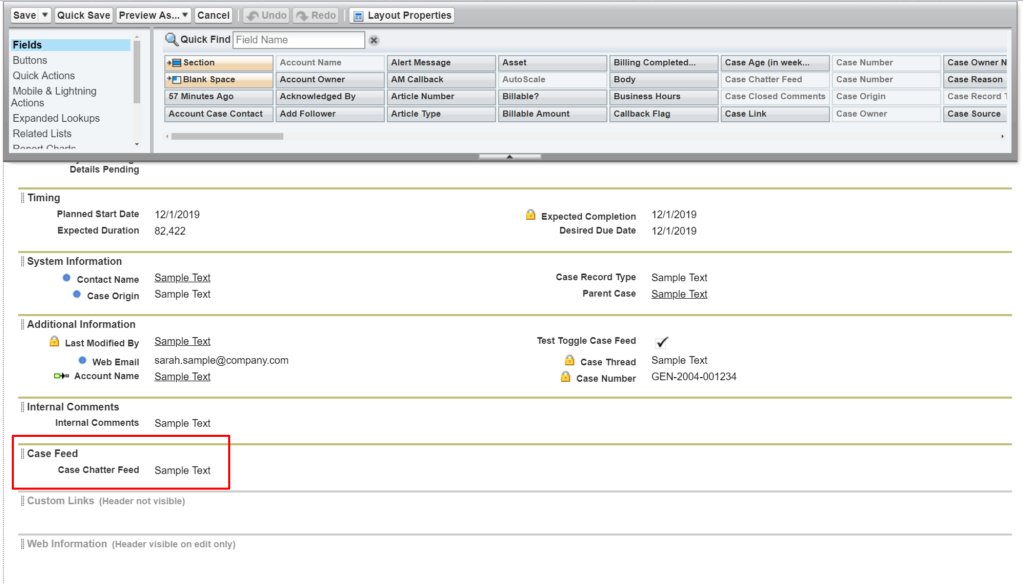
The first step is to add a custom field to Case to store the details from the Chatter Posts.
Here I create a Rich Text field called Case Chatter Feed with a default length of 32,768 characters.
The next step is to update my Page Layout to include this new field. In this example, I have also added a new Section to put it in.
Now, when I want to create a new Printable View of my record, I must first populate this field with the current content of the record’s Chatter Feed. I can handle this step by running a Flow. The only attribute I need to pass into this Flow is the record ID (varCaseId) from the Case page.
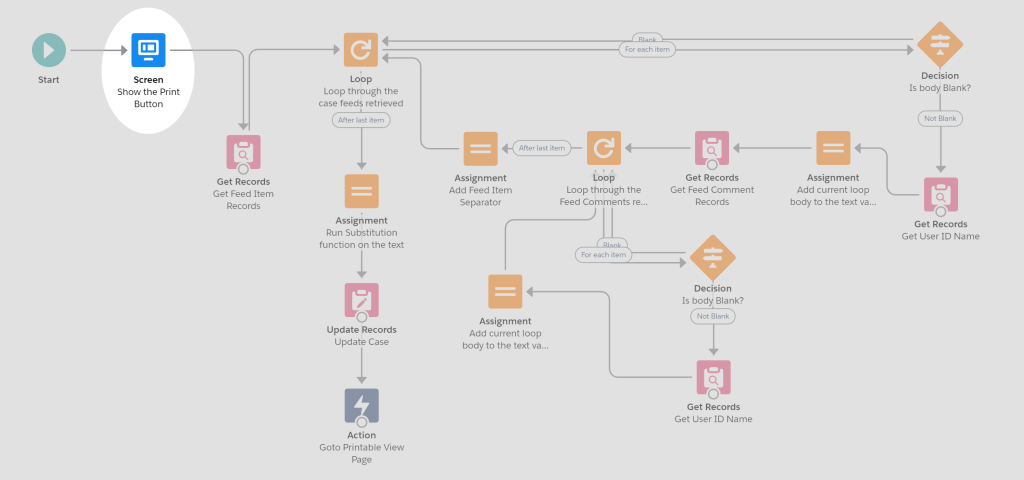
In this body of this Flow I get all of the user created Chatter Posts and Comments and insert them into my new custom field. Later in this post I will show you how the first and last steps in this Flow tie everything together.
In the first Get Records step, I get all Feed Item records related to the Case and specify the fields I will be using later in the Flow.
I then Loop through each of those Feed Items by referencing the collection variable {!Get_Feed_Item_Records} that was automatically created by the Get Records step. Here I also create a new single Record variable {!loopFeedItem} to store each record inside of the loop.
In the Decision step, I skip any Feed Items records with a blank body. This way I’m only processing user created posts. You can modify this logic if you want to include more details.
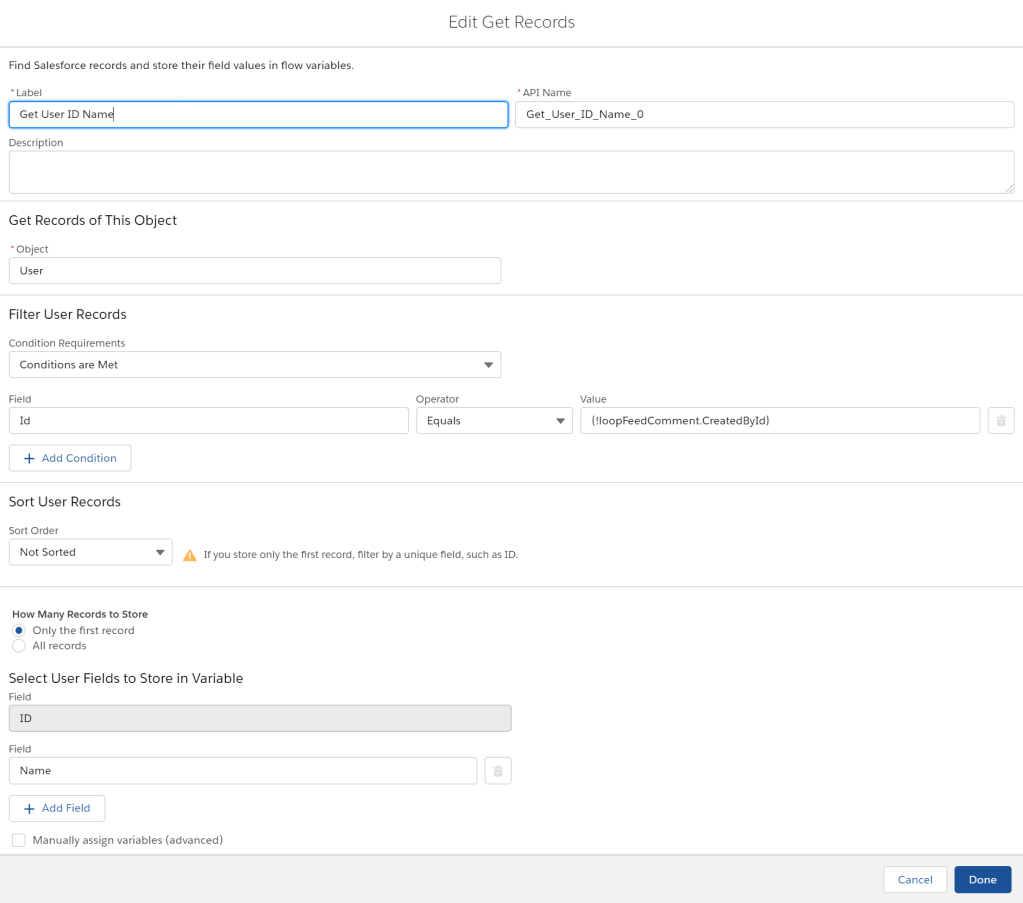
Because the Feed Item records only include the user’s ID, I use a Get Records step to get the user’s name to include in my Chatter Feed field.
In the Assignment step, I build out each of the Feed Item fields I want to show as part of the Post as well as the formatting of the information. This is done by using the Add operator to build out the full feed one piece at a time.
We end up turning this from the Chatter Feed:
Into this in our custom field:
I’ve used a combination of Formula resources and Text Template resources to build out each post.
ttLineSeparator (Text Template)
~ ~
fSpaceSeparator (Text Formula)
” | “
For each Feed Item I do another Get Records to find any Feed Comments associated with the current Feed Item.
I then Loop through each of those Feed Comments by referencing the collection variable {!Get_Feed_Comment_Records} that was automatically created by the previous Get Records step. Here I also create a new single Record variable {!loopFeedComment} to store each record inside of the loop.
Just like I did with Feed Items, I skip any Feed Comments with a blank body in the Decision step.
Because the Feed Comment records only include the user’s ID, I use a Get Records step to get the user’s name to include in my Chatter Feed field.
I continue to build out my chatter posts field by adding Feed Comments and formatting in the Assignment step.
Here I’ve used some additional formatting variables.
ttCommentSeperator (Text Template)
.
fCommentIndent (Text Formula)
” —– “
After the Feed Comment Loop is completed, I add one more Assignment step to add a separator before the next Feed Item.
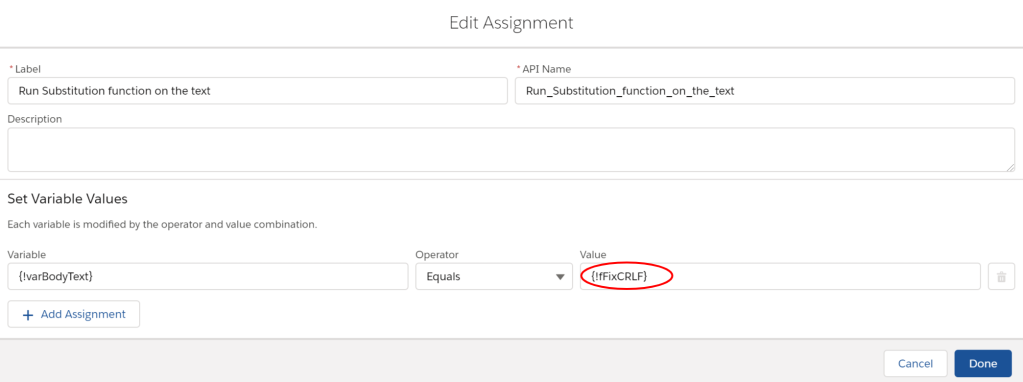
After the outer Feed Item Loop is finally completed, I add one more Assignment step to cleanup the separations between the lines.
This is a little trick you can use to put line separators (Carriage Return, Line Feed) inside of a text field. Text Templates support separate lines but they can’t contain just a single separator so my ttLineSeparator Text Template includes a single special character on each line that get removed by my fFixCRLF Formula.
ttLineSeparator (Text Template)
~ ~
fFixCRLF (Text Formula)
SUBSTITUTE({!varBodyText},”~”,””)
The last piece needed to get my Chatter Posts into the Case record so they can be displayed is to add an Update Records step to save the record with the newly built Chatter Feed details.
Now I will show you how to add a couple more pieces to this Flow so we can use it on a Lightning Record Page and have it open a new Tab with the Printable View.
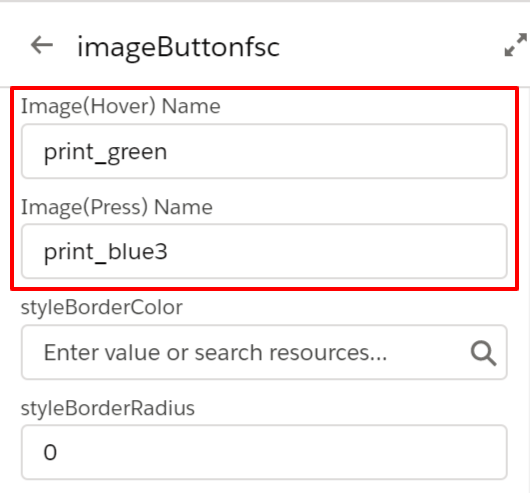
I want to put this Flow on the Case Lightning Record Page but I don’t want it to run until selected by the user. I handle this by adding a Screen to the beginning of the Flow that displays a custom image and waits until the user clicks on it before continuing with the rest of the Flow. Here I’m using the Image Button Flow Screen Component from unofficialsf.com. I’ve added the display, hover and pressed images for the button as Static Resources to my org so they can be referenced by the Image Button component. (Follow the Image Button link for complete documentation on this component)
Select the display image and the action to take when clicked
Select the images to display during mouse hover and mouse press
Select the size of the image
The final step in my Flow is an Action that opens a new Tab with the URL for the Printable View of the Case record. Here I’m using another component from unofficialsf.com. This one is the Open URL Flow Action. (Follow the Open URL link for complete documentation on this component)
The URL for the Printable View is created with a formula that combines the Base URL for the running org with the Case Record Id and the Printable View URL identifier.
All I need to do now is to activate then add this Flow to the Case Lightning Record Page and configure it to pass in the recordId to my varCaseId input variable.
I’ve created a couple of Installation Packages for those who want to try this out in their orgs. The first package includes both the Image Button and Open URL components. That package will only install in your org if you have neither of those components already installed. The second package does not include those components and the provided Flow must be edited to access them. I’ve provided instructions in the Flow showing how to do that.
1 – Install Package with Custom Case Field, Components, Image Static Resources and Sample Flow
Make sure you have the current version installed for the Image Button component
Make sure you have the current version installed for the Open URL component
Add the new field ( Case Chatter Feed ) to the Case Page Layout
Edit the Flow ( Case – Printable View with Chatter Posts – Template )
See the instructions in the 2 Flow Screen elements
Activate the Flow
Add the Flow to the Case Lightning Record Page
https://unofficialsf.com/wp-content/uploads/2022/09/largeUCSF-300x133.png00Eric Smithhttps://unofficialsf.com/wp-content/uploads/2022/09/largeUCSF-300x133.pngEric Smith2019-12-03 07:25:272019-12-03 07:25:30How to Include Chatter Posts on Printable Views
My packaging pipeline has really improved in the last few months, thanks to sfdx and packaging commands that are now available. I thought I’d put together a video showing how to take a Flow/NBA app (or really any Salesforce app) and easily package with the most effective tools.
https://unofficialsf.com/wp-content/uploads/2022/09/largeUCSF-300x133.png00Alex Edelsteinhttps://unofficialsf.com/wp-content/uploads/2022/09/largeUCSF-300x133.pngAlex Edelstein2019-12-01 18:24:252019-12-01 18:24:29Using SFDX to Easily Create Packages
Lightning Flow Screen Components are a great way to add power to and improve the look of your Flows. In this four-part series, I’ll show you how a single component, designed to display a list or table, can enhance your Flows.
The unofficialsf.com website includes Datatable as one of many Flow Screen Components you can use for your own organization.
This component is derived from the datatable Lightning Base Component. I recently enhanced the base component to be more powerful and Admin friendly.
I will be showing you some examples about how the Datatable component:
Can be used in place of a Record Choice Set (Dynamic Record Choice) for selecting a record while displaying more than a single field
Can be used to select multiple records from an object then perform additional actions on them
Can be used to present your data in an interactive and visually enhanced format
Can be used to display and inline edit a collection of records
Part 4: Inline Editing
In November of 2019, Kirill Boyarkin, updated this component to support inline editing. Now you can specify individual columns as editable and the changed values will be passed back to your Flow so you can update the object records.
In this example, I created a simple Flow to present a list of Account records with the Annual Revenue column set to editable.
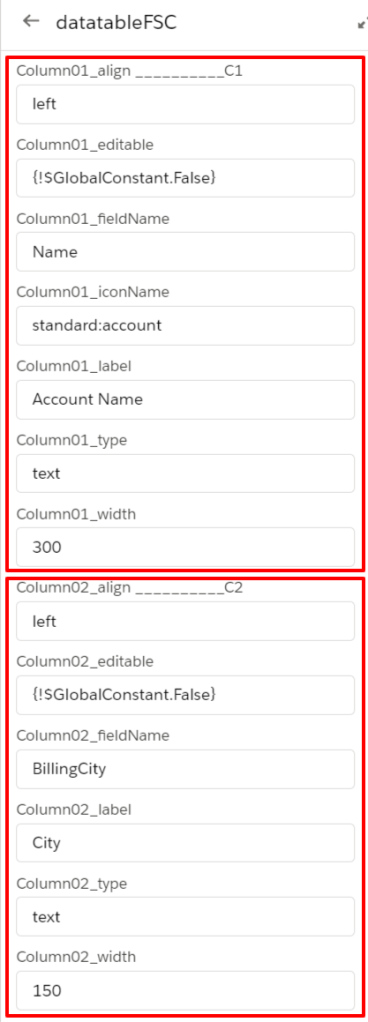
The Get Records node populates an SObject Collection variable with the records and fields I want to display in my datatable.
I pass that collection into the datatableFSC component on my Flow Screen, define the columns I want to display and set the Revenue column to be editable.
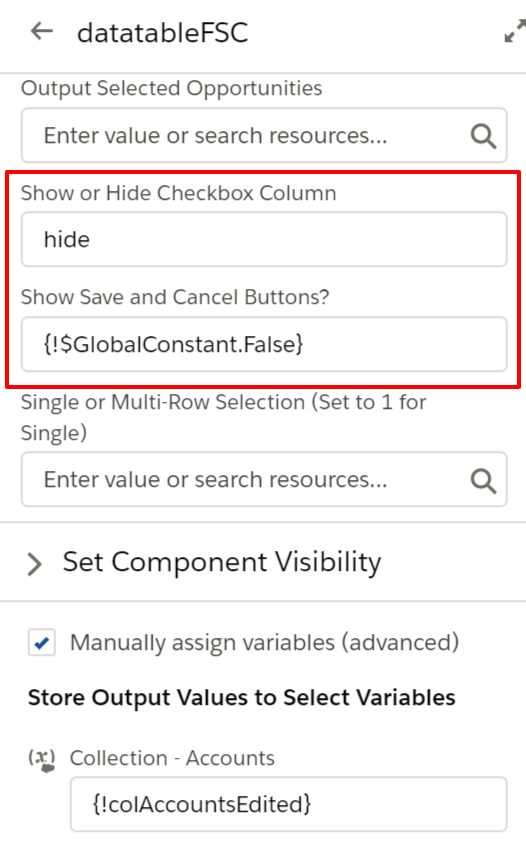
This component has a lot of attributes, so make sure you assign any output attributes in the Output Values section. For my output attributes, I select “Manually assign variables (advanced)” and assign my new SObject collection variable to the same Collection – Accounts attribute I used to pass in my records.
NOTE: The output attribute for selected records (Output Selected Accounts) is only used for identifying selected records in the datatable and may not contain the updated values. When you are combining editing and selecting in a single table, use the “Output Selected Accounts” attribute to get the list of selected records and their IDs and use the “Collection – Accounts” attribute to access the edited records.
The final Update Records node in my Flow is to update the Account object with my collection of edited records.
If you Show the checkbox column with your datatable, you will be able to select multiple rows and optionally apply an edit to all of the selected rows.
By default, the component will display Cancel and Save buttons once you start making edits. You can bypass this option by setting the “Show Save and Cancel Buttons?” attribute to False. Any edits will then be automatically saved once you hit the Next button.
Note:If there are a large number of records in the datatable, the Next button will always display at the bottom of the screen, but the user will have to scroll to the end of the table to see the Cancel and Save buttons.
See the complete series on how you can use the datatable Flow Screen Component in your Lightning Flows.
Part 1 – Use a Datatable to present a dynamic choice for record selection in a Flow. Part 2 – Use a Datatable in a Flow to select and act on a collection of records. Part 3 – Use a Datatable to display a formatted, interactive table in your Flow. Part 4 – Use a Datatable to inline edit a group of records.
https://unofficialsf.com/wp-content/uploads/2022/09/largeUCSF-300x133.png00Eric Smithhttps://unofficialsf.com/wp-content/uploads/2022/09/largeUCSF-300x133.pngEric Smith2019-11-30 07:59:352021-08-09 09:35:52Enhance your Flows with Data Tables – Part 4 (Inline Editing)