Create a Next Best Action Employee App – Part 2
Setup and Installation steps (View Part 1 for demo video and details on the building blocks)
STEP 1: Install package
- Install the NBA Employee app package and follow along
OR
- Clone repo from git: https://github.com/jnarayanan15/repo/tree/Employee_NextBestAction
STEP 2: Setup the environment
- Make sure all custom fields on the User object are accessible and visible in the page layouts
- Object Manager →User →Fields & Relationships
- Navigate to each of the fields below and follow the steps to Set Field Level Accessibility to Visible to all profiles
- Navigate to each of the fields below and follow the steps to Set Field Level Accessibility to Visible to all profiles
- Einstein HiPo Likelihood
- Next Shift Start Date
- Next Shift End Date
- Is People Manager
- Survey Taken
- Navigate to each of the fields below and follow the steps to Set Field Level Accessibility to Visible to all profiles

- Ensure that the fields are visible in the default page layout
- Go to object manager – User page layouts. Drag the custom fields to the Additional Information Section
- Repeat for Message layout →Drag the Category field appears in the detail page
STEP 3: Create Users of the app.
- User1
- First name Bessie
- Last Name Thomas
- use your email for email and
- give a username such as b.thomas@demo51.org
- In additional information
- Check Is People Manager
- Add dates for Next Shift Start and Next Shift End Dates
- Leave the Survey Taken column unchecked
- User2 (Important to use the same name as for the purpose of the demo , it is hard coded)
- First name Rosa
- Last Name Garcia
- use your email for email and
- give a username such as m.garcia@demo51.org
- In additional information
- Leave the Is people manager unchecked
- Leave the Survey Taken column unchecked
- Give a value >80% to simulate Einstein HiPo Likelihood
- Add dates for Next Shift Start and Next Shift End Dates
- Make sure to remember the username and also change the password. (You should receive an email on the registered email)
STEP 4: Assign permissions
- Go to users – permission set and enable both Goodmorning and Goodmorningsales permission for the user user(user user is the admin user for scratch orgs)
- Permission set →Manage Assignments→ Add Assignments→ User, User (if scratch org or the relevant users) .
- Profiles→system admin→ change permissions to view object (Assuming both users are System Administrators. If not assign the following permission accordingly to the users created)
- custom app setting →check bright team management

STEP 5: Add Data to custom objects

- Go to SalesTacticalPlan object from the AppMenu (If it does not show – make sure the user permissions are set)
- Create a record with the details shown (EmployeeDailyTacticalPlan)
- Create the following records to the Recommendation object
- If you do not see any field visible on the recommendation object : Go to Recommendation object Manager→Page Layout→Manage Assignment →Edit Assignment and assign recommendation layout to all users.
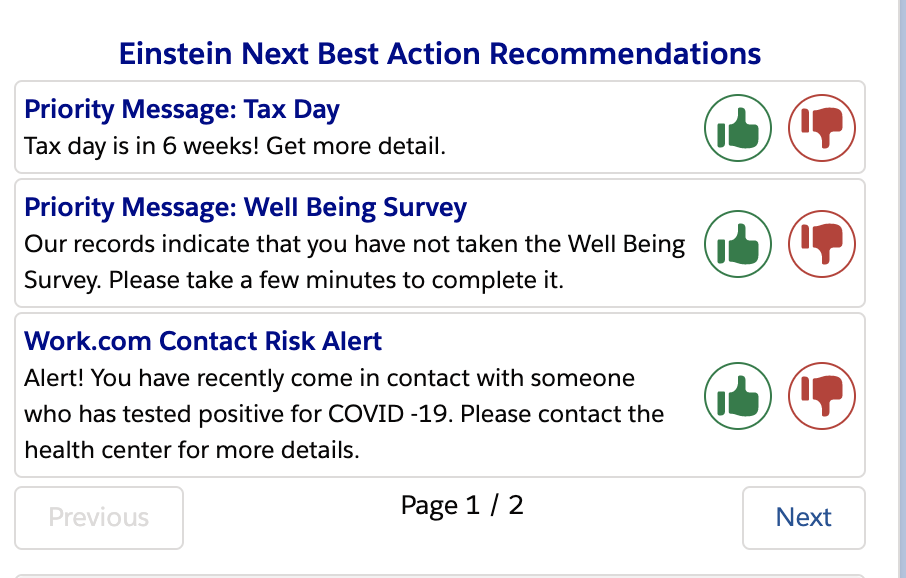
| Name | Description | Action Reference | Acceptance Label | Rejection Label | ||
| 1 | Priority Message: Tax Day | Tax day is in 6 weeks! Get more detail. | Tax_Flow | Accept | Reject | |
| 2 | Priority Message: Well Being Survey | Our records indicate that you have not taken the Well Being Survey. Please take a few minutes to complete it. | Well_Being_Survey_Flow | Accept | Reject | |
| 3 | Work.com Contact Risk Alert | Alert! You have recently come in contact with someone who has tested positive for COVID -19. Please contact the health center for more details. | Contact_Risk | Accept | Reject | |
| 4 | Return to Work Shift Days | Shift_Flow | Accept | Reject | ||
| 5 | Training Recommendation | Your manager has identified that you will benefit from the Great Salesforce Leaders training. Click to enroll. | Enrollment_Flow | Accept | Reject |
STEP 6: Set up the flow component to accept input for which messages and their respective priorities to be surfaced on the NBS Component
- Navigate to the Bright Team Mgmt App from the App Menand then user profile(click on the profile pic icon) and then edit page to bring up LAB. NOTE: If you click on user profile when on setup , you go to User setup not the profile page so make sure you are on the app when pulling it up
- Drag the Flow component and choose Manage Employee Tactics as shown below


Drag a flow component.Choose the manage tactical plan. activate it for the org default
- Go to the Bright Team Mgmt app and then user profile(click on the profile pic icon) and then edit page to bring up Lightning App Builder — if clicking on user profile when on setup pulls up

Also set component visibility , add filter, Save and Activate.
- Go back to user profile and the flow component displays –
- Click Manage the team Priorities

[If the following error message displays then do this additional step below]

This step maybe required on a non-scratch org - go to Setup - My Domain →Register a domain →Login →Deploy to users.

Once done go back to UserProfile
- Click Manage the team Priorities

Order priorities(these are passed in from the flow) - these are all messages that are available.
Once ordered - it gets saved on the EmployeeDailyTacticalPlan record as shown below

STEP 7: Set up the NBA component (This is another flow component with a custom LWC -NOT THE STANDARD NBA COMPONENT)
We use a custom component here to show the modularity of the strategy builder. This demo can also be built with the standard NBA component and that is not covered here.

- Navigate to the user profile page again and edit page.
- Add another flow component (which acts as the NBA component )
- Choose ‘DemoFlow_GetRecommendationsWithFlowAction’ Flow
- Click on the Pass Record id
- Enter the strategy name- EmployeeTacticalStrategy (In the NBA component record id is passed automatically)
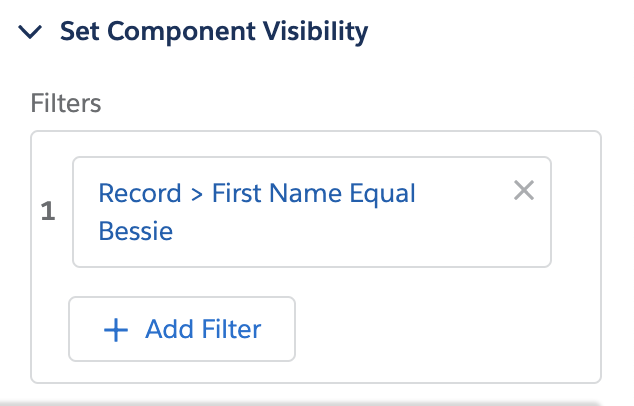
Set component visibility so it is viewed by the second user
STEP 8: Login and test the component
- Login to the first user page : Bessie smith – Set the priorities. (If already covered in the steps above, login as the second user)
- Now login to the second user page : See that the recommendations are displayed