
How to Optimize Omni Supervisor with Supervisor Configurations
In recent releases there have been some big changes to Omni Supervisor setup to make life easier and more efficient for Supervisors. In the Winter ’23 release it has been taken a step further, by adding the ability to create your own Custom Actions using Salesforce Flow – this puts the power in your Salesforce Administrators hands to add the most impactful actions for your supervisors to each Omni Supervisor screen.
This configuration is all setup through ‘Supervisor Configurations’ – some of the key benefits of using these are:
- Only see the agents that are most relevant to each Supervisor
- Only see the work that is relevant to each Supervisor (through Queues or Skills)
- Have custom actions that are most relevant to each Supervisor
The goal of this post is to walk you through setting up Omni Supervisor in the most optimal way in Salesforce.
Setup guide
First, I want to cover the basics – getting and setting access to Omni Supervisor and some of the Omni Supervisor settings available, before we move onto optimizing the Supervisor experience.
Access to Omni Supervisor
Included with Service Cloud (or any other way you have gained access to Omni-Channel) is the ability to monitor agents and work in real-time with the Omni Supervisor tool. Once Omni-Channel is enabled, it will become available – however we recommend that you limit who has access to it. You can do this by:
- Editing all of your profiles to set ‘Omni Supervisor’ to ‘Tab Hidden’ under Tab Settings (or Object Settings) for your profiles
- Create a Permission Set that grants access to this tab – similar to the screenshot below. You can then assign this permission set to your managers, supervisors and team leaders. Ideally you may want to include this option with other Supervisor settings, or create a Permission Set Group which includes this access.

Now that you have configured who can see it – you can add ‘Omni Supervisor’ to your Service Console by following the instructions in our help docs.
Supervisor Settings
On the ‘Supervisor Settings’ admin screen, there are various options you can enable – we recommend you enable all of them (learn more about each setting here), unless your country has particular restrictions on these items (the sneak-peek options need to be disabled in some countries due to privacy concerns).
Optimizing Omni Supervisor
Now that you have Omni Supervisor showing up for your Supervisors, let’s improve their experience. All of the configuration for optimizing Omni Supervisor can be done on one screen, the ‘Supervisor Configurations’ admin screen. We recommend that you create a Supervisor Configuration for each team or department in your organization – this will allow your supervisors to just see the agents and work that is relevant to them, removing any extra noise from other teams or departments.
Configure which Users Supervisors can see
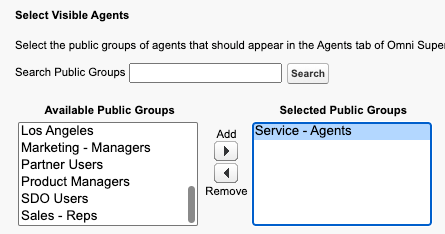
The first part of Supervisor Configuration is restricting which agents the Supervisor with this configuration will be able to see in Omni Supervisor – this is done through Public Groups. There are many other benefits to assigning your agents to Public Groups on top of using them with Supervisor Configurations – you can even nest Public Groups, so this is a great practice even without using them here.
As we suggest a Supervisor for each team and department, we also suggest you have a Public Group setup for each of your teams or departments. Once created, it is as simple as assigning the public group(s) to a Supervisor Configuration, this will mean that Supervisors assigned this configuration will only see agents within the assigned public group(s), reducing the noise in Omni Supervisor.
Configure which Work Supervisors can see
The next step is to filter the amount of work that the Supervisor sees in the Queue Backlog, Assigned Work and Skills backlog Tabs. For queue based work, this is as easy as assigning the appropriate queue(s) to the Supervisor Configuration – this will once again reduce the noise, and ensure the assigned Supervisor(s) only see the queues and work most relevant to them.

If you are using Skills based routing, it is a little more complex as you have the option to either display work with ANY of the skills you add to the configuration, or only display work that includes at least ALL of the assigned skills. The ‘ALL’ setting can be particularly helpful if you split your work by particular departments and/or countries or languages, and assign skills to work in this way. For instance, if you could add ‘French’ & ‘Tech Support’ to this list, and all work assigned at least the ‘French’ and ‘Tech Support’ skills would show up, but not any with only ‘France’ & ‘Finance Support’ skills assigned.

Configure which Actions Supervisors can take
This part is so exciting we have created out own blog about it! Check it out here.
However at a minimum, we recommend that you add the standard buttons to the screens – these are ‘Change Queues’ & ‘Change Skills’ (if you are using Skills based routing) on the ‘All Agents’ tab, and add the ‘Assign Agents’ button to the ‘Queues Backlog’ tab.
Assign Supervisor Configuration
Now you have created a configuration for each team and department, you can assign them to the appropriate supervisors and/or team leaders, and watch their productivity soar!
