
Add a Rich Text Input Control to your Flow Screens
This Post was most recently updated on: 1/11/25
Key Contributors: Nick Sauer, Clifford in Frankfurt
1/11/25: Thanks to Jeroen, this component is now reactive
9/21/24: Thanks to Declan, you can get a more accurate count by excluding HTML
4/16/23: Thanks to Clifford in Frankfurt, this extension now fully supports the ability to enable or suppress specific formats
Input Rich Text sports a nice toolbar and allow rich text creation. It also provides Find and Replace, Autoreplace, and Blocklists. As you can see below, these new features are available via a swanky bottom toolbar, and can be turned on or off as a group. Clifford in Frankfurt has added additional ability to control which features are enabled or suppressed.
Note that this isn’t the only choice you have. Here’s a powerful alternative extension to consider, with a different mix of features.
You can pass in a map of terms that you want to automatically replace.
How it Works:
Use Case Example: Business has the need to enter customer-facing details that:
- Blocks users from entering certain sensitive words/symbols
- Automatically applies Trademarks (™) or other company-specific terminology.
- Allows for Find & Replace tool to correct mistakes
Summary:
IMPORTANT: Use enabledAdvancedTools = true input attribute if you want to leverage these enhanced features. Otherwise leave empty and regular input Rich Text component will be used.
- Warn or Block Transition in Flow if disallowed words and/or symbols are present.
- Find and Replace
- Auto-Replace suggested words
- Undo functionality for search/replace or suggested words
- Character Count and Max Character limits.
Admin Instructions:
Enabling and Disabling Features in Flow:
- Default function is regular rich text input field. To enable advanced features set enableAdvancedTools to true.
- Setting label provides a field label for the rich text input.
- Rich Text input/output is provided through the value attribute.
Configure the default Rich Text Features in Flow:
- By default, all rich text features (called formats) like bold, italic, image etc. are enabled.
- Optionally, specify the exact formats you want to allow by providing a comma-separated list with formats to the “Enabled Formats” attribute. Example: bold, image
- Optionally, disable certain categories by providing a comma-separated list with categories to the “Disabled Categories” attribute. Example: INSERT_CONTENT, ALIGN_TEXT
- The complete list of formats and categories can be accessed in the Input Rich Text documentation on: https://developer.salesforce.com/docs/component-library/bundle/lightning-input-rich-text/documentation
Replace Text with Suggested Terms:
- If autoReplaceMap is populated, then a button is shown to user.
- Use autoReplaceMap to set up key:value pairs in JSON. Example: {“Test”:”GreatTest™”} a. When user employs the button, the key will be replace by value.
Managing Disallowed Words and Symbols:
- If disallowedSymbols or disallowedWords is filled, then user will be notified while typing one of those words or symbols.
- Both disallowedSymbols and disallowedWords accept a comma delimited string.
- The default message will say ‘Error’ and provide the violating word/symbol. This will also give validation error if user tries to advance while error is still present.
- To change the message to a warning only, and turn off the associated validation (allowing user to advance the Flow), set warnOnly attribute to true.
Character Counts and Limits:
- Character count is off by default. Set characterLimit to an integer value to show character count and limit.
- If warnOnly is not set when characterLimit is on, then the Flow Next/Finish cannot be used until resolved.
| Parameter | I | O | Information |
|---|---|---|---|
| enabledFormats | X | An optional comma-seperated list of allowed formats. By default, the list is computed based on enabled categories. Example: bold, image | |
| disabledCategories | X | An optional comma-separated list of button categories to remove from the toolbar. Example: INSERT_CONTENT, ALIGN_TEXT | |
| enableAdvancedTools | X | Boolean. Set to true if you want to use enhanced rich text. Default is false (regular input component) | |
| autoReplaceMap | X | JSON formatted key:value map. (example => {“Test”: “GreatTest™”} ) | |
| disallowedSymbols | X | Comma-separated list of words to block. Example: /,@,* | |
| disallowedWords | X | Comma-separated list of words to block. Example: bad,worse,worst | |
| warnOnly | X | Boolean. Set to True if you want to allow Next even where disallowed Symbol or Word remains. Default is false. | |
| characterLimit | X | Integer. Set character limit. This will enable character count and limit, and if warnOnly is not true, then will block next. | |
| value | X | X | Input and output Rich Text that you’ll be editing |
| label | X | X | Input to provide field-level label if desired |
| excludeHTMLCharacterCount | X | Set to True if you want to exclude HTML characters in the character count |
User Instructions:
- While entering text in the Rich Text Area, if you use words or symbols that are flagged as not allowed, you will receive either a warning message or an error message. a. If the warning message is displayed, this is for notification only, and you will be able to proceed. b. If the error message is shown, this means you will need to correct the noted error prior to continuing. If you try to click Next/Finish, a validation message will be given.
- To Search and Replace text, click on the magnifying glass icon. titled ‘Search and Replace’ a. A ‘Search Text’ field is displayed where you enter the text you want to find. b. A ‘Replace with Text’ field is shown where you enter the replacement text to be applied where the ‘Search Text’ is found. c. Use the ‘Check’ icon to commit the search/replace. d. Use the ‘Revert Last Change’ button that appears after search/replace to undo the changes just made. e. If you no longer want to use Search/Replace, you can click on the Magnifying Glass icon again to hide these fields.
- To replace suggested terms set up by your admin, click on the Merge icon titled ‘Apply Suggested Terms’. Note this will only be shown if your admin has configured this. a. The component will find text to be replaced and overwrite with teh replacement term identified by your admin.
b. Use the ‘Revert Last Change’ button that appears after search/replace to undo the changes just made.
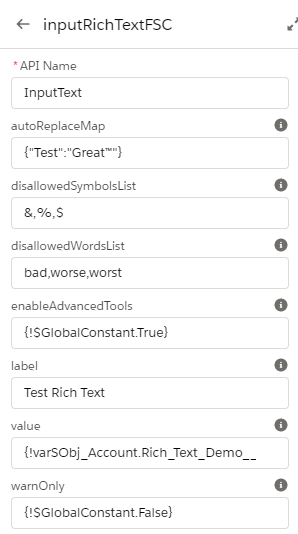
Component Input Example:
Installation:
1.7 Unlocked 1/11/25 Production Sandbox – Reactivity added
Resources:
Also see https://unofficialsf.com/copy-paste-of-images-in-flow/
Old Versions
1.6 Unlocked 9/21/24 Production Sandbox – Additional support for turning on formats
1.5 Unlocked 4/16/23 Production Sandbox – Additional support for turning on formats
1.4.1 Unlocked 7/3/21 (Production or Dev) 7/3/21 – Eric Smith – Added an * next to the Input Label when the Required attribute is True
1.4.1 Unlocked 6/3/21 (Sandbox)
1.4 Unlocked 6/25/21 (Production or Dev)
1.4 Unlocked 6/25/21 (Sandbox)
6/25/21 – Eric Smith – Added a Required attribute and adjusted the bottom margin to better match standard components