
Tag Archive for: Lightning Flow
Salesforce Flow Tutorials
Starting out with Flow? Here are some great introductions
New! 6 New Videos to Help You Understand Flow Builder
Home Pages
Salesforce Admins Automation Page
Salesforce Flow Developer Center
Trailheads
Paid Courses
Udemy
Videos – General Flow Learning
- from Salesforce: 5 New Videos to Help You Understand Tricky Flow Concepts
- ApexHours Flow Tutorials
- Adam Foyston – How to Build a Salesforce Flow for Beginners (4-21)
- Learning Salesforce Flow by Salesforce Break (Andy Utkan)
- Videos from SFDC Craftmanship
- Videos from Salesforce Geek
- Salesforce Flowsome
- Salesforce’s Video Tutorial Series
- Tutorials for Salesforce Flow, featuring the new Flow Builder. 1a) Introduction https://youtu.be/4zcMkWeSLKs 1b Get a Record and Use It https://youtu.be/PtC_2Hit41Q 1c Get Multiple Records and Loop Through Them https://youtu.be/ELXfWRSvtuc 1d Decisions, Related Records, Buttons https://youtu.be/Hp8uMcrCJ28 1e Screen Elements: https://youtu.be/9Ps6o4ai7Hc 1f Roundup of Other Flow Features https://youtu.be/qzMvKgbiwHk
- playlist of all Flow videos produced by Salesforce
- SalesforceMentor.com on Flow
- Force 501 on Flow
- Brian Kwong’s Video Tutorial Series
- Deanne Walters (Database Deanne)
A Salesforce Admin dedicated to automation and good databases.
Topic-Specific Videos
- 10 Ways to Get Creative with Lightning Components
Eric Smith’s Presentation from London’s Calling 2021
Developer-Centric Videos
Automation Guides
Official Sites
- Flow Documentation (https://sfdc.co/flowdocs)
- Lightning Flow Developer Center (https://sfdc.co/flowdev)
- Salesforce Automation Trailblazer Community
Community Sites
“Unofficial Flow” Community Site (unofficialsf.com)
Introduction: Using Salesforce Flow With Quip
The new Quip Flow Actions for Salesforce Flow open up new ways to combine the shared, universal accessibility of Quip with the power of Salesforce.
Here are some examples:
#1: Update Salesforce with Data From Different Quip Docs
In this example, Quip docs have been created for different Salesforce contacts. One scenario where this can be useful is when an enterprise has employees that don’t have Salesforce licenses. If each of those employees has a Quip document and a Contact representing them, the documents can be used to display data from Salesforce and collect data from the employees. (Note that this uses the new Spring ’19 Flow Builder):

A key element of this is that the name of each quip document is formed using a Flow formula:
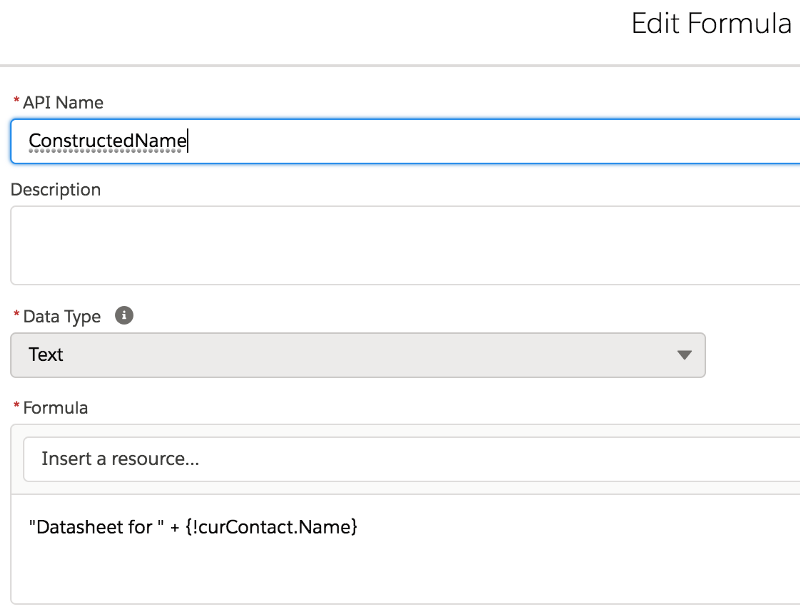
To configure the Get Quip Sheet Data flow action, we do the following:
- Provide the name of the corresponding Quip doc. Start with a contact name, generate the ConstructedName using that formula, and pass it in to the flow action:

2) For each piece of data that we want to extract from the quip doc, we reference it by specifying the label value of the cell to its immediate left. This is one of three ways you can specify a specific cell value:

3) Finally, map the retrieved values from the Quip document to flow storage variables so you can use them later in the flow:

Side Discussion 1: Error Messags
Here I’ve created variables to map the Error Message and Is Success outputs. You don’t have to actually use these variables, but if you take the time to define them, then any error messages you get will show up in the debugger like this:

If I try to immediately update the Contact as soon as I get the data out of the Quip document like this:
Side Discussion 2: Mixing Callouts and Transactions
In my first attempt at setting up the flow, it looked like this:

When I ran the flow in the debugger, though, I got this error:

I had forgotten that you can’t use a callout (here, the flow action is “calling out” from Salesforce to the quip api endpoint) in the middle of an open Salesforce transaction. When flow loops, Salesforce prepares a single transaction so it can commit all of the loops with one database action, in the name of resource conservation.
I needed to restructure my flow and got a key hint from a brand new tooltip:

The tooltips in Flow Builder are completely overhauled and have a lot of extremely timely tips; they’re not just simple definitions.
The resulting flow uses a collection operator. Each time we go through the loop, the modified contact is added to a new “updatedContacts” collection variable that can later be used to carry out the update.

#2 Clone a Quip Template and Update the Resulting Quip Sheets with Salesforce Data
Now let’s change direction and go From Salesforce To Quip. The use case is this: Given a set of Contacts, generate a custom Quip sheet for each one and fill it with Contact data. Then email the URL to each of the Contacts.
This might be useful if you want to generate shareable reports for your customers using data stored in Salesforce.
This flow features 2 of the new Quip Flow Actions:
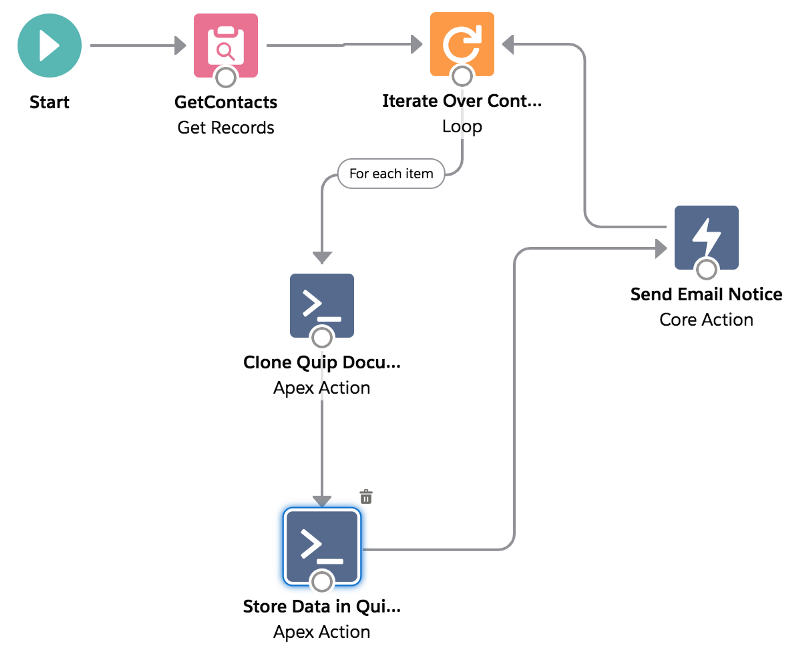
Clone Quip Document is a simple action that duplicates a named document. Store Data in Quip Document does the heavy lifting of inserting flow data into specific Quip cells.
We create a Quip document to act as our template:

The Clone action generates a new quip sheet based on this template, and give it a name using a formula technique like the one described above.
The Store Data in Quip action lets you specify up to ten pieces of data to write to 10 cells. You can use several approaches to specify a target cell:
- Specify a label and indicate that the target cell is immediately to the right of that label (that’s what we’re doing)
- Specify a label and indicate that the target cell is immediately below that label
- Specify both a column label and a row label, in which case the target cell is the intersection of the column and row. This is great for updating a single cell in a table.
- Specify a cell by its absolute address (for example: B2)
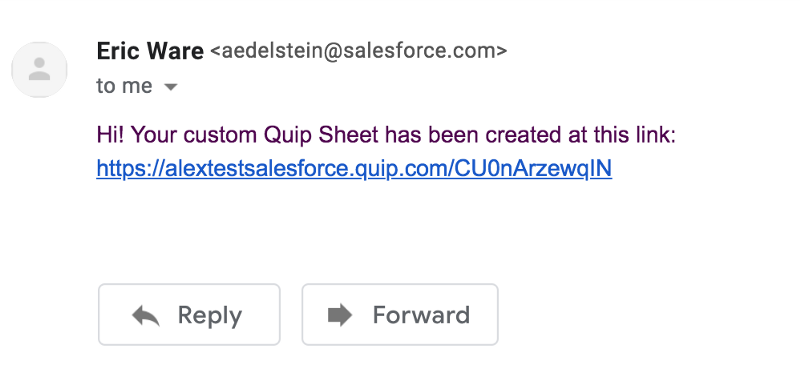
The flow produces sheets like this:

and generates emails like this:
Row Operations
You can use the AddRowToQuipSheet action to add a row to a sheet using data from Salesforce or update an existing row.
Here’s an example of an Add:

And here’s a sample showing an Update:

Walkthroughs of these are provided in the video (see link at the top of this article.)
Quip User Management with Flow
There are also Flow Actions to Add a User to a Folder and Remove them from a Folder so you can add quip folder activation to your onboarding flows.
Quip Document Management with Flow
There are also Flow Actions to Rename a Quip Folder and Add a Quip Document to a Folder to make it possible to automate management of your Quip data.
Learn More:
Using Flow with Chat, Bots and SMS via Twilio and Authy
Never have we crammed so many different forms of awesome into one solution. Special guest appearance by Custom Metadata Types.
Credit to Kamlesh Patel who actually built this demonstration and the components in it.
Check out the video: https://youtu.be/G5q6jiBkqoI


How to Build a Flow Action with Apex
The other day I built a flow action that generates random numbers. While doing it, I recorded the process, because we don’t have a lot of tutorial material on how you can turn a chunk of useful Apex code into a nice, declarative flow action.
For a general introduction to the invocable action interface, check this out.

Easy Random Numbers Come To Flow
So I was reading this thread that mentioned random numbers, and then I read this great post about building a Blackjack game out of flow, and the Monty Python-caliber dry humor (which may or may not be intentional; I haven’t figured that out yet) about the complicated math necessary to generate pseudo-randomness. And then I thought about how easy it is over in Apex-land to generate random numbers, so I built a Flow Action you can install into your org that takes two values and generates a true random number in that range.

Guest Post: Duke and Luke’s Blackjack-in-Flow
While browsing reports of flow sessions at Dreamforce, I came across two guys claiming to implement an Entire Heckin’ Blackjack inside of Flow. This is My Kind of Dreamforce Session, but I wasn’t able to make it because they keep Product Managers very busy at Dreamforce. As of this moment I’m still waiting for the video to get posted, but in the meantime I asked them to write a blog post. As you can see, this flow involves everything: Steps, Debugger, Lightning Component, Formulas. It’s really impressive, and the blog post is presented here.
============
Architect: Sean Dukes
Coder: Luke Kozakewycz
By Sean Duke
It all started at a Salesforce user group. I was doing a presentation on Lightning Flow. I’d used a ‘Hello World’ Lightning component and showed how you could change the greeting based on the region of the person. It went down pretty well, but it was hardly the rich user experience you read about.
Fast forward a few weeks and for some reason I had the idea that Blackjack would be a great visual use case. I sketched out a basic design and it seemed like it ought to work, so I submitted the idea as a Dreamforce talk. I didn’t expect things to go any further, so it was something of a surprise when a few weeks later, the email came through. “Your idea has been accepted, can you run us through your slides next week?”
“Yes, of course.” There followed an interesting few days where we put some slides together and tried to turn those early sketches into something that at least proved that what we wanted to do was possible.
“The first thought that struck me was that I’d never played Blackjack.”

The first thought that struck me was that I’d never played Blackjack. There could be experts in the room. I needed to truly understand how to play the game, so I wouldn’t get found out. I hunted around the internet and interviewed a couple of people who had played. My initial ideas weren’t far off, but, now that I had my user stories, it was interesting how much like a real project this was becoming.
In Blackjack, you typically have more than one deck of cards and they’re not shuffled between every hand. But they are shuffled. The first job was to get those cards and shuffle them. Salesforce doesn’t have a random number function, which would have made our life easy, so we had to come up with another way.
If you think about it, when you shuffle cards it isn’t random. The order they start in determines the order they end up in. We didn’t need random, we just needed unpredictable. So how do you do that?
There are in fact several ways you could do this. This is mine …
The solution we came up with was to use two objects. The first object was the base deck. This contained the 52 cards, with their value, an image url, the name and whether the card was an ace or not. We also assigned each card a different five-digit prime number.
For the first shuffle, we looped through the base deck and added two of each card to a new sObject Collection. As we did that, we calculated a number we call the seed.
The formula was pretty simple.
The formula was pretty simple. Multiply one thousand plus the time the user was created in hundredths of a second by the card prime number and then by a second five-digit prime number. This gives you a number of between twelve and fourteen digits. We then take the right hand seven digits which is our first unpredictable number.
VALUE(RIGHT(TEXT([Card prime number]*([Time Created]+1000)*[Prime number 1]),7))
When we add the second card, we use a different prime number. We now have 104 cards in an sObject collection with 104 unpredictable seed numbers and we save this to a second object called Card Deck that has a lookup to the user. If we sort by this, then each card deck will have a different card order for each player unless they created their accounts at precisely the same second.
We don’t stop there.
We don’t stop there.We use a second field called the shuffle order. This is a formula field that multiplies the seed by a ten digit prime number and by the record number of the card in the card deck (a sequential number) and then we take the middle seven digits. This is the field we actually sort by. Even if two players started at exactly the same time, their shuffle orders would be radically different.
Shuffling again is simple. All we do is copy the shuffle order to the seed field and this creates a new shuffle order. It works really nicely.

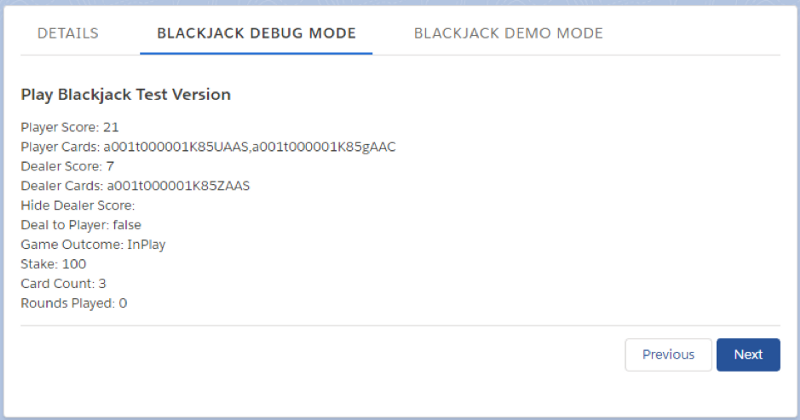
It’s easy and satisfying to test this. The first thing to do is create a list view that shows the user’s cards.

Then you go to the shuffle flow — we have a separate flow because we re-use it in several places.

Now you click the debug button and enter in the user ID, which is the only input parameter required by the flow and click Run.
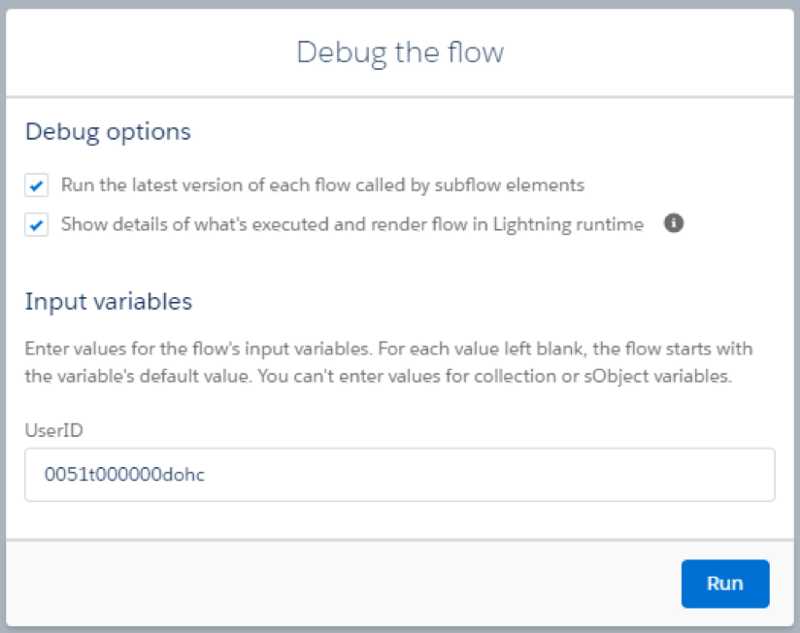
It’s worth noting that this debug method actually does run and changes data. It’s not something you want to be doing in your production org with an untested flow! For our purposes though, it’s great. Click refresh and you can see the result.

So shuffling was a good start and relatively straightforward. Now for the game itself. This was definitely the heavy thinking part. The breakthrough came when we started to look at the journey of each individual card.
We load the shuffled deck into an sObject Collection and then follow each card around. We use a series of variables to record what is happening with the player and the dealer and then we make decisions based on the value of those variables.
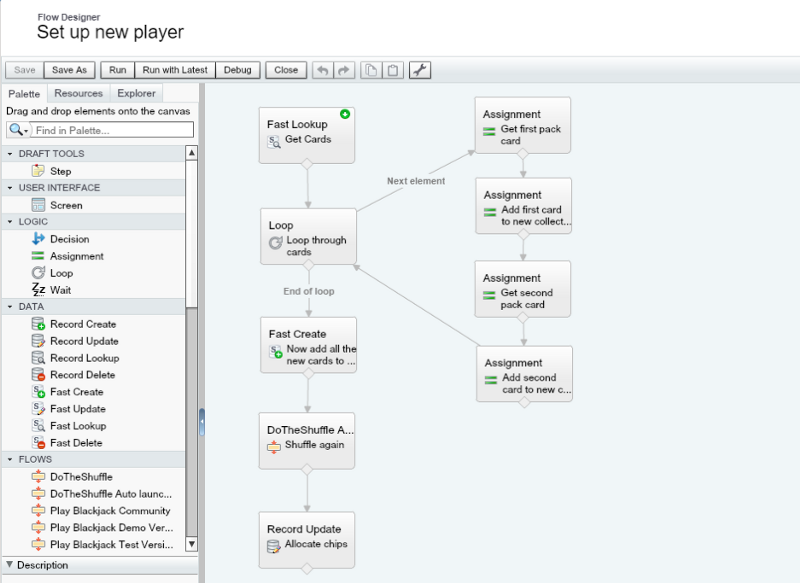
It took a while, but this is what we ended up with.
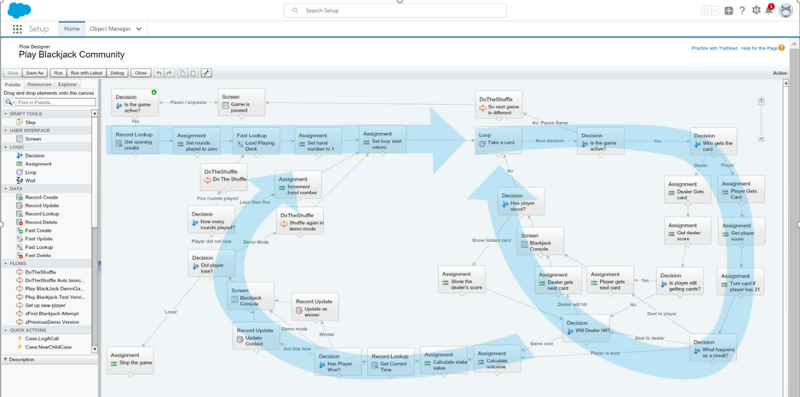
Break this down and the first part of the flow is all about getting ready. The right hand loop represents the playing of a single hand and the left hand loop runs when that hand is over and we get ready to play the next one. Simple 🙂 In all we ended up with 34 elements in the flow and four of those are to stop people cheating!
We should probably confess at this point that we decided splits, doubling and insurance were out of scope for our project. I have no doubt we could add those things in now.
A couple of things we noticed as we went along. Firstly, we were really diligent about creating descriptions on every flow element as a first step. Writing in long hand exactly what we expected to happen at each stage made completing each element much easier and the whole thing was easier to debug. The other thing that was interesting, was that the more efficient and the more correct our flow became, the fewer elements we had and the more elegant the flow itself appeared. I’m particularly proud of the fact that in the whole flow, we only ended up with one crossing connector and though I’ve tried, I can’t see a way to get rid of it. It will be interesting to see what this looks like when we put it in the new Flow Builder.
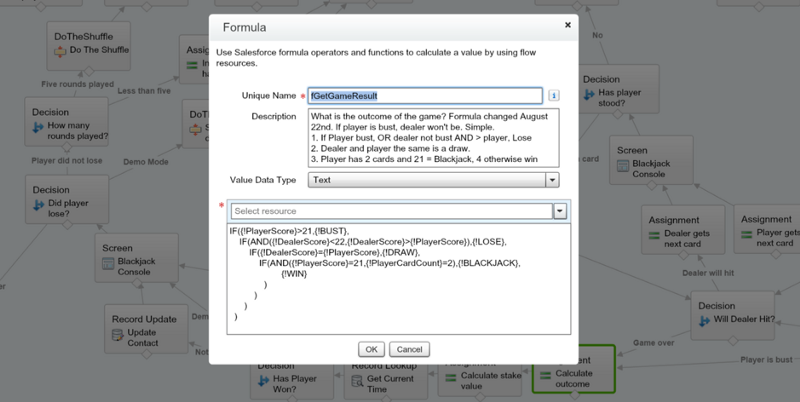
One thing that helped to keep the flow manageable was using formulas. For example, we have an assignment step where we work out the outcome of the game when the dealer has finished playing. We could have done this with a decision element and five assignments, but we were able to achieve the same thing with one assignment and a formula. Our assignment step sets the value of the GameOutcome variable to a formula result. This trick really cut down on complexity.
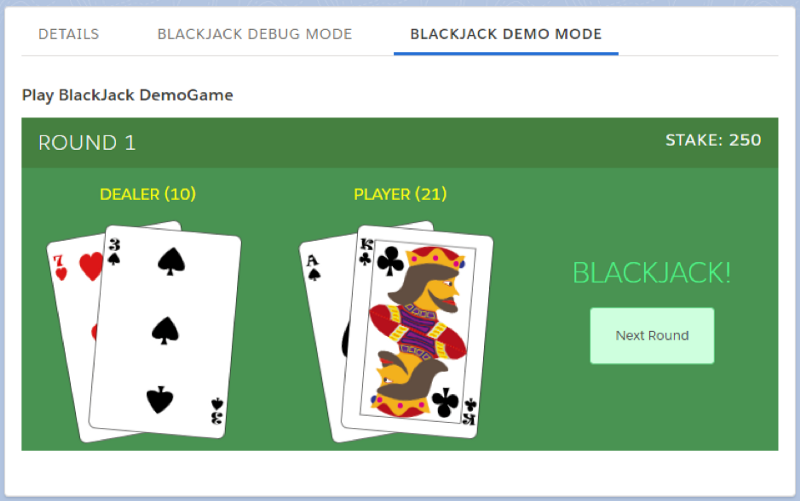
We tested our game as we were building it using a variation on that original ‘Hello World’ component. We had a view showing us the player’s card deck and then put our component onto a page, then we could compare the two side by side and make sure the game was behaving as we expected. This was crude and we didn’t have hit and stand buttons, but it was very useful.
At this point we had a working game and my coding skills had reached their limit. It was time to call in a professional! The Lightning component we built looks great, but it does remarkably little work. The screen element passes various values into the flow so that we know what we want to display. It has a timer, so you can see the cards being dealt out and it does look pretty, but that’s effectively it.
The only time the Lightning component changes a value is when the player hits stand. There’s an attribute called DealToPlayer. This will be true if it’s the player’s turn and if the player hits ‘Stand’ then this changes to false and is passed back to the flow. The flow does the rest.

Now all we needed to do was drag our flow onto the Lightning community home page (or in this case onto a Contact page for testing) and that was that.
We had our game and we could and did take it to Dreamforce. We even managed to get the whole audience playing in our special community and we had prizes, including for the fastest loser! Overall, it was great fun and a hugely interesting learning experience. If you want to find out more then, when the recording comes out, you should watch it.

Architect: Sean Dukes
Coder: Luke Kozakewycz
We both worked on bits of all of it.
© Sean Dukes 2018