Flow Orchestration has a unique licensing characteristic: when you purchase it, you can request no-cost Salesforce Workflow Orchestration User licenses for employees that aren’t already on Salesforce. These licenses are limited but are designed to enable employees who don’t normally have a need for Salesforce to participate in Orchestrations. This works because Flow Orchestration is paid for on a per-Run basis.
Here’s an example: Coffee Corp. purchases 1m runs per year of Orchestration. They also request 50 Workflow Orchestration licenses so they can bring their Compliance department onto Salesforce to participate in business processes involving regulated securities. They don’t pay anything for the 50 Workflow Orchestration licenses.
The Workflow Orchestration User SKU
This SKU has a zero dollar cost and can be bought with Orchestration Runs skus.
When a customer is provisioned with the Workflow Orchestration sku, they receive:
A SalesforcePlatform User License
A Company Community Permission Set License (“PSL”)
Additionally, the Salesforce account team is authorized to add:
3. an Additional Custom Objects PSL at no cost.
Note that this doesn’t get added automatically; the account team needs to apply it separately during quoting.
This provide the core user capabilities, enabling a user to be defined in Setup, giving them a login, and providing general Salesforce access.
It provides:
–Access to custom apps developed in your organization or installed from AppExchange. –Core platform functionality such as accounts, contacts, reports, dashboards, documents, and custom tabs.
Each license provides more storage for Enterprise, Unlimited, and Performance Edition users.
Company Community PSL
This PSLbuilds on the Platform license and adds: –Access to cases, and documents. –Access to up to 10 custom objects and 10 custom tabs –Access to custom tabs, Salesforce Files, Chatter (people, groups, feeds), and an Experience Cloud site. -Read-only access to Salesforce Knowledge articles. –Access to Content, Ideas, Assets, and Identity features –Access to activities, tasks, calendar, and events
Additional Custom Objects
Access to up to 2,000 custom objects.
What you Don’t Get
Users with this combination of licenses:
Aren’t entitled to some user permissions and standard apps, including standard tabs and objects such as forecasts, leads, campaigns, and opportunities
Limitations
User can’t be an agent, admin/dev, or sales rep.
Subscriptions may only be used to complete tasks assigned by an orchestration within the scope of the user license.
Nothing can be stacked on top of the $0 User License SKU – no addons can be purchased for the user license user to use.
https://unofficialsf.com/wp-content/uploads/2022/09/largeUCSF-300x133.png00Alex Edelsteinhttps://unofficialsf.com/wp-content/uploads/2022/09/largeUCSF-300x133.pngAlex Edelstein2022-09-30 09:56:352022-09-30 09:57:34How to add additional employees to your Flow Orchestrations at no cost
With Winter ’23, it’s possible to send screen flows to a Slack user or channel, and enable them to run the flows without leaving Slack.
There are two great use cases for enabling your screen flows to run in Slack:
I you have users who spend time in Slack, they may want to have a Slack experience and you can give them one without having to maintain two different versions of a workflow
You want to build a no-code Slack application
In Winter ’23, the initial supported pattern involves sending/dispatching/pushing a screen flow to a slack destination:
In the future there will be other ways to launch screen flows in Slack, such as via Shortcuts.
Official Documentation
Before we go further, make sure you’re aware of these official docs:
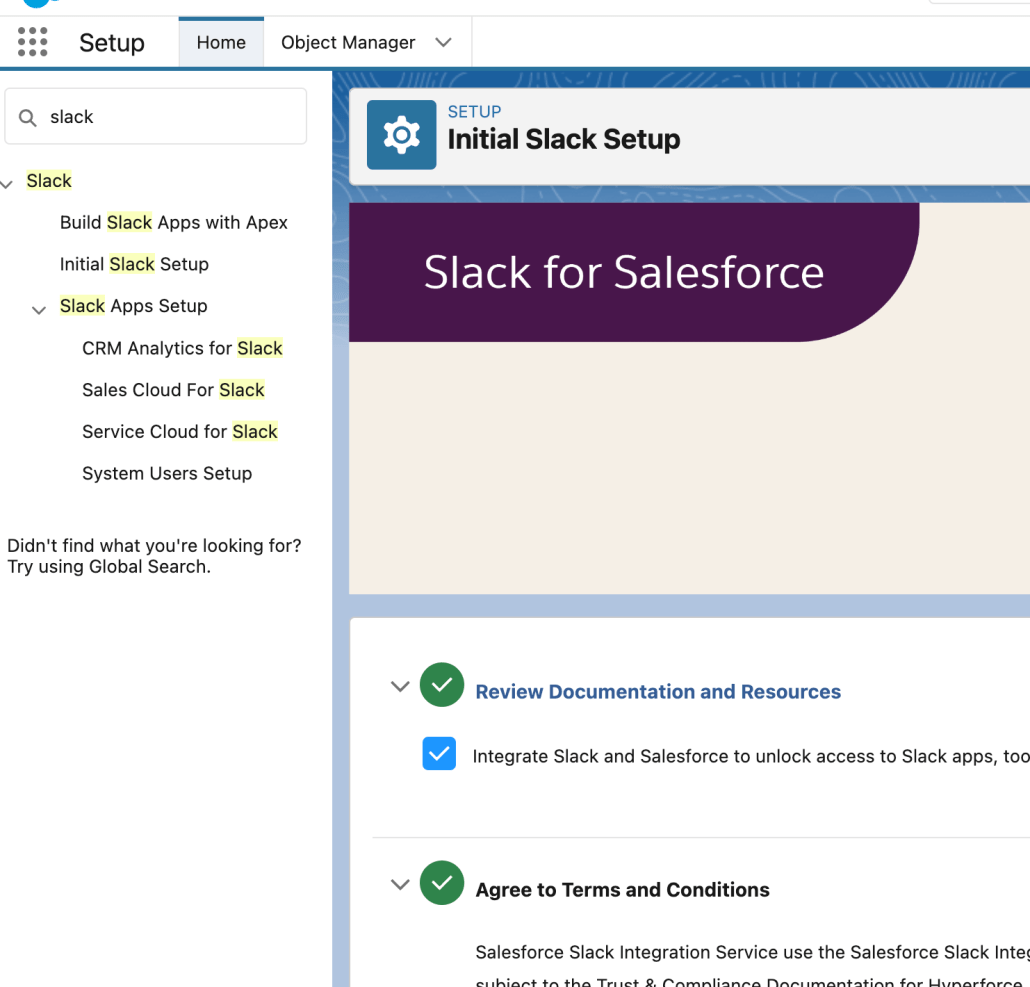
It’s ESSENTIAL that you verify that you basic connectivity between your Slack accounts and your Salesforce org is fully and properly configured BEFORE you start dispatching screen flows.
These are the signs of a properly configured infrastructure:
1. Salesforce for Slack, the main Salesforce Slack App, is visible in the App list of any user who wants to run screen flows from Slack
If you don’t see this? Look around the Slack App Directory. Here are a couple of places it lives:
and also take a look at the Initial Slack Setup page in Salesforce Setup:
2. When you click on the Home tab of Salesforce for Slack app in your Slack desktop, you do NOT see a Connect button like the example on the right:
If you see that button, and you want to enable the logged-in Slack account to work with screen flows, you need to set up the connection. Keep in mind that simply installing Salesforce for Slack does not automatically register all of the Slack users on that workspace. They each have to individually log into a salesforce org and approve a connection between Slack and Salesforce.
3. Once the connection is created, verify in User Settings (NOT Setup) that a mapping exists between a Salesforce User and a Slack Account, like this:
From a Flow point of view, you target a Slack account for a flow by having a mapping from that Slack account to a Salesforce User, as shown above, and taking that user’s recordID (you DON’T use username or the channel IDs)
How to Build
With that taken care of, we can can start using screen flows in Slack
Part 1: Creating a Slack-Ready Screen Flow
Create a Screen Flow and check the ‘Make available in Slack (Beta)’ checkbox, available in the Advanced section of Flow Settings
Checking the ‘Make available in Slack (Beta)’ checkbox filters the Screen Builder to show only the elements that currently can be rendered in Slack:
Expect more components to be available in future releases.
Save the screen flow and don’t forget to activate it.
Part 2: Setting Up Your Dispatch
The initial paradigm for Flow in Slack is that you ‘dispatch’ or ‘send’ the screen flow to a specific Slack channel from a flow. Later there will be ways to start screen flows from the Slack side via shortcuts and the like.
Every time you create a Slack-enabled screen flow, a unique ‘SendMessageToLaunchFlow action is generated to send it into Slack.
This is similar to how special actions are generated for each Email Alert and each Quick Action your org defines.
Configuring the Dispatch Action
Here’s what a configured Send Message To Launch Flow action looks like:
Input Property
Notes
Slack App
If your org has properly enabled Slack Integration you should see a choice ‘Salesforce for Slack’. Choosing anything other than that is for experts.
Slack Workspace
This will show the workspaces that have 1) installed the specified Slack App and 2) connected it to your org
Execute Action As
This should generally be set to Slack App. If a flow is running in User Context and not System Context, you can choose to have the message sent to Slack by the running User, as opposed to the App.
Slack Conversation ID
This label is in the process of being renamed because you only use Conversation ID’s if you want to send the flow to a group channel. If you’re sending to an individual, use the recordID of their Salesforce User account (example: 005B0000003c7pNIAQ)
Slack Message
Allows you to customize the initial launch message.
Button Label
Allows you to customize the initial launch message.
Slack Bot Name
This will change the label that posts the launch message. See Slack Bot Name, below.
Slack Timestamp
Slack timestamps act as unique identifiers for messages. If you pass in a valid message timestamp, the Flow launch message will show up as a response to that message.
Slack Bot Name
If no value is provide, the App Name (“Salesforce for Slack”) is used
Let Us Know
Have you built a Slack solution using Flow? Share it with us here in the comments!
https://unofficialsf.com/wp-content/uploads/2022/09/largeUCSF-300x133.png00Alex Edelsteinhttps://unofficialsf.com/wp-content/uploads/2022/09/largeUCSF-300x133.pngAlex Edelstein2022-09-22 14:14:492022-09-29 14:37:10Running Screen Flows in Slack
https://unofficialsf.com/wp-content/uploads/2022/09/largeUCSF-300x133.png00Alex Edelsteinhttps://unofficialsf.com/wp-content/uploads/2022/09/largeUCSF-300x133.pngAlex Edelstein2022-09-19 09:36:392022-09-19 09:36:43Guides to Flow and Flow Orchestration at DF ’22
Editor’s Note: This Guest Post was created by Alkymi. UnofficialSF occasionally showcases companies and products that work with Flow Flow Orchestration.
Collaboration for the AI Era: The Data Action Layer.
Seemingly every day we hear examples of Automation speeding up the business world in dramatic ways. Yet, hundreds of millions of documents, PDFs, Emails, Spreadsheets are exchanged daily while almost all of the data they contain are still extracted manually! At Alkymi, we’re building the Data Action Layer (DAL) from the unstructured, real-world data that businesses run on.
Alkymi’s user-friendly solutions – including Data Inbox, Patterns, and Patterns Studio – empower frontline users to eliminate the tedious manual input tasks and take instant action to meet their business goals – like onboarding customers. And with Alkymi Patterns Studio, anyone can build customizable automation for any kind of document, no coding or technical expertise required.
That’s because one of Alkymi’s founding principles is to make it as easy as possible for our customers to trigger actions in the applications and platforms they currently use like Outlook, Microsoft Power Automate, and of course, Salesforce. For us, there’s no better example of a mission critical business application than Salesforce, and we love working with customers to help them supercharge their Salesforce processes with actionable, structured data.
Automating Workflows in Salesforce Orchestrator
We here at Alkymi love Salesforce Orchestrator. It gives users broad capabilities to build, organize, and execute complex multi-team, multi-step workflows, encompassing many of the multi-step processes our customers are focused on, such as customer onboarding, performance reporting, and alternative asset management, which require handoffs between different teams, each with their own set of objectives and responsibilities.
The genius of Orchestrator is allowing users to custom design these workflows to ensure that their business logic is fully reflected each step of the way. For example, if a team should only take an action after a step has been completed with a certain outcome, Orchestrator will ensure that team is only looped in at the right time, if and when required.
Where Alkymi enters the equation is by helping users get more out of Orchestrator by fueling it with instantly actionable document data, the critical data that’s usually manually keyed in before a process can begin. Think of Alkymi as a booster rocket that accelerates the input of the unstructured data automation, while Orchestrator ensures the rest of the process can run successfully based on the data provided.
Blazingly fast Onboarding that saves hours.
Customer Onboarding is one of Alkymi’s most popular use cases, and many of our Financial Services (Wealth & Asset Management) customers use Salesforce to run their onboarding processes. That’s why we couldn’t think of a better way to showcase the power of an Alkymi Data Inbox + Salesforce collaboration than this complex, multi-team workflow that has mission critical business impact.
Our first video, (“Accelerating Customer Onboarding”), spotlights a customer onboarding process based on real workflows requiring three teams to work together to take actions like sending customer communications, processing documents, approving applications, and more. It also touches a range of business systems in addition to Salesforce and Data Inbox, with parts of the workflow happening in email as well as Slack.
Typically, these would be extremely time-consuming manual processes, with lots of potential for process restarts, and missed handoffs. By extracting data from the critical documents needed to fuel instant actions in Orchestrator, we show how it’s possible to save 2.7 hours per new customer by leveraging Data Inbox + Orchestrator.
In the second video, (“Building Workflows”) you’ll see how easy it is to adjust an existing workflow in Orchestrator based on changing business requirements, simply by adjusting the actions that should occur when certain information is found in a document. This makes it easy to update Work Guides so that the right workflow step is followed based on the data encountered in a document.
Let’s Get Your Customer Onboarding Up to Speed.
Onboarding is a complicated workflow that can present significant challenges for operations teams, and it’s just one of hundreds of thousands of similar workflows that exist across enterprises. Combining Alkymi Data Inbox’s unstructured data automation with Salesforce Orchestrator’s workflow orchestration capabilities empowers businesses to accelerate and streamline this process, yielding significant time savings and reducing operational overhead.
To learn more or request a free Data Inbox trial, visit www.alkymi.io.
This new ChangeOwner action provides advanced automation control over how related objects get handled when a records owner is changed.
Flow already makes short work of changing the owner of a record; a single Update Record is all it takes. But elsewhere in Salesforce, there’s support for more sophisticated ownership change control. For example, when you change the owner of a Case or an Opportunity, you get an additional choices and two related changes:
When you change the owner of an Account from a list view, you get a large number of choices:
Change Owner in Style is a Flow Action that gives you the full power of all of those Salesforce “Owner Change Options”. One of the best ways to see what you can do is to run the test flow that comes packaged with the action. Here’s the main screen:
Now, the screen above is somewhat artificial because it’s designed to show every possible option. In practice, you’ll usually know which object type you’re dealing with, and won’t need to expose all of the possibilities that the action supports. In many cases, you won’t need to expose any UI at all.
How It Works
You need to pass in at least one of:
a record
a record collection
a recordId
Those are set here:
You need to pass in a User Id to the newOwnerId input. You can use a Lookup component for this (see the video above)
You need a Remote Site Setting (The Change Owner action calls a public Salesforce API endpoint so you need to allow your org to essentially call itself.)
Most of the rest of the inputs are boolean inputs that take either true or false, but a few take specific values
Note that Send Email Notification, which shows up in the Change Owner modal dialogs in the LIghtning UI is not supported here, as it is not exposed in the API for unknown reasons. Use another action to generate an email if you need this capability.
“Also transfer Notes, Attachments and Google Docs” doesn’t seem to be working at the API level.
There are a couple of inputs where, if you want to set them to true, you need to also set some other input to true. Those are:
TransferOtherOpenOpportunities
In order for this to work TransferOwnedOpenOpportunities must ALSO be true
TransferAllOwnedCases
In order for this to work TransferOwnedOpenCases must ALSO be true
Using This Action Directly From Apex
All invocable actions, like the one demonstrated here, can now be invoked directly from Apex code, without requiring any flows, as of Winter ’23. Learn more.
This action constructs a SOAP call from within Apex, allowing access to properties that exist only in SOAP headers. This is the full list:
This approach can be used to create invocable actions for these other SOAP use cases.
https://unofficialsf.com/wp-content/uploads/2022/09/largeUCSF-300x133.png00Alex Edelsteinhttps://unofficialsf.com/wp-content/uploads/2022/09/largeUCSF-300x133.pngAlex Edelstein2022-09-17 14:54:432022-09-17 15:31:41Advanced ‘Change Owner’ Configuration Now Available In Flow and Apex
Update January 25, 2025: install links updated to latest version Update October 15, 2022: install links updated to latest version Update September 26, 2022: install links updated to latest version
Next week is the year’s big Main Event: Dreamforce. For some of us, that means packing our things and scrambling to fill our session schedules, make meetup plans, and find the perfect dinner spot. For others, like me, an sense of impending FOMO.
Fortunately, the announcements made at Dreamforce, and the Winter 23 release just a few weeks after, will be for everyone, whether you make it in to San Francisco or not. If you’ve reviewed the release notes or scoped out your preview sandbox, one item you may notice is that the Dynamic Fields feature for Screen Flows will be Generally Available, and with that, picklist fields will be Record Type-aware. This means you can simply place a record variable’s picklist field on a screen, and if you’ve set the Record Type for that record, it will correctly display only the picklist values that are active for that Record Type. However, that Record Type must be set on the record variable before the Flow arrives on that Screen with the picklist. So, then: what options do we have today for letting a user select a Record Type?
Today’s Options for RecordType Selection in Flows
You could build a Choice for each Record Type. That might work, but what if different users have a different permissions to different Record Types. Sounds like a pretty hairy mess to try to get right, and to maintain moving forward. Not a great option.
You could do a Record Choice Set or a Collection Choice Set based on the RecordType object. Of course! Perhaps by setting the Screen Flow to run in User Mode, which respects a user’s access to records, we’ll only get the Record Types that the user has permissions for. If you’ve tried this, you’ll quickly learn that the RecordType object, which holds all each object’s Record Types, is not limited by the user’s permissions. If a user has read access to an object, they’ll have access to every RecordType for that object, even if they don’t have permission to create a record for that Record Type.
The closest I could find is the GetRecordTypeInfo action in the UnofficialSF Flow Action Pack. Its a nifty action! But its a bit incomplete, as it requires you to pair it with another screen component, it won’t give you the Record Type Descriptions, and the Record Type information is provided in separate text collections, making it challenging to be able to use the selected option downstream in the Flow.
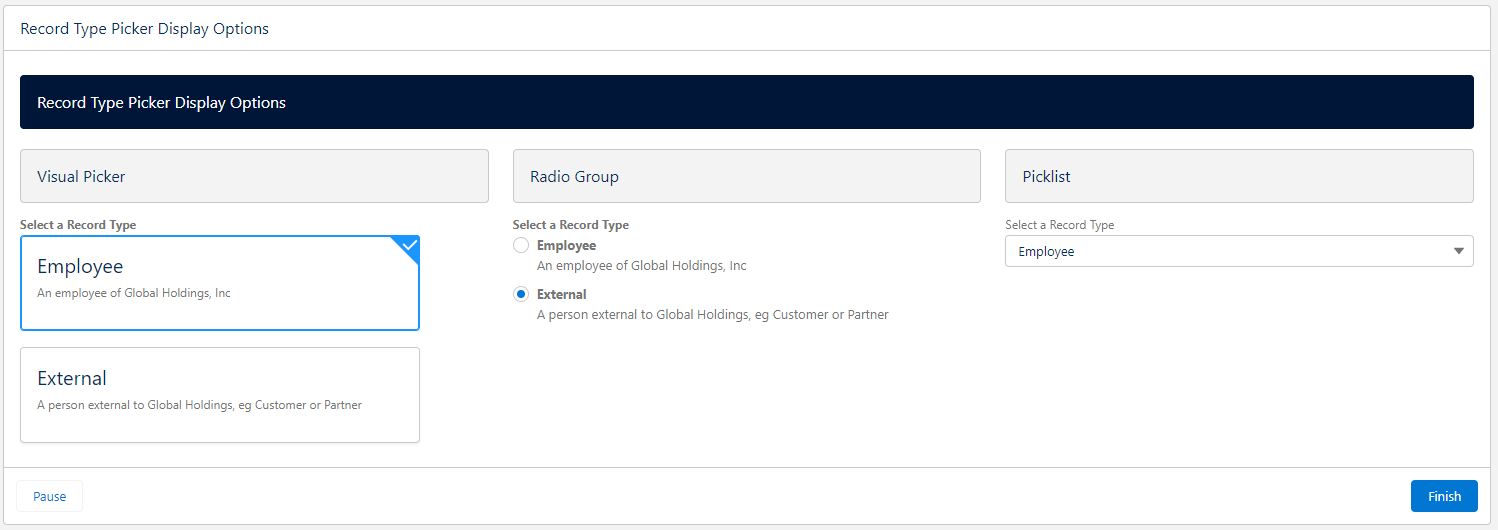
🎉 Welcome to the team, Record Type Picker 🎉
The Record Type Picker is an open-source, free-to-use component that can be used in Screen Flows to give users selectable choices of Record Types, automatically filtered to just the Record Types that the running user has access to!
Three display types
Visual Picker, Radio Group, Picklist, each with optional Show or Hide Descriptions
Optional Auto-Next Navigation on Select
Auto navigate on selection works best with the Visual Picker on a screen that doesn’t have any other inputs and has the footer and/or Next button hidden. When the user clicks on a selection, the Flow will automatically navigate to the next screen. It is also recommended to provide a “Previous” button on the next screen so that the user has a chance change their selection if they’ve made a mistake.
Easy configuration with a Custom Property Editor that has a Preview mode
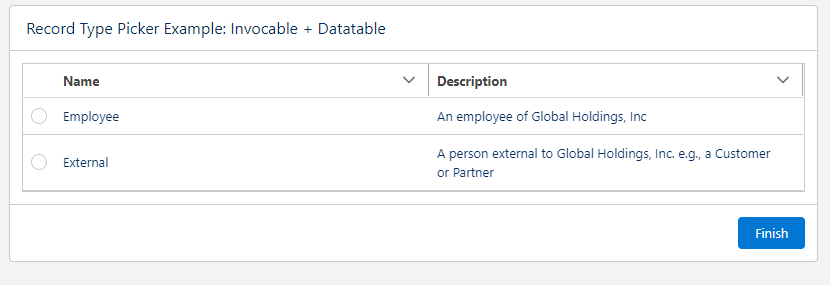
Bonus Invocable Action
The package also comes bundled with an Invocable Action to get a Collection of RecordTypes available to the running user, in case you’d prefer to use other screen components like Collection Choices or Data Table
Install with Ease
This component does not depend on any other packages, and can be installed with an unlocked, namespaced package using the links below. The namespace means you don’t have to worry about conflicts with anything you’ve already got in your org, and being unlocked gives you the confidence that what you see in the source repo is what you get in the package.
There are a handful of features that I’d like to add, but its at the point now that it should be pretty useful for anyone that needs this kind of thing. Take a look, and please add any issues or feature requests to the Issues log in the GitHub repo!
Jeff Kranz
Platform Product Manager for Riskonnect, a Salesforce OEM Partner since 2007.
Opinions and statements made on this platform do not represent those of my employer.
https://unofficialsf.com/wp-content/uploads/2022/09/RecordTypePickerDisplayOptions-3.png5301498Jeff Kranzhttps://unofficialsf.com/wp-content/uploads/2022/09/largeUCSF-300x133.pngJeff Kranz2022-09-16 10:22:002025-01-25 06:25:31Introducing: User-aware Record Type Picker for Flows
UPDATE: Salesforce has added official support to Flow Orchestration for this functionality. Learn more.
Work Guide Plus (“WG+”) is a custom Work Guide component that you can add to record and home pages, similar to how the Orchestration Work Guide works. In addition to being able to display an individual work item, it can show a list of all the work items currently assigned to the running user.
Consider this example, where I have two work items assigned to me that are associated with the Jones Pharma account:
The Out of The Box Work Guide will simply display one of the two, but WG+ will show a list:
Select a work item and click Open Work Item to work on it.
If there’s only 1 work item assigned to the running user, WG+ will simply execute it and not bother with the list.
Screen flows used as step flows MUST have an input text variable named recordId to receive the record Id as context information, if you use Work Guide Plus.
When the screen flow is finished, WG+ will return to the list of Work Items. It has a two second delay to allow Orchestration to update the status of your work items, and this value can be overridden (the idea here is that if you return to your list too quickly, you might still see the work item you just finished work on because orchestration is still in process).
As a side note, this component features the new official Datatable component, which is Beta in Winter ’23. Because of that, however, it requires a Winter ’23 org. We’ll publish an installable package as soon as Winter ’23 becomes generally available. In the meantime, you can grab the component from the repository below and add it directly to a Winter ’23 org.
https://unofficialsf.com/wp-content/uploads/2022/09/largeUCSF-300x133.png00Alex Edelsteinhttps://unofficialsf.com/wp-content/uploads/2022/09/largeUCSF-300x133.pngAlex Edelstein2022-09-16 07:44:532024-05-08 14:53:50Work Guide Plus adds a work list to the Flow Orchestration Work Guide
UPDATE: I TESTED POSITIVE FOR COVID THE NIGHT BEFORE DREAMFORCE, SO I WON’T BE AT THIS MEETUP. you might want to go anyways and see who shows, however.
Alex here…. If you’re coming to Dreamforce, drop by and say hello and tell me how you’re using Salesforce Automation and what you want to see in the future. I’ll be hanging out at Moscone West on the 2nd floor in back behind the session rooms, where they serve lunch, on Tuesday between 2:30-3:30pm. Would love to chat!
https://unofficialsf.com/wp-content/uploads/2022/09/largeUCSF-300x133.png00Alex Edelsteinhttps://unofficialsf.com/wp-content/uploads/2022/09/largeUCSF-300x133.pngAlex Edelstein2022-09-14 19:59:442022-09-20 06:22:09At Dreamforce: The 1st Unofficial Unofficial SF SF Meetup
I love it when we get some of those official Salesforce Flow videos with those sweet, sweet production values. This latest set of bite-sized videos is a definite new Must Watch for new Flow creators, drilling down on specific topics like Scheduled Paths and Variables.
The videos are short, but there’s some nice focus: one of them focuses purely on introducing variables, using a lunchbox and thermos metaphor:
And another one focuses purely on Before Save vs After Save triggers:
Check it Out! And find other Flow tutorials here.
https://unofficialsf.com/wp-content/uploads/2022/09/largeUCSF-300x133.png00Alex Edelsteinhttps://unofficialsf.com/wp-content/uploads/2022/09/largeUCSF-300x133.pngAlex Edelstein2022-09-14 10:18:222022-09-14 10:18:27From Salesforce: 6 New Flow Builder Videos for Beginners