We’re Experimenting With Ads….
It costs about $600 per year to sustain UnofficialSF.com, and we’re experimenting with some ad placement to help keep the site running. I apologize for the inconvenience!

It costs about $600 per year to sustain UnofficialSF.com, and we’re experimenting with some ad placement to help keep the site running. I apologize for the inconvenience!
Controlling Picklist and Multiselect Picklist based on Record Types
Created by Ajaypreet Singh Saini
This Post was most recently updated on: 3/2/26
Current Version: 1.0.0
This Generic Record Type Picklist is a high-performance “all-in-one” component for Salesforce Screen Flows. It dynamically fetches and displays picklist and multiselect values based on a specific Record Type. Instead of building unique screens for different business processes, you can use this one component to ensure users only see the options they are allowed to select.
Core Features
Dynamic UI Switching: You don’t need two separate components for Picklist and Multiselect Picklist. ‘Multi-select Picklist’ property set to TRUE in the component property editor turns a standard dropdown (Picklist) into a beautiful Dual Listbox for Multi-select fields.
Record Type Intelligence: Filters values by Record Type ID, Developer Name, or Label, making it “Sandbox-to-Production” safe.
Built-in Validation: Includes a custom validation engine that prevents users from proceeding if a required field is empty.
Metadata Synchronization: Automatically pulls Field Labels directly from your Object Manager settings (when API Name is provided), reducing manual configuration, but if needed, it gives you an option to override the Label.
Review Mode: Features a professional Read-Only display to show users their selections on summary screens without allowing edits.
Note:
This component acts as a normal Picklist or Multiselect Picklist if the “Record Type Needed?” property is not set (default value is FALSE).
If this “Record Type Needed?” is set to TRUE, then provide either the RecordType Name, RecordType ID, or RecordType DeveloperName in the “Record Type Identifier” input to convert this normal Picklist or Multiselect Picklist to be controlled based on Record Type.
| Attribute | Type | Notes |
| INPUT | ||
| Default Value | String | Sets the initial selection. For Multi-select, use semicolon-separated values (e.g., Option1;Option2). |
| Object API Name | String | (Required) The API name of the Salesforce Object (e.g., Account, Custom_Object__c). |
| Field API Name | String | (Required) The API name of the Picklist or Multi-select Picklist field. |
| Label Override | String | Custom text for the field label. If blank, it defaults to the Field Label defined in Salesforce. |
| Inline Help Text | String | Text to display in the info-bubble next to the field label. |
| Multi-select Picklist | Boolean | Switch between a Dropdown (False) and a Dual Listbox (True). |
| Required | Boolean | If True, the Flow prevents navigation until a value is selected. |
| Read Only Mode | Boolean | Displays the selected value as static text in a shaded box—ideal for summary screens. |
| Disabled | Boolean | Grays out the input, preventing any user interaction while still showing the current value. |
| Record Type Needed? | Boolean | Set to True to enable filtering of picklist values by a specific Record Type. |
| Record Type Identifier | String | The ID, Developer Name, or Label of the Record Type used to filter the list. |
Production or Developer Version 1.0.0
Sandbox Version 1.0.0
3/2/26 – Ajaypreet Singh Saini – v1.0.0
Initial Release
3/2/26 – Ajaypreet Singh Saini – v1.0.0
Initial Release
Production or Developer Version 1.0.0
Sandbox Version 1.0.0
Check out him overview of this major new visual component:
Yumi’s post does a great job of diving into this powerful new feature that’s easy to miss. One issue is discoverability: to find this trigger, you need to know about the Automation Event-Triggered Flow Type.

Innovation in agentic orchestration is accelerating rapidly, and our automation product teams have been hard at work improving Flow to make it easier than ever to bring agents and human-centered work together. With the Summer ’25 release, we’ve introduced powerful new capabilities that help you embed Agentforce agents into your automations and extract structured data from agent responses. I also have an update on how we’re tapping into MCP to make Flow and Action Platform capabilities available to the full power of all actions —connect any agent technology to the full power of Salesforce actions.
Add agents to automation with Flow & Agentforce
As of Summer ‘25 release, you can now easily insert Agentforce agents into most flows.
This video from Liz Awad, one of our product managers, demonstrates a flow that features two different embedded Agentforce agents. One of the great strengths of Flow is its ability orchestrate different agents and combine them with business logic that guarantees certainty and safety (often referred to as deterministic processing).
How It’s Done
Activate your Agentforce Agent in Setup. Then go to a flow that supports the Action element, such as a Screen Flow, an Autolaunched Flow or a Record-Triggered Flow. Add the Action element, and in its property editor, click on the AI Agent Actions category, and you’ll see an action for each of your activated Agentforce agents.
If you have MuleSoft for Flow : Integration installed, you’ll also be able to find actions for sending prompts to OpenAI and Anthropic.
Easily extract information from Agent responses with Structured Outputs
One of the problems we have had to solve in the last year involves the handling of the text output that Agents return. That text is unstructured, just like this post. But suppose you want to use information that the Agent returned in subsequent parts of your flow? You need a way to accomplish several things:
Our Action Platform team worked with our Agentic Orchestration program to solve this by enhancing all of the Agentforce actions to use Structured Outputs, a simple mechanism that lets the builder, at Design Time, identify specific named values that they want to use. These values are passed to the agent as instructions and the agent returns them in a format that the flow can automatically extract. The values also surface as available Design-Time resources that can be mapped to downstream inputs.
How It’s Done
From the property editor use the Configure Structured Outputs section to define the outputs you want to get back from the agent:

Coming Soon: MCP Server Support for All Invocable Actions
There are now more than 1000 standard actions made available by different Salesforce products, and each month more than 350,000 different custom actions (written in Apex) get used. Most of these are available today in Agentforce, but what if you want to use a different agent technology but still access all of your Salesforce actions and capabilities?
It will soon be possible to define MCP Servers on the Salesforce Platform. MCP is a new technology that, among other things, standardizes the way that actions can be tapped into by agents. When you create an MCP server, you will be able to add any Salesforce action to it, immediately providing a way to expose actions to your agent of choice.
Summary: Orchestrate Agents Today with Flow and Actions
You can use generally available Flow and Action features today to orchestrate rich interactions that mix agents and humans. This allows the immediate combination of the reasoning power of agents and the certainty of process automation, which provides a way to insert agentic reasoning into all manner of business processes while maintaining control and safety. I encourage you to try our latest features out!
I recently had the opportunity to meet with the team responsible for the excellent AppExchange product that handles enhanced approval requests. It is available in both a free and a paid version. Their roadmap includes expanding the app to work seemlessly with both the original and the new flow based approval processes.
You can read all about it here. Efficient Approval Management with Salesforce Flow Approval Processes and Enhanced Approval Requests Pro

Disclaimer: This is more of a thought exercise than a valid use case, and contains some anti-patterns. It is meant to give one an example of parsing a prompt’s output with Apex.
From a screen flow on the account page, we want to surface a list of the top 5 best products most likely to sell at an account. This information should be based on industry trends and purchasing history of the account.
We also want to know how much time passed since the last purchase of the product, and how many times the product has been purchased in the last year.
These top 5 products should be displayed in a table, from which the user can select one or more to create an opportunity and a related list of opportunity products.
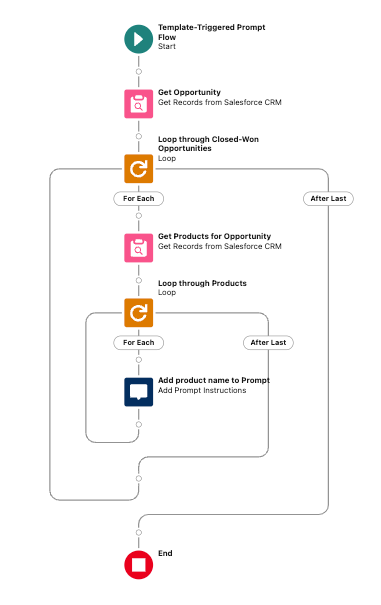
We’ll use a template triggered prompt flow to ground the prompt builder with the appropriate data from the account.
The prompt builder output can’t simply return records. We can only access the output in its rawest form: as string of JSON. We’ll need to parse the JSON and map it to something that can be displayed in a table component in the screen flow.

There are different table components available in flow. The out-of-the-box table component can only be used to display records. There are third party components that can display a list of Apex-defined objects. For simplicity, we are going with the former. That means every piece of data we want to show needs a corresponding field. We need two new custom fields: Time Passed from Last Purchase and How Many Times Purchased In Last Year.

Since our focus is on getting JSON from the prompt and parsing it, we won’t spend too much time on the precise business logic. Here’s what the template triggered prompt flow looks like.
Here’s what the prompt looks like:You are a Sales Rep for the {!$Organization.Name} company.You want to understand what would be next best order for the customer {!$Input:Account.Name} based on his previous ordersAs the orders you will lookup in the last year orders{!$Flow:Recommended_Next_Best_Product_Flow.Prompt}Summarize the products to count how many times each product have been purchased but don't put this result in the answer.Also try to understand from the purchase dates when it was the last time each product has been purchased, also don't put this calculation in the answer.Based on this calculation propose 5 products to order that might be suggested for the next order for the customer based on the products that have been purchased more times or that is a long time since the last purchase.Do not include "*" in the product nameTry to suggest products with the Product Family of Services or SoftwareTry to suggest also product that are more suitable for the customer industry that is {!$Input:Account.Industry}Order the results from the most suggested to the less suggested.For each suggested product, say how much time passed from the last purchase (in months or weeks) and specify how many times it has been purchased in the last year.Avoid suggesting products like shipping charges since they are automatically calculated.In the output of this prompt, return the 5 products in a list of objects. Each object should include the following attributes: ProductName, ProductId, ProductFamily, TimePassedFromLastPurchase, HowManyTimesPurchasedInLastYear.In the output of this prompt, only include the JSON array of the objects. Do not include any other text.Delete the "```json" at the beginning of the prompt, and delete the "```" at the end of the prompt.
Pay close attention to the last few lines of the prompt.
Note: It is critical to remove the “`json from the beginning and the “` at the end of the prompt output.
Remember, this will be launched in a screen flow. The screen flow will be distributed on the account lightning record page. It’ll take that account id, get the entire account record, then pass the whole record to the prompt builder.
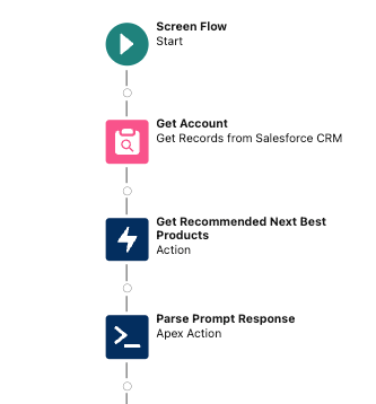
The output from the prompt must be manually mapped to a text variable, in order to pass it to the Apex action.

Here is what the Apex code looks like.
public class ProductInfoParser {

    // Inner class to represent the structure of the incoming JSON
    public class ProductInfo {
        public String ProductName;
        public String ProductId;
        public String ProductFamily;
        public String TimePassedFromLastPurchase;
        public Integer HowManyTimesPurchasedInLastYear;
    }

    // Wrapper class to handle the input from Flow
    public class Request {
        @InvocableVariable(required=true)
        public String jsonInput; // The input from Flow, a single string containing the JSON array
    }

    // Wrapper class to handle the output back to Flow
    public class Response {
        @InvocableVariable
        public List<Product2> products; // The list of Product2 objects to return
    }

    // Invocable method to be called from Flow
    @InvocableMethod(label='Parse JSON and Map to Product2' description='Parses JSON array and maps the values to a List<Product2>')
    public static List<Response> mapJsonToProducts(List<Request> requests) {
        List<Response> responses = new List<Response>();
        Request req = requests[0];
        Response res = new Response();
        res.products = new List<Product2>();

        // Deserialize the JSON array into a list of ProductInfo objects
        List<ProductInfo> productInfoList = (List<ProductInfo>) JSON.deserialize(req.jsonInput, List<ProductInfo>.class);
        System.debug(productInfoList);

        // Map the ProductInfo to actual Product2 objects
        for (ProductInfo info : productInfoList) {
            Product2 prod = new Product2();
            prod.Name = info.ProductName;
            prod.Id = info.ProductId;
            prod.Family = info.ProductFamily;
            prod.Time_Passed_From_Last_Purchase__c = info.TimePassedFromLastPurchase;

            // Convert integer to string for the text field
            prod.How_Many_Times_Purchased_In_Last_Year__c = String.valueOf(info.HowManyTimesPurchasedInLastYear);

            // Add the mapped product to the response list
            res.products.add(prod);
        }
        // Add the response with the list of products to the responses list
        responses.add(res);

        // Return the responses containing the lists of Product2 objects
        return responses;
    }
}
Important: The object attributes of the JSON returned by the prompt builder output must match the attributes of the Apex class. Note the attributes of the inner class ProductInfo match exactly: ProductName, ProductId, ProductFamily, TimePassedFromLastPurchase, HowManyTimesPurchasedInLastYear.
These must match in order for us to take advantage of the system method JSON.deserialize(). It is possible to create a custom JSON parser, but that is both messy and unnecessary.
The remainder of the flow takes the top recommended products returned from the Apex, and renders them in a table. The user may then select the products, and the flow will create an opportunity and related opportunity products.

Delete the "```json" at the beginning of the prompt, and delete the "```" at the end of the prompt.Check out our newly published post covering the things we’re working on this year at Salesforce for the Flow family!
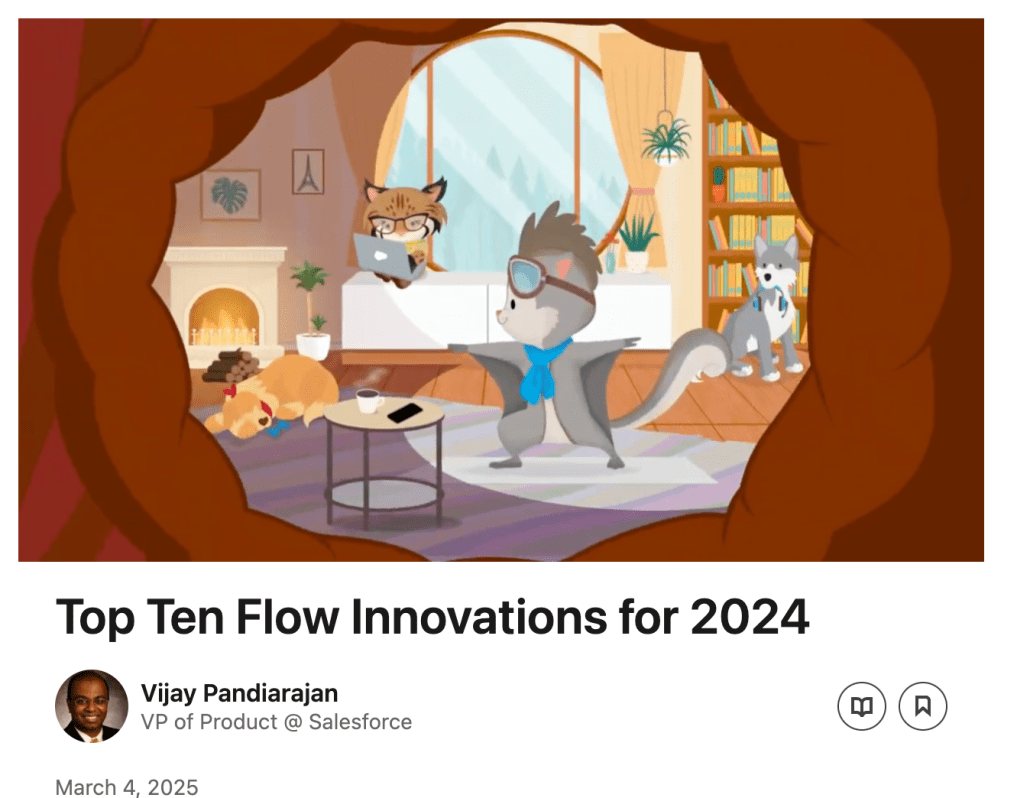
Check out this great post from Vijay, a VP of Product Management on the Flow team at Salesforce.
Hi Salesforce friends!! I am super excited to share an awesome new feature by the Omni-Channel team from the Spring ’25 release: the new ‘Reassign’ standard action. This new standard action allows reps to reassign work to different queues, agents, skills, or even invoke an Omni-Channel flow with just a few clicks.
Let’s dive into the details:
The new Reassign Action simplifies the setup process and accelerates time-to-value for Omni-Channel. It enables direct routing to skills and ensures that reassigned work is prioritised based on its original creation date. This means that reassigned tasks don’t get lost at the bottom of the queue, helping to boost resolution times and improve SLA attainment. The other benefit is that reps can also push work into Omni-Channel, if it was not routed by Omni-Channel initially. This feature is available on Enhanced Omni-Channel and all routable objects except Messaging Sessions and Voice Calls as they have their own transfer experience today.

Setting up the Reassign Action is straightforward. Here’s a quick guide:
For more detailed information on setting up the Reassign Action, check out these help docs:
• Setting Up Reassign Work
• Agent Reassign Work
Custom Request Date-Time Field in Omni-Channel
One of the standout value of the reassign feature is how it factors in the original creation date of the work item and ensures that reassigned work is prioritised higher in the queue.
In Omni-Channel, the routing order is as follows:
Behind the scenes of the reassign action, we set the ‘CustomRequestedDateTime’ to the created date of the work item. This ensures that the work item enters the queue at the appropriate place, rather than at the created date-time of the agent work, thereby maintaining its priority.
For more information, refer to this doc:
Default Configuration
To reassign a work item, it must have a routing configuration. When you reassign a work item to a specific agent or skill, Omni-Channel uses the routing configuration of the existing AgentWork record, not the PSR (PendingServiceRouting) record. In case a work item doesn’t have a routing configuration, define a default routing configuration in the Service Channel settings. This is crucial for work items that weren’t originally routed by Omni-Channel and therefore don’t have a routing configuration.
For more information on limitations, refer to this doc:
• Work Reassignment Limitations
While the current release does not include list views and supervisor actions, these features are on the roadmap.