While running some tests with my latest version of the Datatable component, I came across an interesting inconsistency in how sorting is handled in flow. Salesforce List Views, sorting in flow elements like Get Records and sorting in a SOQL query in DataFetcher provide case insensitive sorting for text based fields.
Example: AbCdE
However, the flow Sort element and column sorting in my Datatable component do case sensitive sorting.
Example: ACEbd
To support both methods, I added a new configuration option to Datatable to ignore character case when sorting. The default remains the case sensitive sorting like we’ve always had in Datatable, but the new attribute allows you to configure the Datatable to have the same behavior as List View sorting.
Along with this update, I changed the API version from 60.0 to 62.0 and addressed a bug where there could be an error when a Remove Row action was configured to be in the first column.
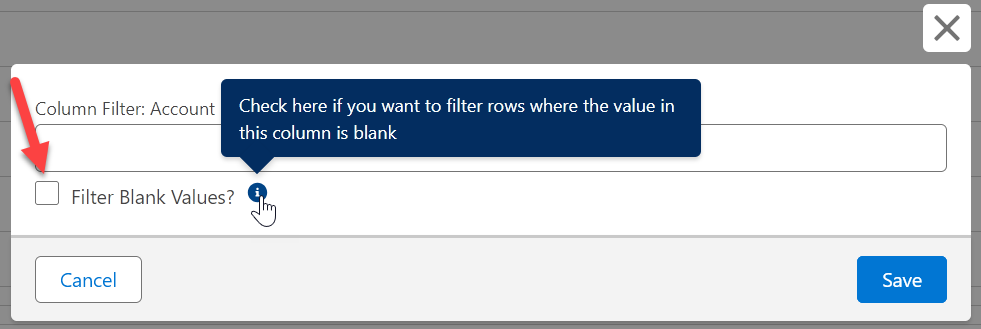
I have released a new version (4.3.3) of the Datatable component that adds a new feature and squashes some outstanding bugs. The latest addition lets you specify column filters that will match records with blank values in the filtered column.
T
Also, the number of characters required in the Search Term box before the search will start has been reduced from 2 to 1.
T
The following bugs have been resolved in this latest version.
Removed processing from v4.3.1 and v4.3.2 related to the Winter 25 base component bug for flexible width columns
Fixed bug where lookup field columns were not holding the flex attribute
Fixed bug where changing or clearing a search or filter value after an edit wouldn’t display all of the original records
Fixed bug where record selections would be cleared when filters were cleared
Fixed bug where wrong record links could be generated in a developer org
Fixed reactivity bug where an error could occur when a previously selected record was no longer included in the current record collection
Fixed bug where reactive collection processors would fail trying to read the selected rows collection when a lookup field was included
PR#1575 – Fernando-Fernandez – If the keyfield attribute is a field that doesn’t actually exist, don’t identify every record as selected
https://unofficialsf.com/wp-content/uploads/2022/09/largeUCSF-300x133.png00Eric Smithhttps://unofficialsf.com/wp-content/uploads/2022/09/largeUCSF-300x133.pngEric Smith2024-11-22 09:20:352024-11-22 09:23:55A new version of Datatable has been released (v4.3.3)
Check out Phil’s powerful combination of recent Flow technologies. He even uses AI to modify old open source code!
https://unofficialsf.com/wp-content/uploads/2022/09/largeUCSF-300x133.png00Alex Edelsteinhttps://unofficialsf.com/wp-content/uploads/2022/09/largeUCSF-300x133.pngAlex Edelstein2024-11-10 19:36:522024-11-10 19:38:07From Phil Ryan: Combine Direct Access Path Header with Reactive Screens
The latest iteration of the Winter ’25 release introduced a change in how columns set to flex to the width of the container behave. The new version 4.3.1 of the Datatable component should now correctly handle flex columns in Winter ’25 orgs.
Notes:
Users will no longer be able to manually change the width of columns set to flex when they are interacting with the Datatable.
The column separator symbol in the header will appear directly after the column label rather than at the end of the column.
I’ve added a new behavior for column headers in this release of the Datatable. They will now Clip or Wrap just like the cell contents based on the setting applied to the column at the time of configuration or if the setting is changed by the User while they are viewing the Datatable.
Get the new installation links and complete documentation on the Datatable page.
Elliot Hebert, an Application Architect at RafterOne, has simplified record validation with a new action to check if a record has any blank field values from a list of field API names that you provide to the component. Find out more about this new invocable flow action here.
https://unofficialsf.com/wp-content/uploads/2022/09/largeUCSF-300x133.png00Eric Smithhttps://unofficialsf.com/wp-content/uploads/2022/09/largeUCSF-300x133.pngEric Smith2024-08-13 12:46:022024-08-13 12:46:06New Flow Action to Check for Blank Fields
Welcome to the next major release of Datatable. There are a couple of amazing new features along with a few minor bug fixes.
• There is now a new Remove Row Action available that allows the removal of individual rows from the Datatable. This can be useful in scenarios such as using the Datatable to display a list of items in a shopping cart and needing to provide users with the ability to remove items from the list.
In addition to setting a maximum number of records, you can specify the icon and color to be used for the action and put the action column on the left or the right of the Datatable.
New outputs are the collection of removed records, the collection of remaining records and the number of records removed. This functionality works for both Salesforce objects and Apex Defined records.
You can even use this action to “select” records and specify a limit on the number of records that can be acted on. This allows you to remove records from the Datatable once they have been selected.
Remove Row Action – Used for Selections with a Limit on the Number of Row Actions
As a time-saving bonus, even if you are not including a remove row action, the new Remaining Rows output collection will contain all the Datatable records including all Edits that were made to the records. You no longer must add extra steps to your flow to combine the edited records with the original records. (How to use both the Selected and the Edited records in a Datatable)
Remaining Rows attribute can be used to output All Records with Edits
• There is a new option to display the number of Selected Records in the table header. Even better, with this release, selected records are now PERSISTENT once selected. Performing table actions such as Pagination, Sorting, Searching, Filtering and Removing Rows will always persist all previously selected records.
Selected Record Persistence with Pagination, Sort, Search, Filter, and Remove Row
• To help with debugging flows where you have multiple Datatables on the same screen, the Console Log outputs will identify the Datatable Header value for each console log statement. To help protect sensitive information, record and field values will no longer show in the console log or debug log outputs. You can still choose to override this behavior in your sandboxes with a couple simple attribute changes in the source code.
Override behavior showing record dataDefault behavior with data hidden
https://unofficialsf.com/wp-content/uploads/2024/07/RR.png11241343Eric Smithhttps://unofficialsf.com/wp-content/uploads/2022/09/largeUCSF-300x133.pngEric Smith2024-07-22 11:49:472024-07-22 13:03:39Check out the latest Datatable improvements!
The recent addition of Prompt Builder to the Salesforce admin toolbelt allows admins to use Einstein generative AI with Salesforce data.
I set out to learn some of this new functionality with a fun little use case: generate an outfit recommendation based on the current weather conditions for the current contact’s mailing city and use the generated output to populate a field on the contact called: What Should I Wear? The current weather information is obtained by using a flow that makes an HTTP callout to a weather API. The flow will be triggered when the template is run, and will return the current weather and temperature back to the prompt based on the input of the contact mailing city.
The first thing you need to do is get access to a special Salesforce trial org, that is enabled for Einstein AI. The easiest way to get access is to go to any of the quick start projects for Einstein AI found in Trailhead. From there you can create a special Einstein AI playground. Keep in mind that the trial org comes with an expiration date and you will lose access to it and all your configurations once it expires.
After logging into the org, you need to Turn on Einstein from the Einstein Setup page.
Only after you do that, will you be able to access Prompt Builder from the setup menu.
The first thing I did was to create a receptacle field for my generated content. I created a Long Text Area field on the contact object called What Should I Wear?
Before starting on my template I created a new Template-Triggered Prompt Flow. In this flow I created an HTTP callout to a publicly available weather API to get the current weather for the inputted city. There are multiple other resources available that explain on how to create and use an HTTP callout action in a flow so I will not add details here.
There are two things unique about this new flow type:
You need to specify the type of prompt template this flow will fit, and also specify the object available for input. The input object must match the input object specified in the prompt template. This introduces 2 new global variables in the flow called $Input, and $Output. You can use them to interact with the calling prompt.
There is a new element for returning output instructions back to the prompt, called Add Prompt Instructions. It will send text back to the prompt and you can merge fields from the flow in it. It is important to handle both positive and negative instructions in case an error occurs and the desired output cannot be generated. In my case I added an instruction saying that an error occurred while getting the weather and also added a formula in my flow that will send a dummy city in case there was no mailing city on the contact record. This handled flow errors from the callout missing a required input parameter. Another option to handle errors would be to have a decision that skips sending a callout if there is no mailing city available.
Here is the configuration of the flow
After the flow is created and activated it can be used as a resource in the prompt instructions.
When you click New Prompt Template, you need to select one of the available templates that fit your use case and the starting object it will use as input. I chose a field generation template, the contact object, and the field I created to hold the output.
the builder workspace will open and it is there that you enter the prompt instructions and test generated responses
This is my Field generation text instructions, using both contact merge fields and the flow that makes the callout
You’re a sales representative who needs to create an outfit recommendation for {!$Input:Contact.FirstName} based on his location {!$Input:Contact.MailingCity}.
When I ask you to create a recommendation, you must strictly follow my instructions below.
Instructions:
“””
Generate an outfit recommendation in one paragraph no longer than 1000 characters.
Use clear, concise, and straightforward language using the active voice and strictly avoiding the use of filler words and phrases and redundant language.
Start the paragraph with a line mentioning the contact’s mailing city and describing the current weather and the current temperature in the contact’s mailing city.
If no value is available for the mailing city , say you cannot recommend an outfit currently.
Based on the weather and temperature, recommend an appropriate outfit to wear.
The recommended outfit should be gender neutral. You can mention accessories such as an umbrella or a hat in the recommendation.
Use the following information to get the current weather: {!$Flow:Contact_GetWeatherByCity_PromptTriggered.Prompt}.
If an error was returned for the current weather, say you cannot recommend an outfit currently.
Do not attribute any positive or negative traits in the recommendation.
“””
Now create the recommendation.
Before activating a new prompt template it is important to test it out repeatedly using various input records to see how it generates the response text, and make any adjustments to the instructions.
Again it is important to handle negative scenarios, in my case if no mailing city is found I instructed the prompt to say a recommendation could not be made.
The last step after activating the prompt template is to add it to the field on the Lightning record page. This will only work with dynamic record pages.
Finally this is a demo of the field generation prompt in action
https://unofficialsf.com/wp-content/uploads/2022/09/largeUCSF-300x133.png00Tamar Erlichhttps://unofficialsf.com/wp-content/uploads/2022/09/largeUCSF-300x133.pngTamar Erlich2024-07-21 13:22:482024-07-22 04:32:20Using Field Generation Prompt Builder and Flow to generate a recommendation
Late last year, Salesforce announced Prompt Builder. Prompts are the mediums that are used to communicate with the large language models (LLM) such as ChatGPT from OpenAI. Prompt Builder gives Salesforce Admins the capability to create, test, revise, customize, and manage prompt templates ensuring high quality outputs that are protected by the Salesforce Trust Layer.
But what is the impact of this all? Being able to use summaries and fuzzy logic as part of your flows is a huge productivity gain for admins and end users.
This article will go over three key areas:
Leveraging Flows Within A Prompt Builder
Calling A Prompt Template From A Record Triggered Flow
Creating A Dynamic Prompt Template With A Screen Flow
Prompt Builder, Prompt Templates, Template-Triggered Prompt Flow – Where do we Begin?
Prompt Builder is the solution to create and manage all of your prompt templates using configuration methods. Prompt Templates are what you build to be re-used as part of a variety of use-cases for field generation, Flows (Record-Triggered, Template-Triggered, & Screen Flows), and Einstein Copilot.
Finally, Template-Triggered Prompt Flows are a new type of flow that is built to enhance, or bring in more, specific data into your prompt template.
You can see the official help article for the prompt template types here. I find visual examples to be the most helpful so here is a quick overview of each in action. These are the first three prompt template types that are currently available with more coming by Salesforce and by customers.
User Triggered Field Generation For Any Summary
As a Seller, I want a way to stamp a current overview of an account regarding any deals or support requests and comments from both. Specifically, I want a way to adjust the output for what is relevant rather than just use a predefined template. Field Generation is a great method to generate content for record fields with the user clicking a button to run the prompt, allowing for adjustments, then populating the field with the output.
Sending An Email Grounded With CRM Data
Rather than using an email template that pulls in merge fields, use the Sales Email template type to create a personalized email in a way that scales, especially with high velocity sellers.
Where static email templates can pull in merge fields, and we can extend this by adding in formula fields on a record – they will always feel like a template. That is where Sales Email (via Generative AI) comes in to provide that human-like messaging.
Go Beyond Field Generations & Sales Emails
Beyond these two types of prompt templates, we have Flex which we will explore today with a screen flow, and record summary, which is part of Einstein Copilot.
Flex: Generate content for any business purposes that other templates don’t cover. Flex prompt templates let you define your own resources. Think of Flex Templates as a regular flow, you can set up any inputs manually and the resulting output is a one-off.
Record Summary: Summarize record data for a comprehensive view of a record. Record summary prompt templates are used by the Summarize Record standard invocable action. In Einstein Copilot, they’re used by the Summarize Record standard copilot action.
Leveraging Template-Triggered Prompt Flows Within A Prompt Template
First let’s see a side-by-side of when you use a flow vs when you don’t within a prompt output. For this example, I’ve created a prompt that provides the user with an overview of all opportunities related to the account.
Using A Related List
As you can see here, we can use the prompt to call out CRM data and using our Trust Layer, send it to the LLM to provide a quick summary back to the user. So what’s the limitation? Without flows we cannot control specifically what information to enhance the prompt with, use formulas, calculate logic, or make a callout to a web service. For example we can’t add in just the Open Cases or only Closed Won Opportunities.
The fact that we have Prompt Builder to quickly adapt and adjust our prompts to ensure a high quality is endless in terms of its value. Remember, we are retrieving and sending information using natural language; there can be times that we pull the wrong records. By adding another line “Display the next steps” to the prompt, I’ve now pulled in more records by accident.
Now, let’s use a flow to retrieve the exact records that we want and push only the fields that we want. Introducing the Template-Triggered Prompt Flow; This launches from a prompt template and allows us to specify what information to enhance the prompt with.
Summary:
Without Flows: Use this prompt and related information, with little control over the specific records/data to provide a response.
With Flows: use this prompt with the exact records and fields with complete control to provide a response.
Retrieving Information That Isn’t Available In Prompt Builder, But Accessible Via Flows.
Another example of using a flow to retrieve specific information is when data is not available in prompt builder to begin with. For example, pulling in emails that were manually logged into the CRM.
Salesforce stores manually logged emails from Cases and Inbox as records in an object called Email Message which cannot be accessed by Prompt Builder. So we can use a flow to retrieve these to then enhance the prompt for a response.
In this example we are using a flow to bring in more data into the prompt that lives directly on the record itself; but we can also use flows to use formulas, run calculations on business logic, and make callouts to web services.
Calling A Prompt Template From A Record Triggered Flow
Rather than our users having to manually choose to fill in a field, let’s now automatically update the account description field when an opportunity is created/updated.
When you activate a prompt template, you can call it as an action from a Flow, this starts to make things interesting when it comes to extending the Generative AI capabilities within Salesforce.
While calling to prompt templates with your flows, you can also define custom variables that don’t have to map to a specific object and can be free text.
These can be pulled in our Flow Builder and we can use variables or data from the record to import here to make these even more flexible.
Creating A Dynamic Prompt Template With A Screen Flow
If we can call out to a prompt template through a flow to stamp into a field or use a user initiated field generation; why would we want to use a screen flow as part of the user experience?
So far, I found that companies want a way to make a prompt template “dynamic” so we can re-use the same prompt template for a lot of different questions.
The video below will go over the capability of asking questions about meeting notes and using a screen flow to be the method of experience.
Another use-case that is coming up more often is helping service teams troubleshoot an issue and adjust the steps based on feedback from the customer. In the below example, we are using a screen flow to showcase the answer and also how the search prompt is being adjusted each time around.
Matching On Natural Language Criteria
Back when I was a Salesforce Administrator, to Consulting on Salesforce, to now working at Salesforce, a constant requirement has always come up for users, “How can I find the right records based on some criteria?” This is something that I built originally with Data Fetcher and Screen Flows for logic that was “hard-coded”, but what if we want to match based on reasoning?
The use case that we have here is to identify the best lender for a business request based on a variety of factors, primarily previous use-cases/reasons that were approved that use natural language that we can’t filter on.
Now with Flows & Prompt Builder we can open up way more possibilities.
Considerations That I’ve Identified So Far
The get records and loop in a Template-Triggered Prompt Flow works for only 1 level of the record information. For example, if I get a collection of events, I can add the event name to the prompt; however I cannot add the related WhoId name or the Owner name unless I use two more get elements.
Template-Triggered Prompt Flows (today, July 2024) are mapped to a specific Prompt Template; meaning I cannot re-use the same flow in multiple prompt templates.
It takes time to load a Generative AI response regardless of the user experience layer we use (field generation, record-triggered flow, screen flow, etc) but we are still saving our users considerable amounts of time – adjust the model being used to change the output and time taken for each prompt to run in Prompt Builder.
When we use flows to enhance a prompt, it is so easy to do so that we often forget LLMs have limits; prompt builder for building the prompt templates currently (today, July 2024) has a character limit of 128,000 characters.
Thank you for following along with this article; my hope is that you have a basic understanding of how we can use Flows to bring even more value and impact to Generative AI within Salesforce.
To learn more about automating generative AI responses in your existing workflows, check out this other blog by Raveesh Raina on embedding AI responses through 3 simple techniques.
Please comment if you have any questions!
https://unofficialsf.com/wp-content/uploads/2022/09/largeUCSF-300x133.png00Alex Edelsteinhttps://unofficialsf.com/wp-content/uploads/2022/09/largeUCSF-300x133.pngAlex Edelstein2024-07-21 06:56:272024-07-22 07:48:52From James Barker: Using Flows with Prompt Builder
You can now choose the field used in the card name and add specific field styling to card headers. I’ve updated the Custom Property Editor with more help text in the banner help and reorganized some sections. Also huge shout out to Brian Paul with an update to the actions that will update the cards if your action makes an update to the record associated with the card. For example, if my action updates the address on an Account and I have the address on my card, it will show the change in the UI without having to navigate back and forth in my flow.