From Mrityunjoy Chowdhury: Adding Multiple Shift records using a CSV file

In the Spring ‘22 release, Scheduler introduced Shift Rostering Management which can be used to setup working hours for resources. 

Instead of adding shift records one at a time, we can add multiple shifts in one go! Salesforce Scheduler allows adding multiple shifts. In this document we will demonsrate how to upload shifts using Salesforce bulk API capability.

Here I’ve even provided a template to help you create the final CSV which you need to upload!

Quick Help Video on process

Video how to create BulkShift csv data

Step 1.a: Creating Shifts CSV file directly 

If you plan to share this with business users, try the format in 1.b which allows you to create the Id & record mapping and the business user only needs to select the record names.

  1. Create spreadSheet/Excel file 
  2. Copy Paste the first row of the below table
  3. StartTime/EndTime Should be in GMT format (Local Time and GMT time difference should be adjusted)
  4. Status should be Published,Confirmed,Tentative
  5. TimeSlotType should be Normal
  6. File -> Download/Export-> download as CSV file
  1. Open Convert  CSV to JSON and upload the file 
  1. Copy the CSV data and use it as CSV shift data in Upload Shift data step.
StartTimeEndTimeStatusServiceTerritoryIdServiceResourceIdOwnerIdTimeSlotType
2022-03-30T04:30:00.000Z2022-03-30T16:30:00.000ZConfirmed0HhS70000004EkMKAU0HnS700000007xwKAA005S7000000VndRIASNormal
2022-03-29T04:30:00.000Z2022-03-29T16:30:00.000ZConfirmed0HhS70000004EkMKAU0HnS700000007xwKAA005S7000000VndRIASNormal
2022-03-26T04:30:00.000Z2022-03-29T16:30:00.000ZConfirmed0HhS70000004EkMKAU0HnS700000007xwKAA005S7000000VndRIASNormal

Step 1.b: Create bulk Shift CSV from customized spreadsheet (Optional step).

  1. Download this File: BulkShifts
  1. Navigate to the “ShiftsMetadata” and add all the metadata of the Shifts. (Step done by Admin)
  • Service Resource Name,Service Resource Id
  • Service Territory Name,Service Territory Id,
  • Owner Name,Owner Id,
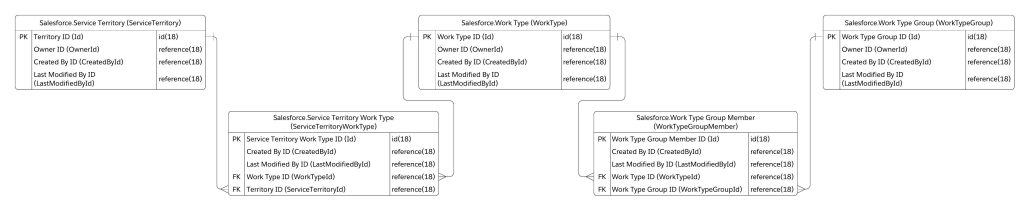
  • WorkTypeGroup Name,WorkTypeGroup Id,
  • GMT Time difference. (GMT time difference is the time difference from your local time to GMT Time).
  1. Navigate to next sheet “DraftShifts” Create your required shifts based on the data you have uploaded in ShiftMetadata sheet,(Note No need to add any data in “GMT Start Time” and “GMT End Time”, it will populate the data automatically on dragging the column. Calculation is already done.Remember that don’t delete the first column because it has all the formulas, just update the first row as per you need.
  1. Navigate to FinalShiftData and you will see the status is already populated.

Drag the rest of the columns to populate all the data from DraftShits to Final Shifts. If there is #NA value present for any cell , remove those values to make value empty.(Note: Do not delete the first row as it has all the formulas. It will populate the value and then drag the column)

  1. Export the FinalShiftData sheet as CSV file

 File -> Download -> Comma Separated Value.

  1. Open Convert  CSV to JSON and upload the file 
  1. Copy the CSV data and use it as CSV shift data in Upload Shift data step.


Step 2: Create a Bulk Job 

Bulk API is rest based so you can use the salesforce workbench to make bulk API requests. 

   A. Open Workbench 

   B. Select Environment and API version (Note: shift for Scheduler is introduced after 54.0)

   C. login to workbench

    D. In the top menu, select utilities | Rest Explorer

We will use /job/ingest resource to create create a Job

URI/services/data/vXX.X/jobs/ingest
Request MethodPOST
Request HeaderContent-Type: application/json; charset=UTF-8Accept: application/json
Request Body{ “object”: “Shift”, “contentType”: “CSV”, “operation”: “insert”, “lineEnding”: “CRLF”}

You should get a response that includes the job ID, with a job state as Open. You’ll use the job ID in Bulk API 2.0 calls in the next steps

Step 3: Upload your CSV data

After creating a job, you’re ready to upload your data. You will provide record data using the CSV formatted data or file you created in steps 1.

URI/services/data/vXX.X/jobs/ingest/jobId/batches
Request MethodPUT
Request HeaderContent-Type: text/csvAccept: application/json
Request BodySample Data:
EndTime,StartTime,Status,ServiceResourceId,ServiceTerritoryId,OwnerId,TimeSlotType,WorkTypeGroupId,WorkTypeId2022-01-14T14:00:00.000Z,2022-01-14T09:30:00.000Z,Tentative,0HnS700000007xwKAA,0HhS70000004EkMKAU,005S7000000VndPIAS,Normal,,2022-01-15T14:00:00.000Z,2022-01-15T09:30:00.000Z,Tentative,0HnS70000004EFyKAM,0HhS70000004EkMKAU,005S7000000VndRIAS,Normal,,

Step 4: Upload complete

Once you’re done submitting data, you can inform Salesforce that the job is ready for processing by closing the job.

URI/services/data/vXX.X/jobs/ingest/jobId
Request MethodPATCH
Request HeaderContent-Type: application/json; charset=UTF-8Accept: application/json
Request Body{    “state” : “UploadComplete”}

Step 5: Check the job status and results.

To get basic status information on a job, such as the overall job state or the number of records processed, use a GET request with the following details:

URI/services/data/vXX.X/jobs/ingest/jobId
Request MethodGET
Request HeaderContent-Type: application/json; charset=UTF-8Accept: application/json

job has been completed and is in the JobComplete state (or Failed state)


Step 6: Check the processed data.

To verify that record was successfully processed or not successfulResults for processed data and failedResults for the records are not processed

URI/services/data/vXX.X/jobs/ingest/jobId/successfulResultsservices/data/vXX.X/jobs/ingest/jobId/failedResults
Request MethodGET
Request HeaderContent-Type: application/json; charset=UTF-8Accept: application/json

From Ruchi Sharma: Preset browser timezone for Guest users

In Spring’21 Salesforce Scheduler introduced a feature to preset the timezone for the appointment time slots .
This feature sets the default time zone for all time slot pages, using the provided DefaultTimeZone flow variable.

We can use this feature to dynamically set the time zone in which guest users load time slots i.e. browser timezone.

This will only work for the Salesforce supported time zones, you can find the complete list here.

Preset browser timezone

We will fetch the browser timezone through the lightning component that will be exposed to the flow builder.
And to validate the browser time zone i.e. supported in salesforce or not, we will write an apex controller.

All the code is bundled at https://github.com/ruchi2994/browserTimeZone. It contains the lightning component, apex class, and updated flow.
After code deployment, enable TimeZoneController apex class access for the guest user profile.

Let’s look at how to use the lightning component in the flow to preset the browser timezone.

That’s it! Activate and run the flow.

Let’s see the demonstration.

From Faith Kindle, Mrityunjoy Chowdhury & Sunil Nandipati: Accessing Inbound Guest Appointment Scheduler Flow from External Websites by Un-authenticated users

Context & Preface

Businesses and Organizations which provide services have to provide a way for their customers to request appointments with the provider’s service resources. These experiences are expected to be easy to access without any kind of account creation and no authentication involved. Examples can be booking an appointment with a hair stylist at your favorite Salon, looking up for a dentist for a regular cleaning, reaching out to a financial advisor at a bank near your home.

To implement un-authenticated user experiences, the best way in Salesforce is to use the Guest user profile that comes with any Experience Sites (Earlier Communities). Experience sites can be built with public pages where end-users can access the application built using these guest user access. Refer this knowledge article for more information around Guest users – https://help.salesforce.com/s/articleView?id=000327969&type=1

From a high level, there are three design options to allow un-authenticated Guest users to access Scheduler features and functionality. These design patterns are as follows and illustrated below.

  1. API level: this pattern offers the most flexibility but requires the most investment in time as everything is custom built. You will host and build your interface entirely on your (external to Salesforce) web site, and create a fully custom-developed user interface with custom code to accesses Scheduler on the back end via Scheduler REST APIs.
    If you are wondering about how all of this works in the context an UNAUTHENTICATED (or guest) user experience — that’s a great question! The Scheduler API can be accessed from an unauthenticated type perspective using the oAuth SAML bearer assertion flow, which uses connected app to request/grant an access token for that “guest user” (unauthenticated) type experience. You will use a connected app associated with a particular profile to grant that profile permissions to access what is needed. This is similar to the way Salesforce Experience Cloud Guest User leverages the Guest User Profile & Guest User to allow unauthenticated type access to Salesforce objects and the Scheduler Inbound flow.
  2. Component Level: this is the option that we will be going over in this blog. Using this pattern you will leverage Salesforce Experience Cloud/ public sites along with out-of-the-box or custom cloned versions of pre-built Scheduler flows. Scheduler flows are flexible and can be customized in a number of ways, including extending to the Scheduler APIs from within the flow. With this design pattern you will access Scheduler flows from your (external to Salesforce) business web site and remain on your web site’s URL.
  3. Page Level: this level of access offers a relatively quick time to market and can be achieved in a number of ways”:
    • Leveraging the end to end Salesforce footprint, offering Scheduler capability as part of an Experience Cloud community.
    • Hosting your Scheduler flow on a public-facing Salesforce Site, and pointing to that site from your site’s menu. You can register a customized domain within Salesforce to use with your site to make the user flow as seamless and branded as possible.

Most business prefer NOT to have too many websites / links and prefer to have everything hosted on their business websites. In such scenarios the appointment scheduling experience needs to be embedded into the business’s website. To implement such user experiences, components build in Salesforce application need to be used outside Salesforce. Salesforce offers a mechanism called LightningOut to provide such experiences.

Configuration steps to be executed

  1. First and foremost thing is to have a Guest user Profile. Create a Digital Experience Site and make the Site available for public access. This can be enabled by navigating to the Site → Builder settings → General and Turning this feature ON.
  1. Navigating to the ‘Guest User Profile’ by clicking on the Profile link and exploring the Object settings, you will notice that the System ONLY allows users to either CREATE or READ on most of the objects. Configure this ‘Guest User Profile’ as mentioned in the help article – https://help.salesforce.com/s/articleView?id=sf.ls_set_up_guest_users.htm&type=5
  2. Create a Flow using the ‘Scheduler Scheduler Flow Template – Inbound New Guest Appointment’. Customize the flow as per your needs or use the template as is. OOTB template will create a lead and assign the service appointment against the lead.
  1. Most of all, for everything to work perfectly, configuring the Scheduler application using the guided setup. Navigate to the hamburger icon to see all applications, look for ‘Salesforce Scheduler Setup Assistant’ and complete the configuration steps

Understanding the Setup

The appointment time slots are determined based on your Org Setup followed by Salesforce Scheduler configurations and data setup. Ensure you have validated all these and setup configurations and data correctly

  1. Organization Setup-
  • Verify the Organization Wide Defaults for external access
    • For the below set of objects either set them to Public Read Only
      • Work Type
      • Work Type Group
      • Service Resource
      • Service Territory
      • User
    • Or extend access to the records by Creating sharing rules for guest users (Determine which records to expose to your Community’s guests and decide on a right sharing method – group based, role based or criteria-based record-sharing rules to match your business processes)
    • NOTE: Without defining sharing rules for guests, unauthenticated users can’t access the records required for the Inbound New Guest Appointment flow with Embedded Services hosted in a community or external site.
  1. Scheduler Application Setup – Ensure you have setup data for these objects
  • What services are offered by the Organization
    • WorkTypeGroup
    • WorkType
    • WorkTypeGroupMember
  • What locations and what times are these services Offered
    • ServiceTerritory
    • ServiceTerritoryWorkType
    • OperatingHours
    • TimeSlot
    • AppointmentTopicTimeSlot
  • What skills are required to provide these services
    • Skill
    • SkillRequirement
  • Who is providing these services and at what times they are NOT available
    • ServiceResource (A user or an Asset)
    • ServiceResourceSkill
    • ServiceTerritoryMember
    • ResourceAbsence
  1. Guest User Setup
  • Make sure you set the default timezone for the guest user profile for the Scheduler
    • Note: Additional customization is required to support the timezone mapping for guest appointments which can be passed via APIs if out of the box flow templates do not support use cases.
  • To allow a guest to schedule appointments, update the Guest User Profile to allow guests users to
    • Run Flows
    • Edit Events
  1. Optionally, configure field level security for the Asset field on the Service Resource object
  • The Asset field becomes available only when your org has an Asset Scheduling license enabled and provisioned in the instance
  • Grant Edit permission to profiles that will book appointments, including guest profiles
  • Add the Asset field to the page layout for the Service Resource object

External Website – Guest User Flow

As mentioned in the preface, to expose lightning components out of Salesforce, we will explore the LightningOut feature. External websites can be your business websites, and adding an experience for customers to request and schedule appointments we need to add a Lightning component to the external website.

Steps involved here

  1. Generate web-based html code that will include the details of the Experience site and the LightningOut component which launches the Guest user Flow. Here is a sample code and refer the demo video to know what changes to make to this sample code so that it works for you.
    1. <head></head>
      <body>
      <script src=”https://sandbox-234ss-cs1.cs1.stmfa.stm.force.com/lightning/lightning.out.js&#8221;></script>
      <script>
      $Lightning.use(“runtime_appointmentbooking:lightningOutGuest”, // name of the Lightning app
      function() {
      $Lightning.createComponent(
      “lightning:flow”, // top-level component of your app
      { }, // attributes to set on the component when created
      “lightningLocator”, // the DOM location to insert the component
      function(cmp) {
      console.log(‘Hi from callback’);// callback when component is created and active on the page
      cmp.startFlow(‘runtime_appointmentbooking__Guest_Flow‘);
      }
      );
      }, ‘https://sandbox-234ss-cs1.cs1.stmfa.stm.force.com&#8217; // Community endpoint
      );
      </script>

      <div id=”lightningLocator”>
      <p>Lightning Component mentioned in the Script is invoked from here</p>
      </div>
      </body>
  2. Work with your company’s external website administrators to embed the above component into your company’s external website where you plan to have it.
  3. Get the details of the page like URL where this is hosted, this will be required to let the external traffic into salesforce in the next step
  4. Setup CORS
    1. Typically this to whitelist the Origin URLs, so that Salesforce can allow these web browsers to communicate with Salesforce

Case Study

Demo Video – https://salesforce.vidyard.com/watch/bXDpEJUm5tDWeYxFNVh7sJ
Demo Video on W3Schools – https://partners.salesforce.com/0684V00000FsyJF

From Shantinath Patil: Google Maps in Scheduler

The out of the box Salesforce Scheduler service territory search screen only lets you search a location via Google API. However, it does not show those locations on a map, nor does it add more information about that territory. An example of such a use case would be letting customers know that route to that branch may be busy someday because of a rally happening near it!

Don’t worry! With a platform like Salesforce, and with a bit of code, we can easily create a new component which can do that. Below is an example of the outcome of such coding!

VIDEO: https://youtu.be/c01EH3_Wv0M

As you can see in the demo above, the following functionalities are achieved

  1. Google search the location (address, city name or Zip Code)
  2. Go through the list of places available around the searched address. We have hardcoded to 50 km for now
  3. Set different logos to different territories
  4. Show operating hours of that territory
  5. Show additional information about selected territory

Let’s walk through the code:

Use of Service Territory Connect API

Salesforce provides us with a nice API to look for Service Territories based on various parameters. You can find more info about this API here: https://developer.salesforce.com/docs/atlas.en-us.chatterapi.meta/chatterapi/connect_resources_service_territories.htm
In our use case, we are using workTypeGroupId, latitude, longitude and radius.

Google Location Places API

To work with Google places API, you need to have an API key. You can get more information about obtaining a key here: https://developers.Google.com/maps/documentation/places/web-service/get-api-key You can use this key in the APEX class. GoogleLocationSearchController

If you look at the code in the class, you will notice that we are making 2 API calls. The first call returns you the address details and a place id. The second call returns you the geolocation data. Geolocation data is what is used by our scheduler connect API.

Core Logic

The brains of this functionality are in the FlowLocationController class. If you could get a Google API key, you can go ahead with the code (You need to replace the Google API key). However, if you do not have the key, you can still use this code by using the drop-downs to select city, state and country picklists.

The code path from the method searchLocationLatLang follows the logic of geolocation. Similarly, the code path of the method searchLocationString follows the logic of the state country picklist.

The method getTimeSlots returns a collection of timeslots information in a map related to an Operating Hour Id. We calculate slots information in string format since we need to show it as HTML in the maps component.

One thing to note here is we are capturing additional information about the territory from the standard Description field. In addition, the logo of each territory is stored in a custom field on Service Territory: Territory_Logo__c.

Aura Components

We have created two aura components and one event to handle location selection. First, the GoogleLocationSearch component calls Google Place API to get suggestions and geolocation information. Once Google API callout is complete, we trigger an event with latitude and longitude information via GoogleLocationSearchEvt. We then capture the event in the flowLocation component to display maps information. This component has specific design attributes which you can use to configure this component in the flows.

Following is the git repository containing all the code (https://github.com/snathpatil/scheduler-Google-map). You can deploy it to any org. Please note that this will create a new remote site setting to https://maps.Googleapis.com. Also, you need to make sure that you provide FLS to the custom field on Service Territory.

References:

  1. Maps component: https://developer.salesforce.com/docs/component-library/bundle/lightning:map/example
  2. Google Places Autocomplete: https://developers.Google.com/maps/documentation/places/web-service/autocomplete

Do checkout other customisations of the Location flow component here: https://unofficialsf.com/location-screen-tips-and-tricks/

From Shantinath Patil: Appointments with Dynamic Duration

In Salesforce Scheduler, Work Type is an entity where we store information about the skeleton of an invite. It’s just a template we can use to define meeting duration, block time before/after, timeframe start/end.

In the provided flow templates, work type selection happens with the help of a work type group. You first select a work type group, then a territory, and based on these two combinations; a work type is chosen automatically. Well, not automatically! The internal logic determines work type based on linking these three objects, as shown below ERD diagram.

Since the Scheduler data model only allows to map one work type to one work type group, there can always be only one work type for the selection of work type group and service territory.

This one-to-one mapping poses a limitation for a requirement where we want to define different duration based on customers needs. The good news is, there is a way to overcome this. This blog will discuss one of the approaches to set up Scheduler data to achieve dynamic duration. The basic premise is to duplicate the work type group and work type records based on durations.

Consider a scenario where you have a premier customer and a regular customer with whom you want to set up a meeting about ‘Wealth Management’. In this scenario, let’s consider that an exclusive customer always needs an appointment with a longer duration, say 90 minutes. Other customers may need a meeting with the same topic for 30/60 minutes. We can store this information on the work type group record for now. The data setup may look something like this:

Once the data is mapped correctly via junction objects in the above format, we can then carve out the following logic:

Following is the working flow with different duration:

VIDEO LINK: https://youtu.be/fwdVoxrrpgY

As you can see based on work type group selection, the flow selects the corresponding work type and duration gets adjusted accordingly.

You may ask this may confuse the end-user! Yes, looking at the same topic titles 3 times may confuse some end users! For this, you can either build your own component to display only the appointment topic and duration to choose. This approach may sound cleaner, but there is one more solution coming up in Spring 22 release. That feature allows you to filter work type groups shown on the screen by passing record ids to the component. We will cover more on that in another blog!

From: Shantinath Patil: Review Your Resource

In Spring 22, the Salesforce scheduler has given a new feature: enabling rendering HTML tags in Service Resource cards. This new feature has opened up many possibilities to show additional information about the resource.

This help guide lets you add fields to the Service Resource cards: https://help.salesforce.com/s/articleView?id=sf.ls_change_the_fields_that_appear_on_the_service_resource_cards.htm&type=5.

Peer reviews and ratings are common decision making guides for customers today to help them pick among

Imagine you were to add the capabilities of a feedback management software (eg: Salesforce Feedback management) to Salesforce Scheduler, you could ask your customers to provide ratings for their appointments and then use those ratings to guide future customers.

With Feedback Management you can not only use survey invitation rules to distribute surveys when an appointment is closed but also use the data mapper feature to easily map the rating from the survey to any object in Salesforce, in this case to the Service Appointment object.

Refer to this link for more details on the datamapper and survey invitation rules

Once you have captured the rating data for your resources, there are several possibilities

  • Help the consumer decide between resources
  • Help Territory Mgr evaluate resources & branch
  • Give preferential treatment to premium customers by only showing them higher rated resources
  • Use Salesforce Einstein’s Machine Learning capabilities to predict who would be the best resource for this prospect based on past ratings giving by similar prospects eg: Someone from the South might prefer a resource from the south, or someone from an age group would prefer certain Resources.

For this blog, we’re going to focus on the Salesforce Scheduler changes you need to make to get the above capabilities going.

let’s take an example of adding a rating to the service resource. Please follow the below steps to show the shining rating stars on the resource card:

1. Fields on Service Resource

To show the rating, we need to create a formula field on Service Resource to render rating stars in cards. We will add this field to the compact layout to show up in the out of the box component. However, to populate value in this field, we need two more fields on Service Resource: to capture the average rating for each of the appointments he served and the number of appointments.

Field LabelField API NameData TypeComments
RatingRating__cNumber(1,0)Number field to store rating between 1-5
Review CountReview_Count__cNumber(18,0)Number field to store number of reviews this service resource have received
Star RatingStar_Rating__cFormula(Text)Formula field which will show ratings based on above 2 fields

The sample formula will turn out like this:

IMAGE(
IF(TEXT( CEILING(Rating__c) ) = '0', "/img/samples/stars_000.gif",
IF(TEXT( CEILING(Rating__c) ) = '1', "/img/samples/stars_100.gif",
IF(TEXT( CEILING(Rating__c) ) = '2', "/img/samples/stars_200.gif",
IF(TEXT( CEILING(Rating__c) ) = '3', "/img/samples/stars_300.gif",
IF(TEXT( CEILING(Rating__c) ) = '4', "/img/samples/stars_400.gif",
IF(TEXT( CEILING(Rating__c) ) = '5', "/img/samples/stars_500.gif",
"/img/samples/stars_000.gif"
)
)
)
)
)
),
'Rating Level'
) + ' ('+ TEXT( Review_Count__c ) + ' Reviews)'

2. Field on Service Appointment

We will have to create a field on Service Appointment to capture the sentiment of a customer based on how the appointment went. We can populate this value from a Survey, which will be sent out once an appointment is complete.

Field LabelField API NameData TypeComments
RatingRating__cNumber(1,0)Number field to store rating between 1-5

3. Propagate value from Service Appointment to Service Resource

Now that we have fields on Service Resource and Service Appointment, we will have to process the aggregate reviews. As shown in the below data model diagram, we can traverse through Assigned Resource and populate this value to Service Resource.

The review aggregator formula that we can use is:

 ((Current Average Rating * Total Reviews) + New Rating) / (Total Reviews+ 1)

Using this formula, we can write a trigger on Service Appointment. As soon as we get a rating from Service Appointment, we will aggregate the review and update its corresponding Service Resource. A sample trigger code is given below:

trigger UpdateSurveyRating on ServiceAppointment (after insert, after update) {

Set<Id> vSetServiceAppointment = new Set<Id>();

for(ServiceAppointment sapp : Trigger.new){
if(Trigger.isInsert && sapp.Rating__c != null){
vSetServiceAppointment.add(sapp.Id);
}else if(Trigger.isUpdate && Trigger.oldMap.get(sapp.Id).Rating__c != sapp.Rating__c){
vSetServiceAppointment.add(sapp.Id);
}
}

if(!vSetServiceAppointment.isEmpty()){

Map<Id, List<ServiceResource>> vMapServiceAppToResources = new Map<Id, List<ServiceResource>>();
List<AssignedResource> vListAssResource = [SELECT Id, ServiceResourceId, ServiceAppointmentId FROM AssignedResource WHERE ServiceAppointmentId IN: vSetServiceAppointment];

if(vListAssResource != NULL && !vListAssResource.isEmpty()){

Set<Id> vSetServiceResource = new Set<Id>();

for(AssignedResource vAssRes : vListAssResource){
vSetServiceResource.add(vAssRes.ServiceResourceId);
}

Map<Id, ServiceResource> vMapServiceResource = new Map<Id, ServiceResource>([SELECT Id, Rating__c, Review_Count__c FROM ServiceResource WHERE Id IN: vSetServiceResource]);
for(AssignedResource vAssRes : vListAssResource){
if(!vMapServiceAppToResources.keySet().isEmpty() && vMapServiceAppToResources.containsKey(vAssRes.ServiceAppointmentId)){
List<ServiceResource> vTempResources = vMapServiceAppToResources.get(vAssRes.ServiceAppointmentId);
vTempResources.add(vMapServiceResource.get(vAssRes.ServiceResourceId));
vMapServiceAppToResources.put(vAssRes.ServiceAppointmentId, vTempResources);
}else{
List<ServiceResource> vTempResources = new List<ServiceResource>();
vTempResources.add(vMapServiceResource.get(vAssRes.ServiceResourceId));
vMapServiceAppToResources.put(vAssRes.ServiceAppointmentId, vTempResources);
}
}

//((Current Average Rating * Total Reviews) + New Rating) / (Total Reviews+ 1)
Map<Id, ServiceResource> vMapServiceResourceToUpdate = new Map<Id, ServiceResource>();
for(ServiceAppointment sapp : Trigger.new){
if(vMapServiceAppToResources.containsKey(sapp.Id)){
for(ServiceResource vResource : vMapServiceAppToResources.get(sapp.Id)){
if(vMapServiceResourceToUpdate != NULL && vMapServiceResourceToUpdate.containsKey(vResource.Id)){
ServiceResource vTempResource = vMapServiceResourceToUpdate.get(vResource.Id);
vTempResource.Rating__c = (((vTempResource.Rating__c * vTempResource.Review_Count__c) + sapp.Rating__c) / vTempResource.Review_Count__c+1);
vTempResource.Review_Count__c++;
vMapServiceResourceToUpdate.put(vTempResource.Id, vTempResource);
}else{
Decimal rating = vResource.Rating__c != NULL ? vResource.Rating__c : 0;
Decimal reviews = vResource.Review_Count__c != NULL ? vResource.Review_Count__c : 0;
vResource.Rating__c = (((rating * reviews) + sapp.Rating__c) / (reviews+1));
vResource.Review_Count__c = ++reviews;
vMapServiceResourceToUpdate.put(vResource.Id, vResource);
}
}
}
}

UPDATE vMapServiceResourceToUpdate.values();
}
}
}

Note: This is just a concept illustrator built for a simple create Guest appointment use case using the out of the box flow template.

Possibilities

From Ruchi Sharma: Setup a Topic Hierarchy

Salesforce Scheduler provides a component to display and select a work type group.
By default, this component display all the work type group records, in Spring ‘22 this component is getting the capability to filter work type group records based on specified Ids.

You can check the component documentation here.

Work Type Group Hierarchy

Imagine you are a bank manager and a user is scheduling an appointment with the bank.
While scheduling an appointment you want the user to select hierarchical work type groups to know about the appointment context.

Example – Suppose the first level work type group hierarchy consists of personal banking, wealth management, etc. Based on user selection we will display the next level hierarchy. If the user selects personal banking then the second level work type group hierarchy consists of checking saving account, loan management, etc.

You can easily display work type group hierarchy in salesforce scheduler flows with clicks, not code! 🙂

Please check below 3 level hierarchy demonstration

Let’s look at how it is done,
Configuration is the same for Outbound, Inbound, and Guest flows, illustrating for Outbound Flow.

  1. Create a self lookup in the Work Type Group object.
    This will store the parent work type group record id.
  2. For this feature, we will be using the ‘Filter by work type group Ids’ input configuration of the ‘Select Work Type Groups’ component.
  3. Add a new Assignment element called “Set filter by work type group ids as null”, after Set Topic Stage.
    And the arrows pointing to the topic screen will now point to this element.

Assignment element :
In this element, we are setting the ‘FilterByWorkTypeGroupIds’ variable as null.

OOTB flow :

After change

  1. After the assignment element adds a “Get Records” element to fetch the work type group records.
    Initially, we are assuming variable workTypeGroupId is null.
    Work_Type_Group__c is the self lookup field.
  1. Loop over fetched work type group records and append the work type group Ids in the “FilterByWorkTypeGroupIds” variable.
  1. After the loop element adds a decision element to check FilterByWorkTypeGroupIds is not null (next-level hierarchy exist) or workTypeGroupId is null (If it’s loading for the first time).
  1. If the next level hierarchy exists then add an assignment element to clear the previously selected work type group and connect this element to “Topic Screen“.
    Else redirect to “Set Appointment Stage”.
  2. Optionally to display the selected hierarchy on top of the work type group selection screen, add a ‘Get Records’ element to fetch the selected work type group record.
    Redirect the topic screen to this element.
    Then add an assignment element and create a work type group collection variable to add the work type group record.
  3. Finally, connect the above assignment element to the assignment element that we have created in step 3.
  1. To show the selected hierarchy, drag and drop the “DisplayWorkTypeGroupHierarchy” custom component above the “Select Work Type Groups” component in the topic screen.
    And pass the work type group collection variable as input to this component that we have created in step 8. (optional)

That’s it! Activate and run the flow.

All the code is bundled at https://github.com/ruchi2994/workTypeGroupHierarchy. It contains the above component and updated flow.

From Chris Albanese: VRA Scheduling – Use Salesforce Scheduler and Visual Remote Assistant to provide virtual meetings

Salesforce Visual Remote Assistant (VRA) allows you to provide immediate assistance to your customers and employees over video chat. You can find much more information on VRA on Salesforce’s website at https://www.salesforce.com/products/service-cloud/features/visual-remote-assistant/

With the Winter ’22 release, VRA introduced a new feature to facilitate the scheduling of virtual appointments between agents or mobile workers and customers with Visual Remote Assistant. This means that if you are using Salesforce Field Service (SFS) or Salesforce Scheduler (Scheduler) you can now have VRA meetings automatically generated and shared with your customer at the time of appointment scheduling. For example, your customer can create an appointment today for a meeting next Tuesday at 9:00AM. When the appointment is created, the customer is sent a link for the Virtual Meeting that they will use at the time of the meeting.

Check out some more details on this below.

What comes in the VRA Scheduling package?

For customers who have purchased VRA and either SFS or Scheduler or both:

  • A separate managed package installed on top of VRA that contains the VRA Scheduling capabilities
    • Experience Cloud Lobby Component
      • for the user to await the start of the meeting
    • Service Appointment Component for VRA Scheduling
      • generates pop up reminder at time of appointment when the agent opens the Service Appointment
    • Custom Notification
      • to remind the Service Appointment Assigned Resource (agent) of their upcoming meeting
    • Session Lobby Invite object
    • Additions to the Visual Configuration setup screens to manage this feature
  • See VRA Installation and Configuration Manual and VRA Admin Manual for more info

Quick Video of it in action

See this video which illustrates what it can look like after a few simple configuration steps

Setting up VRA Scheduling for Salesforce Scheduler

Preliminary Things

  • Make sure Scheduler is enabled in your org
  • Determine when you want to generate VRA Scheduled Appointments
    • For example, if a user selects an Appointment Type of Video this would trigger the creation of the VRA Lobby Link
  • Plan a confirmation and reminder strategy
    • VRA Scheduling comes with a flow that you can use to send the initial confirmation via email
    • You may want to also send a reminder notification to your customer prior to the meeting, such as 1 hour before
  • Enable Digital Engagement so you can send SMS messages for the confirmation and reminder notifications
  • Install the latest versions of the packages

Object Model Changes

I made 2 small changes to the Service Appointment Object to add 2 text fields. This was done to simplify the sending of an SMS Message to the customer when scheduling a new virtual Service Appointment.

  • First Name – this text field stores the first name of the contact associated with the Service Appointment
  • Lobby Link – this text field stores the Session Lobby Invite url

Flow Setup

VRA Manage Lobby Invites
Configure the flow called VRA Manage Lobby Invites to meet your needs. This flow is configured out of the box to create, update and delete Session Lobby Invites based on the life cycle of a Service Appointment. You need to tailor the trigger criteria and the decision criteria to meet your needs.

Trigger Criteria
The flow triggers on Service Appointment and provides criteria that you can tailor. For Scheduler, I removed the work type criteria that is present and replaced it with Appointment Type = Virtual. Whenever a Service Appointment with Appointment Type = Virtual, this flow will fire.

Out of the Box Trigger Criteria

My criteria which is based on Appointment Type. Only Service Appointments with Appointment Type = video (this is the API value for Virtual meetings) will trigger this flow

Decision Criteria
The out of the box flow will create Session Lobby Link records when the Service Appointment is Dispatched. This applies nicely for Salesforce Field Service. For Scheduler, this may or may not apply, so edit this accordingly. I left this as is and created a supplemental flow (below this screen shot).

Supplemental Flow
I created an additional flow to accomplish 2 things: 1) make sure the SA has an email and phone saved to it and 2) change the status to Dispatched. This is to trigger the VRA Manage Lobby Invites flow.

It’s a triggered flow on SA whenever the SA is created and the Contact Id is present but the email address is not

Overview of flow. It retrieves the contact record from the SA and then updates the SA’s status, email and phone.

Update the SA status, email and phone

Session Lobby Link update flow
This is an additional flow which updates the lobby link to precisely share with the customer the experience site page containing the Lobby component. Out of the box, the link generated points to the experience site home page. This flow allowed me to put the Lobby component on a specific experience site page. This is not required, but it provided me with flexibility to put the lobby component on any page.

Overview of flow. Note that the last step is a Messaging Notification action to send an SMS message to the customer.

Updating the Lobby Link to the desired experience site page

Details of the formula used. It’s a simple text substitution to insert the specific experience site page. In my example, I placed the lobby component on a page called vra-lobby, so I’ve inserted that value into the url.

Updating the Service Appointment. In this step, I retrieve the Service Appointment using the Session Lobby Invite field called Record Id (not to be confused with Id). I’m updating my 2 custom fields to make the SMS messaging template easier to construct.

Messaging Template

This is the template I used. You can see I’m using the custom fields I created for First Name and the Lobby Link as well as the appointment start time.

Experience Cloud Changes

This was a simple change. I added a new page to my experience site called vra-lobby. I placed the Lobby Component on that page. I made sure that the page was accessible to a guest user.

Service Appointment Page Reminder Component

Add the Service Appointment reminder component to the Service Appointment page. This component requires no parameters. It generates a pop up notification when opening the SA to remind the user there is a virtual session that needs to start.

Summary

VRA Scheduling makes it easy to provide customers with links to a 2 way video session when scheduling an appointment.

Additional Notes about this Example

This is just a concept illustrator. You may want to add additional logic to your flows to send reminders to the customer along the channel of their choice. I’ve used SMS in my example, but making this more generic to support additional channels is recommended.

Appointment Reminders for the customer are not depicted in this example, but these would be easy to set up with a flow.

From Sunil Kumar Nandipati: Salesforce Scheduler with Einstein Activity Capture

Salesforce Scheduler

Salesforce Scheduler (formerly known as Lightning Scheduler) gives you the tools you need to simplify appointment scheduling in Salesforce. Create a personalized experience by scheduling customer appointments—in person, or by phone or video—with the right person at the right place and time.

Enabling Event Management for Salesforce Scheduler

When you enable the Event Management setting under Salesforce Scheduler settings, Salesforce Scheduler writes service resources’ appointments as events on their Salesforce calendar. To write events from Salesforce calendar to external calendars, use a calendar sync tool such as Einstein Activity Capture (EAC).

If a calendar sync tool doesn’t work for you, you can explore Platform Events and APIs related to the specific external calendar tool that you want to be externally synced with Events created in salesforce. For the sake of this article we will limit our conversations around EAC.

Einstein Activity Capture

Einstein Activity Capture (EAC) helps keep data between Salesforce and external email and calendar applications (like Microsoft Outlook or Google Calendar) up to date. Objects that can be synched using EAC include Tasks, Events, Contacts and Emails. This article will NOT cover the configuration of EAC, however will limit our conversations around events, since Scheduler “Event Management” is limited to the scope of only synching service appointments to Events.

Configurations to watch out between both applications when using Salesforce Scheduler

  1. Whenever a service appointment is created in “Salesforce Scheduler”, if the “Event Management” feature is turned ON, a related Event is created and added to the user’s Salesforce Calendar. For the EAC event sync directions – “Salesforce to External (Microsoft or Google or Similar)” and “Synch Both ways”; this implies that the said event will be synced to the user’s external calendar application (Microsoft or Google or Similar).
    1. Events that are created by the Salesforce scheduler when a service appointment is created are restricted from editing on Salesforce. Guidelines need to be setup on updating these events on an external calendar (after they are synced from Salesforce to external).
    2. If a user tries editing these events on an external calendar and tries to sync back to Salesforce – EAC will NOT be able to update existing event on the Salesforce Calendar, user needs to resolve these errors later by retaining original time as recorded on Salesforce.
    3. To understand what fields on the Service Appointment are mapped to create the Event record – Refer the field mapping table in the help documentation https://help.salesforce.com/s/articleView?id=ls_enable_event_mgmt.htm&type=5&language=en_US
    4. We will try to cover about mapping custom fields on the service appointment to the Event in a future blog
  2. For the EAC event sync directions – “External (Microsoft or Google or Similar) to Salesforce” and “Synch Both ways”; this implies that the events created in the external calendar application will be synched to Salesforce and related events would be created in Salesforce and will be viewable on the Salesforce calendar. When a scheduling flow executes, the system will look at the scheduling policy assigned to the Flow, and during that time if the system finds that the scheduling policy setting “Check Salesforce Calendar for Resource Availability” is turned ON, Scheduler will exclude the booked slots (of external synched events) along with existing Service Appointments booked for the resource and ONLY show the overall available slots in the Time Slot selection screen.

References:

Scheduler – https://help.salesforce.com/s/articleView?id=sf.ls_event_mgmt_overview.htm&type=5
EAC – https://help.salesforce.com/s/articleView?id=sf.einstein_sales_aac.htm&type=5
Events and EAC – https://help.salesforce.com/s/articleView?id=sf.aac_guidelines_sync.htm&type=5

From Shantinath Patil: Schedule a support advisor

Let’s think of you as a support agent. You get a call from a customer asking for an appointment for some questions he has on the case and wants to talk with the case owner. So what can do you What will you do in this “case?”

Salesforce Scheduler can help you in this “case”. Let’s drill down on what all we need to accomplish this:

  1. Case owner as a Service Resource
  2. Case reference to Appointment
  3. A flow
  4. Quick action on Case to initiate the flow.

A logical flow of the approach we will take in this use case will look like the following:

Get Case Details

Since this flow will run on the case, we need to get the details of it. First, we can set the “recordId” input parameter to get the current case, automatically giving us the case Id. Then, using this variable, we can query the case using the “Get Records” element in the flow.

Note that we need AccountId to map it to the ParentRecordId of the Service Appointment. OwnerId is needed to get the related Service Resource.

If we want to tag the current CaseId, we can create a new lookup on Service Appointment. A custom field is needed since Service Appointment can only support Account, Lead, and Opportunity except for Case! To ensure that value is populated in that lookup, we can override the JSON we pass in the final Save Action defined in the flow. For more details, you can refer to the blog here: https://unofficialsf.com/build-your-own-appointment-review-screen/. For now, we can skip it.

Get Service Resource

If we want to set the case owner as of the person who will work on this case, we need to make sure that he is a service resource. For more details, please check this help doc: https://help.salesforce.com/s/articleView?id=sf.ls_create_resources.htm&type=5.

To fetch the service resource, we can add the “Get Records” element like below. In this, we are fetching Service Resource based on Case OwnerId.

Leverage filterByResourceIds

Scheduler flow allows you to filter the resources based on the list of Ids you pass to it. You can read more details here: https://help.salesforce.com/s/articleView?id=sf.ls_enable_service_resource_filtering.htm&type=5.

We can leverage this functionality for our use case. Since we want our case owner to be the Service Resource, we can add the Service Resource Id from the previous step to filterByResourceIds. Additionally, we can make anonymous booking as true and resource booking as false. This will make sure that we skip the OOB triage screen and resource selection screen.

The advantage we get from this is if the case owner is not a Service Resource, existing logic will fetch any available resource anonymously. You will not have to worry about resource selection. End to end experience will be very seamless for the agent who is booking that appointment.

Once all the nodes and assignment is done, you can test the flow using the “Debug” option and activate it once it’s working as expected.

Setup

After this step, it’s up to you how you want to distribute the flow. For this blog, we are using Case Action to create a new appointment. Since the “recordId” flow variable is set for “Available for input” in the flow, this action will automatically set it to the current record on the detail page.

You can add this action to the case layout. The end-to-end flow should work something like this:

We have added all the metadata to this git repo for your reference. Please feel free to deploy it to your Sandboxes and try it out! Link: https://github.com/snathpatil/case-appointment-booking

Note if you’re looking for a virtual advisor then do have a look at this blog: https://unofficialsf.com/tele-or-virtual-scenarios-using-salesforce-scheduler/

Scheduler is not to be positioned in cases where the Service Resource is travelling to a customer’s location