
From Ankit Srivastava: Event integration with Salesforce Scheduler’s Appointment Distribution
Salesforce Scheduler is getting capability to equitably distribute meetings between eligible Service Resources in Winter ’22 release. It will support an implementation of Load Balancing logic working on Service Appointment records to do the Appointment Distribution.
In following sections we will see the architecture of Appointment Distribution feature and how can we enhance it to include Events (Salesforce Calendar) also in the utilisation calculation for Appointment Distribution.
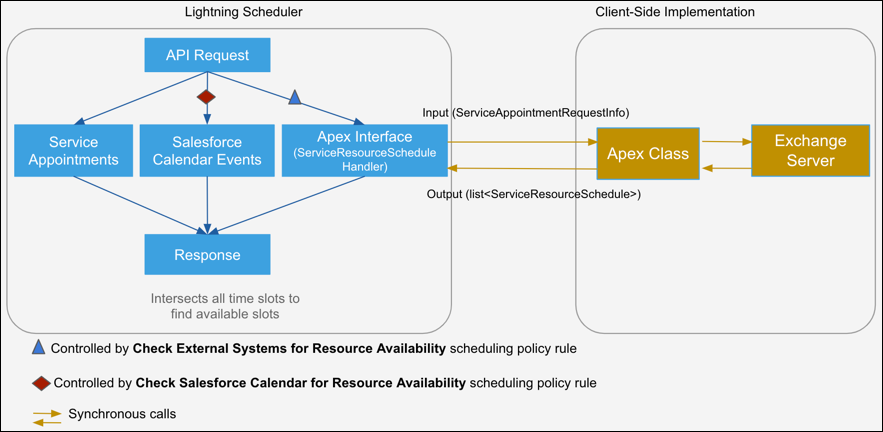
Design of Appointment Distribution
Appointment Distribution feature is built upon two main sObjects:
- AppointmentScheduleAggr
- AppointmentScheduleLog

For all practical purposes, individual utilizations that make it into AppointmentScheduleLog entity are rolled up as summary records in AppointmentScheduleAggr entity (if IsUsedForResourceUtilization parameter is set to true).
AppointmentScheduleLog entity supports any of Service Appointment, Resource Absence or Event as a polymorphic lookup in its RelatedRecord field. Out of the box, Salesforce Scheduler only inserts records for corresponding Service Appointments in AppointmentScheduleLog entity.
Incorporating Event in Appointment Distribution’s utilisation
As evident from the design showcased above we can incorporate Event in Appointment Distribution’s utilisation with some coding and customisation. Let us now create a demo trigger which can be used to demonstrate this.
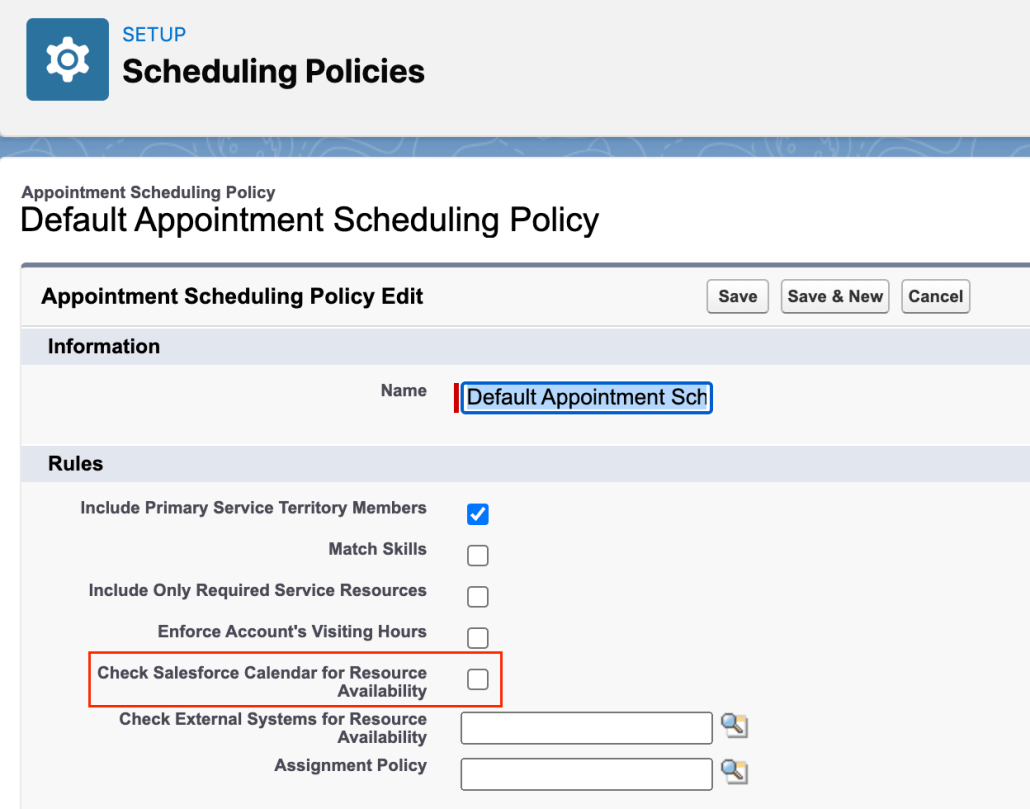
Salesforce Scheduler creates Event entries if “Event Management” setting in turned ON. If “Aggregate Resource Use” is also ON in same org then we will get 2 entries instead of 1 in AppointmentScheduleLog entity; one due to ServiceAppointment record and other through its associated event.
Therefore, as a prerequisite before deploying this trigger we should turn OFF “Aggregate Resource Use” in Salesforce Scheduler settings if “Event management” is turned ON.
Pseudocode
Let us first discuss the pseudocode for trigger when new Event records are created.
- Create a trigger which runs after Event records are inserted. This trigger should run in global context.
- Loop through individual event records: For each evt in Inserted Events:
- Is evt != Recurrence Pattern? (I am not handling recurring events as part of this PoC)
- Yes →
- Does evt belong to a User who is also a Service Resource (SR)?
- Yes →
- Calculate Event Date (D1)
- Does AppointmentScheduleAggr record (ASA) for SR & D1 exist?
- Yes →
- Get ASA.Id
- No →
- Create ASA record for SR & D1 combination & return ASA.Id
- Yes →
- Calculate Event Duration (d)
- Create AppointementScheduleLog record and insert it
- Yes →
- Does evt belong to a User who is also a Service Resource (SR)?
- Yes →
- Is evt != Recurrence Pattern? (I am not handling recurring events as part of this PoC)
Demo Code
Disclaimer: The following code is meant to be verbose and easily understandable from a Salesforce Developer perspective. Given a choice between performance vs readability I have strived for the latter. It is a proof of concept to demonstrate the feature and should be modified and tested thoroughly as per different data shapes and existing code in the org.
Trigger:
/**
 * Created by Ankit Srivastava.
 */

trigger EventUtilization on Event (after insert, after update, after delete, after undelete) {
    if (Trigger.isInsert) {
        List<Event> events = Trigger.new;
        //Insert records in AppointmentScheduleLog and AppointmentScheduleAggr entities for all newly created Events
        EventUtilizationUtil.processInsertEvents(events);
    } else if (Trigger.isUpdate) {
        List<Event> previousEvents = Trigger.old;
        List<Event> updatedEvents = Trigger.new;
        //Modify records in AppointmentScheduleLog and AppointmentScheduleAggr entities for all updated Events
        EventUtilizationUtil.processUpdateEvents(previousEvents, updatedEvents);
    } else if (Trigger.isDelete) {
        List<Event> deletedEvents = Trigger.old;
        //Delete records from AppointmentScheduleLog entity for all deleted events
        EventUtilizationUtil.processDeleteEvents(deletedEvents);
    } else if (Trigger.isUndelete) {
        List<Event> undeletedEvents = Trigger.new;
        //Insert records in AppointmentScheduleLog and AppointmentScheduleAggr entity for all Events removed
        //from Recycle Bin
        EventUtilizationUtil.processUndeleteEvents(undeletedEvents);
    }
}
Helper Class:
/**
 * Created by Ankit Srivastava
 */

public without sharing class EventUtilizationUtil {
    public static void processInsertEvents(List<Event> events) {
        //I am not handling recurring events as part of this PoC code
        List<Event> nonRecurringEvents = removeRecurringEvents(events);

        //Remove events that meet following condition:
        //  Events that are for any User who is not a Service Resource
        Map<Event, ServiceResource> relevantEvents = filterNonRelevantEvents(nonRecurringEvents);

        List<AppointmentScheduleLog> appointmentScheduleLogs = new List<AppointmentScheduleLog>();
        for (Event evt : relevantEvents.keySet()) {
            Date eventDate = getEventDate(evt.StartDateTime, evt.ActivityDate, evt.IsAllDayEvent);
            ServiceResource sr = relevantEvents.get(evt);

            //Get existing AppointmentScheduleAggr record for current event's
            //Service Resource and Date. If no such record exists then create one
            //This method call is doing SOQL calls & DML in a loop, this is for
            //ease of understanding & will be less performant than Bulk code
            AppointmentScheduleAggr asa = getAppointmentScheduleAggrRecord(sr, eventDate);

            AppointmentScheduleLog asl = new AppointmentScheduleLog();
            asl.ServiceResourceId = sr.Id;
            asl.RelatedRecordId = evt.Id;
            asl.AppointmentDate = eventDate;
            asl.UsageType = 'LightningScheduler';
            asl.IsUsedForResourceUtilization = true;
            asl.AppointmentScheduleAggrId = asa.Id;
            asl.ResourceUtilization = getEventDuration(evt.DurationInMinutes, evt.StartDateTime, evt.EndDateTime, evt.IsAllDayEvent);

            appointmentScheduleLogs.add(asl);
        }
        //Insert all AppointmentScheduleLog record.
        //Rollup to AppointmentScheduleAggr will happen automatically
        insert appointmentScheduleLogs;
    }

    public static void processUpdateEvents(List<Event> previousEvents, List<Event> updatedEvents) {
        //TODO
    }

    public static void processDeleteEvents(List<Event> deletedEvents) {
        //TODO
    }

    public static void processUndeleteEvents(List<Event> undeletedEvents) {
        //TODO
    }

    /*
    This method is used to remove Events without attached user record who is also a service resource
     */
    private static Map<Event, ServiceResource> filterNonRelevantEvents(List<Event> events) {
        Map<Event, ServiceResource> resp = new Map<Event, ServiceResource>();
        if (events != null && events.size() > 0) {
            Set<String> ownerIds = new Set<String>();
            for (Event event : events) {
                ownerIds.add(event.OwnerId);
            }
            ServiceResource[] serviceResources = [SELECT Id, RelatedRecordId FROM ServiceResource WHERE RelatedRecord.Id IN :ownerIds AND isActive = TRUE];

            for (Event event : events) {
                for (ServiceResource sr : serviceResources) {
                    if (sr.RelatedRecordId == event.OwnerId) {
                        resp.put(event, sr);
                        break;
                    }
                }
            }
        }

        return resp;
    }

    private static List<Event> removeRecurringEvents(List<Event> events) {
        List<Event> filteredEvents = new List<Event>();
        for (Event e : events) {
            if (!isRecurringEvent(e)) {
                filteredEvents.add(e);
            }
        }
        return filteredEvents;
    }

    private static Boolean isRecurringEvent(Event evt) {
    /*
        https://developer.salesforce.com/docs/atlas.en-us.object_reference.meta/object_reference/sforce_api_objects_event.htm
    */
        return evt.IsRecurrence == true || evt.IsRecurrence2 == true;
    }

    private static Date getEventDate(Datetime startDateTime, Date ActivityDate, Boolean isAllDayEvent) {
    /*
        https://developer.salesforce.com/docs/atlas.en-us.object_reference.meta/object_reference/sforce_api_objects_event.htm
    */
        if (isAllDayEvent) {
            if (startDateTime == null) {
                return ActivityDate;
            }
        }

        return startDateTime.date();
    }

    private static AppointmentScheduleAggr getAppointmentScheduleAggrRecord(ServiceResource sr, Date appointmentDate) {
        AppointmentScheduleAggr[] asa = [SELECT Id FROM AppointmentScheduleAggr WHERE ServiceResource.Id = :sr.Id AND AppointmentDate = :appointmentDate];

        if (asa != null && asa.size() > 0) {
            //Return existing AppointmentScheduleAggr record
            return asa[0];
        }

        AppointmentScheduleAggr asaToInsert = new AppointmentScheduleAggr();
        asaToInsert.AppointmentDate = appointmentDate;
        asaToInsert.ServiceResourceId = sr.Id;
        insert asaToInsert;

        //Return newly created AppointmentScheduleAggr record
        return asaToInsert;
    }

    private static Integer getEventDuration(Integer durationInMinutes, Datetime startDateTime, Datetime endDatetime, Boolean isAllDayEvent) {
    /*
        https://developer.salesforce.com/docs/atlas.en-us.object_reference.meta/object_reference/sforce_api_objects_event.htm
    */
        if (isAllDayEvent) {
            return 1440;
        }

        if (durationInMinutes != null) {
            return durationInMinutes;
        }

        return Integer.valueOf((endDatetime.getTime() / 1000 / 60) - (startDateTime.getTime() / 1000 / 60));
    }
}
The above code is for handling creation of Event records. Similar code can be added in processUpdateEvents(), processDeleteEvents & processUndeleteEvents() methods to handle complete CRUD of Event entity.
The source code is also present at https://github.com/anardana/salesforce-scheduler–appointment-distribution-events-integration
P.S. We can write similar logic for including ResourceAbsence in utilisation for Appointment Distribution.


