
From Shantinath Patil: Email signature booking
THIS CAPABILITY IS COMING WITH THE SALESFORCE SCHEDULER PRODUCT IN SUMMER 22 RELEASE!! CHECK IT OUT
Ever wondered if you can offer a link to your customers to book an appointment with you? Or a situation where you want everything to be preselected, and you will immediately jump to the timeslot screen? Well, wait no more! In this blog, we will show you how you can achieve this!
Let’s consider the first scenario. You give a link to a customer OR add a link to your email signature. Here is what you have to do.
Part 1: Prepare!
We need to build a flow such that our landing page should be the timeslot screen. To make that work, we should be able to populate all the required values. In current out of the box flows, all the screens we traverse are used to populate values required for the timeslot screen. Let’s see what all values we need to populate.
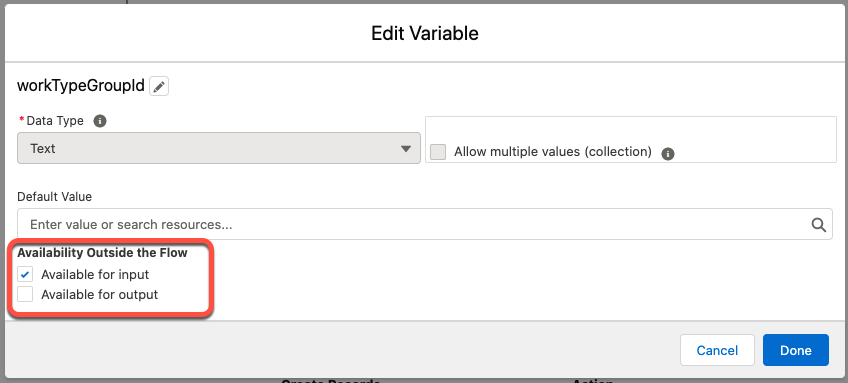
- Work Type Group: This is the outcome from the OOB Work Type Group Selection page. This helps the internal logic to get which topic/template we are trying to book.
- Service Territory: This is the location of your appointment.
- Service Resource: This is the resource that will cater to the appointment request.
Since these values are needed as inputs for our flow, we can create flow variables and mark them available for input.
Once all these flow variables are created, we can create the assignment for those. Note that we need to assign Service Territory Id to a Service Appointment instance. This makes sense if you look at location screen output. That screen is giving selected territory output as “{!ServiceAppointment.ServiceTerritoryId}”. And since we cannot just set one field on the Service Appointment instance, we will have to initialise all other fields as an empty string. For this, we can refer to the OOB assignment stage.

The next step is to link all required values to the timeslot screen. Again, we can refer to the OOB timeslot screen configuration. We should be doing the only change to pass our input flow variables for Service Resource and Work Type Group.

After that, configure the review screen. Make sure you map all the required attributes.

And finally, we should configure the save action. Here you can pass “{!serviceAppointmentFields}” as input, which is an output of the Review Screen. For now, we are considering invoking this flow for guest flow, so we are adding Lead as input as well.

Optionally you can configure the confirmation screen. Done! Your flow should be ready to be tested. Save and debug the flow by providing the input attributes!

Part 2: Distribute!
In a nutshell, we created a flow that takes all the parameters needed for the TimeSlot screen and process it. Once such a flow is ready, we can then use any mechanism of distribution of the flow.
Here is the link to Salesforce documentation which explains to you how can we create a flow page in the community and pass values: https://help.salesforce.com/articleView?id=sf.flow_distribute_internal_url_variable.htm&type=5
This is not the only way! You can even embed the flow in a lightning component and embed that to an external website. More detail: https://developer.salesforce.com/docs/atlas.en-us.lightning.meta/lightning/components_using_flow_inputs_set.htm
If you take the approach of exposing this flow in a public community, consider adding a ReCaptcha. More details: https://unofficialsf.com/protect-a-flow-on-a-public-community-with-the-google-recaptcha-component/
The below demo shows all things in action. You can see that a service resource has sent details to a prospect related to Salesforce Scheduler. That email includes a link. Once the user clicks on the link, they will get redirected to our public community page, which hosts the flow we created from the above steps. All the user have to do it to select a slot, add their details and submit!
Part 3: One More Thing!
Now that we have created a flow that takes input, we surely don’t expect our Service Resources to generate the link manually! Besides, it’s easier to use existing components to build a flow that will give output as an URL to proudly put in their email signature or give to customers! Heck, they can even include that in their digital business cards!
To do this, we will reuse existing OOB components. It’s like the Service Resource will perform initial actions on behalf in OOB flow on behalf of the end-user. Following are the steps to create such a flow:
- We will configure the “Generate Signature URL” button on the Service Resource page. From there, one can initiate the signature generation flow. Hence we need “recordId” as an input flow variable.
- We will pass this record id to the existing WorkTypeGroup selection page. This will ensure that only the WTGs which are related to that resource are displayed.
- Next, configure the Service Territory screen. Here we need Service Resource Id and WTG Id, which will be the output of the previous screen. Having both the inputs will ensure that search results for the territory will give us the correct territory.
- Finally, we will generate the URL from all the selection with the help of a formula flow variable. The formula looks like this:

Note that we have considered the scenario that actual booking flow is configured in a community, hence the “communityURL” variable.
Once you build out the flow, it looks like this:

Test this flow in the flow debug, and once done, activate it. You can configure a new quick action on Service Resource and add that to its layout.
Both the flows are added to this git repo:https://github.com/snathpatil/signatureflow. You can deploy it to your salesforce org and validate!