

Convert Records to a CSV File
Original work done by Ragan Walker and Adam White with additional credit due to Narender Singh’s ‘Create Records from CSV‘ action and CapTech Consulting. This was built this to fully utilize some of UnofficialSF’s awesome custom actions like ExcecuteSOQL, Send Rich Text Email, and Get Field Names from a Layout.
Video
There’s a video showing off the examples at the bottom of the post – Check it out
Install
This component is now part of Flow Screen Action Base Pack as of version 2.36
A Note on Files
If you arent familiar with the data model / structure of Salesforce Files (ContentDocumentLink,ContentDocument,ContentVersion) I STRONGLY recommend getting familiar with it. Not only because it will help you understand this action better, but because every admin and developer should know how they function.
Alex Edelstein also wrote a very helpful article on the matter here: https://unofficialsf.com/using-files-and-attachments-in-flow/ We built this to easily support providing a collection of ContentDocumentLinks to feed straight into the Send Rich Text Email action!
Use Cases
- Generate a CSV file and Email it to a group of people, even non-SF Users using Send Rich Text Email
- Generate a CSV file and post it to a Chatter Group or a Document Library
- Create a screen flow triggered from a Related List, List View, or Quick Action that lets users pick records using Datatable and output their selections to a CSV file, then email that file to a set of users that they pick.
- Send a CSV of records to an another system using invoked Apex Actions
- Generate a CSV file from a ‘Complicated Collection’ – Utilize UnofficialSF’s Collections Processors to create collections of records that would be impossible with Salesforce Reports or even SOQL
Features
- Create Multiple ContentDocumentLinks – Linkages between File and Records – Specify a string or text collection of record IDs to associate the file with those records
- Sharing / Collaborator Rights – Specify the sharing and visibility of each ContentDocumentLink
- Limit the Fields Exported to CSV – Customize the order and fields included in your CSV via text collection or comma-seperated string. This is optional, if left blank, it will export all fields that were in the collection / query.
- Aggregate Queries and Custom Relationship Support* – Support for relationship fields provided by ExcecuteSOQL Example: Contact__r.Custom_Field__c.
- Run Asynchronously – Can execute ‘asynchronously’ if CPU timing is an issue.
- Generate a Platform Event if ran asynchronously – If ran asynchronously, supports generating a platform event of type ‘CSV_Document__e’. The platform event does not come packaged with this, you will need to create it manually for now. See below for when and why you’d want to use this.
- Error Handling – We added some error handling for a variety of scenarios – including if you hit CPU limits we suggest switching you into asynchronous mode
Inputs
Required:
- recordCollection
- Record (sObject) Collection – The collection you want to turn into a CSV
- documentTitle
- Text – The title of the File when generated
Optional:
- documentShareType
- Text – Sharing permissions for the file. Available values: “V” (viewer), “C” (collaborator), “I” (inferred); Default value: “V”
- documentVisibility
- Text – Specifies whether the document is available to all users, internal users, or shared users. Available values: “AllUsers”, “InternalUsers”, “SharedUsers”; Default value: “AllUsers”
- linkedRecordIds
- Text Collection – List of recordIds to link generated document to. If this and linkedRecordIdsString are left blank, will only relate to the running user
- linkedRecordIdsString
- Text – Comma-separated string of recordIds to link generated document to. If this and linkedRecordIds are left blank, will only relate to the running user
- fieldsCollection
- Text – Collection of strings of record fields names to print as columns in CSV. If this and fieldsString are empty, all populated fields on the record collection will be displayed.
- IMPORTANT: If you want to include related fields from a SOQL query (Custom_Object__r.Custom__c) this parameter is required.
- If you used field aliasing in an aggregate query, alias names can be provided rather than the API names.
- fieldsString
- Text – Comma-separated string of record fields names to print as columns in CSV. If this and fieldsCollection are empty, all populated fields on the record collection will be displayed.
- IMPORTANT: If you want to include related fields from a SOQL query (Custom_Object__r.Custom__c) this parameter is required.
- If you used field aliasing in an aggregate query, alias names can be provided rather than the API names.
- executeAsyncIdentifier
- Text – If provided, the action will execute asynchronously and return values will be posted to a platform event: CSV_Document__e. Use this identifier to listen for the platform event in a ‘Wait’ element in flow or use Summer 20’s ‘Invoke Flow from a Platform Event’.
- Note: You generally want to pass in the Flow’s Interview ID (Done by accessing the Flow global variable $Flow.InterviewGuid
Outputs (Optional)
If the action is executed asynchronously (indicated via executeAsyncIdentifier parameter), then the job id(s) for the execution are returned immediately and the document information is published via platform event if configured. Otherwise when run synchronously the CSV File information is returned immediately.
- ContentDocumentID
- Text – ID of the ContentDocument generated
- ContentVersionID
- Text – ID of the ContentVersion generated
- ContentDocumentLinkIDs
- Text Collection – IDs of the ContentDocumentLinks generated
- asyncJobIDs
- Text Collection – Id of the asynchronous job queued (AsyncApexJob). If the action was executed asynchronously all other return values will be null. Use this to query for status of the job.
Considerations
When using this action, you are still subject to normal governor limits, even when running this action asynchronously. We’ve added customized error handling should you input a collection of records that exceed the available heap limit.
Examples
Create a CSV file then post it to a Chatter Group
One potential use case here could be generating a CSV from a Flow lookup, then posting the file generated to a Chatter Group AND to a specific Account. Here’s how we’ll relate the file to multiple entities using a collection of ContentDocumentLinks.
Here’s how you’d do it:

- Generate whatever Record Collection you want from a Flow Get step. Feel free to choose ‘All fields’ but beware – you will want to limit the fields when you configure the action or you’ll get every field on the object in your file.
- Do another Lookup on ‘CollaborationGroup’ using the group name to get the ID of the Chatter Group

- Create a Text variable and check ‘Allow multiple values (collection)’ This is what you’ll be adding your related IDs to.
- Create an assignment step to add both the ‘recordId’ variable used to launch the flow and the results of the Chatter Group lookup Id {!Look_up_Chatter_Group_ID.Id}.

- We’re ready to generate our CSV! See below for how you’d configure it. For documentTitle I recommend a formula field and grab the related record’s details and the TODAY() function to add to the file name. Check out the ContentDocumentLink documentation linked above for a good description on what each of the values mean for ShareType and Visibility.

- Your CSV will now be in the ‘Files’ related list of any records you put into the linkedRecordIDs String/Collection!
- Note: If you don’t specify any Linked Records, the File will simply be associated to the user that runs the Flow.
- If you want to create a chatter post to the group then relate the file to the post as well, you can use the out of the box ‘post to chatter’ action and then do a ‘Create’ step on ‘FeeedAttachment’ using the output ID of the chatter step and the outputs from the CSV action:


Output aggregate queries with ExecuteSOQL
This action is also supports aggregate querying with Alias support with ExecuteSOQL.
Aggregate functions in SOQL, such as SUM() and MAX(), allow you to roll up and summarize your data in a query. For more information on aggregate functions, see “Aggregate Functions” in the Salesforce SOQL and SOSL Reference Guide.
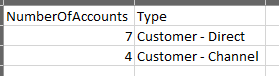
Aggregate Queries
Let’s try passing in a query string from ExecuteSOQL into the CSV action – including an Alias for our Count expression. By providing an alias for our count, the CSV will have a nice clean column name instead of some nasty ‘expr0′ label.
SELECT count(Id) NumberOfAccounts, Type
FROM Account
WHERE type != null
Group by Type

- Run the ExecuteSOQL action using the query above in a Text Template variable as the ‘soqlQuery’ input.
- NOTE: MAKE SURE YOU USE PLAIN TEXT! There’s also a bug in flow where if you make any changes to the text and save it, it will revert to rich text. Every time you edit it, you will need to flip it to plain text.

- Run the action with the output from the ExecuteSOQL action and voila!

And the output file:
Related Fields
When paired with ExecuteSOQL you can also output related fields! Check out the video for how to do this. The key thing here is that you need to make sure all the fields in your SELECT statement are in the ‘fieldsString’ input. So if the query you pass into ExecuteSOQL is:
select id, name,Type, Ultimate_Parent_Company__r.Name from Account where Id = ‘{!recordId}’
You should be putting this into the fieldsString input for the CSV action:

TIP: It might be easier and more maintainable if you store your fields in a text variable so you can reference them in one place.
Wait for a Platform Event and Send an Email with the File Attached.
- Create a new Platform Event type – call it ‘CSV Export Event’ and create the fields exactly as shown in the code below.
- Comment back in the code referencing the platform event in the Apex Class (aka remove all the backslashes)

Your uncommented code should look like this:

- You’re now ready to utilize the Platform Event functionality! The next step is really up to you and your process. In Summer ’20 you can choose to launch a flow based on this platform event type, or you can incorporate a ‘Wait’ element and resume on a platform event being posted. See below for an example.
- For the CSV action you want to populate the executeAsyncIdentifier input variable with the Flow Interview ID:

- Here’s how you’d configure it the Resume piece of your ‘Pause’ action, :
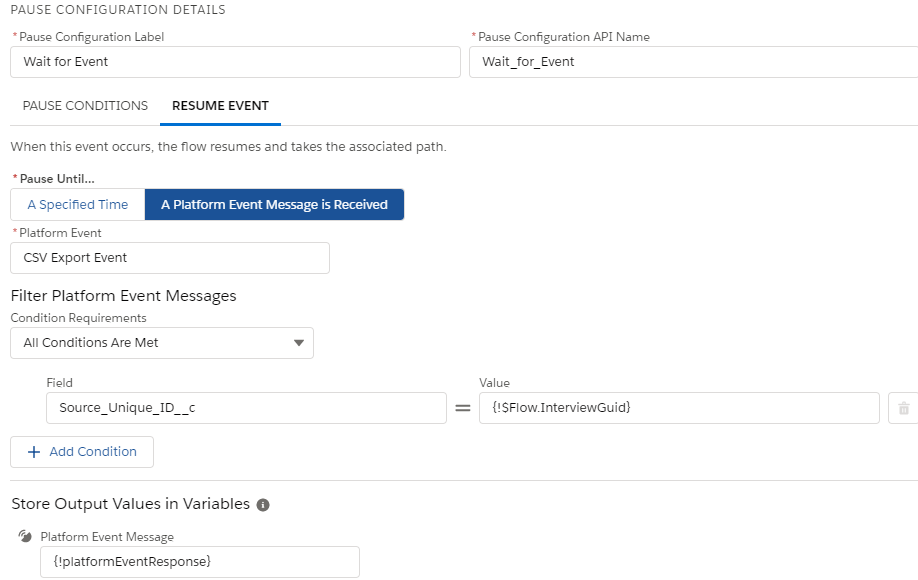
- You can store the Platform Event Response in a ‘record variable’ for use later in the flow. Just be sure to assign anything you might want from it in a separate variable like below:

- Using the response from the platform event, you can use the Response’s ContentDocumentID to then do a ‘Get’ on ContentDocumentLink using the response ID and store it in a Record Collection Variable to be used in the handy dandy Send HTML Action. Make sure you store All Records.

- In your Send HTML Action configuration just throw in the results of the ‘Get’ above and you’re all set to send attachments!

Here’s the full picture:
