Agentforce and External Services: A No-Code API Integration Guide
As a Salesforce administrator, you’re always looking for ways to make your org smarter and more efficient. Agentforce has already transformed how you handle sales and service inquiries, but what if your AI agents could access external information from any API to add agentic automation to any task? And what if you could set this up without writing a single line of code?
In this guide, I’ll walk you through how to integrate a mock credit check API with Agentforce using External Services. While we’re using a simulated credit service for this example (no real credit checks are performed), the integration process is the same as how you would connect to any external API that your company already uses. Even better, you can set this up on your own at no cost to follow along.
What We’re Building: Simulating an AI-Powered Credit Assistant
Before diving into the how-to, let’s clarify what we’ll be covering:
- An Agentforce Topic configuration that demonstrates how to connect to external APIs
- Supporting configurations of the Salesforce Platform that enable connectivity
- A realistic simulation of pulling credit information using a customer’s unique identifier
- All of this without writing custom code, using the same process you’d follow with real APIs!
The Magic Behind It: External Services + Agent Actions
The secret to this integration is combining two powerful Salesforce features:
- External Services allow you to connect to external APIs without code,
- Agentforce Agent Actions enables AI agents to use those external API capabilities.
When combined, these features let your AI agents access and use external assets just like a human agent or Flow automation would, but with better ease-of-use powered by natural language. Whether connecting to our mock credit API or your organization’s actual financial back-ends, fulfillment systems, or third-party APIs, the process remains the same.
Step-by-Step Setup
Step 1: Set Up a Mock API
For this demonstration, we’ll use a free mock API service called Beeceptor. This simulates how a real API would work without needing actual financial data:
- Download the OpenAPI spec from this GitHub gist. If you’re familiar with GitHub, you’ll note the option to download all three files at once. (We’ll need the other two for a later step.)
- Go to Beeceptor.com and create a free account.
- Use this option to create a mock server from the OpenAPI spec. You’ll upload the file you downloaded, then click the primary button to start the generation process.
- Click the button that appears at the end of the import process to navigate to the details of the new endpoint. If you created a free account, you can also navigate to Your Endpoints in the dropdown at the upper right (showing your name). Either way, you’ll want to drill into the details of the mock server.
- Next, we’ll create intelligent mocking rules to simulate realistic responses. Click Mocking Rules, then click Create New Rule to begin. We’ll need one rule for each method in our mock API:
GetCreditScoreandGetCreditHistory. Match the configuration for each method with the screenshot below. Note that we’ll make clever use of Beeceptor’s features to generate realistic results, so you’ll need this syntax for the Response body of the credit score, and this syntax for the Response body of the credit history. Copy the syntax from GitHub to save yourself time and hassle.


Step 2: Connect Your API to Salesforce with External Services
Now, we’ll connect Salesforce to the mock API. To do this, we need a Named Credential to hold the URL, and an External Credential to capture the authentication needed to access this URL. (The two are linked.) We’ll keep this simple by using the No Authentication option, since no authentication is actually required to use the Beeceptor endpoint. Please note that Beeceptor will only accept a limited amount of requests per day without a paid account.
- In Setup, go to Security > Named Credentials
- Click the External Credentials subtab and click New.
- Fill in the details and click Save:
- Label:
No Auth for Credit Check - Name:
no_auth_for_credit_check - Authentication Protocol:
No Authentication
- Scroll down to Principals and click New:
- Fill in
no_authas the Parameter Name and click Save.

Since Trust is Salesforce’s #1 value, the Named Credential subsystem also requires explicit permissions granted to users to make callouts using a given credential. This is represented by the Principal on the External Credential, and we’ll link it to the user who will actually be using the Agent. The Principal holds information like a password or API key, though there’s no such sensitive values to worry about in this example.
With that understanding, let’s grant ourselves access to the new Principal.
- In Setup, go to Users > Permission Sets.
- Locate a Permission Set already assigned to your user, or create a new one. Click into it, then scroll down to External Credential Principal Access and click that link.
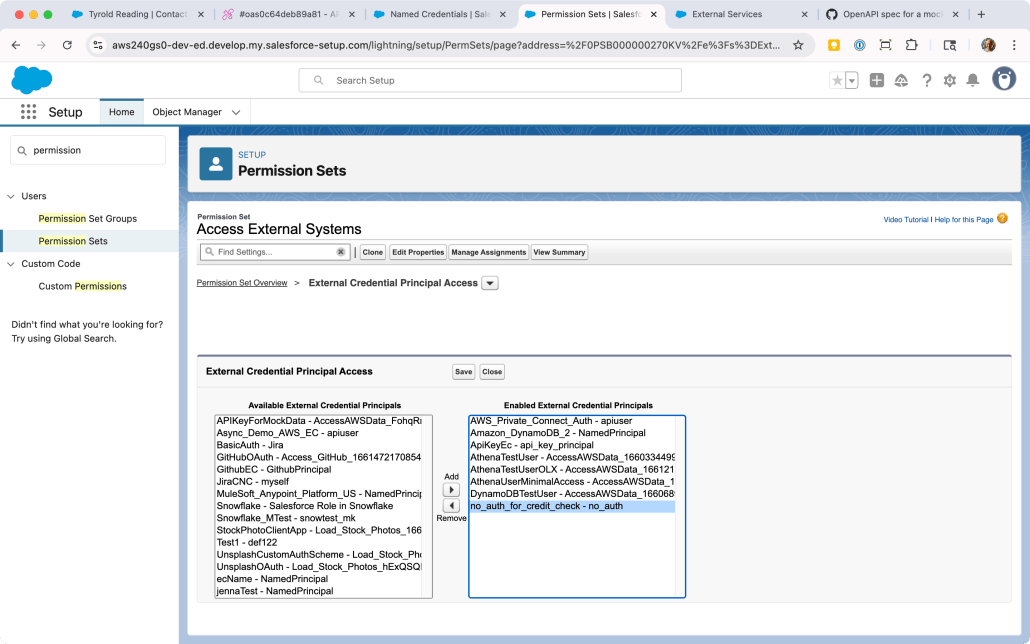
- You’ll be looking at a list of Principals that the users with this Permission Set can use in a callout. There may be no items in this list; either way, click Edit so we can add the new Principal.
- The list on the left-hand side will contain all the External Credential Principals in the org. Find the one we just created (
no_auth_for_credit_check - no_auth) and click the right arrow under Add to add it to the list. (Refer to the screenshot below for guidance.) Click Save.
To recap, what we’ve done is allow one or more users to make a callout using this credential. This is similar to how you need to grant access to Objects, Reports, Apex Classes, and other constructs in Salesforce.
You may have noticed we didn’t capture the URL in Salesforce yet. Let’s do that now by creating the Named Credential.
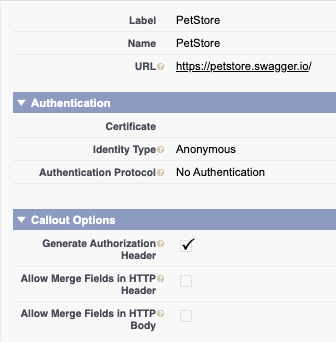
- In Setup, go to Security > Named Credentials
- On the Named Credentials subtab, click New.
- Fill in the details and click Save:
- Label:
Credit Check API - Name:
credit_check_api - URL: Paste in the URL of the mock API from Beeceptor.
- Scroll down to Principals and click New:
- Fill in
no_authas the Parameter Name and click Save.

Finally! We now have the Named Credential configured with both the correct URL and the correct authentication options, and we’ve granted ourselves access to use it. With that in place, we can register the mock API as an External Service. This will enable us to use the API methods as Agent Actions.
- In Setup, go to Integrations > External Services
- Click Add an External Service
- Choose From OpenAPI Specification and click Next.
- Enter
CreditAPIas the External Service Name and use the following as the Description:Returns the credit score and related information for a consumer identified by their National ID Number. - Under Service Schema, choose “Upload from local” and upload the OpenAPI specification you downloaded from GitHub (mock-openapi-spec.json).
- Under Select a Named Credential, locate the
credit_check_apicredential you created previously. - Click Save & Next.
- Click the checkbox next to the Operation column to multi-select both methods from the API. Click Next.
- Review the new service and click Finish. You’ll see it added to the list of External Services.
Step 3: Add Custom Fields to the Contact Object
To make our scenario more realistic, we’ll add a custom fields to store the simulated credit information:
- In Setup, go to Object Manager > Contact
- Click Fields & Relationships > New
- Create a field with the Label of
National ID Number(Text, 20 characters). - Optionally, you can add it to the Page Layout or Lightning page.
For more on adding custom fields to objects, refer to this section of Salesforce Help. Technically, you can get the External Service and Agent to work without it.
Step 4: Create Agent Actions in Agentforce
Now, let’s make these API operations available to our AI agent:
- In Setup, type Agentforce into the Quick Find and click Agentforce Assets.
- Click on the Actions subtab and then New Agent Action.
- Fill in the details for the first action and click Next:
- Reference Action Type:
API - Reference Action Category:
External Services - Reference Action: Select Get Credit Score from the dropdown
- Agent Action Label:
Get Credit Score - Agent Action API Name:
Get_Credit_Score
- Enter
Getting credit scorein the Loading Text - Under the first Output, check the checkbox for Show in conversation.
- Click Finish
- Repeat steps 3-5 for a second action, with the following differences:
- Reference Action: Select Get Credit History from the dropdown
- Agent Action Label:
Get Credit History - Agent Action API Name:
Get_Credit_History - Loading text:
Getting credit history

Step 5: Create a Topic for Credit Information
Now, you’ll create a topic that uses these actions. A complete description of Agentforce is beyond the scope of this post, so here’s some resources to refer to if you’re still getting familiar with Agent configuration:
- This developer guide covers External Services and Agents, with a focus on MuleSoft
- This blog post uses GitHub as an example, and also includes a video)
- This trail on Trailhead leads you through an extensive example including Data Cloud and more
Since you’ve built the Agent Actions in the steps above, add both of them to a Topic just like any other Actions.

The description of the Actions is pre-populated from the API spec, so most of the Topic configuration amounts to instructing Agentforce to use these Actions when the user enters input like run a credit check.

Step 6: Test Your Integration
Time to see your new API integration in action:
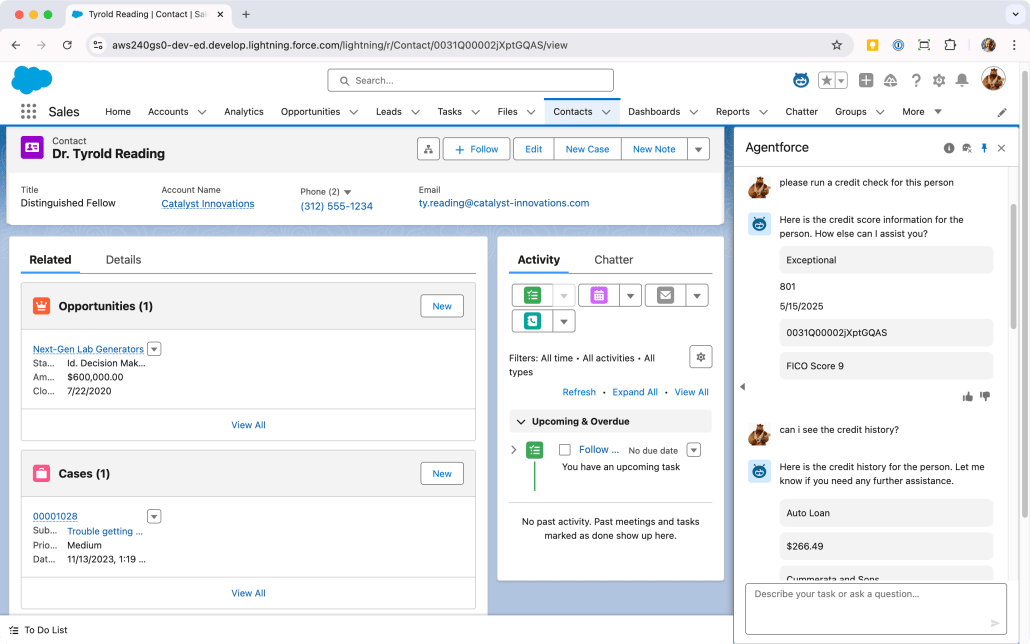
- Navigate to a Contact record in your Salesforce org
- Make sure the Contact has a value in the
National ID Numberfield (add something like “123-45-6789” if it’s empty) - Click the Agentforce icon in the top right corner of the page to open the Agent UI in the side panel
- Type a natural language request like…
- “Run a credit check for this person”
- “What’s this person’s credit score?”
- “Check the credit history for this customer”
Sit back and watch as the Agent recognizes the intent and activates your Credit Check topic, retrieves the National ID when possible, calls the mock API to get simulated credit information, and presents the results in a conversational format. Whew!

Try different types of requests and see how the Agent handles them. You can also test what happens when you don’t have a National ID on the Contact; the Agent should ask you to provide one.
The Results: Understanding the Power of API Integration
After setting up our mock API integration, you’ve learned how your AI agents can:
- Retrieve and use external API assets in real-time
- Process that data intelligently to provide relevant insights
- Maintain context between the external data and your Salesforce records
- Deliver this information conversationally to users
All of this happens without any custom code or expensive development resources. The only thing left to do is figure out what to do with all the time you’ve saved. 🙂
Have you integrated external APIs with Agentforce? Share your experience in the comments below!