With Salesforce Scheduler, it’s easy to embed appointment scheduling into standard Salesforce workflows, such as leads and referrals, opportunities, accounts (and person accounts in the B2C Model) and ALSO cases (as of Winter ’23 release).
But NOT for Contacts (with B2B model).
In this blog, we will look at options to schedule a contact.
Note: Field Service Lightning Product extends this to additional objects – Work Order, Work Order Line Item and Asset.
Understand Scheduler OOTB Behavior
Before we start looking at an option how we can customize the experience for scheduling around a contact, lets try to understand the core objects we have from Salesforce Scheduler that capture a booked appointment using the OOTB behavior and how we can reuse the existing OOTB available references.
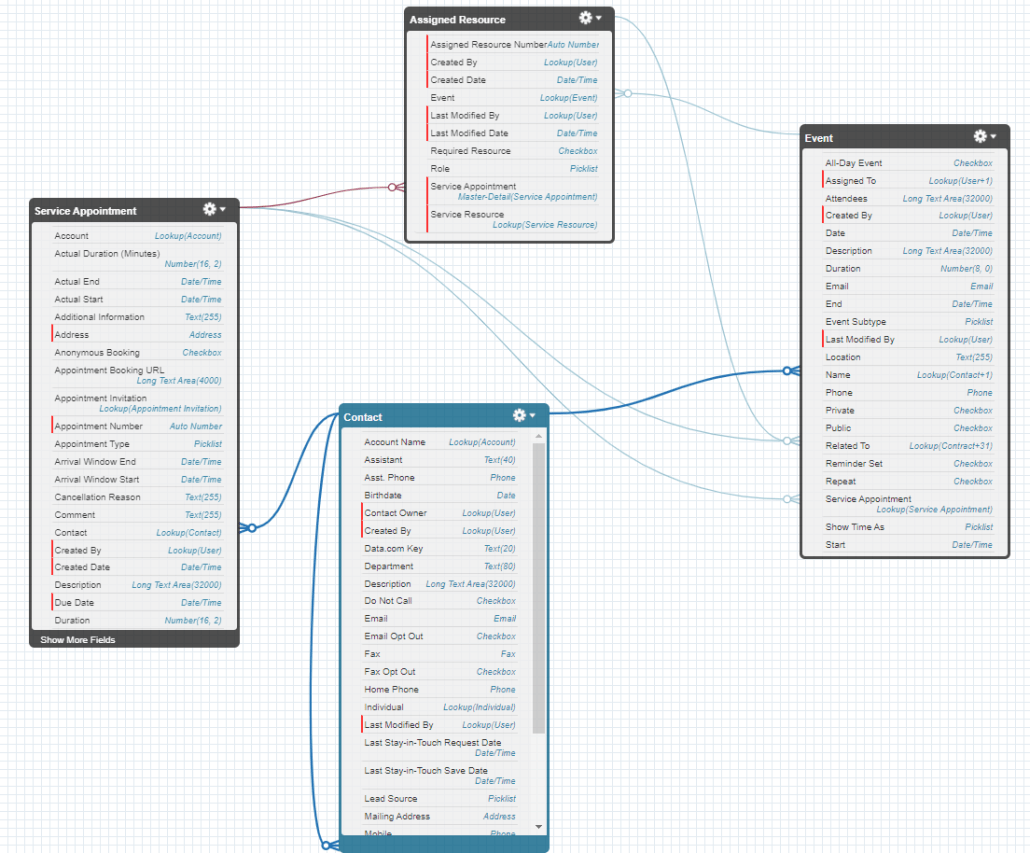
Service Appointment
Assigned Resources
Event
We will keep our focus understanding the relationships and the references
Object
Field
Data Type
Usage
Service Appointment
ParentRecord
Lookup(Account, Opportunity, Lead, Case)
Using Salesforce Scheduler we can create a Service Appointment only around Account, Opportunity, Lead or Case.
Service Appointment
Account
Lookup(Account)
Defaults to the Customer account’s for inbound, Left blank for a Lead, Case and related account if booking around an opportunity.
Service Appointment
Contact
Lookup(Contact)
Defaults to the user’s contact record when requesting from a customer community via an inbound authenticated user booking scenario. Left blank otherwise.
We will use this standard field to Stamp the Contact ID – during Service Appointment creation when doing an Outbound Scheduling from Internal Salesforce in this blog.
Assigned Resource
ServiceAppointment
Master-Detail(Service Appointment)
Service Appointment object does NOT hold the service resource information, it is primarly stored in the Assigned Resource object. This is the reference to Service Appointment.
Assigned Resource
ServiceResource
Lookup(Service Resource)
Service Resource reference (can be either a user or an asset)
Service Resource
RelatedRecord
Lookup(User)
Service resource object reference to a User – which can be either a Platform Starter / Partner Community / Customer Community Plus / Salesforce license type user
Event
WhoId
Lookup(Contact,Lead)
Events are like your calendar events. The person who will attend this event is captured here.
Event
WhatId (Related To)
Except Lead and Contact, Other objects
And this event is related to what in Salesforce
Event
ServiceAppointment
Lookup(Service Appointment)
When Event Management is turned ON on the Scheduler settings, every time a service appointment is created, it creates a related Event – this is to hold that references
Event
Owner (Assigned To)
Lookup(User,Calendar)
Represents the owner of the record (internal user or an external calendar)
Customization Guidance to schedule a Contact
Having looked at the above objects and references, it is pretty much clear that we CAN reuse the existing Contact lookup on Service Appointment. When using Events, we WILL have to make sure the related EVENT gets created with this Contact reference as well.
To achieve this we need to modify the existing template slightly. Try these steps outlined below
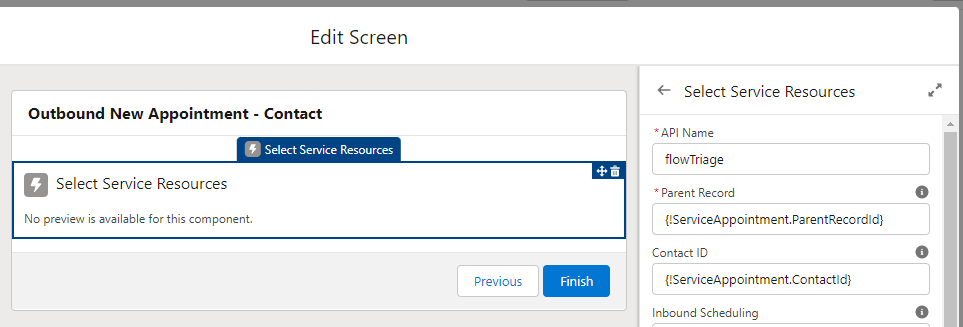
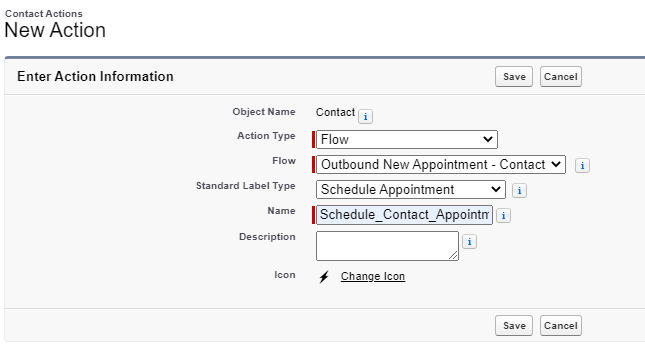
Start with a cloned flow from the template (In this example we have cloned the “Outbound New Appointment” template to create a flow called “Outbound New Appointment for Contact”)
Since we plan to launch this from a Contact record, the recordId will be the Contact.Id that will be passed to the Flow. So we need to make sure we capture the Contact.AccountId as well. Create a variable to capture the AccountId. Service Appointment ParentID field can only accept records from Lead, Account and Opportunity, so lets make sure we pass the account information from the Contact
Assignment – Set Initial Values :: make sure the recordId is assigned to ServiceAppointment.ContactId
Screen – Attendees Screen :: ensure the Contact ID assignment is NOT empty – change it to {!ServiceAppointment.ContactId}
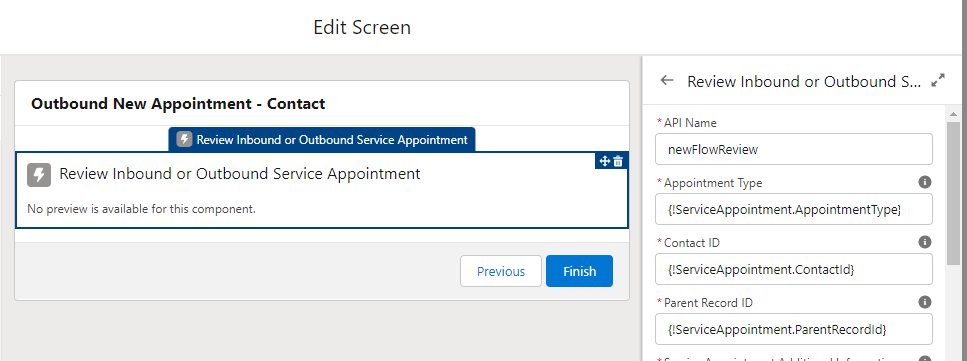
Screen – Review Screen :: ensure the Contact ID and Parent Record ID assignments are correct
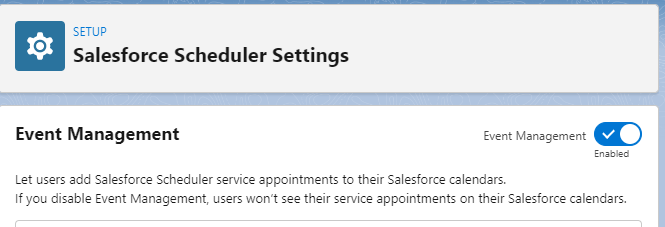
Finally make sure the Event Management is turned ON
Save the Flow and Activate it
Add a Lightning Action to Launch this flow
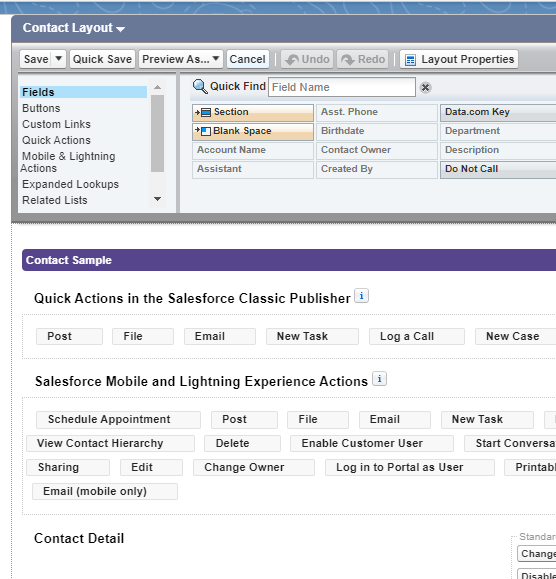
Add this Lighting Action to your Contact Page Layout
Finally, test it for yourself. Here is a demo of the same configuration tested on a developer trial org
Considerations when using with Field Service
As mentioned in the preface – Scheduling an appointment gets extended to additional Objects which are NOT supported by Salesforce Scheduler when using Salesforce Field Service product (Earlier Field Service Lightning).
Especially with both the products (Scheduler and Field Service) in the same org, ensure you take extra care around Event Management using a custom route rather than turning ON the Event Management option as mentioned above.
https://unofficialsf.com/wp-content/uploads/2022/09/largeUCSF-300x133.png00Sunilhttps://unofficialsf.com/wp-content/uploads/2022/09/largeUCSF-300x133.pngSunil2022-08-04 20:29:162022-11-10 00:14:17From Sunil Nandipati: Scheduling a Contact
The Summer ’22 release of Salesforce Scheduler introduces an amazing new feature called Share Service Resource Availability by Using an Invitation URL. This feature allows a service resource to easily generate a URL that their customers and prospects can use to schedule appointments with them.
Above: Help and Training Article describing the new feature
At the heart of this feature is a new object called Appointment Invitation. When a service resource generates their URL, a record is created in this object.
Like most objects in Salesforce, you can add custom fields to this object.
Why would you do this?
This allows the service resource to personalize the invitation, meaning you could do something as simple as displaying information to the customer while they are scheduling an appointment from this invitation. Additionally, you can perform more complex processes such as writing the information to the service appointment that is created.
Example Configuration – Basic
Let’s look at a simple example.
We are going to allow the Service Resource to enter a friendly message that they want the customer to see when the run the scheduling flow.
Add a new field to the Appointment Invitation object. In my example, I added a text field called additional info.
Grant field level security to the service resources that will use this and the community/guest community profiles that will be viewing this information.
Modify the Generate Appointment Invitation flow to prompt the service resource for the additional information and then save that to the Appointment Invitation object, as depicted in the screens below.
Seeing the Results
Here we see our Service Resource entering a message while running the flow to create the invitation URL.
Displaying the additional information message to the Service Resource on the confirmation screen.
Here we see the customer running the flow. They received an email with the URL (not depicted), clicked on it and landed here, with the additional information message displayed to the user.
Example Configuration – just a smidge more configured than the basic example above
What if we wanted our Service Resource to select a related Marketing Campaign and then send an invite. All service appointments created from that invite should be linked to that campaign.
Data Model, Security and Sharing Changes
Add a lookup relationship field on Appointment Invitation to the Campaign object
Add a lookup relationship field on Service Appointment to the Campaign object
Grant field level security on these fields to community/guest community users
Create sharing rule on Campaign object to share campaign data with community/guest community users
Data model changes depicted below
Flow Changes
Generate Invitation Flow
Add a Campaign picklist and related Record Choice Set
Save the selected Campaign to the Appointment Invitation Object
Generation Invitation changes depicted below
Book Appointment from Invitation Flow
Add an Update Record Step after the Save Appointment step to save the Campaign Id to the Service Appointment
For guest users, make sure you run this flow in the System Context without Sharing – Access All Data
Book Appointment from Invitation changes depicted below
Running the Flow
Service Resource
Service Resource running the Generate Appointment Invite flow and selecting a Campaign
Customer/Prospect
Their experience has no change. But when the schedule an appointment, the service appointment stores the campaign id.
Service Resource
Service Resource reviewing Service Appointment. Note Campaign is associated with the service appointment.
https://unofficialsf.com/wp-content/uploads/2022/09/largeUCSF-300x133.png00Sunilhttps://unofficialsf.com/wp-content/uploads/2022/09/largeUCSF-300x133.pngSunil2022-07-15 05:37:442022-07-15 05:39:09From Chris Albanese: Enhancing the Share Availability Feature with Appointment Invitation configurations
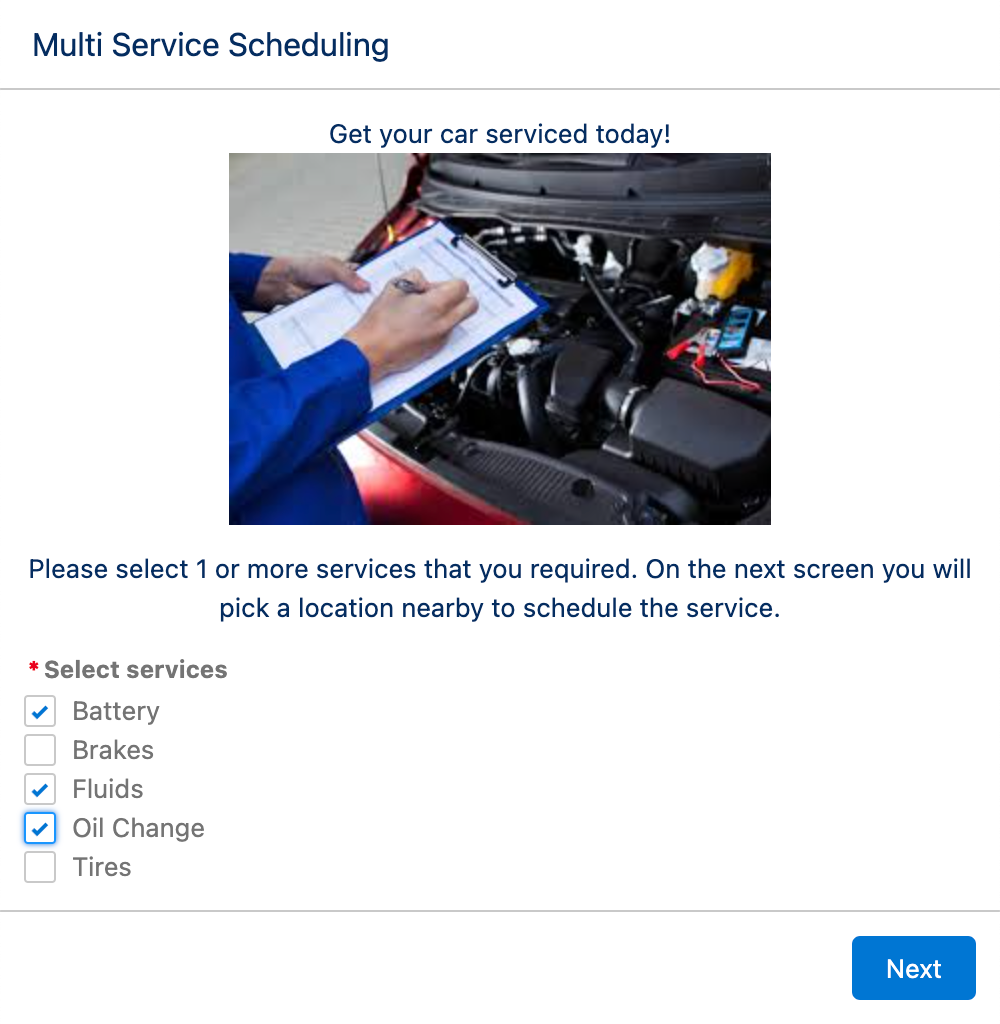
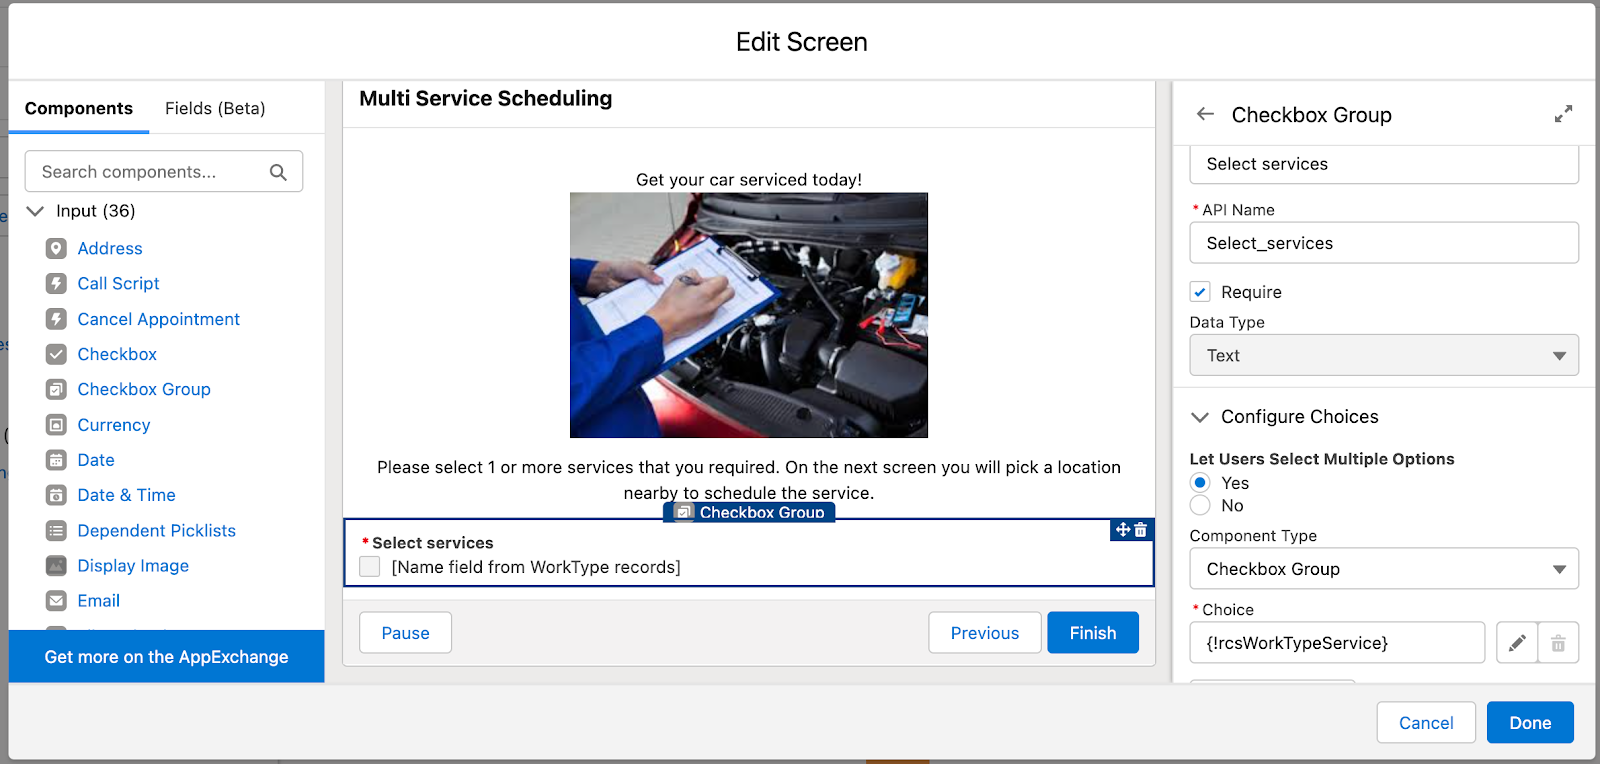
What if your business offers appointment booking for multiple services with a single appointment. For example, you offer auto services and allow customers to select from a menu of options, such as oil change, tire rotation, brake service and others. The customer may select 1 service or multiple services, and depending on the services selected, the duration of the appointment should be long enough enough to accommodate the selected services.
Above: Example of a flow screen prompting a user to select 1 or more auto services
What if you also had many store locations, and each store might offer a different menu of options. For example, the Wakefield store offers all services but the Reading store does not offer brake services.
With Salesforce Scheduler, you can accommodate this out of the box by creating many Work Type Groups to represent the combinations of services.
Consider the following table of Work Type Groups with its limitless number of combinations
Services
Duration
Oil Change
30
Brakes
60
Tire Rotation
30
Wiper Service
15
Oil Change and Brakes
90
Brakes and Tire Rotation
90
Tire Rotation and Wiper Service
45
Oil Change and Wiper Service
45
Brakes and Wiper Blades
75
…and many more combinations
But, this is probably not the most practical way to offer a menu of services. This document describes an alternative approach which includes 2 custom fields and a small bit of Apex code. Check out the details below.
Solution Overview
This solution allows you to run the Scheduler flows with a few minor configurations and an Apex @invocableMethod, allowing the user to select the desired services and perform precision scheduling without all of the permutations of work type groups.
The solution consists of custom fields on the Work Type object and Service Appointment object, an Apex Class, Work Type Group and Work Type data organized in a specific way and a configured flow. The flow makes use of the FilterByResourceIds parameter to ensure only those resources who have the skills needed are returned.
Objects
Work Type Groups
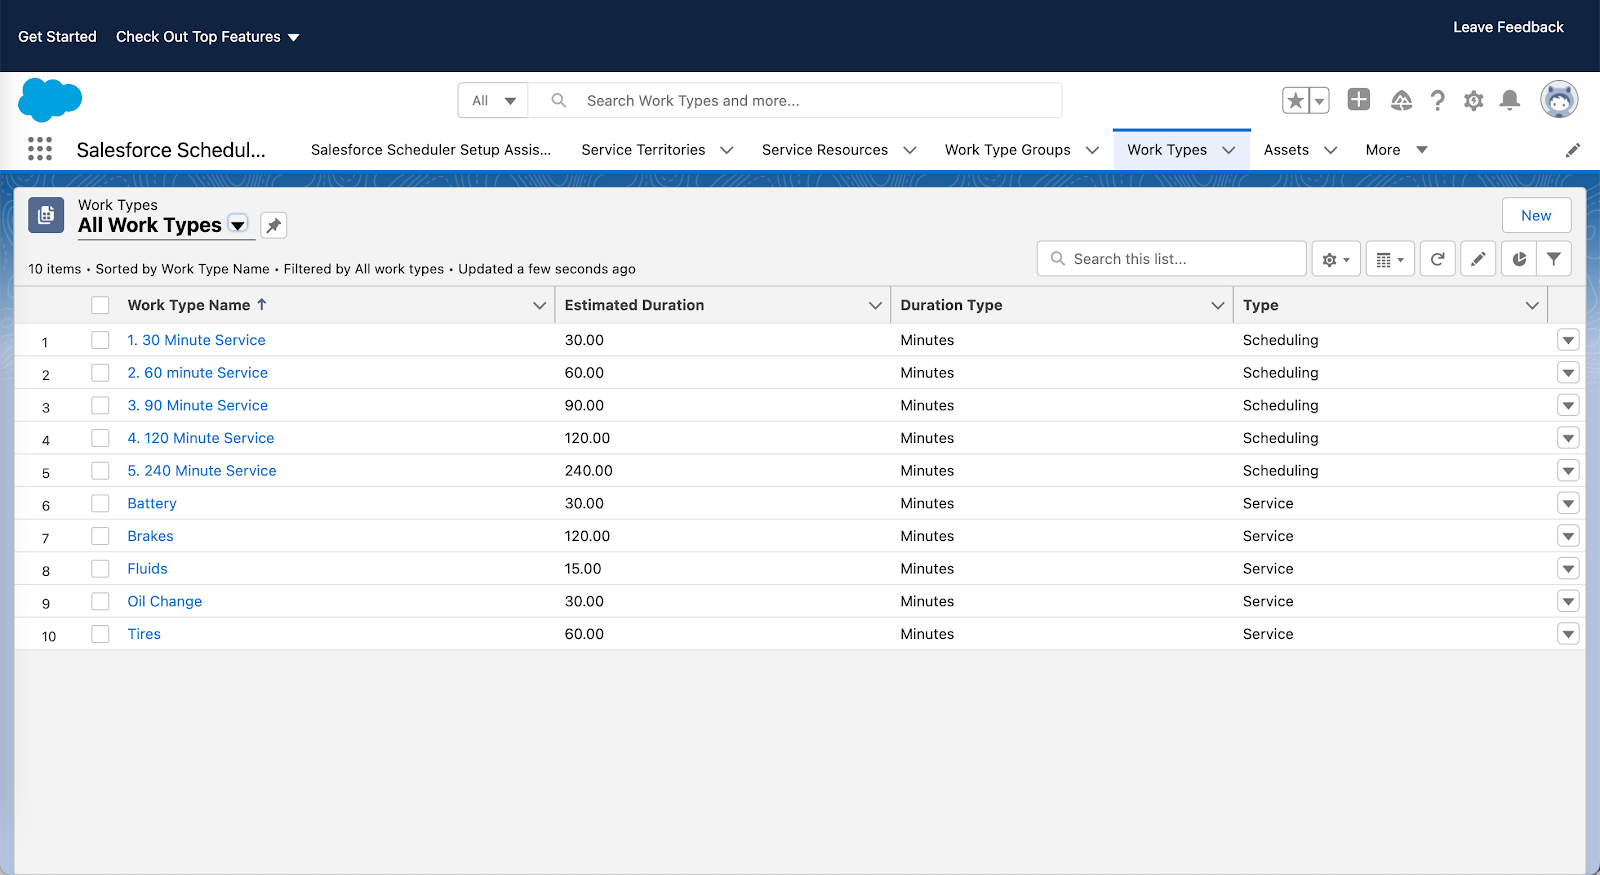
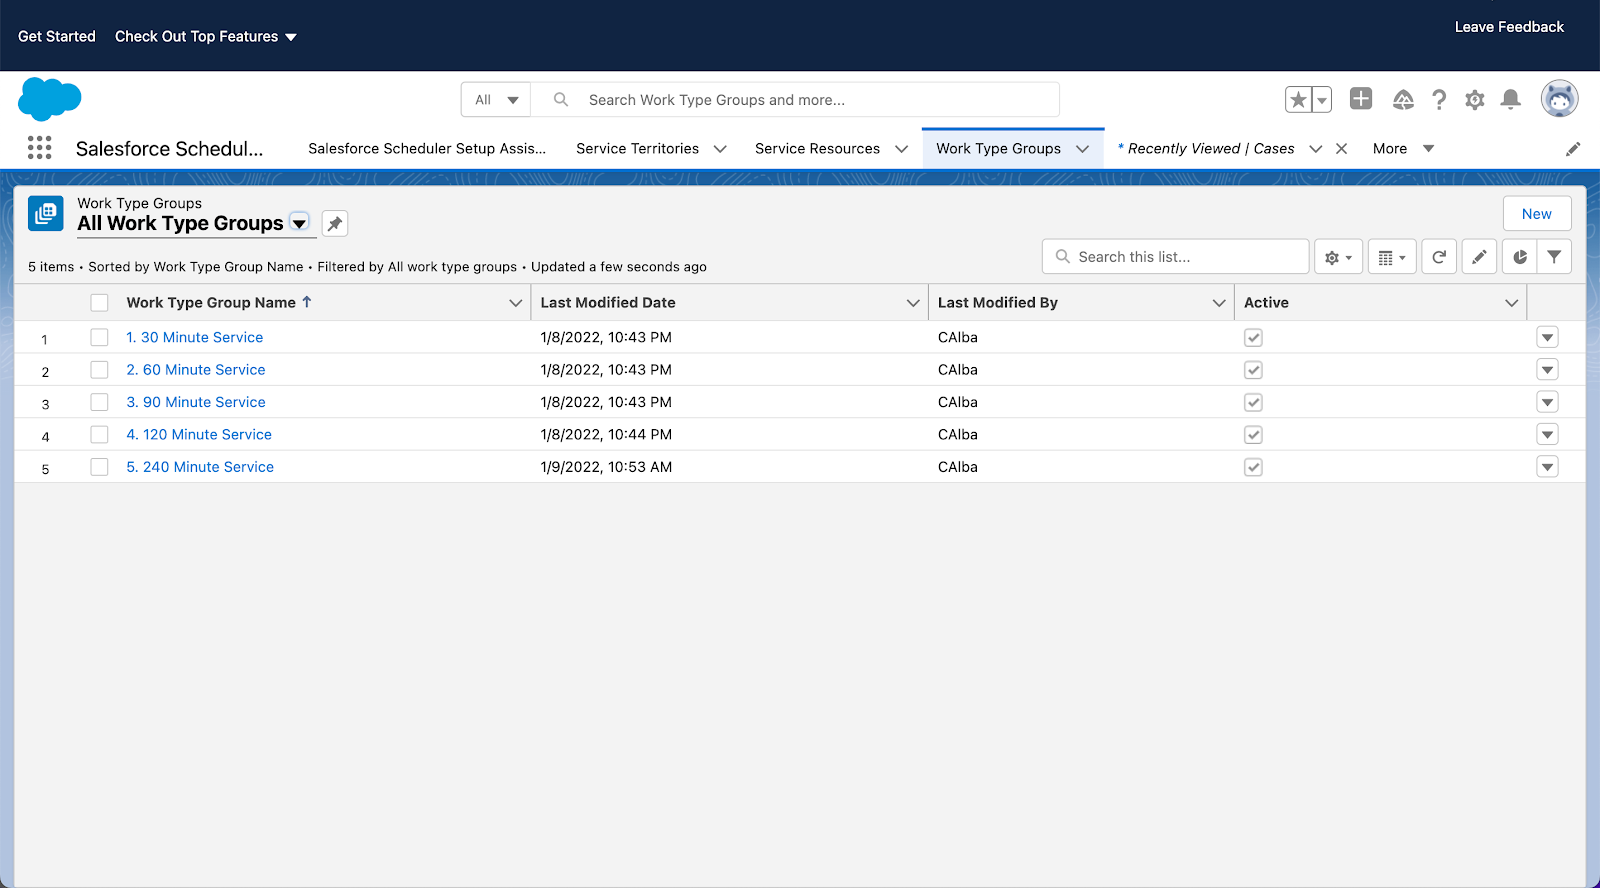
Create Work Type Groups only to reflect the duration of the services required. For example, Work Type Groups called 30 Minutes, 45 Minutes, 60 Minutes, 90 Minutes, etc. These are tied to Work Types with the respective durations.
Skills
Create Skills for each service required. For example, create an Oil Change Skill, a Brake Service Skill, a Tire Rotation Skill and so on.
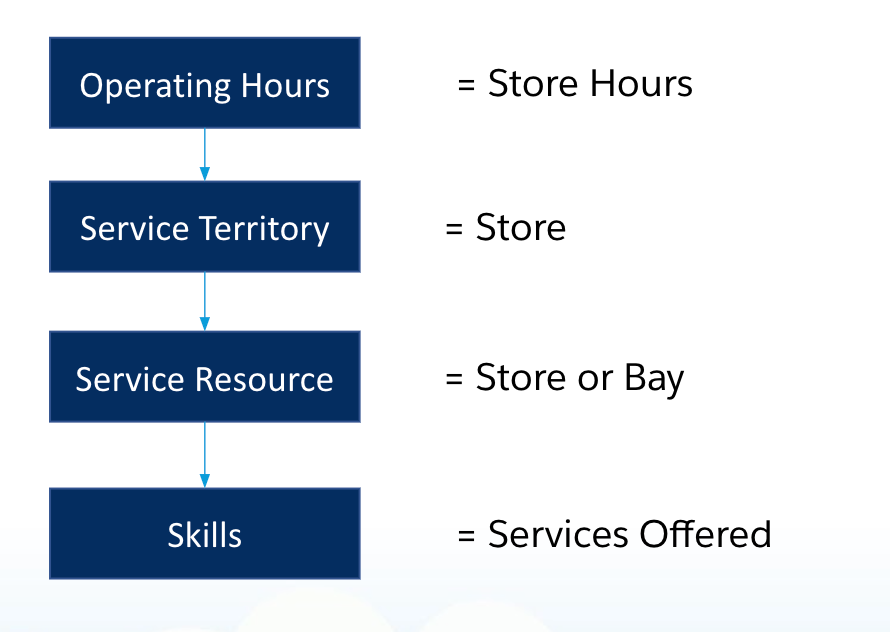
Service Resources and Service Territories
Create Service Territories to represent the store locations and create 1 resource for each service lane or bay present in the store. Assign skills to service resources to define the services offered. For example, if the store offers oil changes and brake service, but no other services, then assign only those 2 skills to the service resources associated with the store.
Service Appointment
Add a custom text (255) field called Selected Services. This will store the id’s of the work types that were selected by the user. This can be used by a rescheduling flow (not described in this document).
Work Types
Add a custom picklist field called Service Type, with values of Service and Scheduling.
Create 2 types of Work Types:
Service Work Types
These are work types that represent each service, the skill required and the expected duration. For example,
WT Name = Oil Change, Skill Required = Oil Change, Duration = 30 Minutes, Service Type = Service
WT Name = Brakes, Skill Required = Brake Service, Duration = 60 Minutes, Service Type = Service
These work types are not assigned to any work types groups or service territory work types.
Scheduling Work Types
These are work types that represent a total duration, have no skills required and the expected duration. For example,
WT Name = 30 Minute Service, Duration = 30 Minutes, Service Type = Scheduling
WT Name = 60 Minute Service, Duration = 60 Minutes, Service Type = Scheduling
These work types are assigned to Work Type Groups (see screenshot below) and they are assigned to service territory work types.
Pic above: Work types for Service (with Skills required) and work types for Scheduling (no Skills required)
Pic Above: Work Type Groups just for Scheduling
Apex Class
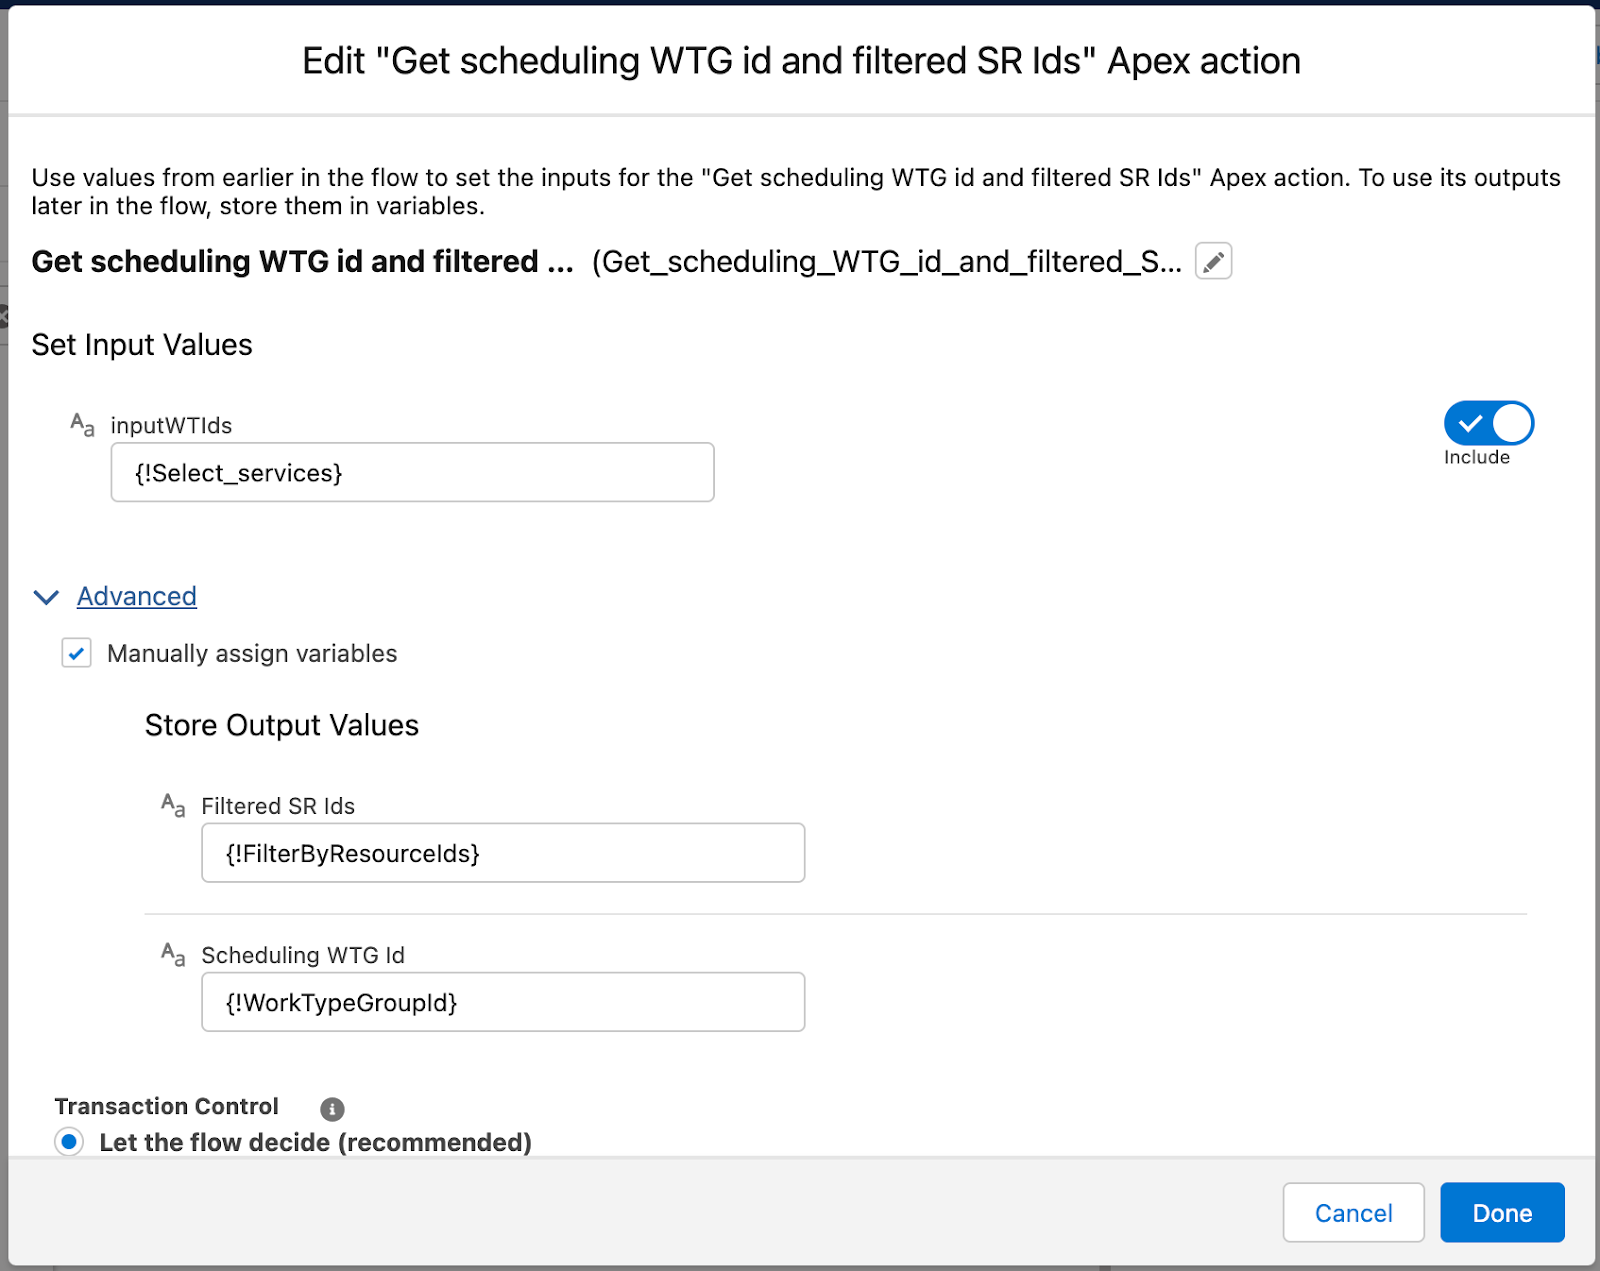
An Apex class is used to determine the scheduling Work Type Group which is just large enough to cover the list of input Services. It accepts a list of Work Type ids and returns a Work Type Group id and a text field containing a comma separated list of Service Resource ids who have the skills required for the input Services.
The code for the apex class and a test class is contained in the package file at the end of this document.
Flow
Modify the Inbound New Guest Appointment flow to prompt for the services required (service work types), call the apex class and then present the list of time slots available.
Pic Above: Flow with new steps added to prompt for services and call the apex class.
Pic Above: New Screen which prompts for services. Select services is a picklist tied to a record choice set which selects only Work Types where Service Type = Service.
Call to Apex which returns the applicable work type group id with the duration large enough to accommodate the selected services. Also set the FilterByResourceIds field, which will be used in the select location and select time slots screens.
Video of it in action
Check out the short video below.
Package
Try it yourself in your own sandbox. The custom fields, Apex Class, Test Classes and an example of a configured Inbound New Guest Appointment flow are included in this repo.
Since FilterbyResourceIds is limited to 50 service resource ids, you should ensure that you pass in a service territory id to the Apex Method so as not to exceed this limit.
Modify line 24 of the Apex code to select the specific service territory selected by the user.
listST = [select id from serviceterritory where isactive = true];
Lines 50-56 contain code to limit the total number of service resource ids to a maximum of 50. If the limit of 50 changes in a future release, you should change this code to reflect the new limit.
Rescheduling Flow
A rescheduling flow is not included here. If rescheduling is part of your use case, use the Service Appointment custom field created in this package to retrieve the services selected by the user when the appointment was scheduled. Add the custom screen and call to the Apex method to retrieve the corresponding scheduling Work Type Group, similar to how the flow in the package has been configured.
https://unofficialsf.com/wp-content/uploads/2022/09/largeUCSF-300x133.png00Sunilhttps://unofficialsf.com/wp-content/uploads/2022/09/largeUCSF-300x133.pngSunil2022-05-24 21:34:002022-05-25 02:24:39From Chris Albanese and Chris Hartt – Scheduling 1 appointment with multiple work types
Shift is one of the major additions made in Salesforce Scheduler, It provides the user with enormous flexibility and makes the entire process of appointment scheduling less cumbersome. The diagram below shows the interaction between Shift and various other entities involved in scheduling a Service Appointment.
A Service Territory Member can have multiple Shifts associated with it and as a result the time slot selected for the Service Appointment can fall between more than one overlapping shifts (considering both the required and primary Service Resources).
In the following sections we will figure out a way to reverse map all the associated Shifts with corresponding Service Appointment.
Creating a custom object
For completing the purpose of reverse mapping Shift with Service Appointment a custom object(Service appointment shift) is used as a junction object. It comprises of the following custom fields:-
ServiceAppointnmentId – Referring to a Service Appointment.
ShiftId – Referring to a Shift whose startTime and endTime completely encloses the Service Appointment’s time slot.
Modified – A boolean flag to help backtrack all the updates made to Service Appointment.Only the records with the flag value false should be considered as reliable entries.
Canceled – A boolean flag which is set to true only when the associated Service Appointment is canceled.
As evident from the design proposed whenever a Service Appointment is scheduled we need to obtain all the Shifts associated with the Service Appointment.For each associated Shift, one record comprising of ServiceAppointmentId,ShiftId
and Modified(initially false) must be made.
For achieving our goal of reverse mapping we will be writing triggers on two entities:
Service Appointment
Assigned Resource
Creating a Service Appointment
We must do the reverse mapping the moment a Service Appointment is created.Whenever a Service Appointment is created necessary inserts are made in Assigned Resource and this will invoke the trigger that we will be writing for Assigned Resource .
Pseudocode
Let us first discuss the pseudocode for triggers when new Service Appointments are created.
Create a trigger which runs after inserts are made in Assigned Resource.
Fetch all the linked Service Appointments using the just inserted Assigned Resource records.
Check for any previous entries for obtained Service Appointments in the custom object and for all those records set the Modified as true.
Design a map of Service Appointment and all the required resources for that appointment.
Loop through all the Service Appointments in the map and obtain the associated Shifts of the Service Resource.
Do the inserts for Service Appointment and Shift mapping records.
Updating a Service Appointment
Whenever a Service Appointment is modified we can make changes in the time slot and the required resources of the Service Appointment.Once a Service Appointment is updated we must set the Modified field for all the records of this Service Appointment in the custom object to true and obtain new associated Shifts. Let’s have a look at the possible scenarios and the way we are handling it.
Deletion of required SR from Appointment(will invoke an after delete trigger on Assigned Resource)
Addition of required SR to Appointment(will invoke an after insert trigger on Assigned Resource)
Moving of SR from required to optional resource(will invoke an after update trigger on Assigned Resource)
Moving of SR from optional to required resource(will invoke an after update trigger on Assigned Resource)
Change in Appointment start time and/or end time
Change in Appointment WTG/WT (Appointment duration)
Changing the time slot at the same time altering the Assigned Resources.
For these cases we will be using one update and a delete trigger on Assigned Resource wherein we implement a similar logic as mentioned above.
Disclaimer: The following code is meant to be verbose and easily understandable from a Salesforce Developer perspective. Given a choice between performance vs readability I have strived for the latter. It is a proof of concept to demonstrate the feature and should be modified and tested thoroughly as per different data shapes and existing code in the org.
trigger getassociatedshifts on AssignedResource (after insert,after update,after delete) {
/* fetching all the linked service appointments from the trigger */
List<ServiceAppointment> AllAppointments = new List<ServiceAppointment>();
if(Trigger.isDelete) {
List<String> AffectedAppointments = new List<String>();
For(AssignedResource a:Trigger.old) {
AffectedAppointments.add(a.ServiceAppointmentId);
}
AllAppointments = [Select Id,ServiceTerritoryId,SchedStartTime,SchedEndTime,WorkTypeId from ServiceAppointment where Id In :AffectedAppointments];
} else {
AllAppointments = [Select Id,ServiceTerritoryId,SchedStartTime,SchedEndTime,WorkTypeId from ServiceAppointment where Id In (Select ServiceAppointmentId from AssignedResource where Id In :Trigger.New)];
}
/*
check for any previous entries for obtained service appointments in the custom object
and for all those records set the modified flag as true
ServiceResourceToServiceAppointment = [Select ServiceResourceId,ServiceAppointmentId from AssignedResource where ServiceAppointmentId in:AllAppointments
For(Service_appointment_shift__c all:[Select id,modified__c from Service_appointment_shift__c where Service_Appointment__c In :changed]) {
all.Canceled__c =true;
all.Modified__c = true;
ServiceAppointmentShiftToUpdate.add(all);
}
/* updating the records */
update ServiceAppointmentShiftToUpdate;
}
https://unofficialsf.com/wp-content/uploads/2022/09/largeUCSF-300x133.png00Sunilhttps://unofficialsf.com/wp-content/uploads/2022/09/largeUCSF-300x133.pngSunil2022-04-28 03:54:132022-06-22 01:58:39From Adwait & Mrityunjoy Chowdhury: Reverse Map Service Appointment to the appropriate shift
A customer of Salesforce is looking to integrate with Zoom and the Online Meeting capabilities from Salesforce using Portal / Internal screens. The use case is fairly straightforward, as a customer of a bank, I want to schedule an online meeting with my advisor and discuss my accounts. The technology the bank wants to use is Zoom.
The technology usage behind this particular demo is to simply create a meeting in Zoom via an API which returns a URL that parties can click on to launch Zoom( either browser or desktop ) and have a meeting. There is a lot more that can be done, but this integration is to show the possibilities with the connection
Technology Utilized
Listened below are the main technologies and configurations used in the demo preparation.
<optional> Visual Code – Used to write and deploy code
Apex Classes
Invocable Methods setup to make available in Flows
Test Classes
Auth Provider Setup in Salesforce
Named Credentials
Salesforce Flows – To provide the screen navigation, call Zoom to get the meeting, and update the appropriate records.
Demo Flow High Level
This section describes the general flow of the demo from start to finish when showing to the customer. This is a specific flow for the customer this demo was prepared for. You can tailor or make your own flow(s) for your customer.
Customer goes to the portal to schedule a meeting, using the Salesforce Scheduler.
This demo has an authenticated flow, there is a person account associated with the demo.
Enter the required information from the screen
Click by previously scheduled service appointments or search for a banker.
Click Next
Click on a Work Type Group → Select the type => Click Next
Select Video Call
Enter a address → San Francisco → Select a branch
Choose a date in scheduler
The call to Zoom is done at this point and a URL is returned to the “Additional Information” Section. Note, this could be put anywhere but for the purpose of the meeting we chose here.
Click on next and a new Service Appointment is created with the Meeting URL in a custom field that can be accessed to launch a Zoom meeting.
The integration behind the scene created a Zoom meeting valid link that can be clicked on to start a Zoom meeting. This utilized the Zoom API, OAuth/Open ID authentication/authorization, and Apex Callout to create and return the meeting.
Demo Details
This section will describe the setup needed to execute the demo. What is described is the particular flow used to validate and test the integration. The entire section for Postman is completely optional, but it is suggested to do this to validate and debug. In our case, it was invaluable in determining the exact headers to place into the API. In the initial development, Postman was first used outside of Salesforce to ensure the API format was correct and the authentication/auth was setup correctly in Zoom.
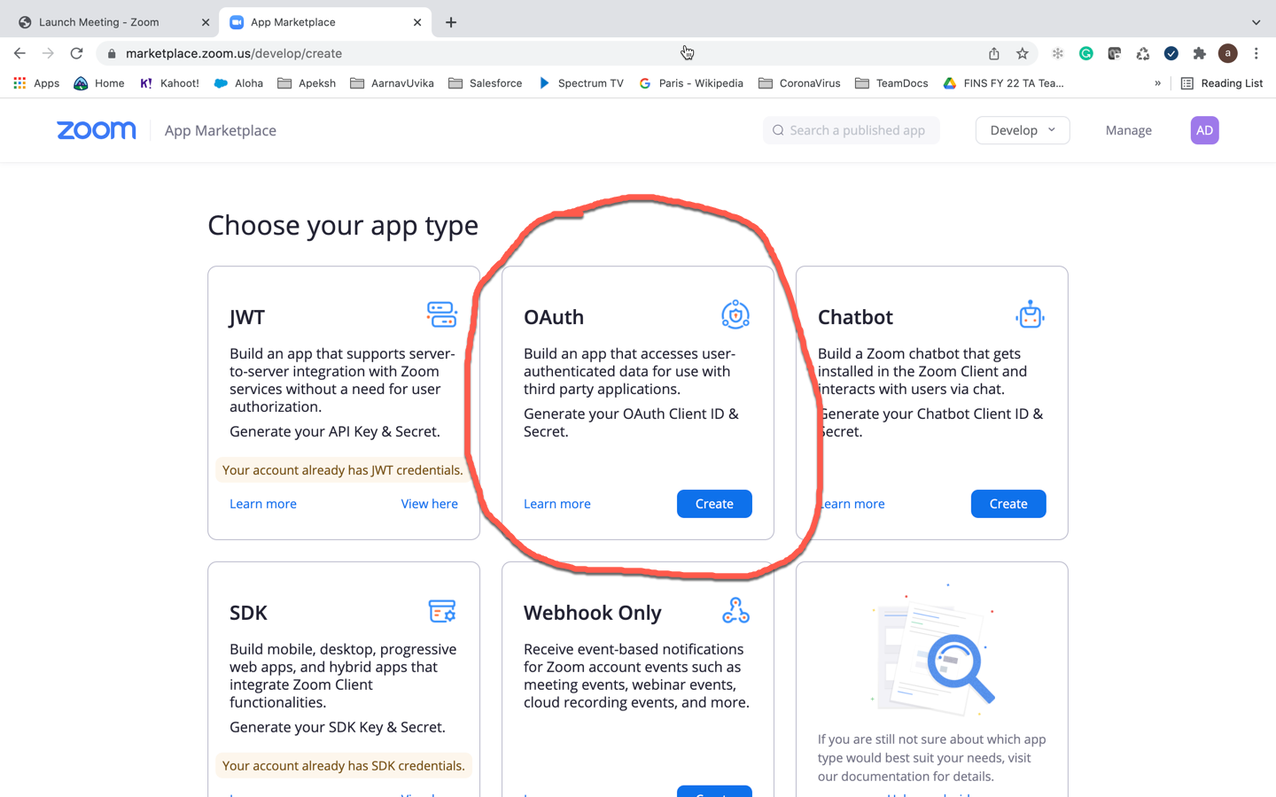
Zoom Setup
The first piece that is needed is a Zoom Developer Account. Please note you cannot use a Salesforce Zoom account as they have disabled permission to use the API. Best bet create Personal Zoom account with personal ( no salesforce account) or working with your client account that allows to create meeting via API
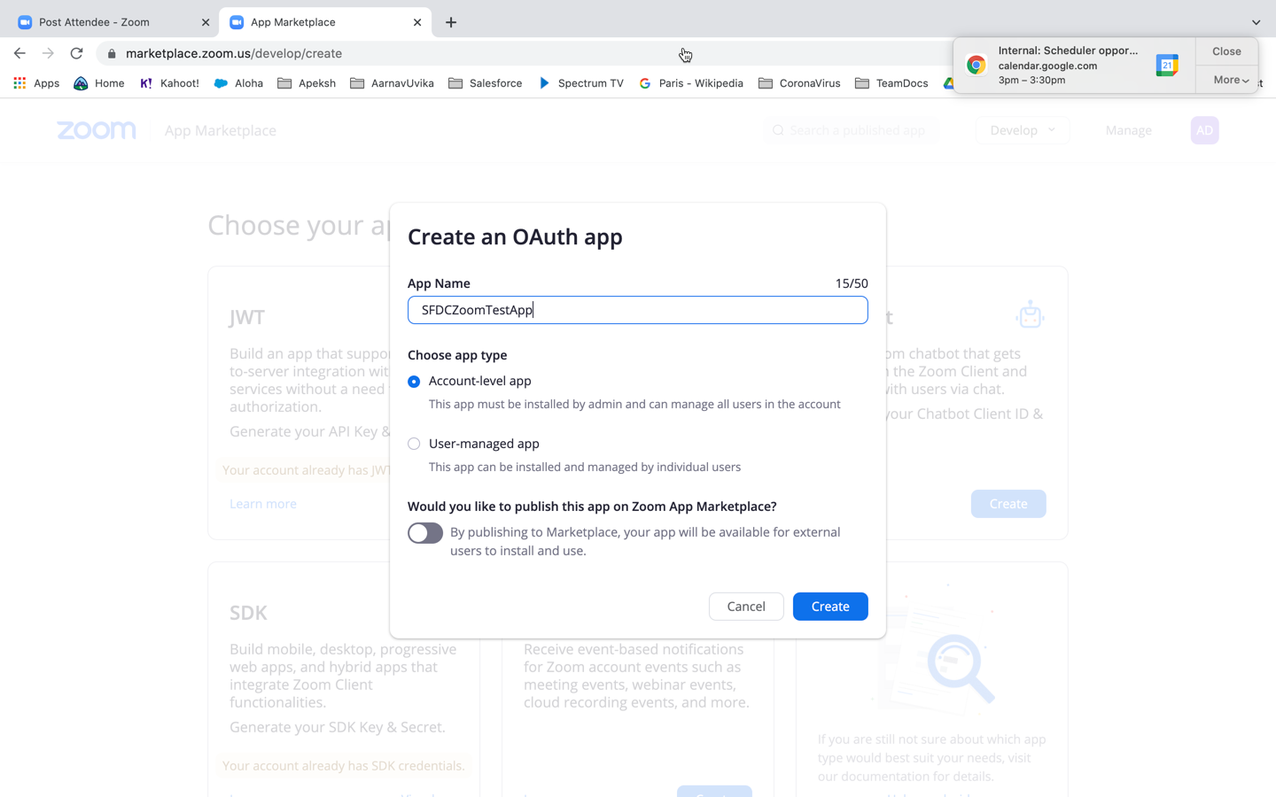
Name it, choose an account level app and toggle off the publish button like this.
Next screen
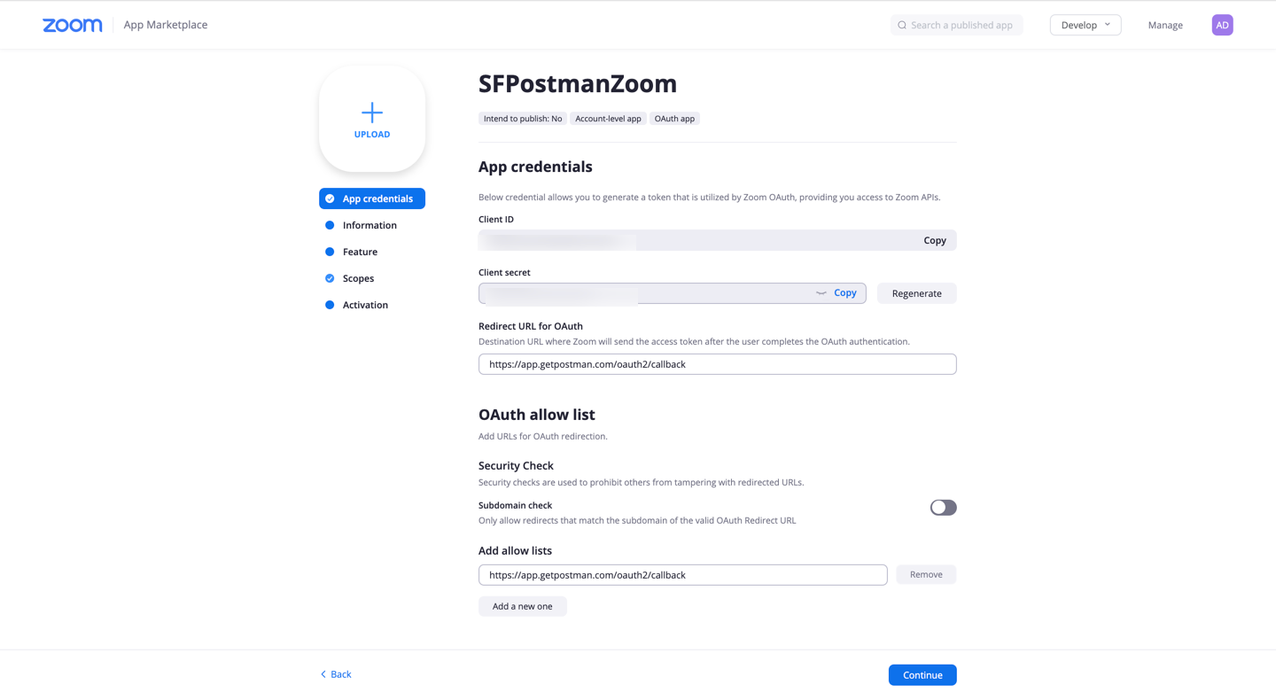
Screen will show the client key, client secret. Copy & store in a secure place. You will need these in the Salesforce setup.
Populate the redirect url and add the allow list.
You will find the redirect url to use in Salesforce → Setup → Authentication provider → Callback URL. (You can change this once you setup authentication provider in Salesforce.)
This section describes the Salesforce Setup needed to access Zoom API meetings. It is strongly advised to setup Postman first to validate and test the API as well as get familiar with the API before jumping into Apex coding setup. This section will consist of Authentication setup, the Named Credential, and the Apex code needed to create a Zoom meeting and retrieve a URL. Additionally, this will provide the callback referenced in the Zoom section which will be needed to complete the Authentication section in Zoom.
Auth. Provider Setup
The first step is to create the Authorization Provider configuration to connect to Zoom. You will need the Secret Key(Value) from the Certificate setup in Zoom and the application id.
Enter Salesforce Setup → Auth Providers → New.
Choose Open ID Connect from the Provider Type drop-down.
Name the Auth Provider.
URL Suffix → Can make the same as the name.
Consumer Key → This is the client key in Zoom.
Consumer Secret → This is the client secret in Zoom.
Make sure this option is checked: Send client credentials in header.
Use the defaults for the remainder.
Save.
Click on the newly defined Auth Provider to open it up.
Copy the Callback URL that is shown in the Salesforce Configuration. If you have Experience Cloud setup and you are using those domains, then add those callback URLs as well to the Zoom Dev configuration.
Take the callback URL you copied above and paste back in the Zoom redirect url & allow list. (Use the exact same word to word, no space.)
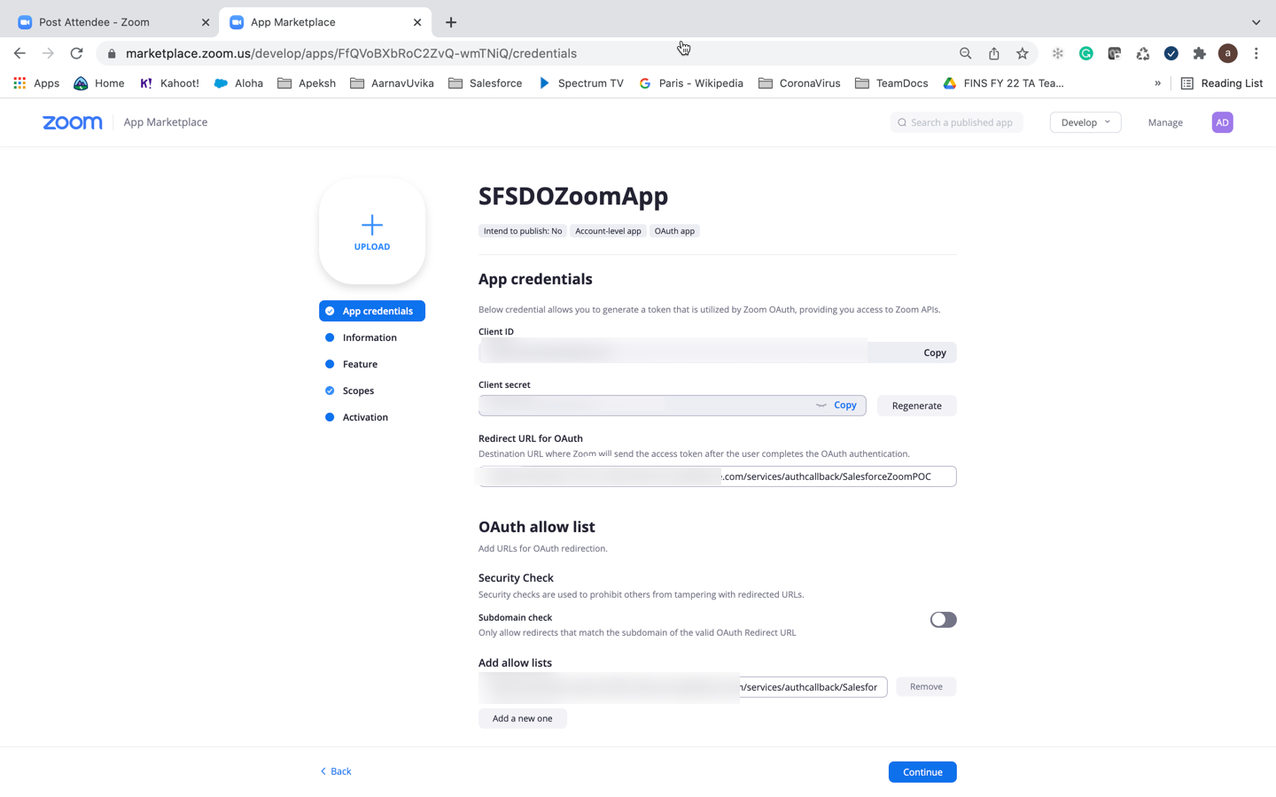
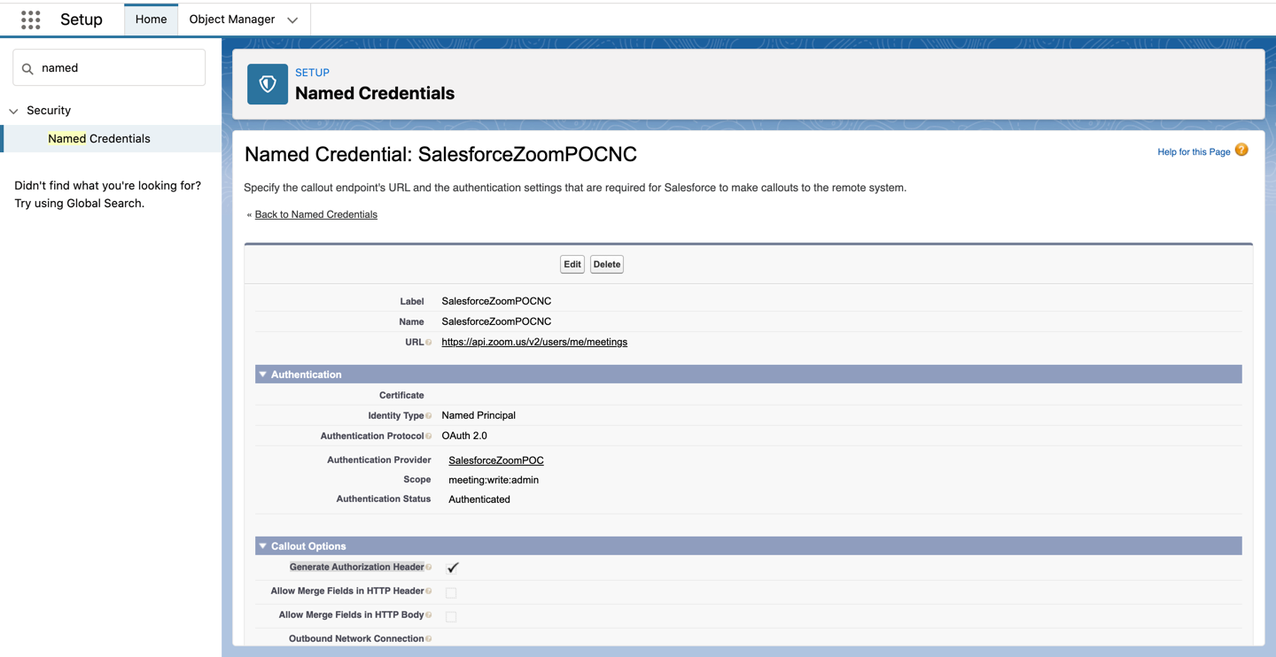
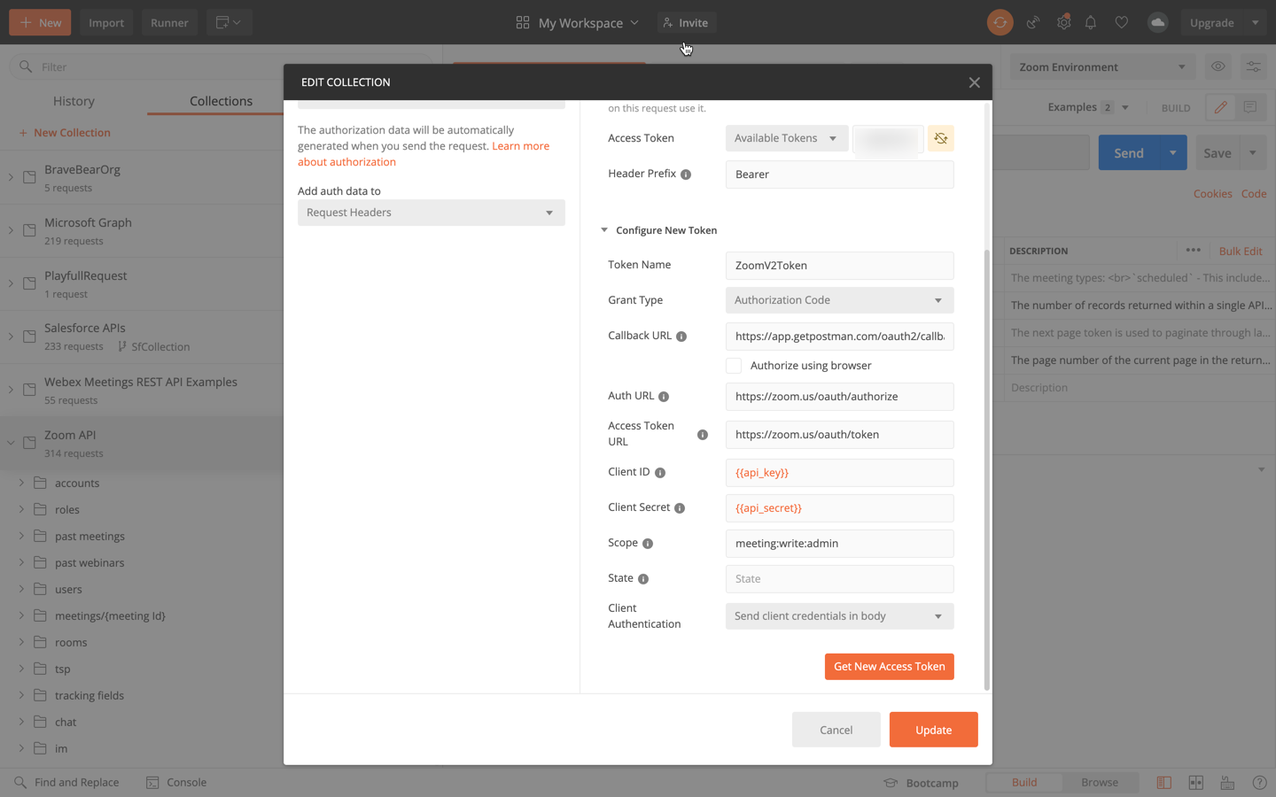
Named Credential
Creating a named credential will perform the authentication to Zoom and do the OAuth validation. Here is where the Zoom Authenticated App is used to validate the OAuth connection. (I set mine to auto approve.) It will prompt you to login to your instance of Zoom. The login will be the Zoom Developer login/id created during the setup of the developer instance.
In Setup → Named Credentials, click New.
Enter the label and the URL of the API Endpoint you wish to access. In this case, the full API is used for the onLineMeeting for Delegated access. The application access has a different signature
Select the Auth Provider created in the previous step.
Scope: very important! The scope here will match the scope you created in Zoom for the application. It is space delimited.
meeting:write:admin
Click on Generate Authorization Header.
Check on Start Auth Flow on Save.
Generate Auth Header is checked.
Click Save. This will trigger the actual connection to Zoom and validate the Authentication.
When you Save, the OAuth flow will initiate.
Zoom Login Screen will popup.
Login.
If successful, you will see Authenticated in the Authentication Status in Salesforce. If it fails, you will get a failure screen from Zoom. Common Issues:
Used the wrong secret key or id. Double check the values in the Auth. The Providers are correct.
URL Endpoint is invalid. Check your URL Endpoint. (Using Postman first helps avoid this issue.)
Salesforce Application Code
This section will review the Apex application code needed to make the Rest API call to setup a Zoom meeting and retrieve the meeting URL from the Zoom Server. The code is not production quality but instead is a sample to prove the concepts. The current iteration does not accommodate error handling in a meaningful way nor does it do much more than create a meeting. The goal of this good is to demonstrate the basic connection for the customer and proof of concept the meeting invites. The sample code will be in two parts, the first part is a test class that can be used to validate the connection and result. Once that is working, then the 2nd class uses @InvocableMethod so that it can be used in flows. Obviously this can be tailored however desired.
This section does not instruct how to setup command line tools, deploy the source, or other development tasks. It is assumed the reader understands how to deploy, run the developer tools/debugger in Salesforce.
Test Apex Class – Simple Class to Create the Meeting utilizing Named Credentials
public class TestZoomApi {
/* Test Method for Unit Testing Connection */
public static String getMeetingUrl()
{
HttpRequest req = new HttpRequest();
Http http = new Http();
//Setup the Endpoint and append the name of the file
if ((parser.getCurrentToken() == JSONToken.FIELD_NAME) &&
(parser.getText() == ‘join_url’)) {
parser.nextToken();
webLink = parser.getText();
System.debug(‘join_url= ‘ + webLink);
}
}
return webLink;
}
}
Common Issues/Errors
Zoom will return a 201 in the HTTP Response. This is a success. It is documented in the API.
HTTP Error 500 – Internal Server Error
Notice the headers that are set. The Zoom documentation does not state it explicitly, but in our testing we found that the 2 accept lines need to be in the header when sending the request. You need to add the gzip, etc and the “*/*” accept lines.
401 – The 401 unauthorized generally means the scope is incorrect in the Named Credential, or in the Named Credential and/or the Zoom setup. Make sure the permissions are correct and the scope is space delimited.
403 – Forbidden – This occurs when the secret keys are incorrect. You should have fixed this when you saved the name credential so it shouldn’t show up.
Note: When using the Apex Debugger – Look for the debug line to joinWebURL populated with a long string for the meeting. It will start with something like this: 12:40:52:477 USER_DEBUG [37]|DEBUG|joinWebUrl= https://us04web.zoom.us/j/xxxxxxxxxx?pwd=xxxxxxxxxxxxxxxxx
Salesforce InvocableMethod Class Utilizing the Apex Code and Callout
This is the actual code used in the demonstration. This code is accessible in the Flow Builder inside of Salesforce as an Apex Action.
global class GetZoomMeetingURLwithInput {
@InvocableMethod(label=’Get Zoom Meeting URL with Input’ description=’Returns a meeting URL For Zoom’)
global static List<String> makeApiCalloutwithInput(List<List<String>> inputZoomsParms)
{
HttpRequest req = new HttpRequest();
Http http = new Http();
//Setup the Endpoint and append the name of the file
if ((parser.getCurrentToken() == JSONToken.FIELD_NAME) &&
(parser.getText() == ‘join_url’)) {
parser.nextToken();
webLink = parser.getText();
System.debug(‘join_url= ‘ + webLink);
}
}
// Apex Actions Return. The method signature for an invocable method requires a List of Strings to be returned.
return new List<String>{webLink};
}
}
Salesforce User Experience Setup
This section is optional but describes how the above code can be accessed in the low-code building tools inside of Salesforce.
This section in a flow shows how this action is called to retrieve a URL for the Zoom Meeting and then assigns it to a Record (such as the Service Appointment, and/ or its associated Event) in Salesforce. A larger flow will then do further processing as part of a full scheduling flow. The takeaway is that the Apex Code above is an option to drag and drop into the low code builder and use it when running a flow. It could also be embedded within a Lightning Web Component(LWC) and used in other places. Alternatively, it can be accessed from another Apex Class to get the required information.
Postman Setup
This section describes how to setup Postman to access Zoom APIs and test the API integration outside of Salesforce in a developer-centric manner. This is completely optional, but oftentimes if it works in Postman and not in another application or Salesforce, you can see what is different in Postman versus the other applications. This tutorial assumes the reader is familiar with Postman and has downloaded the application or is using the web version. This document will use the desktop installation for reference. This section does not require knowledge of the Salesforce Setup. We recommend starting with Postman before the setup in Salesforce.
Postman Collection – use version 2 link below. (Do NOT use v1.)
To make life easier, download the Postman Collection already created for Zoom as plenty of examples. To do so:
Setup Postman Authentication
Setting up Authentication is straightforward and will require the client id and secret key from the Zoom setup done previously. Additionally, you will need to add the callback URL to the Authentication section in Zoom. You also need to setup Environment variables as part of this step.
Salesforce Scheduler gives tools needed to simplify appointment scheduling in Salesforce. We can create a personalized experience by scheduling customer appointments in person, or by phone or video; with the right person at the right place and time. One of the strong feature of the product is its ability to manage availability of multiple Service Resources for various Work Types across multiple Service Territories.
Now the biggest question is if there is an out of the box Salesforce Report that can provide a list of service appointment slots available for all or a specific set of service resources. The Answer is NO.
So, how do we solve for it?
Salesforce Scheduler calculates the availability of a service resource at runtime on demand (when a user is scheduling an appointment). Salesforce Scheduler uses multiple entities along with data from external systems to calculate availability data. This information is NOT stored anywhere to report on.
To solve for the reporting Question – we need some complex level of customization. This can be achieved using the power of the Salesforce Scheduler and Salesforce platform to generate reports on Service Resource’s availability information.
Approach we will use in this blog post
Salesforce Scheduler provides the LxScheduler namespace which offers the apex method getAppointmentCandidates which provides the availability information. We will use this method to
retrieve the information using Apex
dump the retrieved information into a custom object that we will create and
report on top of the custom object
Create Custom Object – Appointment Slots
Let us create a custom object, “Appointment Slots” with these custom fields to store availability information
Service Resource (lookup)
Service Territory (lookup)
Work Type Group (lookup)
Start Date (Date/Time)
End Date (Date/Time)
Remaining Appointments (Integer, default value = 1)
Enable reporting for this custom object.
Query and Dump retrieved information into the Custom Object
public without sharing class ReportDump implements Database.Batchable<sObject>{ public Database.QueryLocator start(Database.BatchableContext BC){ String query = 'SELECT Id FROM ServiceResource where isActive = true'; return Database.getQueryLocator(query); }
public void execute(Database.BatchableContext BC, List<ServiceResource> srList){ Integer DUMP_DURATION = 30; String ACCOUNT_ID = '001xx000003GYQRAA4'; String SCHEDULING_POLICY = '0Vrxx0000004C92'; //Hardcoding WTG for now List<String> wtgs = new List<String>(); wtgs.add('0VSxx0000004C92GAE');
List<Appointment_Slots__c> slots = new List<Appointment_Slots__c>();
for (ServiceResource sr : srList){ //Find all territories he works in List<ServiceTerritoryMember> stms = [Select Id, ServiceTerritoryId from ServiceTerritoryMember where ServiceResourceId = :sr.Id]; List<String> territories = new List<String>(); for (ServiceTerritoryMember stm : stms){ territories.add(stm.ServiceTerritoryId); }
for (String wtg : wtgs){ lxscheduler.GetAppointmentCandidatesInput input = new lxscheduler.GetAppointmentCandidatesInputBuilder().setWorkTypeGroupId(wtg).setTerritoryIds(territories).setStartTime(System.now().format('yyyy-MM-dd\'T\'HH:mm:ssZ', 'America/New_York')).setEndTime(System.now().addDays(DUMP_DURATION).format('yyyy-MM-dd\'T\'HH:mm:ssZ', 'America/New_York')).setAccountId(ACCOUNT_ID).setSchedulingPolicyId(SCHEDULING_POLICY).setApiVersion(Double.valueOf('54.0')).build(); String response = lxscheduler.SchedulerResources.getAppointmentCandidates(input);
public void finish(Database.BatchableContext BC){ }
}
Create a Report using the Custom Object
Create a Salesforce report using this custom object. Refer – https://help.salesforce.com/s/articleView?id=sf.rd_reports_overview.htm&type=5 on how to create reports. Here is a sample matrix report we created which reports a Service resources total available hours at a Service location for an appointment topic / template – and this is how it looks.
Truncating records in custom Object
The example quoted above requires the Appointment Slots object to be empty in order to calculate the Service Resources availability. Ensure you truncate the data in the custom object before running the above batch job. Please refer this help article on Truncating Salesforce Obejcts https://help.salesforce.com/s/articleView?id=sf.dev_object_trunc.htm&type=5.
In the Spring ‘22 release, Scheduler introduced Shift Rostering Management which can be used to setup working hours for resources.
Shifts is a paradigm changing update to Salesforce Scheduler product. It eases pain of setting adhoc or non-recurring time slots for Service Resources to work. It also gives flexibility to work outside Service Territory’s operating hours.
One of the advantages of using Shifts is the ability to use Custom reports to report on working hours of a resource but that goes away if we allow resources to setup shifts beyond the working hours of a Territory. So here one would want to restrict the Service Resource to only create Shifts within the working hours of a Service Territory. This way, you could use create a custom report on the Shift record to understand the working hours of previous weeks or months.
Another scenario where this could be a need is when we have two types of Service Resources:
Service Resources who work within the constraints of their Service Territory’s Operating Hour
Service Resources who can go beyond their Service Territory’s Operating Hours. For eg: contractors (independent wealth managers) who can even take important appointments after working hours of the Service Territory (Branch)
Selectively restraining working hours of resources
First we need to define which resources can work beyond their branches working hours.
For this we are going to simply add a custom field to Service Resource of type boolean. Let’s call this field OvertimeEnabled for now.
If OvertimeEnabled is True then the Service Resource can work extra hours else they cannot.
Data Model
Next we need to set our Scheduling Policy such that we don’t restrict Shifts as per Service Territory’s Operating Hour by default. For this we will se up policy to use Shifts but uncheck the box ‘Use service territory’s operating hours with shifts’
Now we can add a trigger on Shift entity which runs before insert and update on the entity. In this trigger we will check validate that shift timings are within Branch’s Operating Hours only for resources who have OvertimeEnabled flag set to false.
Set<Shift> confirmedShifts = new Set<Shift>(); Set<String> territoryIds = new Set<String>(); //We will only run this validation for Shifts with Status Category = "Confirmed" AND Service Resource can work extended hours for(Shift shift: shifts) { if(shift.StatusCategory == 'Confirmed' && srIds.contains(shift.ServiceResourceId)) { confirmedShifts.add(shift); territoryIds.add(shift.ServiceTerritoryId); } }
if(confirmedShifts.size() > 0) { //Get all Service Territory IDs along with their OperatingHourId ServiceTerritory[] territoryIdsWithOperatingHours = [SELECT Id, OperatingHoursId FROM ServiceTerritory WHERE Id IN :territoryIds];
Set<String> operatingHourIds = new Set<String>(); for(ServiceTerritory st: territoryIdsWithOperatingHours) { //Service Territory may not have Operating Hour defined if(st.OperatingHoursId != null) { operatingHourIds.add(st.OperatingHoursId); } }
//Get Timeslot information for all Operating Hours got in previous step. We disregard all STM level concurrent timeslots (Shifts with MaxAppointments set to 1) TimeSlot[] timeSlots = [SELECT Id, DayOfWeek, StartTime, EndTime, OperatingHoursId FROM TimeSlot WHERE MaxAppointments = 1 AND OperatingHoursId IN :operatingHourIds];
//Complex data structure to store Working hours for all Service territories. We will store empty inner map in case Service Territory does not have Operating Hour defined Map<String, Map<String, TimeSlot>> serviceTerritoryWithTimeSlotsPerDay = new Map<String, Map<String, TimeSlot>>();
if(dayOfShiftStart != dayOfShiftEnd) { s.addError('Shift should be within Service Territory\'s Operating hours '); } else if(slots.get(dayOfShiftStart) == null || slots.get(dayOfShiftEnd) == null) { s.addError('Operating Hours for Service Territory not set up correctly'); }else if(s.StartTime.time() < slots.get(dayOfShiftStart).StartTime || s.EndTime.time() > slots.get(dayOfShiftEnd).EndTime) { //Eureka s.addError('Shift should be within Service Territory\'s Operating hours '); } } } }
P.S. For this code we have considered that Service Territory’s OH are in same timezone as shifts being created.
https://unofficialsf.com/wp-content/uploads/2022/09/largeUCSF-300x133.png00Akshayhttps://unofficialsf.com/wp-content/uploads/2022/09/largeUCSF-300x133.pngAkshay2022-02-09 04:38:062022-02-09 04:38:44From Ankit Srivastava: Restraining Shifts within the Service Territory’s Operating Hours
Businesses and Organizations which provide services have to provide a way for their customers to request appointments with the provider’s service resources. These experiences are expected to be easy to access without any kind of account creation and no authentication involved. Examples can be booking an appointment with a hair stylist at your favorite Salon, looking up for a dentist for a regular cleaning, reaching out to a financial advisor at a bank near your home.
To implement un-authenticated user experiences, the best way in Salesforce is to use the Guest user profile that comes with any Experience Sites (Earlier Communities). Experience sites can be built with public pages where end-users can access the application built using these guest user access. Refer this knowledge article for more information around Guest users – https://help.salesforce.com/s/articleView?id=000327969&type=1
From a high level, there are three design options to allow un-authenticated Guest users to access Scheduler features and functionality. These design patterns are as follows and illustrated below.
API level: this pattern offers the most flexibility but requires the most investment in time as everything is custom built. You will host and build your interface entirely on your (external to Salesforce) web site, and create a fully custom-developed user interface with custom code to accesses Scheduler on the back end via Scheduler REST APIs. If you are wondering about how all of this works in the context an UNAUTHENTICATED (or guest) user experience — that’s a great question! The Scheduler API can be accessed from an unauthenticated type perspective using the oAuth SAML bearer assertion flow, which uses connected app to request/grant an access token for that “guest user” (unauthenticated) type experience. You will use a connected app associated with a particular profile to grant that profile permissions to access what is needed. This is similar to the way Salesforce Experience Cloud Guest User leverages the Guest User Profile & Guest User to allow unauthenticated type access to Salesforce objects and the Scheduler Inbound flow.
Component Level: this is the option that we will be going over in this blog. Using this pattern you will leverage Salesforce Experience Cloud/ public sites along with out-of-the-box or custom cloned versions of pre-built Scheduler flows. Scheduler flows are flexible and can be customized in a number of ways, including extending to the Scheduler APIs from within the flow. With this design pattern you will access Scheduler flows from your (external to Salesforce) business web site and remain on your web site’s URL.
Page Level: this level of access offers a relatively quick time to market and can be achieved in a number of ways”:
Leveraging the end to end Salesforce footprint, offering Scheduler capability as part of an Experience Cloud community.
Hosting your Scheduler flow on a public-facing Salesforce Site, and pointing to that site from your site’s menu. You can register a customized domain within Salesforce to use with your site to make the user flow as seamless and branded as possible.
Most business prefer NOT to have too many websites / links and prefer to have everything hosted on their business websites. In such scenarios the appointment scheduling experience needs to be embedded into the business’s website. To implement such user experiences, components build in Salesforce application need to be used outside Salesforce. Salesforce offers a mechanism called LightningOut to provide such experiences.
Configuration steps to be executed
First and foremost thing is to have a Guest user Profile. Create a Digital Experience Site and make the Site available for public access. This can be enabled by navigating to the Site → Builder settings → General and Turning this feature ON.
Navigating to the ‘Guest User Profile’ by clicking on the Profile link and exploring the Object settings, you will notice that the System ONLY allows users to either CREATE or READ on most of the objects. Configure this ‘Guest User Profile’ as mentioned in the help article – https://help.salesforce.com/s/articleView?id=sf.ls_set_up_guest_users.htm&type=5
Create a Flow using the ‘Scheduler Scheduler Flow Template – Inbound New Guest Appointment’. Customize the flow as per your needs or use the template as is. OOTB template will create a lead and assign the service appointment against the lead.
Most of all, for everything to work perfectly, configuring the Scheduler application using the guided setup. Navigate to the hamburger icon to see all applications, look for ‘Salesforce Scheduler Setup Assistant’ and complete the configuration steps
Understanding the Setup
The appointment time slots are determined based on your Org Setup followed by Salesforce Scheduler configurations and data setup. Ensure you have validated all these and setup configurations and data correctly
Organization Setup-
Verify the Organization Wide Defaults for external access
For the below set of objects either set them to Public Read Only
Work Type
Work Type Group
Service Resource
Service Territory
User
Or extend access to the records by Creating sharing rules for guest users (Determine which records to expose to your Community’s guests and decide on a right sharing method – group based, role based or criteria-based record-sharing rules to match your business processes)
NOTE: Without defining sharing rules for guests, unauthenticated users can’t access the records required for the Inbound New Guest Appointment flow with Embedded Services hosted in a community or external site.
Scheduler Application Setup – Ensure you have setup data for these objects
What services are offered by the Organization
WorkTypeGroup
WorkType
WorkTypeGroupMember
What locations and what times are these services Offered
ServiceTerritory
ServiceTerritoryWorkType
OperatingHours
TimeSlot
AppointmentTopicTimeSlot
What skills are required to provide these services
Skill
SkillRequirement
Who is providing these services and at what times they are NOT available
ServiceResource (A user or an Asset)
ServiceResourceSkill
ServiceTerritoryMember
ResourceAbsence
Guest User Setup
Make sure you set the default timezone for the guest user profile for the Scheduler
Note: Additional customization is required to support the timezone mapping for guest appointments which can be passed via APIs if out of the box flow templates do not support use cases.
To allow a guest to schedule appointments, update the Guest User Profile to allow guests users to
Run Flows
Edit Events
Optionally, configure field level security for the Asset field on the Service Resource object
The Asset field becomes available only when your org has an Asset Scheduling license enabled and provisioned in the instance
Grant Edit permission to profiles that will book appointments, including guest profiles
Add the Asset field to the page layout for the Service Resource object
External Website – Guest User Flow
As mentioned in the preface, to expose lightning components out of Salesforce, we will explore the LightningOut feature. External websites can be your business websites, and adding an experience for customers to request and schedule appointments we need to add a Lightning component to the external website.
Steps involved here
Generate web-based html code that will include the details of the Experience site and the LightningOut component which launches the Guest user Flow. Here is a sample code and refer the demo video to know what changes to make to this sample code so that it works for you.
<head></head> <body> <script src=”https://sandbox-234ss-cs1.cs1.stmfa.stm.force.com/lightning/lightning.out.js”></script> <script> $Lightning.use(“runtime_appointmentbooking:lightningOutGuest”, // name of the Lightning app function() { $Lightning.createComponent( “lightning:flow”, // top-level component of your app { }, // attributes to set on the component when created “lightningLocator”, // the DOM location to insert the component function(cmp) { console.log(‘Hi from callback’);// callback when component is created and active on the page cmp.startFlow(‘runtime_appointmentbooking__Guest_Flow‘); } ); }, ‘https://sandbox-234ss-cs1.cs1.stmfa.stm.force.com’ // Community endpoint ); </script>
<div id=”lightningLocator”> <p>Lightning Component mentioned in the Script is invoked from here</p> </div> </body>
Work with your company’s external website administrators to embed the above component into your company’s external website where you plan to have it.
Get the details of the page like URL where this is hosted, this will be required to let the external traffic into salesforce in the next step
Setup CORS
Typically this to whitelist the Origin URLs, so that Salesforce can allow these web browsers to communicate with Salesforce
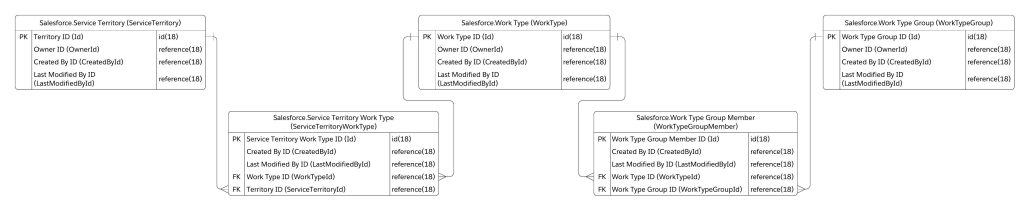
In Salesforce Scheduler, Work Type is an entity where we store information about the skeleton of an invite. It’s just a template we can use to define meeting duration, block time before/after, timeframe start/end.
In the provided flow templates, work type selection happens with the help of a work type group. You first select a work type group, then a territory, and based on these two combinations; a work type is chosen automatically. Well, not automatically! The internal logic determines work type based on linking these three objects, as shown below ERD diagram.
Since the Scheduler data model only allows to map one work type to one work type group, there can always be only one work type for the selection of work type group and service territory.
This one-to-one mapping poses a limitation for a requirement where we want to define different duration based on customers needs. The good news is, there is a way to overcome this. This blog will discuss one of the approaches to set up Scheduler data to achieve dynamic duration. The basic premise is to duplicate the work type group and work type records based on durations.
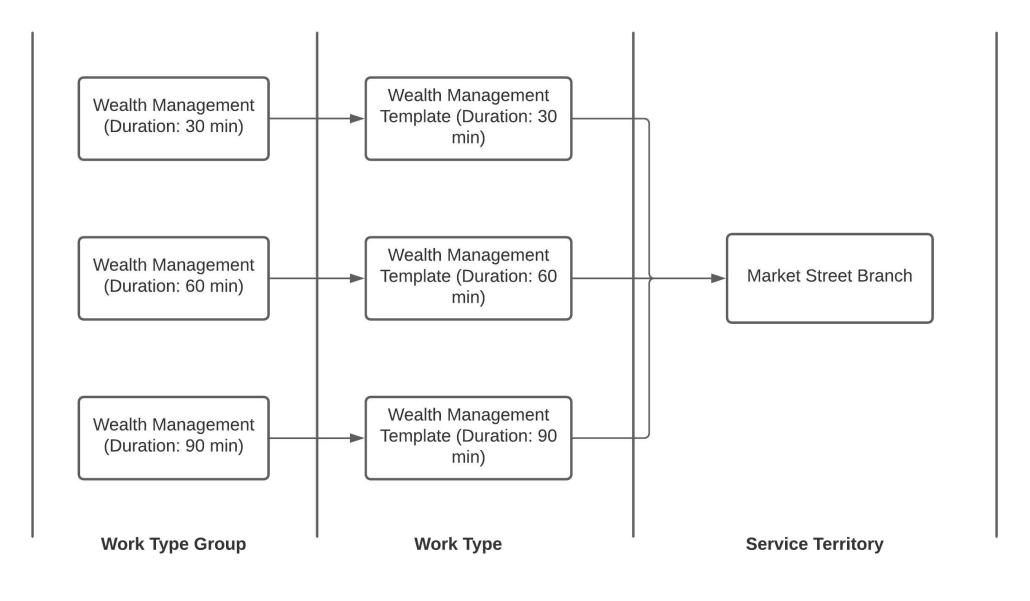
Consider a scenario where you have a premier customer and a regular customer with whom you want to set up a meeting about ‘Wealth Management’. In this scenario, let’s consider that an exclusive customer always needs an appointment with a longer duration, say 90 minutes. Other customers may need a meeting with the same topic for 30/60 minutes. We can store this information on the work type group record for now. The data setup may look something like this:
Once the data is mapped correctly via junction objects in the above format, we can then carve out the following logic:
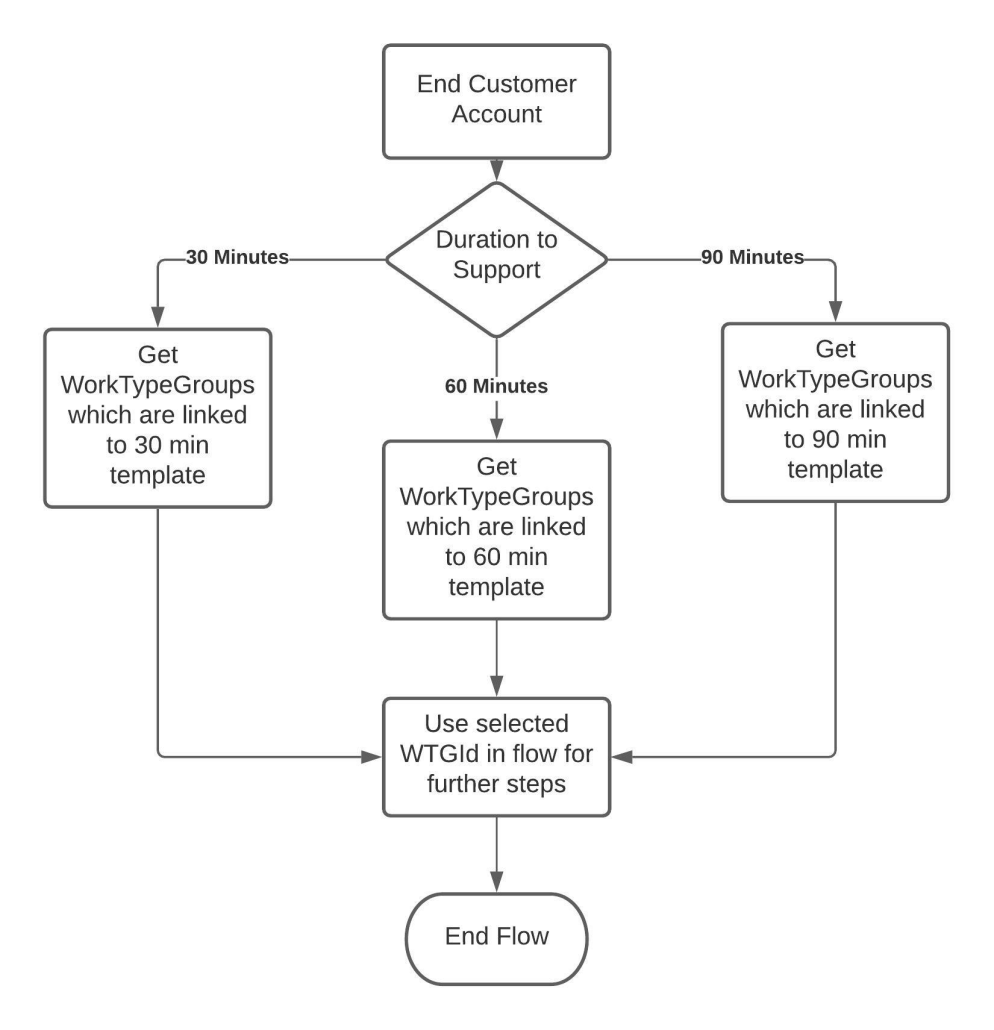
Following is the working flow with different duration:
As you can see based on work type group selection, the flow selects the corresponding work type and duration gets adjusted accordingly.
You may ask this may confuse the end-user! Yes, looking at the same topic titles 3 times may confuse some end users! For this, you can either build your own component to display only the appointment topic and duration to choose. This approach may sound cleaner, but there is one more solution coming up in Spring 22 release. That feature allows you to filter work type groups shown on the screen by passing record ids to the component. We will cover more on that in another blog!
https://unofficialsf.com/wp-content/uploads/2022/09/largeUCSF-300x133.png00Akshayhttps://unofficialsf.com/wp-content/uploads/2022/09/largeUCSF-300x133.pngAkshay2022-01-18 01:46:252022-01-18 01:46:58From Shantinath Patil: Appointments with Dynamic Duration
In Spring 22, the Salesforce scheduler has given a new feature: enabling rendering HTML tags in Service Resource cards. This new feature has opened up many possibilities to show additional information about the resource.
Peer reviews and ratings are common decision making guides for customers today to help them pick among
Imagine you were to add the capabilities of a feedback management software (eg: Salesforce Feedback management) to Salesforce Scheduler, you could ask your customers to provide ratings for their appointments and then use those ratings to guide future customers.
With Feedback Management you can not only use survey invitation rules to distribute surveys when an appointment is closed but also use the data mapper feature to easily map the rating from the survey to any object in Salesforce, in this case to the Service Appointment object.
Once you have captured the rating data for your resources, there are several possibilities
Help the consumer decide between resources
Help Territory Mgr evaluate resources & branch
Give preferential treatment to premium customers by only showing them higher rated resources
Use Salesforce Einstein’s Machine Learning capabilities to predict who would be the best resource for this prospect based on past ratings giving by similar prospects eg: Someone from the South might prefer a resource from the south, or someone from an age group would prefer certain Resources.
For this blog, we’re going to focus on the Salesforce Scheduler changes you need to make to get the above capabilities going.
let’s take an example of adding a rating to the service resource. Please follow the below steps to show the shining rating stars on the resource card:
1. Fields on Service Resource
To show the rating, we need to create a formula field on Service Resource to render rating stars in cards. We will add this field to the compact layout to show up in the out of the box component. However, to populate value in this field, we need two more fields on Service Resource: to capture the average rating for each of the appointments he served and the number of appointments.
Field Label
Field API Name
Data Type
Comments
Rating
Rating__c
Number(1,0)
Number field to store rating between 1-5
Review Count
Review_Count__c
Number(18,0)
Number field to store number of reviews this service resource have received
Star Rating
Star_Rating__c
Formula(Text)
Formula field which will show ratings based on above 2 fields
We will have to create a field on Service Appointment to capture the sentiment of a customer based on how the appointment went. We can populate this value from a Survey, which will be sent out once an appointment is complete.
Field Label
Field API Name
Data Type
Comments
Rating
Rating__c
Number(1,0)
Number field to store rating between 1-5
3. Propagate value from Service Appointment to Service Resource
Now that we have fields on Service Resource and Service Appointment, we will have to process the aggregate reviews. As shown in the below data model diagram, we can traverse through Assigned Resource and populate this value to Service Resource.
The review aggregator formula that we can use is:
((Current Average Rating * Total Reviews) + New Rating) / (Total Reviews+ 1)
Using this formula, we can write a trigger on Service Appointment. As soon as we get a rating from Service Appointment, we will aggregate the review and update its corresponding Service Resource. A sample trigger code is given below:
trigger UpdateSurveyRating on ServiceAppointment (after insert, after update) {