For those that were unable to make our presentation at Dreamforce, you can find the content here! The slide deck that we presented is below – for each of the 5 tips, there are posts on this website that dive into more details, however first, we announced that ‘Enhanced Omni-Channel‘ is now GA! Check out the link for more details.
This post is to describe how and when to setup and configure Status-Based capacity in Salesforce, when using Omni-Channel routing, including some common pitfalls and how to avoid them.
One of the big issues we hear a lot is that admins will configure agents to have really high capacity numbers, so that they are always busy with cases that are in progress – maybe a capacity as high as 100 cases at once. This works OK initially, but then an agent goes on leave for a couple of weeks and when they come back online they get 100 brand new cases right away they need to action – PANIC!
I’ll talk about how to avoid this problem down below, but first – let’s start with the basics.
What is status-based capacity?
Within the Omni-Channel setup you have two options for capacity management – ‘Tab-based’ or ‘Status-based’. This gets set at the ‘Service Channel’ level, so for each object type that is routed in Omni-Channel, you can use a different model (e.g. VoiceCall versus MessagingSession).
This influences how and when work items are consuming an Omni-Channel users capacity, and therefore if and when they receive new work.
So what’s the difference? I’ll start with Tab-based, this is the default capacity model and the simplest. When an Omni-Channel user accepts a piece of work, that work is opened in a new console tab. That work will continue to consume capacity until the user closes that tab, or logs out of Omni-Channel.
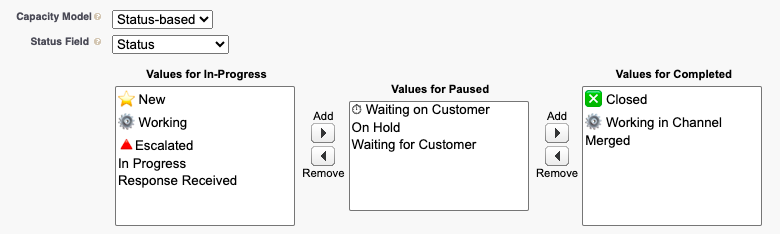
Status-based works differently – capacity consumption is based on a the value of a picklist field on the record that is being routed. In the Channel Settings, the admin will map which picklist field to use on the object and then map each of that picklists’ values to an Omni-Channel status – either ‘In-Progress’, ‘Completed’ or (new in Winter ’24) ‘Paused’. When the appropriate field on the record is updated, the Omni-Channel status may change, and result in capacity being released. For example, in the configuration below, if the ‘Status’ field on this record was updated from ‘Working’ to ‘Waiting for Customer’, capacity will be released as the work will move to a ‘Paused’ state – similarly if it moves back to ‘Working’ it will start consuming capacity again.
When to use status-based capacity?
Status-based capacity is best suited to long running asynchronous work, where the work may pause and resume throughout it’s life cycle – perhaps you need to wait on the customer to get back to you or a back office team to respond with more information – these are perfect candidates for Status-based capacity. Most often, this is an object like the Case or Lead object.
Today, unfortunately it isn’t supported on the Chat, Voice or Messaging channels, but we’re working on fixing those last two, stay tuned!
How should I configure status-based capacity?
I’ve sold you on status-based capacity – great!! The basics you can find in our help docs, but in this post I want to go into more details of the ins and outs of this.
What we have often found, is that admins will only map the ‘Completed’ status to fields that map to the work being fully complete, rather than also when the agent is unable to do more work on it right now, e.g. Waiting on a customer. To work around this, they will set the agents’ capacity to a really high number – which works OK initially, until a new agent or an agent who was on holiday for a while comes back and they get assigned 50 work items at once! Oh no!!
To avoid this, admins should always ensure that the capacity matches what a user is actually capable of handling at any one moment, so more like 3 or 4 cases at once for instance. There are then 2 more steps: at once.
Map or create any mid-states for the work, where work is not actively happening on the work right now, but will should resume later, to a ‘Paused’ or ‘Completed’ status, to ensure work in these states do not consume capacity
Ensure that users are updating the records appropriately to release capacity, or ideally use automation to update the record as appropriate for the user.
When to use Paused or Completed? What’s the difference?
In Winter ’24 we enhanced Status-based capacity to add a new ‘Paused’ status. The purpose of this is to give users visibility into work that they currently own, and will need to resume at some point. The purpose of this is to give us
The difference between paused and completed is two-fold – the first part is the visibility mentioned above, and being able to see their paused work in the Agent Inbox. The second part is related to when the work resumes – paused work will always go back to the record owner, regardless of their current status or capacity, meaning they could be offline when that work resumes. Work that resumes from the ‘Completed’ state, can go through some extra logic to determine who the work should be assigned to – for instance it can check availability or capacity and return it to the original queue if the record owner isn’t available right now.
Which you want to use are up to you and your business case – is a quick response more important? Then use Completed. Is a consistent owner and the customer relationship more important ? Then use Paused. Both work great for different use cases.
Just now there is no easy way to initially ‘Paused’, and then change to the ‘Completed’ behavior (e.g. at the end of your shift or before going on leave) – but a way to ‘Leave’ the work, or relinquish ownership will be coming soon (goal for Spring ’24!) – stay tuned!
Are there any downsides? What’s the catch?
Once you have status-based capacity configured correctly, there are very few downsides, however there are one or two things to be aware of:
You are now more dependent on agents to end their work and look after their workload a lot more, so they will need to stay on top of their work and backlog to update it as appropriate (or add automation to auto-close work as needed).
The ‘Active Time’ field on the AgentWork record doesn’t get recorded – this is on our backlog to resolve, so keep a lookout each release.
Messaging and Voice don’t support this capacity model today (yet!)
We will continue to invest in enhancing Status-based capacity, but don’t worry – Tab-based isn’t going anywhere!
I hope you found this post useful and please let me know in the comments if you have any questions!
https://unofficialsf.com/wp-content/uploads/2022/09/largeUCSF-300x133.png00Craig Patersonhttps://unofficialsf.com/wp-content/uploads/2022/09/largeUCSF-300x133.pngCraig Paterson2023-09-12 11:53:072023-09-12 12:17:36Best practices for Status-Based Capacity with Omni-Channel
Maybe you’ve heard about “Enhanced Omni-Channel” in our release announcements, or maybe saw a great new feature in a demo that you don’t have access to and want to learn more. You are in the right place! Let’s answer some common questions about Enhanced Omni-Channel, and get you excited to upgrade to a whole new world!
Why does Enhanced Omni-Channel even exist? What’s wrong with the previous platform?
First – the boring stuff! In technical terms, Enhanced Omni-Channel is running on a whole new backend infrastructure, that is built for increased horizontal scale on Hyperforce. The existing platform has served us well until now and will continue to be supported for the foreseeable future, but as we look to scale & streamline our applications, a new one was required.
What do I get with Enhanced Omni-Channel?
Enhanced Omni-Channel is available to all of our customers as part of the Winter ’24 release, and at launch includes:
More detail on these shortly, however the other important thing to note is that all future innovation on Omni-Channel will only be available to customers on Enhanced Omni-Channel – so if you want any routing, agent or supervisor experience improvements then you will want to upgrade as soon as you can!
What is the Enhanced Agent Experience?
I’m so glad you asked! In Winter ’24, we’re excited to bring a new Agent Inbox experience to our Omni-Channel users. This new experience is optimized for asynchronous and long running work, allowing agents to see all the work on their plate in a single Inbox view. This gives agents much more visibility into their backlog and is much easier to use – and what’s more, this is just the beginning of the enhancements to their experience!
Paused Work
Those with keen eyes may have noticed something a bit strange in the screen shot – what does that ‘Paused’ badge mean? As part of this upgrade, we have improved the Status Based Capacity setup, to add a ‘Paused’ status alongside the previous ‘In-Progress’ and ‘Completed’ statuses for work. This means customers can now define situations where the record owner retains ownership and visibility of work in their Inbox, but the work doesn’t consume their capacity.
Once there is work to be done, the user is notified via the blue dot shown above – this is just the first use case of this notification, and we’re confident that users are going to love it!
These are just the beginning of an improved agent experience – more big changes are coming soon, stay tuned!
What is the Enhanced Supervisor Experience?
We haven’t forgotten about our Supervisors! Omni-Supervisor is great, but it has lacked a high level summary view, where you can see the health of your operations in one place – that is until now! The first feature available for Enhanced Supervisors is a new Wallboard view allows you to quickly and visually get a quick pulse check of your team in real time, allowing easier and faster identification of any actions that may need to be taken.
Check wait times, queue or skill backlog sizes, handle times, agent status & agent capacity all at a glance, and filter to see your most important queues or skill combinations.
What’s the catch? Do I lose anything when I upgrade to Enhanced Omni-Channel?
Sounding too good to be true? For most Omni-Channel customers, you will lose absolutely nothing, and all features that are available today will continue to work on Enhanced Omni-Channel with no changes necessary after upgrading – agents just need to log out and back into Omni-Channel. There is 1 exception to this – the ‘Transfer Skills’ button that shows up on the Omni-Channel widget isn’t present on the Enhanced version – if you are using this button, we suggest creating a Flow on the relevant record that handles the transfers instead. You can find an example in this Quip document, including a link to install the Flow and post installation instructions.
For any customers using our Chat channel (formerly known as LiveAgent), or any ‘Standard’ Messaging channels (such as SMS or WhatsApp) will need to upgrade to their ‘Enhanced’ equivalents before upgrading to Enhanced Omni-Channel, as these channels will stop working after the upgrade.
It couldn’t be simpler! Navigate to ‘Omni-Channel Settings’, and click the toggle on the right hand side. That will walk you through accepting the required terms and conditions, before enabling Enhanced Omni-Channel. After that, with a quick logout of Omni Channel and a screen refresh, the new Agent & Supervisor experiences will show up!
Here is a quick video that provides an overview of Enhanced Omni-Channel, and will show you the upgrade process
I hope this post answers the question of what is Enhanced Omni-Channel and motivates you to turn it on. We have an amazing roadmap of features that we will continue to deliver on the Enhanced Omni platform – stay tuned and keep logging your ideas on the Ideas Exchange!
https://unofficialsf.com/wp-content/uploads/2022/09/largeUCSF-300x133.png00Craig Patersonhttps://unofficialsf.com/wp-content/uploads/2022/09/largeUCSF-300x133.pngCraig Paterson2023-09-06 05:42:442025-06-25 11:23:33What is Enhanced Omni-Channel?
With the advent of System-context screen flows I can’t help but think of the famous phrase ‘With great power comes great responsibility’. When running screen flows in system context, you could inadvertently grant Read or Edit access to a critical system field to the wrong audience. Let’s say you wanted to do some cool stuff like in Jen Lee’s recent post about Community User Management, and you want to ensure the person running the flow has the ‘Manage External User’ permission. Her flow does this check using a custom permission, which is totally fine, this just checks the system permissions directly.
All of that is possible with some straightforward SOQL queries against the Permission Set Assignment object. You may or may not be aware, but the PermissionSet object actually contains Profile permissions as well so it’s a one-stop shop for getting Field and System permissions!
Run an action to check a field permission
The following example will run you through a VERY basic scenario where a Flow presents a screen to update a given field and the flow is running in System context – God mode.
We let the user pick an Account Rating in a basic Flow screen with a picklist radio button
We run the ExecuteSOQL action to check if the running user has ‘Edit’ permission for the Account Rating field.
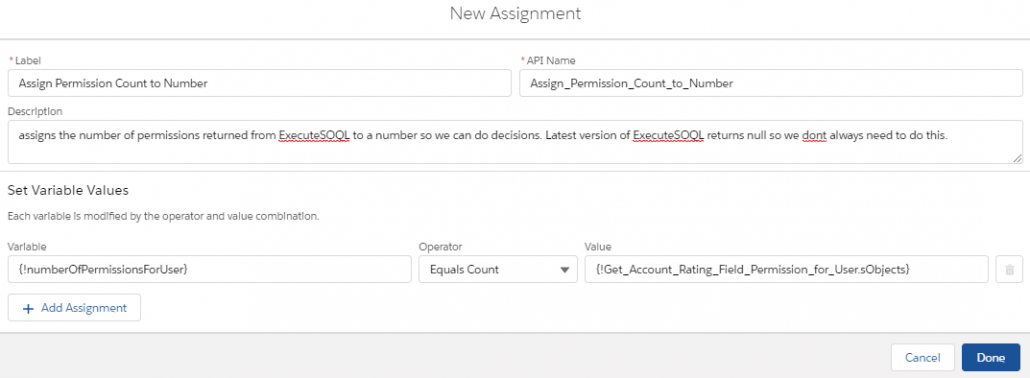
For older versions of ExecuteSOQL that return an ’empty’ collection we assign the count of the results to a number field
We then do a decision to see if the number of permissions assigned to the user is > 0.
We then either show a screen that says you cant edit it or we move on with updating the field.
Flow Overview
Most of you can probably handle the beginning and end – so I’ll provide some more color on the middle part that does the permission checking.
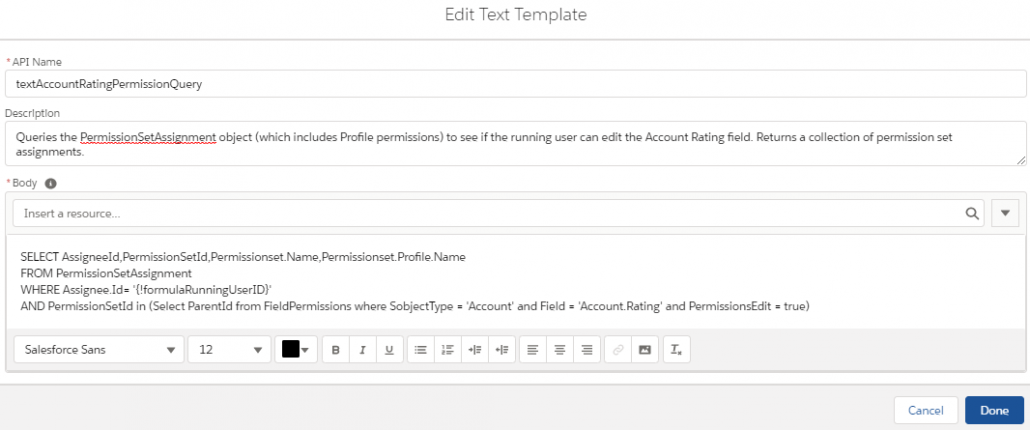
You’ll want to construct your query using a Plain Text text template variable:
SELECT AssigneeId,PermissionSetId,Permissionset.Name,Permissionset.Profile.Name FROM PermissionSetAssignment WHERE Assignee.Id= ‘{!formulaRunningUserID}’ AND PermissionSetId in (Select ParentId from FieldPermissions where SobjectType = ‘Account’ and Field = ‘Account.Rating’ and PermissionsEdit = true)
*WARNING* If you make any edits to the text template variable, a Flow bug will revert the template back to rich text and it will break the action! Make sure you revert it to Plain Text after every edit.
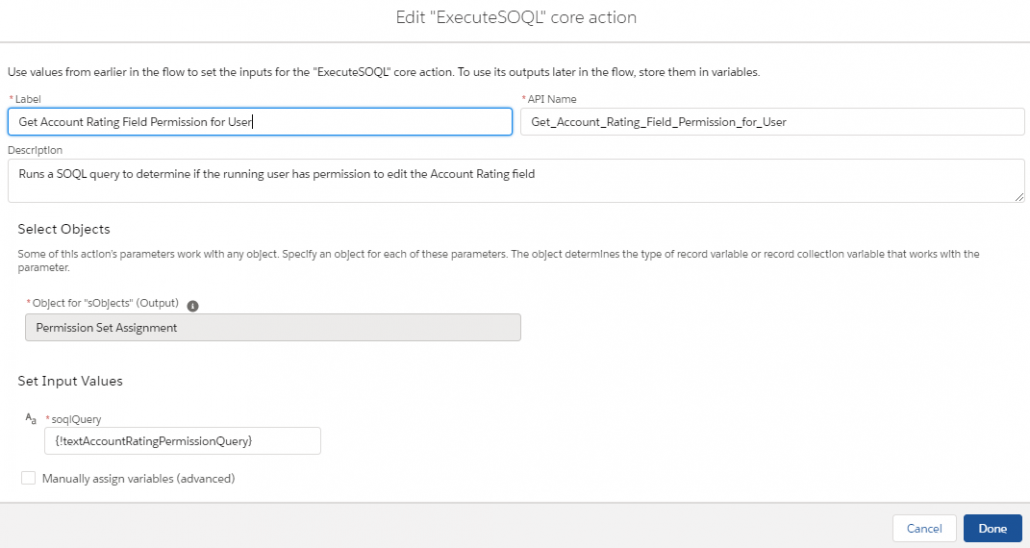
Next up is to make the ExecuteSOQL action:
Here’s an example result from the action above that returns the permission granted by the System Admin profile when run as myself.
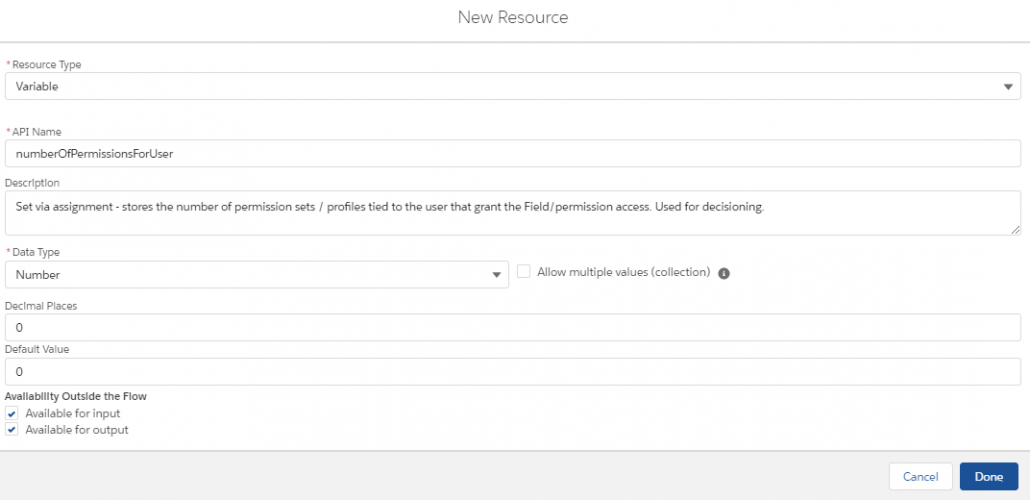
(For older versions of ExecuteSOQL only) You’ll then want to assign the results to a number since older versions of ExecuteSOQL return an empty collection if no results are found. Make sure you set the default value to 0 when making the variable.
Use an ISNULL check if you’re using the latest and greatest.
Create your decision and you’re done!
Checking multiple fields
You could of course extend this to multiple fields in one query by modifying the SOQL query, for example:
SELECT AssigneeId,PermissionSetId,Permissionset.Name,Permissionset.Profile.Name FROM PermissionSetAssignment WHERE Assignee.Id= ‘0051I000000UB4LQAW’ AND PermissionSetId in (Select ParentId from FieldPermissions where SobjectType = ‘Account’ and Field in (‘Account.Rating’,’Account.Type’) and PermissionsEdit = true)
System permission checks
You can also check for specific system permissions! Let’s say you wanted a Flow embedded on the Case layout that manages the Contact’s community user record. The query below could be used to check if the user handling the case has permissions to manage the external user account:
SELECT AssigneeId,PermissionSetId,Permissionset.Name,Permissionset.Profile.Name FROM PermissionSetAssignment WHERE Assignee.Id= ‘{!formulaRunningUserId}’ AND PermissionSetId in (Select Id from PermissionSet where PermissionsManagePartners = true)
https://unofficialsf.com/wp-content/uploads/2020/06/FlowOverview.png497955Adam Whitehttps://unofficialsf.com/wp-content/uploads/2022/09/largeUCSF-300x133.pngAdam White2020-06-09 10:00:592020-06-09 10:19:31Tutorial: Check field and system permissions in screen flows when using System Context using ExecuteSOQL
#1: Update Salesforce with Data From Different Quip Docs
In this example, Quip docs have been created for different Salesforce contacts. One scenario where this can be useful is when an enterprise has employees that don’t have Salesforce licenses. If each of those employees has a Quip document and a Contact representing them, the documents can be used to display data from Salesforce and collect data from the employees. (Note that this uses the new Spring ’19 Flow Builder):
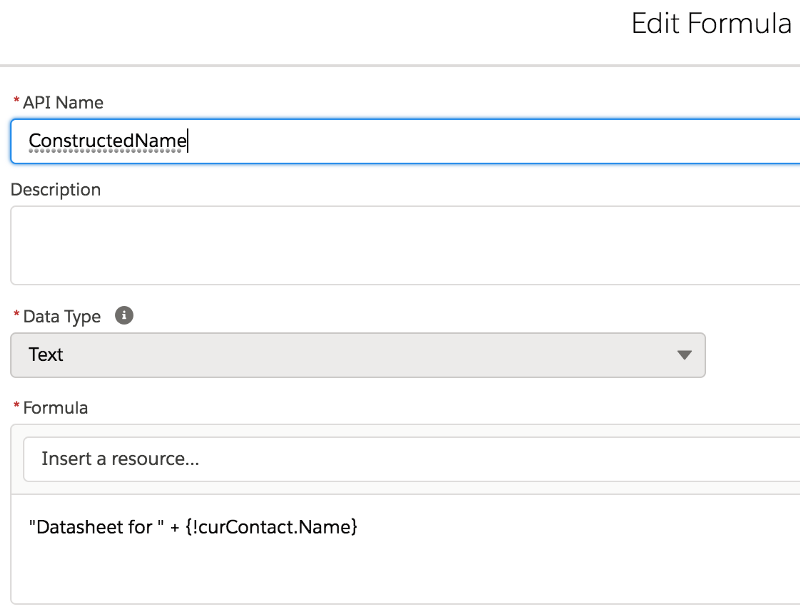
A key element of this is that the name of each quip document is formed using a Flow formula:
To configure the Get Quip Sheet Data flow action, we do the following:
Provide the name of the corresponding Quip doc. Start with a contact name, generate the ConstructedName using that formula, and pass it in to the flow action:
2) For each piece of data that we want to extract from the quip doc, we reference it by specifying the label value of the cell to its immediate left. This is one of three ways you can specify a specific cell value:
3) Finally, map the retrieved values from the Quip document to flow storage variables so you can use them later in the flow:
Side Discussion 1: Error Messags
Here I’ve created variables to map the Error Message and Is Success outputs. You don’t have to actually use these variables, but if you take the time to define them, then any error messages you get will show up in the debugger like this:
If I try to immediately update the Contact as soon as I get the data out of the Quip document like this:
Side Discussion 2: Mixing Callouts and Transactions
In my first attempt at setting up the flow, it looked like this:
When I ran the flow in the debugger, though, I got this error:
I had forgotten that you can’t use a callout (here, the flow action is “calling out” from Salesforce to the quip api endpoint) in the middle of an open Salesforce transaction. When flow loops, Salesforce prepares a single transaction so it can commit all of the loops with one database action, in the name of resource conservation.
I needed to restructure my flow and got a key hint from a brand new tooltip:
The tooltips in Flow Builder are completely overhauled and have a lot of extremely timely tips; they’re not just simple definitions.
The resulting flow uses a collection operator. Each time we go through the loop, the modified contact is added to a new “updatedContacts” collection variable that can later be used to carry out the update.
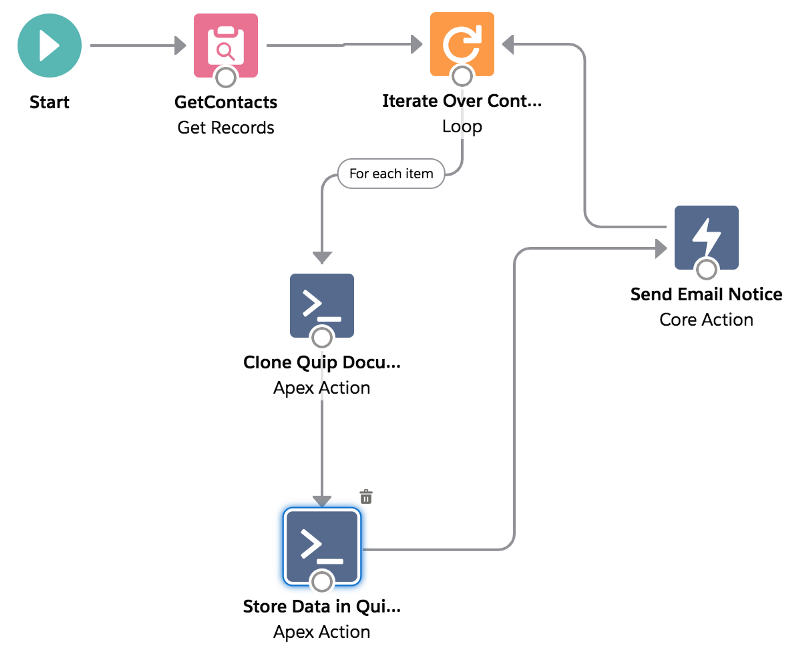
#2 Clone a Quip Template and Update the Resulting Quip Sheets with Salesforce Data
Now let’s change direction and go From Salesforce To Quip. The use case is this: Given a set of Contacts, generate a custom Quip sheet for each one and fill it with Contact data. Then email the URL to each of the Contacts.
This might be useful if you want to generate shareable reports for your customers using data stored in Salesforce.
This flow features 2 of the new Quip Flow Actions:
Clone Quip Document is a simple action that duplicates a named document. Store Data in Quip Document does the heavy lifting of inserting flow data into specific Quip cells.
We create a Quip document to act as our template:
The Clone action generates a new quip sheet based on this template, and give it a name using a formula technique like the one described above.
The Store Data in Quip action lets you specify up to ten pieces of data to write to 10 cells. You can use several approaches to specify a target cell:
Specify a label and indicate that the target cell is immediately to the right of that label (that’s what we’re doing)
Specify a label and indicate that the target cell is immediately below that label
Specify both a column label and a row label, in which case the target cell is the intersection of the column and row. This is great for updating a single cell in a table.
Specify a cell by its absolute address (for example: B2)
The flow produces sheets like this:
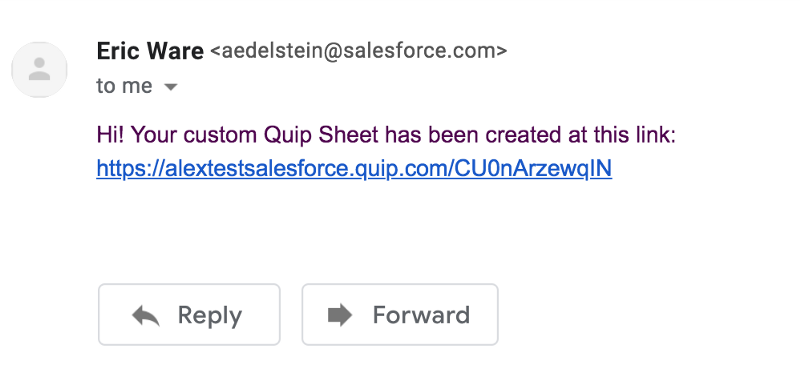
and generates emails like this:
Row Operations
You can use the AddRowToQuipSheet action to add a row to a sheet using data from Salesforce or update an existing row.
Here’s an example of an Add:
And here’s a sample showing an Update:
Walkthroughs of these are provided in the video (see link at the top of this article.)
Quip User Management with Flow
There are also Flow Actions to Add a User to a Folder and Remove them from a Folder so you can add quip folder activation to your onboarding flows.
Quip Document Management with Flow
There are also Flow Actions to Rename a Quip Folder and Add a Quip Document to a Folder to make it possible to automate management of your Quip data.
https://unofficialsf.com/wp-content/uploads/2022/09/largeUCSF-300x133.png00Alex Edelsteinhttps://unofficialsf.com/wp-content/uploads/2022/09/largeUCSF-300x133.pngAlex Edelstein2018-12-28 04:23:462019-05-23 07:55:32Introduction: Using Salesforce Flow With Quip
Some excellent screen components are starting to get published as Salesforce Labs packages on the new Flow Solutions section of AppExchange. These require no code at all.
Swipey is essentially a Multi-Select Picklist control with a fun, visual swipe-left, swipe-right usage model:
Flow Magic provides a way to create picklists that use images and icons. It’s a Visual Picker builder:
https://unofficialsf.com/wp-content/uploads/2022/09/largeUCSF-300x133.png00Alex Edelsteinhttps://unofficialsf.com/wp-content/uploads/2022/09/largeUCSF-300x133.pngAlex Edelstein2018-10-13 21:27:582019-02-03 02:24:37New Flow Screen Components on the AppExchange: Swipey and Flow Magic
https://unofficialsf.com/wp-content/uploads/2022/09/largeUCSF-300x133.png00Alex Edelsteinhttps://unofficialsf.com/wp-content/uploads/2022/09/largeUCSF-300x133.pngAlex Edelstein2018-10-13 21:14:232019-10-24 22:23:49Using Flow with Chat, Bots and SMS via Twilio and Authy
The other day I built a flow action that generates random numbers. While doing it, I recorded the process, because we don’t have a lot of tutorial material on how you can turn a chunk of useful Apex code into a nice, declarative flow action.
For a general introduction to the invocable action interface, check this out.
https://unofficialsf.com/wp-content/uploads/2022/09/largeUCSF-300x133.png00Alex Edelsteinhttps://unofficialsf.com/wp-content/uploads/2022/09/largeUCSF-300x133.pngAlex Edelstein2018-10-07 18:33:302019-02-03 02:24:37How to Build a Flow Action with Apex