As a Salesforce administrator, you’re always looking for ways to make your org smarter and more efficient. Agentforce has already transformed how you handle sales and service inquiries, but what if your AI agents could access external information from any API to add agentic automation to any task? And what if you could set this up without writing a single line of code?
In this guide, I’ll walk you through how to integrate a mock credit check API with Agentforce using External Services. While we’re using a simulated credit service for this example (no real credit checks are performed), the integration process is the same as how you would connect to any external API that your company already uses. Even better, you can set this up on your own at no cost to follow along.
What We’re Building: Simulating an AI-Powered Credit Assistant
Before diving into the how-to, let’s clarify what we’ll be covering:
An Agentforce Topic configuration that demonstrates how to connect to external APIs
Supporting configurations of the Salesforce Platform that enable connectivity
A realistic simulation of pulling credit information using a customer’s unique identifier
All of this without writing custom code, using the same process you’d follow with real APIs!
The Magic Behind It: External Services + Agent Actions
The secret to this integration is combining two powerful Salesforce features:
External Services allow you to connect to external APIs without code,
Agentforce Agent Actions enables AI agents to use those external API capabilities.
When combined, these features let your AI agents access and use external assets just like a human agent or Flow automation would, but with better ease-of-use powered by natural language. Whether connecting to our mock credit API or your organization’s actual financial back-ends, fulfillment systems, or third-party APIs, the process remains the same.
Step-by-Step Setup
Step 1: Set Up a Mock API
For this demonstration, we’ll use a free mock API service called Beeceptor. This simulates how a real API would work without needing actual financial data:
Download the OpenAPI spec from this GitHub gist. If you’re familiar with GitHub, you’ll note the option to download all three files at once. (We’ll need the other two for a later step.)
Use this option to create a mock server from the OpenAPI spec. You’ll upload the file you downloaded, then click the primary button to start the generation process.
Click the button that appears at the end of the import process to navigate to the details of the new endpoint. If you created a free account, you can also navigate to Your Endpoints in the dropdown at the upper right (showing your name). Either way, you’ll want to drill into the details of the mock server.
Next, we’ll create intelligent mocking rules to simulate realistic responses. Click Mocking Rules, then click Create New Rule to begin. We’ll need one rule for each method in our mock API: GetCreditScore and GetCreditHistory. Match the configuration for each method with the screenshot below. Note that we’ll make clever use of Beeceptor’s features to generate realistic results, so you’ll need this syntax for the Response body of the credit score, and this syntax for the Response body of the credit history. Copy the syntax from GitHub to save yourself time and hassle.
Step 2: Connect Your API to Salesforce with External Services
Now, we’ll connect Salesforce to the mock API. To do this, we need a Named Credential to hold the URL, and an External Credential to capture the authentication needed to access this URL. (The two are linked.) We’ll keep this simple by using the No Authentication option, since no authentication is actually required to use the Beeceptor endpoint. Please note that Beeceptor will only accept a limited amount of requests per day without a paid account.
In Setup, go to Security > Named Credentials
Click the External Credentials subtab and click New.
Fill in the details and click Save:
Label: No Auth for Credit Check
Name: no_auth_for_credit_check
Authentication Protocol: No Authentication
Scroll down to Principals and click New:
Fill in no_auth as the Parameter Name and click Save.
Since Trust is Salesforce’s #1 value, the Named Credential subsystem also requires explicit permissions granted to users to make callouts using a given credential. This is represented by the Principal on the External Credential, and we’ll link it to the user who will actually be using the Agent. The Principal holds information like a password or API key, though there’s no such sensitive values to worry about in this example.
With that understanding, let’s grant ourselves access to the new Principal.
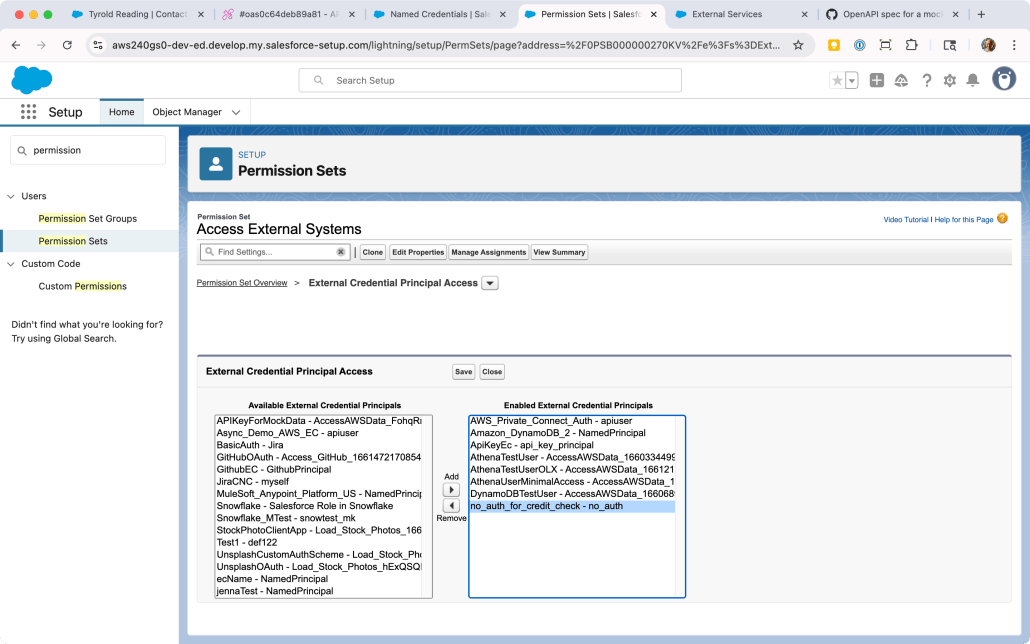
In Setup, go to Users > Permission Sets.
Locate a Permission Set already assigned to your user, or create a new one. Click into it, then scroll down to External Credential Principal Access and click that link.
You’ll be looking at a list of Principals that the users with this Permission Set can use in a callout. There may be no items in this list; either way, click Edit so we can add the new Principal.
The list on the left-hand side will contain all the External Credential Principals in the org. Find the one we just created (no_auth_for_credit_check - no_auth) and click the right arrow under Add to add it to the list. (Refer to the screenshot below for guidance.) Click Save.
To recap, what we’ve done is allow one or more users to make a callout using this credential. This is similar to how you need to grant access to Objects, Reports, Apex Classes, and other constructs in Salesforce.
You may have noticed we didn’t capture the URL in Salesforce yet. Let’s do that now by creating the Named Credential.
In Setup, go to Security > Named Credentials
On the Named Credentials subtab, click New.
Fill in the details and click Save:
Label: Credit Check API
Name: credit_check_api
URL: Paste in the URL of the mock API from Beeceptor.
Scroll down to Principals and click New:
Fill in no_auth as the Parameter Name and click Save.
Finally! We now have the Named Credential configured with both the correct URL and the correct authentication options, and we’ve granted ourselves access to use it. With that in place, we can register the mock API as an External Service. This will enable us to use the API methods as Agent Actions.
In Setup, go to Integrations > External Services
Click Add an External Service
Choose From OpenAPI Specification and click Next.
Enter CreditAPI as the External Service Name and use the following as the Description: Returns the credit score and related information for a consumer identified by their National ID Number.
Under Service Schema, choose “Upload from local” and upload the OpenAPI specification you downloaded from GitHub (mock-openapi-spec.json).
Under Select a Named Credential, locate the credit_check_api credential you created previously.
Click Save & Next.
Click the checkbox next to the Operation column to multi-select both methods from the API. Click Next.
Review the new service and click Finish. You’ll see it added to the list of External Services.
Step 3: Add Custom Fields to the Contact Object
To make our scenario more realistic, we’ll add a custom fields to store the simulated credit information:
In Setup, go to Object Manager > Contact
Click Fields & Relationships > New
Create a field with the Label of National ID Number (Text, 20 characters).
Optionally, you can add it to the Page Layout or Lightning page.
For more on adding custom fields to objects, refer to this section of Salesforce Help. Technically, you can get the External Service and Agent to work without it.
Step 4: Create Agent Actions in Agentforce
Now, let’s make these API operations available to our AI agent:
In Setup, type Agentforce into the Quick Find and click Agentforce Assets.
Click on the Actions subtab and then New Agent Action.
Fill in the details for the first action and click Next:
Reference Action Type: API
Reference Action Category: External Services
Reference Action: Select Get Credit Score from the dropdown
Agent Action Label: Get Credit Score
Agent Action API Name: Get_Credit_Score
Enter Getting credit score in the Loading Text
Under the first Output, check the checkbox for Show in conversation.
Click Finish
Repeat steps 3-5 for a second action, with the following differences:
Reference Action: Select Get Credit History from the dropdown
Agent Action Label: Get Credit History
Agent Action API Name: Get_Credit_History
Loading text: Getting credit history
Step 5: Create a Topic for Credit Information
Now, you’ll create a topic that uses these actions. A complete description of Agentforce is beyond the scope of this post, so here’s some resources to refer to if you’re still getting familiar with Agent configuration:
This developer guide covers External Services and Agents, with a focus on MuleSoft
This blog post uses GitHub as an example, and also includes a video)
This trail on Trailhead leads you through an extensive example including Data Cloud and more
Since you’ve built the Agent Actions in the steps above, add both of them to a Topic just like any other Actions.
The description of the Actions is pre-populated from the API spec, so most of the Topic configuration amounts to instructing Agentforce to use these Actions when the user enters input like run a credit check.
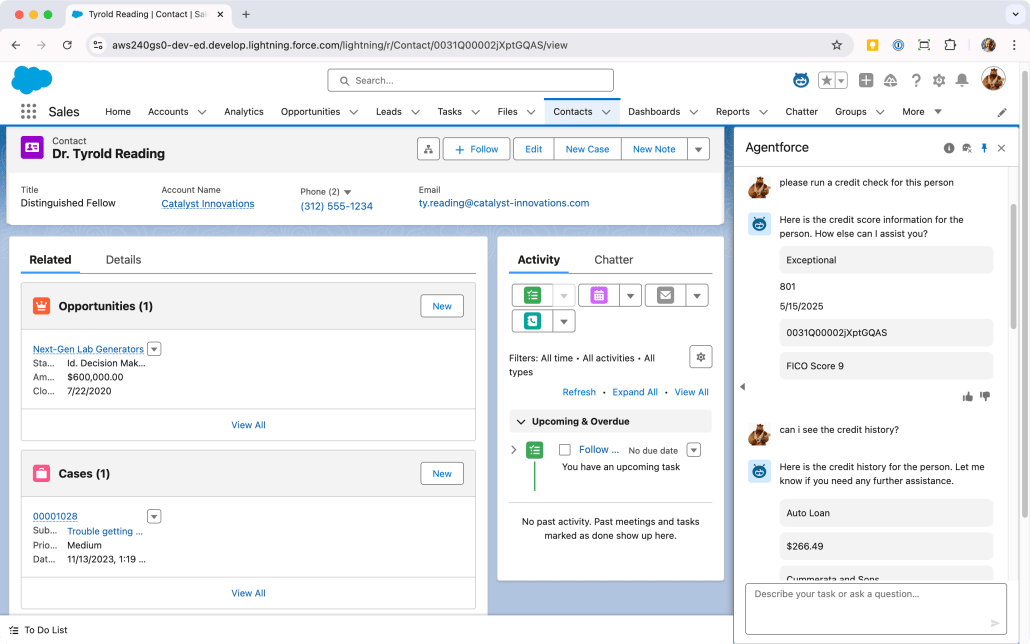
Step 6: Test Your Integration
Time to see your new API integration in action:
Navigate to a Contact record in your Salesforce org
Make sure the Contact has a value in the National ID Number field (add something like “123-45-6789” if it’s empty)
Click the Agentforce icon in the top right corner of the page to open the Agent UI in the side panel
Type a natural language request like…
“Run a credit check for this person”
“What’s this person’s credit score?”
“Check the credit history for this customer”
Sit back and watch as the Agent recognizes the intent and activates your Credit Check topic, retrieves the National ID when possible, calls the mock API to get simulated credit information, and presents the results in a conversational format. Whew!
Try different types of requests and see how the Agent handles them. You can also test what happens when you don’t have a National ID on the Contact; the Agent should ask you to provide one.
The Results: Understanding the Power of API Integration
After setting up our mock API integration, you’ve learned how your AI agents can:
Retrieve and use external API assets in real-time
Process that data intelligently to provide relevant insights
Maintain context between the external data and your Salesforce records
Deliver this information conversationally to users
All of this happens without any custom code or expensive development resources. The only thing left to do is figure out what to do with all the time you’ve saved. 🙂
Have you integrated external APIs with Agentforce? Share your experience in the comments below!
https://unofficialsf.com/wp-content/uploads/2022/09/largeUCSF-300x133.png00Ross Belmonthttps://unofficialsf.com/wp-content/uploads/2022/09/largeUCSF-300x133.pngRoss Belmont2025-05-16 16:35:332025-05-16 16:35:36Agentforce and External Services: A No-Code API Integration Guide
Private Connect provides customers a fully-managed, bi-directional, private connection between their Salesforce tenants and their Amazon Web Services (AWS) account. Customer can easily connect their Salesforce apps and processes to resources in their Virtual Private Clouds (VPCs) running on AWS using Amazon’s PrivateLink for more secure API integrations. All traffic is routed over a dedicated connection without any traffic or customer VPCs ever being exposed to the public internet.
Why (or when) would customers want to use Private Connect?
Regulated customers and partners building enterprise applications across multiple public clouds and data centers need to do so over a secure and dedicated connection to mitigate the risks associated with exposing their data to the public internet. Avoiding the public internet can reduce the compliance/audit burden on customers significantly.
Private networking allows customers to isolate sensitive resources on AWS—so they can’t be subject to a DDOS attack—while still providing a means for them to connect to Salesforce. Some customers have deployed complex, messy workarounds to keep traffic private; these can be decommissioned once Private Connect is in place.
Customers can place some of their computing resources or assets (i.e. data) within a Virtual Private Cloud (VPC) on AWS. This is analogous to keeping them isolated on an “island” for safety reasons. The “island” has no internet access, but Private Connect helps reach the resource by “digging a tunnel” and delivering a private connection.
With Private Connect, customers can leave their VPCs on a private subnet rather than expose them to the public internet. The setup assumes the AWS account already has the VPC (virtual private cloud) configured, including NLBs (network load balancers), private subnets, and required security groups. If that’s not in place, refer to the AWS documentation or engage the AWS account team (who can get a solution architect involved). Salesforce does not offer advice on AWS network architecture.
What are the top use cases for Private Connect?
Call out from Salesforce to a custom app/endpoint on AWS
Example: check that a given item is in stock before selling it to a customer by calling out to the inventory system on AWS
Call out to AWS endpoints to bridge to legacy infrastructure in banking or health care
Running jobs on AWS that load data in through Salesforce APIs, or retrieve data
Example: funneling Leads into Salesforce from third parties
Use Salesforce solutions like Data Cloud and CRM Analytics to process data hosted on AWS
Create dashboards in CRM Analytics using data in a Snowflake tenant hosted on AWS
Leverage data in Redshift or Snowflake in omni-channel marketing via Data Cloud
Integrating Salesforce with third-party apps running on the customer’s AWS account
Example: document management via FileNet
MuleSoft can also be deployed to a customer’s AWS account to solve integration use cases
Access to on-premise application systems such as IBM AS/400 via Amazon DirectConnect
Is Private Connect available now? If so, which geographies are supported?
Yes! Private Connect launched on July 2020, and is available for use connecting to more than a dozen AWS regions. In theory, customers can connect to other regions by “peering” traffic on the AWS side. We can’t provide detailed guidance on how to set this up, so we strongly recommend customers get help from AWS if they want to use an advanced approach like that.
The back-end infrastructure for Private Connect is part of Hyperforce itself, so Hyperforce has to be online in a given region for Private Connect to be available. If you’re curious when a given region will be available, contact the Hyperforce team. When Hyperforce becomes available in a given region (e.g. Ireland or Switzerland), then shortly afterwards the infrastructure for Private Connect becomes enabled in that location.
What types of companies or organizations will find Private Connect particularly appealing?
We see higher levels of interest from those in regulated industries like Financial Services and Health Care who need PCI or HIPAA compliant secure connections to carry their API traffic. Those in the public sector can also leverage Private Connect in GovCloud.
Broadly speaking, if a customer bought Shield, that indicates they value security and should consider Private Connect for their integrations.
What is the key value proposition for Private Connect?
Keep Communications Private and Secure: Private bidirectional connections between Salesforce and AWS make it such that valuable AWS resources aren’t exposed to the public internet can’t be attacked by DDOS.
Reduce the Compliance and Audit Burden: Integrations that avoid the public internet face less regulatory scrutiny.
Improve Productivity for Network Teams: Save time and effort in the setup, configuration and maintenance of private connections with the point-and-click setup UI. Decommission your legacy workarounds.
Product, Technical & Support
How does Private Connect work?
Salesforce has worked directly with Amazon to connect our network to theirs, powered in part by an AWS offering called PrivateLink. This connectivity enables API calls to go from Salesforce to AWS (and vice versa) without using the public internet.
Salesforce manages what we call a Transit VPC in each supported AWS Region. Customers create a PrivateLink from the Transit VPC to their target VPC, and everything “behind” the Transit VPC is managed and secured by Salesforce. This works whether your org is hosted in first-party data centers, or Hyperforce.
For security reasons, we cannot explain every detail of how the product’s infrastructure operates—but this gives you an overview. The rest of this guide provides certain additional details.
How do I set up connections? Do they go both ways?
The setup UI for Private Connect provides a point-n-click experience that creates and provisions the required PrivateLinks on the customer’s behalf. Setup allows you to create two kinds of private connections:
Outbound: traffic originates in Salesforce, goes out to AWS
Useful for Apex callouts, External Services, Flow Actions, External Objects…and more, as we expand our platform
Inbound: traffic originates in AWS, comes in to Salesforce
Make calls to any of our typical APIs (e.g. REST, Bulk) through the connection
The following diagrams illustrate the most common use cases. Outbound connections are typically used when Apex or Flow needs to reach out to a protected API endpoint isolated within a VPC.
Outbound connection in Private Connect
Inbound connections are commonly used to allow services, apps or “jobs” running inside a VPC to access Salesforce’s APIs, either to load data or invoke actions on our platform.
Inbound connection in Private Connect
Can I connect multiple VPCs to my org?
Yes, though that will require additional licenses of Private Connect. Each VPC requires a distinct connection, which incurs costs for Amazon, Salesforce, and the customer.
Can I connect multiple Orgs to a single VPC?
Yes, though that will require licenses for Private Connect in each org. Each org needs a provisioned connection to the VPC in question.
Can I connect to other AWS services outside my VPC?
Amazon continues to add to this list over time, both by adding new services and making existing services compatible with PrivateLink.
Private Connect creates a connection to a given VPC to avoid the public internet, and from there AWS can route the request/traffic to these services that they manage (on your behalf).
Outbound connection in Private Connect to services managed by AWS
Does Private Connect make the connection between Salesforce and AWS faster?
Improving data transfer speeds is not the focus of Private Connect; refer to the value propositions listed immediately above. Private Connect can, however, lead to faster connections in the case where a customer has deployed complex, clunky workarounds on their own in an attempt to deliver equivalent security benefits. If they deploy Private Connect and decommission what they had before, they may see faster speeds when compared to their custom build.
Private Connect will not be faster than using the public internet, though. Both Salesforce and AWS have very fast pipes to the internet, and leveraging those is usually the best in terms of raw speed. That said, slowing things down slightly for better security is usually worth the trade-off, similar to how employees use a VPN to connect from their laptops to servers behind a firewall. A minor trade-off in performance for vastly increased security is a wise decision.
The public internet has slightly higher transfer speeds than Private Connect.
Does Private Connect support Heroku (since that runs on AWS)?
Customers can connect their own VPC to a Heroku Private Spaces (in this manner) using PrivateLink. Contact the Heroku team if you have further questions.
Does Private Connect support MuleSoft?
It depends how MuleSoft is hosted. MuleSoft CloudHub is MuleSoft’s managed SaaS offering, and unfortunately it does not support Private Connect as of this writing. Check with the MuleSoft team for updates on this.
MuleSoft has the ability to be deployed inside a customer’s VPC, however. In that scenario, connecting to it would be the same as any other connection.
Can I use Private Connect with Amazon AppFlow?
Yes! In fact, Amazon has built Private Connect support directly into AppFlow’s setup UI. If a customer has a license for Private Connect, AppFlow can provision a working connection on the customer’s behalf and use it to move data in and out of Salesforce. It’s great from an ease-of-use perspective, though if you have an issue with the AppFlow connection, you’ll need to get support primarily from Amazon. (Amazon manages the connections, and customers cannot manipulate them directly.)
Does Private Connect support Hyperforce?
Yes. Both Hyperforce and first-party hosted orgs can use Private Connect. Creating a private connection works the same in both. When an org is migrated to Hyperforce, the back-end architecture of Private Connect makes that transition seamless—there’s nothing to worry about!
You can contact the Hyperforce team if you have questions or concerns about what’ll happen when your customer’s org migrates to Hyperforce.
If an org is on Hyperforce, can you explain why Private Connect is still needed? Why can’t they just use AWS PrivateLink?
It’s true that if a customer’s org is on Hyperforce, API integration traffic between their org and their own AWS resources will not leave AWS’s network. But if the AWS resources are isolated in a VPC (to prevent DDOS), Private Connect is still needed to establish private connectivity to the VPC that contains the Salesforce org.
Customers can, in theory, deploy other protections for services or data exposed to the public internet. That said, the use of such protections create a non-trivial maintenance burden for the customer, and their effectiveness is debatable. Private Connect is designed to avoid this maintenance burden.
Advantages of Private Connect on Hyperforce
Some people inquire about the ability to use AWS PrivateLink to connect “directly” to the VPC containing their Hyperforce org. Salesforce has always delivered fully managed SaaS offerings, and there no plans to allow customers wire into our network infrastructure at such a low level. That would introduce significant security concerns, and would not support org migration.
Private Connect handles all the network management behind the scenes, in the same way that Salesforce manages the data and file storage underpinning customer orgs.
Does Private Connect support sandbox orgs?
Full and Partial Copy sandboxes are supported with Private Connect, but not Developer or Developer Pro sandboxes. By using the “Match Production Licenses” feature in their sandbox, the customer is able to get the same number of connections in their sandbox as in their production org. That means sandbox testing is typically free of charge.
You may be wondering what you can do with Private Connect in a Developer or Developer Pro sandbox, knowing that working connections can’t be provisioned and established. Here’s the answer: Dev and DevPro environments can be used to create an (inactive) placeholder connection which can be pushed to production via packaging or other means. This benefits organizations that look to minimize making configuration changes directly in a production org.
Note: Sandbox copies will not copy over existing connections from the parent production org.
What’s the best way to test Private Connect in a sandbox?
Whenever possible, customers should validate their connectivity approach in a sandbox before working in production. That implies that the Salesforce sandbox is connected to a non-production environment in AWS e.g. an “integration” or “staging” environment.
Does this support the EU Zone (restricted operating region)?
Yes, it’s been tested and confirmed as of March 2023.
What are the limitations of Private Connect?
Check out the Considerations public help document for more info. You’ll need to make sure Private Connect works in the geographical region you’re targeting.
Outside that, there is one notable limit relating to outbound connections (described in the next section).
Hard limit in outbound connections
Salesforce limits the amount of outbound traffic we will process through a private connection. In this context, “outbound” refers to data sent or fetched by Apex code, Flow, or External Services as part of an outbound call to a customer’s AWS account. Our code will not process more than 56.48 GB of data per hour in this manner.
When the limit is reached, the code does not pull through any more data, and throws an error. To avoid problems, use the Limits API and query the PrivateConnectOutboundCalloutHourlyLimitMB value to keep an eye on how much data has been used.
There is no “grace period,” so no other outbound traffic will pass through until the top of the hour when the counter is reset. Purchase additional data add-on packs to cover the usage required by your applications and use cases.
Note: Bear in mind that outbound traffic in Private Connect typically boils down to using Apex to either “push” data out to another endpoint, or “pull” it into CRM from the outside. It’s likely some other platform limit (e.g. Apex governor limit) would be reached long before an Apex method loads more than 50 GB of data into CRM in a single hour. Consider a different architecture less reliant on Apex code if you’re planning on moving that much data in or out of CRM with such high frequency.
Contractual limit for inbound connections
If the customer pulls data out of Salesforce via our APIs or tools like Amazon AppFlow, that is not affected by the outbound limit described above. When we say “outbound,” we’re referring to requests that originate in Salesforce and go out to another system.
What we consider “inbound” traffic also has a limit of 56.48 GB per hour, but that is enforced by the contract the customer enters into with Salesforce. It is not a “hard” technical limit; processing would continue if, in theory, this limit was exceeded. That said, Salesforce reserve the right to change the technology and put “hard” limits in place in the future.
Customers pay for API usage, so that offsets the costs borne by Salesforce. More to the point, our APIs can handle extremely high volumes of traffic, so we don’t need a limit like this to protect this aspect of our infrastructure.
What notable offerings are not supported by Private Connect?
Tableau
Marketing Cloud
Commerce Cloud
Event Relay (integration with AWS EventBridge)
Workaround: Amazon AppFlow can be used for eventing, and it supports Private Connect
Apex Continuations
Provisioning of connections in Developer Sandboxes, Developer Pro Sandboxes, Scratch Orgs, Developer Edition orgs
What compliance certifications is available with Private Connect?
Private Connect is included in our latest PCI Attestation of Compliance (AOC) and compliant in the following:
Private Connect is not a VPN, though, behind the scenes, Private Connect sets up VPN-like secured tunnels to ensure that the traffic is kept private, secure and compliant. A key advantage of Private Connect is how it handles all the complexities around security controls and enables our customers to set up the secured connectivity through a point-and-click UI.
Does Private Connect use IPSec?
Yes, Private Connect uses IPSec tunnels between the transit VPC and Salesforce org.
What type of encryption does Private Connect Support for the IPSec tunnel?
In addition to encryption at the TLS layer, Private Connect support IPSEC encryption for traffic between transit VPC and Salesforce orgs (at layer 3). We use Advanced Encryption Standard (AES) in Galois/Counter Mode (GCM) to encrypt traffic.
How does disaster recovery (DR) work?
Private Connect implements a 3 AZ (Availability Zone) design and uses redundant IPSec tunnels to connect between sites. Also, if the customer org migrates to a new DC for DR, the traffic is automatically routed to the new site.
Does Private Connect move data between a Salesforce org and AWS, like MuleSoft, AppFlow, Glue, or other ETL tools?
No. Private Connect only establishes the tunnel; running integration traffic through the tunnel needs to be handled by some other product or feature set.
Since Salesforce is multi-tenant, how do you keep traffic separate on the Salesforce side so that Org/customer A and Org/customer B don’t overlap inappropriately?
It’s true that the Transit VPC is shared, but it has dedicated Private Link endpoints per customer that resulted from creation actions by that customer in their org. Subsequently, only a Private Link created for the org can be associated with a Named Credential for the org. When the named credential is used in an outbound callout, it will result in the outgoing HTTP request only traversing the associated PrivateLink created by the customer at the Transit VPC.
Are user sessions supported over Private Connect?
No, currently they are not supported. The intended use case for Private Connect is API integrations.
How can a customer connect from on-prem to their Hyperforce org using Private Connect?
Customers can build connections from their on-prem infra to their own VPC in AWS via AWS Direct Connect and then use Private Connect to reach their Salesforce org. Refer to this article for more details.
Is there another option besides Private Connect for private communication from a customer VPC to a Salesforce org?
As of this writing, there is no other offering, feature or SKU that delivers private connections to our infrastructure besides Private Connect. Customers may be able to keep other network traffic private using other AWS network tools, but there’s no other way to bridge into the infrastructure that Salesforce manages.
Does Private Connect use certificates or authentication?
Private Connect uses Advanced Encryption Standard (AES) in Galois/Counter Mode (GCM) (AES-GCM, in short) to encrypt traffic between sites and the certificates are rotated periodically.
That said, it is not required that customers use certificates to take advantage of Private Connect. Private Connect only provides the network route, and many types of authentication can be applied to API traffic through the tunnel.
For example, When calling out from Salesforce to a service managed by Amazon (e.g. Athena or Redshift), the AWS Signature V4 protocol would be used. If the callout is to a custom service (e.g. Lambda or EC2), customers might leverage OAuth, API keys, or other authentication methods.
Since the route is private, customers can, in theory, avoid implementing authentication on custom endpoints. However, this is not recommended.
Can I use Private Connect with CRM Analytics?
Yes! Refer to this section of the CRM Analytics documentation for details.
Can I use Private Connect with Data Cloud?
Yes! Refer to this section of the Data Cloud documentation for details. Note that Data Cloud has a different implementation and approach to pricing, so the information below on Pricing & Limits does not apply.
Pricing & Limits
What is the pricing model?
It’s useful to imagine a cell phone as an analogy. There’s a cost for the “line” (connection), and that includes a default allotment of data. Additional data can be purchased as well. Contact your account rep for specific price quotes.
Each license includes both 1 outbound and 1 for inbound connection, as well as a data transfer allocation of 5GB per day (shared by all connections in the org). Each add-on data pack adds an extra 5GB per day.
What are the limits?
Refer to the section above for a discussion of inbound and outbound limits.
Salesforce Connect is an add-on product for the Salesforce platform that provides seamless data integration, allowing users in core CRM to view, search, and modify data stored outside your Salesforce org—without importing it or ETL. You can surface data you own and store in other sources without copying it into Salesforce, but you can still view and edit that data directly within the Lightning UI, Flow, Apex, and more.
Note: Salesforce Connect requires a separate license; licensing is discussed below.
The remainder of this guide goes into additional detail on the different aspects of this feature set and deepen your understanding. Think of it like a director’s commentary on a movie; not strictly required, but available for those interested in a deep dive.
Common Use Case
It’s useful to ground this discussion in a real-world example. ERP integration is one very common use of Salesforce Connect, enabling sellers and customer service reps to access information often not stored in Salesforce as the system of record. Order details, shipments, returns, invoices, and payments all fit into this category.
Customer service agents in particular may access this information hundreds of times a day, and Salesforce Connect avoids the need for them to “flip tabs” or manually cross-reference information from other apps. This saves time and reduces errors in busy call centers, keeping productivity high and improving customer service.
Orders from an external system surfaced via Salesforce Connect
This can be extended to Experience Cloud, allowing customers a robust means to view details about their bills, orders, and shipments in the same interface they use to search the knowledge base and submit requests for support. Developers can use this data in all sorts of creative ways, since it can be accessed in Apex with the same syntax as any other object.
Key Benefits of Salesforce Connect vs. ETL
Though ETL is a widely-deployed pattern for system integrations, it has notable downsides. Salesforce Connect offers multiple advantages:
Real-Time Access to Changes: Unlike ETL (Extract, Transform, Load) processes that involve periodic data synchronization, Salesforce Connect provides real-time access to external data, ensuring users always have the most current information.
Minimized Storage and Data Movement: With Salesforce Connect, there’s no need to store copies of external data within Salesforce, which reduces storage costs and minimizes data redundancy. Security and compliance are easier to manage, since you avoid copying data between systems.
Simplified Maintenance: Managing data mappings and transformations within an ETL process can be complex and time-consuming, and failed ETL sync jobs are a hassle to clean up. Salesforce Connect simplifies this by offering point-and-click setup and straightforward ongoing maintenance.
Origin and Evolution
It’s useful to understand the landscape in which this product was introduced, comparing and contrasting with today’s environment to reflect on the evolution and forward trajectory of Salesforce Connect.
Note: this guide makes forward-looking statements. Please make your purchase decisions based on the products and features generally available at the time of purchase. Refer to our safe harbor statement for more on this topic.
ERP and On Premise
When this capability first became available in 2014, the focus and the task at hand for most customers was either ERP integration or integration to RDBMSs like Oracle and SQL Server—likely deployed on premise. Cloud adoption looked very different 10 years ago than it does now.
Salesforce Connect launched with a reliance on the OData protocol, the 2.0 version of which was finalized only shortly before the initial release of the product. This was a good fit for the task, since major ERP vendors supported OData via add-on tools and Microsoft helped their customers solve for the “last mile” to expose their data sets via OData for HTTP access.
In either case, customers were responsible for standing up some intermediary component to provide API access to the back-end data store. IT teams need to engage to deploy and manage these solutions. This is still a viable pattern, with MuleSoft or third-party tools like DataDirect enabling connectivity to a wide variety of data sources.
Moving Beyond OData to the Cloud
Cloud adoption has accelerated greatly since the introduction of Salesforce Connect. Infrastructure spending ballooned more than 5,000%, from around $12 billion in 2010 to an expected $623 billion by 2025 (sources here and here). Studies by Deloitte and Accenture show that more data deployments are planned for the cloud than other forms of hosting, and firms that are further along in their cloud adoption report higher levels of success in terms of their target outcomes.
When a data set is in the cloud, network access via HTTP tends to be available. In theory, this addresses the “last mile” challenge mentioned earlier. REST APIs provide access to small-to-medium scale transactional data sets, and other tools exist to handle high-volume ingestion and egress. And though enterprise architectures are as heterogenous as ever, a relatively short list of major cloud vendors have emerged as leaders in the “lakehouse” space. This opens the door for Salesforce Connect to target a small number of known endpoints and address a large portion of real-world customer use cases. As of this writing, Salesforce Connect can access structured data on AWS (S3, DynamoDB, and RDS) as well as Snowflake.
For use cases that focus more on front-end applications, GraphQL has emerged as a popular approach to aggregating disparate transactional data stores behind a single API endpoint. The Salesforce Connect team has made initial investments in this area as well, and we have ideas for how to expand what’s possible.
If the data isn’t hosted in a major public cloud, and isn’t accessible via a standard like OData or GraphQL, Salesforce Connect offers an option to leverage any REST API using Apex code. This code option can be thought of as a substitute for using an additional translation component in the architecture (e.g. MuleSoft), though those components are still a wise investment for teams that want to minimize code maintenance.
All told, Salesforce Connect is well-positioned to continue providing value for customers in the era of Big Data and AI. The bulk of this guide covers how each option works, as well as key concepts to bear in mind to make the wisest choices when crafting your architecture. This document also includes information on how Salesforce Connect compares to or compliments other offerings from Salesforce.
How It Works
Salesforce Connect achieves its results via real-time callouts from your org to an HTTP endpoint exposing the records in question from a data store customers own or manage. When a user in Salesforce takes action—like loading a List View or invoking Flow that accesses certain records—Salesforce Connect translates that action into a query, sends the query to the corresponding external data source as an HTTP request, and feeds the results back into the Salesforce platform. The originating action completes, and (in most cases) the fact that the data is external comes with no disadvantage.
Salesforce Connect translates a SOQL statement to a format that works for a given external data source, and performs the query (or DML) via an HTTP request to an API endpoint.
The use of real-time callouts is sometimes referred to as data virtualization or “zero-copy ETL.” Terms aside, the key point is that Salesforce Connect does not “sync” your data, make a copy of the record, or store it in our logs. This is a notable advantage when working with sensitive customer data.
Salesforce Connect exposes data from external systems as an External Object, which you can treat like a Custom Object in features such as:
Tabs, List Views, and Related Lists in the user interface
Reports and Dashboards
Flow and other automation tools
Query and DML operations in Apex
Mobile apps and Experience Cloud
…and more.
Many of the features on this list (like the Related List shown above) are enriched by the ability to create relationships from External Objects to both standard and Custom Objects. External Objects can look “up” to standard or Custom Objects, and vice versa. You can even leverage Indirect Relationships to align data based on a shared value rather than the Salesforce ID, which you may not want to store in the external system.
Metadata Configuration
Each External Object is linked to an External Data Source, which holds the reference to the external system along with the parameters needed to understand its API and responses. Typically, an individual External Object is aligned to a remote table in that external database, and each field on the object is aligned to a column in that table. And just like with Custom Objects, the External Object and its fields can be labeled and modeled in a way that’s optimized for human readability. Here’s an example:
The ORDER_MGMT database/schema in the external system is represented as an External Data Source called Order Management.
The ORDERS table in that database is represented as an External Object called Order.
The O_ORDERSTATUS column in that table is represented as a Picklist field on the External Object called Order Status with values like Open, Fulfilled, and Canceled.
Validate and Sync
In the vast majority of cases, the work required to configure of External Objects is reduced significantly by Salesforce Connect’s ability to read the metadata of the target External Data Source. The Validate & Sync feature set helps create the External Objects in Salesforce with fields of the appropriate matching types.
In particular, the Sync feature/button imports the available metadata from the external system into Salesforce, parses it, and presents the administrator with a list of Objects it can create on the user’s behalf. This feature also has intelligence to handle External Objects that have already been configured in Salesforce, but may have changed in the external system (e.g. a new column has been added).
Note: The sync feature does not sync any data—only metadata. The term “sync” is meant to imply that the data model in Salesforce is aligned with the tables and columns in the source system.
Available Adapters and System Compatibility
Our Focus: Adapters and Standards
Salesforce Connect does not have a vast library of connectors like MuleSoft or Data Cloud, and it’s not likely that it ever will. Instead, Salesforce Connect includes adapters aligned with open standards like OData, GraphQL, or SQL. The target system needs to adhere to some standard format to be compatible with Salesforce Connect in an out-of-box manner.
For the (many) systems that expose their data via an arbitrary REST API and do not follow a standard, we provide a Custom Adapter Framework for customers or partners to write their own adapter in Apex. This delivers robust results as long as the API in question supports a few key behaviors.
If the target system has no accessible REST API, it’s best to deploy a MuleSoft-based solution to access the data where it’s stored and translate it to a format Salesforce Connect can interpret. MuleSoft can solve for the “last mile” in a number of scenarios, including on-premise hosting, JDBC/ODBC, legacy systems, and more. The combination of MuleSoft and Salesforce Connect is a very popular deployment pattern, and helps illustrate that the two are not competing offerings. (See below for more on the comparison between our offerings.)
To recap, the target system either needs to expose the data in a well-known format, or some additional component needs to reformat it so that Salesforce Connect can leverage it. The notable exception to this rule is Amazon DynamoDB, for which there is a distinct adapter resulting from Salesforce’s global partnership with AWS. (The next section includes more information on this.)
Adapters and Usage Patterns
What follows is a list of the adapters supported by Salesforce Connect, along with a separate section for each to call out additional relevant details and highlight when they’re typically deployed.
OData: Salesforce Connect supports various versions of the Open Data Protocol.
OData 4.01: This is the newest version; use it whenever possible.
OData 4.0: Similar to OData 4.01, but subject to callout limits. Avoid this choice.
OData 2.0: This version of the standard is more than a decade old; avoid this choice whenever possible.
SQL: As of this writing, Salesforce Connect is compatible with the SQL APIs of two major data lake vendors:
Amazon Athena provides SQL querying via a REST API for structured data in Amazon S3 buckets.
GraphQL: GraphQL is a highly flexible approach to data APIs that offers interesting efficiencies, but is less rigorous than OData re: how it dictates the interactions between the client and service. This creates trade-offs to manage.
GraphQL is also used to access data in Amazon RDS. (Refer to the section below for more.)
Amazon DynamoDB: high-scale NoSQL store that handles RDBMS-like use cases via PartiQL. Consider this option if you have millions or billions of records to store in a given table.
Custom Adapter: Customers or partners can use the Custom Adapter Framework to write their own adapter in Apex for any external system that does not fit into one of the options above.
Cross-Org Adapter: Enables a basic level of integration with another Salesforce org, with notable limitations. This is option is included here for completeness, but is not expected to receive large new features.
Read on to learn more about what’s unique for each protocol or adapter.
OData
OData is often used with ERP and order fulfillment systems, since Microsoft and SAP are co-sponsors of the OData standard and support OData natively in their offerings. It’s a robust standard with a broad scope that can, in theory, support nearly any style of client application in an integration use case.
If you’ve never encountered OData, you can think of it as a way to send any SQL statement over a URL. A query or DML statement gets translated into a (long) URL with various parameters, and the service is expected to parse that HTTP request and execute it against the back-end data store. This approach can support nearly any application that works with relational data, but requires the service to parse and interpret a very wide variety of requests. (Imagine writing a generic SQL parser.) Most service owners don’t write this complex code by hand, and offload the heavy lifting either to tools from major vendors like Microsoft and SAP, or battle-tested libraries like Apache Olingo and PyOData. If those options aren’t readily available, MuleSoft can translate nearly any structured data into the OData format.
Salesforce Connect calls out to an OData translation layer, often powered by MuleSoft.
Since OData dovetails with relational databases so cleanly, it’s a great fit for Salesforce Connect’s need to weave external data into the relational paradigm used by the core Salesforce platform. Our customers can query or update any data, leverage flexible filtering options, and quickly configure the data source via the metadata exposed by an OData service.
OData 4.01 is the most up-to-date, and should be used whenever possible. One key advantage of the 4.01 adapter is the lack of limits re: the number of callouts; this adapter leverages Named Credentials for HTTP callouts, which can handle very heavy workloads.
The only other additions to 4.01 as compared the older 4.0 adapter are batch processing for DML and minimal metadata. Customers need to use the 4.01 adapter to leverage these new capabilities, though workloads running on the 4.0 adapter today will still work on the newer 4.01 adapter. We recommended upgrading as soon as resource availability allows.
OData 4.0: This adapter was introduced a few years after the OData 4.0 standard was finalized, which represented a significant modernization of OData services. XML was replaced by JSON for data and metadata, URLs were changed to make queries more powerful, batch support was added, extensibility was improved, and more.
The 4.01 Adapter should be used to take advantage of these enhancements; don’t deploy a new configuration with the 4.0 adapter. Existing installations will be supported for the foreseeable future.
OData 2.0: This is the oldest version of OData we support, and the standard is over a decade old. Don’t deploy a new configuration with the 2.0 adapter.
Customers who have deployed OData 2.0 services should begin thinking about how to transition to a the latest version of the standard; Microsoft and SAP both have options.
You can also consider moving the data store to a hyperscale public cloud like AWS to take advantage of modern technologies, pay-as-you-go pricing, and high availability. It may be more advantageous on a net basis to move the data into a modern lakehouse instead of rewriting the code for an OData service.
SQL
SQL and RDBMSs represent a wildly popular approach to working with structured data. Moreover, relational data integrates into the core Salesforce platform very smoothly, since a relational database technolgies underpin SObjects.
The challenge in working with these data stores is not SQL, but transport and network access. Salesforce Connect needs an API accessible via stateless HTTP, and most RDBMSs require persistent JBDC/ODBC connections. Hence, the current iteration of the SQL Adapter is optimized for certain strategic Salesforce partners that host the data/service and provide HTTP access to their API. (If you need access to an RDBMS hosted elsewhere, use MuleSoft along with Salesforce Connect.)
Snowflake provides customers with a flexible, easy-to-use data platform that provides SQL access to nearly any data set. The Snowflake compatibility in Salesforce Connect leverages this SQL capability via an API to act as a system of engagement on top of this data, and join it to records stored natively in CRM to provide a full 360º view of the customer.
Salesforce Connect can leverage both standard and dynamic tables, which simplify configurations that would otherwise include managing streams.
As of this writing, Salesforce Connect does not support Snowflake views, but those views can be “wrapped” in a dynamic table.
Snowflake offers a variety of authentication options, though as of this writing the only one that has been tested by our team is the OAuth Custom Client. Our documentation discusses how to configure this capability, including authentication setup.
Note, however, that full coverage of Snowflake’s integration and access control capabilities is beyond the scope of our help articles. Make sure the Role used for authentication has sufficient access to the target table(s), schema, and warehouse.
Amazon Athena is a managed service on AWS that can execute SQL queries against data stored in flat files (e.g. CSV, JSON, Parquet) persisted in S3 buckets. This provides durable, low-cost storage for very large data sets. Similar to Snowflake, Athena’s UI is SQL-oriented and appeals to highly technical personnel, making Salesforce useful as a system of engagement for this data.
Common configurations of Athena include a pipeline that populates the data in the S3 buckets in a very deliberate manner to optimize efficiency and reduce query costs. Due to this careful configuration of the underlying S3 resources, the Athena compatibility in Salesforce Connect does not support inserting, updating or deleting data.
Note that both Athena and S3 need to be configured, managed, and maintained separately. This includes not only the IAM security configuration, but also the extent to which files on S3 are partitioned and indexed to optimize query performance and manage costs. Additionally, both those services have their own billing and cost implications.
A full discussion of Athena and S3 administration is beyond the scope of our documentation materials. Refer to this example as a starting point for how to configure minimal access to AWS for Salesforce Connect’s purposes.
GraphQL
GraphQL is an increasingly popular data integration option that provides some advantages over vanilla REST. It can be an attractive choice when aggregating data from multiple discrete back-end data stores. Additionally, it provides client applications with more flexibility in terms of what data is returned from the source system—especially for data with relationships. This provides notable advantages when writing UI code.
This approach to relationships is less useful in the context of Salesforce Connect, since the Salesforce platform primarily leverages data relationships modeled via a relational database paradigm. Most times, multiple smaller queries are executed against the external system, and the Salesforce platform stitches together the results for the benefit of the user or workload in Salesforce.
In general, Salesforce Connect’s approach to GraphQL is heavily influenced by the Salesforce platform’s relational database roots. Our customers can sort, filter, and aggregate data on nearly any field. GraphQL APIs typically don’t provide that same level of robustness; it’s more common to see that records can only be filtered or sorted by a few key fields. Broadly speaking, GraphQL does not specify a particularly strict contract between a client and the service, causing both sides to make assumptions as to how to “meet in the middle.” Popular tools like Apollo, Relay, and Hasura each need to insert opinions on fundamental behaviors like pagination and state management.
At present, Salesforce Connect addresses this ambiguity by setting a comparatively high bar for the service to meet, which enables the richest experience for customers accustomed to the full power of the Salesforce platform. We’ve partnered with Amazon to provide a sample solution for Amazon RDS and AWS AppSync that customers can either use directly or treat as a reference implementation and emulate in their own server stack.
Salesforce Connect connects to Amazon RDS by using AWS AppSync as a middleman to handle the GraphQL exposure.
Note: AWS AppSync is a very robust GraphQL service that provides a convenient front-end to many data stores, similar to how their API Gateway offering simplifies the task of managing disparate back-end APIs. It’s worth your attention if you’re interested in this problem space and have invested in AWS.
In the future, we hope to open up the GraphQL Adapter to make it easier to work with existing GraphQL services as they are, rather than requiring them to change to meet Salesforce’s requirements. This moves the burden to the Salesforce side of the integration, and likely will involve Apex code to cope with the divergence in server-side behaviors across different implementations.
Amazon DynamoDB
Amazon DynamoDB is a NoSQL data store that provides customers a database-like solution for heavy B2C-scale data workloads involving millions or billions of records in a single table. It provides a unique architecture that keeps performance consistently high for common operations like query and insert, even when table sizes reach a level that would be problematic for most databases.
This power comes with notable trade-offs. Customers can’t sort, filter, or aggregate the data set in a highly flexible manner like they would in an RDBMS, or join tables together to grow the data model in an arbitrary direction as business requirements change. Instead, customers must understand their query and access patterns up front—before the first version of their application is deployed—and reverse-engineer an appropriate data model based on how future queries will function. Moreover, all records for a given application are typically stored in a single, shared table. Amazon’s documentation covers this topic, which is sometimes referred to as “access-first design.”
Due to the limitations in querying, Reports & Dashboards are not supported in Salesforce Connect for External Data Sources of this type. The reporting capability built into CRM allows users to sort, filter, and group by nearly any field—and DynamoDB does not support this. Broadly speaking, data is exported out of DynamoDB for analysis. (Tableau does not connect directly to DynamoDB either.)
Though these trade-offs may seem significant, they are worth it if your workload is very heavy and your data volume is high. There are a limited number of ways to address the challenges inherent to managing billions of records with fast throughput and high reliability. The main e-commerce experience at Amazon.com is built on DynamoDB, which serves over 100M requests per second on Prime Day while maintaining single-digit millisecond response times.
In the context of Salesforce, this can be valuable for high-volume record keeping e.g. audit or history tables. These data sets typically have clear access patterns—enabling effective access-first design—and customers can both store and query an effectively unlimited amount of data in an efficient manner.
Our documentation highlights an order management example, though the concepts have been applied to history tables, maintenance records, payment history, and more. Review these articles to get a sense for how the columns are populated in a counterintuitive manner in an access-first, single-table design.
Finally, it’s worth recognizing that since DynamoDB is a NoSQL data store, customers often store JSON in the individual attributes (columns) and can add a new attribute (column) to a table at any time. This provides flexibility, but prevents Salesforce Connect from programmatically syncing the metadata to assist administrators when configuring the External Objects and their fields. To address this challenge, Salesforce Connect includes a customized setup wizard that reads an initial subset of data in a given table and suggests a configuration that acts as a workable starting point.
Custom Adapter Framework a.k.a. Apex Adapter
If none of the above options will work to access the target data store, it’s often possible to write Apex code to access the system’s REST API. Indeed, REST APIs are wildly popular, with developers reporting they’re three to four times as likely to use REST compared to the usual alternatives (sources here and here). As of this writing, it’s Salesforce Connect’s second most popular option.
Customers often report they want to integrate to a certain target system that has a given API, but the API can’t change in any way. It may be controlled by another team, or a third-party vendor. Writing a custom adapter shifts the burden to the Salesforce “client” to address the service as it is.
This will provide a robust solution as long as the REST API has a few key capabilities, like querying with either client-side or server-side pagination, along with some filtering and sorting options.
Pagination: Records returned from the external system need to be returned in “pages” or “chunks.”
The Apex client can either request a limited number of records, or the server can decide on the page size and return a subset of the total results.
If the server controls the pages, note that the pages may not be of equal size.
Modern systems like Snowflake tend to manage pagination automatically on the server side; it’s usually wisest to use that option when it’s available.
It’s critical that the external system support some form of pagination. Basic features in the Salesforce UI like List Views won’t work without it.
Filtering: Only records that match certain criteria are returned, for example Orders created in the last month for a particular customer Account.
It’s likely the external system doesn’t allow records to be filtered by every field, but this workable as long as there’s enough control to navigate the data set.
Example: for CRM use cases, it’s important to filter the total list of Orders by customer Account, so an agent can see what a given customer bought. It’s less important to filter the orders by, say, Subtotal (e.g. “show me only Orders with a Subtotal of exactly $50.”)
Data analysis use cases may involve such investigations, but that’s outside the norm for sellers and customer service agents.
Sorting: Arrange the records returned in a given order, for example most recent appearing first.
Some sorting capability is important for human readability of the data set. Customer service agents probably want to see the Orders for a customer sorted by criteria like “most recent on top” or “most expensive to least expensive.”
That said, as with filtering, it’s usually not critical for every field to be sortable. As long as Orders can be sorted by Created Date and Amount, that may be enough for your customer-facing teams to work with the information. Arranging the Orders by Subtotal is likely to be of limited value.
Other capabilities are secondary in importance:
Aggregation is a nice-to-have, supporting SOQL syntax like SELECT COUNT(ExternalId) FROM My_Object__x. If the external system support aggregation in its query syntax, these SOQL statements can be processed very efficiently.
Note, however, that server-side aggregation is not leveraged by the Reports & Dashboards built into CRM. So instead of a COUNT() query, a Report in CRM will load all the records matching a certain criteria, then count them.
DML operations like insert and update will allow Salesforce users to edit data in the remote system, though the Apex code may make callouts to other API methods to invoke compound operations in the external system like requestRefund(orderId).
If you’re exploring the option of writing your own adapter in Apex, you may find it helpful to experiment with this freely-available API that supports robust querying with filtering, sorting, and pagination.
Cross-Org Adapter
The Cross-Org Adapter allows customers to read or write data in a specific target org from another “calling” org. It creates a point-to-point connection that can surface objects in the target org as External Objects in the calling org. This can create positive outcomes for customers when many subsidiary or “child” orgs all reference a single master data set from one “parent” org.
Outside of that scenario, there are many limitations. Since External Objects are treated like Custom Objects, the special features on standard objects like Accounts, Contacts, Opportunities, Leads, and Cases aren’t available. Files and Activities aren’t available either. The list of limitations includes, but is not limited to:
Uploading, downloading, previewing, and managing Files
Reporting across orgs that aggregates similar Objects
Special handling of Activities, Events, and Tasks
Out-of-box tools for tracking Field History
Lead conversion workflows
Opportunity pipeline workflows
Case closure workflows
Special handling for content in the the Knowledge object
Special handling for objects in Industries apps such as Financial Services Cloud and Health Cloud
Some customers desire an outcome where a User in Org A can leverage all the data, configurations, and apps in Org B as if they were actually a User in Org B. This is out of scope for the Cross-Org Adapter, and there are no plans on the roadmap to target that concept. Users are fundamentally bound to the tenant in which they reside, and do not cut across multiple tenants/orgs. Changing that would have major implications.
Customers seeking to integrate multiple orgs together should explore Data Cloud; the harmonization and replication features in particular speak to common multi-org scenarios. If that isn’t a fit, we recommend you explore the MuleSoft product suite to address other integration needs.
Note: Queries made by Salesforce Connect from a calling org to a target org count against the API limits of the target org.
Comparisons to Other Salesforce Products
Architects planning integrations know they need to carefully evaluate their options and select the one that best fits the job at hand. This section takes a closer look at how Salesforce Connect compares to other tools provided by Salesforce that interact with external data.
MuleSoft
MuleSoft Anypoint and Salesforce Connect are not direct “apples-to-apples” substitutes. In fact, they’re usually better together.
MuleSoft Anypoint is a wide-ranging integration toolset that can solve nearly any integration challenge, allowing unified access to systems that have clean APIs—as well as those that don’t. Very often, the two work together to “meet in the middle,” exposing data from anywhere via OData. And though MuleSoft is very powerful, Salesforce Connect is still needed to access data from external systems without copying it into the target org.
So to reiterate, MuleSoft alone (without Salesforce Connect) can only copy data into the target org. This has storage and security implications, and the data is no longer real-time. On the other hand, Salesforce Connect alone (without MuleSoft) can only access systems that have a “clean,” robust API with HTTP access. The APIs that best fit that criteria come from major vendors like AWS, Snowflake, or Microsoft.
Data Cloud
BYOL Data Sharing in Data Cloud resembles the functionality of Salesforce Connect, but harmonizes data from disparate sources and unlocks next-generation use cases around omni-channel marketing and AI. There’s no equivalent for those in Salesforce Connect. Data Cloud also has a wide array of connectors, as well as other features like replicating data across different orgs used by different departments.
That said, if your primary goal is empowering customer service agents or sellers with external data in CRM, Salesforce Connect enables that with a simpler architecture. And if you want users in CRM to create or edit external data (without writing code), you need to use Salesforce Connect.
Tableau and CRM Analytics
Tableau and CRM Analytics provide best-in-class visualization and reporting for data residing in many external data sources. Those primarily focused on visualization and data analysis will be better served to stick with those solutions rather than using Salesforce Connect to feed external data into CRM reports and dashboards. Built-in reporting is not as feature-rich, and is best for operational reports displaying a few thousand rows of data (or less).
Data surfaced through Salesforce Connect as External Objects offers most—but not all—of the features available with Custom Objects. Here are the most common areas that trip customers up:
Record Sharing: the vast majority of external data stores do not have anything equivalent to Salesforce’s Owner field, and all the sharing rules built on top of that. Typically, Salesforce authenticates to the remote system with a defined “role” such that all users in Salesforce of a certain type (e.g. Sales or Service) will see the same records.
A notable exception to this is data sources hosted by major vendors like AWS or Microsoft. Cloud offerings from those vendors come with robust Identity & Access Management tools, so data can be secured via RBAC, ABAC, and more. You can usually leverage this in a successful configuration with a careful use of Named Credentials, authenticating to their APIs in the correct way.
Another exception would be any system that supports Per User authentication, most commonly enabled via OAuth. Here again we see that judicious use of Named Credentials can solve for AuthZ in external systems.
Triggers and automation: In the vast majority of cases, Salesforce is not notified when external data changes. The most robust way to solve for this is via an event-driven architecture, which (like robust access controls) is typically available if the data resides with major vendor platform like AWS. Use the eventing tool of your choice to send an event to Salesforce when data changes in an external system.
Formulas and Roll-Up Summaries are not available on External Objects. Those features are powered by the Salesforce platform’s control of the underlying data store.
There’s a limited exception to this in the Amazon DynamoDB Adapter. Formulas can be used to create “virtual columns” that don’t actually exist in the remote table. This can solve for simple scenarios e.g. City = “Chicago” and State = “Illinois” combined into a Location field with the value of “Chicago, Illinois”.
This formula approach may be extended into the other adapters in the future. Apex code can also achieve the same results when using the Custom Adapter Framework.
Reporting in core CRM will not load high-volumes of external records into a single Report just because the external database contains millions (or billions) of records. Existing limits still apply; expect reports to be limited to a few thousand records.
The Reporting module in core CRM makes a larger number of comparatively small queries, then stitches them together to create the results of the report.
Tools like Tableau and CRM Analytics are usually needed when working with millions of records in an analytical/reporting context. Most times, data needs to be extracted out of the source system for reporting on large data sets to be efficient. (The data gets stored in a different, optimized manner.)
Analogy: Salesforce Connect as Plumbing
A broad rule of thumb that’s useful when evaluating Salesforce Connect is to think of it like plumbing that brings data into your org instead of water. The data comes in through one central point and is distributed to different rooms of the house, each of which may have appliances or fixtures that use it.
If something seems to be wrong with the dishwasher or sink, you should troubleshoot by carefully inspecting that particular fixture before looking at the plumbing. There could be an issue with the pipes, but if that’s the case, you’ll likely see problems elsewhere in the house.
Additionally, the various capabilities of our platform are like appliance or fixtures that each use water in a slightly different way. Customers typically ask about:
User interface
Lightning
Classic
Console
Mobile
Analytics
Reports & Dashboards
CRM Analytics
Tableau
Automation
Flow
OmniStudio
Development tools
Apex
APIs
LWC
Other platform features using data from Salesforce Connect
Each of these features are like appliances built by different teams at different times. None of them use External Objects in precisely the same manner; External Objects come from a data framework that each feature team implements against in their own way. Hence, questions such as “how does Console work with External Objects?” need to be directed to the team who can speak to how that feature is built.
Unfortunately, deep inspection of the pipes doesn’t tell you much about how the sink works.
Limits
As of this writing, there are two notable areas in which customers may encounter “hard limits” in Salesforce Connect’s processing. This section of the documentation contains a more complete list everything that could be construed as a limitation, though only these two are commonly encountered by customers and require additional commentary.
Callouts: Salesforce Connect calls out to the remote system to fetch external data in response to some user action in the platform. The action could be as simple as rendering a List View of the top 20 records, or it could be a complex piece of Apex invoked by Flow.
Due to legacy technical concerns in the OData 2.0 and 4.0 adapters, there is a limited number of callouts per hour that will be made to obtain/manipulate remote data. Those adapters make up to 20,000 callouts per hour by default, across all users in an org.
The other adapters effectively do not have a callout limit. Again, refer to the official documentation for full details.
Customers facing this limit should upgrade to the 4.01 Adapter, which does not have the callout limit. Earlier sections of this guide cover on that topic.
Contact our support team if you’re using OData 2.0 and upgrading to 4.x is in your plans but is still in the future.
ID Mapping: The Salesforce platform needs an ID for each record in the database for many (if not most) of the capabilities to function. List Views, Record detail pages, Reports, and more all need this to perform their operations. To apply these capabilities to external data, Salesforce Connect creates a Salesforce ID for each remote record it encounters, and maps it to the External ID that can be used to query that record from the remote system.
This mapping is temporarily stored in a table we manage internally, and there is limit to the rate at which mappings can be inserted into this table: 100,000 mappings per hour can be created.
The mapping is created the first time Salesforce Connect encounters the record in question; it happens automatically the first time we query the record.
Just like Salesforce’s 15/18 character IDs, the External ID is arbitrary and treated as a String.
Contact our support team if you’re planning something like a “one-time data load” and you’re concerned your users might touch more than 100,000 different records in a single hour.
There are plans in place to raise this limit significantly in the future; refer to our safe harbor statement.
Troubleshooting
Salesforce Connect is highly reliable, and its straightforward architecture minimizes problems at run time. When customers encounter trouble, it’s typically at setup time and almost always relates to authentication.
If you’re having trouble authenticating to the target system, you’ll need to engage the team that maintains or supports that endpoint to understand the auth options. That might be the support team from a major vendor like AWS or Snowflake, or it could be the developers that built the custom server-side back-end.
It’s best to troubleshoot by simplifying the number of “moving parts,” so one good strategy is to take Salesforce Connect out of the equation and use curl or Postman to reach the endpoint and see if you can get a successful response. Newer adapters use Named Credentials for callouts and authentication, so you may want to refer to the Troubleshooting section of this guide. Named Credentials can also be used with the older adapters using this strategy.
Once you can authenticate, the Validate & Sync capability handles the heavy lifting in the setup process. The notable exception to this is the Amazon DynamoDB Adapter, which has its own configuration wizard to aid setup as much as possible in the absence of metadata describing the external table. If your DynamoDB table has a complex model, you’ll want to carefully review our documentation on qualifiers and consider modeling your solution on this example.
If you’re having trouble writing the Apex code for the Custom Adapter, refer to the section above on that adapter for links to the documentation and samples.
Licensing
Salesforce Connect is not free, and comes with an add-on cost based on the number of connections. Customers need one license for each endpoint from which Salesforce Connect accesses data. The endpoint can, in theory, aggregate data from multiple back-end data stores—and that has no impact on licensing. In the case of AWS or Snowflake, a single endpoint can surface a vast amount of data.
One license of Salesforce Connect allows for one External Data Source, defined by one endpoint. This can aggregate data from multiple back-end data stores.
Licensing for the Cross-Org Adapter
The exception to this is the Cross-Org Adapter, which allows a given Salesforce org to access up to five other orgs. Note, however, that if Org A needs to read data from Org B—and vice-versa—then each of those orgs needs a license. That requires (at least) two licenses to be purchased, with one placed in each org.
Licensing for the Cross-Org Adapter
One license of Salesforce Connect enables connections to both one external endpoint and five other Salesforce orgs.
One nice bonus is that a single license of Salesforce Connect allows an org to connect to one external endpoint, and five other Salesforce orgs.
To get an accurate estimate of the licensing costs, it’s best to consult with your Salesforce account executive, who can provide tailored pricing based on your organization’s needs.
If you’re still evaluating Salesforce Connect, you can sidestep licensing concerns and try it out in a Developer Edition or Trailhead org for free. Both contain the licenses you need to try it for free.
Salesforce Connect offers a powerful and efficient way to integrate external data into your Salesforce environment. With its real-time data access, reduced data redundancy, and simplified maintenance, it presents a compelling alternative to traditional ETL processes. By leveraging out-of-the-box adapters and following best practices for troubleshooting, you can maximize the benefits of Salesforce Connect.
Named Credentials allow Salesforce developers and administrators to specify the URL of an outbound HTTP call and its required authentication parameters in one definition. By capturing this in a declarative manner, you don’t have to worry about the authentication protocol implementation, endpoint allowlisting, or token storage. Trailblazers can focus on their Flows or Apex code and let the Salesforce platform handle the rest.
The remainder of this article goes into additional detail on the different aspects of this feature set and deepen your understanding. Think of it like a director’s commentary to a movie; not strictly required, but available for those that want a deep dive.
Origin
The Apex programming language has had HTTP callout capability for quite a while, and, in the early years, administrators needed to specify which endpoints can be referenced in callouts by defining Remote Site Settings. This is an allowlisting construct which forced administrators to explicitly take action before code in their org could call out to a remote system. (That notion of explicit action persists to this day, but in a different form.)
The popularity of OAuth caused us to reevaluate this problem space, since OAuth’s browser flow is a multi-step process that is difficult to manage in Apex with a high degree of trust. This combination of factors prompted the team to combine the endpoint definition with built-in authentication protocol support—and thus, Named Credentials was born.
Capabilities
Named Credentials includes many capabilities; what follows is a description of each one.
Auth Protocol and Token Management
Named Credentials handles the handshaking between Salesforce and the remote identity provider or token endpoint. This is more than just a single OAuth implementation; there are multiple variants under the OAuth standard, as well as completely different auth approaches like AWS’s Signature V4, API keys, JWT, and Basic Auth. We keep up with these specs, as well as the ways in which major vendors have chosen to implement them.
We also handle encrypted token storage and refreshing, so your application can wash its hands of that concern and never touch a sensitive value. It’s wise to consider these tokens as “radioactive” and not handle them any more than necessary.
Endpoint Definition and Allowlisting
By defining the target endpoint in a Named Credential, you can allow administrators to adjust it by keeping it out of your code. This gives you more flexibility when it comes to production deployments, keeping your code cleaner and less likely to fail audits.
Furthermore, Salesforce administrators can control which remote endpoints their orgs are allowed to call; this has always been an element of trust supported by the Salesforce platform. But when the endpoint is defined in a Named Credential, this is handled automatically.
Private Routing
Highly regulated industries like financial services and health care often prefer to route network traffic privately so that it doesn’t traverse the public internet. Named Credentials supports this by leveraging Private Connect, which allows integration traffic between a Salesforce org and an AWS account to avoid the internet. Salesforce and AWS have worked together to bridge our networks together to deliver this capability.
Bear in mind there’s no other way to achieve private routing in your callouts besides using a combination of Named Credentials and Private Connect. You define the target endpoint in a Named Credential, and also specify the Outbound Network Connection that should be used to route that call. If you make the callout in “raw” Apex code, it will be routed over the public internet.
Configuration API
While Named Credentials support the Metadata API, this can only be used to move some configurations between orgs. Unfortunately, you can’t use it move any shared secrets like API keys between your orgs, because that would involve retrieving the secret value from the org in clear text (before deploying it to the target org). You also can’t package these secrets, for the same basic reason.
To close this gap, we have a configuration API, available in both Apex and via REST (as a Connect API). You can use this API as a control plane to create and manage credentials, enabling what you might call infrastructure-as-code or policy-as-code. This new API gives you different options to solve these issues, as well as others we haven’t foreseen regarding setup. You can write code against this new API and blend it into your CI/CD pipeline.
Refer to our packaging guide for details on what you can package, and where you’ll need to use the API to close any remaining gaps.
ISV Support
It’s worth reiterating that the configuration API supports creating Named Credentials from Apex code, which is useful for ISVs that want to build a custom setup experience for administrators installing their managed package. We have a developer guide with Apex samples devoted to this topic.
Note that credentials created in this manner are attributed to the namespace of the managed package that created them, but are disabled by default. An administrator needs to explicitly enable them for callouts using a toggle switch.
As of this writing, Apex can only be used to create Named Credentials—not edit or delete them. We plan to address this soon, but when we do, any updated credentials will be left in a disabled state that requires administrators to turn them back on manually. This prevents a nefarious ISV from redirecting their endpoints from a trusted one to one that an administrator hasn’t seen.
Granular Principals and Permissions
Named Credentials supports robust security in multiple ways. First, explicit access is required to use the Principal in a credential—the identity of the caller in the external system—for a given callout. (AWS also uses the term Principal to represent the same idea.) Many times, this identity is an “integration user” or “service account” that does not correspond to an individual human being. Principals like that typically hold an API key or other secret, for example. The permissions make it explicit that a given User has been granted access to that key/secret—not in its raw form, but usable within the context of a callout. The callout will be blocked if the calling user hasn’t been granted permissions to the Principal.
Users need permissions to make callouts using a certain Principal. It’s similar to how we added the requirement a few years ago that users need explicit permission to run an Apex class. (A key principle for us at Salesforce is that everything is secure by default.)
Additionally, we allow multiple Principals to be associated with a given credential. Service Cloud agents, for example, might have read access to data in a remote system, whereas Service Cloud managers also have the ability to delete records in that external app. If a single User is granted access to multiple Principals for the same credential, there’s a precedence that can be applied to decide which one to use. Essentially, admins set a numerical order using the Sequence Number.
Approximating Record Sharing
The use of different Principals opens the door to external data with different levels of access, almost like record sharing in Salesforce. If a given endpoint can return different results with different user context, we want to enable access that’s as fine-grained as the endpoint allows.
Even though most remote systems only support broader “roles” like “Sales” vs. “Marketing,” major vendors like AWS do in fact offer very fine-grained access controls, and we encourage customers to take advantage of them to the fullest extent possible. That way, the Salesforce “client app” has minimal, optimized access to the remote system. We enable this via support for AWS’s IAM Roles Anywhere, dynamic scopes in OAuth, and more.
Extensible Architecture
This is a robust subsystem with a lot of “headroom” for future growth. We are committed to solving for as many different variations of authentication challenges as we can reasonably support across our many thousands of customers.
Rationale: Why not “roll my own?”
It’s possible for you to write your own Apex code to handle authentication handshakes, but it’s a bad idea. From the security perspective, you’d need to figure out where to store the various tokens securely—but pass it to different user contexts at the right time to perform the callout successfully. It’s easy to mishandle this and create a vulnerability. Other major vendors like Google also encourage developers to use well-debugged libraries to tackle this task.
From the productivity perspective, the less code you have to write and maintain, the better. Let us handle it and stay focused on what’s unique about your application. Why do undifferentiated work?
Expanded architecture: why the change?
In recent years, we’ve expanded the architecture to prepare for future growth and deepened support for other protocols like AWS SigV4, API keys, and JWT with custom claims. We’ve also added a configuration API to make it easier to automate the deployment of credentials across environments.
As we built support for this myriad of options, we came to a point where we could no longer squeeze all the configuration settings for the entire subsystem into one database table. We would’ve needed something like Record Types, but unfortunately that doesn’t exist for metadata objects. Hence, there are multiple objects under Setup you’ll need to configure. Read on for an explanation of the different parts.
Understanding Named Credentials vs. External Credentials, Permissions, and more
One change we made as part of the recent architecture expansion is to capture the endpoint and the authentication details via separate (but related) objects under the Setup menu: a Named Credential, and an External Credential. In the case of OAuth’s common browser flow, you’ll also need an External Auth Identity Provider to specify additional configuration parameters. (More on that below.)
The endpoint is still defined in the Named Credential, which now has a lookup to what we call an External Credential. We moved the authentication configuration to this new object; it holds settings for which protocol you’re using (OAuth, JWT, etc.) and the parameters required to make that callout successfully on your behalf. Separating the two objects allows the same auth config to be used for multiple endpoints. For example, you might authenticate against Google’s OAuth service, and then make calls to both the Google Drive API and the Google Calendar API with the same token.
Aside: External Auth Identity Providers
Developers and system administrators often face hassles when integrating enterprise systems due to those systems exhibiting non-standard behaviors. This is extremely common; many major vendors deviate from the OAuth spec in one way or another. To cope with this issue, we’ve split out OAuth configuration even further into an External Auth Identity Provider with a set of Custom Request Parameters. This allows you to add headers, query string parameters, and more to the handshake with the identity provider.
It’s worth lingering on this point for additional clarity. One reason many widely-used systems do not conform strictly to the OAuth specification is that they’re SaaS apps with an element of multi-tenancy; many customers share the same API and infrastructure. So when an application connects to that API, the API demands that clients specify which tenant they are acting on behalf of—and there any many different ways to do this. Some apps have a Salesforce-style My Domain URL, but others might simply expect a string value in a special header. Unfortunately, the OAuth spec does not cover this, so many vendors handle it in slightly different ways.
Due to this divergence of behavior, you’ll often find that you need to add a custom parameter to the query string or as a specially-named header. This is where Custom Request Parameters are useful; you can add parameters to query, HTTP header, or request body for the token request or refresh request. (Typically, the token request and the refresh request will have matching parameters—but you never know!) You can also add query parameters to the authorize request, which tacks them onto the URL users visit to log into the external system.
You may also need to add headers that are part of the HTTP spec to ensure that the IDP’s endpoint is returning information in the format Salesforce expects (JSON). This end-to-end example uses GitHub to show this in action; you can see all the different parts of the Named Credentials stack working together.
So, to recap: because OAuth is both commonly used but requires non-standard configuration, an External Auth Identity Provider is required to capture the additional configuration. An External Credential has a Lookup to an External Auth Identity Provider to reflect this. If the external system deviates from standards so wildly that configuration parameters aren’t enough to get authentication working, you can still use an Auth Provider along with a custom plugin written in Apex. External Credentials can look up to either an External Auth Identity Provider or an Auth Provider, thus providing the fullest range of solutions.
Generally speaking, we recommend using an External Auth Identity Provider along with Named Credentials to achieve integration via OAuth. External Auth Identity Providers are friendlier when it comes to packaging, and offer slightly stronger security by way of PKCE support and suppressed display of the client secret.
Note: the means by which developers and administrators make callouts has not changed. For example, the syntax used in Apex to refer to a Named Credential is the same—even though we have expanded the underlying architecture.
These objects work together to deliver the benefits of Named Credentials, while also supporting new use cases. We’ll use an extended analogy to explain the different pieces.
Analogy: Driver’s License and Passport at the Airport
In the United States, most adults present their Driver’s License when asked to verify their identity. This single ID card enables you to access many different resources and services. You include this with your paperwork when opening a bank account. You submit this when registering to vote. And you can use it when checking into a flight at an airport.
Each one of those different resources or services would map to a Named Credential, and you only need one External Credential to access them all. We allow External Credentials to be reused so they don’t have to be duplicated, since doing so is not a best practice from a security standpoint.
Not everyone has a Driver’s License, of course. Only those who’ve passed the test and meet other criteria re: age and physical capability have permission to drive. In Salesforce, this is represented by Permission Sets, and External Credentials are tied to Permission Sets to signal that a given User is allowed to utilize them. (We’ll take a break from the analogy to clarify that this permission check happens at runtime, right before Salesforce makes the HTTP callout on the User’s behalf.)
The convenience of a single ID card is obvious, but we also see potential issues. What does being a safe driver have to do to with traveling by plane—or voting, for that matter? For air travel, it’s better to have a passport. With that form of identification, you can fly to foreign countries and (optionally) save time via programs like Global Entry and TSA PreCheck.
A driver’s license and passport are both state-issued IDs, and there are others like military IDs. So for the sake of this discussion, we might say that U.S. airports have a “State-Issued ID protocol” with its own processes, enforcement, and evolution. This is analogous to an authentication protocol like OAuth 2.0 or AWS’s Signature Version 4. The protocol has an interrelated set of rules and processes that dictate how the verification will work—and they change over time. In the case of U.S. airports, we’re in the middle of a transition from driver’s licenses to the Real ID program (as of this writing). You can think of this as an upgrade to the State-Issued ID security protocol, which deprecates support for simpler forms of identification.
For the time being, travelers can bring either a passport or a driver’s license to the airport to get through security. In Salesforce, we represent this by allowing multiple Principals for a given External Credential, one of which provides more access than the other. (A driver’s license can’t get you into a foreign country, but a passport can.)
Diagram showing key terms used in Named Credentials
Here’s how we might depict this in the example of the airport and other services:
Diagram showing key terms used in Named Credentials, using airport security as an analogy
The Moment of Authentication
As you approach the airport, a passport or driver’s license isn’t enough to get you into your seat on the plane: you need a boarding pass. For this discussion, let’s assume you walk up to the counter and check in with an agent. When you give the agent your ID, they authenticate you, checking that the ID is valid (not expired or forged) and represents you (versus someone else). Inherent in this transaction is a request to access a certain resource (a seat on the plane). If all that goes well, they hand you the boarding pass, which will get you access to the desired resource when you’re at the gate.
This critical moment is worth more examination. Most integrations require a two-step process (like the airport) wherein Salesforce presents the credentials (ID card), and in exchange we receive an access token we’ll use down the line. This initial exchange might fail, and the most common reason is that the credentials are invalid or expired. If your ID or passport is expired, the agent check-in desk can’t trust that you are who you say you are—and they won’t give you a boarding pass.
Sidebar: HTTP Error Codes and Token Refreshes
When the callout from Salesforce can’t be authenticated due to invalid or expired credentials, the external system should return an error with a status code of 401. Some systems don’t follow the standards and return a different status code like 400 or 403, which is not correct. A 403 should be reserved to communicate that the identity of the caller is valid, but the external system knows that the caller in question should not be given access to the requested resource.
Interestingly, this is how the Salesforce API works; you may have established your identity correctly, but if you attempt to read a record that you’re not authorized to access, you’ll get a 403 returned. In our airport analogy, I can present a valid ID, but if I purchased a seat in Coach, I won’t be allowed to access the First Class cabin. My identity has noting to do with it; identity is not access. I’m also not allowed to access the cockpit and fly the plane.
When Salesforce receives a 401, we return to the correct endpoint to “refresh” the token by presenting the credentials again—yielding a new token. The Named Credentials subsystem will then attempt the callout again, with an updated token. If Salesforce receives a 403, some other security setting should change in the external system to grant the principal the correct access to the target resource. Until that happens, API callers won’t be able to tell the difference between insufficient access rights and expired authentication.
We recognize that Salesforce administrators often have no control over how external APIs work. Hence, we’ve added a setting to External Credentials called Additional Status Codes for Token Refresh to allow status codes besides 401 to trigger Salesforce to obtain a fresh token. If, for example, the system in question returns a 403, you can simply enter 403 in the text box for that configuration. You can also enter a comma-separated list of multiple response codes; check the documentation on External Credentials for details.
Understanding User External Credentials
Now that you’ve authenticated, you’ve got your boarding pass—which will be critical for the future moment at the gate. In a system integration, Salesforce stores the returned access token securely in the User External Credential object. These tokens expire, and the Named Credentials subsystem handles the refresh process automatically. If Salesforce needs access to the same resource again, we’ll overwrite the old token with the new one.
Note that User External Credential is a data object, not a metadata object. End users who make callouts at runtime will need some access to this object via their Profile or Permission Sets. If you create a new Permission Set, it will have access to this object by default; that’s a convenience we have put in place to save administrators some time and hassle. That said, you can turn that off and grant access in your own way, if you prefer. Our recommendation is to create new, fine-grain Permission Sets for specific external systems that can be bundled into Permission Set Groups. Granting broad access at the Profile level makes it easy to open up “too much” access.
Since User External Credentials are data, they can’t be packaged; this is benefit that avoids the security risks inherent in moving it between environments. To be clear, these sensitive values like access tokens and API keys will not be moved from production environments to sandboxes during a sandbox refresh.
It’s also useful to bear in mind that an in an org with thousands of users, Salesforce may need to store tens of thousands of access tokens. There generally aren’t tens of thousands of metadata records in an org—you’re not likely to have >10,000 Flows or Apex Classes—so we store this as data to make internal operations more efficient.
Diagram showing key terms used in Named Credentials, including User External Credentials
Using our airport analogy, User External Credential would be analogous to a purse or wallet that holds your boarding pass: don’t forget it! You may need to manage access to this object carefully; this article explains when different levels of access to that object are needed.
Diagram showing key terms used in Named Credentials, with User External Credentials as a purse or wallet
Note: If your configuration includes Guest Users, bear in mind they have a unique Profile. If unauthenticated Guest Users are using functionality that makes callouts, you’ll need to grant explicit access to the User External Credential object as part of that Profile. This article in the documentation describes what level of access is needed, depending on the authentication protocol.
Accessing the Resource (Finally!)
You’ve made it to the gate and are ready to board. You present your boarding pass, walk onto the plane, and take your assigned seat. Hooray! You finally made it!
Diagram: using a passport to board a commercial flight successfully
In terms of Named Credentials, Salesforce makes the callout to the target endpoint, and presents the access token along with the request to read a given piece of data or invoke an operation. Access is granted, and we receive the appropriate response.
Certificates
In the analogy above re: a driver’s license or passport, those IDs are similar to a certificate in Named Credentials. A certificate asserts the caller’s identity, but is issued by a trusted, neutral authority separate from both Salesforce and the target external system. Contrast this with a password, which comes with no such additional assurance. My driver’s license was issued by the state of Illinois. A certificate in a system integration might be issued by a company like DigiCert or GlobalSign.
The external system dictates whether or not certificates need to be used, and Named Credentials supports their use when calling the target endpoint. For better or worse, certificates can’t be packaged (as of this writing). This is likely due to the sensitivity in widely distributing a trusted identity. Factor this in when you’re configuring Named Credentials in your org.
Having Trouble with Permissions?
The legacy iteration of Named Credentials did not have any access controls, and we wanted to improve this when we revamped the architecture. In particular, here are some things you should watch out for:
Callouts will fail if the calling user doesn’t have permissions to the appropriate Principal defined as part of an External Credential. Refer to this Help & Training article for details on how to grant such permissions.
Callouts will also run into trouble if the calling user does not have access to the User External Credential object, since that object holds the actual access token used with the target endpoint. The section above explains this in more detail, and there’s a special Help & Training article with a complete rundown of how much access is needed based on which authentication protocol is used.
When a new Permission Set is created, it receives access to the User External Credential object by default. This makes it easier to grant access without worrying about User External Credentials. The object access can, however, be disabled if you prefer to manage your permissions another way.
Guest Users will always need explicit access to the User External Credential object.
If a managed package requires you as an administrator to create a particular Named Credential for its use, note that you will need to allowlist the namespace of the package before it can make a callout. Refer to this Help & Training article.
MuleSoft Robotic Process Automation (RPA) gives you the power to automate business processes that usually require human input and interact with systems that don’t have an API, extending the reach of Salesforce’s process automation capabilities by integrating these RPA processes into flows in Salesforce as of Winter ’23!
Use MuleSoft RPA Manager to publish REST APIs for your RPA processes to Anypoint Exchange, which you can then register as External Services in Salesforce and invoke from low-code tools like Flow Builder.
Step 2:Create an Authentication Provider – Use the ID and the secret from your MuleSoft Anypoint Platform connected app to create an authentication provider.
Step 3: Create a Legacy Named Credential (Retrieve APIs) – Create a legacy named credential to access/authenticate into your MuleSoft Anypoint Platform connected app from Salesforce and retrieve the APIs published to MuleSoft Anypoint Exchange. The legacy named credential stores the URL for MuleSoft Anypoint Platform. External Services uses the legacy named credential when listing the MuleSoft APIs available for import.
Note: the ability to create a ‘Legacy’ named credential is still supported, although it will be discontinued in a future release, at which point, this portion of the instructions will be updated to reflect the new capability.
Salesforce: Named Credentials Home Page
Step 4: Create a Named Credential (Runtime) and External Credential
Note: MuleSoft RPA authenticates clients invoking RPA processes through API keys. The Salesforce Winter ’23 release includes new functionality in Named Credentials and External Credentials that supports this type of authentication.
Create a second named credential that stores the endpoint for MuleSoft RPA Manager. External Services uses the second named credential when invoking “runtime” the MuleSoft RPA process in a flow.
External credential:
Before creating a second named credential, first create an external credential.
Create an external credential to capture the API key and other authentication details.
Then create a named credential to store the actual endpoint.
This allows for multiple endpoints to be addressed with the same authentication configuration.
After entering the details for the external credential, click Save. You’re taken to the Named Credentials screen. Now you need to create a permission set mapping for this new external credential. This mapping ensures that only the correct users get access to these credentials.
Permission set mappings:
Click External Credential and select the external credential you created.
Scroll to Permission Sets Mappings so you can link the external credential to a user’s permission set.
Click New to create a permission set mapping for this external credential using the details below for an external credential that uses ‘Custom’ as the authentication protocol.
Custom headers:
Lastly, create a custom header for this external credential using the the details below as guidance for how to create a custom header.
Example Salesforce: External Credentials Detail Page
Now that you have an external credential, create a named credential and then link it to the external credential you just created in the previous step. As mentioned before, this second named credential stores the endpoint for MuleSoft RPA Manager. External Services uses the second named credential when invoking “runtime” the MuleSoft RPA process in a flow. Use the details below for how to create a named credential.
Example
Salesforce: New Named Credential Window
Verify that the external credential and the named credential you just created are linked
From the Named Credentials page, click External Credentials.
Click the name of the external credential from this list and confirm that the named credential you just created appears in the Related Named Credentials area shown in the example below.
As a reminder:
The Named Credential stores the MuleSoft RPA Endpoint
The External Credential stores the MuleSoft RPA API Key + Authentication details
Example Salesforce: External Credentials Detail Page
As you are configuring the external service, recall that you created two named credentials.
Legacy named credential (Retrieve APIs) – this named credential stores the MuleSoft Anypoint platform URL and is used to retrieve the APIs published to MuleSoft Anypoint Exchange. Use this named credential in the “Select a MuleSoft Anypoint Platform Account” screen.
Example
Named credential (Runtime) – this named credential stores the MuleSoft RPA Manager URL and is used when invoking “runtime” the MuleSoft RPA process in a flow. Use this named credential in the “Configure your MuleSoft Anypoint Platform Service” screen.
Now you are ready to start and check the status of the MuleSoft RPA process from a flow.
If you follow the steps outlined in the help docs Invoke a MuleSoft RPA Process in a Flow, listed below are a few additional tipsto help guide you through the flow configuration.
Create Resource for RPA Process Input Variables
Tip: In step 2, when creating a New Resource to store the input variables for the RPA process, you can obtain the External Service Name and Apex Class Name from the External Services Detail Page to help configure the New Resource
Salesforce: External Services Detail Page
Assign Values to RPA Process Input Variables
Tip: In step 3, you can obtain the information about each variable/input parameter that needs to be defined in the above Apex class from the External Services Detail Page as well as the OpenAPI specification (a few examples shown below).
https://unofficialsf.com/wp-content/uploads/2022/09/largeUCSF-300x133.png00Andrea Guzmanhttps://unofficialsf.com/wp-content/uploads/2022/09/largeUCSF-300x133.pngAndrea Guzman2022-11-08 14:50:162022-11-15 10:32:58Invoke a MuleSoft RPA Process from Flow using External Services
Now you can access External Services registered actions directly from Apex to tap into reusable functionality when writing Apex code. Previously, actions created through External Services were exposed exclusively for invocation through Flow or Einstein Bots.
If a registration is in use by a flow, now you can update it with a new, compatible API specification version. Previously, you couldn’t update a registered schema that was in use by a flow. If the new schema version isn’t compatible, the edit workflow notifies you which operations and schema objects are in use by which flows and by which Apex classes. With this information, you know which existing references are incompatible so that you can remove them before saving your updated registration.
Now you can register an external service without manually editing the schema before registration to conform to the 80-character limit for derived operation and object developer names. This enables you to register more APIs with less friction!
Check out all the enhancements you can look forward to with the Spring ’22 release!
External Services is a feature of the Salesforce Platform that empowers customers to connect Salesforce to external business actions and build process integrations without writing custom code.
https://unofficialsf.com/wp-content/uploads/2022/09/largeUCSF-300x133.png00Andrea Guzmanhttps://unofficialsf.com/wp-content/uploads/2022/09/largeUCSF-300x133.pngAndrea Guzman2022-02-04 15:49:292022-02-04 15:49:32Learn MOAR in Spring ’22 with OpenAPI 3.0 Support for External Services
UnofficialSF.com has added a new section devoted to Service Cloud channel functionality, which is increasingly driven by flow-based services.
Check it out here. If you know of a good post or page on the topic, don’t hesitate to let us know via the form on the home page.
https://unofficialsf.com/wp-content/uploads/2022/09/largeUCSF-300x133.png00Alex Edelsteinhttps://unofficialsf.com/wp-content/uploads/2022/09/largeUCSF-300x133.pngAlex Edelstein2022-01-20 16:34:202022-01-28 08:46:40UnofficialSF has a new Service Cloud Channels Section
Check out some of the changes and enhancements to External Services in the Winter ’22 release – supporting even larger API spec sizes (4MB!) and improving the registration workflow with rescoped limits!
Import MuleSoft Anypoint Platform APIs via External Services
Import your MuleSoft Anypoint Platform APIs in a few clicks. Previously, you needed to manually export your Open API 2.0 specifications from MuleSoft and import them into an external service. Now, all you need to do is select your MuleSoft Name Credentials and let Salesforce do the heavy lifting of importing your endpoints and converting them into actions.
Revised and Expanded Operation, Action, and Object Limits
You can register even more complex, publicly available API specifications. Most registration limits have been rescoped from a per API spec limitation to a per org limitation, and have been expanded.
Map Non-Standard Media Types in Your Registration
A Salesforce administrator, developer, or ISV can edit the compatible media type mappings in an external service registration for OpenAPI specifications with unknown or non-standard request or response media types.
For Winter ’22, we’ve provided a workaround. With the Metadata API, you can manipulate a registration and override the definition of the custom header.
External Services in Einstein Bot Builder
Add an external service’s action to your bot from the Bot Builder. Previously, you could only add an external service’s action to your bot via a flow.
Check out the announcement regarding all the improvements shipping in the Summer ’21 release!
#LearnMOAR about enhancements to external services in Summer '21. ⬇️
Now you can seamlessly integrate with even more third party platforms and build upon their published #APIs without having to manually edit input specifications before registering. https://t.co/e9p7Yrmqst
— Salesforce Developers (@SalesforceDevs) May 18, 2021