
From Adwait : Email Appointment Confirmation with Video Conferencing Information (3rd Party) included
Introduction
This blog will cover the scenarios for a salesforce user to integrate third party web conferencing tools which provide video appointments (like zoom, WebEx, MS team) and send an email confirmation including those details for the recipient to attend the meeting.
We will follow the following steps in order :
- Integrate salesforce scheduler with any third party video web conferencing provider.
- Create a record triggered flow on Service Appointment that will call external API’s and obtain the Meeting URL.
- Fetch the associated lead email address and service resource name.
- Configure this flow to stamp the service resource name on the comments field and meeting URL on AppointmentBookingInfoURL field of the service appointment.
- Create an apex action to send email to the leads email address using appropriate email template.
We will be covering both the scenarios
- Service Appointment is booked used AppointmentType as “Video”.
- Service Appointment is booked using EngagementChannelType with ContactPoint as “Video”.
Now, we will be following these steps but before that go through the key points and always keep them in mind.
Key Points
- AWS Chime and other third party providers(webEx, MS Team etc) cannot be used in the same org.
- In the steps ahead we will be using comments field on Service Appointment to store service resource name, this is just a working example you can also create a custom field for that purpose but don’t forget to edit the email template if you are using a custom field for this purpose.
- While using third party providers after the service appointment is completed the status of the service appointment should be changed manually.
- Third Party Integration Customer can use only one Zoom or any other provider user to setup and have to use the same common credentials to initiate the call.
- Always make sure that you provide a valid email address for each unauthenticated user. For more information refer to this doc https://help.salesforce.com/s/articleView?id=sf.adding_new_users.htm&type=5&language=en_US.
Appointment is booked using Appointment Type “Video”
Integrating your org with any third party video web conferencing provider
One can follow these blogs for integrating orgs with different providers:
- Zoom : https://unofficialsf.com/create-zoom-meetings-from-salesforce-with-scheduler/
- Microsoft Teams : https://unofficialsf.com/create-ms-team-meetings-from-salesforce/
- WebEx : https://unofficialsf.com/webex-with-salesforce-scheduler/
- VRA : https://unofficialsf.com/vra-scheduling-use-salesforce-scheduler-and-visual-remote-assistant-to-provide-virtual-meetings/
After integrating your org with the web conferencing provider of your choice we need to create a record triggered flow.
**As rest of the steps are common, For the purpose of this blog we have integrated our org with zoom.
Create a Record -Triggered flow on Service Appointment
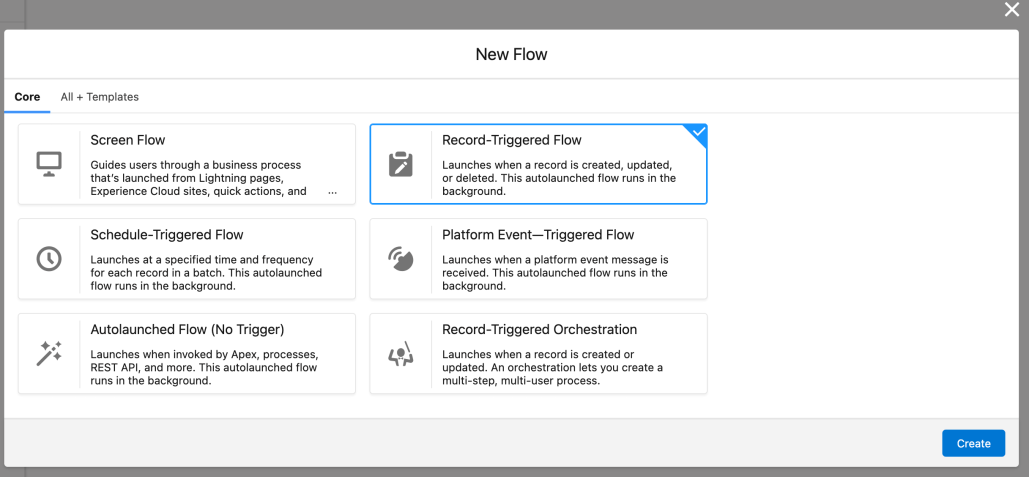
- Go to Setup → Flows → New Flow
- Click on Record-Triggered Flow and Create
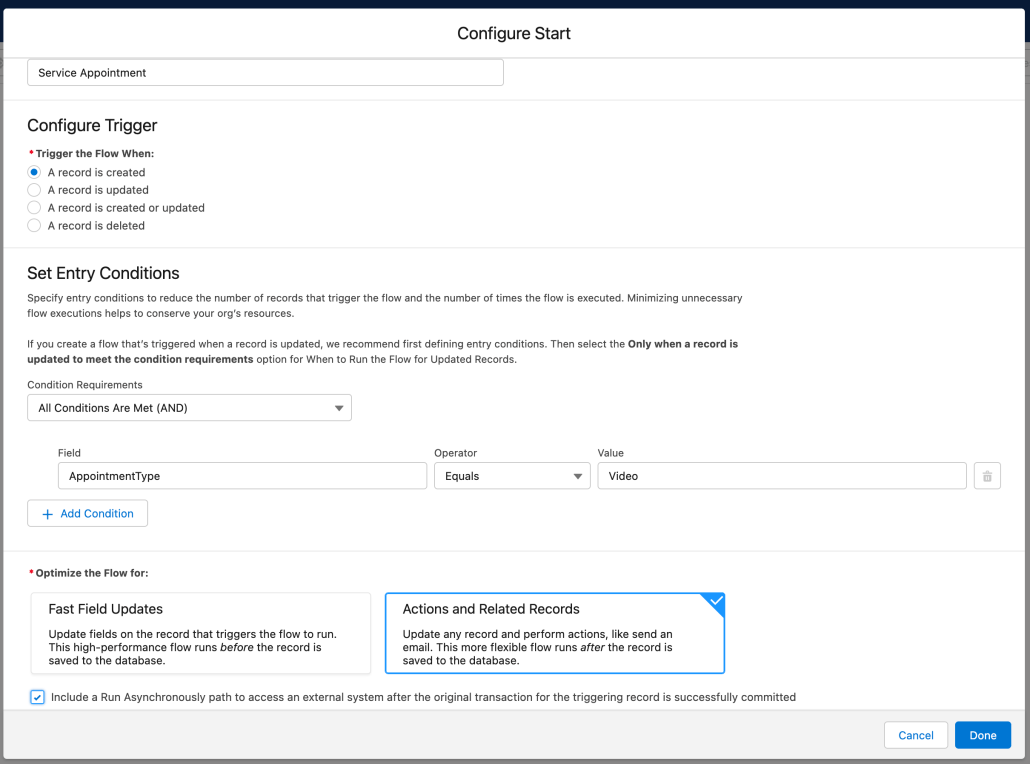
- Select Service Appointment as Object.
- Click “A record is created” radio button.
- From the Condition Requirements dropdown select All Conditions Are Met (AND).
- Add condition AppointmentType equals “Video”.
- Click Actions and Related Records.
- Click the “Include a Run Asynchronously path to access an external system after the original transaction for the triggering record is successfully committed” checkbox at bottom and click done.
- Select Free-Form from the drop down at top

- Open Developer Console in a new tab and create a new class “GetZoomMeetingURLwithInput” and use the code provided below inside the class body(this class will provide the meeting URL).
public class GetZoomMeetingURLwithInput {
   @InvocableMethod(label='Get Zoom Meeting URL with Input' callout='true')
   public static List<String> makeApiCalloutwithInput(List<String> appointmentId)
   {
       HttpRequest req = new HttpRequest();
       Http http = new Http();
       //Setup the Endpoint and append the name of the file
       req.setEndpoint('callout:SalesforceZoomPOCNC');
       req.setMethod('POST');
       req.setHeader('Content-Type','application/json');
       req.setHeader('Accept','*/*');
       req.setHeader('Accept-Encoding','gzip, deflate, br');
       req.setBody('{"topic": "test create meeting","type": "1"}');
       HTTPResponse res = http.send(req);
       System.debug('Response Body: '+res.getBody());
       /* Parse Response */
       JSONParser parser = JSON.createParser(res.getBody());
       String webLink;
       webLink = 'ZoomNotSetup';
       while (parser.nextToken() != null) {
       if ((parser.getCurrentToken() == JSONToken.FIELD_NAME) &&
       (parser.getText() == 'join_url')) {
           parser.nextToken();
           webLink = parser.getText();
           System.debug('join_url= ' + webLink);
           }
       }
   return new List<String>{webLink};
   }
}
**This piece of code is specific for Zoom and you can refer to the blogs mentioned above for other web conferencing providers.
- Go to the flow builder again and drag and drop one action element from the left hand side menu.
- Select “Type” from Filter by drop down.
- Click on “Apex Action” in the left side menu.
- Select “Get Zoom Meeting URL with Input” in the Action drop down.
- Enter “Get Meeting URL” in the label field and “Get_Meeting_URL” in the API Name .
- Click on the Don’t include button.
- In the appointmentId field select {!$Record.Id}.
- Expand the Advanced section and Click the “Manually assign variables” checkbox .

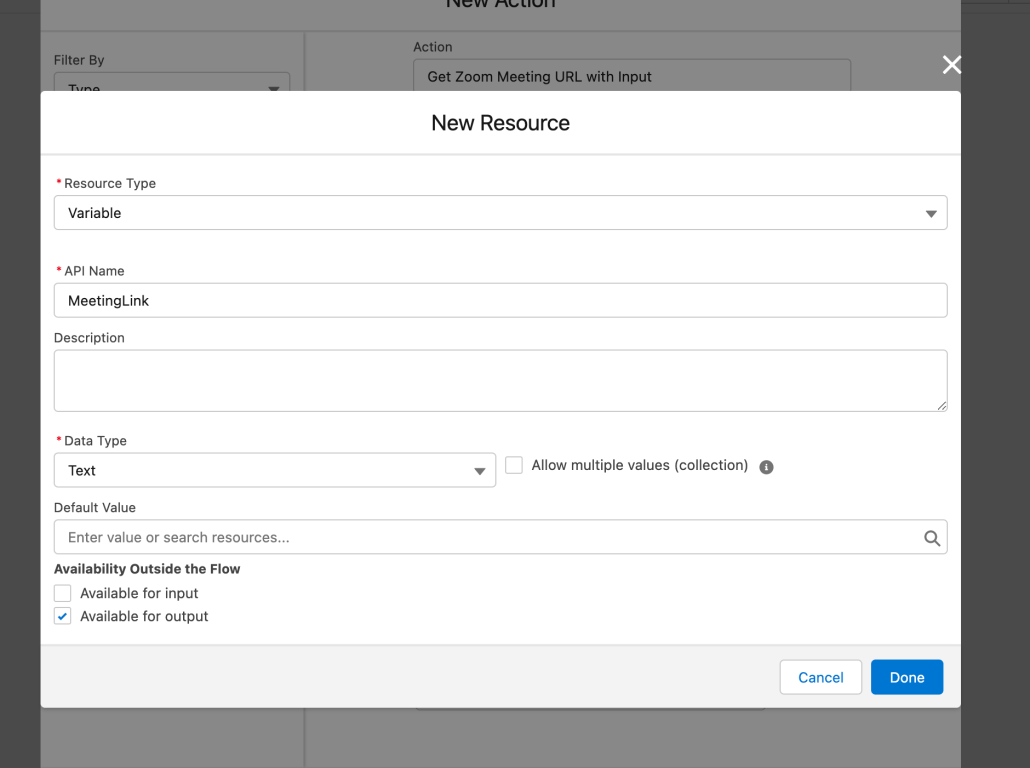
- Click on the output field input box and Click on the New Resource option.
- Select “Variable” as Resource Type.
- Enter “MeetingLink” in the API name field.
- Select Data Type as “Text”.
- Click on “Available for output checkbox“ and Click Done.
- Click Done again for the Apex Action.
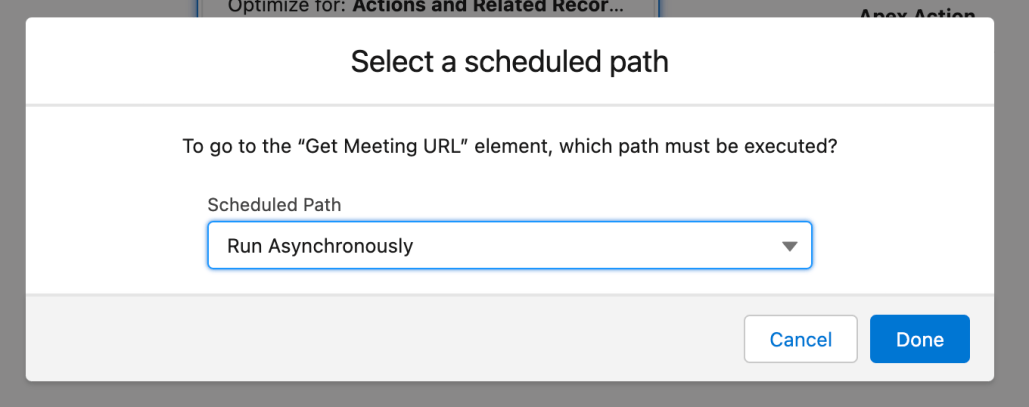
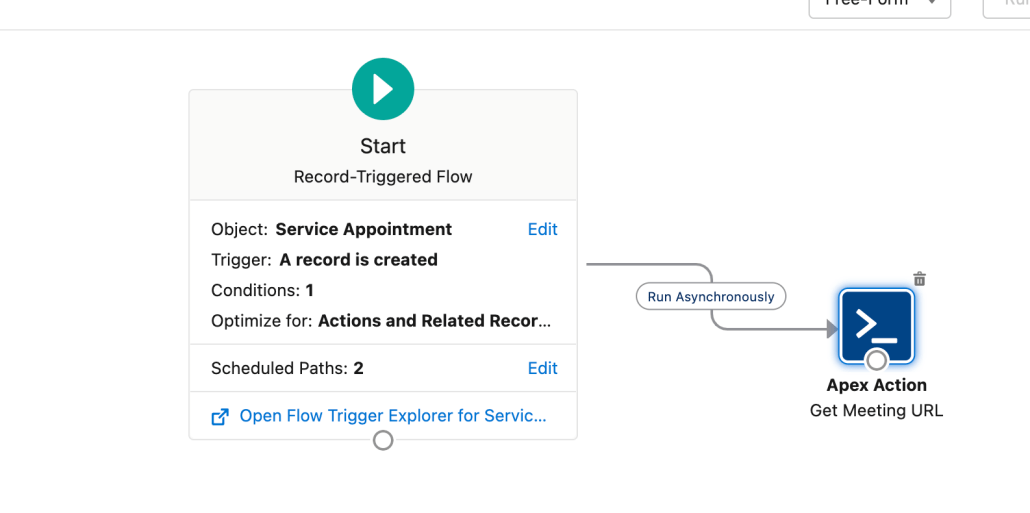
- Now, Connect the start element with the Apex Action element and Select “Run Asynchronously” as scheduled path
- Now, Your flow will look something like this.
Fetch recipient E-mail address from the parent lead record
- Drag and drop get records element on the flow builder.
- Enter “Get Lead Email” in the label field .
- Enter “Get_Lead_Email” in the API Name field.
- Select “Lead” as Object.
- From the Condition Requirements dropdown select All Conditions Are Met (AND).
- Add condition Id equals {!$Record.ParentRecordId}.
- Click “Only the first record” radio button.
- To store the value of record fetched create a new resource of type “Record” by clicking on the new resource from the Record input field.

- Select “Variable” as Resource Type.
- Enter “LeadRecord” in the API name field.
- Select Data Type as “Record”.
- Select “Lead” as Object and click Done.
- Select “Email” from the field drop down
- Click on “When no records are returned, set specified variables to null.” radio button and click Done.
- Connect the apex action with the get records element.
Fetch service resource name
- Drag and drop get records element on the flow builder.
- Enter “Get assigned resource” in the label field .
- Enter “Get_assigned_resource” in the API Name field.
- Select “Assigned Resource” as Object.
- From the Condition Requirements dropdown select All Conditions Are Met (AND).
- Add condition ServiceAppointmentId equals {!$Record.Id}.
- Add condition IsRequiredResource equals {!$GlobalConstant.True}.
- Click “Only the first record” radio button.
- To store the value of record fetched create a new resource of type “Record” by clicking on the new resource from the Record input field.
- Select “Variable” as Resource Type.

- Enter “ServiceResource” in the API name field.
- Select Data Type as “Record”.
- Select “AssignedResource” as Object and click Done.
- Select “ServiceResourceId” from the field drop down
- Click on “When no records are returned, set specified variables to null.” radio button and click Done.
- Connect the “Get lead record” action with this get records element.
Using this ServiceResourceId we need to fetch ServiceResource’s name
- Drag and drop get records element on the flow builder.
- Enter “Get Service Resource Name” in the label field .
- Enter “Get_Service_Resource_Name” in the API Name field.
- Select “Service Resource” as Object.
- From the Condition Requirements dropdown select All Conditions Are Met (AND).
- Add condition Id equals {!ServiceResource.ServiceResourceId}.
- Click “Only the first record” radio button.
- To store the value of record fetched create a new resource of type “Record” by clicking on the new resource from the Record input field.
- Select “Variable” as Resource Type.

- Enter “ServiceResourceName” in the API name field.
- Select Data Type as “Record”.
- Select “ServiceResource” as Object and click Done.
- Select “Name” from the field drop down
- Click on “When no records are returned, set specified variables to null.” radio button and click Done.
- Connect the “Get assigned resource” action with this get records element.
Stamp the ServiceResource name on the comments field and meeting URL on the AppointmentBookingInfoURL field
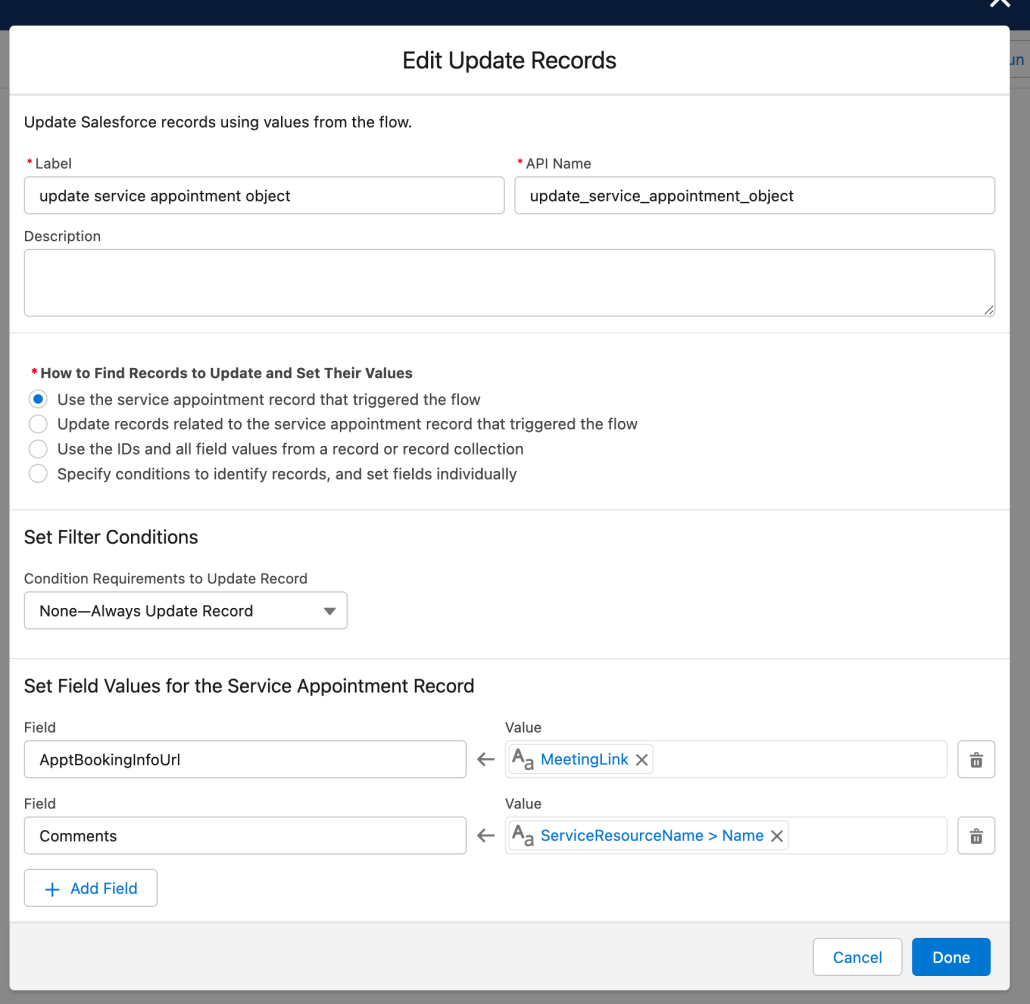
- Drag and drop update records element on the flow builder.
- Enter “Update service appointment object” in the label field.
- Enter “Update_service_appointment_object” in the API Name field.
- Click “Use the service appointment record that triggered the flow” radio button.
- Add field “ApptBookingInfoUrl” and MeetingLink(variable that stores the value of meetingURL) as value.
- Add field “Comments” and ServiceResourceName.Name(variable that stores the value of ServiceResource name) as value and click Done.
- Connect Update record element with previous get records element.
Create an apex action to send email to the leads email address
Go to developer console and create a new apex class “SendEmailToGuest” and use the code snippet provided below in the class body.
** There are some Out of the box Email templates that Salesforce Scheduler provides and here we are utilising one of them.
** The template unique name used here is specific for appointments scheduled using “Video” AppointmentType and needs to be changed in case of EngagementChannelType.
public class SendEmailToGuest {
   @InvocableMethod(label='Send Email To Guest' callout='true')
   public static Void SendEmailToGuestUsingEmailTemplate(List<inputvariables> inputParams)
   {
       EmailTemplate et = [SELECT Id,Subject, Body FROM EmailTemplate WHERE DeveloperName ='SchedulerUnauthenticatedUserAppointmentTypeEmailTemplateForThirdParty'];
       List<string> toAddress = new List<string>();
       toAddress.add(inputParams.get(0).leadEmail);
       Messaging.SingleEmailMessage mail = new Messaging.SingleEmailMessage();
       mail.setTemplateId(et.Id);
       mail.setToAddresses(toAddress);
       mail.setTargetObjectId(inputParams.get(0).leadId);
       mail.setWhatId(inputParams.get(0).appointmentId);
       mail.setSaveAsActivity(false);
       mail.setUseSignature(false);
       List<Messaging.SingleEmailMessage> allmsg = new List<Messaging.SingleEmailMessage>();
       allmsg.add(mail);
       try {
           Messaging.sendEmail(allmsg,false);
           return;
       } catch (Exception e) {
           System.debug(e.getMessage());
       }
   }

    public class inputvariables {
        @InvocableVariable
        public String leadEmail;
        @InvocableVariable
        public String leadId;
        @InvocableVariable
        public String appointmentId;
        }
}
- Go to the flow builder again and drag and drop one action element from the left hand side menu.
- Select “Type” from Filter by drop down.
- Click on “Apex Action” in the left side menu.
- Select “Send Email To Guest” in the Action drop down.
- Enter “Send Email to guest” in the label field and “Send_Email_to_guest” in the API Name .
- Pass the appointmentId, leadEmail and leadId to the apex action as shown here.
- In the appointmentId field select {!$Record.Id}.
- In the leadEmail field select {!leadRecord.Email}.
- In the leadId field select {!$Record.ParentRecordId}.
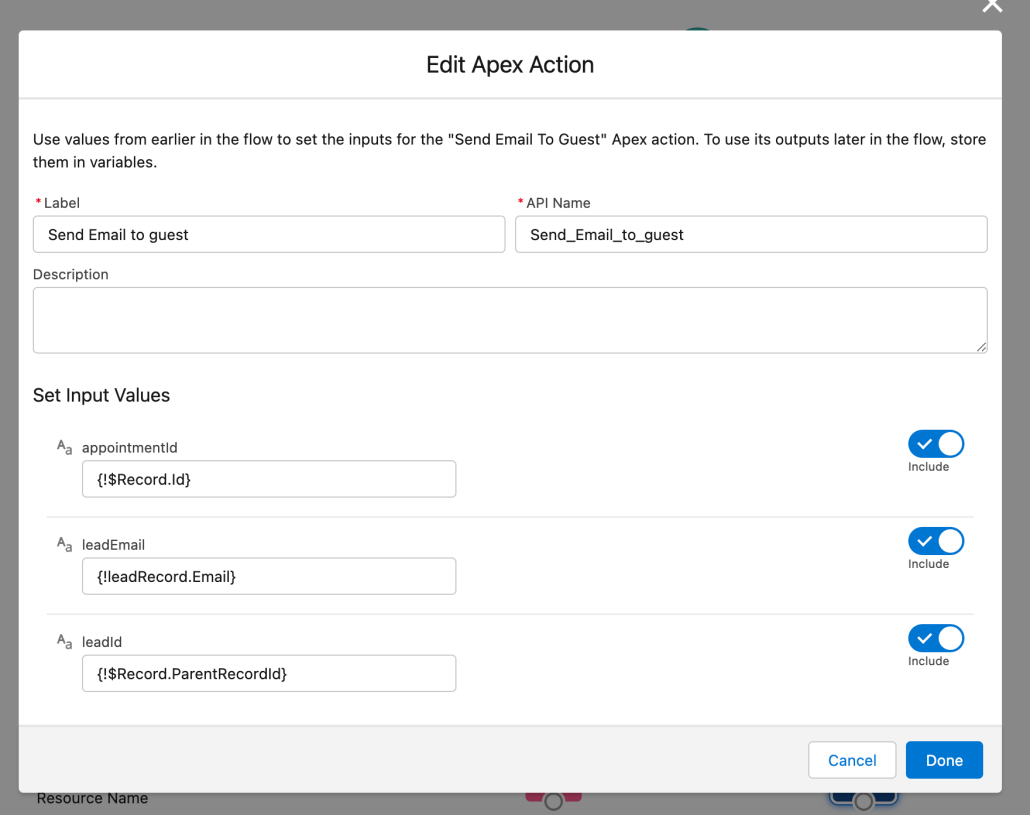
- Click done and connect this apex action with the last element .
- Now flow is all set, save the flow and activate the flow.
- Enter “Service Appointment With Zoom” as Flow Label.
- Enter “Service_Appointment_With_Zoom” as Flow API Name.
This is how the complete flow will look.

Test the flow by creating a service Appointment
- Schedule a Service Appointment for lead.
- Appointment Booking URL and Comments field gets populated due to the flow we configured just now.

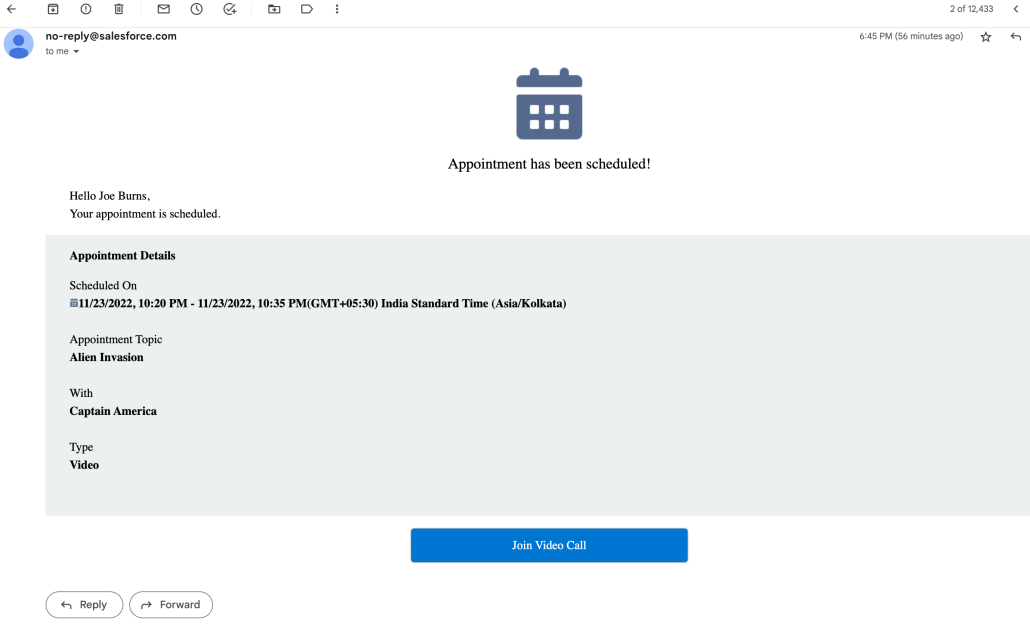
- The Unauthenticated user will receive an e-mail .
- And the Unauthenticated user can join the meeting by clicking the button in the E-mail.
Write this Salesforce Scheduler Appointments to Salesforce Calendar
Go to setup → salesforce scheduler setting and check that event management setting is turned on.
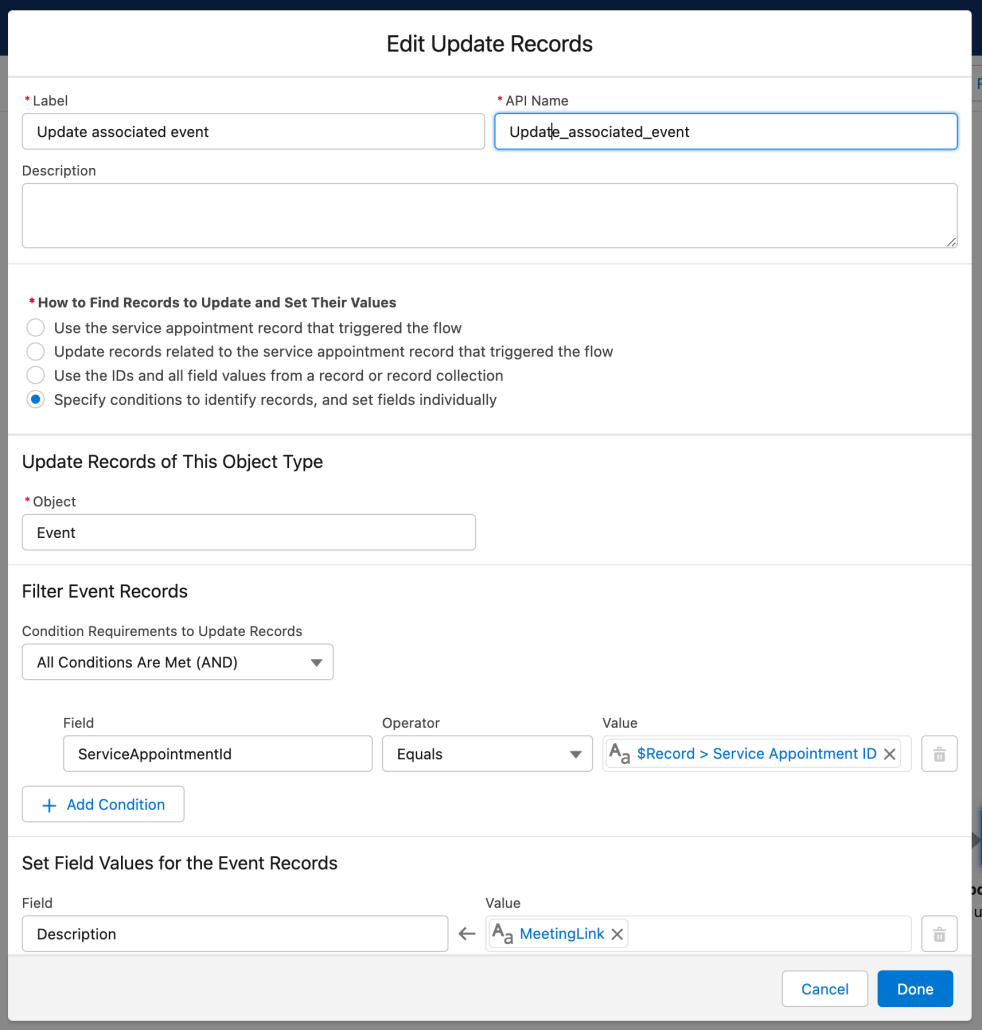
We want that the meeting link for this service appointment is also visible in the description of the associated event.
- Drag and drop update records element on the flow builder.
- Enter “Update associated event” in the label field.
- Enter “Update_associated_event” in the API Name field.
- Click “Specify conditions to identify records, and set fields individually” radio button.
- Select “Event” as object from the dropdown.
- Add a condition “ServiceAppointmentId” equals $Record.Id.
- Now, Set Field Values for the Event Records and set field as “Description” and value “MeetingLink”(variable that stores zoom meeting link).
- Click done, connect this update element with the apex action we used for sending mails, save the flow and activate it.
- Now when you’ll book a service appointment with appointment type “video” the associated event’s description will contain meeting link.

** When you use Einstein Activity Capture to sync events, fields from your Salesforce events are mapped to fields in the connected Microsoft or Google account refer to this document to verify which field is mapped with which.
https://help.salesforce.com/s/articleView?id=sf.aac_sync_event_field_mapping.htm&type=5
Appointment is booked using EngagementChannelType with ContactPoint “Video”
There is a very slight difference between the two scenarios
- Create EngagementChannelTypes with ContactPoint “Video”
- Create a record-triggered flow as in the previous scenario.
- From the Condition Requirements dropdown select All Conditions Are Met (AND).
- Add condition EngagementChannelType Id equals id of the engagement channel type created
- And use “SchedulerUnauthenticatedUserEngagementChannelEmailTemplateForThirdParty” as the developer name in the apex class used for sending the email to the guest and rest of the steps are common between the two scenarios.