In Salesforce Scheduler, Work Type is an entity where we store information about the skeleton of an invite. It’s just a template we can use to define meeting duration, block time before/after, timeframe start/end.
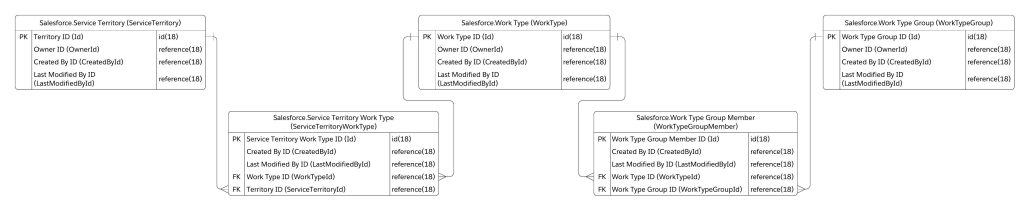
In the provided flow templates, work type selection happens with the help of a work type group. You first select a work type group, then a territory, and based on these two combinations; a work type is chosen automatically. Well, not automatically! The internal logic determines work type based on linking these three objects, as shown below ERD diagram.
Since the Scheduler data model only allows to map one work type to one work type group, there can always be only one work type for the selection of work type group and service territory.
This one-to-one mapping poses a limitation for a requirement where we want to define different duration based on customers needs. The good news is, there is a way to overcome this. This blog will discuss one of the approaches to set up Scheduler data to achieve dynamic duration. The basic premise is to duplicate the work type group and work type records based on durations.
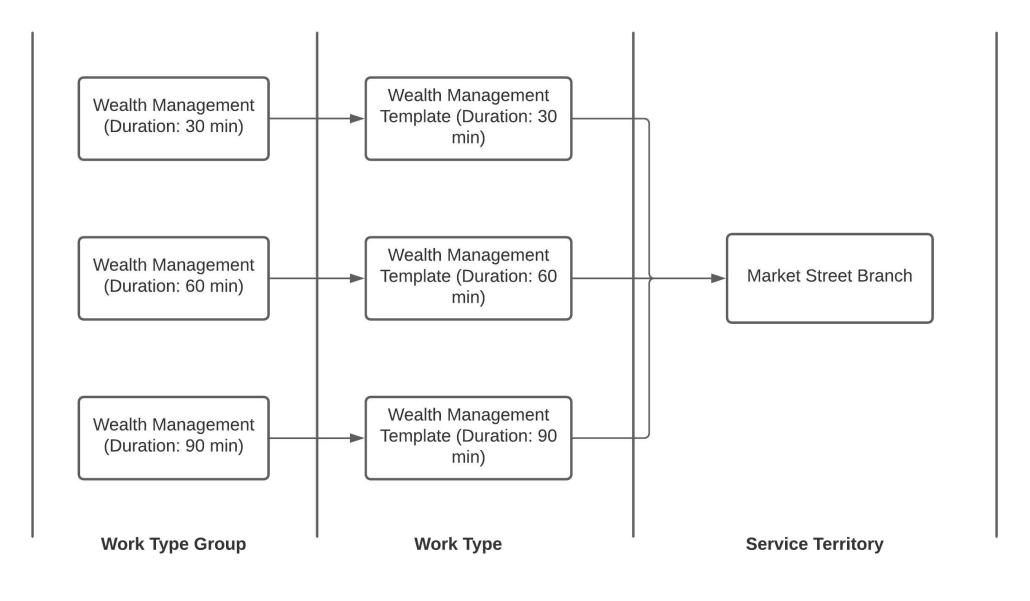
Consider a scenario where you have a premier customer and a regular customer with whom you want to set up a meeting about ‘Wealth Management’. In this scenario, let’s consider that an exclusive customer always needs an appointment with a longer duration, say 90 minutes. Other customers may need a meeting with the same topic for 30/60 minutes. We can store this information on the work type group record for now. The data setup may look something like this:
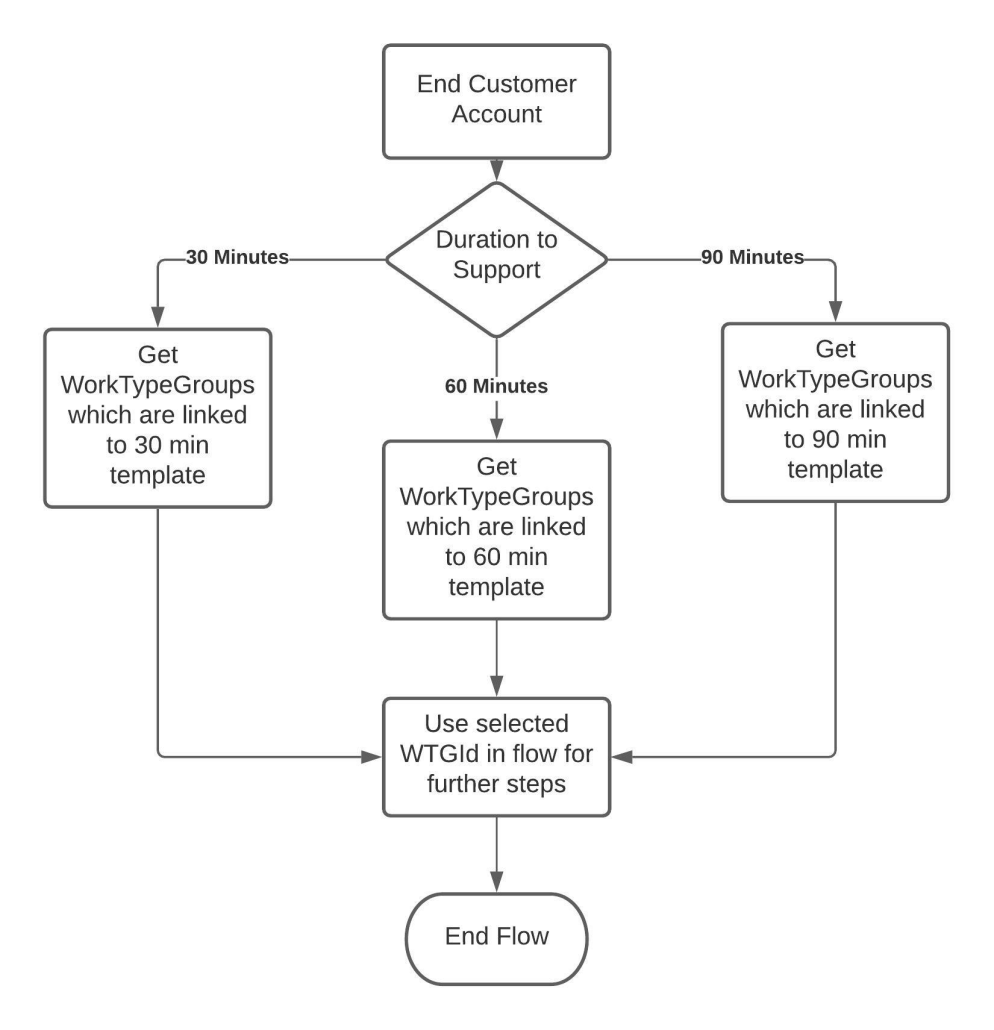
Once the data is mapped correctly via junction objects in the above format, we can then carve out the following logic:
Following is the working flow with different duration:
As you can see based on work type group selection, the flow selects the corresponding work type and duration gets adjusted accordingly.
You may ask this may confuse the end-user! Yes, looking at the same topic titles 3 times may confuse some end users! For this, you can either build your own component to display only the appointment topic and duration to choose. This approach may sound cleaner, but there is one more solution coming up in Spring 22 release. That feature allows you to filter work type groups shown on the screen by passing record ids to the component. We will cover more on that in another blog!
https://unofficialsf.com/wp-content/uploads/2022/09/largeUCSF-300x133.png00Akshayhttps://unofficialsf.com/wp-content/uploads/2022/09/largeUCSF-300x133.pngAkshay2022-01-18 01:46:252022-01-18 01:46:58From Shantinath Patil: Appointments with Dynamic Duration
In Spring 22, the Salesforce scheduler has given a new feature: enabling rendering HTML tags in Service Resource cards. This new feature has opened up many possibilities to show additional information about the resource.
Peer reviews and ratings are common decision making guides for customers today to help them pick among
Imagine you were to add the capabilities of a feedback management software (eg: Salesforce Feedback management) to Salesforce Scheduler, you could ask your customers to provide ratings for their appointments and then use those ratings to guide future customers.
With Feedback Management you can not only use survey invitation rules to distribute surveys when an appointment is closed but also use the data mapper feature to easily map the rating from the survey to any object in Salesforce, in this case to the Service Appointment object.
Once you have captured the rating data for your resources, there are several possibilities
Help the consumer decide between resources
Help Territory Mgr evaluate resources & branch
Give preferential treatment to premium customers by only showing them higher rated resources
Use Salesforce Einstein’s Machine Learning capabilities to predict who would be the best resource for this prospect based on past ratings giving by similar prospects eg: Someone from the South might prefer a resource from the south, or someone from an age group would prefer certain Resources.
For this blog, we’re going to focus on the Salesforce Scheduler changes you need to make to get the above capabilities going.
let’s take an example of adding a rating to the service resource. Please follow the below steps to show the shining rating stars on the resource card:
1. Fields on Service Resource
To show the rating, we need to create a formula field on Service Resource to render rating stars in cards. We will add this field to the compact layout to show up in the out of the box component. However, to populate value in this field, we need two more fields on Service Resource: to capture the average rating for each of the appointments he served and the number of appointments.
Field Label
Field API Name
Data Type
Comments
Rating
Rating__c
Number(1,0)
Number field to store rating between 1-5
Review Count
Review_Count__c
Number(18,0)
Number field to store number of reviews this service resource have received
Star Rating
Star_Rating__c
Formula(Text)
Formula field which will show ratings based on above 2 fields
We will have to create a field on Service Appointment to capture the sentiment of a customer based on how the appointment went. We can populate this value from a Survey, which will be sent out once an appointment is complete.
Field Label
Field API Name
Data Type
Comments
Rating
Rating__c
Number(1,0)
Number field to store rating between 1-5
3. Propagate value from Service Appointment to Service Resource
Now that we have fields on Service Resource and Service Appointment, we will have to process the aggregate reviews. As shown in the below data model diagram, we can traverse through Assigned Resource and populate this value to Service Resource.
The review aggregator formula that we can use is:
((Current Average Rating * Total Reviews) + New Rating) / (Total Reviews+ 1)
Using this formula, we can write a trigger on Service Appointment. As soon as we get a rating from Service Appointment, we will aggregate the review and update its corresponding Service Resource. A sample trigger code is given below:
trigger UpdateSurveyRating on ServiceAppointment (after insert, after update) {
Salesforce Scheduler provides a component to display and select a work type group. By default, this component display all the work type group records, in Spring ‘22 this component is getting the capability to filter work type group records based on specified Ids.
Imagine you are a bank manager and a user is scheduling an appointment with the bank. While scheduling an appointment you want the user to select hierarchical work type groups to know about the appointment context.
Example – Suppose the first level work type group hierarchy consists of personal banking, wealth management, etc. Based on user selection we will display the next level hierarchy. If the user selects personal banking then the second level work type group hierarchy consists of checking saving account, loan management, etc.
You can easily display work type group hierarchy in salesforce scheduler flows with clicks, not code! 🙂
Let’s look at how it is done, Configuration is the same for Outbound, Inbound, and Guest flows, illustrating for Outbound Flow.
Create a self lookup in the Work Type Group object. This will store the parent work type group record id.
For this feature, we will be using the ‘Filter by work type group Ids’ input configuration of the ‘Select Work Type Groups’ component.
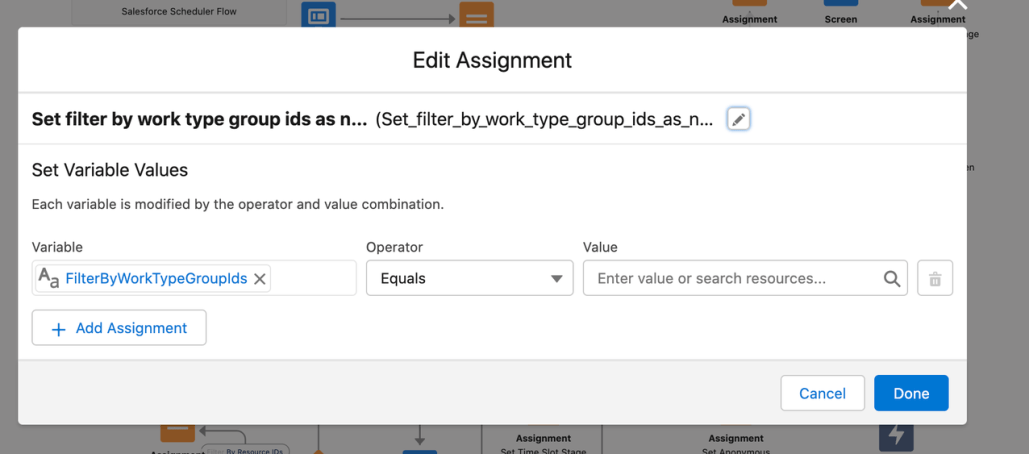
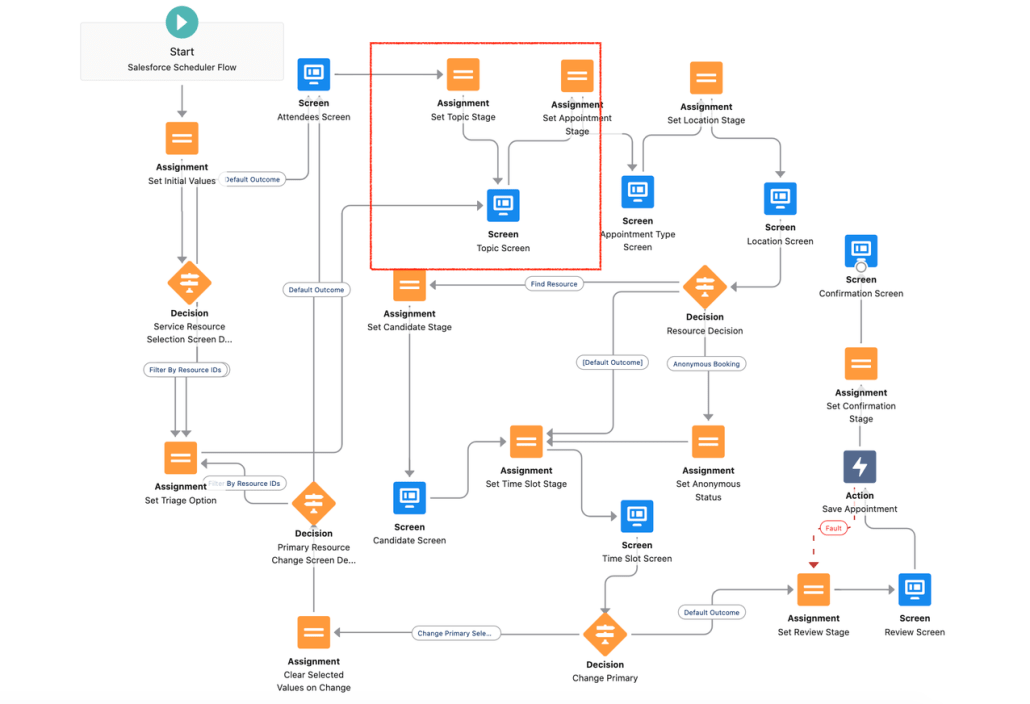
Add a new Assignment element called “Set filter by work type group ids as null”, after Set Topic Stage. And the arrows pointing to the topic screen will now point to this element.
Assignment element : In this element, we are setting the ‘FilterByWorkTypeGroupIds’ variable as null.
OOTB flow :
After change
After the assignment element adds a “Get Records” element to fetch the work type group records. Initially, we are assuming variable workTypeGroupId is null. Work_Type_Group__c is the self lookup field.
Loop over fetched work type group records and append the work type group Ids in the “FilterByWorkTypeGroupIds” variable.
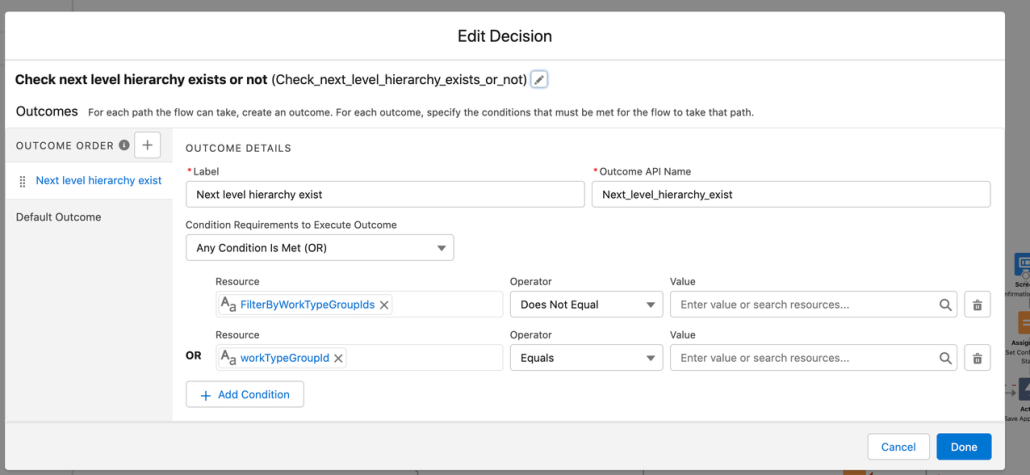
After the loop element adds a decision element to check FilterByWorkTypeGroupIds is not null (next-level hierarchy exist) or workTypeGroupId is null (If it’s loading for the first time).
If the next level hierarchy exists then add an assignment element to clear the previously selected work type group and connect this element to “Topic Screen“. Else redirect to “Set Appointment Stage”.
Optionally to display the selected hierarchy on top of the work type group selection screen, add a ‘Get Records’ element to fetch the selected work type group record. Redirect the topic screen to this element. Then add an assignment element and create a work type group collection variable to add the work type group record.
Finally, connect the above assignment element to the assignment element that we have created in step 3.
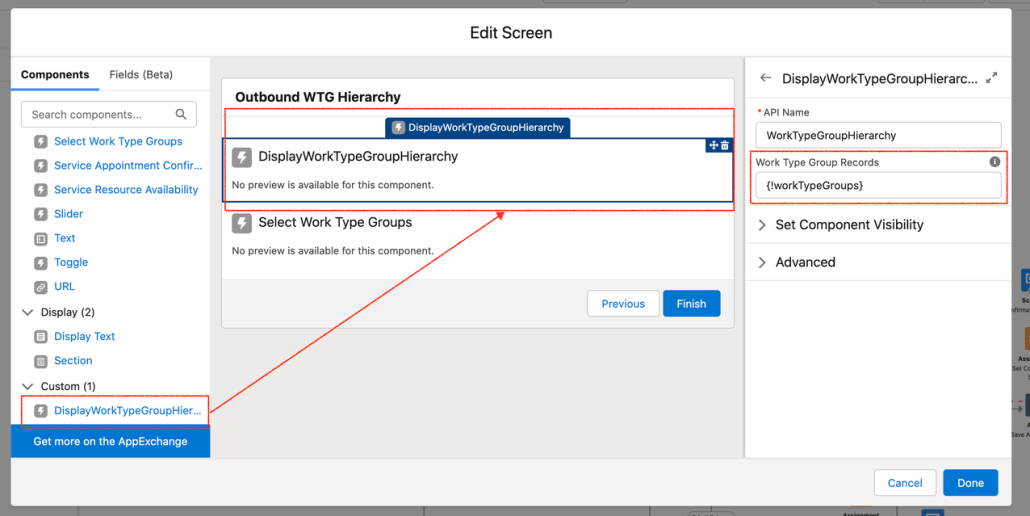
To show the selected hierarchy, drag and drop the “DisplayWorkTypeGroupHierarchy” custom component above the “Select Work Type Groups” component in the topic screen. And pass the work type group collection variable as input to this component that we have created in step 8. (optional)
With the Winter ’22 release, VRA introduced a new feature to facilitate the scheduling of virtual appointments between agents or mobile workers and customers with Visual Remote Assistant. This means that if you are using Salesforce Field Service (SFS) or Salesforce Scheduler (Scheduler) you can now have VRA meetings automatically generated and shared with your customer at the time of appointment scheduling. For example, your customer can create an appointment today for a meeting next Tuesday at 9:00AM. When the appointment is created, the customer is sent a link for the Virtual Meeting that they will use at the time of the meeting.
Check out some more details on this below.
What comes in the VRA Scheduling package?
For customers who have purchased VRA and either SFS or Scheduler or both:
A separate managed package installed on top of VRA that contains the VRA Scheduling capabilities
Experience Cloud Lobby Component
for the user to await the start of the meeting
Service Appointment Component for VRA Scheduling
generates pop up reminder at time of appointment when the agent opens the Service Appointment
Custom Notification
to remind the Service Appointment Assigned Resource (agent) of their upcoming meeting
Session Lobby Invite object
Additions to the Visual Configuration setup screens to manage this feature
See VRA Installation and Configuration Manual and VRA Admin Manual for more info
Quick Video of it in action
See this video which illustrates what it can look like after a few simple configuration steps
Setting up VRA Scheduling for Salesforce Scheduler
Preliminary Things
Make sure Scheduler is enabled in your org
Determine when you want to generate VRA Scheduled Appointments
For example, if a user selects an Appointment Type of Video this would trigger the creation of the VRA Lobby Link
Plan a confirmation and reminder strategy
VRA Scheduling comes with a flow that you can use to send the initial confirmation via email
You may want to also send a reminder notification to your customer prior to the meeting, such as 1 hour before
Enable Digital Engagement so you can send SMS messages for the confirmation and reminder notifications
I made 2 small changes to the Service Appointment Object to add 2 text fields. This was done to simplify the sending of an SMS Message to the customer when scheduling a new virtual Service Appointment.
First Name – this text field stores the first name of the contact associated with the Service Appointment
Lobby Link – this text field stores the Session Lobby Invite url
Flow Setup
VRA Manage Lobby Invites Configure the flow called VRA Manage Lobby Invites to meet your needs. This flow is configured out of the box to create, update and delete Session Lobby Invites based on the life cycle of a Service Appointment. You need to tailor the trigger criteria and the decision criteria to meet your needs.
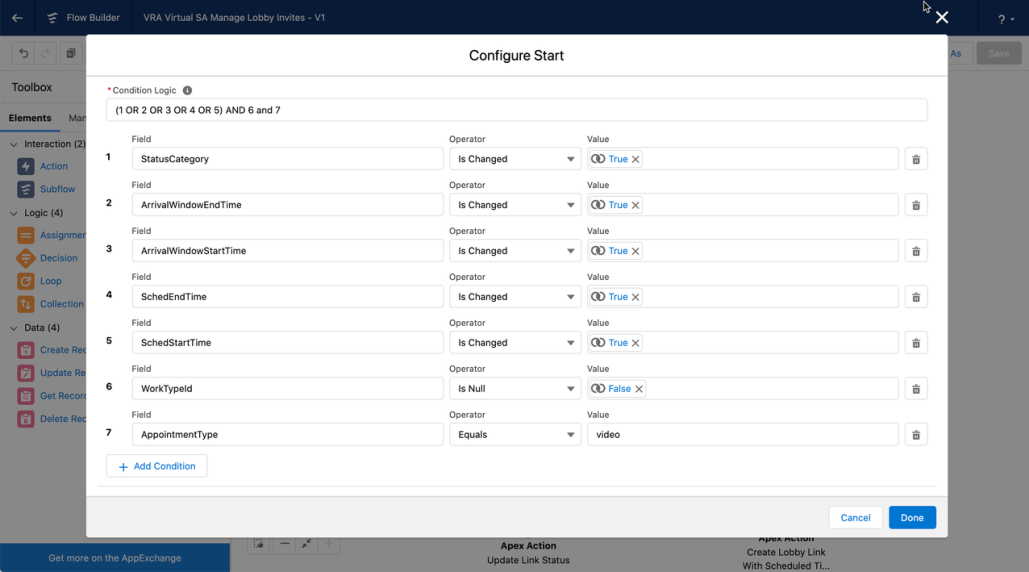
Trigger Criteria The flow triggers on Service Appointment and provides criteria that you can tailor. For Scheduler, I removed the work type criteria that is present and replaced it with Appointment Type = Virtual. Whenever a Service Appointment with Appointment Type = Virtual, this flow will fire.
Out of the Box Trigger Criteria
My criteria which is based on Appointment Type. Only Service Appointments with Appointment Type = video (this is the API value for Virtual meetings) will trigger this flow
Decision Criteria The out of the box flow will create Session Lobby Link records when the Service Appointment is Dispatched. This applies nicely for Salesforce Field Service. For Scheduler, this may or may not apply, so edit this accordingly. I left this as is and created a supplemental flow (below this screen shot).
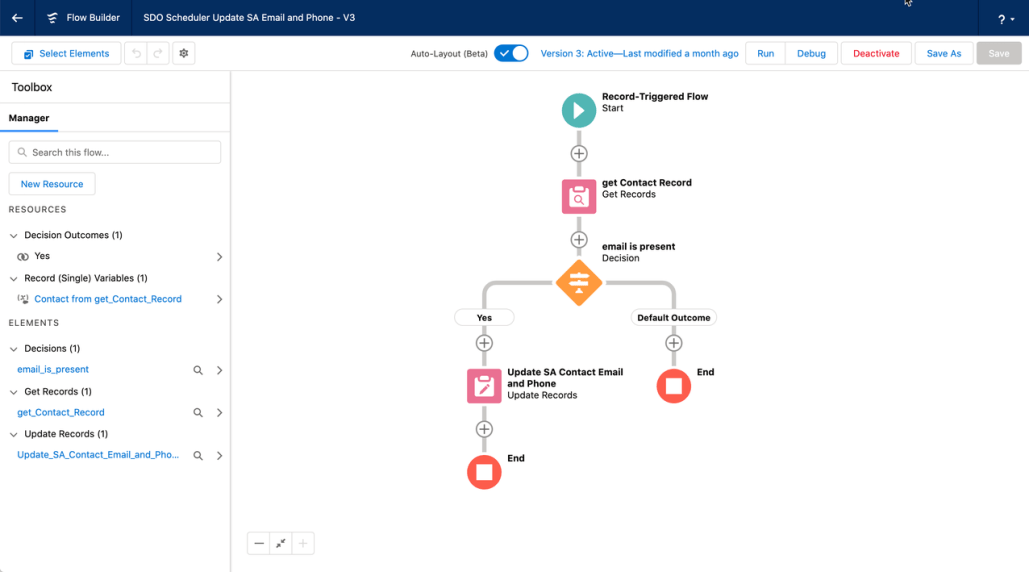
Supplemental Flow I created an additional flow to accomplish 2 things: 1) make sure the SA has an email and phone saved to it and 2) change the status to Dispatched. This is to trigger the VRA Manage Lobby Invites flow.
It’s a triggered flow on SA whenever the SA is created and the Contact Id is present but the email address is not
Overview of flow. It retrieves the contact record from the SA and then updates the SA’s status, email and phone.
Update the SA status, email and phone
Session Lobby Link update flow This is an additional flow which updates the lobby link to precisely share with the customer the experience site page containing the Lobby component. Out of the box, the link generated points to the experience site home page. This flow allowed me to put the Lobby component on a specific experience site page. This is not required, but it provided me with flexibility to put the lobby component on any page.
Overview of flow. Note that the last step is a Messaging Notification action to send an SMS message to the customer.
Updating the Lobby Link to the desired experience site page
Details of the formula used. It’s a simple text substitution to insert the specific experience site page. In my example, I placed the lobby component on a page called vra-lobby, so I’ve inserted that value into the url.
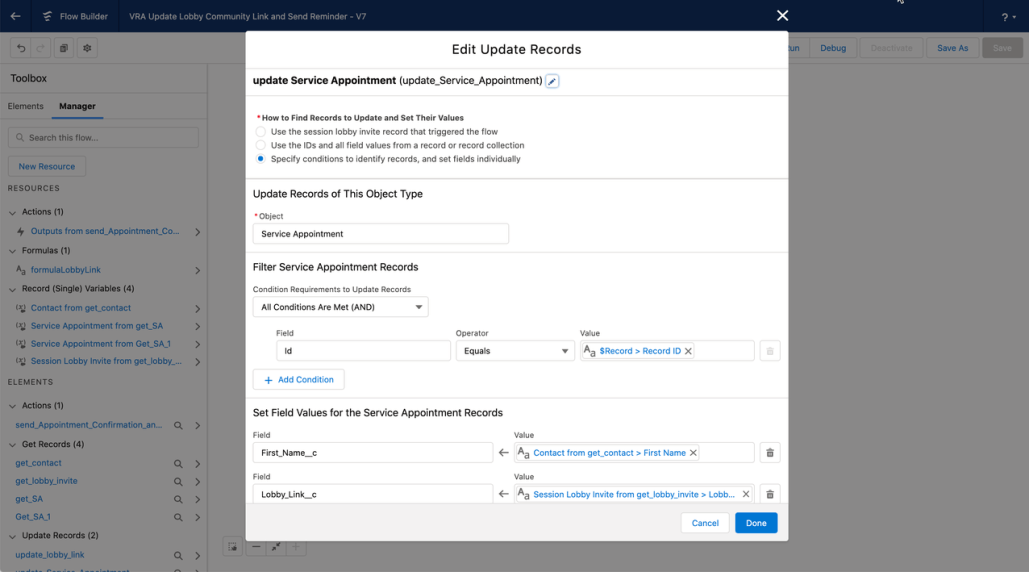
Updating the Service Appointment. In this step, I retrieve the Service Appointment using the Session Lobby Invite field called Record Id (not to be confused with Id). I’m updating my 2 custom fields to make the SMS messaging template easier to construct.
Messaging Template
This is the template I used. You can see I’m using the custom fields I created for First Name and the Lobby Link as well as the appointment start time.
Experience Cloud Changes
This was a simple change. I added a new page to my experience site called vra-lobby. I placed the Lobby Component on that page. I made sure that the page was accessible to a guest user.
Service Appointment Page Reminder Component
Add the Service Appointment reminder component to the Service Appointment page. This component requires no parameters. It generates a pop up notification when opening the SA to remind the user there is a virtual session that needs to start.
Summary
VRA Scheduling makes it easy to provide customers with links to a 2 way video session when scheduling an appointment.
Additional Notes about this Example
This is just a concept illustrator. You may want to add additional logic to your flows to send reminders to the customer along the channel of their choice. I’ve used SMS in my example, but making this more generic to support additional channels is recommended.
Appointment Reminders for the customer are not depicted in this example, but these would be easy to set up with a flow.
https://unofficialsf.com/wp-content/uploads/2022/09/largeUCSF-300x133.png00Akshayhttps://unofficialsf.com/wp-content/uploads/2022/09/largeUCSF-300x133.pngAkshay2021-12-20 23:12:002021-12-28 00:31:37From Chris Albanese: VRA Scheduling – Use Salesforce Scheduler and Visual Remote Assistant to provide virtual meetings
Salesforce Scheduler (formerly known as Lightning Scheduler) gives you the tools you need to simplify appointment scheduling in Salesforce. Create a personalized experience by scheduling customer appointments—in person, or by phone or video—with the right person at the right place and time.
Enabling Event Management for Salesforce Scheduler
When you enable the Event Management setting under Salesforce Scheduler settings, Salesforce Scheduler writes service resources’ appointments as events on their Salesforce calendar. To write events from Salesforce calendar to external calendars, use a calendar sync tool such as Einstein Activity Capture (EAC).
If a calendar sync tool doesn’t work for you, you can explore Platform Events and APIs related to the specific external calendar tool that you want to be externally synced with Events created in salesforce. For the sake of this article we will limit our conversations around EAC.
Einstein Activity Capture
Einstein Activity Capture (EAC) helps keep data between Salesforce and external email and calendar applications (like Microsoft Outlook or Google Calendar) up to date. Objects that can be synched using EAC include Tasks, Events, Contacts and Emails. This article will NOT cover the configuration of EAC, however will limit our conversations around events, since Scheduler “Event Management” is limited to the scope of only synching service appointments to Events.
Configurations to watch out between both applications when using Salesforce Scheduler
Whenever a service appointment is created in “Salesforce Scheduler”, if the “Event Management” feature is turned ON, a related Event is created and added to the user’s Salesforce Calendar. For the EAC event sync directions – “Salesforce to External (Microsoft or Google or Similar)” and “Synch Both ways”; this implies that the said event will be synced to the user’s external calendar application (Microsoft or Google or Similar).
Events that are created by the Salesforce scheduler when a service appointment is created are restricted from editing on Salesforce. Guidelines need to be setup on updating these events on an external calendar (after they are synced from Salesforce to external).
If a user tries editing these events on an external calendar and tries to sync back to Salesforce – EAC will NOT be able to update existing event on the Salesforce Calendar, user needs to resolve these errors later by retaining original time as recorded on Salesforce.
We will try to cover about mapping custom fields on the service appointment to the Event in a future blog
For the EAC event sync directions – “External (Microsoft or Google or Similar) to Salesforce” and “Synch Both ways”; this implies that the events created in the external calendar application will be synched to Salesforce and related events would be created in Salesforce and will be viewable on the Salesforce calendar. When a scheduling flow executes, the system will look at the scheduling policy assigned to the Flow, and during that time if the system finds that the scheduling policy setting “Check Salesforce Calendar for Resource Availability” is turned ON, Scheduler will exclude the booked slots (of external synched events) along with existing Service Appointments booked for the resource and ONLY show the overall available slots in the Time Slot selection screen.
Let’s think of you as a support agent. You get a call from a customer asking for an appointment for some questions he has on the case and wants to talk with the case owner. So what can do you What will you do in this “case?”
Salesforce Scheduler can help you in this “case”. Let’s drill down on what all we need to accomplish this:
Case owner as a Service Resource
Case reference to Appointment
A flow
Quick action on Case to initiate the flow.
A logical flow of the approach we will take in this use case will look like the following:
Get Case Details
Since this flow will run on the case, we need to get the details of it. First, we can set the “recordId” input parameter to get the current case, automatically giving us the case Id. Then, using this variable, we can query the case using the “Get Records” element in the flow.
Note that we need AccountId to map it to the ParentRecordId of the Service Appointment. OwnerId is needed to get the related Service Resource.
If we want to tag the current CaseId, we can create a new lookup on Service Appointment. A custom field is needed since Service Appointment can only support Account, Lead, and Opportunity except for Case! To ensure that value is populated in that lookup, we can override the JSON we pass in the final Save Action defined in the flow. For more details, you can refer to the blog here: https://unofficialsf.com/build-your-own-appointment-review-screen/. For now, we can skip it.
We can leverage this functionality for our use case. Since we want our case owner to be the Service Resource, we can add the Service Resource Id from the previous step to filterByResourceIds. Additionally, we can make anonymous booking as true and resource booking as false. This will make sure that we skip the OOB triage screen and resource selection screen.
The advantage we get from this is if the case owner is not a Service Resource, existing logic will fetch any available resource anonymously. You will not have to worry about resource selection. End to end experience will be very seamless for the agent who is booking that appointment.
Once all the nodes and assignment is done, you can test the flow using the “Debug” option and activate it once it’s working as expected.
Setup
After this step, it’s up to you how you want to distribute the flow. For this blog, we are using Case Action to create a new appointment. Since the “recordId” flow variable is set for “Available for input” in the flow, this action will automatically set it to the current record on the detail page.
You can add this action to the case layout. The end-to-end flow should work something like this:
Scheduler is not to be positioned in cases where the Service Resource is travelling to a customer’s location
https://unofficialsf.com/wp-content/uploads/2022/09/largeUCSF-300x133.png00Akshayhttps://unofficialsf.com/wp-content/uploads/2022/09/largeUCSF-300x133.pngAkshay2021-09-27 23:18:282021-09-27 23:29:17From Shantinath Patil: Schedule a support advisor
Salesforce Scheduler is getting capability to equitably distribute meetings between eligible Service Resources in Winter ’22 release. It will support an implementation of Load Balancing logic working on Service Appointment records to do the Appointment Distribution.
In following sections we will see the architecture of Appointment Distribution feature and how can we enhance it to include Events (Salesforce Calendar) also in the utilisation calculation for Appointment Distribution.
Design of Appointment Distribution
Appointment Distribution feature is built upon two main sObjects:
AppointmentScheduleAggr
AppointmentScheduleLog
For all practical purposes, individual utilizations that make it into AppointmentScheduleLog entity are rolled up as summary records in AppointmentScheduleAggr entity (if IsUsedForResourceUtilization parameter is set to true).
AppointmentScheduleLog entity supports any of Service Appointment, Resource Absence or Event as a polymorphic lookup in its RelatedRecord field. Out of the box, Salesforce Scheduler only inserts records for corresponding Service Appointments in AppointmentScheduleLog entity.
Incorporating Event in Appointment Distribution’s utilisation
As evident from the design showcased above we can incorporate Event in Appointment Distribution’s utilisation with some coding and customisation. Let us now create a demo trigger which can be used to demonstrate this.
Salesforce Scheduler creates Event entries if “Event Management” setting in turned ON. If “Aggregate Resource Use” is also ON in same org then we will get 2 entries instead of 1 in AppointmentScheduleLog entity; one due to ServiceAppointment record and other through its associated event. Therefore, as a prerequisite before deploying this trigger we should turn OFF “Aggregate Resource Use” in Salesforce Scheduler settings if “Event management” is turned ON.
Pseudocode
Let us first discuss the pseudocode for trigger when new Event records are created.
Create a trigger which runs after Event records are inserted. This trigger should run in global context.
Loop through individual event records: For each evt in Inserted Events:
Is evt != Recurrence Pattern? (I am not handling recurring events as part of this PoC)
Yes →
Does evt belong to a User who is also a Service Resource (SR)?
Yes →
Calculate Event Date (D1)
Does AppointmentScheduleAggr record (ASA) for SR & D1 exist?
Yes →
Get ASA.Id
No →
Create ASA record for SR & D1 combination & return ASA.Id
Calculate Event Duration (d)
Create AppointementScheduleLog record and insert it
Demo Code
Disclaimer: The following code is meant to be verbose and easily understandable from a Salesforce Developer perspective. Given a choice between performance vs readability I have strived for the latter. It is a proof of concept to demonstrate the feature and should be modified and tested thoroughly as per different data shapes and existing code in the org.
Trigger:
/**
 * Created by Ankit Srivastava.
 */

trigger EventUtilization on Event (after insert, after update, after delete, after undelete) {
    if (Trigger.isInsert) {
        List<Event> events = Trigger.new;
        //Insert records in AppointmentScheduleLog and AppointmentScheduleAggr entities for all newly created Events
        EventUtilizationUtil.processInsertEvents(events);
    } else if (Trigger.isUpdate) {
        List<Event> previousEvents = Trigger.old;
        List<Event> updatedEvents = Trigger.new;
        //Modify records in AppointmentScheduleLog and AppointmentScheduleAggr entities for all updated Events
        EventUtilizationUtil.processUpdateEvents(previousEvents, updatedEvents);
    } else if (Trigger.isDelete) {
        List<Event> deletedEvents = Trigger.old;
        //Delete records from AppointmentScheduleLog entity for all deleted events
        EventUtilizationUtil.processDeleteEvents(deletedEvents);
    } else if (Trigger.isUndelete) {
        List<Event> undeletedEvents = Trigger.new;
        //Insert records in AppointmentScheduleLog and AppointmentScheduleAggr entity for all Events removed
        //from Recycle Bin
        EventUtilizationUtil.processUndeleteEvents(undeletedEvents);
    }
}
Helper Class:
/** * Created by Ankit Srivastava */
public without sharing class EventUtilizationUtil { public static void processInsertEvents(List<Event> events) { //I am not handling recurring events as part of this PoC code List<Event> nonRecurringEvents = removeRecurringEvents(events);
//Remove events that meet following condition: // Events that are for any User who is not a Service Resource Map<Event, ServiceResource> relevantEvents = filterNonRelevantEvents(nonRecurringEvents);
List<AppointmentScheduleLog> appointmentScheduleLogs = new List<AppointmentScheduleLog>(); for (Event evt : relevantEvents.keySet()) { Date eventDate = getEventDate(evt.StartDateTime, evt.ActivityDate, evt.IsAllDayEvent); ServiceResource sr = relevantEvents.get(evt);
//Get existing AppointmentScheduleAggr record for current event's //Service Resource and Date. If no such record exists then create one //This method call is doing SOQL calls & DML in a loop, this is for //ease of understanding & will be less performant than Bulk code AppointmentScheduleAggr asa = getAppointmentScheduleAggrRecord(sr, eventDate);
appointmentScheduleLogs.add(asl); } //Insert all AppointmentScheduleLog record. //Rollup to AppointmentScheduleAggr will happen automatically insert appointmentScheduleLogs; }
public static void processUpdateEvents(List<Event> previousEvents, List<Event> updatedEvents) { //TODO }
public static void processDeleteEvents(List<Event> deletedEvents) { //TODO }
public static void processUndeleteEvents(List<Event> undeletedEvents) { //TODO }
/* This method is used to remove Events without attached user record who is also a service resource */ private static Map<Event, ServiceResource> filterNonRelevantEvents(List<Event> events) { Map<Event, ServiceResource> resp = new Map<Event, ServiceResource>(); if (events != null && events.size() > 0) { Set<String> ownerIds = new Set<String>(); for (Event event : events) { ownerIds.add(event.OwnerId); } ServiceResource[] serviceResources = [SELECT Id, RelatedRecordId FROM ServiceResource WHERE RelatedRecord.Id IN :ownerIds AND isActive = TRUE];
for (Event event : events) { for (ServiceResource sr : serviceResources) { if (sr.RelatedRecordId == event.OwnerId) { resp.put(event, sr); break; } } } }
return resp; }
private static List<Event> removeRecurringEvents(List<Event> events) { List<Event> filteredEvents = new List<Event>(); for (Event e : events) { if (!isRecurringEvent(e)) { filteredEvents.add(e); } } return filteredEvents; }
private static Date getEventDate(Datetime startDateTime, Date ActivityDate, Boolean isAllDayEvent) { /* https://developer.salesforce.com/docs/atlas.en-us.object_reference.meta/object_reference/sforce_api_objects_event.htm */ if (isAllDayEvent) { if (startDateTime == null) { return ActivityDate; } }
return startDateTime.date(); }
private static AppointmentScheduleAggr getAppointmentScheduleAggrRecord(ServiceResource sr, Date appointmentDate) { AppointmentScheduleAggr[] asa = [SELECT Id FROM AppointmentScheduleAggr WHERE ServiceResource.Id = :sr.Id AND AppointmentDate = :appointmentDate];
if (asa != null && asa.size() > 0) { //Return existing AppointmentScheduleAggr record return asa[0]; }
The above code is for handling creation of Event records. Similar code can be added in processUpdateEvents(), processDeleteEvents & processUndeleteEvents() methods to handle complete CRUD of Event entity.
Note: There are other models too where you could have the same resource in multiple territories as a secondary resource. Now if a customer selects a face to face appointment, you could call a scheduling policy with only only Primary Resources flag and if your customer selects a video / phone call you could also have the Secondary Resources flag checked which will allow this customer to setup meetings with all your primary and secondary resources, there by giving you additional capacity.
Performance Considerations
Precision scheduling is a performance intensive affair and it considers several different elements while coming up with the available time slots – skills, skill levels, resource holidays, working hours, location, etc.
Performance improvements tips
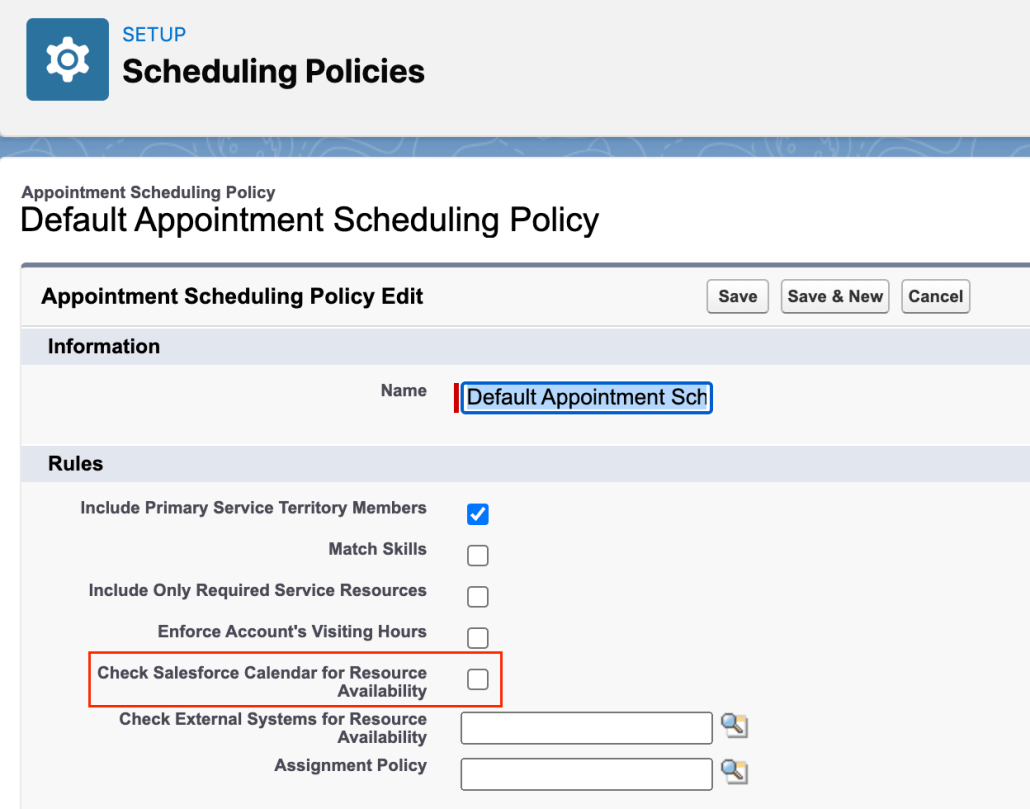
1.Remove Event checks in Scheduling Policy
If you are not checking Salesforce Calendar for Resource Availability then disable it.
2.Reduce Time range
Reducing the time range that you fetch the Resources & Time Slots for, helps improve the performance of the Scheduler algorithm and allows you to query more eligible resources. Using this mechanism, you have certain controls present
Flows: Use Time slot multiplier to reduce the number of days you are querying for from 14 (default) to 7 by reducing this Time Slot Multiplier flow variable to 1. Click here for details
APIs: Use Start Time & End Time to reduce the number of days you are querying the system for (default is 31 days.) Click here for details
3.Appointment Distribution
Using the new capability introduced in Winter 22: Appointment Distribution
One of the biggest bottlenecks is the number of resources whose calendar needs to be checked. As the number of eligible resources increases, Salesforce scheduler takes longer to fetch the resource list. For a 14 day period it is recommended that we keep around 20 eligible / qualified resources ie: In other words 20 resources with the same skill in the service territory if you are using the out of the box flows.
If the above doesn’t give you the performance boost needed then consider the new capability introduced in Winter 22 which will only look for the calendar of the x least utilised resources at that point and hence circumvent this problem. Since you are considering the least utilised resources and showing up their slots, you will likely get most of the available slots and automatically balance the workload of your resources.
Here x is configurable(Click here for release notes) Use the new Number of Resources to Show (Appointment Distribution) attribute in flows. This attribute is available in the Select Service Resource, Select Service Appointment Time, and Select Service Resource and Service Appointment Time screen components. If you’re using APIs, use the resourceLimitApptDistribution parameter. This parameter is available in the getAppointmentCandidates REST API and the available-territory-slots Connect API.
A simple test allowed me to manage a territory of 300 resources too using this feature on the flows shipped with the product, as long as I restricted the number of eligible resources (x) to 20.
Note: The above figure could change based on customisations and the specific data shape so would recommend running a test or proof of concept on your specific setup before moving ahead.
https://unofficialsf.com/wp-content/uploads/2022/09/largeUCSF-300x133.png00Akshayhttps://unofficialsf.com/wp-content/uploads/2022/09/largeUCSF-300x133.pngAkshay2021-08-29 23:02:132023-02-08 22:24:03Tele or virtual Scenarios using Salesforce Scheduler
Company ABC LLC wants to have a self-service tool to allow the customer to schedule an appointment in person or via virtual conference (Voice/Video) to have a more interactive experience
COVID crisis has amplified the need to do video conferencing
Company ABC LLC wants to have the flexibility to send a notification to customer about the appointment
if Virtual appointment send virtual conferencing links
Company ABC LLC wants the flexibility to allow to add Cohost for a virtual conference or add additional invite on the customer side (eg: Spouse/friend) or employee side (Specialist, Product manager, etc) on a virtual conference – This is optional
Technology Considered
Salesforce Scheduler
Webex Virtual Conferencing when a customer chooses to do Virtual Conference ( Voice/Video)
Leveraging Webex API v1
Personas
Customer scheduling meeting ( in person /Virtually) and Customer’s Addl. invitee
Employee as Host/CoHost
Employee as additional Attendee
User Flow
Client/Company is leveraging Salesforce Scheduler to schedule appointments in person or virtual from available spots
Clients’ Customer clicks on Schedule an Appointment
He inputs his basic information (name, email and phone) and selects the in-person or virtual option
He picks up time and date and clicks next
For a virtual appointment, SF will send WEBEX API call with Oauth token, meeting invite details ( title, day, time, meetingpassord etc) along with Customer/invitee information (name and email)
Webex will create a meeting and send API response with a Webex link and behind the scene notify the Customer and host ( For host it leverages email tied to user associated for authentiication )
optionally add multiple regular invitee/cohost invitee during creation
Salesforce- Webex OpenID/Oauth integration is leveraged for Authentication/Authorization purpose
Deep Dive and Develop Steps
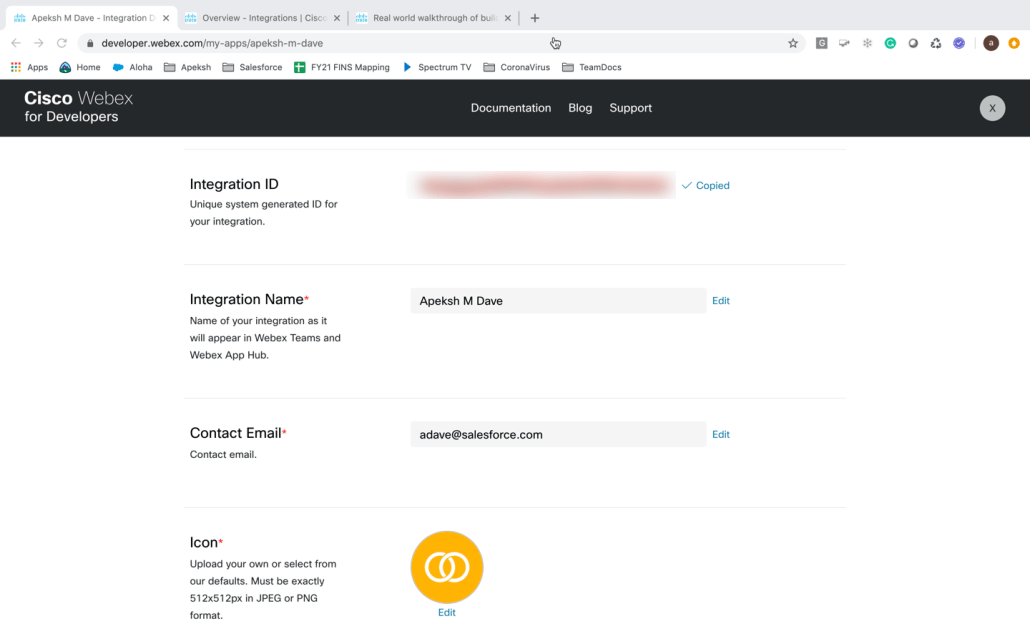
Step 1: Setup Salesforce Org and Webex Account
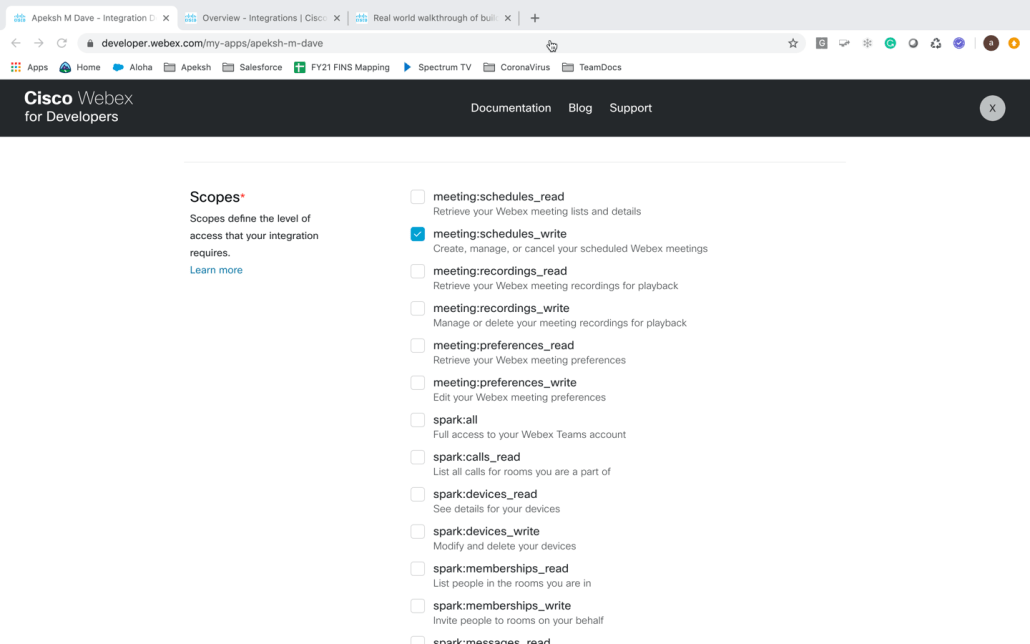
Step 2: Setup Oauth in Webex and Salesforce
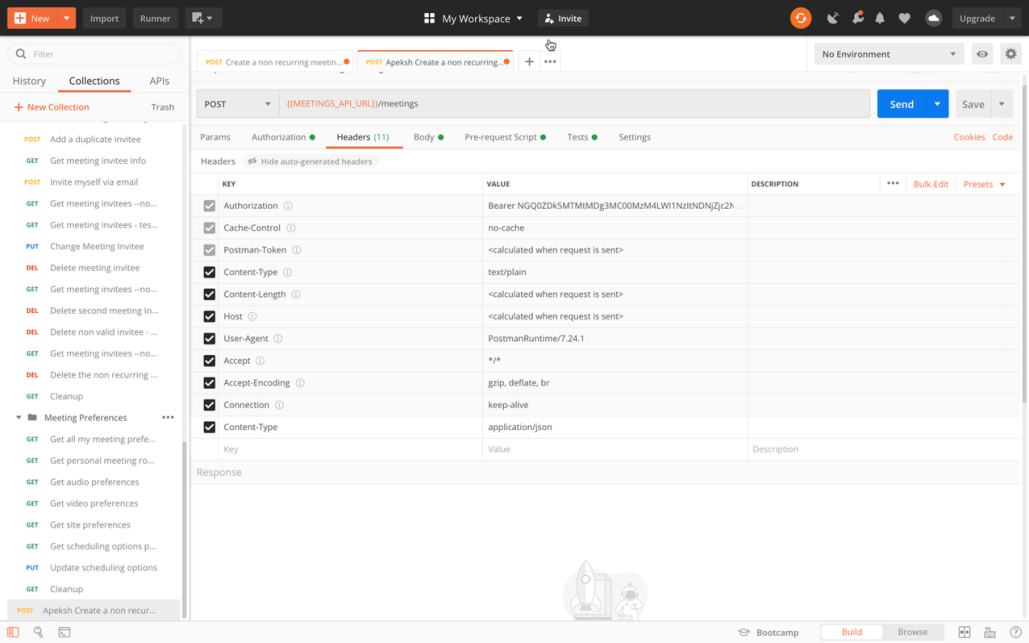
Step 2a: Verify Webex Oauth Setup via Postman Webex Collection
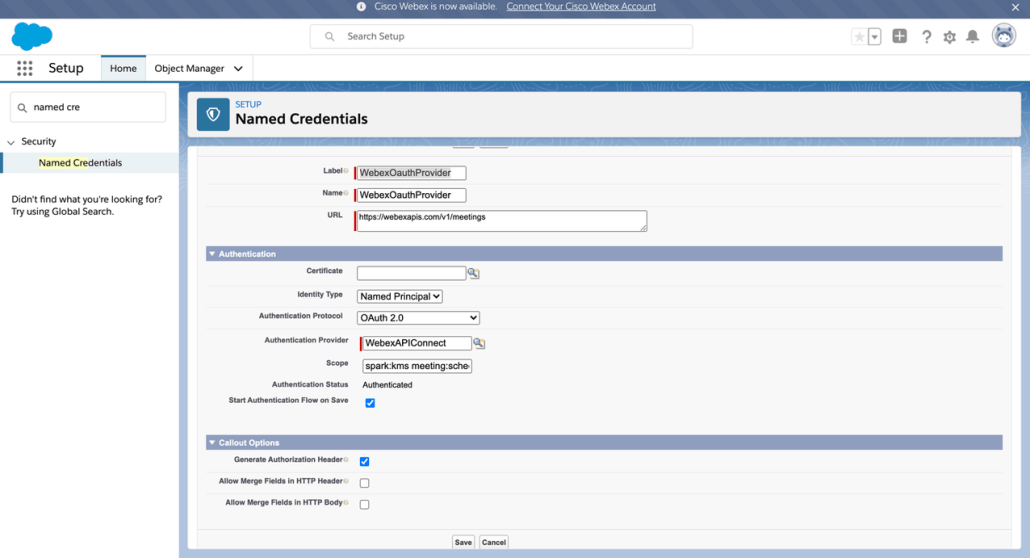
Step 3: Setup/Verify Oauth with Salesforce
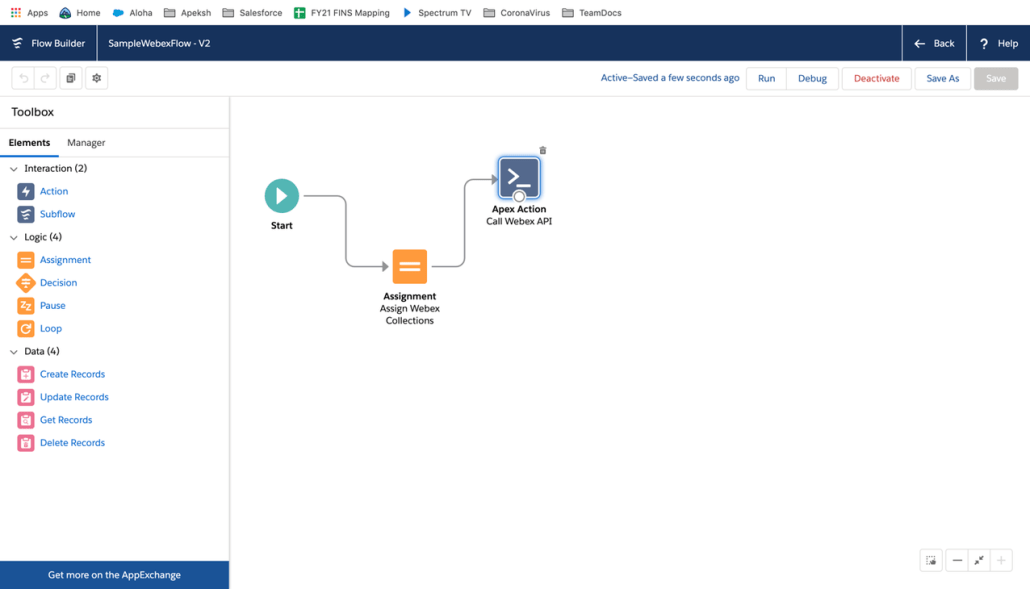
Step 4: Invoke Webex API…Invoke Webex API vai Apex/Named Cred
Optional steps outside of Scheduler
Optional – SF will make Webex API call outside of scheduler with employee information as Co host/invitee or it can make Webex API call to add additional invitee on the customer side or employee side without being co-host
Edit Existing Webex invite by Adding Specialist banker as Cohost
How can i troubleshoot with Postman
Step 1 -Pre Requisite
Get Salesforce Org where you can run flows
Email id ( preferably new one so it does not have webex account on this from your corporation side )
Webex Developer Account to Create meetings
How to get this
Send email to devsupport@webex.com to create Trial Account with License with your Name and email address
Account userid( your email id ) and steps to setup password will be sent to your Email id
TIPS
If you just go to webex and create webex account it will NOT work
if you have Corp userid/pwd with Webex it may not work
The default time zone for all times shown in a Salesforce Scheduler flow would be the timezone set for the user scheduling the appointment. See more details on how this would work for the various flows here.
In Spring 21 feature, a feature provided an ability to (pre)set the timezone across multiple screens on the Outbound, Inbound & Guest User flows (Create & modify) across mobile & desktop.
One common scenario this helps you to cover is, when a Customer care agent is booking an “On-behalf” appointment and wants to see the time-slots in the timezone of their selected territory.
Now, this is easy to achieve with Clicks, not code!
Imagine a customer care agent based in Chicago (Central time) is booking an appointment for a customer who wants to meet a banker in the Denver branch (Mountain time) of Cumulus bank.
Wouldn’t the customer care agent wants to see the time slots in Mountain time automatically and book the appointment?
With Salesforce Scheduler, now the agent can easily look at the available time slots in the bank operating hours timezone by default and book the appointments. Don’t worry about the Timezone in which the territory is operating and all; it is taken care of!! All the timings shown in my flow are configured to Cumulus Bank (Denver) operating timezone.
Question: What if some other bank is at a different location or any Service Territory for that matter? Will my flow behave like it is configured to that Service Territory dynamically?
Answer: Oh Yes!!
Let’s look at how it is done,
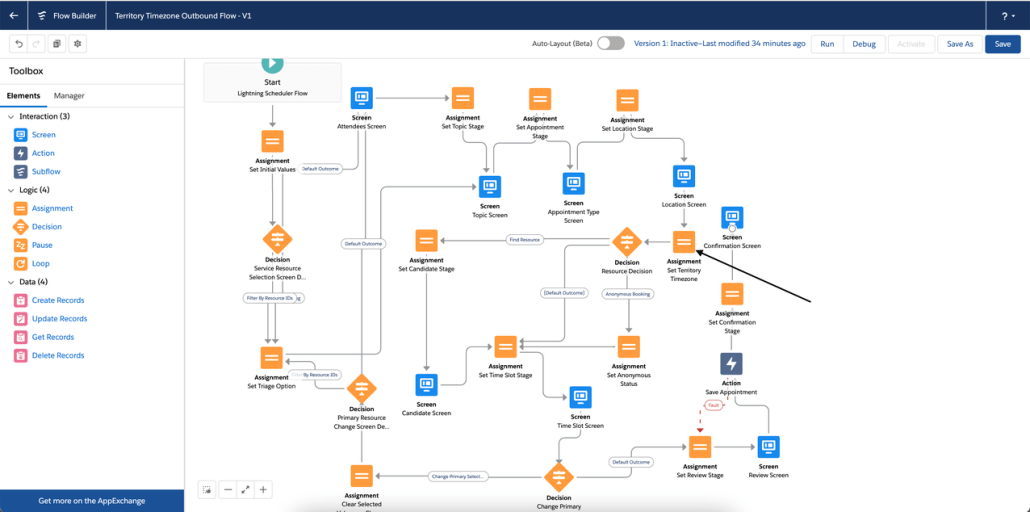
Configuration is the same for Outbound, Inbound, and Guest flows, illustrating for Outbound Flow.
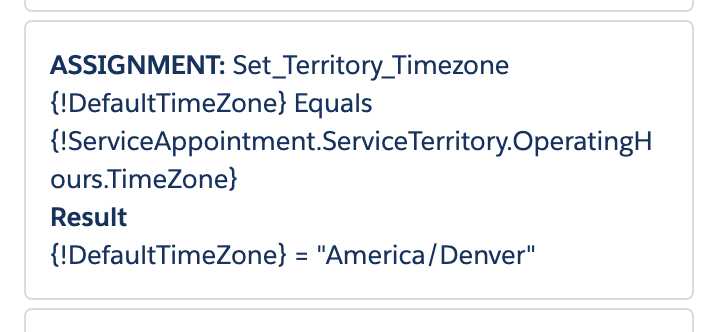
Add a new Assignment Element called Set Territory Timezone, after the Location Screen.
Set the DefaultTimeZone variable to Timezone from ServiceTerritory Operating Hours.
Save the flow.
— Now the flow is configured to the timezone based on the Service Territory chosen —
Screens that have an impact :
Candidate Screen now shows Next Availability in the Service Territory Timezone.
Flow Time Slot Screen, now by default shows Time Slots in Territories Timezone.
Flow Review Screen shows the selected time slot in the timezone in which Territory Operates.
For Inbound and Guest Flow., Next Availability and Time Slots are configured to Territory Timezone on Resource Time Slot Screen, and it looks like,
These are some of the use-cases that can be solved but not limited to,
Agents booking on-behalf appointments, want to see all time-slots in territory timezone by default.
Branch Managers and above, no matter from where customer books an appointment, he/she visits our site and tries to book appointment and all time-sots should be shown in my Territory supported Timezone by default.
Guest appointment booking, are you sending out an email to customer to book an appointment using the link and wants him to see time-slots in your territory timezone?
Your customer will never miss his/her appointment time, when booked with Territory timezone!
https://unofficialsf.com/wp-content/uploads/2022/09/largeUCSF-300x133.png00Akshayhttps://unofficialsf.com/wp-content/uploads/2022/09/largeUCSF-300x133.pngAkshay2021-06-21 22:32:432021-06-21 22:33:32From: Saikiran Gogurla: Spring 21 Feature: Preset the Territory’s Timezone on the timeslot screen