How to validate custom Flow screen components in Flows by Narender Singh
Narender Singh form https://forcepanda.wordpress.com posted a series of blogs on how to add validation to custom flow screen components:

Narender Singh form https://forcepanda.wordpress.com posted a series of blogs on how to add validation to custom flow screen components:
Flow now has a Lookup Component.

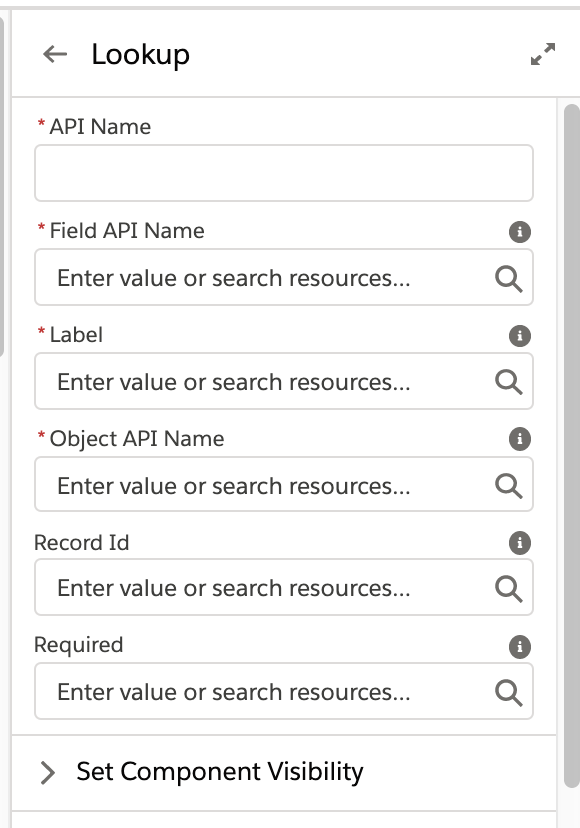
This component includes type-ahead search, and a list of recently chosen records. Here are the input parameters that you can pass in to it:

You configure it by pointing it at an existing Lookup field using the Object API Name and Field API Name fields. If you want to set its initial value, you can pass in a recordId, and you can make the field required.
You can make use of Lookup Filters with Lightning Flow. The filter does not (unfortunately) act before the list is rendered for the user. Instead it acts when the corresponding record is saved. Let’s walk through an example:
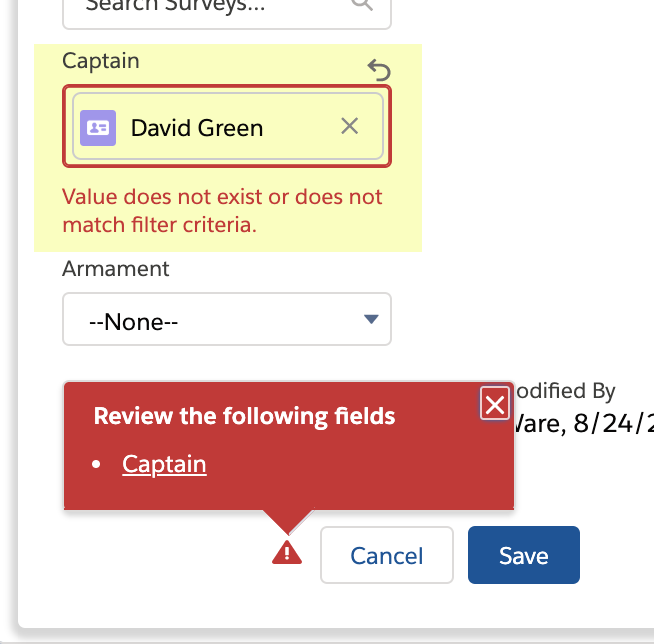
My Ships__c custom object has a Captain__c custom field that’s a Lookup to Contacts:

The Lookup control used on Flow screens is the same one used on Lightning record pages. Here’s what it looks like on a Lightning record page:

…and here’s how it looks on a Flow screen:

Suppose I add a Lookup Filter that filters out David Green:

One thing to note is that caching may cause it to take several minutes for the lists to update. I had to wait about 10 minutes after creating this Lookup Filter before David Green disappeared from the lists. However, effective immediately, if I selected David Green and tried to save the record in either a record page or via Flow, I would get an error message like this:
Once any caching refreshes, though, values that are blocked by the filter will not be visible in the Lookup
For more information, including info on OwnerId lookups, see https://unofficialsf.com/the-salesforce-automation-and-decisioning-wiki/14805/
Since this is an official component, consider posting questions and issues to the popular and well-monitored official community.
I’m pleased to report on the great things the Flow team has built over the Summer. These Flow Previews have become my favorite blogs to write because there are so many goodies to disclose. If you want to try these out immediately, get a free preview org.
It’s now possible to schedule Flows to run on a schedule. This applies to “Autolaunched” flows (i.e. flows without screens). Double-click on the Start element to set the schedule:

Notice that you can also add a record query. At the scheduled time, Flow will run the query and then run the Flow for each returned record, providing a powerful new batch mode capability.
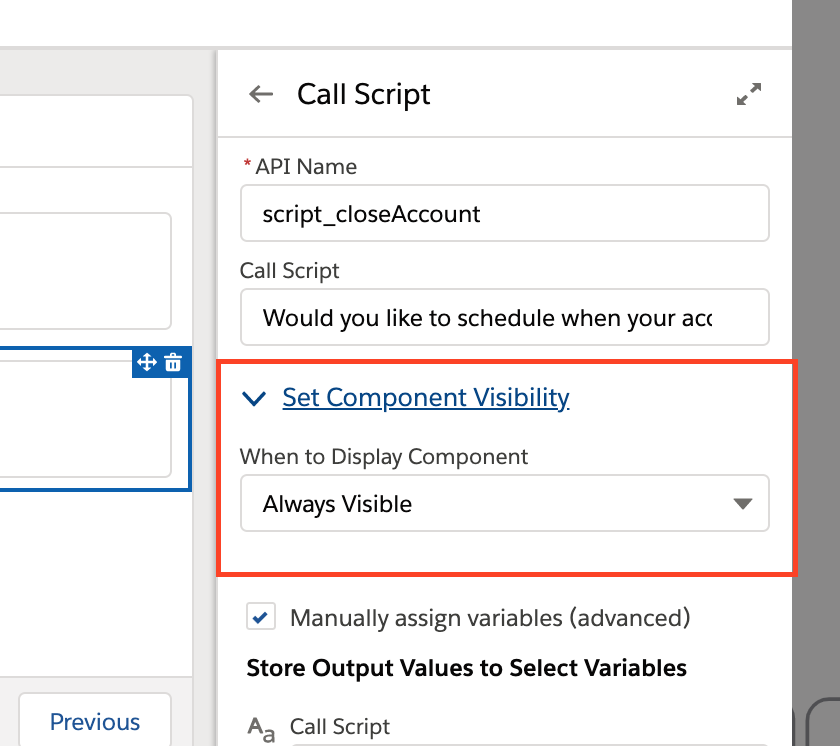
Fields can now appear and disappear on the screen as a result of some other field or value.

This is controlled via this new section in the field property editors:

Operator Note: If you’ve just created a field, you have to close the screen and reopen it before that field can be used as a ‘parent’ field. Yes, we think this is annoying too and we’ll fix it next version (this is one of those ‘harder than it looks’ caching yadda state storage yadda yadda problems).
The Automation group at Salesforce is in the early stages of a multi-release campaign to simplify the process of creating Flows. This will touch nearly every part of the product. One of the first benefits harvested from this can be seen in a change to the Get Records element. As you’ll recall, when you query for a record or a collection of records, Flow requires you to define a variable of the same type to temporarily store the information. That is done here:

You then use the storage variable when you refer to the queried records in a downstream element, like this:

In Winter ’20, you no longer have to do this. The streamlined Get Records looks like this:

Automatically generated references for Get Records queries look like this:

and automatically generated references for Screen Components look like this:

Lightning Web Components is Salesforce’s new framework for creating fast, reusable components. Flow already has a growing set of custom screen components built using the previous Aura technology, and those will continue to work. We’re advocating that all new development of components be done in the new Lightning Web Component technology, though, and you’re going to start to see new functionality that is only available to Lightning Web Components and not to ones built in Aura.

We’ve published a blog post here that consolidates all of the important information about creating and using LWC-based Flow Screen Components.
It’s now easy to add a Lookup field to flow screens:
This component includes type-ahead search, and a list of recently chosen records. Here are the input parameters that you can pass in to it:
You configure it by pointing it at an existing Lookup field using the Object API Name and Field API Name fields. If you want to set its initial value, you can pass in a recordId, and you can make the field required.
Enhancements to the canvas include:

You can optionally secure flow definitions on a per-profile basis.

We’ve refreshed the main list view in Setup.

We made a couple of enhancements to Process Builder:
When an error occurs in Flow, a platform event called FlowExecutionErrorEvent is now fired, and you can subscribe to that event with a Process Builder trigger. This lets you use the power of Process Builder and Flow to generate custom error handling. For example, you could set things up so:
There are a few gotchas to keep in mind, and they’re discussed in detail here.
Suppose you need a way to easily take a string with spaces and URL-encode it so you can put it in a URL (for example: ‘my cat’ becomes ‘my+cat’). You also have some numbers in string form that you want to add commas to (i.e convert 2348934 to 2,348,934).
In Apex, these are super simple because of the large library of available functions.
To URL-encode a string, you just write:
String encoded = EncodingUtil.urlEncode(myString, 'UTF-8');and to format a string, you can just write:
response.outputStr = Integer.valueOf(inputStr).format()But the fun part of Flow is not having to write code. String Changers provides a couple of actions that carry these out.

This action strips out any characters that can’t be used in an api name. One use of this: Use a formula in Flow to generate strings that include the running user and/or the current time and then strip out anything that will block the use of that string to name a flow.
Version 2.0 10/30 Production Sandbox
The source code is available here and is a great template to convert other Apex string functions.
SOQL provides a useful IN operator that filters the query on a specific set of values:

You currently can’t do this directly in the Flow Builder Get Records element, but you can install this FilterCollection Flow Action to provide the capability.
Out of the box, this action is set up to support standard objects: Contact, Account, Opportunity, Lead, Product, Case. You can easily modify it in Apex to support additional objects of your choice (see customization, below).
For our example, we want to query for all accounts that have an Industry that’s IN Banking or Chemicals. We expect to get back three of these four accounts:

Configure this Action by passing three pieces of information:
Here’s an example of a properly configured set of inputs:

This action will return a corresponding collection of filtered objects. Make sure you create a collection variable of the appropriate Record type and map it in the Store Output Values tab.
The following information is for advanced Flow users and discusses how this action can be modified to support additional types of objects. A current limitation in Flow makes it so that Apex Actions have to add specific code for each specific sObject they want to support (it’s on the roadmap to eliminate this limitation). So the bad news is that only 5 common standard objects are currently supported in FilterCollection.
The good news, though, is that it’s easy to add support for additional standard objects and custom objects.
To add support for an additional object, you have to add code in four places. First, add an input variable to the Requests inner class and an output variable to the Results inner class:

To process the input collection, add a code block based on the five lines immediately below. This has the effect of casting (transforming) your specific SObject collection to a general SObject collection. Then at the end, add a when clause to the switch statement to cast the general filtered-down collection back to the specific SObject type that Flow needs:

If you do add more standard objects, please consider making a pull request to the source code so everyone can benefit from your work!
Here’s a broadcast of one of the two Advanced Flow sessions from TDX.
This Post was most recently updated on: 2/11/26
Current Version: 1.6.0
In my spare time I’m experimentally rebuilding Approval Processes on top of Flow and I recently had a need for a way in Flow to retrieve a set of picklist values that I could then work with. So I built a simple Flow Action to enable all flow designers to do this without code.
It’s a little like the Picklist Choice Set resource in that you hand it the name of an Object and a Field, but it returns a collection of strings that you can then work with directly.
You can iterate through the values but one of the most useful things to do with this is to pass them into the new multiselect dual listbox screen component to let the user pick from among them.
Note: If you’re simply trying to extract the value of a particular picklist field on a record, try https://unofficialsf.com/extract-text-from-email-fields-picklist-fields-and-more-with-the-extracttextfromnontextfield-action/
Provide this action with the api names of your target Object and Field. Field must be a picklist.
V1.6.0 1/11/25 Production Sandbox more improvements
V1.6.0 2/11/26 Production Sandbox
Old Versions
V1.5 12/13/22 Production Sandbox misc improvements
Version 1.4 6/21 Add bulkification
In the common diagnostic use case, you have a tree structure of information and you work your way through the tree, gathering information and using it to determine the next diagnostic question. This is useful for important and distinctive use cases like troubleshooting and coming up with a good offer. Here’s an example:
Now, the flow in the above video only has four screens and creating four screens isn’t too hard, especially with Flow Builder’s ‘Duplicate’ tool. However, what if you have 500 of these screens? And what if this content is constantly changing and you want to make it possible for non-Admins to maintain it?
There’s a great way to address this use case, and I call it the Troubleshooter pattern. In this pattern, you don’t insert the content into screen elements. Instead you insert it into records of a custom object. Then you use a single Screen to load the appropriate custom object’s content for display. Part of the content includes a set of choices that the user can use to signal where they want to go next. Each choice points to another node of content.
Here’s the entire flow used to generate the content seen in the video above:

Two custom objects have been created here:
DiagnosticNode represent a screenful of information. It includes a rich text content field to display to the agent or user or technician. It also contains a radio button group that gets loaded with all of the node’s child DiagnosticOutcomes.
DiagnosticOutcome represents a single choice/answer that might come out of a particular DiagnosticNode. It will render as a radio button choice and has two important properties: the Label and a lookup to a different DiagnosticNode that will be the next node loaded if that choice is selected.
The beautiful thing about this approach is that the creation, editing, reporting, analytics of the content nodes themselves is all done with regular Salesforce records. For example, if I want to build out my tree of decisions, I first create a new target DiagnosticNode:

And then add as many different destination outcomes as I want:

The flow can display content either from the rich text “Node Content” field on the DiagnosticNode custom object or from a Knowledge article. To use Knowledge, check the box on a DiagnosticNode and select the desired article.
A button at the bottom of the page provides easy access to the record containing the content being looked at. This makes use of a custom Flow Screen Component called Navigation Button.
git source for the full project (including Knowledge support)