I’m pleased to pass on this new survey from the Salesforce Automation Design Team. I highly encourage everyone to fill it out. These are the key designers who are at the heart of all the changes we make to the user experience of Flow and Flow Orchestration. Giving them your latest thoughts on functional gaps, experiential challenges, and the like is a great way to influence the course of the products. This data will also be reviewed by the product manager group.
Hello everyone! We at the Salesforce design team are working on new and improved automation capabilities for Flow, and as part of that process we want to hear from our customers. We’ve created this 10 minute survey so that we can learn more about your automation experience in Salesforce, and would greatly appreciate anyone here taking the time to fill it out. Specifically we’re gathering feedback around:
What sorts of automations you’ve created, or want to create
What needs you have for accessing data outside of SFDC in your automations, if any
If you’ve previously used any other automation tools besides Flow
If you’ve ever created an automation in Flow before, you’re exactly who we’re looking to hear from! Every little bit of feedback matters, so please help us create the best product we possibly can for you.
https://unofficialsf.com/wp-content/uploads/2022/09/largeUCSF-300x133.png00Alex Edelsteinhttps://unofficialsf.com/wp-content/uploads/2022/09/largeUCSF-300x133.pngAlex Edelstein2022-08-12 08:27:102022-08-12 08:27:18Complete the New Survey from the Salesforce Automation Design Team!
Flow Orchestration and Flow are the future of automation in Salesforce. With Flow Orchestrator, admins can build highly customizable approval solutions to suit all of their business requirements. The new However, Approval Orchestrator from Forcelution extends Flow Orchestration to provide the best combination of flexibility, ease of use, and power! This Salesforce add-on is now available on the AppExchange and provides an easy and intuitive wizard to create Orchestrator approval processes in very little time. Simply specify the object, entry criteria, and approver details, and click “Create”! The application automatically generates the appropriate parts of the underlying orchestration for you. And because these concern flows, you simply edit and extend the logic when business requirements change.
Highlights
Generate approval processes in just a few clicks
As an admin, you can define your approval process via an intuitive jump start wizard. Approval Orchestrator automatically generates and deploys the orchestration and associated flows that make up your approval process.
Leverage all the power and flexibility of Flow
Once the orchestration and associated flows are generated, you can easily extend them to fit your specific business requirements. For example, you can add a Slack message to notify approvers upon submission of an approval request.
Create Approval Request reports
In contrary to standard Salesforce approval processes, Approval Orchestrator stores approval requests and steps in reportable objects. This gives you the possibility to create reports and dashboards on approval requests, so that approval managers always exactly and in real-time know what’s going on.
What’s next?
With the current jump start wizard of Approval Orchestrator you can generate the orchestration and associated flows for a simple approval process. The generated orchestration and flows can be enhanced in Orchestrator / Flow Builder. We are working on functionality to make generating approval processes and managing approval requests even easier. These roadmap items will be made available in the upcoming releases.
Advanced Approval Process Wizard
In addition to the current jump start wizard, you can soon choose to use a wizard for generating more advanced Orchestrator approval processes. This wizard will be like the six-step wizard for creating Salesforce approval processes. The new wizard will allow you to generate multi-stage approval processes, including different actions and approvers. In just a few steps, you can create the most advanced approval processes, exactly suiting your specific business requirements!
Migration tool for Salesforce Approval Processes
With this migration tool you can easily migrate your existing Salesforce approval processes to Orchestrator approval processes. This means you can keep your existing approval functionality, but at the same time have the possibility to enhance and further automate your approval processes in Orchestrator and Flow Builder. Also, Approval Orchestrator uses reportable objects to store approval requests and approval steps. This means you can finally create reports and dashboards on approvals.
Mass Approval Management Tool
Our existing app “Enhanced Approval Requests Pro” gives users the possibility to submit multiple records in one go for approval, and allows approval managers to filter and mass approve, reject, or reassign pending approval requests. This “mass management” functionality is currently only available for Salesforce approval processes, but will soon also be made available for Orchestrator approval processes. Approval Orchestrator will be a huge time saver for your entire organization!
Learn about the range of Approvals options from Salesforce here.
https://unofficialsf.com/wp-content/uploads/2022/09/largeUCSF-300x133.png00Alex Edelsteinhttps://unofficialsf.com/wp-content/uploads/2022/09/largeUCSF-300x133.pngAlex Edelstein2022-08-07 11:13:482022-08-07 11:13:51ISV Spotlight: Forcelution’s Approval Orchestrator – A Fast, Easy, and Intuitive way to build the ultimate approval process in Flow!
The world of approvals has gotten richer and more complex in the last year or two. Here’s a summary of your options.
‘Legacy’ Approval Processes
We informally use the word “Legacy” here at Salesforce when talking about Approval Processes, the classic technology available in Setup at no additional cost:
In evolutionary terms, if you’ll permit a digression, the alligator is often called out as an animal that hasn’t evolved at all in hundreds of millions of years and continues to do well in its ecological niche. Legacy Approval Processes is something of an alligator. It’s very old, fairly ugly, and highly effective. Salesforce has stopped active development on this technology, just like it stopped active development on Workflow Rules. The simple reason is that the twenty year-old architecture of those services is hard to work with today, and it’s costly to make changes to those products because the changes cannot be used anywhere else. To increase the rate of innovation (think: new features), we’ve needed to focus on a smaller number of technological platforms, and that means a focus on Flow. Legacy Approval Processes does not make use of Flow technology.
There are no plans to end-of-life Legacy Approval Processes, but don’t expect any more new features.
Advantages
Unlimited usage without additional license costs
Currently has the strongest set of Approval-related features
Disadvantages
Inflexible (Hard to customize)
Can’t leverage Flow capabilities like screen flows
Hard to incorporate into more sophisticated business processes
Approvals in Flow Orchestration
Flow Orchestration provides a powerful new foundation for the creation of approval processes. As shown in these early tutorials, it’s easy to set up an Interactive Step in an Orchestration Stage that’s assigned to an approver. Orchestration will quietly wait until the approver takes action, and then wake up.
Think about Orchestration as a powerful new application platform that lets you build sophisticated business processes that include approvals. As a paid product, it’s overkill for simple one step approvals. In addition, it lacks many of the approvals-centric features of Legacy Approval Processes, such as built-in support for Delegate Approvers.
Where Orchestration really shines is in its flexibility. Want to create an approval with several stages of parallel approvals? Straightforward. Want to customize the screens that the approvers see, and the information on those screens? Straightforward. Want to add timers that ensure that if an approval step isn’t completed, an alternative fall back is used? Straightforward.
In this orchestration by German solar company Eigensonne, multiple approvals are nested in the larger business process (shown in red, below):
Advantages
Maximum flexibility
Futureproof: Flow and Orchestration are the future of Salesforce automation
Mix other parts of a business process in with the approval parts
Dynamic assignment of approvers
Uses Screen Flows to provide customized approval requests
Disadvantages
Must be purchased separately (beyond annual 600 run allocation)
Takes more work to setup initial orchestrations
Missing some of the built-in features of Legacy Approval Processes
Steeper learning curve
Approval Orchestrator by Forcelution Apps
Approval Orchestrator is a paid, supported application that has been developed to run on top of Flow Orchestration. It takes the advantages of Flow Orchestration and eliminates many of the disadvantages. Learn more here.
https://unofficialsf.com/wp-content/uploads/2022/09/largeUCSF-300x133.png00Alex Edelsteinhttps://unofficialsf.com/wp-content/uploads/2022/09/largeUCSF-300x133.pngAlex Edelstein2022-08-04 07:10:462022-08-04 07:17:59Understanding Your Salesforce Approvals Choices
From Dean Fischesser, one of the nicest Orchestration demos I’ve seen:
In this great demo created by the business process involves a complex set of steps needed to onboard a Physician into a health system:
Completion of an initial Omniscript….
…triggers the underlying orchestration:
Note that the screen flow forming the first interactive step has embedded FlexCards in it!
By embedding Flexcards in Screen Flows, the Flexcards can be used as part of Orchestration Interactive Steps and be used from within the Orchestration Work Guide.
https://unofficialsf.com/wp-content/uploads/2022/09/largeUCSF-300x133.png00Alex Edelsteinhttps://unofficialsf.com/wp-content/uploads/2022/09/largeUCSF-300x133.pngAlex Edelstein2022-07-22 15:49:392022-07-22 15:49:45Using Orchestrator with OmniScripts to Address Health Use Cases
Think of an Orchestration step as a core flow surrounded by a layer that tracks who that flow is assigned to and what determines when that flow has been properly completed. Once the main orchestration flow starts, it will pause and go to sleep when all appropriate steps have been started. Then it will wake up when work on the steps is carried out, and reevaluate, determining if new steps should be started. Starting a step does not itself create a transaction. Let’s look at what happens with the step’s core flow: 1) If it’s an Interactive Step, the core flow is a screen flow, and the assignee is sent a notification. When the assignee starts that screen flow, it will obviously be in a new transaction. 2) If it’s a Background Step, the core flow is an auto-launched flow. It will normally run synchronously with the resumed Main Orchestration Flow. That means it’s part of the same transaction as the Main Orchestration Flow, and this ‘open DML’ situation prevents callouts, so Orchestrator provides an optional checkbox with the text ‘Contains external callouts or pause elements’ , that will force a new transaction for the step’s core flow. If your entry conditions for a step are advanced, you may want to use a flow to determine whether the step is ready to start. These are called Evaluation Flows, and they also execute in the same transaction as the resumed Main Orchestration Flow.
https://unofficialsf.com/wp-content/uploads/2022/09/largeUCSF-300x133.png00Alex Edelsteinhttps://unofficialsf.com/wp-content/uploads/2022/09/largeUCSF-300x133.pngAlex Edelstein2022-06-24 11:40:132022-06-24 11:40:17Transactions and Flow Orchestration
You can terminate a running orchestration by doing an Update Records on its Orchestration Run record:
https://unofficialsf.com/wp-content/uploads/2022/09/largeUCSF-300x133.png00Alex Edelsteinhttps://unofficialsf.com/wp-content/uploads/2022/09/largeUCSF-300x133.pngAlex Edelstein2022-04-17 15:23:292022-04-17 15:23:33Quick Tip: Cancel a Running Orchestration from a Flow
Here’s what you can look forward to in Summer ’22 – hopefully this post will make your ‘Summer 22 Treasure Hunt’ posts a little easier!
Note that this is not the complete list of changes and you should carefully check the Release Notes for changes that may impact your org.
Record Triggered Flows
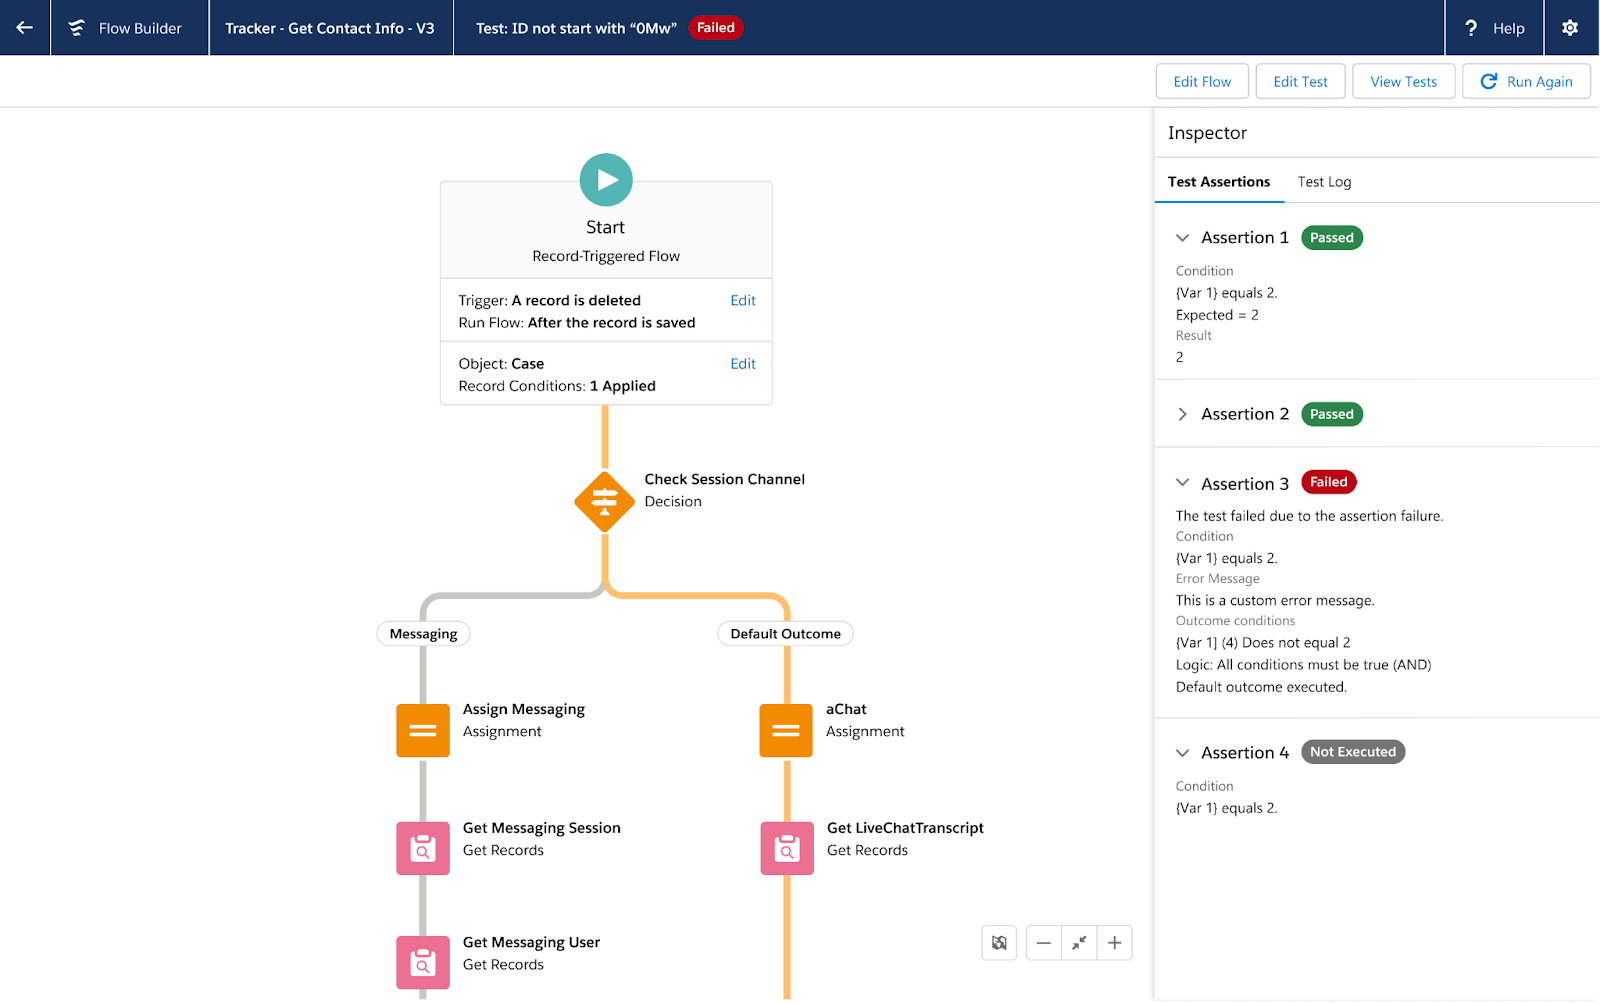
No-Code Flow Testing Arrives (Beta)
Imagine a scenario where your organization has a team of 15 people managing your Salesforce instance and multiple people making changes to Flows. There’s often a risk that somebody could unintentionally break some business rule logic. With the introduction of Flow Tests, you can check to ensure that you’ve maintained your business-critical logic from version to version.
Flow Tests allow you to set up assertions or ‘assumptions’ about your results that you want to always stay the same. Those assertions protect your future self or others on the team from making costly mistakes in the future.
Note: You can currently only create Flow Tests for After-Save and Before-Save flows.
Be on the lookout for a bigger post with a video walkthrough of Flow Tests in the coming weeks.
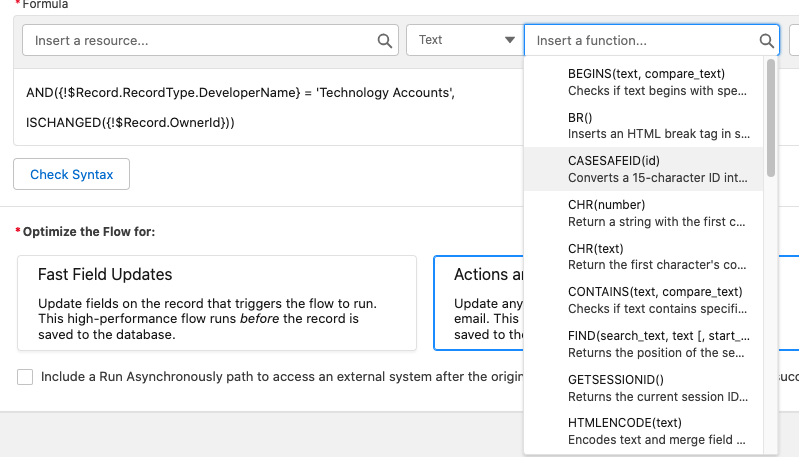
New Formula Builder With Syntax Checking in Entry Conditions
Get a sneak peak of our new and improved Formula builder in action on Entry Criteria in Record Triggered Flows. Yep – that means you can now use a formula for your entry conditions! Before this new formula experience existed, you generally had to hope your syntax was accurate and only received feedback about your formula when you went to save your Flow.
Features:
Select predefined operators to build your formula versus starting out with a blank slate
Check syntax to validate that your formula works within the context of your Flow
Traverse through relationships using Formulas and reference Global Variables
As noted above, you can now traverse through parent fields in Entry Criteria – one of the most common scenarios is checking for the Record Type’s Developer Name!
Keep in mind that complex formulas in entry criteria will negatively affect performance, so if you are able, stick with non-formula based conditions. Be on the lookout for this new formula building experience to come to other areas of Flow, like Formula resources, in a future release.
Workflow Rule Converter Goes GA
Our Workflow Rule converter is now GA – You can now convert even more workflow rules to Flows using our nifty conversion tool. We added support for Formulas and also added support for Null checks.
There will still be some Workflow Rules that are not convertible, namely:
Formulas featuring:
Hour/Minute/Second/TimeNow/TimeValue
IsClone
$RecordType
Be on the lookout for the official release notes covering all of the additions and considerations.
Flow Trigger Explorer Enhancements
Check out all the awesome improvements to Flow Trigger Explorer below.
Create New Flows Directly From Trigger Explorer
We’ve added the ability to create a new flow directly from Trigger Explorer – save time by pressing ‘New Flow’ for each trigger category. It even autofills the type and object for you!
Control Trigger Ordering
You can now control your record-triggered flow order directly from Trigger Explorer! Before this, ordering had to be done within each Flow’s advanced settings. Note that if you change the ordering of an active flow, a new version will automatically be created and activated for you. Keep this in mind if you decide to revert a Flow to an older version which may conflict with another flow’s trigger order.
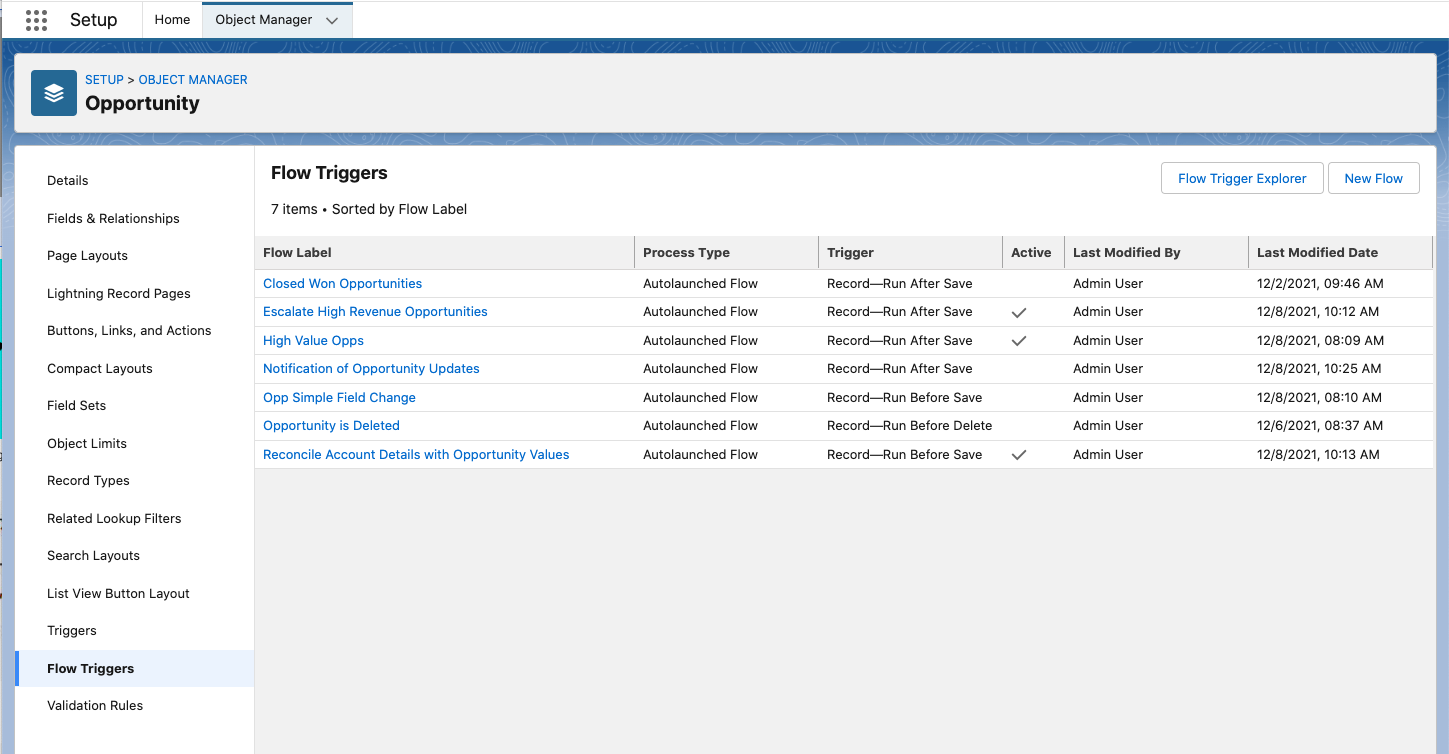
Flow Triggers and Trigger Explorer Available in Object Setup Menu
Save time and get a picture of all of an object’s record-triggered flows directly from the Object Manager. You can even create a new flow or open up Trigger Explorer from the object’s setup menu! No more digging around in your org’s Flows list view.
Screen Flows
Add Descriptive and Collapsible Section Headers to Your Flow Screens
New in Summer ‘22, admins can add headings to sections in their Flow screens.
When a section has a heading, the end user is able to collapse or expand the section as they progress through the screen. Currently, all sections are expanded by default.
With section headings, admins can provide additional context and visual hierarchy for their end users, making it easier for users to make sense of a long block of inputs or multiple tasks in one screen.
Additionally, section headings give visually impaired users the hierarchy they need to assess where in the screen they are.
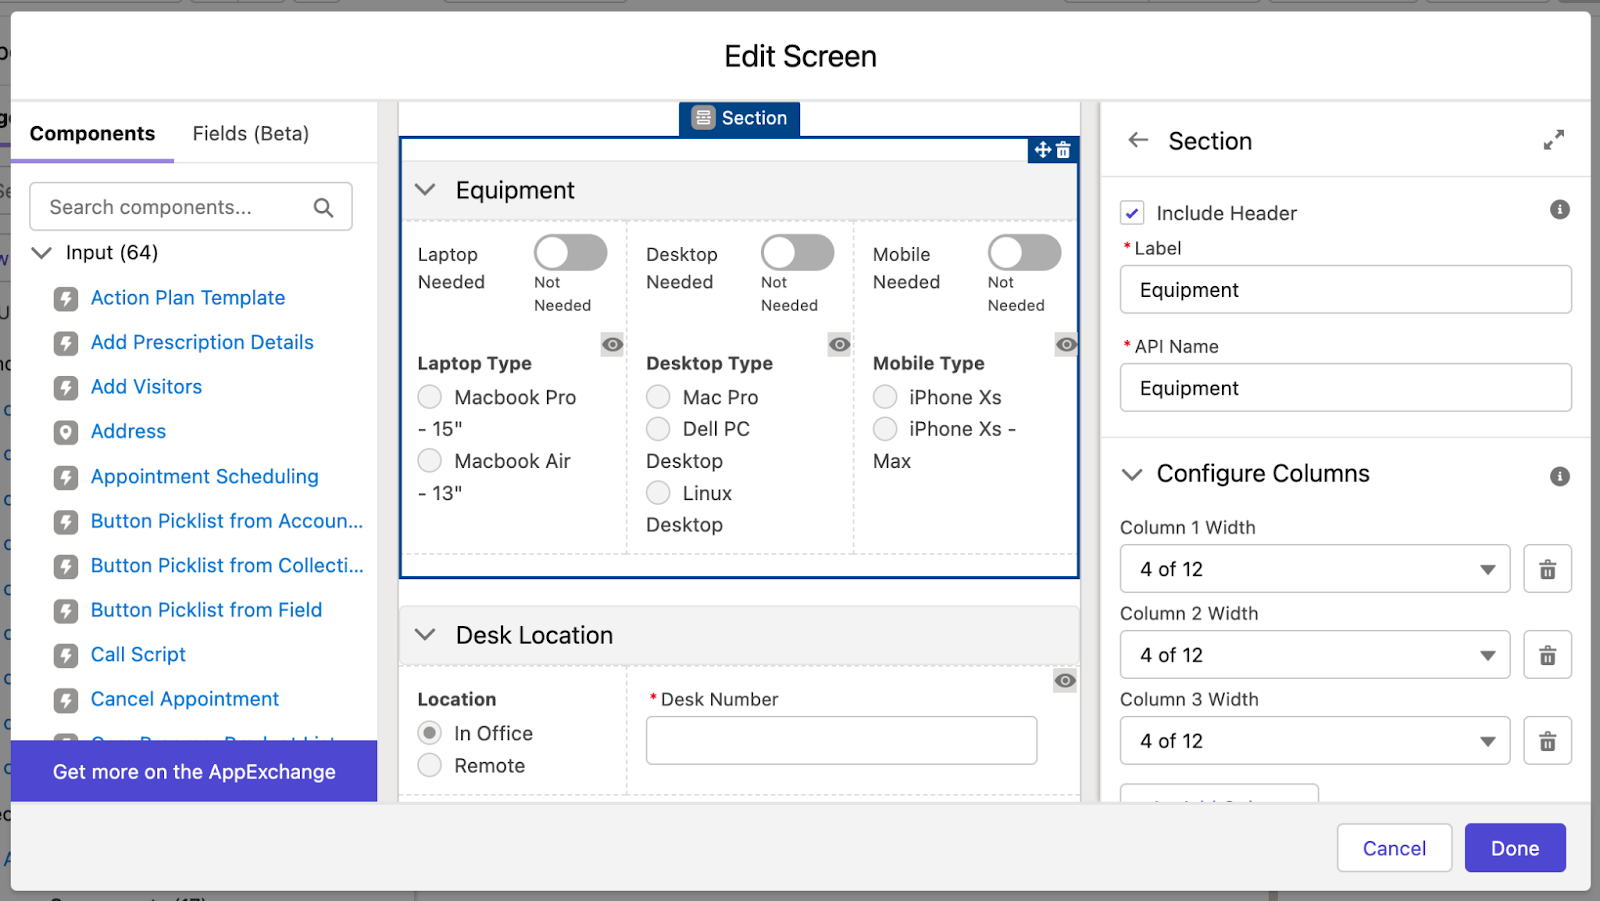
Dynamic Forms for Flow (Beta) – Name and Address Fields Added
You can now add Address and Name fields from the Fields tab in Screen Flows. For example, dragging the Name field on a Contact record will bring over all of the associated name fields like Salutation, First Name, Last Name, and more.
Dynamic Forms Address Field – Now with Google Typeahead!
Note that one of the coolest features of the newly added Address field support with Dynamic Forms for Flow is that it now supports typeahead results to automatically populate address data – a huge data integrity and time savings improvement. Check out how fast and accurate it was to fill in the Billing and Shipping address information for a new account.
Screen Editor Accessibility Improvements
We’ve made the following improvements to the Screen Editing experience for visually impaired users:
When you open the screen editor, the focus is automatically set to the Label field in the screen properties pane (for new screens) or the Edit button that enables you to edit a screen’s label (for existing screens).
After you create a component visibility condition in a screen component, focus is set to the condition you created.
After you create a choice resource from a value field, focus is set back to the value field where you created the choice.
With Lightning Web Runtime (LWR) on Node.js, you can build digital experiences that meet the high scale, security, and performance demands of modern web applications. LWR is a non-opinionated way to configure and load the modules, services, and dependency providers you need to build a JavaScript app.
Some benefits of LWR are:
Performance—Thanks to page generation at build time, not runtime, our bar is set at subsecond full-page loads.
Friction-Free—An enjoyable local development experience.
Power—All the power of Lightning Web Components and the Salesforce platform at your disposal.
Important Notes About Running Flows in LWR
LWR is a strict ‘no aura’ environment, which means there cannot be any aura-based local actions or custom aura components in your Flow.
Additionally, Flows with the following screen components / features are not yet supported:
File Upload
Image
Screen Inputs generated using Dynamic Forms for Flow
Lastly, Flows run in LWR Sites cannot be paused or resumed.
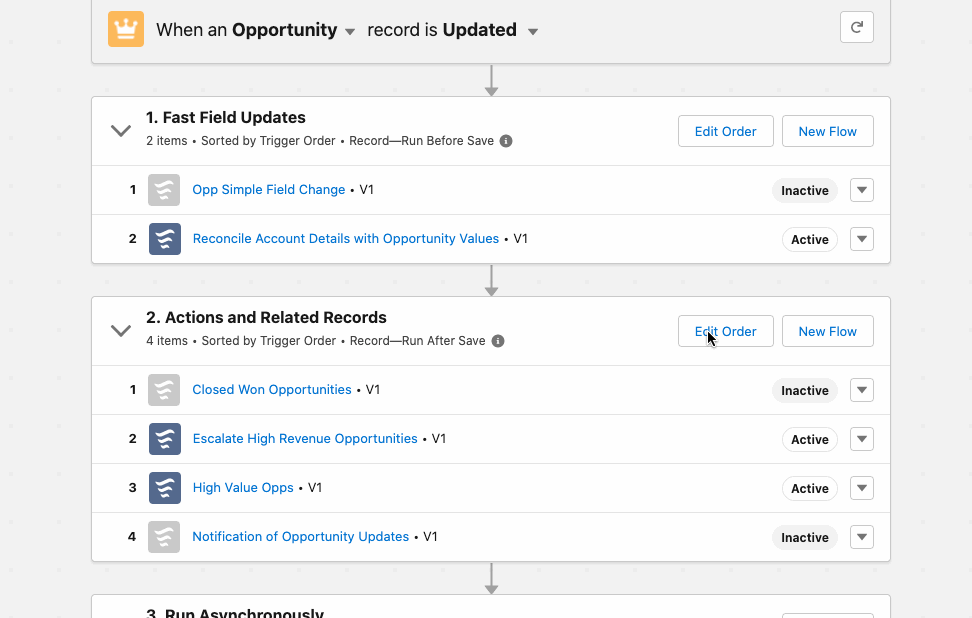
Orchestrator
Orchestrations Now Deployable with Change Sets
Admins that use Change Sets to deploy changes through their environments can now deploy orchestrations and the associated flows with the change set tool. Keep in mind you still need to activate the orchestrations upon successful deployment.
New $Orchestration System Variable
We introduced the new $Orchestration global variable that you can reference at any place throughout an orchestration. This new variable allows you to reference the Orchestration Instance Id which is handy for complex orchestrations that involve external systems which may pause or resume the orchestration with platform events.
Open Associated Flows from an Orchestration.
You can now save time to make quick edits by opening evaluation, screen, or autolaunched flows directly in Flow Builder from within an orchestration step.
More Orchestration History Tracked
You can now track more orchestration events from the Orchestration History. orchestration. The following events were added to the history:
An orchestration is canceled
A stage or step is discontinued
An orchestration, stage, or step encounters an error
A work item is reassigned
Order Triggered Orchestrations with Flow Trigger Explorer
Triggered orchestrations can now be ordered along with other After-Save Flow Triggers within Flow explorer. This makes maintaining the order of your automations easier and ensures your orchestrations occur exactly when you want.
Next Best Action
Limit Recommendation Repetitions
You can now limit the number of times Next Best Action recommendations are repeated with the new Limit Repetitions Flow element.
Available for strategies built using the Recommendation Strategy Flow type.
Example Use Cases
Limit a recommendation from repeating for 3 months when an employee accepts an action to reset password.
Limit a recommendation from repeating for a year when a customer rejects an offer to purchase an add-on for a discount.
Usage
When the Flow runs on an object page, it limits repetitions by record. Otherwise, it limits by runtime user.
Add Limit Repetitions element after you have your collection of recommendations and you have your recommendation IDs or keys.
Customize limits based number of responses within a specific number of days.
Save a step by assigning values to the RecommendationOutput right within the Advanced section versus adding the Assignment element.
All Flows
Autolayout’s Go-To Connectors Now Highlight Referenced Elements
We introduced Go-To connectors as a way to summarize the outbound connections an element may have in autolayout. For elements with long names, it was often hard to see the element a Go-To connector referenced.
Now, you can find connected elements in your flow by clicking the Go-To connector – Flow will now highlight and the target elements. As an added benefit, we’ll also adjust the Zoom level to ensure the Go-To connector and all of the target element(s) are all in view.
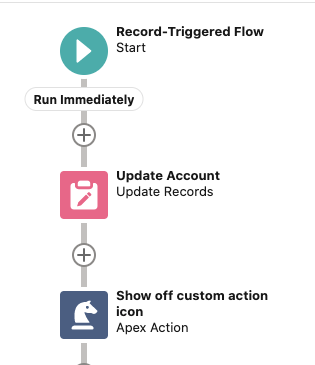
Custom Icons for Invocable Actions
Take note ISVs and Partners – invocable actions can now have their own unique icons in Flow Builder. This provides fantastic opportunities for branding and at-a-glance ease of use.
Developers creating invocable actions can choose to specify either Salesforce Lightning Design System (SLDS) icons or custom SVG files (added as a Static Resources in the org) to use as the icons for their actions in Flow Builder.
Developers specify action icons through a new iconName modifier in the invocableMethod annotation in the Apex code for actions: @invocableMethod(iconName=’icon’).
Note that custom icons are only displayed in flows using auto-layout.
Use Standard SLDS Icons
Below is a quick example of an out of the box SLDS icon – all I did here was add the SLDS path to the icon in the invocable action @InvocableMethod piece of the Apex Class:
@InvocableMethod(iconName=’slds:custom:custom47‘)
The format expected is slds:<slds Icon category>:<icon name>
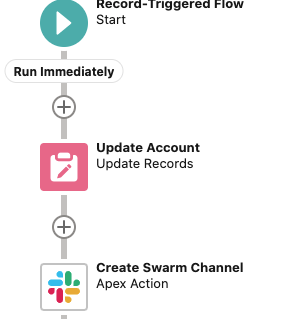
Using Custom Icons – SVG Files
The real power and pizazz of this feature comes from being able to use custom SVG files. SVG (Scalable Vector Graphic) files are vectorized and contain XML metadata about how they should be displayed.
Suppose I have a static resource named ‘slacklogo’ – an SVG file. The naming convention expected in the invocable method is resource:staticResourceName:svgID. The SVG g-tag Id can be found in the actual metadata of the file. If one doesn’t exist, you’ll need to add one (via Notepad or your IDE of choice).
SVG files must meet the following requirements:
The <svg> element in the file includes an id, xmlns, and viewBox attribute
The <svg> element in the file doesn’t include a style, height, or width attribute
The file doesn’t include a <clipPath> element
Each <path> element in the file includes a fill attribute
Here’s an example with a custom slack icon uploaded as a static resource: @InvocableMethod(iconName=’resource:slacklogo:slack’)
Be on the lookout for more info in the official release notes for best practices and setup help with custom action icons.
Delete Flow and Process Versions from Managed Packages
ISVs and Partners – this one is a biggie for you. You can now delete a flow or process version from a managed package in the org that uploads the package. After you delete the version, the org that subscribes to the package keeps the version until someone manually deletes the version in the subscriber org. This is a great change for ISVs as it means orgs will no longer hit the Flow version limit when new flow versions are pushed from package upgrades.
Note: To turn on this feature, contact Salesforce Support.
This is the second post of a 2-part series. Here, we go over how to run an Orchestration. In Part 1, we built this Orchestration and showed the different features available to admins and end users during design time.
Overview
Orchestration Run Through
This is what the end user experience looks like when running the Orchestration that we built in the first post.
Orchestration Runs List View
The Orchestration Runs list view will give you a consolidated view of every orchestration that’s ever been run in your org. Admins can also cancel their running Orchestrations from this list view.
Debugging Your Orchestration
If an orchestration is not functioning as expected, you may want to visualize how it has progressed through each stage. The Debugger is a great tool for seeing the progress an orchestration has made. Additionally, the Debugger will list real values of any variables you’ve added in your Orchestration.
Orchestration History
Upon clicking into an orchestration run, you can access the full run history. You’ll see a step-by-step rundown of what’s been completed in the orchestration so far, who completed it, and how long it took. The history is a great starting point for identifying bottlenecks in your process.
Orchestration Work Items List View
The Orchestration Work Items list view allows your end users to more efficiently track all of their assigned work, and is the view from where Admins can reassign work items.
https://unofficialsf.com/wp-content/uploads/2022/09/largeUCSF-300x133.png00Alex Edelsteinhttps://unofficialsf.com/wp-content/uploads/2022/09/largeUCSF-300x133.pngAlex Edelstein2022-03-07 17:54:512022-03-09 08:55:03How to Run an Orchestration: Case Management Example
This is the first post of a 2-part series. Here, we go over how to build an Orchestration. In Part 2, we actually run this Orchestration and show the different features available to admins and end users during runtime.
Overview
Orchestrator (GA Spring 2022) is a new product from Salesforce that allows you to orchestrate processes with multiple flows and multiple users to automate sophisticated business processes without code.
In this tutorial, we will build a Record-Triggered Orchestration for a case management process. We will cover all of the features available to customers while building their Orchestrations.
How do I activate Orchestrator?
Orchestrator is by default activated in every production salesforce Org. As pricing is done using a freemium consumption-based model, you can build and test your orchestration for free, given that you have not exceeded the default 600 runs provided to every org (Please reach out to your Service Cloud AE regarding further Orchestrator pricing). So, you shouldn’t have to do anything special in order to activate and use orchestrator.
To ensure you have Orchestrator in your Salesforce org, you can navigate to the setup menu. From there:
Click Process Automation > Flows
Click New Flow
Click All + Templates
If you see a tab for Orchestrator, that means you can use Orchestrator!
Flowchart (model it out)
Before creating your orchestration, it can be useful to visualize your entire end-to-end process in order to understand which parts you’d like to model within salesforce, which parts will need intervention from third-party systems, which parts should occur in the background, which parts need user input, etc.
Getting Started
To create a new orchestration, you’ll need to navigate to the set up menu. From here, click on Process Automation > Flows, and then “New Flow”. This will take you to the flow set up modal. From here, click “All + Templates”, and then “Orchestrator”. You now have the option of building either an auto-launched orchestration (invoked by Apex, REST API, or other custom code) or a record-triggered orchestration (invoked similarly to a record-triggered flow). We are going to build a record-triggered orchestration.
We are now taken to the Orchestration Builder UI. It’s pretty empty since we haven’t added anything yet. What we do see is the Orchestration trigger. Here, we can modify when we want our Orchestration to be triggered.
Add Stages
Let’s add a stage to our Orchestration. Stages are how Orchestrator groups related steps together. Stages are useful for visualizing Orchestrations in terms of larger subprocesses. Also, you can run multiple steps in parallel if they share a stage, so if you’ve got a number of steps that need to be run in parallel, you’ll want to put them in the same stage.
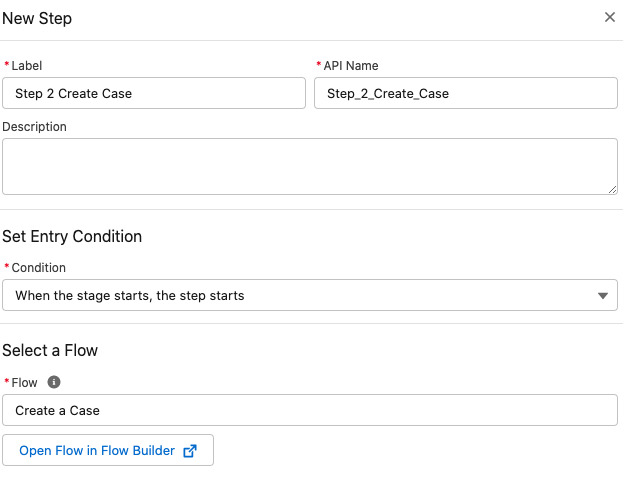
Add Flows
Each stage will consist of steps. Before we can add a step, we need to create a flow for each step we want our Orchestration to have. These flows will be doing the low-level work (record updates, screens for user tasks, etc.) for our Orchestration.
Background Steps
The first type of step is a background step, which calls an autolaunched flow when it is run. Background steps are great for repetitive background work: record updates, invocable action calls, and sending notifications to users are all examples of background work for which these steps should be used.
Interactive Steps
The second type of step is an interactive step. This step should be used whenever a user needs to give their input on something: approval steps, pricing quotes, and collecting feedback through a form are three examples of how interactive steps might be used.
Logic Elements
Orchestrator currently supports 2 types of logic elements: decisions and go-to connectors. Decision elements allow you to have branching paths that execute on certain conditions, while go-to elements let you loop back to previous elements of your Orchestration. You may have multiple paths in your Orchestration which lead to the same rejection stage; a go-to element allows you to reuse the same stage to handle all of these outcomes.
Evaluation Flows
Evaluation flows give you greater control over the entry and exit criteria of your steps and stages. If you don’t wanna start a step until a certain condition has been met on a record field for example, you’ll want to use an evaluation flow to check for this. Additionally, maybe you want to end a stage before completing all of its steps, because an important criteria has already been met. An evaluation flow fits this use case as well.
Before You Run: Do These 3 Things
Before you can run your orchestration, you need to set up the work guide on any relevant record pages, set the process automation email, and activate your orchestration. This video shows you how to do all three.
Important Consideration: $Record Refresh
A current limitation to be aware of is how Orchestrator saves the context record for a Record-Triggered Orchestration.
In a nutshell, you can circumvent this by always calling a “Get Record” element at the start of every flow to ensure you’re getting the most up to date information on the context record.
This video will help you ensure you don’t run into any problems related to this limitation.
Next Steps
In Part 2, we will go over how you can run this Orchestration and take advantage of our monitoring features to get more information on your running Orchestrations.
https://unofficialsf.com/wp-content/uploads/2022/09/largeUCSF-300x133.png00Alex Edelsteinhttps://unofficialsf.com/wp-content/uploads/2022/09/largeUCSF-300x133.pngAlex Edelstein2022-03-07 17:54:022022-03-07 17:55:32How to Build an Orchestration from Scratch: Case Management Example