

Debugging Tips for Salesforce Orchestrator
These guidelines apply as of Spring ’22. In general, the idiosyncracies and gaps that are discussed here represent things that the development team just hasn’t had a chance to get to yet.
Key Debugging Concepts
Use the Orchestration Run list view to access the debugger for in-process orchestrations.
Unlike screen and autolaunched flows, there’s no Debug button in Flow Builder for orchestrations. There probably will be one at some point, but the best explanation is that the mindset of an orchestration is oriented around it being ‘In Process’, and there’s going to be a different place where you manage your In Process orchestrations than the Flow Builder canvas.
The first thing to get comfortable with is the Orchestration Run list view, which you can access from the waffle

This produces this view:

The Debug and Cancel menu items are only available on In Progress runs.
You can debug a paused orchestration, and you can debug a failed (errored) orchestration, but you can’t debug a completed orchestration
Suppose you are trying to figure out whether a value is being output by a step flow as expected. You could run the step flow in isolation, but then you have to simulate the inputs that it gets, and that can take time and be unreliable.
As long as you have at least one Interactive Step, the orchestration will pause and you can click Debug Orchestration, as shown above. If you don’t have anything to stop the run from hurrying through to completion, you won’t have a way (for the time being) to inspect intermediate values.
If you do have an all-Background Step orchestration, you can tack on a placeholder Interactive step to ensure you can fully inspect the values. Here’s an example:

You can also insert a step that causes an error, because the error email will contain the same information as the debugger:

Note that when the error happens in a step flow, you’ll get two error emails, one for the step flow and one for the orchestration (which is also a flow).
If you want to inspect intermediate step flow values, use manual variables
Orchestrator currently shows, for each step flow, the inputs that went into it and the outputs that came out of it:

However, Orchestrator does not yet show each element of the Background Step. In the case above, I was debugging a problem with the Flow Interview and wanted to see what value was output from the Get Records call here:

Usually, I use automatic outputs and don’t create manual variables, but because of the limitation of seeing the internal elements of background steps, I elected to create a variable to store the Flow Interview and clicked ‘Available for output’:

Then, in the Get Records, I manually mapped the field I cared about to this manual variable:

As a result of this, I’m able to observe what was being returned for Flow Interview, even though it’s in the middle of the Background Step:

If you choose to do this, be careful about other things downstream in your flow that might mutate the value of your variable before it gets output.
Orchestrator Pricing
Orchestrator is generally available and here’s an unofficial FAQ on how it will be priced.
How is it sold?
The product will be sold via a consumption-based approach where customers purchase a quantity of yearly ‘runs’ There’s also a way to enable non-Salesforce users to use these runs without purchasing Salesforce user licenses for them. (See below)
What’s the Freemium Allocation?
All PxE, Enterprise, Enterprise, and Unlimited Editions get 600 annual runs included (regardless of org size).
Pricing Before any Discounts?
It’s a consumption-based SKU which means you pay $1 per orchestration run, and it’s sold in yearly increments. Customers purchasing in volume can seek discounts, as is usual.
Is there a way to extend Orchestrator usage to non-Salesforce users in my org?
Yes. There’s a new ‘no-cost’ Limited User License in the works that is designed to be assigned to users who don’t already have a user license. This will allow them to log into Salesforce and participate in orchestrations. The license will have limitations on it, so it isn’t a substitute for a typical Salesforce license. Learn more here.
How do I quantify the number of runs I’ll need?
You buy a single quantity of runs that will last for the duration of your contract, so if the contract is a two year contract, specify a run quantity that matches your expected utilization in that time-frame. Runs do not roll over when the contract ends.
From Akihiro Iwaya: Adding Approval Functionality to Orchestrator
Akihiro-san has done some of the most in-depth early consumption of Orchestrator. Here he demonstrates a number of techniques for lighting up approval processes.
Orchestrator goes GA in Spring ‘22 with new enhancements!!
- Assignment to Queues and Groups
- Reassignment of Work Items
- Cancel a running orchestration
- API access to trigger Orchestrations
I have been exploring the use of Orchestrator for approvals use cases. Previously I concluded that “I have confidence in replacing the approval process with Flow Orchestrator because I believe that new functionalities related to the approval process will be available at GA. My implementation of the approval process is a little bit complicated because of lacking standard functions such as supporting Autolaunched Flow, recall approval process (back to previous stage), standard actions (lock & unlock record, get queue member) but I am very excited to continue to watch new features. “
In this post I’ll look more deepily at approvals use cases using the GA Orchestrator feature set. I will show three approval process examples using a simplified Employee Time Off Application with minimum automated actions.
Examples
- Exampl 1: Simple Approval Process using the Manager Field
Automatically assign an approver using the manager field in User.
The second example is using the new enhancement of “Assignment to Queues and Groups”. Submitter and the first approver can choose either a user or a queue.
- Example 3: User Can Dynamically Choose Next Approvers:
The final example makes use of the new enhancement of “API access to trigger Orchestrations”. Submitters can select one of the orchestrators to initiate new orchestration on Screen flow calling Apex action. This is a great enhancement because the user dynamically chooses any orchestrator on the fly. At this Example, the submitter selects a route table record containing three approvers and serial or parallel orchestrator during submit for approval. Again you can add functionalities that are implemented at case1 and case2.
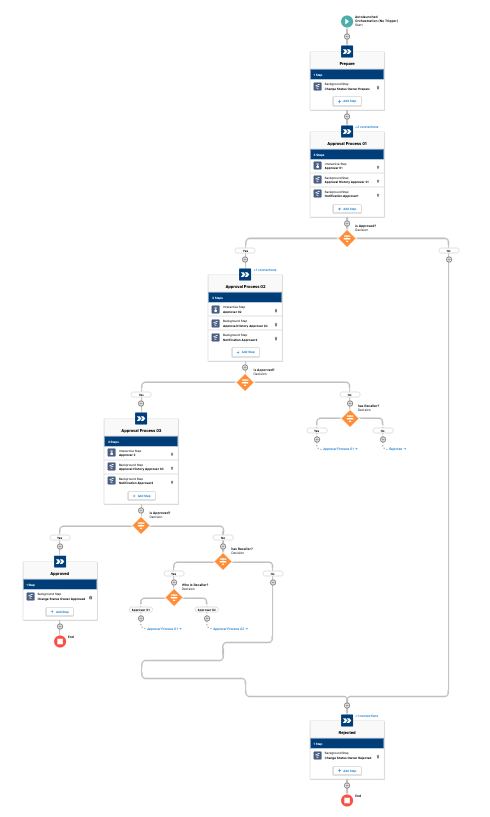
Example 1: Simple Approval Process1 using the Manager Field
The first example is very simple and familiar with the legacy approval process. Automatically assign an approver using a manager field in the user table. There are only two approval steps but you can add more steps.
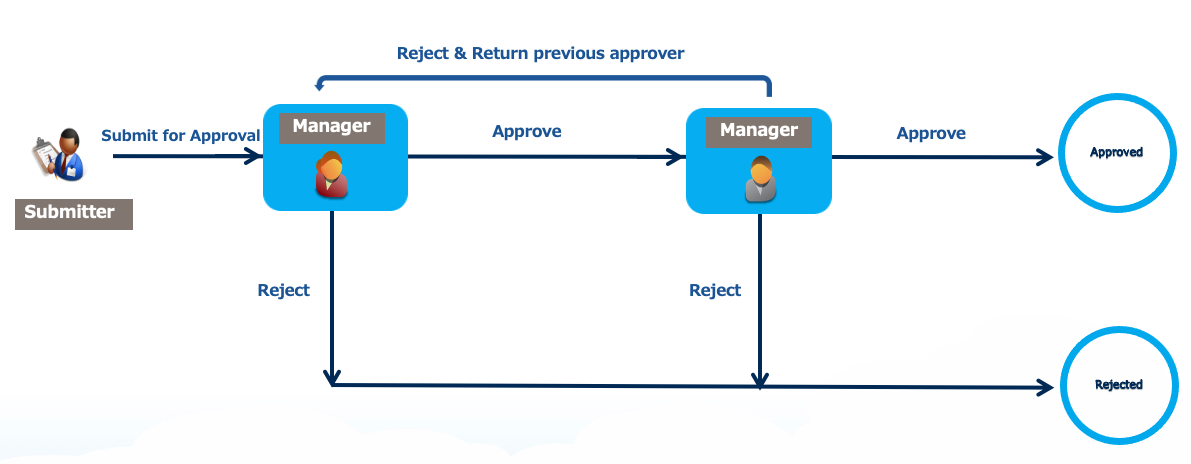
Features
- Assign an approver using a manager field
- Return approval request to previous approver after final approval
- Track and view approval history
- Custom ‘Lock Record Behavior
- Custom notification
- Eemail notification
Video
Creating Custom ‘Lock Record’ Behavior using Record Type
When the user clicks on this custom Submit for Approval button, the record type of the underlying record is changed. There are two record types, new and read-only with corresponding page layout

- The Submit for Approval button vanishes. This is enabled in part by the recently introduced Dynamic Actions, a feature that allows admins to choose which actions need to appear in the Highlights Panel on the object’s record page
- The new record type is linked to a read-only page layout, creating the effect of a Lock Record process.
- Additional Notes:
- There is one concern that required fields can not be Read-Only in the layout. Since those fields are always editable, I decided that no fields are required at this object.
- Replace “New” button : There are two reasons for replacement of New button. Users can not skip record type selection page for default new button and after hitting new button, screenflow shows record creation form with validation of required fields.
Custom Notification
The Messaging Notification(?) action is used to generate custom notifications:

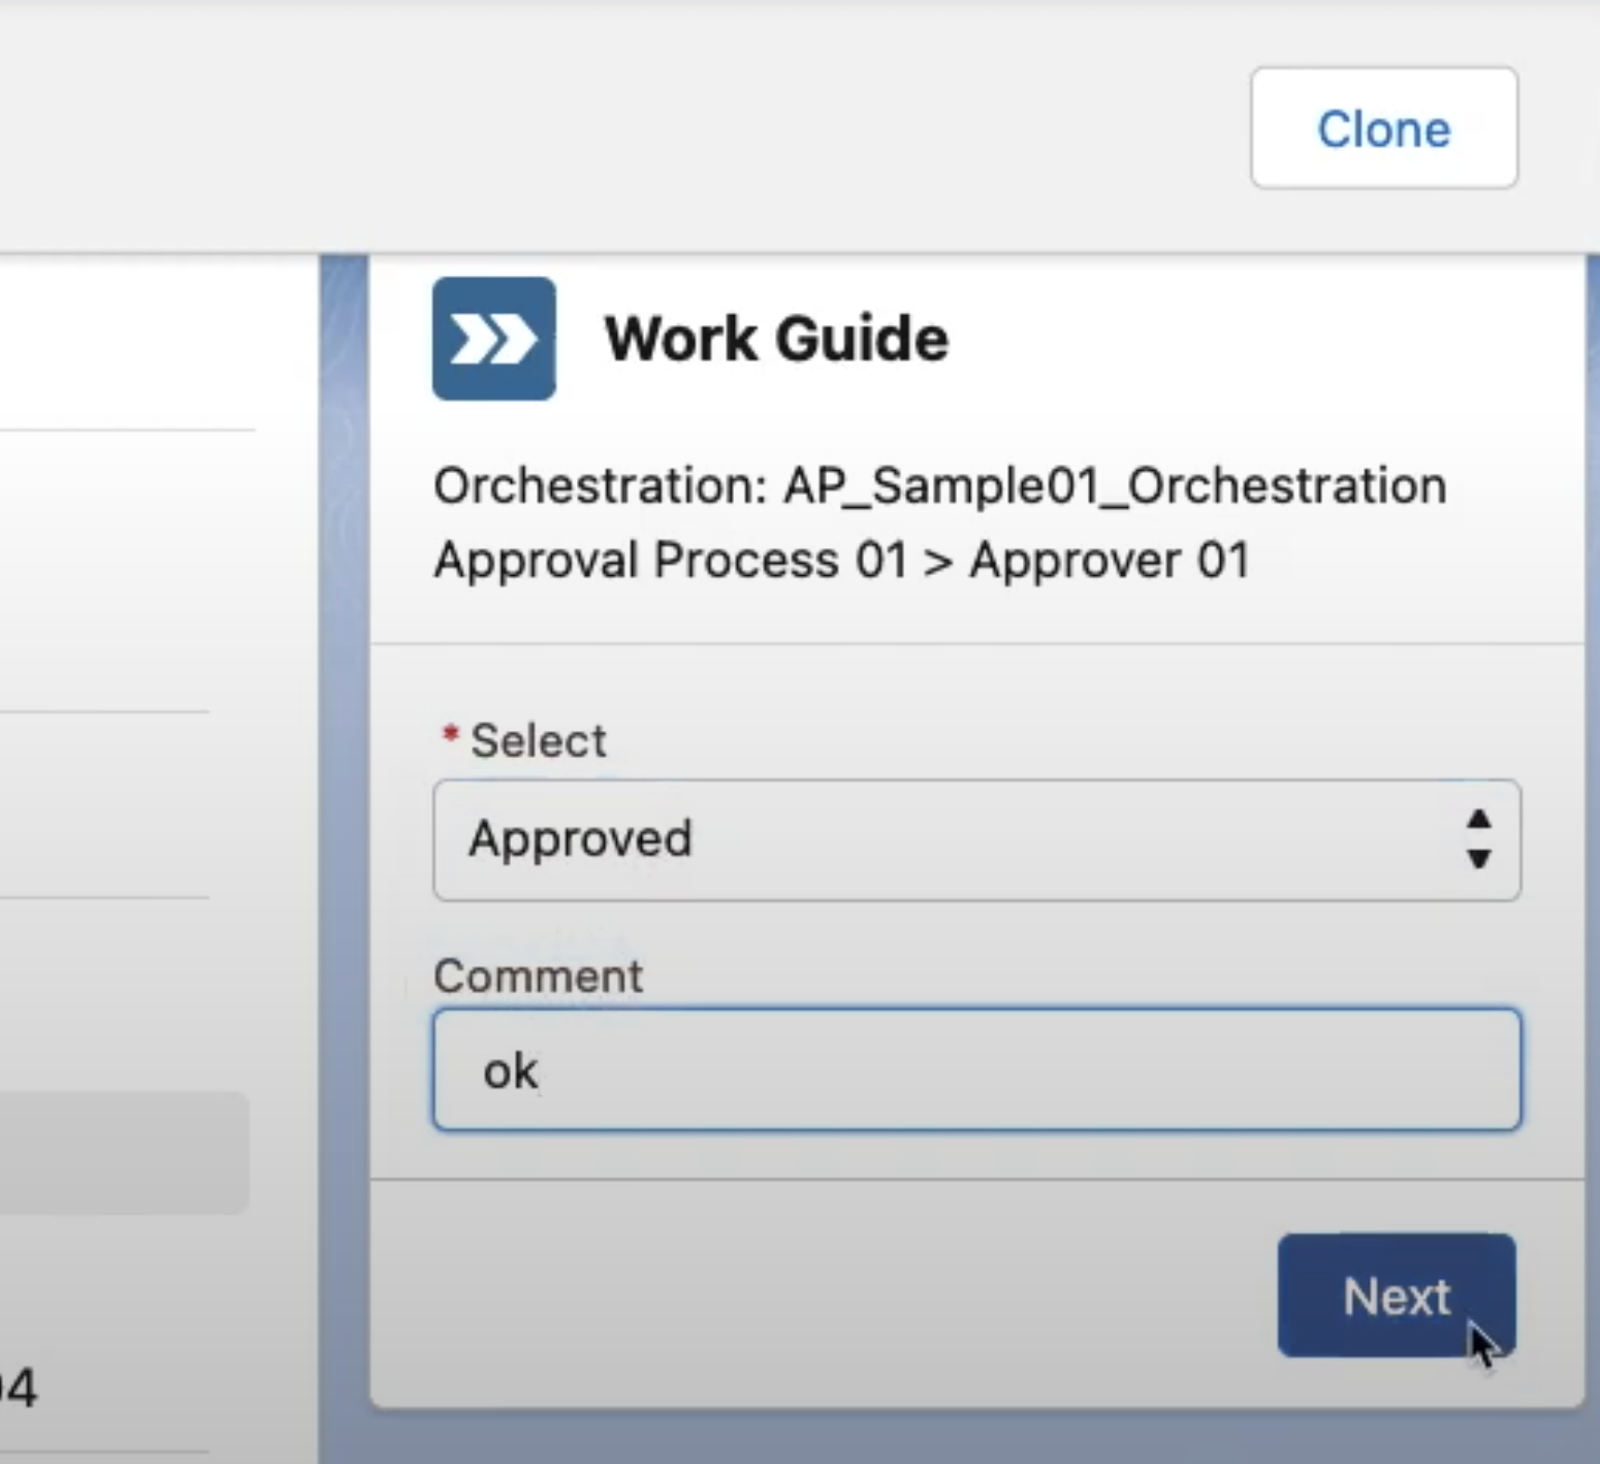
Work Guide Usage
Approval is done in the Work Guide, where conditional field visibility shows only the necessary fields:

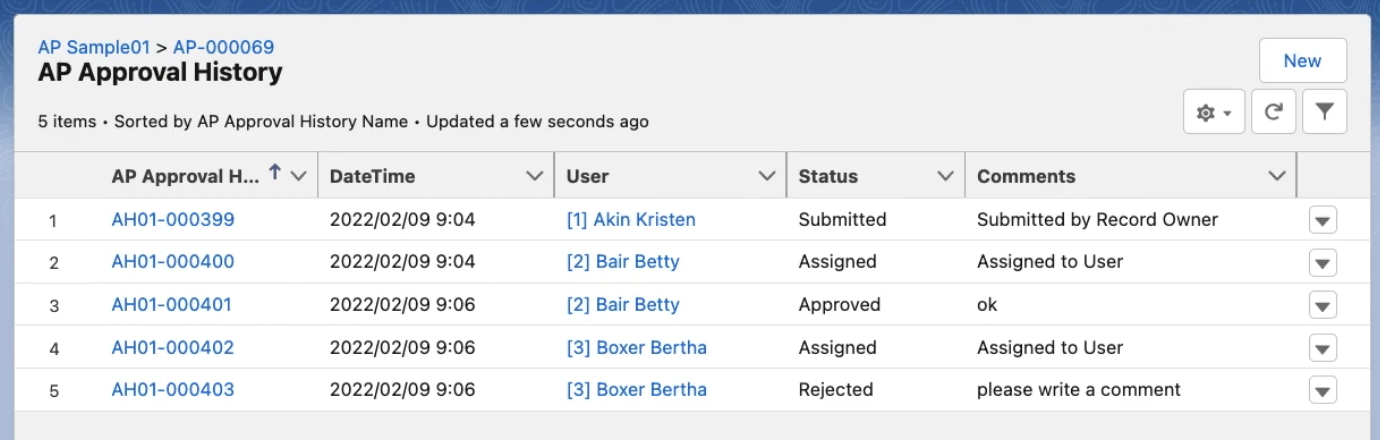
Approval History
Approval History items are logged to enable the full history to be easily views:
Recording
Orchestration

Example 2 Approval Process Using Queues/Groups
The second example highlights the abillity of Spring ‘22 Orchestrator to “Assignm to Queues and Groups”. This example doesn’t provide a way to return the approval request to other approvers but you can easily add that as was shown in Example1.

Features
- choose a user or a queue
- approval history
- lock / unlock record
- custom notification
- email notification
Choosing a Queue with a Custom ‘Submit for Approval’ Flow

Recording
Orchestration

Example 3 :User Can Dynamically Choose The Next Approvers
The final example demonstrates the power of the new feature “API access to trigger Orchestrations”. Submitters can select one of the orchestrators to initiate new orchestration on Screen flow calling Apex action. This is a great enhancement because the user dynamically chooses any orchestrator on the fly.


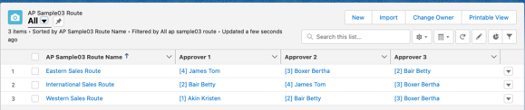
To enable this, I created a custom object called a route table where I can configure different combinations of approvers:

Features
- route table (custom object) containing three approvers
- choose either parallel or serial orchestrator
- return the approval process to other approvers at serial mode
- approval history
- lock / unlock record
- Change record owner to System User so that submitter and approvers can not edit
- custom notification
- email notification
When the record is submitted, this version of the orchestration let’s them choose between Serial and Parallel, and lets them choose one of the predefined routes:

Serial mode

Parallel mode

Recording
Orchestration
Serial mode
Parallel mode

Legacy Approval Process Features
There are legacy approval process features and corresponding implementation ideas on Orchestration.
Create an Approval Process with the Standard Wizard
- Control Which Records Apply to an Approval Process
- Record-Trigger Orchestration can narrow down records that can be part of the approval process with setting entry conditions
- Dynamic action can control action buttons on your record pages. You can set action visibility in order to hide/show your action button that executes your Autolaunched Orchestration
- Choose Approval Request Notification Templates
- Not supported yet
- Choose an Automated Approver Throughout an Approval Process
- Interactive steps of Orchestration support User Resources that associate a hierarchy field—such as the user’s manager
- Specify Who Can Edit Locked Records
There are three ways to implement “No one can edit a record after submit for approval except admin” functionalities in my examples. The legacy approval process allows administrators to edit or the both administrators and the assigned approver to do. In case you need that the assigned approver also edit a record, “Changing record owner” may be one you take. Before assigning a work item to an approver, the record owner is updated to the approver in flow.
- Example1 : Dynamic action,record types, replace new button
- Example2 : Apex Approval Class
- Example3 : Change record owner
- Design the Approval Request Page
- You can design whatever you like on Screen flow for the approval request
- Specify Who Can Submit Records to an Approval Process
- Record-Trigger Orchestration can not set an entry condition with a hierarchy field. So you need to go a long way around to achieve it.
- flow action
- Dynamic action can control who can submit records to an approval process
- screen flow
- Update records element update field value
- Updating field value kicks your Record-Trigger Orchestration
- flow action
- Record-Trigger Orchestration can not set an entry condition with a hierarchy field. So you need to go a long way around to achieve it.

- Dynamic action can control action buttons on your record pages. You can set action visibility in order to hide/show your action button that executes your Autolaunched Orchestration
Add an Approval Step to an Approval Process
- Control Which Records Apply to an Approval Step
- You can utilize Decision element of Orchestration
- Identify Assigned Approvers for an Approval Step
- Orchestration with User, Queue, and Group resources implement most ways by the legacy approval process except two things.
- Difficult to implement delegate approval request to other
- When multiple approvers (Queue or Group) are selected, ONLY “the first response to the approval request determines whether the record is approved or rejected.” is supported by Orchestration
- Orchestration with User, Queue, and Group resources implement most ways by the legacy approval process except two things.
- Specify Rejection Behavior for an Approval Step
- You can utilize Background step of Orchestration
Automated Actions to an Approval Process
- Add Automated Actions to an Approval Process
- You can utilize Background step of Orchestration
- Groups of Automated Actions in an Approval Process
- You can manage automated actions in Autolaunched flow called by Orchestration
- Add an Existing Automated Action to Your Approval Process
- You can manage automated actions in Autolaunched flow called by Orchestration
Prepare Your Org for Approvals
- Let Users Respond to Approval Requests by Email
- Not supported yet
- Let Users Respond to Approval Requests from Chatter
- Not supported yet
Approval History Reports
- Fields Available for Approval History Reports
- Use the All Orchestration Runs list view to see all in-progress, cancelled, and completed orchestrations in your org. more detail
Manage Multiple Approval Requests
- Transfer Pending Approval Requests
- When an interactive step in an orchestration runs, it creates a work item and assigns it to a user, group, or queue. You can now reassign a work item that hasn’t been completed to a different user, group, or queue. more detail
- Remove Pending Approval Requests
- Not supported yet
Approval Requests for Users
- Withdraw an Approval Request
- You can now cancel in-progress orchestrations from the orchestration runs list view. more detail
Conclusion
Orchestrator CAN be a replacement of the legacy Approval Process and implemented with a more complicated scenario. But in case the legacy approval process supports your requirement, then implement it by legacy one. Otherwise you develop your own approval process on Orchestrator. Before Approval Process Flow Templates will be officially distributed, we utilize a hybrid of the legacy and orchestrator for the approval process.
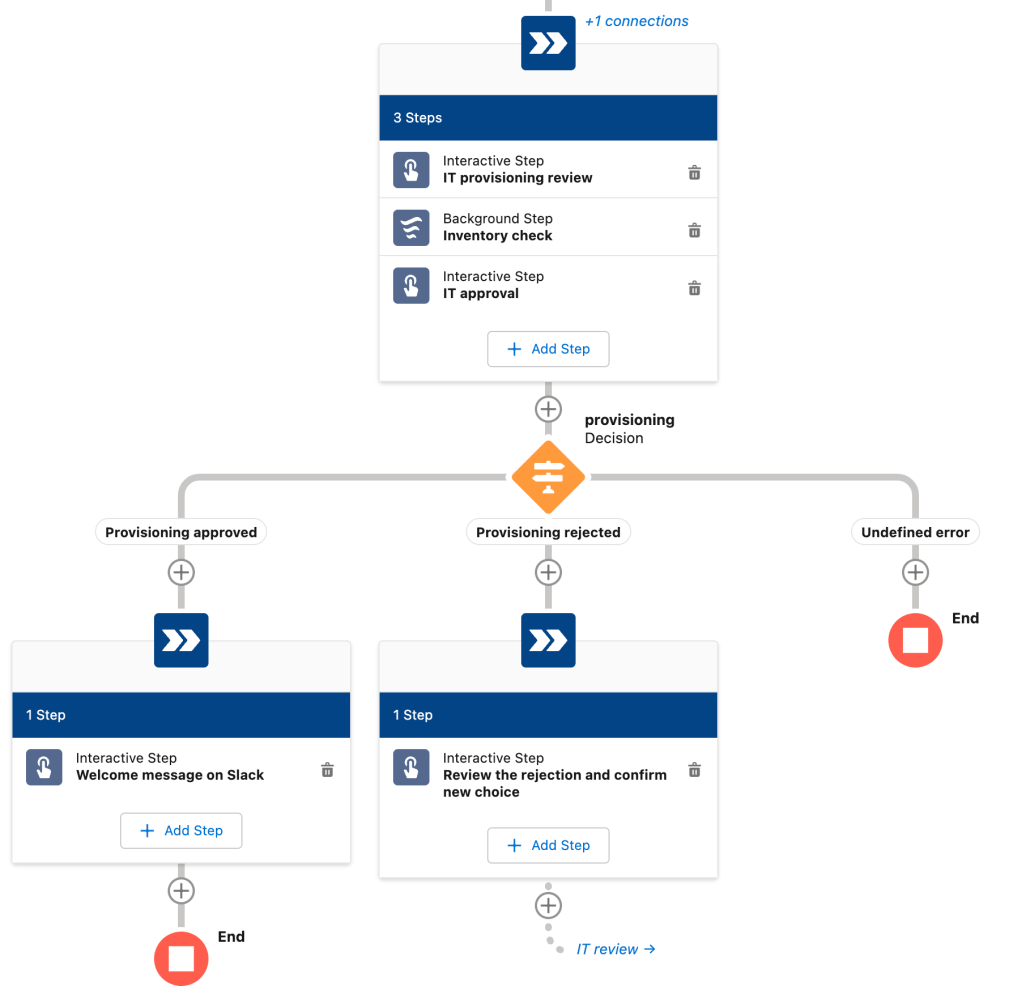
Case Management with Salesforce Orchestrator
Here’s a quick teaser trailer showing how Orchestrator enables the Case Management life cycle to be reimagined.
We don’t yet have this available as a packaged template. But keep your eye out for packaged orchestration templates like this one that can be easily modified.
Preview: Powerful Approvals Orchestrations from Forcelution Apps
You can build powerful approvals solution on Orchestrator, but if you want a polished out-of-the-box solution, you’ll want to consider this upcoming Approval Orchestrator Add-On from Forecelution Apps. They already provide a powerful extension to Legacy Approval Processes and have set out to provide a solution that makes it easier to create approvals in Orchestrator.

The main goal is to provide the ease of use of the dedicated configuration experience that Legacy Approval Processes are used to while enabling the high degree of customization that Orchestrator provides. Check out this preview:
As you can see here, they provide dedicated UI that makes it easy to define Approval Processes without going into Flow Builder:

Their solution auto-generates the appropriate parts of the underlying orchestration. At that point, it’s possible to open up the individual steps and customize them.
Learn more about the new Approvals Orchestrator here.
Learn more about their existing add-on for Legacy Approval Processes here, and keep your eyes open for update posts here at UnofficialSF.com
UnofficialSF has a new Service Cloud Channels Section
UnofficialSF.com has added a new section devoted to Service Cloud channel functionality, which is increasingly driven by flow-based services.
Check it out here. If you know of a good post or page on the topic, don’t hesitate to let us know via the form on the home page.
Spring 22 Sneak Preview: Flow, Orchestrator & Next Best Action
Compiled this time as a collaboration between Alex Edelstein and Adam White.
Here’s what you can look forward to on Spring ’22. Try it out here: https://www.salesforce.com/form/signup/prerelease-spring22/
Salesforce Orchestrator Goes GA
New enhancements in Spring ’22:
Assignment to Queues and Groups
Work Items can be assigned to multiple users
Reassignment of Work Items
Allow users to reassign Work Items to others
Cancel a running orchestration
A run can be canceled from the list of runs
API access to trigger Orchestrations
Initiate an Orchestration via the Flow REST API
API access to monitor Orchestrations (Connect API)
Inspect running Orchestration instances
CI/CD & SFDX
All Orchestrator components can be deployed
Flow Support Has Been Extended to Standard Support Customers
Until now, technical support for Flow required Premium or Signature support. As of 12/1/21, it is now available to Standard support. This is, needless to say, a big deal.
Generate Next Best Action Recommendations Using Flow
You can now use Flow Builder to craft recommendation strategy flows that generate actionable recommendations that work with the specialized Next Best Action lightning component on Lightning Pages and the Suggested Actions in Community Pages. Previously, doing this required the use of a separate builder

Create recommendation strategies from the New Flow window:

Automatically Migrate your Workflow Rules to Flows


A New Element Joins the Fray – Collection Filter!
A new way to filter and find records in a collection joins the growing number of out of the box collection processors. Instead of looping to find a set of records within a collection, you’ll now be able to specify record criteria or create a formula to filter down an existing collection into a smaller one. This opens up a world of possibilities as it will allow you to handle greater amounts of records without hitting the ‘Iteration Limit Exceeded’ error that plagues transactions with bigger loops. Need to filter down a collection of 500 contacts? Collection Filter can do that for you!


Check out the separate post about Filter here on USF!
Sneak Preview: The New ‘Collection Filter’ Element
View All of an Object’s Record-Triggered Flows with Flow Explorer…
Flow explorer shows an ordered list of all the flows affected by a specific triggering event.


You will also get a nice side panel that allows you to open the flow directly and view all of the versions associated with the Flow. Notice how you’ll also be able to activate previous versions in the same place.
…AND Control the Order of Your Triggered Flows
You can apply numeric values to order your triggered flows.
- Flows with the same trigger (before- or after-save) on the same object with trigger order values from 1 to 1,000 run in ascending
order (1, 2, 3, and so on). Multiple flows with the same trigger order value run in alphabetical order based on the flows’ API nam - Flows without trigger order values run next and in the order of their created dates. Flows in Winter ’22 and before run and continue
to run in this order, unless you define a trigger order value for them. - Flows with trigger order values from 1,001 to 2,000 run next and in ascending order. Any ties are settled using the flows’ API names.

(Note that the team does expect, in a future release, to marry this ordering process to the Flow Explorer shown above for a drag and drop reordering capability.)
Dynamic Forms for Flow (Beta) Supports Additional Field Types
You can now additionally add Email, Phone, and Picklist fields by simply dragging the fields onto the screen:

This features remains in Beta. Keep in mind that if you want to create an easy form to enable the creation of a new record using this feature, create a new record variable to contain it and select it in the ‘Record Variable’ field in the upper right. (later the team plans to make that step automatic and unnecessary)
Auto-Layout Improvements
Autolayout Mode has gone GA and filled in a couple of coverage gaps:

Perhaps the best new Auto-Layout feature is…
Open Subflows Directly from the Canvas in Auto-layout
An often requested quality of life feature, you can now open subflows directly from the canvas and when creating a Subflow! In the future (safe harbor) we plan to add the Subflow description to the canvas as well.


Shortcuts provide faster access to preconfigured elements
In Record-Triggered Flows in Autolayout Mode, shortcuts will appear to facilitate email sending and record updating:

Accessibility Enhancements
1) Flow Achieves Full WCAG 2.0 Accessibility Support
2) Create and Edit Flows with Your Keyboard
3) Screen Flows launched via a URL-based method now meet the contrast requirements of
Web Content Accessibility Guidelines (WCAG) 2.1 Level AA
Flow’s accessibility services have been improved. Keyboard traversal is fully supported in Screen Builder as wells as the Flow runtime. You can navigate between sections of Flow Builder, and screen readers work across the full product.

Custom Footer Labels are Translatable
The Custom Footer Labels that became available last release are now fully translatable.

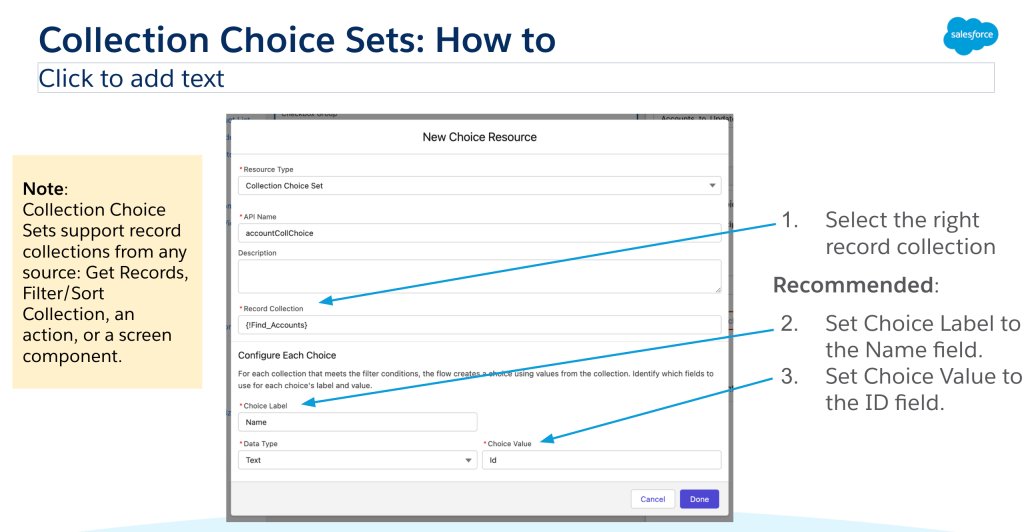
Choices Enhancements: Use a Record Collection to Generate Your Choices
If you have a collection of records or strings from earlier in your flow, you can now use that to generate a set of radio buttons, checkboxes, or picklist items.


Supercool Pilot Updates – Reactive Screens
See this post for an example of how reactive screens allow powerful dynamic effects on Flow screens. If you want to join the pilot, go here.

New Ordering Changes take effect for flows configured to run on the latest API version (54.0)
After-Save Record-Triggered Flows Now Run Before Entitlements are Executed
Entitlements can now include any updates made by traditional after-save flows.
Approval and Time-Based Workflow Field Updates Now Execute Before-Save and After-Save Record-Triggered Flows
This change allows field changes made by approval processes to trigger flows.
Keep in mind that this will not affect any existing flows unless you choose to click Save As and ‘upgrade’ the flow to use version 54 or higher.
Enhanced Einstein Discovery Flow Action supports Multiclass Models
Multiclass models predict the most likely outcome among up to ten possible outcomes. For example, if you offer seven insurance products, use a multiclass model
to predict which insurance product a new customer will likely purchase. When you run the flow, the output of this action is the predicted
value (the predicted winning insurance product, for example), along with a bar chart of ranked probabilities by value (all insurance
products). Optionally, you can include top predictors.

Order Management: New Flow Actions, and Rollback
The Order Management flows are updated to use the Roll Back Records element, which cancels pending record changes when a flow
exits due to an error. In addition, the following new actions are available:
Find Routes With Fewest Splits Using OCI
Find inventory availability using Omnichannel Inventory and identify the fulfillment routes with fewest splits for an order summary.
This action combines the existing Omnichannel Inventory Service Get Availability and Find Routes With Fewest Splits actions.
Add Order Item Summary
Add order item summaries to an order summary

In addition, you’ll enjoy improved order throughput with the flows in the DOM Routing Flow package. We’ve updated them to use multithreaded processing
with scheduled paths.
Additionally, an Even Exchange standard flow is now available.
Easily Keep Track of your Flows in your Browser Tabs
The flow’s name and version now appear on your browser tab titles, so you can quickly
scan your workspace and find your flow.

More Places Where You Can Use a Flow to Override Standard Behavior
More Salesforce product teams are implementing functionality using standard flows and allowing users to override the functionality with custom flows.
Health Cloud: Adding Patient Medication

Event Monitoring enables flows to be created that respond to Security Events
ApiAnomalyEvent, CredentialStuffingEvent, ReportAnomalyEvent, and SessionHijackingEvent are exposed as selectable platform events in Platform-Event triggered flow start elements.
Salesforce Surveys now ships Sentiment Analysis flows out-of-the-box
To process text responses in bulk, use a flow:
• Perform Survey Sentiment Analysis for User-Selected Question: Screen flow. Lets you define custom values, such as survey, questions,
type of operation to perform on the responses, and date range to process responses in the selected timeline.
• Perform Survey Sentiment Analysis: Autolaunched flow. Lets you schedule bulk processing of responses.
Use the invocable action in the flow to define the operation to perform on the responses and the date range.
From Tamar Erlich – Submit an orchestration from a button
Currently there are two ways you can launch a flow orchestration: using a record trigger, or auto launch from Apex, But what if I want to be able to launch an orchestration from a button and mimic the good old “Submit for Approval” button?
I looked at alternative ways to start orchestrations, and this is what I found:
1. Launching an orchestration from a URL button was not user friendly as the user was presented with a blank auto launched flow screen and was not redirected back to the record when finished even if the the return URL was part of the button definition. Overall, while this may work, the user experience was not smooth
2. Trying to include the submit flow as an interactive step assigned to the current user, resulted in a warning when saving the flow and an error during execution saying that no assigned user was found
I ended up with the following solution that worked well and gave a smooth user experience:
1. An action button to launch the submit flow on the record page
2. A submit screen flow that will update a field on the record to indicate the record was submitted and who the approver is
3. An orchestration that will listen to the field updated by the submit flow and will run the approval flow, routing to the approver that was updated on the record by the submit flow
4. The approval flow will update the record again with the final approval status
Here is an illustration of the overall process:

Both the submit and approve flows are very simple and only have one screen followed by an update records step
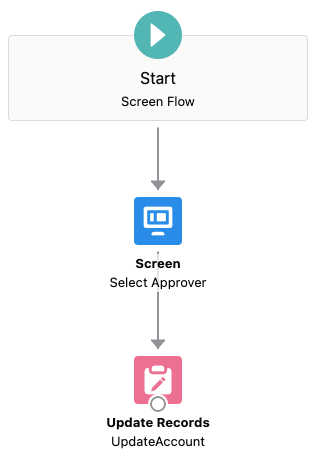
Launch the submit flow from an action button added to the page layout

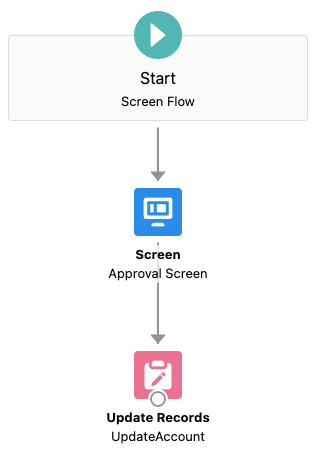
The flow orchestration only has one stage and one step

It starts when the record’s approval status is updated to submitted

And routes the approval to the username that was updated on the record by the submit flow

Here is a short video demonstrating the complete process
Some notes about the flows:
1. The submit flow clears any previous approval status and rejection notes
2. The approval flow only displays rejection notes if the user selects to reject, using a visibility rule
3. In both flows, I’m using a record input variable and this saves having a get records element in the flow as the whole record gets passed in from the button or from the orchestration step
Possible enhancements:
1. The approval request flow can include a message with approval details to the approval request flow by using a display text with merge fields from the record and related records information
2. The submit flow can select the approver automatically by using criteria from the record or an approval matrix stored in custom metadata
3. The submit flow can also be used to recall or not allow to submit an approval by displaying another screen based on the approval status
Launching an orchestration from a button opens up a lot of possibilities, please share if you come up with other use cases.
New ‘Eigensonne’ Orchestrator Demo from the Orchestrator Team
This video shows an actual orchestration created by Orchestrator product manager Abhishek Sharma in collaboration with pilot Orchestrator customer Eigensonne:
In this demo, you can see Orchestrator’s new beta features, including autolaunched flow support and go-to connectors for routing to a previous stage.