Working with Serialized Data

NOTE: this page won’t make full sense until the QuickQuery extension is published along with Datatble version 3.5. That should happen in the next day or two.

Traditionally, Flow likes to work with structured data. That’s stuff like Case and Account. Flow also likes simple primitives like Text and Number. Additionally, when the data type is know, you can use Apex Types.

Starting in 2019, it became possible to specify types at ‘Design Time’, in the Flow Builder. This is the experience you get when you use a component or action that supports generic inputs. For example, the Upsert action found in Collection Actions extension lets you upsert any object you want, so long as you specify the specific object at Design Time. In the example below, the person building the flow has ‘locked in’ Account as the kind of object that will be upserted:

In our Quick Query use case, we have a new situation. There, an interplay takes place when the flow is running, between the Quick Query component with its filter buttons and Export to CSV capability, and the Datatable component. The user can specify the object they want to query for by selecting it in Quick Query:

So here, we have the object being selected not at Coding-Time (where the developer might specify that it’s an Account, and it could never be changed by the admin), and also not at Design-Time (where the admin might specify that it’s an account, but it would then be locked in and would not be changeable by the user), but at Run-Time, by the user.

This is cool and powerful, but it creates some challenges. Flow component inputs like Datatable have to be locked in at design-time. Flow just doesn’t have a way to say ‘this input can be changed on the fly by the user’, and there’s nothing like that on the roadmap.

To work around this, the latest version of the components used in the Quick Query demonstration (Quick Query and Datatable) and the Upsert Records action that this flow uses all support a new unofficial mechanism called Record Datastrings. A Record Datastring is simply a JSON representation of a Salesforce record. Here’s an example of a record datastring that contains 7 cases:

 [{“Status”:”Escalated”,”Subject”:”Sample Case 2: The widgets we received are the wrong size. 2″,”OwnerId”:”005B0000005ayPRIAY”,”Origin”:”Phone”,”Id”:”500B0000004eodSIAQ”,”attributes”:{“type”:”Case”}},{“Status”:”Escalated”,”Subject”:”Flux capacitors are offline3211″,”OwnerId”:”005B0000005ayPRIAY”,”Origin”:”Email”,”Id”:”500B0000009dcaNIAQ”,”attributes”:{“type”:”Case”}},{“Status”:”New”,”Subject”:”Subject 2111211″,”OwnerId”:”005B00000084OPCIA2″,”Origin”:”Email”,”Id”:”500B0000009v4KSIAY”,”attributes”:{“type”:”Case”}},{“Status”:”New”,”Subject”:”Subject 511″,”OwnerId”:”005B00000084OPCIA2″,”Id”:”500B0000009v4KVIAY”,”attributes”:{“type”:”Case”}},{“Status”:”New”,”Subject”:”Subject 122″,”OwnerId”:”005B00000084OPCIA2″,”Id”:”500B0000009v5QyIAI”,”attributes”:{“type”:”Case”}},{“Status”:”New”,”Subject”:”Subject 15″,”OwnerId”:”005B00000084OPCIA2″,”Id”:”500B0000009v5R1IAI”,”attributes”:{“type”:”Case”}},{“Status”:”New”,”Subject”:”Subject 16″,”OwnerId”:”005B00000084OPCIA2″,”Id”:”500B0000009v5R2IAI”,”attributes”:{“type”:”Case”}}]

Let’s look at an example. Quick Query will perform a query of whatever object the user selects, and output it in several formats. Meanwhile Datatable now has the ability to accept data in Record Datastring format as well as the Sobject Collection that it already supported. And the new Quick Query has the ability to output Record Datastrings. Here’s what the inputs look like in Datatable’s property editor:

The most important thing to notice is that Input data is Serialized is checked. When that’s checked, all of the normal Datatable inputs are ignored, and only the two inputs immediately below the checkbox are used. Notice how the ‘recordDataStringAll’ output from Quick Query is mapped to the inputs of Datatable. This is only possible because the org has been enabled for Reactive Screens pilot. Note that we separately provide the objectName.

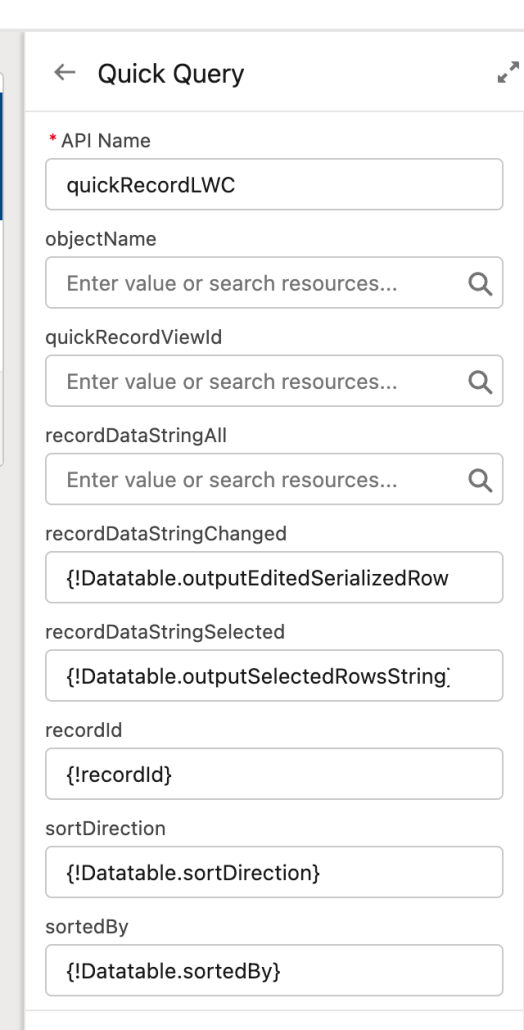
In our QuickQuery example, the wiring also goes the other way. We wanted to enable an Export to CSV button as shown above and we wanted that button to be able to work on only the selected rows in the datatable. That means that every time the user changes their selections in the datatable, we need to let the Quick Query component know. We do that with the same wiring, but this time the wiring goes from outputs in Datatable component to inputs in Quick Query:
Datatable provides elegant inline editing, and we wanted to make it easy to apply all changes as easily as possible. To accomplish that, we enhanced the Upsert Records action to also support the recordDataString that Datatable outputs. Here’s what our sample flow looks like:

Note that this flow is installed with the Quick Query package. The inputs of Upsert looks like this:

Here you can see that we’re passing in only the edited rows. Note that we still needed, at design-time to ‘lock’ an object into Upsert Records. We selected Account but if we’re using recordDataStrings, that value is ignored.

Considerations

The addition of recordDataString support to components and classes adds complexity to the configuration process. so it should only be done if there’s a real opportunity to let users switch between objects at runtime.

How to Run an Orchestration: Case Management Example

This is the second post of a 2-part series. Here, we go over how to run an Orchestration. In Part 1, we built this Orchestration and showed the different features available to admins and end users during design time.

Overview

Orchestration Run Through

This is what the end user experience looks like when running the Orchestration that we built in the first post.

Orchestration Runs List View

The Orchestration Runs list view will give you a consolidated view of every orchestration thatโ€™s ever been run in your org. Admins can also cancel their running Orchestrations from this list view.

Debugging Your Orchestration

If an orchestration is not functioning as expected, you may want to visualize how it has progressed through each stage. The Debugger is a great tool for seeing the progress an orchestration has made. Additionally, the Debugger will list real values of any variables you’ve added in your Orchestration.

Orchestration History

Upon clicking into an orchestration run, you can access the full run history. Youโ€™ll see a step-by-step rundown of whatโ€™s been completed in the orchestration so far, who completed it, and how long it took. The history is a great starting point for identifying bottlenecks in your process.

Orchestration Work Items List View

The Orchestration Work Items list view allows your end users to more efficiently track all of their assigned work, and is the view from where Admins can reassign work items.

How to Build an Orchestration from Scratch: Case Management Example

This is the first post of a 2-part series. Here, we go over how to build an Orchestration. In Part 2, we actually run this Orchestration and show the different features available to admins and end users during runtime.

Overview

Orchestrator (GA Spring 2022) is a new product from Salesforce that allows you to orchestrate processes with multiple flows and multiple users to automate sophisticated business processes without code.

In this tutorial, we will build a Record-Triggered Orchestration for a case management process. We will cover all of the features available to customers while building their Orchestrations.

How do I activate Orchestrator?

Orchestrator is by default activated in every production salesforce Org. As pricing is done using a freemium consumption-based model, you can build and test your orchestration for free, given that you have not exceeded the default 600 runs provided to every org (Please reach out to your Service Cloud AE regarding further Orchestrator pricing). So, you shouldn’t have to do anything special in order to activate and use orchestrator.

To ensure you have Orchestrator in your Salesforce org, you can navigate to the setup menu. From there:

  • Click Process Automation > Flows
  • Click New Flow
  • Click All + Templates

If you see a tab for Orchestrator, that means you can use Orchestrator!

Flowchart (model it out)

Before creating your orchestration, it can be useful to visualize your entire end-to-end process in order to understand which parts you’d like to model within salesforce, which parts will need intervention from third-party systems, which parts should occur in the background, which parts need user input, etc.

Getting Started

To create a new orchestration, youโ€™ll need to navigate to the set up menu. From here, click on Process Automation > Flows, and then “New Flow”. This will take you to the flow set up modal. From here, click “All + Templates”, and then “Orchestrator”. You now have the option of building either an auto-launched orchestration (invoked by Apex, REST API, or other custom code) or a record-triggered orchestration (invoked similarly to a record-triggered flow). We are going to build a record-triggered orchestration.

We are now taken to the Orchestration Builder UI. Itโ€™s pretty empty since we havenโ€™t added anything yet. What we do see is the Orchestration trigger. Here, we can modify when we want our Orchestration to be triggered.

Add Stages

Letโ€™s add a stage to our Orchestration. Stages are how Orchestrator groups related steps together. Stages are useful for visualizing Orchestrations in terms of larger subprocesses. Also, you can run multiple steps in parallel if they share a stage, so if you’ve got a number of steps that need to be run in parallel, you’ll want to put them in the same stage.

Add Flows

Each stage will consist of steps. Before we can add a step, we need to create a flow for each step we want our Orchestration to have. These flows will be doing the low-level work (record updates, screens for user tasks, etc.) for our Orchestration.

Background Steps

The first type of step is a background step, which calls an autolaunched flow when it is run. Background steps are great for repetitive background work: record updates, invocable action calls, and sending notifications to users are all examples of background work for which these steps should be used.

Interactive Steps

The second type of step is an interactive step. This step should be used whenever a user needs to give their input on something: approval steps, pricing quotes, and collecting feedback through a form are three examples of how interactive steps might be used.

Logic Elements

Orchestrator currently supports 2 types of logic elements: decisions and go-to connectors. Decision elements allow you to have branching paths that execute on certain conditions, while go-to elements let you loop back to previous elements of your Orchestration. You may have multiple paths in your Orchestration which lead to the same rejection stage; a go-to element allows you to reuse the same stage to handle all of these outcomes.

Evaluation Flows

Evaluation flows give you greater control over the entry and exit criteria of your steps and stages. If you don’t wanna start a step until a certain condition has been met on a record field for example, you’ll want to use an evaluation flow to check for this. Additionally, maybe you want to end a stage before completing all of its steps, because an important criteria has already been met. An evaluation flow fits this use case as well.

Before You Run: Do These 3 Things

Before you can run your orchestration, you need to set up the work guide on any relevant record pages, set the process automation email, and activate your orchestration. This video shows you how to do all three.

Important Consideration: $Record Refresh

A current limitation to be aware of is how Orchestrator saves the context record for a Record-Triggered Orchestration.

In a nutshell, you can circumvent this by always calling a “Get Record” element at the start of every flow to ensure you’re getting the most up to date information on the context record.

This video will help you ensure you don’t run into any problems related to this limitation.

Next Steps

In Part 2, we will go over how you can run this Orchestration and take advantage of our monitoring features to get more information on your running Orchestrations.

From Mitch Lynch: New Progress Indicators for Flow


This Post was most recently updated by Eric Smith on:ย 7/1/22

See the AppExchange Listing Here: https://appexchange.salesforce.com/appxListingDetail?listingId=a0N3u00000Pt7yzEAB

See the Source Code and Install Link Here: https://github.com/SFDC-Assets/DynamicFlowProgress


Mitch, who works i Salesforce’s Public Sector group, has created two different extensions recently. First, there’s Dynamic Flow Progress Component, which is available on App Exchange:

He also has created a sophisticated solution called Progress Trail that uses records to represent stages of progress:

ProgressTrail_AnimatedScreenshots.gif

Check them out!

From Melody Lwo: A New Model-Driven Flow-Planning Video

I like the way her new video uses a pattern/template approach to break problems down.

Check it out!

Text Area Plus adds multiple features to Text Area

Created by Nathan Shulman and Josh Dayment

This Post was most recently updated on: 7/5/23

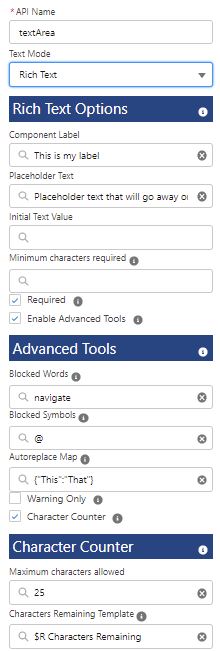
Text Area Plus! is an improved version of the standard flow text area adding a suite of text-related tools to allow for the Flow Admin to provide a better User Experience and quicker set up than the standard flow screen components.

Text Area Plus!, currently offers two run modes Plain Text or Rich Text with some shared functionality and some unique functionality currently only available in the Rich Text run mode.

Setup Properties

Shared & Plain Text

  • Label: This is a string variable that will add a label to the text area.
  • Minimum Characters Allowed: This is the minimum number of characters required in your text area i.e. 25 will set a minimum number of characters required for the flow to advance or finish.
  • Placeholder Text: This is a string variable that is placeholder text stored in the component once the user begins typing this text is removed and replaced with what the user is inputting.
  • Initial Text Value: This is a string variable that will prepopulate the value of the component if you have a predefined value it can be stored here. This is also your output value.
  • Required: When true this requires an entry in the component
  • Character Counter: Control the visibility of the character counter when marked as true will display the character counter underneath the component.
  • Maximum Characters Allowed: This is the maximum length of your text area i.e. 25 will limit the total number of characters to 25 in the text area.
  • Characters Remaining Template: Add custom messaging to the character counter i.e. $R characters remaining until complete
  • Help Text: When populated it will display help text next the component

Rich Text

  • Enable Advanced Tools: When marked as true will display a subset of advanced tools offered for the rich text input portion. 
  • Blocked Words: Comma-separated string variable of words the admin wants to block the user from entering into the component.
  • Blocked Symbols: Comma-separated string variable of symbols that should be blocked from being entered into the component.
  • Auto Replace Map: String variable in json format consisting of a key(word to find and replace) and value (word to replace the key with)
  • Warning Only: When true this will only warn the user of an error in the blocked words or symbols list and allow them to continue the flow if false and blocked words or symbols have a value and its found in the text it will stop the flow from advancing.

Display Text

  • Text Value: This is the variable for the text you wish to display in the component i.e. a Text Template
    • You are also given a text editor similar to the out of the box display text component to draft content directly in the component

Text Input

  • Text input is a simple text input similar to the out-of-the-box flow text component with a smaller input window but adds the character counter and minimum characters count features

Video Walkthrough

Additional Resources

Install

V 1.8 7/5/23 Production Sandbox Adds Text Input option and optional Help Text along with minor bug fixes

Troubleshoot installation issues

Previous Versions

V 1.7 6/11/23 Production Sandbox Bug Fixes

V1.6.1 5/5/23 Production Sandbox Bug fixes and add output for both Rich Text and Slack Markdown

V1.6 12/9/22 Production Sandbox This adds limited conversion of html to slack markdown on text the Text Area Plus

V 1.5.2 10/29/22 Production Sandbox bug fixes and Display Text mode

Version 1.5.1 7/1/22 bug fix and support for rich text labels

Version 1.5

Version 1.0.0.0

Source Code

View Source

From Ryan Mercer: A better way to Check for Duplicate Records in Flow

You probably have Duplicate Rules configured in your Salesforce org, right? Well, if you don’t, you should check them out!

A duplicate rule defines what happens when a user views a record with duplicates or starts creating a duplicate record. Salesforce provides standard duplicate rules for business and person accounts, contacts, and leads. You can also create duplicate rules.

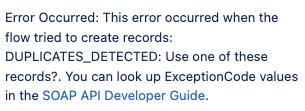
Duplicate rules can bring your Flow to a screeching halt if you try to create a record that already exists. Your duplicate rule is working exactly as designed; your flow, however, is not.

Screenshot of a Flow error message that reads - 'Error Occurred: This error occurred when the flow tried to create records: DUPLICATES_DETECTED: Use one of these records?. You can look up ExceptionCode values in the SOAP API Developer Guide.'

Introducing “Duplicate Record Check”

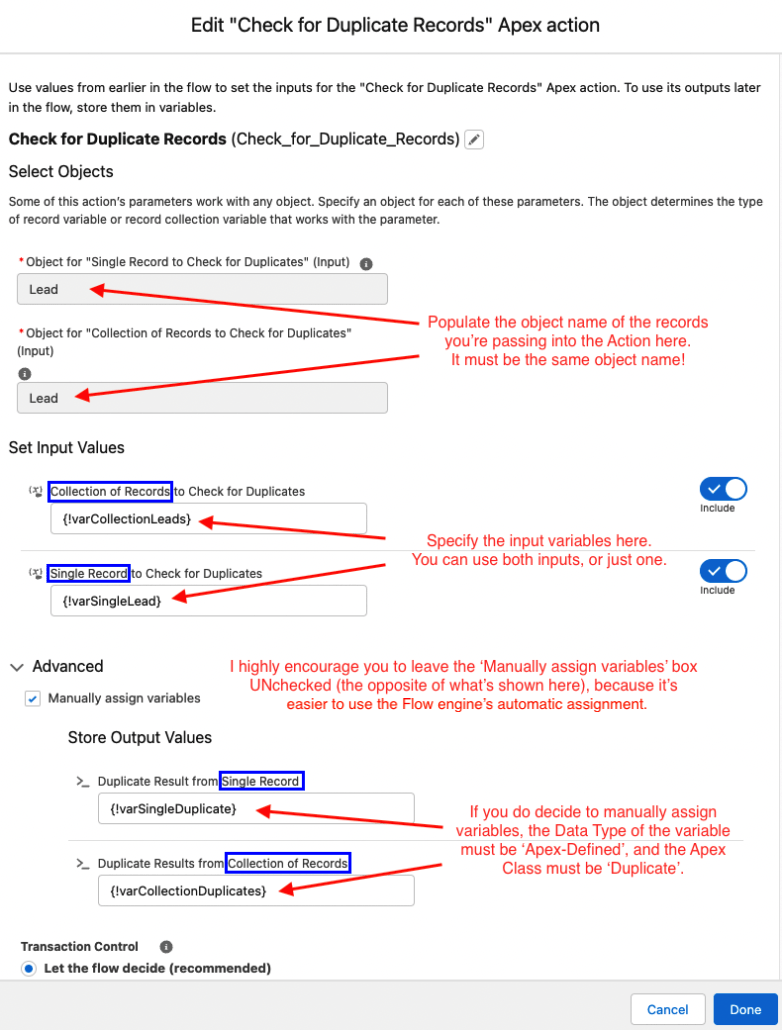
Duplicate Record Check is an Apex Invocable Action that will allow you to run your duplicate rules on records prior to creating them in your Flow. Take a look at this video introduction for an explanation as to why and how you might use this action.

How to Configure the Component

You can either pass in a single record, a collection of records, or both into the action. If using both, the single record and collection of records MUST be of the same object type!

The action will return two Apex-Defined variables of the Duplicate class:

A screenshot that shows there are two returns from the action: 1. single input return and 2. collection input return.

And each variable, will include:

  1. Whether a duplicate was found;
  2. The duplicate record’s Id; and
  3. The duplicate record’s Object name.
And each returned object has three data points: 1. Boolean identifying whether there's a duplicate, 2. the Duplicate record Id, and 3. the Duplicate record object name.

Apex Developer Support

Don’t write Apex? Feel free to skip over this!

This component is supported by the Datacloud Namespace. The shape of the Datacloud results object is a little unwieldy. You can use the DuplicateRecordCheck_Util class to make your life a little easier. Here’s how you use it:

// Assuming your Duplicate Rules are configured accordingly.
Lead ld = new Lead(
  FirstName = 'Ryan',
  LastName = 'Mercer',
  Email = 'ryangmercer@gmail.com'
  Company = 'unofficialsf'
);
insert ld;
        
sObject input = ld.clone(false,true);
List<Duplicate> duplicates = DuplicateRecordCheck_Util.findDuplicates(new List<sObject>{input});
        
system.assert(duplicates[0].isDuplicate == TRUE);
system.assert(duplicates[0].duplicateRecordId == ld.Id);
system.assert(duplicates[0].duplicatesObjectType == 'Lead');

Installation

Production or Developer Version 1.0

Sandbox Version 1.0


View Source

View Source

Use Flow to get the running User’s Time Zone offset from GMT

A couple of years ago, I created a component to convert a Date value to a Datetime value in a Flow. Recently, Andy Engin Utkan, figured out a way to use this component to overcome issues he was having when using a Display Text component in a Flow when trying to show Datetime values and have them display in the correct time zone.

You are unable to use a formula in Salesforce to determine a User’s time zone. Admins have created very complex formulas trying to calculate an offset based on the User’s State or Country but then they ran into issues trying to handle Daylight Savings Time adjustments as well.

Here’s an example presented by Eric Praud on Jen Lee’s “How I Solved This” Admin Podcast where he created a new custom object, added 9 custom fields to the User object and came up with this formula to get the hour of the day when converted to the User’s local time:

IF( OR(
ISBLANK( $User.Summertime_Start_Offset__c ),

CreatedDate< DATETIMEVALUE(DATE(YEAR(DATEVALUE(CreatedDate)),MONTH($User.Summertime_Start_Date__c),DAY($User.Summertime_Start_Date__c))
-(WEEKDAY(DATE(YEAR(DATEVALUE(CreatedDate)),MONTH($User.Summertime_Start_Date__c),DAY($User.Summertime_Start_Date__c)))-1)) + $User.Summertime_Start_Offset__c /24,

CreatedDate>=
DATETIMEVALUE(DATE(YEAR(DATEVALUE(CreatedDate)),MONTH($User.Wintertime_start_Date__c),DAY($User.Wintertime_start_Date__c))
-(WEEKDAY(DATE(YEAR(DATEVALUE(CreatedDate)),MONTH($User.Wintertime_start_Date__c),DAY($User.Wintertime_start_Date__c)))-1))+$User.Wintertime_Start_Offset__c/24

),

HOUR(TIMEVALUE(CreatedDate+$User.GMT_Offset__c /24))
+IF( AND($User.Southern_Hemisphere__c, NOT(ISBLANK( $User.Summertime_Start_Offset__c ))),1,0)
-IF(HOUR(TIMEVALUE(CreatedDate+ $User.GMT_Offset__c /24))
+IF( AND($User.Southern_Hemisphere__c, NOT(ISBLANK( $User.Summertime_Start_Offset__c ))),1,0)>23,24,0)

,
HOUR(TIMEVALUE(CreatedDate+(1+ $User.GMT_Offset__c )/24))
-IF( AND($User.Southern_Hemisphere__c, NOT(ISBLANK( $User.Summertime_Start_Offset__c ))),1,0)
-IF(HOUR(TIMEVALUE(CreatedDate+(1+ $User.GMT_Offset__c )/24))
-IF( AND($User.Southern_Hemisphere__c, NOT(ISBLANK( $User.Summertime_Start_Offset__c ))),1,0)>23,24,0)

)

Andy figured out that taking the difference between the Datetime returned by my component (midnight GMT) and the Datetime returned by the Flow formula DATETIMEVALUE(Date) you would get the GMT Offset for that date based on the running User’s time zone.

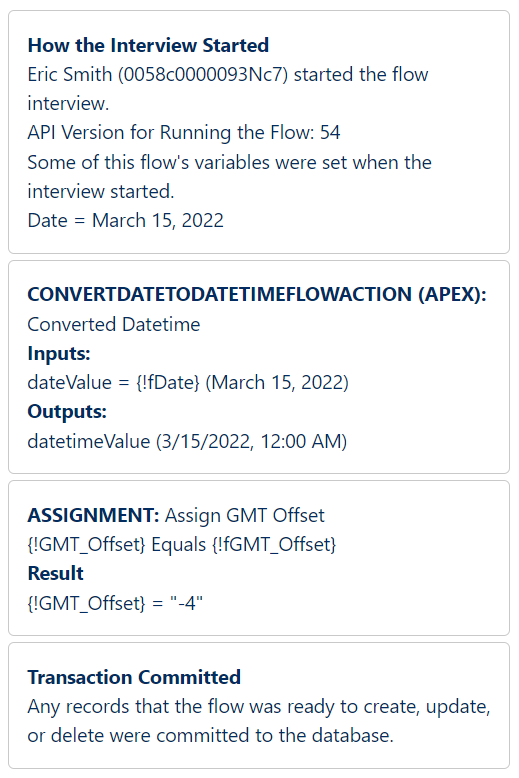
Here’s a sample sub-flow I created that you could use to get the User’s GMT Offset for any date. You can call this sub-flow anywhere you need to get the offset to use in Datetime value calculations for the User’s time zone.

A Date Variable is created for Input and a Number Variable is created for Output.

A Formula is used to assign a default value of Today if no date value is passed into the flow.

The result of the fDate formula is passed into the Convert Date to Datetime Flow Action

And finally, the difference between the two Datetime values is calculated, converted to hours and passed back to the calling Flow.

Here’s an example of how you could call this sub-flow from your flow.


Depending on the date, the difference between GMT (Greenwich Mean Time) also known as UTC (Coordinated Universal Time) and the User’s time could be different.

For Example:

From the second Sunday of March at 07:00 UTC until the last Sunday of March at 01:00 UTC, London is four hours ahead of New York.

From the last Sunday of March at 01:00 UTC until the last Sunday of October at 01:00 UTC, London is five hours ahead of New York.

From the last Sunday of October at 01:00 UTC until the first Sunday of November at 06:00 UTC, London is four hours ahead of New York.

From the first Sunday of November at 06:00 UTC until the second Sunday of March at 07:00 UTC, London is five hours ahead of New York.

So, for me in the Eastern Time Zone, running the Flow with a Date of 3/1/2022 returns a value of -5 for my offset from GMT.

However, because of Daylight Savings Time, running the Flow with a date of 3/15/2022 returns the correct GMT offset of -4 for that date.


Get the Convert Date to Datetime Flow Action on UnofficialSF.
https://unofficialsf.com/convert-date-to-datetime-flow-action/

Find more from Eric Smith on his blog.
https://ericsplayground.wordpress.com/

Find out more from Andy Engin Utkan on his blog.
https://salesforcebreak.com/