I’ve been playing around with communications services and wanted to try sending an SMS using the popular MessageBird platform. In the video shown here, I demonstrate how you can do this with the No-Code HTTP Callout action that’s available for installation as an extension, along with a hard-learned lesson about including the required headers. I also demonstrate a dedicated invocable action for sending via MessageBird to show how dedicated actions are easier to work with:
Install
Haven’t packaged this one yet because it only contains a single action, but check out the source below.
https://unofficialsf.com/wp-content/uploads/2022/09/largeUCSF-300x133.png00Alex Edelsteinhttps://unofficialsf.com/wp-content/uploads/2022/09/largeUCSF-300x133.pngAlex Edelstein2022-05-24 08:53:242022-05-24 08:55:14Two Ways to Send SMS Messages From Flow Using MessageBird
Here’s more detail on what this announcement means and represents.
Four New Flow Capabilities
Flow for Slack encompasses four new Flow & Approval Processes capabilities:
A set of Flow Actions that enable flows to carry out common Slack activities like Create Channel and Post Message
Screen Flows in Slack, enabling entire screen flows to execute without modification in Slack channels.
Orchestrator in Slack, which adds task notification and enables Work Items from Orchestrator to be worked on without leaving Slack
Approval Processes send notifications to Slack
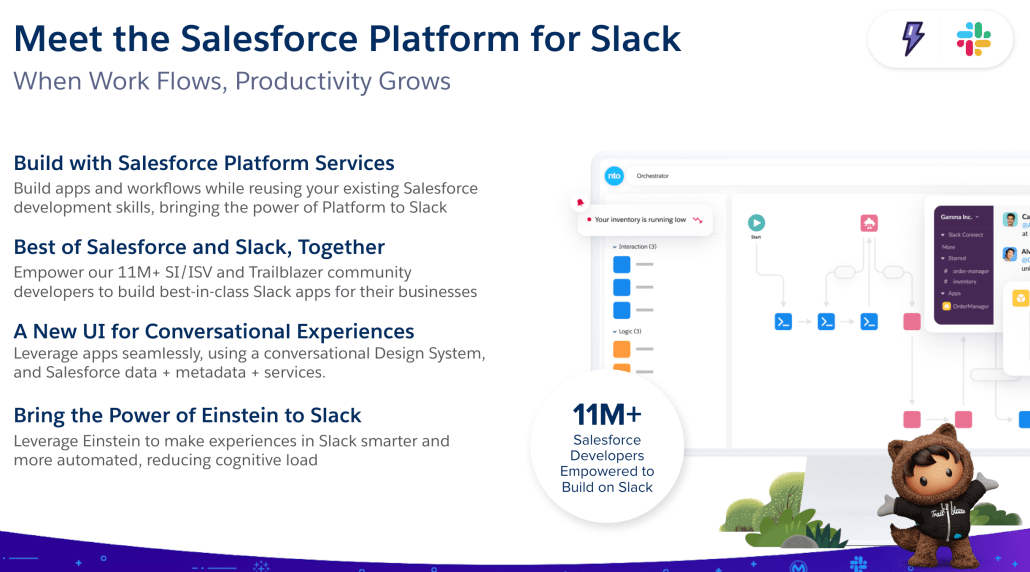
These are all part of the newly announced Salesforce Platform for Slack:
Flow Actions for Slack
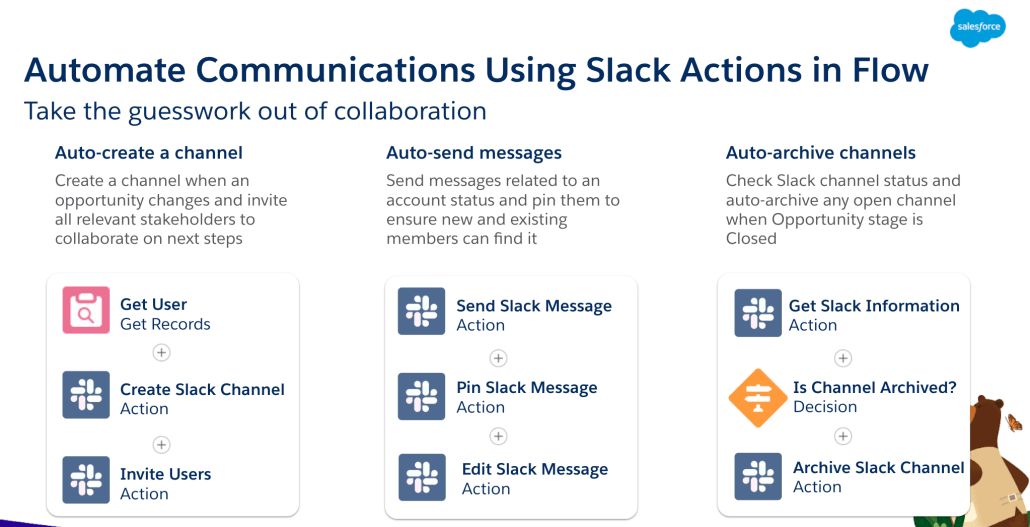
Flow Actions for Slack are available automatically on every org, as of Summer ’22. Here are some use cases:
Screen Flows in Slack
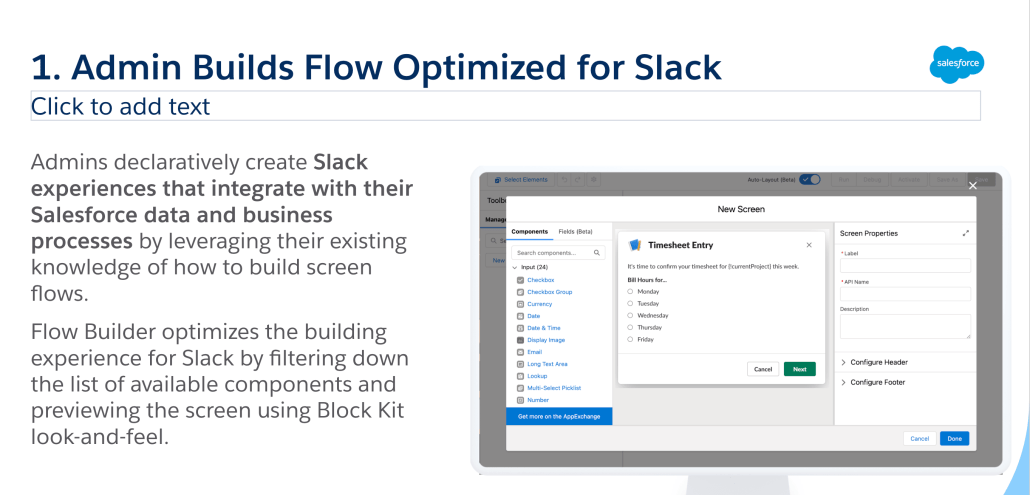
The basic ideas behind Flow in Slack is that you can build a screen flow in Flow Builder….
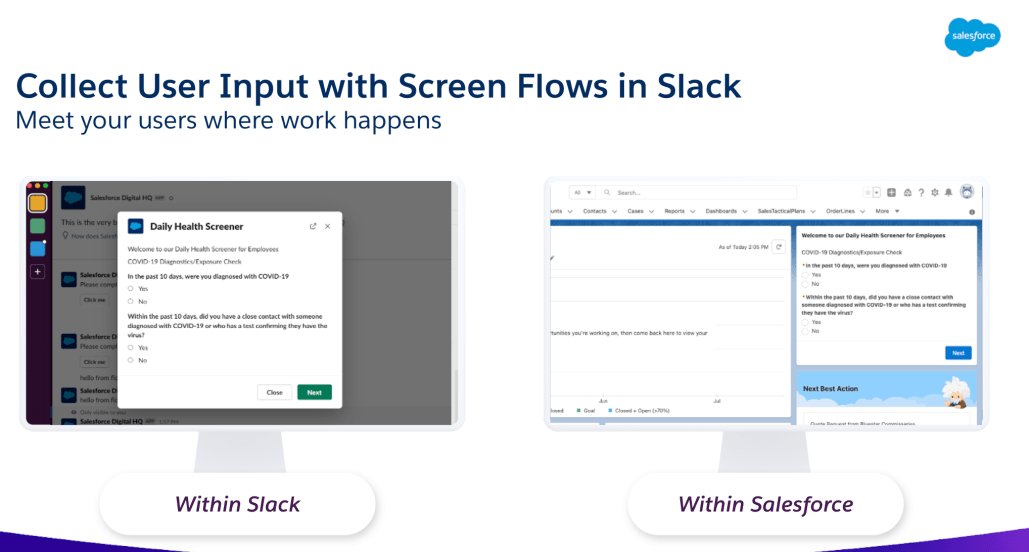
….and that screen flow will run equally well in both Slack channels and traditional Salesforce containers like record pages:
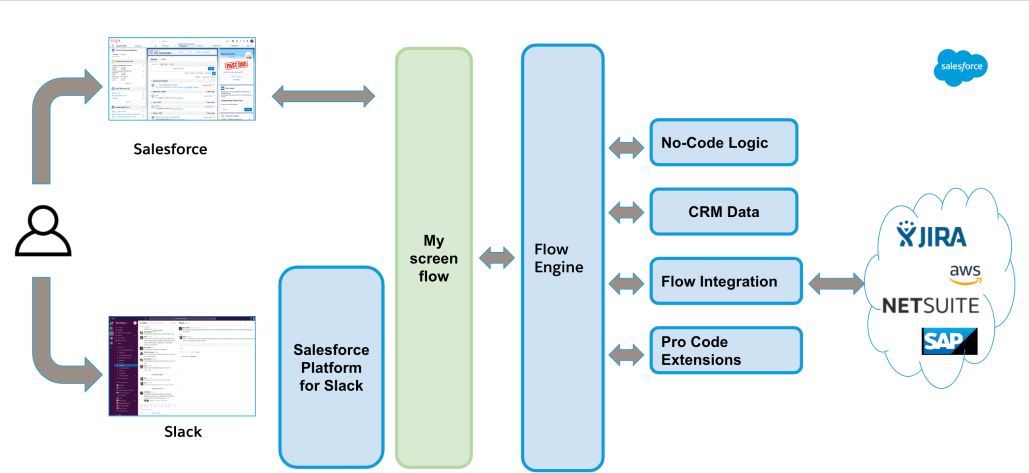
Here’s a look at how it fits together:
Thin Work vs. Thick Work
Let’s first discuss why this is such a useful ability. One might argue that the kind of work that gets done in Slack is very different from the kind of work that gets done in Salesforce. This is sometimes referred to as ‘Thin Work’ vs. ‘Thick Work’. If you consider traditional Salesforce applications, there’s some validity to this concern. We don’t hear Slack users asking to carry out, in Slack channels, the substantial analytical work that you use Tableau analytics tools for, or try to use a Field Service Scheduling Console from a Slack channel.
What makes Flow such a good pairing for Slack is the fact that screen flows are already fundamentally Thin Work constructs. Each screen in a screen flow maps nicely to a single Slack message in a Slack channel. Flows are already used to carry out hundreds of millions of thin work transactions each month. And the new Flow Orchestration service extends that further, allowing work to be assigned to individuals and then worked on via these thin screen flows.
Notice the Salesforce Platform for Slack block in the diagram above. This is a new included service from Salesforce that makes it easy for Salesforce tools like Flow to work with Slack:
Looking at the Benefits
Let’s consider the big benefits of Screen Flows in Slack.
Benefit 1: Build Once, Deploy Everywhere
The development environments for ‘native’ Salesforce and Slack apps are very different, and a lot of duplication of effort is necessary to create coded solutions that work in both places. With Flow in Slack, it is now possible for the first time to build a single application that works across the entire Salesforce environment, from record pages to Slack channels, while delivering the exact user experience that each community expects and deserves.
To apply some traditional analogies: one of my first tech jobs was testing printers against some productivity software being created for hardware like the Apple II GS. I happily pulled down 6 of those sweet, sweet 1989 dollars hour after hour, working from a lab full of printers in Mountain View, California. The work was substantial however, because each printer maker provided their own printer driver, and our productivity software had to work with each driver’s nuances and variations. Today, application environments from Microsoft and Apple abstract that away. As a developer you can generally write without worrying about the specific printer support.
Flow provides a similar abstraction. The Flow development time has done the work to create two runtimes, the modern equivalent of those hair-metal-era printer drivers. These are the existing Lightning Runtime for Flow and the new Slack Runtime for Flow. Each of these runtimes talks to the Salesforce org and receives Flow metadata for each new screen. The runtime then translates the metadata into the appropriate presentation. As a Flow user, you probably aren’t even aware of all the work the Lightning Runtime carries out. Each time you load a record page with an embedded flow or pop up a flow modal from a button, this runtime loads as javascript into your browser, and start converting metadata into the web descriptions that Lightning uses to generate things like radio buttons and picklists. The new Slack Runtime actually operates on the backend, but carries out the same function. It converts that same screen metadata into a Salesforce platform construct called a View Definition, and the Salesforce Slack Platform then converts the View Definition into the Block Kit that Slack uses to render those same radio buttons.
But the good news is you need to understand anything from that last paragraph. Because Flow will handle it for you. If you can build a screen flow, you can run it in both places.
Benefit 2: Meet Your Users Wherever They Want To Work
Because flows will now run in both environments, you can look forward to greater compliance and happier users. Those users who want to work from the familiar Salesforce environment won’t have to change their behavior. And those users who never want to leave Slack will be able to get more of their Salesforce work done where they want to do it. Take as an example the perennial challenge of getting Salespeople to update their opportunities. If they can do from lightweight apps deployed as flows onto their mobile phone Slack apps, they’re going to be more compliant and you’re going to have happier managers.
Benefit 3: Stimulating Slack Adoption in the Salesforce Environment
If you’re in an organization that is not 100% on Slack, you can stimulate adoption by incorporating Flow in Slack into your strategy. Key applications that users are used to doing in Salesforce can be made available to them Day 1 in their new Slack environment. IT fears can be allayed by pointing to the ability to Build Once and Deploy in both environments. And to those concerned about a split organization running on two technologies, you can point out how screen flows become a unifying application tool that reduces the impact of the different lower layers.
Benefit 4: Bringing No-Code App Dev to Slack
Slack is a powerful application platform, but 100% of the applications written for it so far have been professional coding jobs. There isn’t a way to create No Code applications that use building blocks and point-and-click logic (The triggered workflows in Slack Workflow Builder are very useful, but because they don’t provide flow control, logical expressions, and enterprise access control, we don’t here consider them to be ‘applications’). Now Slack Applications can be quickly and easily crafted by non-developers, greatly extending the accessibility of the Slack Platform.
Beta Availability in Summer ’22
The Beta of Flow in Slack will be available for use in Summer ’22. It only supports a couple screen components and does not yet work inline, but we encourage the community to try it out.
Sending or Starting a Screen Flow in Slack
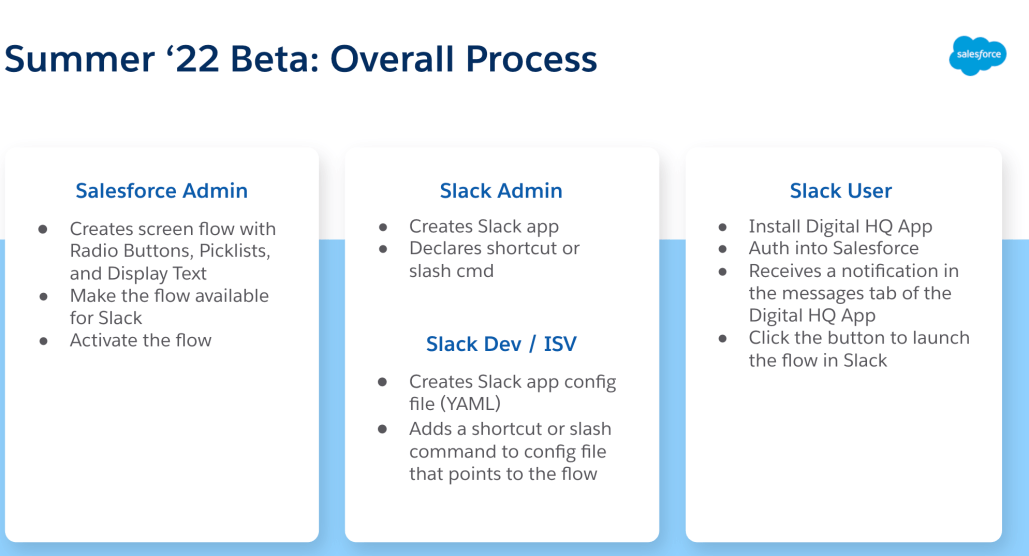
In the Summer ’22 release, here’s how you you send a flow to a Slack recipient:
Create the screen flow in Flow Builder.
Enable it for Slack (see ‘Enabling a Screen Flow to Run in Slack’, immediately below). Save and Activate.
You’ll find among your Flow Actions a newly generated Send Message to Launch Flow invocable action (only available on sandboxes in Summer ’22) corresponding to your screen flow.
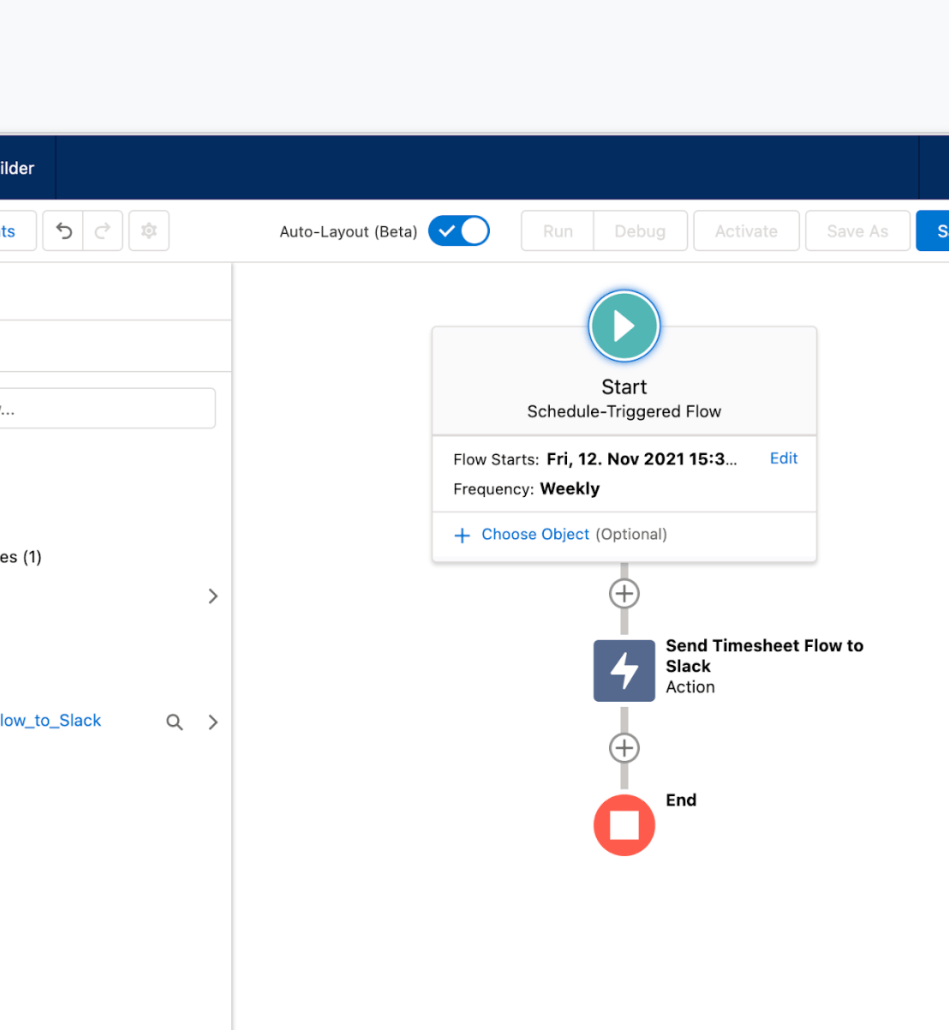
What you do next depends on how you want to trigger the sending of the screen flow to a Slack Channel. An example: Create a Schedule-triggered flow and add your Send Message to Launch Flow action to it.
When the parent flow triggers, a message will be sent to the target Slack Channel, and recipients will be able to click to run your screen flow.
Note that the Connect Salesforce with Slack permission is required.
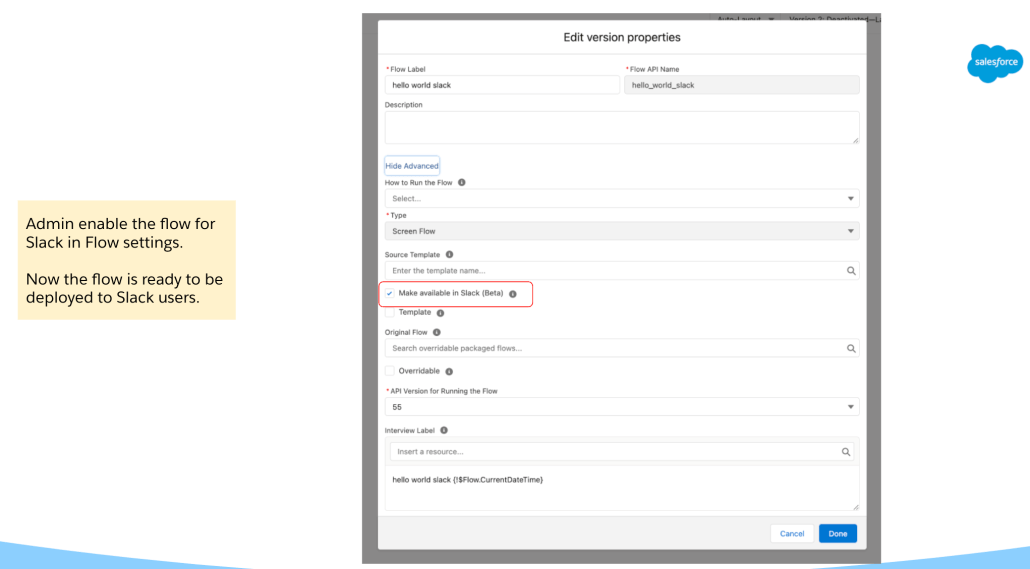
Enabling a Screen Flow to Run in Slack
In the Summer ’22 release, use this new checkbox to publish a flow for use in Slack:
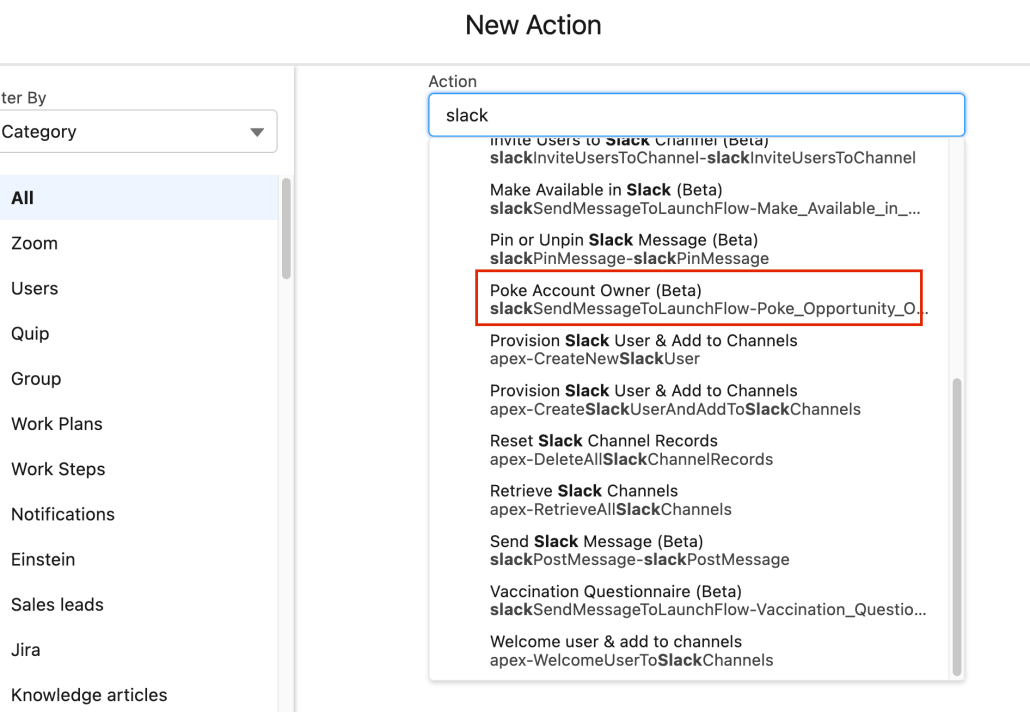
Finding the Generated Action
A separate Flow Action is generated for each Screen Flow that gets ‘made available in Slack’ (see above). This is similar to how Quick Actions are each shown in the action picker in Flow Builder as distinct Flow Actions. Here’s an example of one of these generated actions:
Here’s what the Send Message to Launch Flow action looks like in a Schedule-triggered flow.
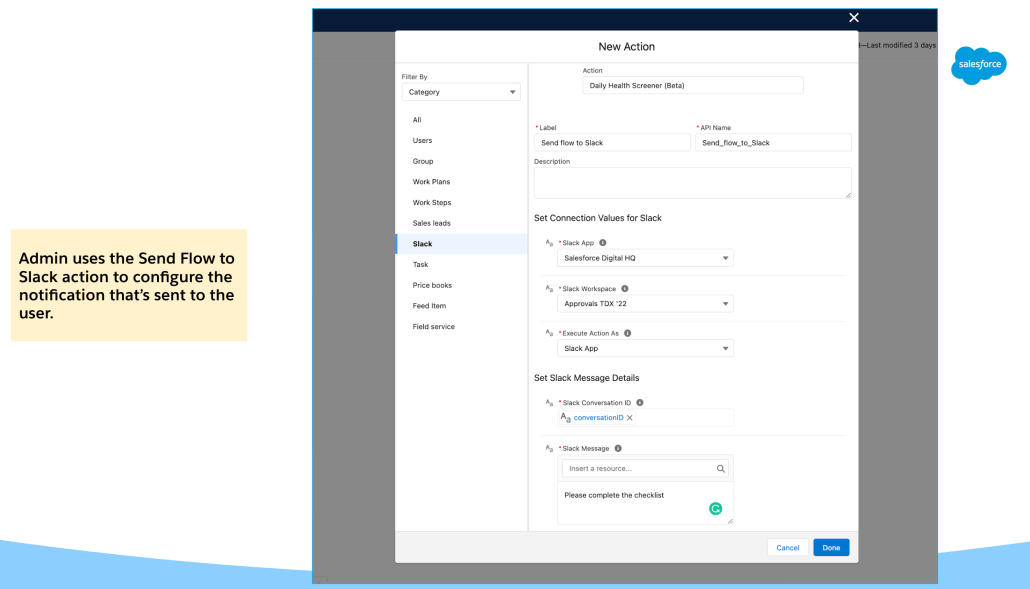
…and here’s how it gets configured:
Note that the technology behind this action will soon be available to notify users of Flow Orchestration Work Items. That’s targeted for Winter ’23.
Roadmap
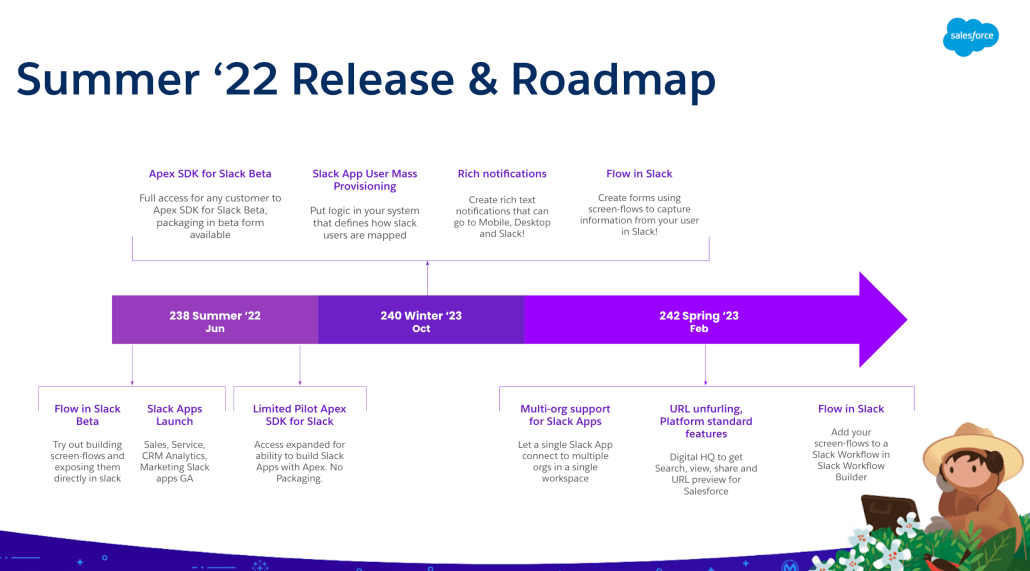
Here’s the larger roadmap for Salesforce Platform integration with Slack
https://unofficialsf.com/wp-content/uploads/2022/09/largeUCSF-300x133.png00Alex Edelsteinhttps://unofficialsf.com/wp-content/uploads/2022/09/largeUCSF-300x133.pngAlex Edelstein2022-05-12 11:27:212022-05-12 11:51:41Introducing Salesforce Flow for Slack
Version 3.0 of FlowActionsBasePack will shortly be available. It is still a managed package, but the namespace of 3.0 and all subsequent versions of FlowActionsBasePack is ‘usf3’ instead of ‘usf’.
Version 3.0.6 of Flow Screen Components Base Pack is being released at the same time. It requires Version 3.0 of FlowActionsBasePack. 9 files that made calls to the usf namespace had their names changed so they can call the usf3 namespace. for example, the component fsc_fieldSelector has been replaced with fsc_fieldSelector3. As a result you will see some dual files, like this:
This means that although the 3.0.6 version of Flow Screen Components Base Pack replaced fsc_fieldSelector with fsc_fieldSelector3, your copy of fsc_fieldSelector was not deleted because something is using it.
We’re encouraging all extension developers to use the latest versions of FlowActionsBasePack and FlowScreenComponentsBasePack as dependencies. If you have calls to ActionBasePack classes, you’ll need to do a find and replace to replace your ‘usf_’ with ‘usf3_’ and if you’re calling one of the screen components like this:
If you have any questions or issues, this post is a good place to post them.
Why the extra messiness and the namespace change? The simple answer is that I broke the packaging upgradeability because I wasn’t careful enough. The changes made here ensure that everyone will be able to upgrade to this new v3.0 generation and other changes ensure that package upgradability can’t be broken in the future.
We’ll gradually upgrade all of the extensions to use V3 and above, and once that’s done, it will be possible to delete the old duplicate files and the old usf namespace classes if you wish.
https://unofficialsf.com/wp-content/uploads/2022/09/largeUCSF-300x133.png00Alex Edelsteinhttps://unofficialsf.com/wp-content/uploads/2022/09/largeUCSF-300x133.pngAlex Edelstein2022-04-14 17:33:332022-04-16 14:10:15Developer Notes: Packaging Changes to the Base Packs
Here’s what you can look forward to in Summer ’22 – hopefully this post will make your ‘Summer 22 Treasure Hunt’ posts a little easier!
Note that this is not the complete list of changes and you should carefully check the Release Notes for changes that may impact your org.
Record Triggered Flows
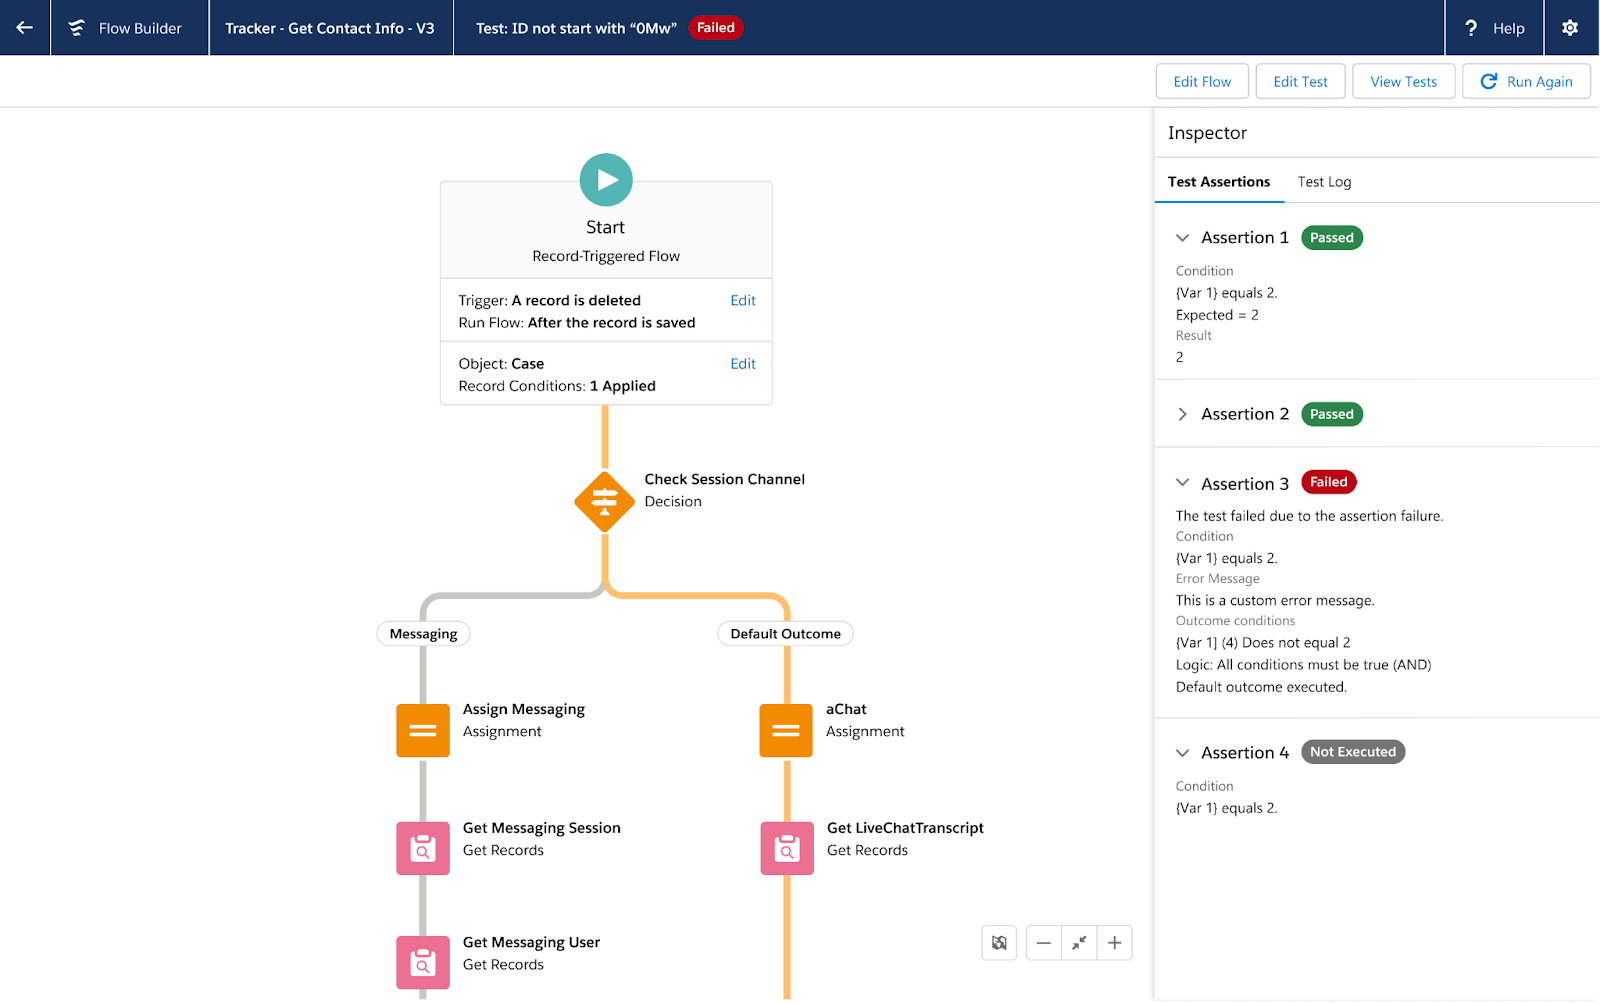
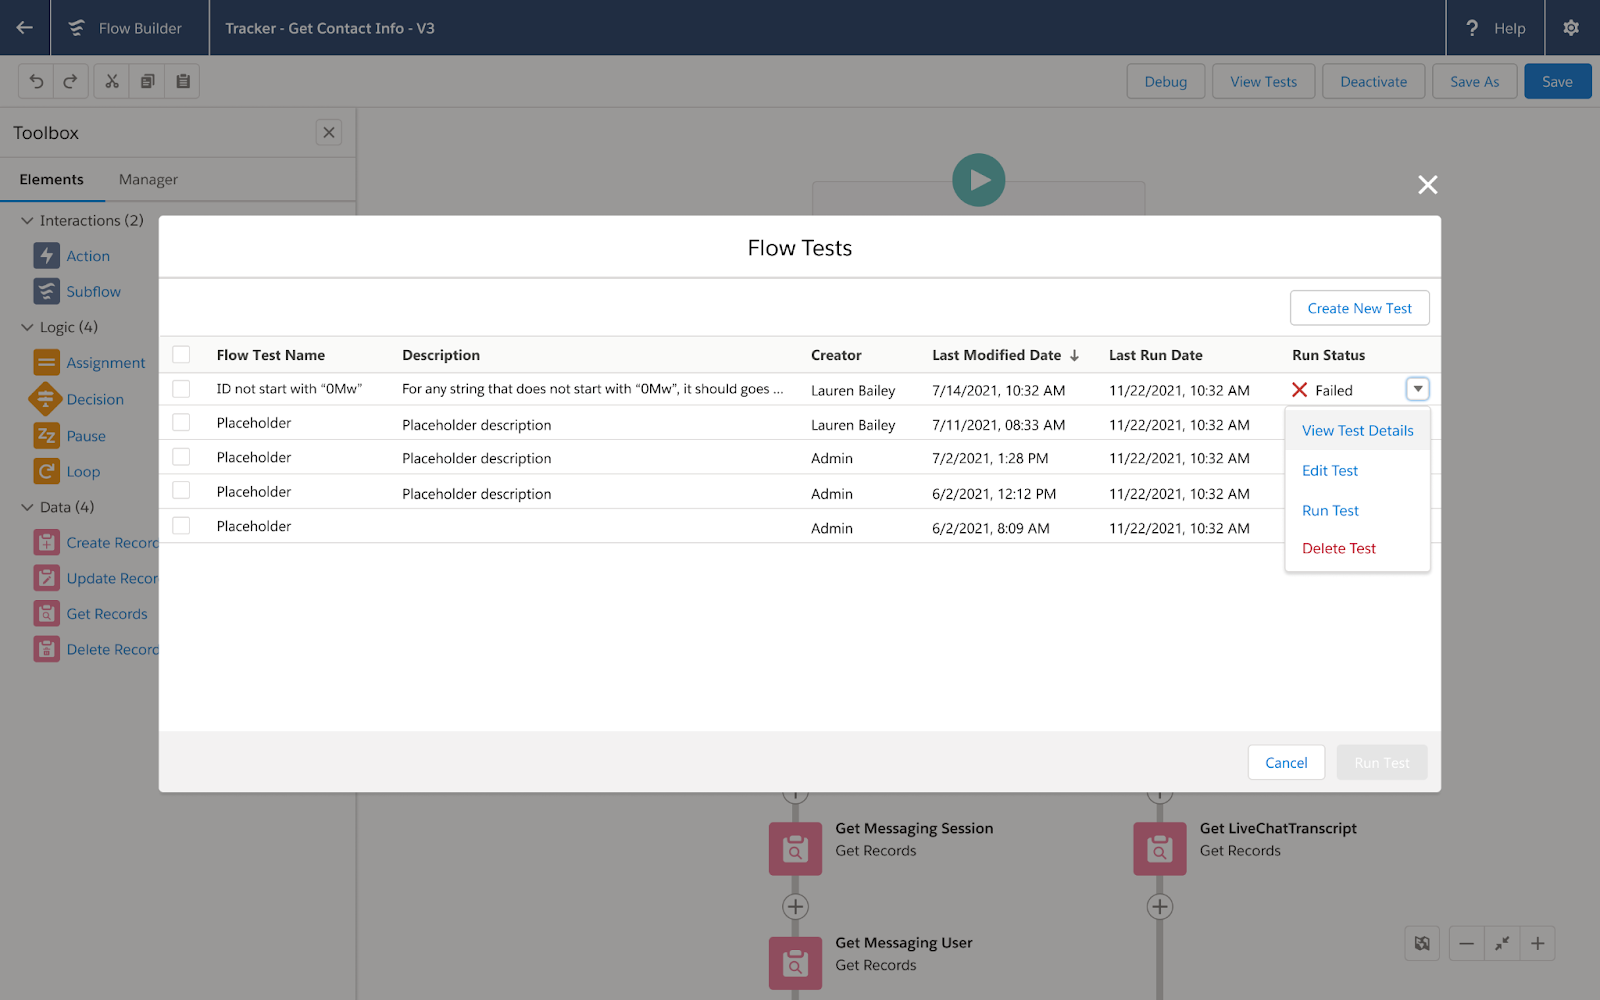
No-Code Flow Testing Arrives (Beta)
Imagine a scenario where your organization has a team of 15 people managing your Salesforce instance and multiple people making changes to Flows. There’s often a risk that somebody could unintentionally break some business rule logic. With the introduction of Flow Tests, you can check to ensure that you’ve maintained your business-critical logic from version to version.
Flow Tests allow you to set up assertions or ‘assumptions’ about your results that you want to always stay the same. Those assertions protect your future self or others on the team from making costly mistakes in the future.
Note: You can currently only create Flow Tests for After-Save and Before-Save flows.
Be on the lookout for a bigger post with a video walkthrough of Flow Tests in the coming weeks.
New Formula Builder With Syntax Checking in Entry Conditions
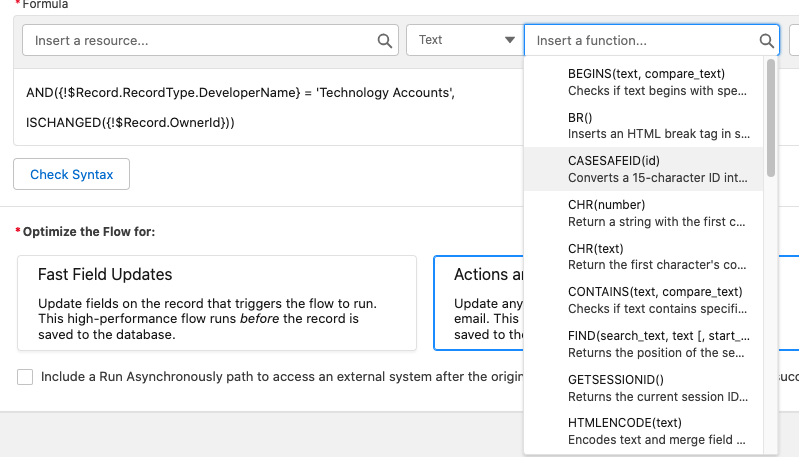
Get a sneak peak of our new and improved Formula builder in action on Entry Criteria in Record Triggered Flows. Yep – that means you can now use a formula for your entry conditions! Before this new formula experience existed, you generally had to hope your syntax was accurate and only received feedback about your formula when you went to save your Flow.
Features:
Select predefined operators to build your formula versus starting out with a blank slate
Check syntax to validate that your formula works within the context of your Flow
Traverse through relationships using Formulas and reference Global Variables
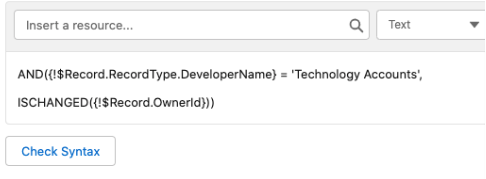
As noted above, you can now traverse through parent fields in Entry Criteria – one of the most common scenarios is checking for the Record Type’s Developer Name!
Keep in mind that complex formulas in entry criteria will negatively affect performance, so if you are able, stick with non-formula based conditions. Be on the lookout for this new formula building experience to come to other areas of Flow, like Formula resources, in a future release.
Workflow Rule Converter Goes GA
Our Workflow Rule converter is now GA – You can now convert even more workflow rules to Flows using our nifty conversion tool. We added support for Formulas and also added support for Null checks.
There will still be some Workflow Rules that are not convertible, namely:
Formulas featuring:
Hour/Minute/Second/TimeNow/TimeValue
IsClone
$RecordType
Be on the lookout for the official release notes covering all of the additions and considerations.
Flow Trigger Explorer Enhancements
Check out all the awesome improvements to Flow Trigger Explorer below.
Create New Flows Directly From Trigger Explorer
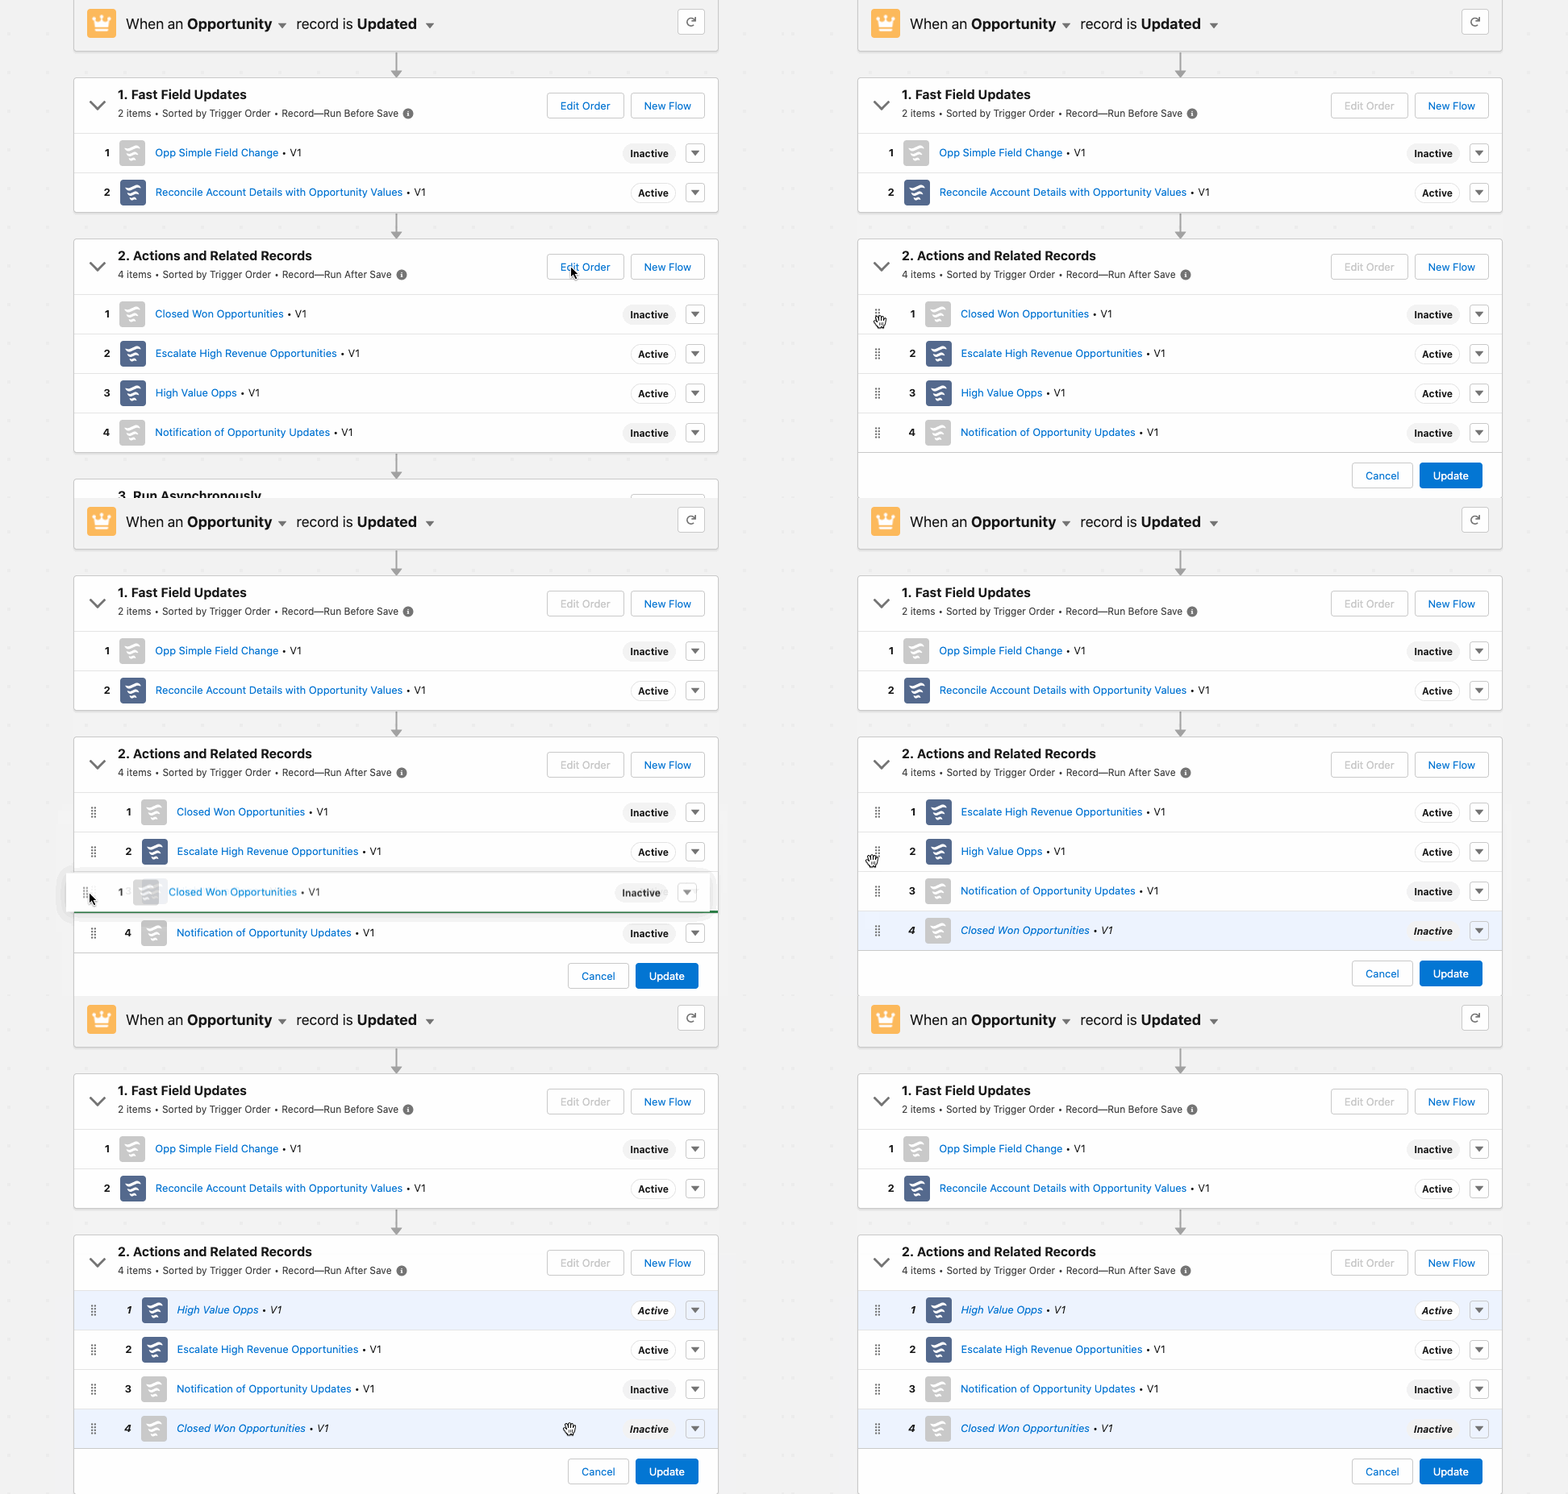
We’ve added the ability to create a new flow directly from Trigger Explorer – save time by pressing ‘New Flow’ for each trigger category. It even autofills the type and object for you!
Control Trigger Ordering
You can now control your record-triggered flow order directly from Trigger Explorer! Before this, ordering had to be done within each Flow’s advanced settings. Note that if you change the ordering of an active flow, a new version will automatically be created and activated for you. Keep this in mind if you decide to revert a Flow to an older version which may conflict with another flow’s trigger order.
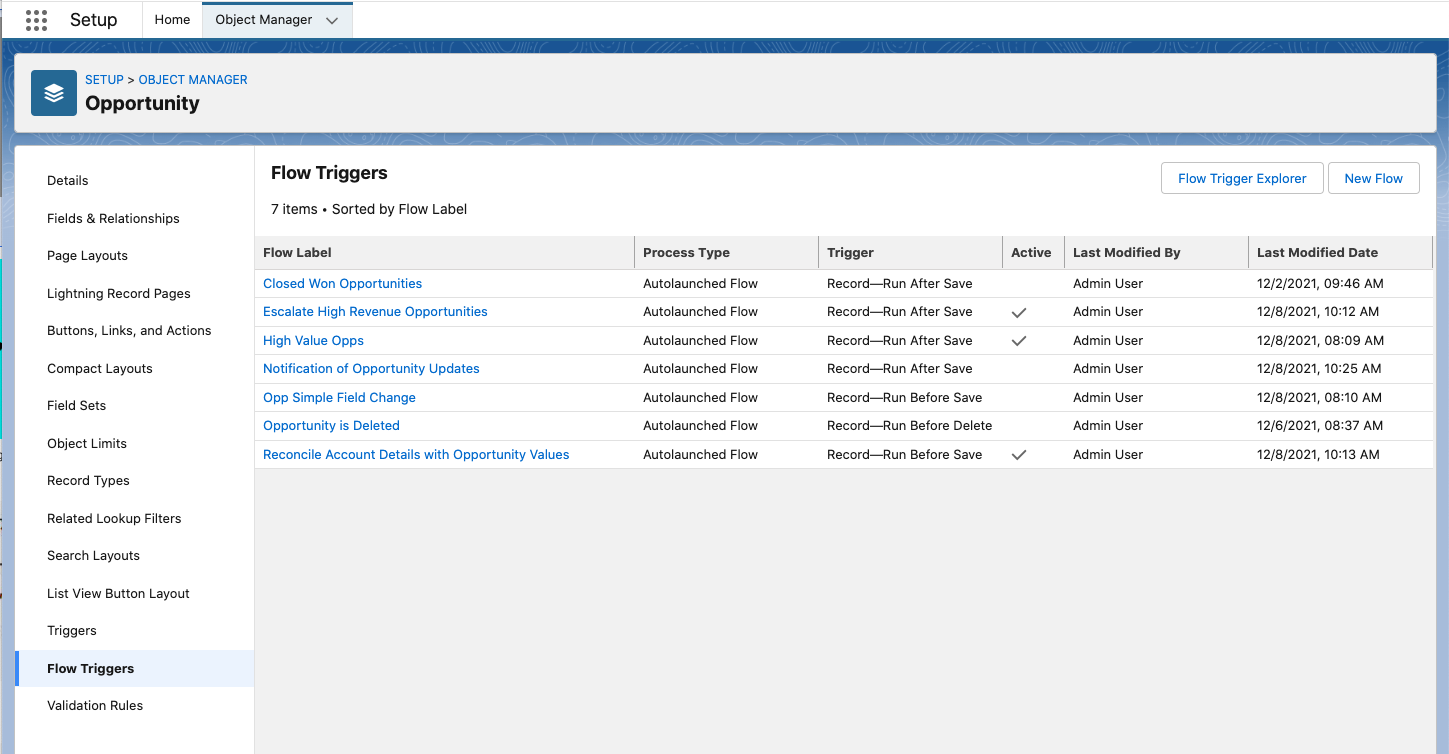
Flow Triggers and Trigger Explorer Available in Object Setup Menu
Save time and get a picture of all of an object’s record-triggered flows directly from the Object Manager. You can even create a new flow or open up Trigger Explorer from the object’s setup menu! No more digging around in your org’s Flows list view.
Screen Flows
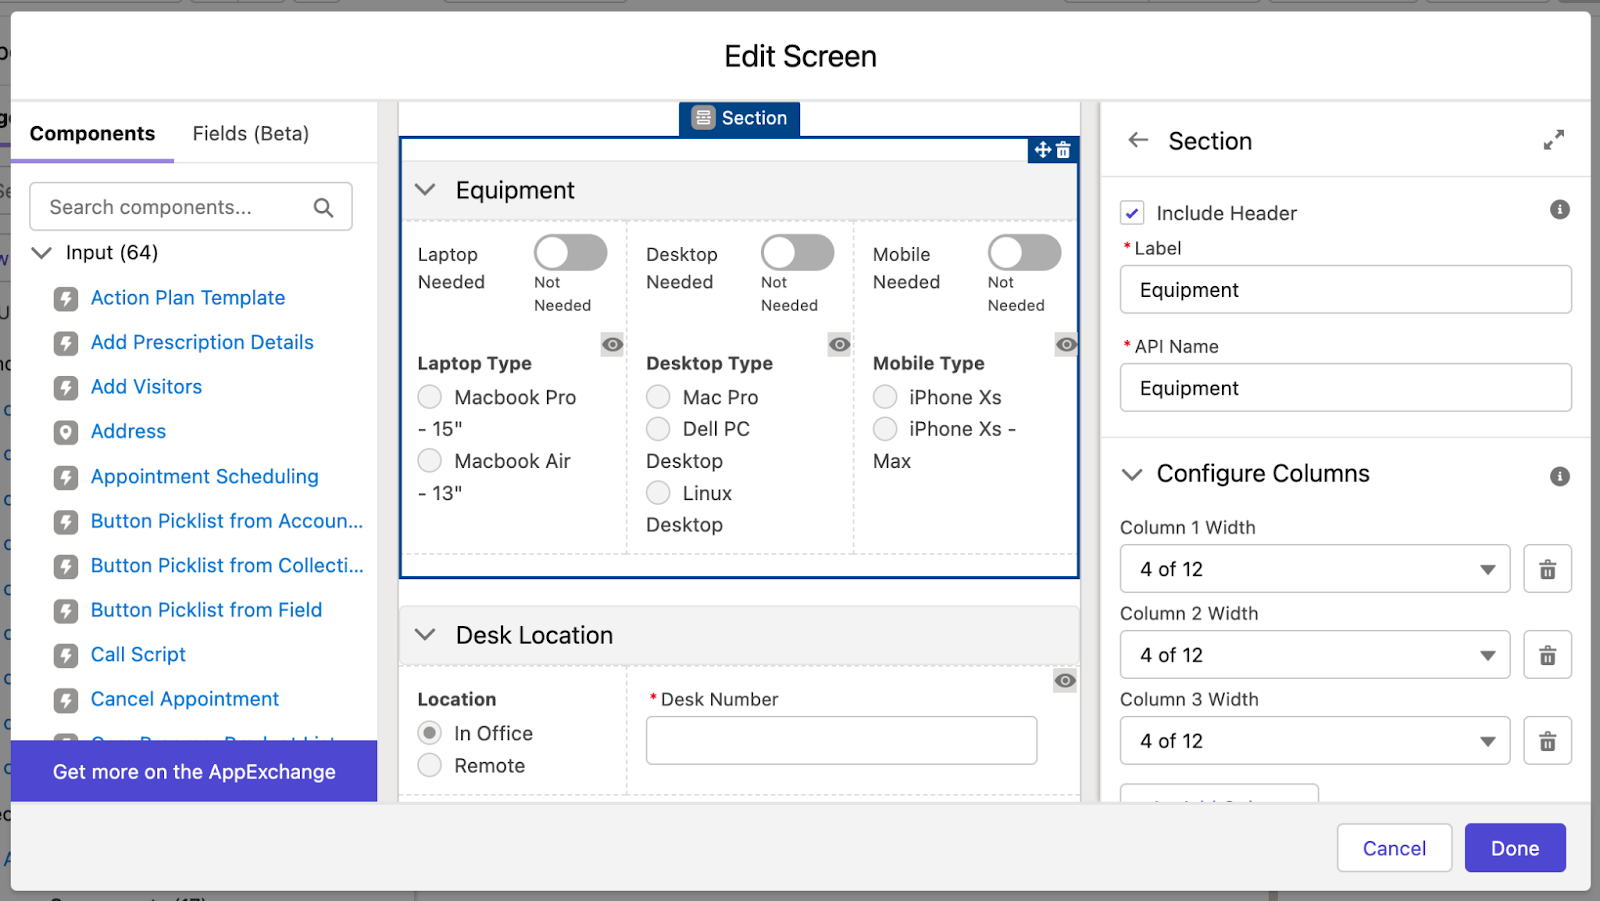
Add Descriptive and Collapsible Section Headers to Your Flow Screens
New in Summer ‘22, admins can add headings to sections in their Flow screens.
When a section has a heading, the end user is able to collapse or expand the section as they progress through the screen. Currently, all sections are expanded by default.
With section headings, admins can provide additional context and visual hierarchy for their end users, making it easier for users to make sense of a long block of inputs or multiple tasks in one screen.
Additionally, section headings give visually impaired users the hierarchy they need to assess where in the screen they are.
Dynamic Forms for Flow (Beta) – Name and Address Fields Added
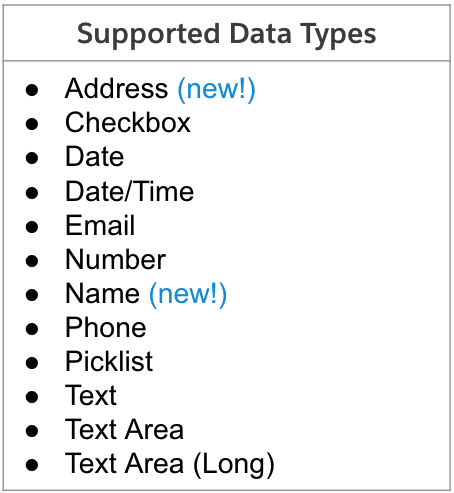
You can now add Address and Name fields from the Fields tab in Screen Flows. For example, dragging the Name field on a Contact record will bring over all of the associated name fields like Salutation, First Name, Last Name, and more.
Dynamic Forms Address Field – Now with Google Typeahead!
Note that one of the coolest features of the newly added Address field support with Dynamic Forms for Flow is that it now supports typeahead results to automatically populate address data – a huge data integrity and time savings improvement. Check out how fast and accurate it was to fill in the Billing and Shipping address information for a new account.
Screen Editor Accessibility Improvements
We’ve made the following improvements to the Screen Editing experience for visually impaired users:
When you open the screen editor, the focus is automatically set to the Label field in the screen properties pane (for new screens) or the Edit button that enables you to edit a screen’s label (for existing screens).
After you create a component visibility condition in a screen component, focus is set to the condition you created.
After you create a choice resource from a value field, focus is set back to the value field where you created the choice.
With Lightning Web Runtime (LWR) on Node.js, you can build digital experiences that meet the high scale, security, and performance demands of modern web applications. LWR is a non-opinionated way to configure and load the modules, services, and dependency providers you need to build a JavaScript app.
Some benefits of LWR are:
Performance—Thanks to page generation at build time, not runtime, our bar is set at subsecond full-page loads.
Friction-Free—An enjoyable local development experience.
Power—All the power of Lightning Web Components and the Salesforce platform at your disposal.
Important Notes About Running Flows in LWR
LWR is a strict ‘no aura’ environment, which means there cannot be any aura-based local actions or custom aura components in your Flow.
Additionally, Flows with the following screen components / features are not yet supported:
File Upload
Image
Screen Inputs generated using Dynamic Forms for Flow
Lastly, Flows run in LWR Sites cannot be paused or resumed.
Orchestrator
Orchestrations Now Deployable with Change Sets
Admins that use Change Sets to deploy changes through their environments can now deploy orchestrations and the associated flows with the change set tool. Keep in mind you still need to activate the orchestrations upon successful deployment.
New $Orchestration System Variable
We introduced the new $Orchestration global variable that you can reference at any place throughout an orchestration. This new variable allows you to reference the Orchestration Instance Id which is handy for complex orchestrations that involve external systems which may pause or resume the orchestration with platform events.
Open Associated Flows from an Orchestration.
You can now save time to make quick edits by opening evaluation, screen, or autolaunched flows directly in Flow Builder from within an orchestration step.
More Orchestration History Tracked
You can now track more orchestration events from the Orchestration History. orchestration. The following events were added to the history:
An orchestration is canceled
A stage or step is discontinued
An orchestration, stage, or step encounters an error
A work item is reassigned
Order Triggered Orchestrations with Flow Trigger Explorer
Triggered orchestrations can now be ordered along with other After-Save Flow Triggers within Flow explorer. This makes maintaining the order of your automations easier and ensures your orchestrations occur exactly when you want.
Next Best Action
Limit Recommendation Repetitions
You can now limit the number of times Next Best Action recommendations are repeated with the new Limit Repetitions Flow element.
Available for strategies built using the Recommendation Strategy Flow type.
Example Use Cases
Limit a recommendation from repeating for 3 months when an employee accepts an action to reset password.
Limit a recommendation from repeating for a year when a customer rejects an offer to purchase an add-on for a discount.
Usage
When the Flow runs on an object page, it limits repetitions by record. Otherwise, it limits by runtime user.
Add Limit Repetitions element after you have your collection of recommendations and you have your recommendation IDs or keys.
Customize limits based number of responses within a specific number of days.
Save a step by assigning values to the RecommendationOutput right within the Advanced section versus adding the Assignment element.
All Flows
Autolayout’s Go-To Connectors Now Highlight Referenced Elements
We introduced Go-To connectors as a way to summarize the outbound connections an element may have in autolayout. For elements with long names, it was often hard to see the element a Go-To connector referenced.
Now, you can find connected elements in your flow by clicking the Go-To connector – Flow will now highlight and the target elements. As an added benefit, we’ll also adjust the Zoom level to ensure the Go-To connector and all of the target element(s) are all in view.
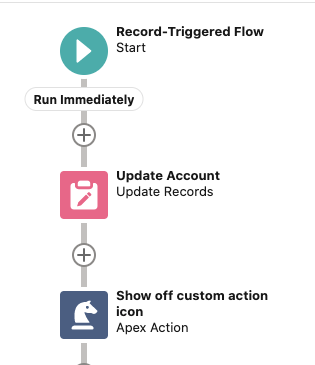
Custom Icons for Invocable Actions
Take note ISVs and Partners – invocable actions can now have their own unique icons in Flow Builder. This provides fantastic opportunities for branding and at-a-glance ease of use.
Developers creating invocable actions can choose to specify either Salesforce Lightning Design System (SLDS) icons or custom SVG files (added as a Static Resources in the org) to use as the icons for their actions in Flow Builder.
Developers specify action icons through a new iconName modifier in the invocableMethod annotation in the Apex code for actions: @invocableMethod(iconName=’icon’).
Note that custom icons are only displayed in flows using auto-layout.
Use Standard SLDS Icons
Below is a quick example of an out of the box SLDS icon – all I did here was add the SLDS path to the icon in the invocable action @InvocableMethod piece of the Apex Class:
@InvocableMethod(iconName=’slds:custom:custom47‘)
The format expected is slds:<slds Icon category>:<icon name>
Using Custom Icons – SVG Files
The real power and pizazz of this feature comes from being able to use custom SVG files. SVG (Scalable Vector Graphic) files are vectorized and contain XML metadata about how they should be displayed.
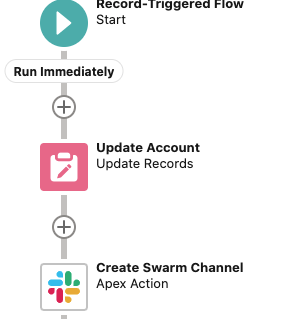
Suppose I have a static resource named ‘slacklogo’ – an SVG file. The naming convention expected in the invocable method is resource:staticResourceName:svgID. The SVG g-tag Id can be found in the actual metadata of the file. If one doesn’t exist, you’ll need to add one (via Notepad or your IDE of choice).
SVG files must meet the following requirements:
The <svg> element in the file includes an id, xmlns, and viewBox attribute
The <svg> element in the file doesn’t include a style, height, or width attribute
The file doesn’t include a <clipPath> element
Each <path> element in the file includes a fill attribute
Here’s an example with a custom slack icon uploaded as a static resource: @InvocableMethod(iconName=’resource:slacklogo:slack’)
Be on the lookout for more info in the official release notes for best practices and setup help with custom action icons.
Delete Flow and Process Versions from Managed Packages
ISVs and Partners – this one is a biggie for you. You can now delete a flow or process version from a managed package in the org that uploads the package. After you delete the version, the org that subscribes to the package keeps the version until someone manually deletes the version in the subscriber org. This is a great change for ISVs as it means orgs will no longer hit the Flow version limit when new flow versions are pushed from package upgrades.
Note: To turn on this feature, contact Salesforce Support.
It’s always fun to see the official content produced by Salesforce with its slick animation. Recently, the company released 5 useful video shorts introducing Flow concepts. We’ll put a link to this on the Tutorial Videos page.
https://unofficialsf.com/wp-content/uploads/2022/09/largeUCSF-300x133.png00Alex Edelsteinhttps://unofficialsf.com/wp-content/uploads/2022/09/largeUCSF-300x133.pngAlex Edelstein2022-04-01 19:00:482022-04-02 06:36:02From Salesforce: Five New Video Shorts That Introduce Flow Concepts
https://unofficialsf.com/wp-content/uploads/2022/09/largeUCSF-300x133.png00Alex Edelsteinhttps://unofficialsf.com/wp-content/uploads/2022/09/largeUCSF-300x133.pngAlex Edelstein2022-04-01 18:56:012022-04-01 18:56:06From SFDC Panther: A Great Video Series on Login Flows, including Multifactor Authentication (MFA)
Editor’s Note: Kerri’s application stands out because of the way it cleverly integrates several extensions to provide a slick send email solution that has template-like features but allows the user to edit the content before sending. Check it out!
I had a real request come in where someone wanted to be able to send branded emails that could be edited and have files attached before sending. At first, this seemed like it might be a bit much, but I thought about it and went to Unofficial SF and installed some packages. I was happy to be able to complete this request without having to get into any code!
In this example, we will be using a Flow to send a rich text email from a button on the Account Page. We’ll be able to edit the email before it is sent and include attachments.
Button Example
Clicking the Send Award Email button triggers the Award Email Flow screen flow:
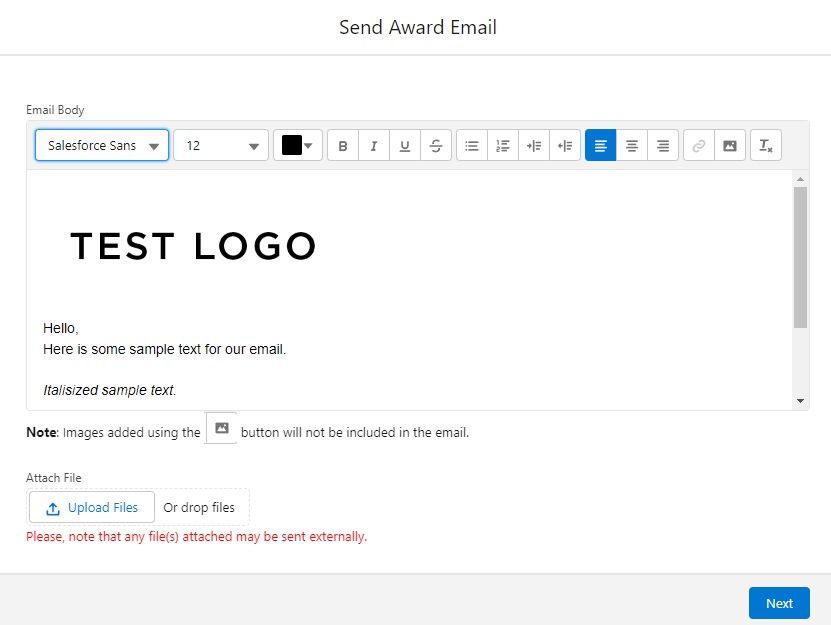
The flow opens a screen with a Rich Text email component, allowing for edits and formatting and also a file upload component:
The only feature in the edit screen that I noticed issues with is the image button. Any uploaded images in this manner are not included in the email:
Clicking Upload Files allows you to attach multiple files to the email and Project record:
The attachments and any changes to the Rich Text template are included in the email.
The Sent Email:
The related record:
Notes & Attachments
Files
Flow: Send Award Email
This Screen Flow allows the User to edit a Rich Text email template that includes a base image and allows for adding multiple attachments.
The first step gets the record to relate this email to for merge fields. In this example, we’re using the Account. We’ll pull in fields from the Account to the Text Template:
Next we start our Email Address collection with the testGroupEmail. For this example, we want to include a group inbox email address as part of our recipient collection. I am starting with adding the address variable manually and will explain why in a moment:
testGroupEmail Variable:
The next step is to populate the rest of our Email Collection. Normally I would set the email collection variable to add all the values at once, but the “Send Better Email” Apex action will keep any extra commas from adding any empty fields and fail during sending.
Example: emailAddresses might look like test@gmail.com ,,,,,,
To resolve this, we need to check if there are values in each field we want to pull an email address from and only add those fields to the collection instead of blank values:
Text Templates
EmailTemplateRT
This is the Rich Text Template where we’ll store some default text, formatting, images:
Note: Extra carriage returns in the rich text seem to appear as ? in the email, so delete any extra spaces in front of your text.
To add the image, I had to switch to Classic, upload the image to a public folder and check Externally Available Image.
Right click on the image (don’t open in a new tab) and copy the address into the Flow Text Template <img src=””> code in Plain Text and the image appears when switching back to Rich Text and when the email is sent:
Note: It doesn’t look like Text Templates work with Files or uploading images to the Rich Text template – at least not for the purposes of sending an email:
EmailTemplateUpdated
This is the template that we will actually use in the “Send Better Email” Apex action. We’ll paste the variable from the Edit Email Screen into the body:
Rich Text side:
Plain Text side. Remove any html tags:
EmailTemplatePT
I’m not currently using this, but it’s just a Plain Text version of the template that can be included in the “Send Better Email” Apex action:
Email Preview Screen
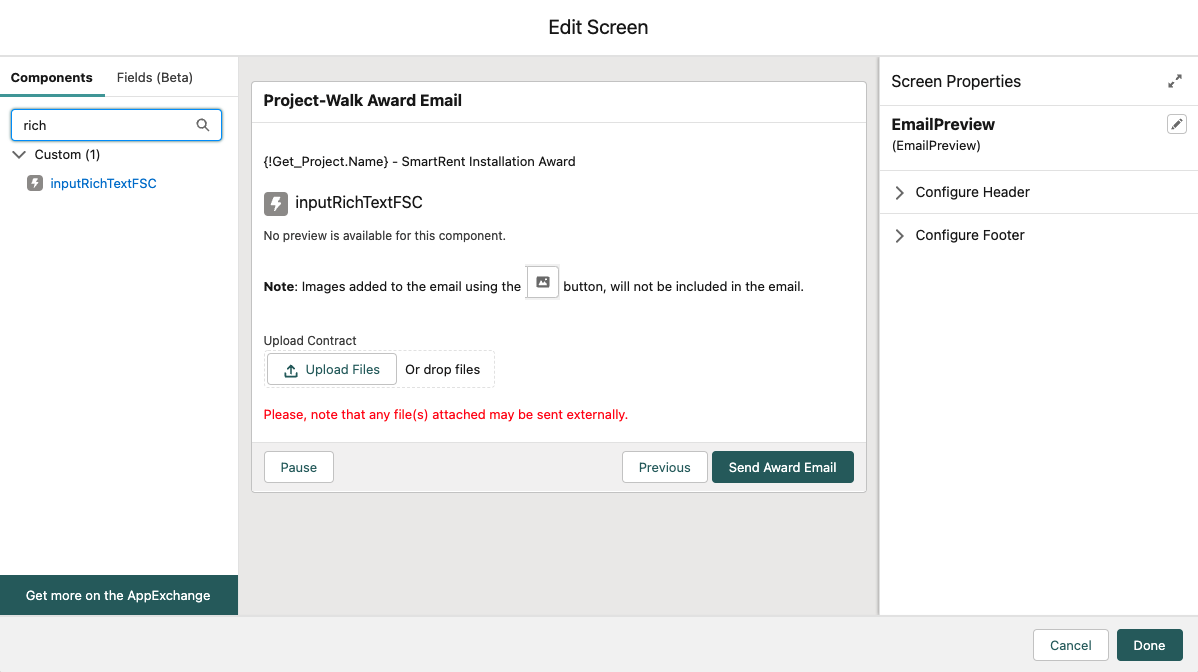
Now, we set up our email edit screen. Drag the inputRichTextFSC component:
Rich Text Value is where we’ll reference our Text Template
I added a note to the Screen about not using the Image icon on the Rich Text Editor to add images because they won’t be included when the email is sent. I don’t see any way to hide this, so I wanted to provide a warning:
File Upload
To upload files to the email, drag the File Upload component to the screen:
File Upload Settings:
Related Record ID – The record where this file will be uploaded. In this case, I pulled the record Id from the initial Get Account element
Allow Multiple Files – Set to True to attach multiple files
Setting the Attachments to Variables
contentDocumentLinksGet1
We need to get our files that were uploaded in the form of Content Document Links in order to include them in the rich text email using SendBetterEmail. A caveat for this is that in order to use this functionality, the Content Document Link query must be filtered like:
By ContentDocumentId OR LinkedEntityId using the Equals operator or multiple Id’s using the IN operator.
You cannot use the Contains operator or any other in this filter.
Failing to filter correctly, will result in the following error when you try to send the email:
“This error occurred when the flow tried to look up records: Implementation restriction: ContentDocumentLink requires a filter by a single Id on ContentDocumentId or LinkedEntityId using the equals operator or multiple Id’s using the IN operator.”
How to filter using the IN Operator?
Set a Loop element to pull in the collection from contentDocumentLinksGet1. We only want to attach the Files that are uploaded during this Screen Flow to the email, not every File attached to the record, so we have to do some filtering.
Decision: Is Content Document Link part of the File Upload?
The File Upload record is not the same as a Content Document Link, but it does collect the Content Document and Content Document Links. When we attach a file or multiple files, File Upload sets a few variables:
contentDocIds – Id to the Content Document of the File(s)
contentVersionIds – sets the version of the File(s)
recordId – the record where the File will live. It’s a Project record in this case.
Querying for the Content Document Link gets a little weird because it’s not set as a variable in the File Upload.
Check if the Content Document Ids from the File Upload variable match the Content Document Id in our current Content Document Link in the loop.
Under normal circumstances, DON’T DO THIS. It’s a bad practice to add DML statements and/or queries within Loops as it’s likely to cause the Flow to fail due to governor limits being reached (CPU errors, max SOQL queries reached, etc). In this case, we’re only looping through a few records that we’ll be attaching to an email. It’s also the only way I can think to get the Content Document Link records from the File Upload.
Again, we need to follow the specific filtering for getting Content Document Links:
Add the current Content Document Link to the record collection that we’ll use in our “Send Better Email” Apex action.
Note: Per discussion on UnofficialSF page for the SendBetterEmail component, this collection variable MUST be named contentDocumentLinks:
“Send Better Email” Apex action
After the last loop, we send the email. The “Send Better Email” Apex action is effective, but very sensitive to the variables you give it.
You can send one email (Standard) or Mass Email. In this example, we just want to send one email to multiple recipients.
Add the Recipients to the Set Addresses section. For Search Existing Flow resources, select String Collection and select our emailAddresses collection variable:
Subject and Body
Set the Email Subject. This can be from a Text Template, Variable, etc or just typed in.
Set the Email Body. Check Specify Body here since we’re using a Text Template and not an actual Email Template. Set HTML Body to the EmailTemplateUpdated Text Template.
Recipients & Recipient-Related Records
Related Record Id: The record we’re pulling fields from and uploading the file to
Attachments
Set to our contentDocumentLinks collection variable
Q: Why do we have a template within a template?
A: Sending using the edited template directly causes weird artifacts to appear in the email:
https://unofficialsf.com/wp-content/uploads/2022/09/largeUCSF-300x133.png00Alex Edelsteinhttps://unofficialsf.com/wp-content/uploads/2022/09/largeUCSF-300x133.pngAlex Edelstein2022-04-01 18:44:232022-04-01 18:44:28From Kerri Mesa: Send Branded Emails With Attachments That Can Be Edited Before Sending
Note: The functionality shown in this post currently requires that orgs be enabled for the Reactive Screens pilot.
QuickQuery works with data presentation components like Datatable and FlexCard to provide innovative, easy-to-use List View solutions. Let’s take a look:
Here, we’re looking at a screen flow on a record page. The screen being shown has a QuickQuery component on top and a Datatable component below:
You start by selecting the object you want to work with:
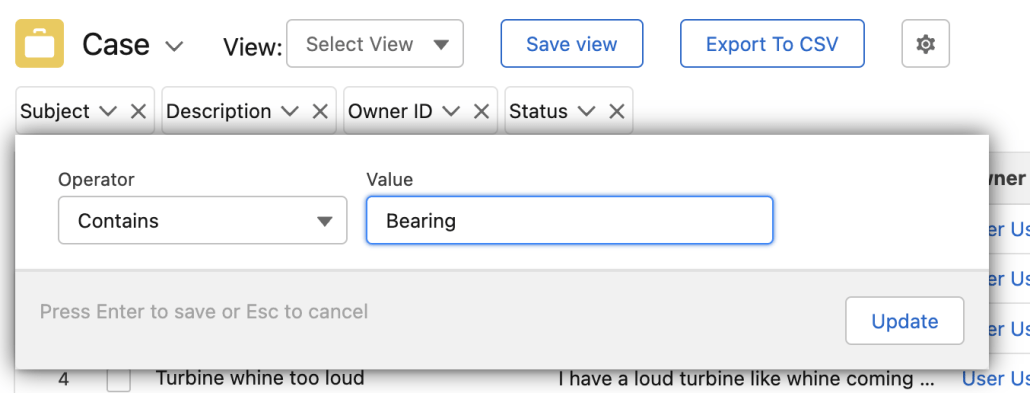
For each column that you’re currently showing, a ‘Filter Button’ appears. Use those to create fast filters, like this:
As you can see above, as soon as the filter expression is created, QuickQuery immediately runs a new query and passes the results to one of its outputs. In this Flow screen, the Datatable component is configured to take that output as an input. Because Reactive Screens is enabled on this org, the Datatable immediately updates to show the filtered results.
Columns and Sorting
Click the gear icon to choose the visible columns and set the sort order:
Creating, Updating and Using Views
A QuickQuery View consists of the Column and Sorting choices, plus the Filter Expressions. You can persist a view by clicking Save view:
Doing this will create or update a set of 3 records:
A FlowTableViewDefinition record stores information about columns, sorting and other table configuration data. This is used for Datatables in general and isn’t specific to Query Query.
A QuickQueryConfiguration record combines a reference to a FlowTableViewDefinition with configuration information specific to this component, such as which object is selected.
A FlowPersonalConfiguration record ties the QuickQueryConfiguration to a User ID. This ensures that when you load this component, you’ll only see the views you created, and not someone else’s view.
Exporting to CSV
An Export to CSV button has been added to QuickQuery to provide an easy way to quickly export sets of records
If you wire the output of a supported data component up to the input of QuickQuery, you can use the Export to CSV function by clicking on that button. Note that in order to make this work, you need to wire the output of the Datatable back into the input of Quick Query, so the Export button knows which records to export.
allows you to preset the object that the component is set to when it first loads
quickRecordViewId
Quick Record Views are saved as records and can be retrieved. If you pass in the id of a Quick Record View, it will be loaded automatically when the component loads.
Step 3 (Optional): Add the Quick Query Deployment flow to a Lightning Page
This package comes with a sample flow “Quick Query Deployment” that can be added to pages. Here, I’ve added it to a Home Page by adding the Flow component and pointing it at Quick Query Deployment flow:
Here’s what that looks like when the page is loaded:
At this point, you should be able to select an Object and see the results show up automatically. If no results are displayed, verify again that your org has the Reactive Screens pilot turned on!
Several new custom objects have been defined as part of this project:
QuickQueryConfiguration
QuickQueryConfiguration is specific to QuickQuery. It encapsulates the settings specific to a particular object. When you select an object in the object picker, its QuickQueryConfiguration is accessed to determine the current filter settings and the underlying FlowTableViewDefinition
FlowTableViewDefinition
This is a renamed version of the ers_DatabaseConfiguration object that was created for Datatable by Eric Smith. The purpose of this object is to define a table view, including things like the columns and their sort order. We anticipate that FlowTableViewDefinition can be used as a common standard across Flow extensions by anyone working with views. Note that this object is actually defined in Flow ScreenComponents Base Pack.
FlowPersonalConfiguration
The goal of this object is to provide a common way to allow individuals to personalize their experience. In the example below, a particular User, reflected by the general Actor ID, is linked to a particular QuickQueryConfigurationName (shown as an id here):
When QuickQuery initializes, it wants to start with the configuration last used by the user that’s running. So it queries to see if there’s a FlowPersonalConfiguration for the running User. If it finds one, it looks to see if any of the 10 available keys match what QuickQuery uses. If it finds one, as is the case above, it will load that particular QuickQueryConfiguration. This mechanism is designed to be used by multiple products. Basically, any product can query for FlowPersonalConfiguration and store configuration values in available ‘slots’. . Note that this object is actually defined in Flow ScreenComponents Base Pack.
https://unofficialsf.com/wp-content/uploads/2022/09/largeUCSF-300x133.png00Alex Edelsteinhttps://unofficialsf.com/wp-content/uploads/2022/09/largeUCSF-300x133.pngAlex Edelstein2022-03-18 06:06:002022-05-20 04:50:00Introducing QuickQuery, the extension that turns Flow into the best List Views
Version 3.5.0 of the Datatable component has been released. It adds some new features and fixes a reported bug.
The primary enhancements are the option to add a record count to the datatable header and an option to immediately navigate to the next flow element when clicking Save after any edits.
Please note that there is still an outstanding issue with sorting and editing changes being refreshed when the Datatable is on a flow screen that also contains a Section.
Updates:
Eliminate padding/margin for Table Border (Thanks to Jerry Poon)
Add option to Navigate Next when selecting the Save button for inline editing (Thanks to Idan Damari)
Rearranged the order of the options in the Table Behavior Section
Changed the Configuration Wizard to use the new FlowTableViewDefinition object from the ScreenComponentsBasePack instead of the ers_datatableConfig object
Added Created and Modified Date columns to the Configuration Record selection datatable
Added optional Record Count to Table Header
Added option to suppress the currency conversion introduced in v3.1.1
Bug Fixes:
Fixed bug when using a % character in a column label [Issue-1069]
https://unofficialsf.com/wp-content/uploads/2022/09/largeUCSF-300x133.png00Eric Smithhttps://unofficialsf.com/wp-content/uploads/2022/09/largeUCSF-300x133.pngEric Smith2022-03-15 08:37:222022-03-15 08:37:27A New Version of Datatable has been Released