Orchestrator is generally available and here’s an unofficial FAQ on how it will be priced.
How is it sold?
The product will be sold via a consumption-based approach where customers purchase a quantity of yearly ‘runs’ There’s also a way to enable non-Salesforce users to use these runs without purchasing Salesforce user licenses for them. (See below)
What’s the Freemium Allocation?
All PxE, Enterprise, Enterprise, and Unlimited Editions get 600 annual runs included (regardless of org size).
Pricing Before any Discounts?
It’s a consumption-based SKU which means you pay $1 per orchestration run, and it’s sold in yearly increments. Customers purchasing in volume can seek discounts, as is usual.
Is there a way to extend Orchestrator usage to non-Salesforce users in my org?
Yes. There’s a new ‘no-cost’ Limited User License in the works that is designed to be assigned to users who don’t already have a user license. This will allow them to log into Salesforce and participate in orchestrations. The license will have limitations on it, so it isn’t a substitute for a typical Salesforce license. Learn more here.
How do I quantify the number of runs I’ll need?
You buy a single quantity of runs that will last for the duration of your contract, so if the contract is a two year contract, specify a run quantity that matches your expected utilization in that time-frame. Runs do not roll over when the contract ends.
https://unofficialsf.com/wp-content/uploads/2022/09/largeUCSF-300x133.png00Alex Edelsteinhttps://unofficialsf.com/wp-content/uploads/2022/09/largeUCSF-300x133.pngAlex Edelstein2022-02-20 10:57:032022-02-20 10:57:08From Narender Singh: A Dependent Picklist That Support Default Record Types
If you are tired of keeping track of all the right commands you need to use to create and publish your own packaged components from VSCode, here are a couple of recent blog posts from Narender Singh and Eric Smith on how they’ve taken some of the complexity out of the process.
https://unofficialsf.com/wp-content/uploads/2022/09/largeUCSF-300x133.png00Eric Smithhttps://unofficialsf.com/wp-content/uploads/2022/09/largeUCSF-300x133.pngEric Smith2022-02-19 07:53:452022-02-19 07:53:50Add a little automation to publishing your packages from VSCode
Akihiro-san has done some of the most in-depth early consumption of Orchestrator. Here he demonstrates a number of techniques for lighting up approval processes.
Orchestrator goes GA in Spring ‘22 with new enhancements!!
Assignment to Queues and Groups
Reassignment of Work Items
Cancel a running orchestration
API access to trigger Orchestrations
I have been exploring the use of Orchestrator for approvals use cases. Previously I concluded that “I have confidence in replacing the approval process with Flow Orchestrator because I believe that new functionalities related to the approval process will be available at GA. My implementation of the approval process is a little bit complicated because of lacking standard functions such as supporting Autolaunched Flow, recall approval process (back to previous stage), standard actions (lock & unlock record, get queue member) but I am very excited to continue to watch new features. “
In this post I’ll look more deepily at approvals use cases using the GA Orchestrator feature set. I will show three approval process examples using a simplified Employee Time Off Application with minimum automated actions.
The second example is using the new enhancement of “Assignment to Queues and Groups”. Submitter and the first approver can choose either a user or a queue.
Example 3: User Can Dynamically Choose Next Approvers:
The final example makes use of the new enhancement of “API access to trigger Orchestrations”. Submitters can select one of the orchestrators to initiate new orchestration on Screen flow calling Apex action. This is a great enhancement because the user dynamically chooses any orchestrator on the fly. At this Example, the submitter selects a route table record containing three approvers and serial or parallel orchestrator during submit for approval. Again you can add functionalities that are implemented at case1 and case2.
Example 1: Simple Approval Process1 using the Manager Field
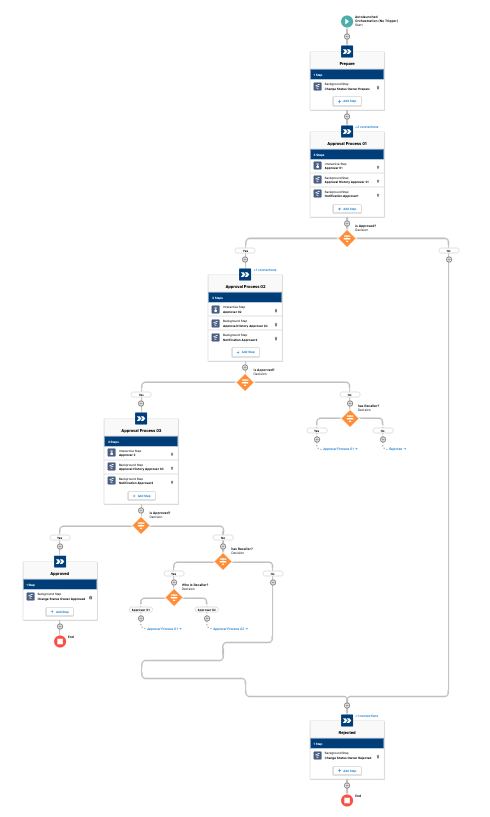
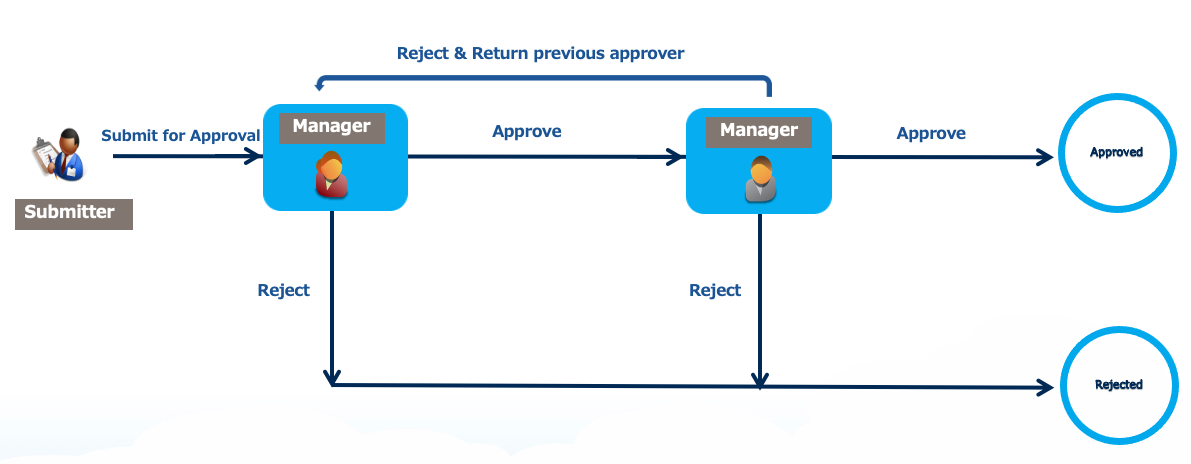
The first example is very simple and familiar with the legacy approval process. Automatically assign an approver using a manager field in the user table. There are only two approval steps but you can add more steps.
Features
Assign an approver using a manager field
Return approval request to previous approver after final approval
Track and view approval history
Custom ‘Lock Record Behavior
Custom notification
Eemail notification
Video
Creating Custom ‘Lock Record’ Behavior using Record Type
When the user clicks on this custom Submit for Approval button, the record type of the underlying record is changed. There are two record types, new and read-only with corresponding page layout
. This allows for these behaviors:
The Submit for Approval button vanishes. This is enabled in part by the recently introduced Dynamic Actions, a feature that allows admins to choose which actions need to appear in the Highlights Panel on the object’s record page
The new record type is linked to a read-only page layout, creating the effect of a Lock Record process.
Additional Notes:
There is one concern that required fields can not be Read-Only in the layout. Since those fields are always editable, I decided that no fields are required at this object.
Replace “New” button : There are two reasons for replacement of New button. Users can not skip record type selection page for default new button and after hitting new button, screenflow shows record creation form with validation of required fields.
Custom Notification
The Messaging Notification(?) action is used to generate custom notifications:
Work Guide Usage
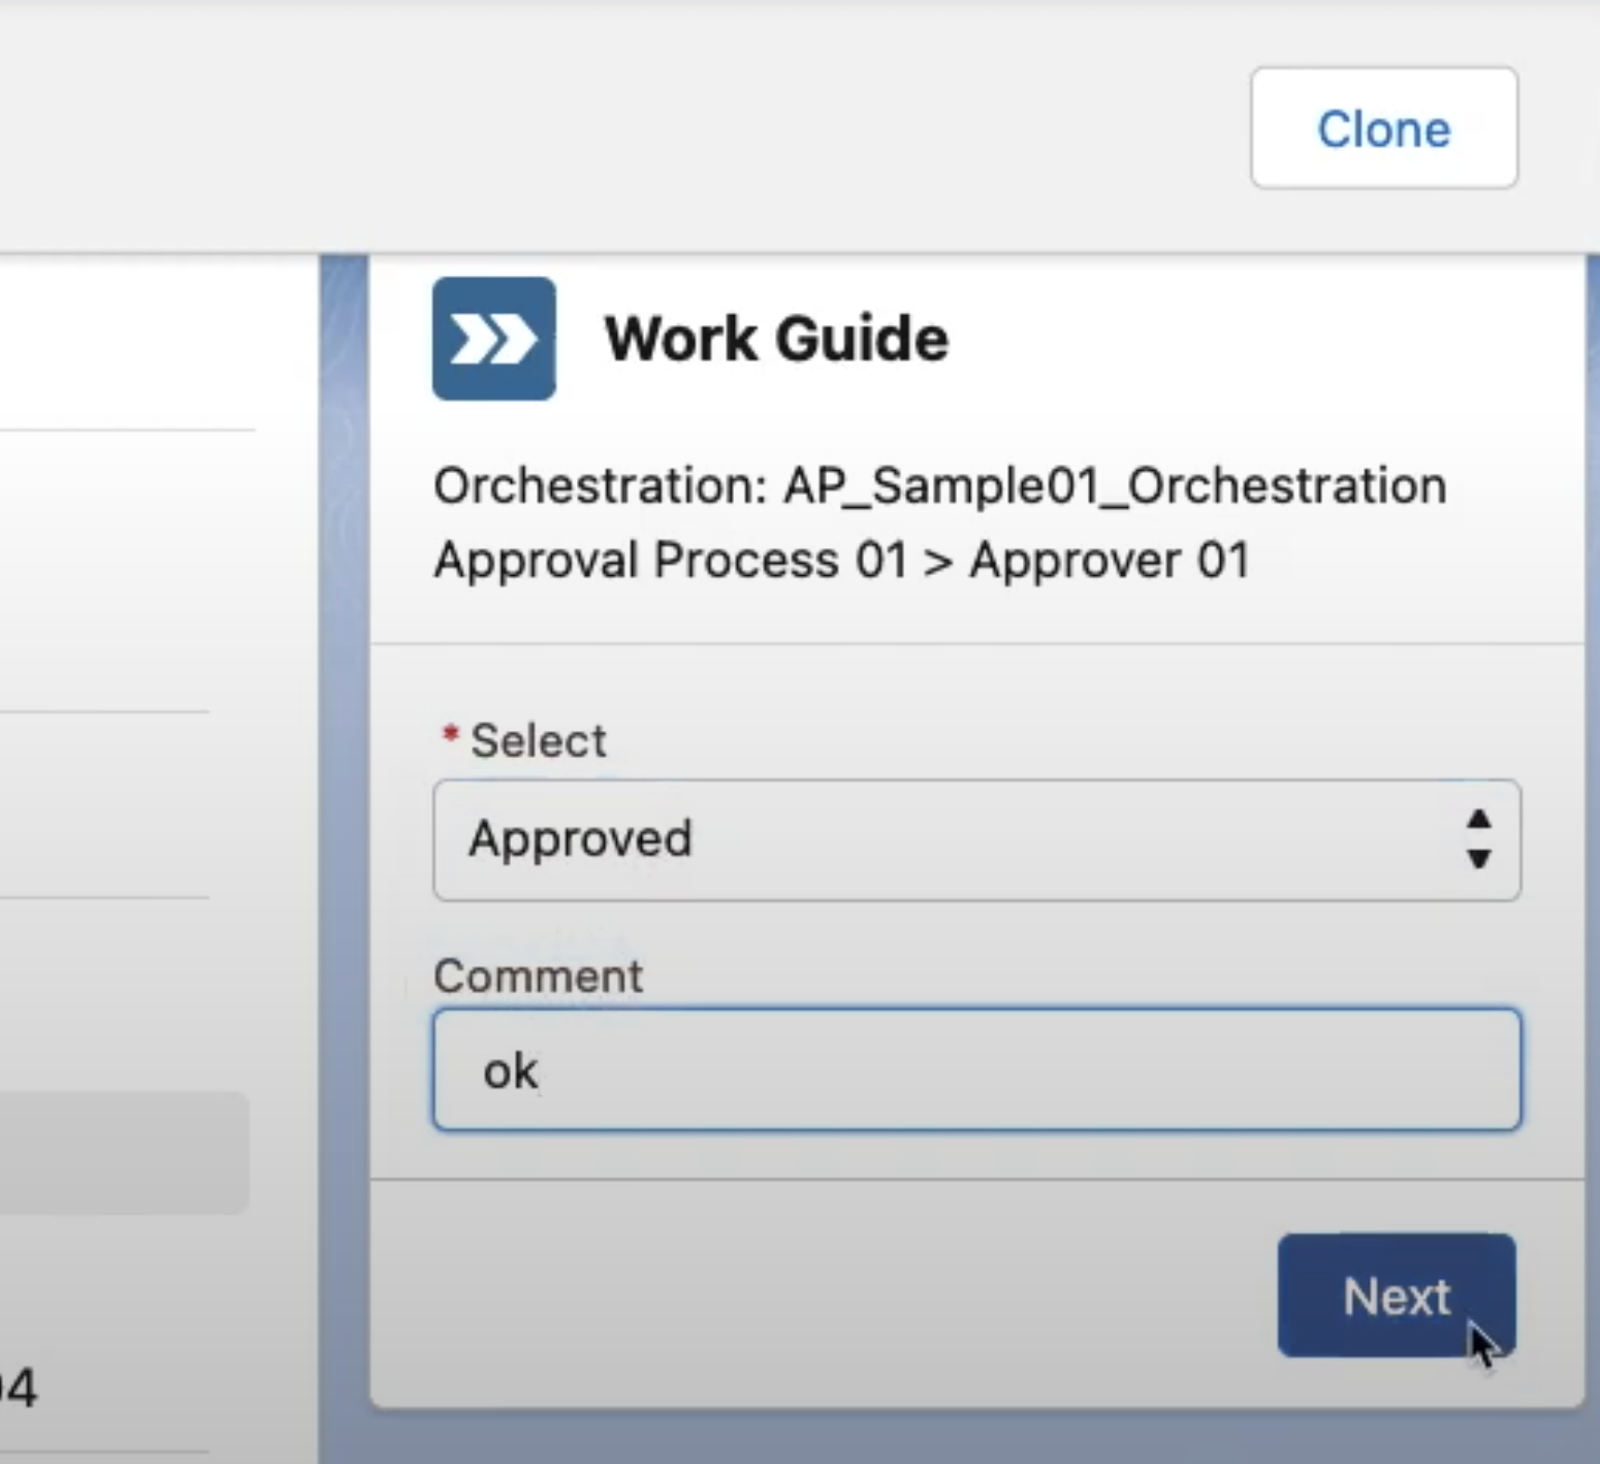
Approval is done in the Work Guide, where conditional field visibility shows only the necessary fields:
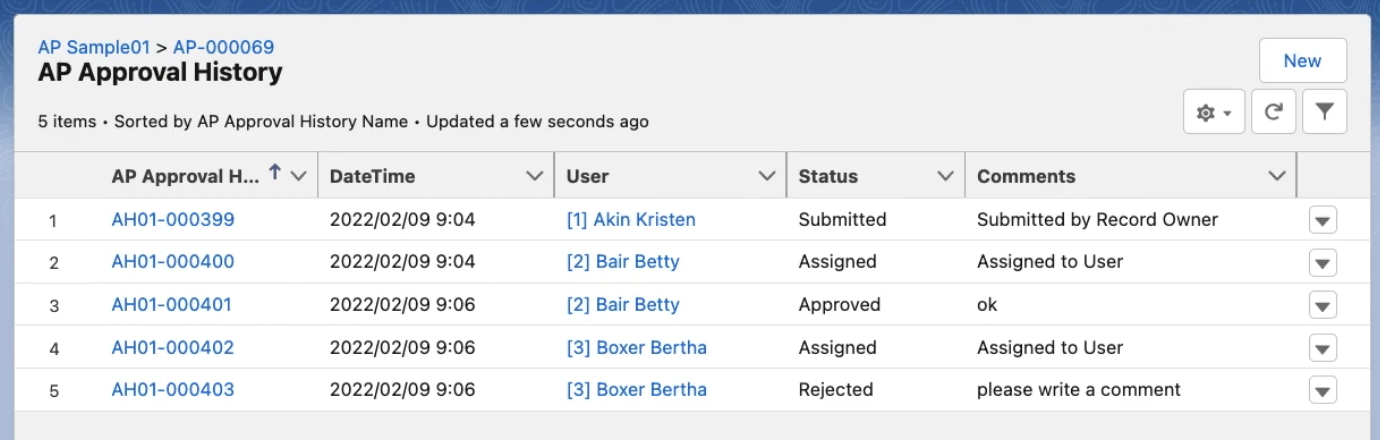
Approval History
Approval History items are logged to enable the full history to be easily views:
Recording
Orchestration
Example 2 Approval Process Using Queues/Groups
The second example highlights the abillity of Spring ‘22 Orchestrator to “Assignm to Queues and Groups”. This example doesn’t provide a way to return the approval request to other approvers but you can easily add that as was shown in Example1.
Choosing a Queue with a Custom ‘Submit for Approval’ Flow
Recording
Orchestration
Example 3 :User Can Dynamically Choose The Next Approvers
The final example demonstrates the power of the new feature “API access to trigger Orchestrations”. Submitters can select one of the orchestrators to initiate new orchestration on Screen flow calling Apex action. This is a great enhancement because the user dynamically chooses any orchestrator on the fly.
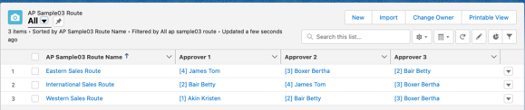
To enable this, I created a custom object called a route table where I can configure different combinations of approvers:
Features
route table (custom object) containing three approvers
choose either parallel or serial orchestrator
return the approval process to other approvers at serial mode
approval history
lock / unlock record
Change record owner to System User so that submitter and approvers can not edit
custom notification
email notification
When the record is submitted, this version of the orchestration let’s them choose between Serial and Parallel, and lets them choose one of the predefined routes:
Serial mode
Parallel mode
Recording
Orchestration
Serial mode
Parallel mode
Legacy Approval Process Features
There are legacy approval process features and corresponding implementation ideas on Orchestration.
Create an Approval Process with the Standard Wizard
Record-Trigger Orchestration can narrow down records that can be part of the approval process with setting entry conditions
Dynamic action can control action buttons on your record pages. You can set action visibility in order to hide/show your action button that executes your Autolaunched Orchestration
There are three ways to implement “No one can edit a record after submit for approval except admin” functionalities in my examples. The legacy approval process allows administrators to edit or the both administrators and the assigned approver to do. In case you need that the assigned approver also edit a record, “Changing record owner” may be one you take. Before assigning a work item to an approver, the record owner is updated to the approver in flow.
Example1 : Dynamic action,record types, replace new button
Record-Trigger Orchestration can not set an entry condition with a hierarchy field. So you need to go a long way around to achieve it.
flow action
Dynamic action can control who can submit records to an approval process
screen flow
Update records element update field value
Updating field value kicks your Record-Trigger Orchestration
Dynamic action can control action buttons on your record pages. You can set action visibility in order to hide/show your action button that executes your Autolaunched Orchestration
Orchestration with User, Queue, and Group resources implement most ways by the legacy approval process except two things.
Difficult to implement delegate approval request to other
When multiple approvers (Queue or Group) are selected, ONLY “the first response to the approval request determines whether the record is approved or rejected.” is supported by Orchestration
When an interactive step in an orchestration runs, it creates a work item and assigns it to a user, group, or queue. You can now reassign a work item that hasn’t been completed to a different user, group, or queue. more detail
You can now cancel in-progress orchestrations from the orchestration runs list view. more detail
Conclusion
Orchestrator CAN be a replacement of the legacy Approval Process and implemented with a more complicated scenario. But in case the legacy approval process supports your requirement, then implement it by legacy one. Otherwise you develop your own approval process on Orchestrator. Before Approval Process Flow Templates will be officially distributed, we utilize a hybrid of the legacy and orchestrator for the approval process.
Here’s a quick teaser trailer showing how Orchestrator enables the Case Management life cycle to be reimagined.
We don’t yet have this available as a packaged template. But keep your eye out for packaged orchestration templates like this one that can be easily modified.
Developers thinking about adding a great configuration experience to their invocable actions and screen components should check this great new video out:
Customers need to be able to build a solution that supports the following scenarios for teamwork and multi-stage work:
Wanting in day changes to the Crew Member/Job Assignment i.e. a crew member called in sick on Monday and we need to send someone in just for that day
Partial job assignment to a new Crew Member for a single day of the multi-day i.e. tech assigned on Monday but will see the whole week on the mobile app and also doesn’t get alerted or have an Assigned Resource created
When various resources are required throughout the duration of the job i.e. need someone with troubleshooting skills for the first day, then a mechanic the second day, then an electrician the third day (team approach)
This will provide a stop-gap accelerator-style solution that will be an unmanaged package with access to the source code for customers to modify.
General Capabilities and Principles
Leverage the knowledge of the dispatcher to generate a collection of Service Appointments (SAs), assigned to designated Service Resources (SRs or techs) by creating Assigned Resource (AR) records. It improves the end-user experience for the creation and maintenance of a large number of SAs which would be administratively burdensome, if not impossible, to do with the out of the box capabilities.
This tool provides an alternative to using the Salesforce Field Service Crew Management and Multiday Work features. This does not provide an automatic, project-like scheduling tool, it’s intended to enhance multi-resource assignment capabilities.
Generate SAs and Assignments based on the Dispatcher’s direction.
Create 2 weeks’ worth of SAs, with the option to include Saturday and/or Sunday, for Gloria and Alan for this Work Order.
Generate an ad hoc batch of SAs to staff a night shift for a given period of time.
The customer reduced the due date which requires an overnight shift to be added for the job to finish on time.
View the SAs for a Work Order and edit them in an easy, spreadsheet-style way.
The customer wants the job finished sooner, which means we need to add 2 hours to each SA Duration.
Selectively Delete SA and Delete all SAs.
The customer called and says we can’t be on-site for a set of days or wanted to cancel the whole job.
Move jobs from one resource to another.
Fred is out for 3 days so move a set of his appointments to another Service Resource.
Push some or all of the jobs N days into the future or to a new date.
The customer says we can’t be on-site for a set of days, so shift all appointments to when we can go back on site.
Phase 1 Features
(MVP) As a Scheduler, I know what jobs my resources are working on. I should be able to:
Set the Service Appointment Parameters I need to determine the first date on-site, the last date on-site (or in the batch), the Start Time, the Duration on-site.
When I’m scheduling jobs outside of my Timezone, I want to be able to be clear about what Timezone I am creating the Service Appointments for so that I can properly offset the Start Time in the Service Appointment Creation Parameters screen.
I need to be able to select from a list of Service Resources that have a Primary or Secondary Territory Membership record of the Service Territory of the Work Order (or manually selected).
In the Resource selection list, I want to know if the Service Resources have any existing Absences and/or Service Appointments already assigned to them during the date range selected so I can select the Service Resources that have the most availability.
In the Service Appointment Creation Review list, I need the ability to NOT create some Service Appointments for some Service Resources on some dates because they only need to be on-site for some of the days in the batch.
I need all created and Assigned Service Appointments to appear on the dispatcher console as soon as they are assigned and I need any updates made in the dispatcher console to reflect in the data table Service Appointment review screen (and vice versa).
I need the ability to create and assign additional batches of Service Appointments that may include night shift and/or off-shift coverage to shorten the elapsed duration of the job.
When I create new assignments, I’d like to be guided by the dates of the SAs that have already been created so I know where to create the next batch of SAs (visibility on the summary table).
When I create additional assignments, I’d like to be guided by the overall Work Order Start and End Dates so I don’t create SAs outside of this date range (visibility on the summary table).
I want the option to create a single batch of Service Appointments for more than 14 days (up to 16 weeks) if I know I only need 1 or 2 resources to assign work and know I will be well below the tool limits of 1000 SAs in the Data Table.
I want to be able to review all of the Service Appointments and Assignments across all of the days so I can see everyone who has been assigned.
I need to be able to move all or some of the Service Appointments to another start date so I don’t have to manually update each appointment start date/time.
I want to be able to edit the Scheduled Stat and/or the Duration of selected Service Appointments and have the Scheduled End recalculate for me so I don’t have to worry about calculating and updating that field myself.
I want to mass delete all or selected open assignments if the job gets rescheduled or canceled to simplify the data management of deleting each one manually.
I want to reassign all or some of the open assignments if a resource becomes unavailable (team shuffle) to simplify the data management of reassigning each one manually.
End-User Guide
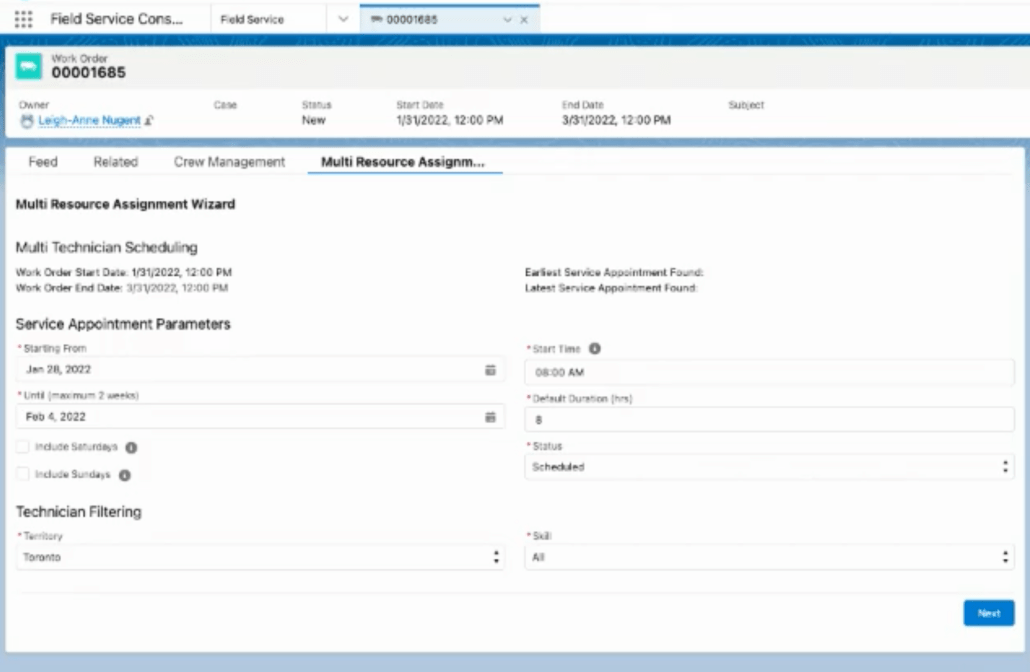
Create SA Screen
Parameter screen
When there aren’t any Service Appointments for the Work Order, you will be presented with the Service Appointment Parameters including the technicians you want to surface.
The Start Time is presented in the Users Salesforce Time Zone. Consider the TimeZone offset if you are creating Service Appointments in a different TimeZone.
Service Resource selection table
This Data Table will show you all the Service Resources a dispatcher can select to assign work to.
Select as many resources you would want to add to the job.
Service Appointment selection table
This Data Table will show you all draft SAs for the entire duration of the job and for each tech.
Select the SAs to keep; you can select all the rows and deselect the ones you don’t want.
Can sort by Scheduled Start Date or Service Appointment.
Can inline edit the Scheduled Start Time and Duration.
Edit SA Screen
When there are Service Appointments for the Work Order, you will be presented with two options: Edit SAs or Create SAs.
Edit SAs
This Data Table will show you all Final SAs for the entire duration of the job and for each tech. Can inline edit the Scheduled Start Time and Duration.
You will have three new options as well as a Data Table.
Change Service Resource – Use this feature when you have to shift a set of SAs to new Service Resource.
Select the SAs you would like to reassign in the Data Table.
Select the Service Territory and Skills to build the list of Service Resources to select.
Select the Service Resource from the Data Table.
All Assigned Resource records will be updated to the new Service Resource.
Shift Appointment Dates – Use this feature when you have to shift a set of SAs to new start date.
Input the start date and the end date range of the SAs to move.
Input the new date to shift the SAs to.
Delete Service Appointments – Use this feature when you have to delete an ad hoc set of SAs.
Select the SAs you would like to delete in the Data Table.
Create SAs
You will be redirected to the create Service Appointment parameters screen.
Delete All SAs
Use this when you need to delete all of the Service Appointments.
Considerations
Datatable presents date/time in the user’s machine settings, not Salesforce User TimeZone or the Service Territory TimeZone.
The max number of rows of Service Appointments the Data Table can display is 1000 rows. Keep this in mind when creating your Service Appointment batches. Its recommended to create batches 2 weeks at a time to keep the numbers down for performance.
Validation rules are caught when you try to save the records (you won’t see them in the table).
Any scheduling conflicts will have to be resolved in the Gantt based on rule violations.
You won’t see the list of Skills each Service Resource has in the table.
If you don’t select any rows in the Service Appointment creation table, you could possibly not create any SAs.
It’s not recommended to mass edit the Date/Time fields in the Data Table Service Appointment. It will update all the records to be the same date and time; you won’t only just update the date value.
If you back out of the flow or sit in the flow screen for over 10 minutes, you might have SAs in a Draft status until the Delete Service Appointment Triggered Flow comes in to delete them (but this time frame can be changed in the flow).
If an appointment is shifted and crossed a daylight saving transition period, this will have to be manually adjusted as it is not accounted for in the solution.
The Service Appointment edit table is not filtered by status but can be configured if desired.
Consider the implications when the package is retired if/when this feature is added to the Product long term roadmap
It is recommended to document the configuration in detail to then determine if something would require refactoring or removal.
Developer Guide
Data Model
Service Appointment Fields
MR Service Resource – this is the Service Resource that the Dispatcher has assigned. It is used to create the Assigned Resource record when creating a new Service Appointment.
MR Parent Work Order – this is the Work Order that owns the Service Appointment.
MR Creation Status – Picklist of Draft, Confirmed, Deleted, This is used to drive the creation process as well as the automatic deletion of Draft SAs that don’t get confirmed or deleted (user just exits the flow with completing)
Work Order Fields
MR_Estimated_Calendar_Days__c
MR_Hours_Actual__c
MR_Hours_Completed__c
MR_Hours_Created__c
MR_Hours_Scheduled__c
MR_Hours_To_Be_Assigned__c
MR_Hours_To_Be_Created__c
MR_Number_of_Techs_Needed__c
MR_Total_Hours_Required__c
MR_Trigger_Cleanup__c – Used by the time based workflow to delete Draft SAs
MR_Trigger_Date_Time__c – Used by the time based workflow to delete Draft SAs
Service Territory Member Fields
MR Resource Name – formula field to display Service Resource Name
MR Service Territory – formula field to display Service Territory Name
Automation
Flows
MR DT Service Appointment Main (name = Multi Resource Assignment Wizard) – calls Creator, Review and Delete
MR DT Service Appointment Creator
MR DT Delete Service Appointments – Mass delete all of the SAs for a Work order
MR DT Service Appointment Review – Update, Change Techs and Delete selected SAs
MR DT Trigger Delete Flow – Time Based flow which deletes Draft SAs that have not been confirmed within 10 minutes (parameter can be changed)
MR DT Update sched end time – Record Triggered flow to recalculate SchedEndTime if SchedStartTime and/or Duration change.
Apex Classes
WOSchedulePayload – Class used to contain the parameters set by the user and pass them to the batch apex job
MRDTAssignment – Assigns SAs to their Assigned Resource – called by MR DT Service Appointment Creator
MRDTGETSTMs – Returns filtered list of STMs based on Territory and Skills and Start / End Dates
MRDTReassignTechs – Called by MR DT Service Appointment Review Flow and used to reassign existing SAs to a new Resource
MRDTSchedMultiVisit – called by MR DT Service Appointment Creator and is used to create the SAs initially
MRDTDateShift – move selected appointments to a new date
MRDTSAValidateUpdate – update any discrepancies between manual updates to SA, like a drag and drop, with the MR_Service_Resource field. return list of SAs to the Review flow along with count of SAs.
MRDTGetTimeZoneInfo – returns the timezone offset between the running users timezone and selected service territory’s timezone. This is used by the MR DT Service Appointment Creator flow to generate a warning message to the user if the timezone offset is not 0.
Test Classes
WOSchedulePayloadTestClass
MRDTAssignmentTestClass
MRDTGETSTMsTestClass
MRDTReassignTechsTestClass
MRDTSchedMultiVisitTestClass
MRDTDateShiftTestClass
MRDTSAValidateUpdate
MRDTGetTimeZoneInfoTestClass
Platform
Permission Sets
MR DT Permission Set – grants access to all of the fields and classes above
Other Requirements
Prior to use, you must deactivate Service Appointment Validation Rule called: Dont_allow_scheduled_or_dispatched
Deactivate Validation Rule on Service Appointment called: Dont_allow_scheduled_or_dispatched
Assign Permission Set to Users who will use this package: MR DT Permission Set
Add flow to work order page: Multi Resource Assignment Wizard
Optional Configuration Steps
Update Flow Screen messaging to suit your business process
Other fields to display in the Data Tables to suit your business process
Related Requests, that are not related to the SA Generator solution
We heard these other requirements that would improve the end-user experience. Consider building something yourself to help with these.
As a Scheduler, I want to be able to go to the Dispatcher console and visibly identify the Service Appointments for the Work Order so I don’t get confused with all the jobs on the Gantt.
As a Scheduler, I want an easy way to clone a Service Appointment from another Service Appointment on the Dispatcher Console so that it is easy to add another appointment for one more day.
Feature Requests
Jobs to be Done
Status
Next Steps
As a Scheduler, I’d like the flexibility to select the Timezone I’d like the Service Appointments to be scheduled in when setting up the initial parameters. Design note: Data table renders the Date/Time fields in the context of the MACHINE settings. Also, mass edit doesn’t only update the start time, it updates the date and the times.
Captured
Review and determine next step
As a Scheduler, in the draft Service Appointments list, I want to know if that SA has an existing Absence or Service Appointment on that date so I can immediately see the conflicting record for that specific Service Appointment (or use any ensuing Gantt violations as guard rails for the dispatcher to use to tweak the schedule for a given Work Order).
Captured
Review and determine next step
As a Scheduler, I want to define the Skills required at the Work Order and have the Match Skills rule consider that the combined Skills of the people I have Assigned to the WO will fulfill the Work Order Skill Requirements.
Captured
Review and determine next step
As an Admin, I want to be able to modify the screen flow so that I can insert another Data Table displaying the individual dates with start times and durations before seeing the Resources to select so that the rough schedule can be created before selecting the resources that will be assigned.
Captured
Review and determine next step
As a Scheduler, when I am deleting a set of SAs, I’d like an additional confirmation screen so that I don’t accidentally delete records.
Captured
Review and determine next step
As a Scheduler, I want the option to let the scheduling engine select the resource based on a defined Role required for each SA (extended match).
Captured
Review and determine next step
As a Scheduler, I’d like to have a job template that could create WOLIs with the required skills (sub-work types) that can be applied for each Task.
Captured
Review and determine next step
As a Tech using the app, I need to see who else is going to be on-site on the same day so that I can see if I can carpool with someone.
Captured
Review and determine next step
As a Tech using the app, I need to see the tool that was assigned to me so that I can bring the right tool on site.
Captured
Review and determine next step
As a Site Supervisor using the app, I need to see all of the people who are staffed on the job each day so that I know who to expect and when (they are ok seeing the data table in the App).
Captured
Review and determine next step
As an Admin, I’d like to have access to Setup Controls to help identify which automation to enable.
– Status Filters for SA edits – Align Earliest Start and Due date if the Scheduled Start/Scheduled End is updated – Set how long the Draft SAs stay in Draft – Error Message and Screen Message Templates
Captured
Review and determine next step
As an Admin, I want to be able to bring the component into Custom Gantt Actions to Create SAs, Edit SAs (make the component a VF Custom Gantt Action)
Captured
Review and determine next step
https://unofficialsf.com/wp-content/uploads/2022/09/largeUCSF-300x133.png00Alex Edelsteinhttps://unofficialsf.com/wp-content/uploads/2022/09/largeUCSF-300x133.pngAlex Edelstein2022-02-08 08:43:332023-08-28 10:32:27Salesforce Field Service: Create Batches of Appointments with Service Appointment Generator
Mun always seems to come up with super clever extensions to Flow. His latest takes Nick Sauer’s excellent Map component and enhances it so that you can drag a map marker around the map!
Generally you won’t use the Actions Base Pack directly. Rather, you’ll be guided to install it as a prerequisite for other useful Flow extensions.
In order to get published on Salesforce App Exchange, it’s necessary to complete a security review and be packaged as a managed package. The version of Actions Base Pack that’s published on App Exchange is guaranteed to have completed that security review.
Should we publish more components on AppExchange?
There’s an overhead cost to processing extensions for App Exchange. We’ll be looking for signal from the ecosystem to see if making this extra effort results in greater adoption of these extensions.
Note that, due to the overhead of passing security reviews, the version published on App Exchange won’t always be the latest version available at UnofficialSF.com. For example, the first version to be posted is version 2.35, but there’s a later version 2.36 available at UnofficialSF.com
https://unofficialsf.com/wp-content/uploads/2022/09/largeUCSF-300x133.png00Alex Edelsteinhttps://unofficialsf.com/wp-content/uploads/2022/09/largeUCSF-300x133.pngAlex Edelstein2022-02-07 12:31:532022-02-07 12:31:59Flow Action Base Pack Now Available on AppExchange
Jeff Kranz over at Riskonnect found a nifty way to utilize the new Collection Filter action to easily convert records selected in a screen choice to a record collection without any Apex. Check out what he sent over!
Screen Choices and their corresponding Choice Sets have come a long way over the years, but there are still some stumbling blocks when it comes to using them for real-world use cases. One of these remaining challenges is extracting the selected values of a multi-select Screen Choice component. Instead of a collection that you can easily process in a loop or send to an apex action, it gives you semi-colon separated text of the selected values. Over the years, there have been some clever workarounds, and some helpful apex actions from the community, but now with enhancements from Spring 22, we can “convert” those selections to a record collection without an Apex Action and more efficiently than previous workarounds.
First, lets set up an overly-simplified, admittedly-contrived scenario.
As a Sales User, I want to view and select one or more Contacts related to an Account, So that I can [do something valuable- remind them of an upcoming event?].
There are always several ways to skin a cat in Salesforce, so lets not get hung up on alternative features for this use case, but rather the general idea of using record collections to let a user make a multi-select choice and then operate on those selected records.
Let’s Build!
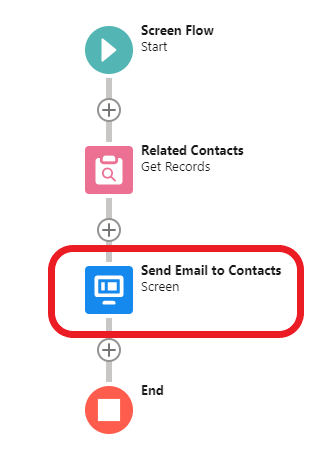
The basic idea is straightforward. Here are the pieces:
Build a collection of records for user selection (through a Get or otherwise)
A screen that presents the user with those records as choices.
Filter the record collection to to just the records that the user selected.
Profit!
Build a collection of records for user selection
In the past, you may have reached for a Record Choice Set to fill out those choices. You can still do that, but for our solution to work, we’ll still need a collection separate from the choice to work with, so we’ll use the new Record Collection Choice Set feature by placing a Get element before the Screen to retrieve the related Contacts and use that as the source for a Record Collection Choice Set.
A screen that presents the user with those records as choices.
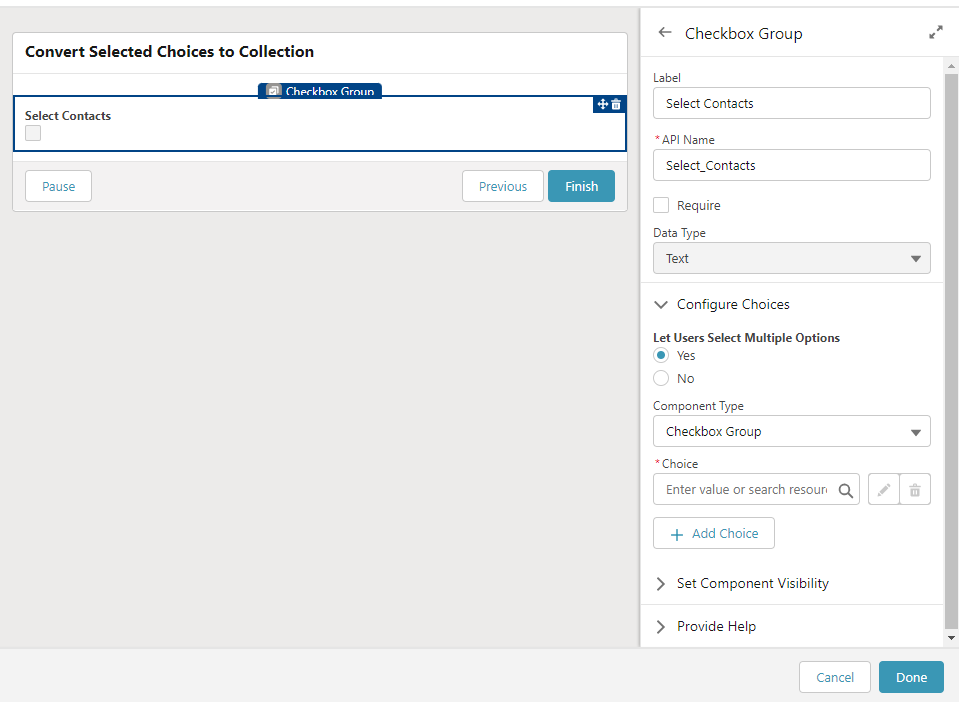
We’ll need at least one screen that has our Choice (we’ll use the Checkbox Group component), configured to use the Record Collection from that Get as the source for the Collection Choice Set.
Filter the record collection to to just the records that the user selected
Here’s the fun part. When the user reaches that screen, they should see something like what you see on the right here, allowing them to select multiple choices.
If you’ve configured multi-select choices, you’ll know that when you reference these selected values later in the Flow, you’ll get something like “XYZ0000000001AAA;XYZ0000000002AAA”. That is, a semi-colon separated text value.
Ok. Thank you. But… not very useful.
Let’s turn that into a collection! But first, we have to do a little workaround to make those selected choice values play nicely in our Filter formula.
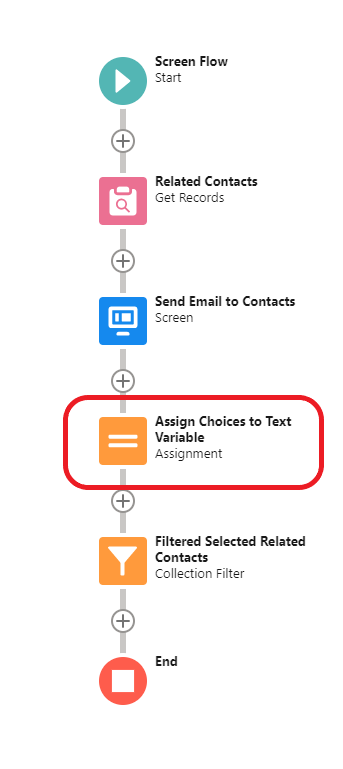
“Assign Choices to Text Variable” Workaround
After the screen, but before the new Filter we’ll be adding, place an Assignment element, and assign the Checkbox Group Screen Component reference (which stores the semi-colon separate values) to a text variable. I won’t go into detail over why you must do this – mostly because I don’t know for sure – but you do need to do it, and I suspect it has to do with the way that choice values can sometimes return the label instead of the value for its value. Nevertheless- this one simple trick will help our next step work.
Filter to “Convert” Original Collection to Selected Records
Now, we can go ahead and create that Filter to give us just the records that were selected in the Screen Choice. The filter should be configured to use a formula, and that formula should use the CONTAINS() function to match only the records that are one of the selected values (using your text variable assigned in the previous step) against the ID value for each item in the collection you are filtering.
Verify Our Expectations with Debug Before We Build Out Further
Before we even move forward with trying to build out more processing on the collection we are now expecting, we can use the Debug mode to Confirm that it is working the way we think it should. If run Debug for an Account record that has Contacts, and select a couple of them, we can see that we’ve now got a record collection of those Contacts available to us for processing in a Loop:
Conclusion
In this post we learned how to turn the selected values from a Screen Choice into a Record Collection of those choices that you can use to operate on in the Flow without any custom apex or third party packages.
You might conclude that it is still some additional overhead, and I might agree. If you can, a custom screen component like UnofficialSF’s DataTable, or this DataTable component, can provide a much more robust, concise Flow configuration for a situation like this. But many of us find ourselves needing to work within the bounds of what tools we get out-of-the-box, and this new approach we can take to converting selected choices into an actionable collection is much more concise and expressive than what we’ve been able to do previously, and I highly recommend considering this approach when you’ve got this kind of restriction and a use case with this kind of need. Happy Flow Building!
https://unofficialsf.com/wp-content/uploads/2022/09/largeUCSF-300x133.png00Adam Whitehttps://unofficialsf.com/wp-content/uploads/2022/09/largeUCSF-300x133.pngAdam White2022-02-01 07:26:542022-02-01 11:23:04From Jeff Kranz: Use Collection Filter to Convert Selected Screen Choices to a Record Collection Without Apex


 . This allows for these behaviors: