Better Call Scripting with AgentScript Flow Screen Component
AgentScript provides a way to add high visibility script blocks to your flow screens. Check it out!


AgentScript provides a way to add high visibility script blocks to your flow screens. Check it out!
This extension includes a flow that will generate Apex test classes for a selected target flow. A good example and use case is shown in this video:
Autolaunched Flows can be launched via a REST or Apex call. That means that you can create tests that invoke the flows, passing in specified inputs, and inspect the outputs from the Flow to see if it’s returning the expected result.
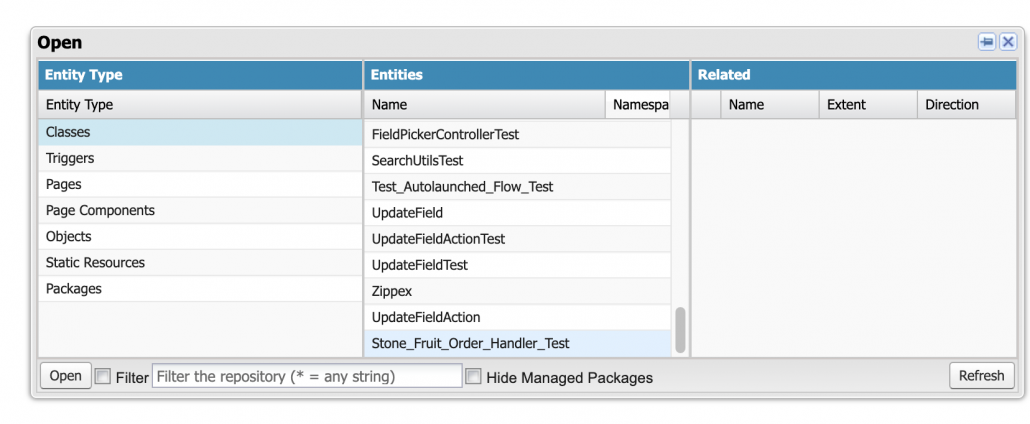
This Flow Autotest package installs a flow called Flow Test Generator. When you run it, you’re asked first if you want to Add, Edit or Delete a FlowTest. FlowTest is a Custom Object that stores the information specific to one test and its assertions:

Creating a new test involves first selecting the target flow, which must be an Autolaunched flow:

For each test, configure the desired combination of flow input values:

Then define the tests you want to run on the resulting flow output values:

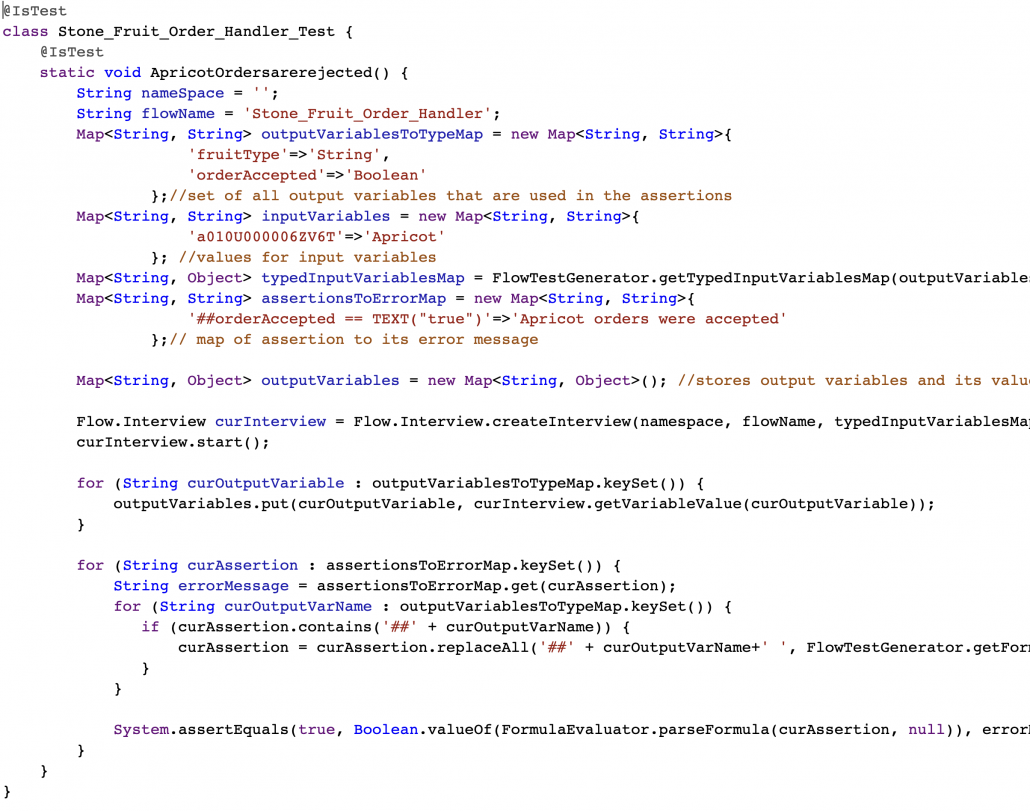
The test class will then be generated. At this time, you have to add it manually to your org using Developer Console.
2/26 V3.0 Production Sandbox – Works with V3 Action and Screen Components Base Pack versions.
Old Versions
Version 1.0.2 Unlocked 9/3/21
NOTE: The Flow Base Components package has been superseded by the Flow Action BasePack and Flow Screen Component Base Pack. If you’re a developer, use those as your prerequisites.
Most components available on UnofficialSF now use the Actions Base Pack and Screen Components Base Pack, described above. A few existing older components still use and require the original Flow Base Components.
As more Flow extensions get built, some components are proving to be popular and reused. To manage this more effectively and minimize conflicts that prevent installation, we’ve created this single base component library. If you want to use one of these components, we recommend that you make this package a dependency and reference the components here. This will help ensure your extension can be easily installed.
There isn’t going to be a managed package version of this because that would put the lightning components into a custom namespace, and lwc doesn’t currently allow lightning components to be used across namespaces
The current components included in Flow Base Components are:
A full expression builder. Generates formula strings for output, and these can be evaluated at runtime by the Evaluate Formula action, which is part of this package.

This is essential for any custom property editor. It provides a picklist showing upstream merge fields.

A full formula builder. Generates formula strings for output, and these can be evaluated at runtime by the Evaluate Formula action, which is part of this package.
Provides a drop in component for selecting Objects or Object/Field combinations.
A simple local action that pops a toast up. Works with Screen flows only.

A screen component that can retrieve or deploy any salesforce metadata.

All of the classes and components in this repo have been given a prefix of ‘fbc_’ this looks a little like a namespace but it is not. This is an unlocked package in the c namespace.
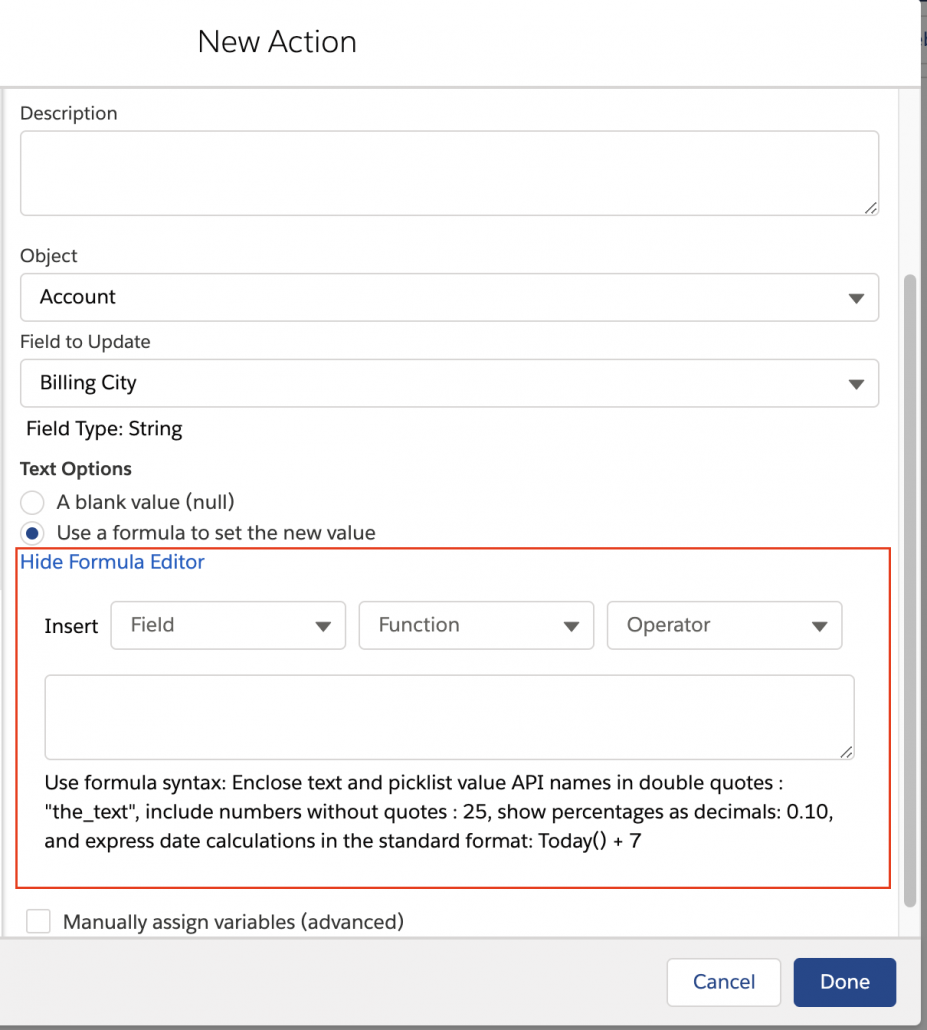
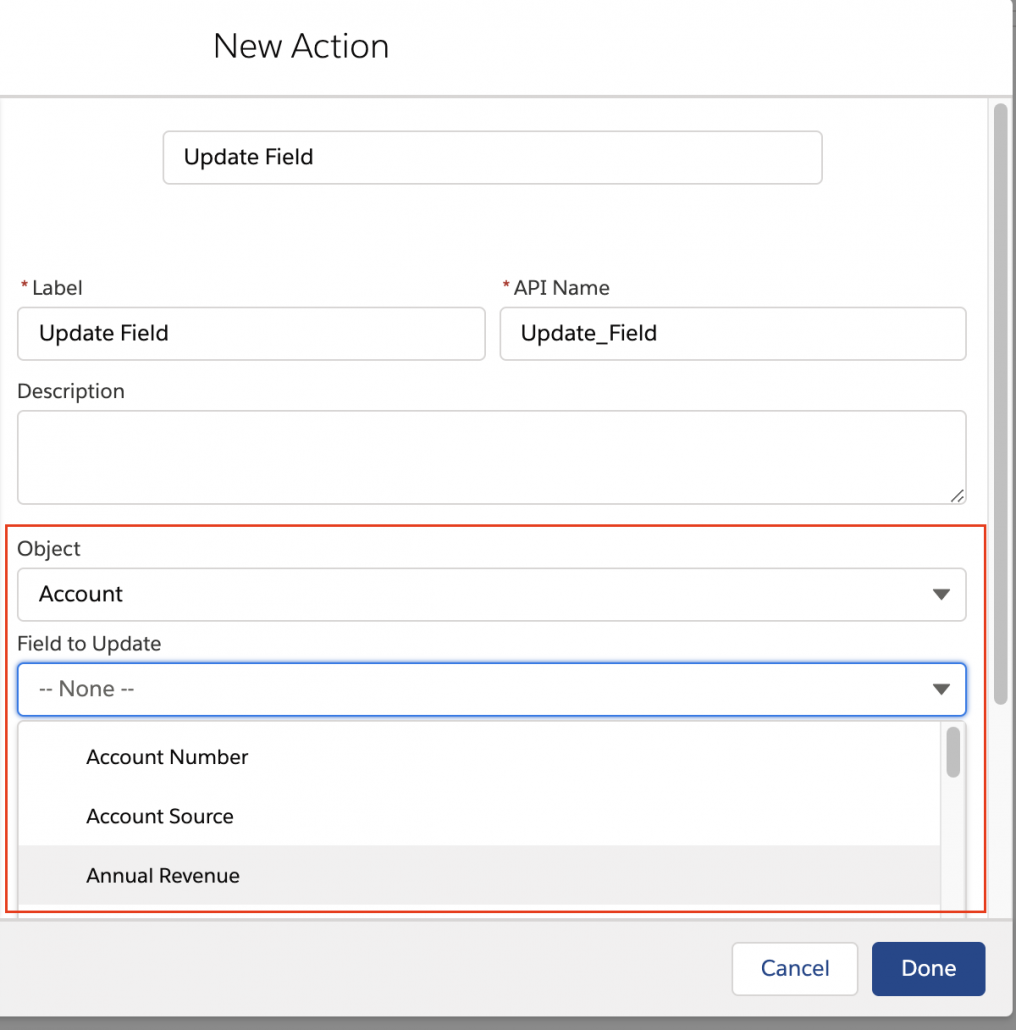
For sample code showing how to reference these, take a look at Update Field, a Flow Action that makes extensive use of this base component package. Here are some examples:
Referencing a base screen component
Pay particular note to the mixed use of hyphens and underscores:

Referencing a class method

Referencing methods and components from an lwc
Note the different syntax:

10/4 fixed test bug.
1.3.3 Unlocked 10/1 fixes QuickChoice naming conflict
1.3.2 Unlocked 9/26 Adds QuickChoice and DualListBox. Also reduces the size of the MetadataService file to avoid the ‘1 million character’ limit.
1.2.6 Unlocked
9/3/20 – Eric Smith – Updated to Escape and Unescape the {} characters so the metadata string value can be handled by a flow
1.2.5 Unlocked 9/1
9/1/20 – Eric Smith – Added Extracted Metadata String and Escaped Metadata String outputs to the RetrieveMetadata and the TransferMetadata components
1.2.4 bug fixes
1.2.3 bug fixes to Flow Combobox
1.2.2: improvements to Transfer Metadata
In version 1.2.1, Flow Base Components gains:
Flow Base Components already contains:
Old Versions
Probably destined for the Academy Award for 2020 for Best Flow Short. Check it out!

This solution features a neat use of Custom Metadata Types to store sets of related values for user creation. Check it out!
This Post was most recently updated on: 4/16/23
Key Contributors: Nick Sauer, Clifford in Frankfurt
4/16/23: Thanks to Clifford in Frankfurt, this extension now fully supports the ability to enable or suppress specific formats
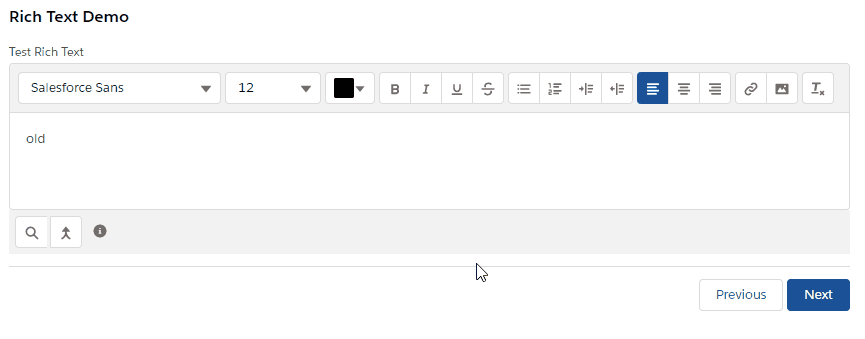
Input Rich Text sports a nice toolbar and allow rich text creation. It also provides Find and Replace, Autoreplace, and Blocklists. As you can see below, these new features are available via a swanky bottom toolbar, and can be turned on or off as a group. Clifford in Frankfurt has added additional ability to control which features are enabled or suppressed.
Note that this isn’t the only choice you have. Here’s a powerful alternative extension to consider, with a different mix of features.
You can pass in a map of terms that you want to automatically replace.
How it Works:
Use Case Example: Business has the need to enter customer-facing details that:
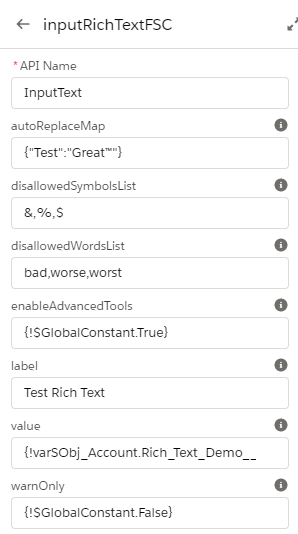
IMPORTANT: Use enabledAdvancedTools = true input attribute if you want to leverage these enhanced features. Otherwise leave empty and regular input Rich Text component will be used.
| Parameter | I | O | Information |
|---|---|---|---|
| enabledFormats | X | An optional comma-seperated list of allowed formats. By default, the list is computed based on enabled categories. Example: bold, image | |
| disabledCategories | X | An optional comma-separated list of button categories to remove from the toolbar. Example: INSERT_CONTENT, ALIGN_TEXT | |
| enableAdvancedTools | X | Boolean. Set to true if you want to use enhanced rich text. Default is false (regular input component) | |
| autoReplaceMap | X | JSON formatted key:value map. (example => {“Test”: “GreatTest™”} ) | |
| disallowedSymbols | X | Comma-separated list of words to block. Example: /,@,* | |
| disallowedWords | X | Comma-separated list of words to block. Example: bad,worse,worst | |
| warnOnly | X | Boolean. Set to True if you want to allow Next even where disallowed Symbol or Word remains. Default is false. | |
| characterLimit | X | Integer. Set character limit. This will enable character count and limit, and if warnOnly is not true, then will block next. | |
| value | X | X | Input and output Rich Text that you’ll be editing |
| label | X | X | Input to provide field-level label if desired |
Component Input Example:
Installation:
1.5 Unlocked 4/16/23 Production Sandbox – Additional support for turning on formats
Resources:
Also see https://unofficialsf.com/copy-paste-of-images-in-flow/
Old Versions
1.4.1 Unlocked 7/3/21 (Production or Dev) 7/3/21 – Eric Smith – Added an * next to the Input Label when the Required attribute is True
1.4.1 Unlocked 6/3/21 (Sandbox)
1.4 Unlocked 6/25/21 (Production or Dev)
1.4 Unlocked 6/25/21 (Sandbox)
6/25/21 – Eric Smith – Added a Required attribute and adjusted the bottom margin to better match standard components
MetadataService is a subset of Andy Fawcett’s legendary Apex-Mdapi metadata service project, slimmed down and packaged to be useful to Flow Developers as a dependency.
If you’re using these metadata deployment and retrieval services in your own Flow Action or Screen Component, consider simply requiring that this package be installed as a prerequisite
Learn more here.
V1.0 Unmanaged 7/5/20
There are some powerful data structures that are currently available only through retrieval and deployment via the metadata API. For example, the Process Builder Converter tool works by first retrieving a process builder process as a piece of flow metadata, then editing the metadata so it can be opened in Flow Builder, and then deploying the modified flow metadata as a new, separate flow.
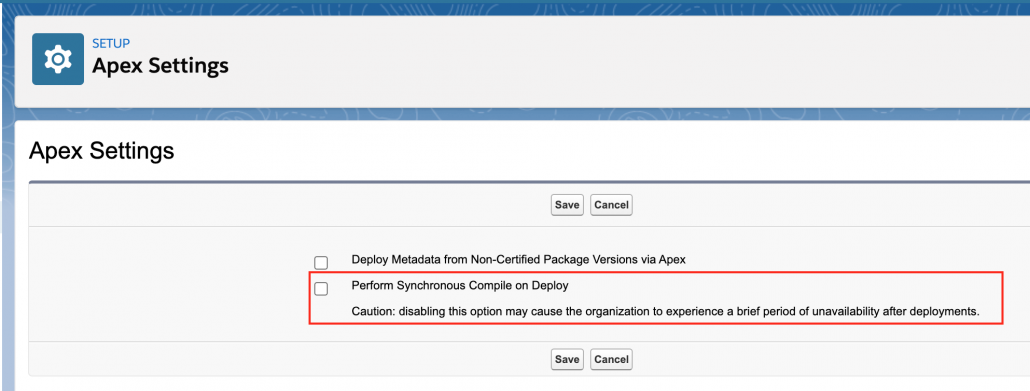
In general, using metadata deployment and retrieval is the last resort you should use. If your data is accessible via the UI API, the Tooling API, or via a REST interface, those are likely to be preferable. One reason is that metadata deployment may trigger a recompilation of all of the apex classes on your org, and that will pause your deployment until it’s finished. So while metadata deployment will generally go very quickly on developer edition orgs, it might be much slower on a production org. (As a note, you can control whether your metadata deployments trigger a recompilation with this checkbox:
Despite these issues, sometimes Metadata deployment is a great tool to use. The Process Builder example is a good one.
Another example involves creating, editing, and deleting ListViews via a Flow Action. While ListViews can be read via UI API and REST, they can only be created, edited, or deleted by doing metadata deployment of ListView metadata.
There are two sets of tools you can use to build Flow Actions and Screen Components that use Metadata Deployment and Retrieval.
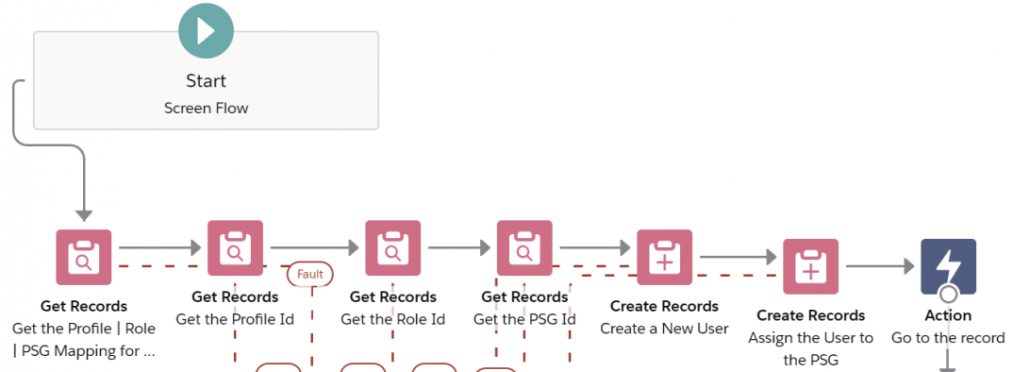
The first tool is the legendary Apex Metadata Service created by Andy Fawcett. This abstracts a lot of gnarly SOAP transactions into nice clean API’s. Here’s an example of a Flow Action making use of the Metadata Service to create ListViews:

The reason this works is that MetadataService has gone and created a wrapper class for each piece of Salesforce metadata. In the code above, you can see that we’re able to reference MetadataService.ListView(). Once we have one of the ListView objects, we can simply fill it with updated values, and then call createMetadata on it. There are similar methods for updating, deleting and reading.
You can peruse the vast set of available objects by scrolling through the main class file here.
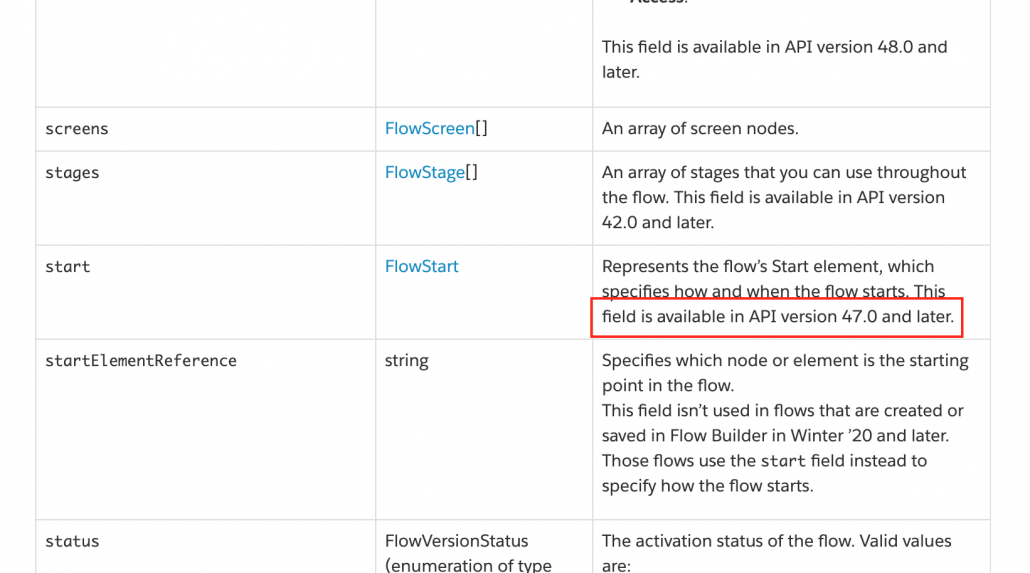
When we went to create the process builder converter, though, we weren’t able to use the above method. The reason is that the current MetadataService only has updated metadata through API version 42, from 2017. We needed to create flow metadata that used brand new additions that had only been added in version 48.0
You can see here, that the Flow definition in Metadata Service (era 2017)…
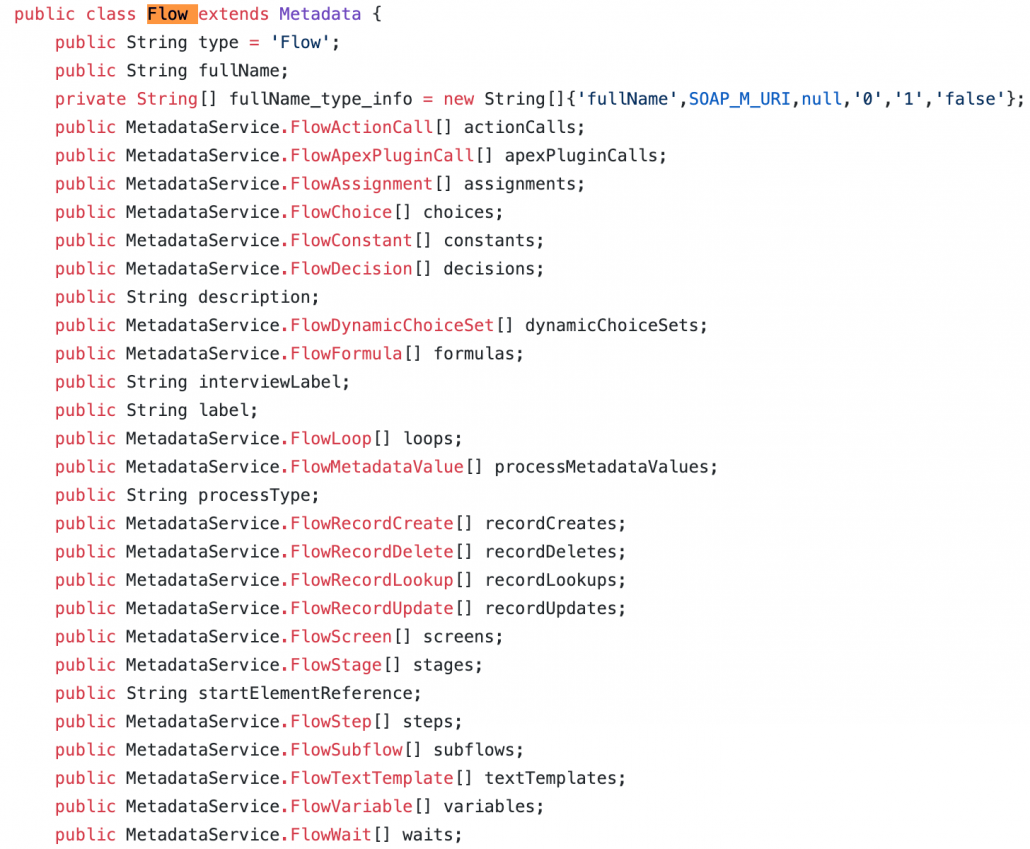
lacks the brand new metadata element that stores new Flow triggering information:
Hopefully, someone will update the MetadataService to the latest API. In the meantime, you can solve this problem because the MetadataService also provides direct access to lower level deploy and retrieve methods that don’t require you to populate one of the metadata objects.

When you operate at this lower level, you have to directly parse and modify the metadata xml. Then you have to zip it up with base 64 encoding, and then you call MetadataService’s ‘deploy’ method directly. This has been implemented asynchronously, so we carry it out via a Flow screen component called TransferMetadata that can sit there on a flow screen and poll until a response is received.
While this may sound a little intimidating, you can just take and copy the code we used.
To streamline the efforts of developers who want to build tools like Create or Edit ListViews, we’ve packaged the necessary MetadataService files into a useful package that you can just require as a dependency. This package leaves out some extraneous files from the repo but has everything necessary to carry out deployment and retrieval.
In general we’re starting to move towards base libraries to avoid collisions and simplify packaging for new actions and developments.
Install it here.
Use UpsertRecords when you want to take a collection that may or may not already exist in the database and save it. If the records in the collection have valid Id values, the corresponding records in the database will be updated with the flow’s collection. If not, new records will be created and saved.
UpsertRecords provides functionality similar to the Apex ‘upsert‘ command. You can optionally provide the name of a field on your object that is the externalId and you can specify that you want partial saving to work even if some of the saves fail (‘all or none’).
This functionality is available in the CollectionActions package starting with version 1.19.2
You can provide either a collection or an individual record (and in fact can provide both), but because of a limitation in the action configuration framework, you have to specify both types, even if you’re only using one, like this:

| Attribute | Type |
| inputCollection | List<SObject> |
| inputRecord | SObject |
| externalIdFieldName | String |
| allOrNone | Boolean |
This action currently has an output called ‘placeholder’ that should just be ignored. If an error occurs during the upsert, the error message will be thrown back to the flow
Install the Collection Actions package, starting with 1.19.2