Taking advantage of the Datatable’s ability to select multiple records and pass them along in a Flow to be acted upon, I created a Flow Action that interfaces with the Metadata API and handles the batch deletion of selected inactive Flows and/or Process Builders.
Using data pulled from three different Salesforce internal objects, I’m able to display details about Flows and Process Builders. The full power of the Datatable component comes into play by offering a List View with sorting, highlighting, filtering and more.
I’ve bundled all of this together in an App that includes a configurable List View, List View with batch selection for delete and a Flow Picker where you can select a single Flow or Process Builder and then work with a List View of all of its active and inactive versions.
https://unofficialsf.com/wp-content/uploads/2022/09/largeUCSF-300x133.png00Eric Smithhttps://unofficialsf.com/wp-content/uploads/2022/09/largeUCSF-300x133.pngEric Smith2022-11-08 09:24:082022-11-05 09:29:54Flow and Process Builder List View with Batch Delete V2
If you have a Sandbox that has been updated to Winter 23 Patch 12 you may run into an issue with the Datatable component where you will get an error if you edit any rows or if you select just a single row. Salesforce is working on an underlying issue in Version 3 of the Flow Runtime, but in the meantime you can update Datatable to avoid this issue and fix a couple of other minor bugs.
The error message you’ll see could be similar to one of these:
The Lightning Component c:datatable generated invalid output for field outputSelectedRow. Contact your administrator with these details: Flow encountered an error when processing and converting between data types. Please check the flow and ensure all data types are matched correctly.
The Lightning Component c:datatable generated invalid output for field outputEditedRows. Contact your administrator with these details: Flow encountered an error when processing and converting between data types. Please check the flow and ensure all data types are matched correctly.
https://unofficialsf.com/wp-content/uploads/2022/09/largeUCSF-300x133.png00Eric Smithhttps://unofficialsf.com/wp-content/uploads/2022/09/largeUCSF-300x133.pngEric Smith2022-11-02 16:01:442022-11-02 16:01:50New Version of Datatable
Being able to pop up a screen flow when something happens can be very useful. Previous explorations include the Detect and Launch component, which focuses on being on a record page and detecting changes to that record. Mun’s solution uses platform events as a transport mechanisms, so it’s a more broadly applicable solution.
Renato has built a package that exposes the main Business Hours functions that are normally only available to Apex developers:
Here are the actions:
BusinessHoursAddAction (businessHoursId, startDate, intervalMilliseconds) Adds an interval of time from a start Datetime traversing business hours only. Returns the result Datetime in the local time zone.
BusinessHoursDiffAction (businessHoursId, startDate, endDate) Returns the difference in milliseconds between a start and end Datetime based on a specific set of business hours.
BusinessHoursIsWithinAction (businessHoursId, targetDate) Returns true if the specified target date occurs within business hours. Holidays are included in the calculation.
BusinessHoursNextStartDateAction (businessHoursId, targetDate) Starting from the specified target date, returns the next date when business hours are open. If the specified target date falls within business hours, this target date is returned.
This bug is in very old Email Alert code and Salesforce is not prioritizing work in that part of the code base. Here’s a fairly straightforward workaround that replaces the Email Alert with a Send Email action in a flow.
For this workaround, we’ll use the exact starting conditions found in the Known Issue. However you can apply this to other scenarios where Email Alert is showing this unwanted behavior.
Let’s assume that you want your Approval Process to Set the Owner of a Case to a Queue. You want email to go out to the Queue Email but not the full set of Queue members. Email Alert is broken here. It sends too many emails out. So, instead of adding an Email Alert to your Approval Process, Create this Record-Triggered Flow:
Note the checkbox outlined in red. In order to call actions like Send Email on a Record-Triggered Flow, you need to use the ‘Asynchronous’ path.
Next, place a Send Email Action on that path:
However, we’re not quite done. We need to do a Get Records on the Queue to extract the Queue Email:
Here’s the final flow:
Now we can set the recipient of the Send Email action to be the Queue Email field from the Queue:
In the above example, I just threw some placeholder text into Body and Subject, but you can create a Text Template in Flow and add merge fields to add useful information into the Email. You can also add a URL that takes the user back to the case.
All API calls into Salesforce endpoints require an authorization. Generally, the SessionId will suffice for this, allowing you to avoid having to set up Auth Providers and Named Credentials just to make an API call to your own org. However, for security reasons, it’s tricky to get the SessionId from Apex.
I’m not sure why the following mechanism works, when all other mechanisms do not work, but I believe this mechanism is here to stay.
First, I’ll give you the most direct way to use this solution.
FlowActionsBasePack isn’t actually doing much work here, and you don’t need to use it; you can simply replicate what it does. To do that you have to first understand what’s really going on.
If you look at the line of code, you can see that the main function is a call to Page.usf3__GenerateSessionIdForLWC
As you can see in this screen shot of FlowActionsBasePack, ‘GenerateSessionIdForLWC’ is a tiny Visualforce page:
It took a surprising amount of web searching to find documentation on using ‘Page’ in Apex. I finally found it here. Page is used to instantiate a PageReference, which is how Apex interacts with Visualforce pages. ‘usf3__’ is the namespace used by all the code in FlowActionsBasePack. So our code basically calls getContent() on the page you can see in the image above. And the only content on the page is a reference to the SessionID.
So, another way you can attack this problem is to create your own Visualforce page on your org. You could name it GenerateSessionIdforLWC but of course you don’t need to. Use the <apex:page> block as shown above and save your page. From then on, any of your apex code can get the SessionId with a single line of code.
https://unofficialsf.com/wp-content/uploads/2022/09/largeUCSF-300x133.png00Alex Edelsteinhttps://unofficialsf.com/wp-content/uploads/2022/09/largeUCSF-300x133.pngAlex Edelstein2022-10-11 19:45:502022-10-11 19:45:56Developer Note: How to Get the SessionId to Use When Calling from An Action Back to Salesforce
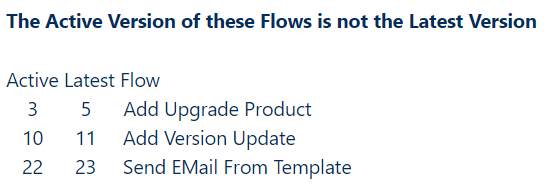
Why would one want to know if the active version of a flow is the most recent version?
There are a couple of reasons why I need to know this information.
I am deploying a large Project from a Sandbox to a Production org where by default, active flows are deployed as inactive. I then have to manually reactivate each of the new flow versions and at some point I need to confirm that I have reactivated each of the deployed flows.
I use subflows and I’m affected by a Salesforce bug* where the latest version of a subflow is executed instead of the currently active version of the subflow. This can cause issues for users in an environment where testing is occurring at the same time updates are being developed and applied.
Read the full article here to find out how this is done and get the link to install the flow that does this into your org.
https://unofficialsf.com/wp-content/uploads/2022/09/largeUCSF-300x133.png00Eric Smithhttps://unofficialsf.com/wp-content/uploads/2022/09/largeUCSF-300x133.pngEric Smith2022-10-10 06:09:062022-10-10 06:09:12How to find out if the active versions of your flows are the most recent versions
If you need a primer on invocable methods or invocable variables, check out this blog. To keep things consistent, this post references the same Product Selector pro-bono project for Playworks.
Here is the inner class of invocable variables.
public class Requests{

        @invocableVariable(label='Product Id' required=true)
        public String productId;

        @invocableVariable(label='Opportunity Id' required=true)
        public String opportunityId;

        @invocableVariable(label='Sales Price' required=true)
        public Double salesPrice;

        @invocableVariable(label='Quantity' required=true)
        public Integer quantity;
    }
And here is the invocable method, which takes a list of Requests objects as an input parameter.
@InvocableMethod(label='Create New Opportunity Products')
public static void createNewOpportunityProducts(List<Requests> requests){

     Requests request = requests[0];
     List<OpportunityLineItem> oppProds = new List<OpportunityLineItem>();

     Opportunity oppty = [SELECT Playworks_Fiscal_Date__c
                          FROM Opportunity
                          WHERE Id =: request.opportunityId];

     PriceBook2 stdPriceBook = [SELECT Id
                                FROM Pricebook2
                                WHERE isStandard = True
                                LIMIT 1];

     PriceBookEntry pbe = [SELECT Id
                           FROM PriceBookEntry
                           WHERE Product2Id =: request.productId
                           AND Pricebook2Id =: stdPriceBook.Id
                           LIMIT 1];

     for(Integer i = 0; i < request.quantity ; i++){
         OpportunityLineItem oppProd = new OpportunityLineItem();
         oppProd.Product2Id = request.productId;
         oppProd.PricebookEntryId = pbe.Id;
         oppProd.OpportunityId = request.opportunityId;
         oppProd.UnitPrice = request.salesPrice;
         oppProd.Quantity = 1;
         oppProds.add(oppProd);
     }
     insert oppProds;
}
Note: The way that this Product Selector flow is designed, only one instance of the Requests class is ever populated. Hence index 0 from List<Requests> is assigned.
Requests request = requests[0];
Typically, Apex tests follow the same basic algorithm.
Create the data
Run the test
Validate the assertions
When writing a test for an invocable method with invocable attributes, there are a couple of things to look out for.
Creating the Data
When the createNewOpportunityProducts invocable method is called by the flow, the flow outputs provide the data. Specifically, the flow maps its output variables to what will become attributes of the Requests object at runtime.
The test class is much more manual. Since there is no flow to pass its output variables, we have to create the necessary data.
Once the data is ready to map, we instantiate an object of the Requests class. To do this, we start with the name of the class that contains the invocable method: ProductSelector_Create. That is followed by dot notation to reference the inner class Requests.
List<ProductSelector_Create.Requests> lpscr = new List<ProductSelector_Create.Requests>();
Remember, only one instance of the Requests class is ever populated. So next we instantiate a single ProductSelector_Create.Requests object, map the data that we created earlier to its attributes, and add it to the list of ProductSelector_Create.Requests.
Now we have an input parameter to pass into the createNewOpportunityProducts invocable method.
Running the Test
There is one more thing to be aware of. When an Apex class is called by an Apex trigger, the DML causes the trigger to fire. Since we’re testing an invocable method that is called by a screen flow, no such mechanism exists. Instead of using a DML, we have to explicitly invoke the method, passing in the input parameter we just created.
Thankfully, there are no real gotchas here. In the Product Selector example, verify that the quantity of 2 caused 2 opportunity products to be created.
https://unofficialsf.com/wp-content/uploads/2022/09/largeUCSF-300x133.png00Andy Andersonhttps://unofficialsf.com/wp-content/uploads/2022/09/largeUCSF-300x133.pngAndy Anderson2022-10-06 11:33:142022-10-06 13:01:32Writing Test Classes for Invocable Methods and Invocable Variables
With Winter ’23, it’s possible to send screen flows to a Slack user or channel, and enable them to run the flows without leaving Slack.
There are two great use cases for enabling your screen flows to run in Slack:
I you have users who spend time in Slack, they may want to have a Slack experience and you can give them one without having to maintain two different versions of a workflow
You want to build a no-code Slack application
In Winter ’23, the initial supported pattern involves sending/dispatching/pushing a screen flow to a slack destination:
In the future there will be other ways to launch screen flows in Slack, such as via Shortcuts.
Official Documentation
Before we go further, make sure you’re aware of these official docs:
It’s ESSENTIAL that you verify that you basic connectivity between your Slack accounts and your Salesforce org is fully and properly configured BEFORE you start dispatching screen flows.
These are the signs of a properly configured infrastructure:
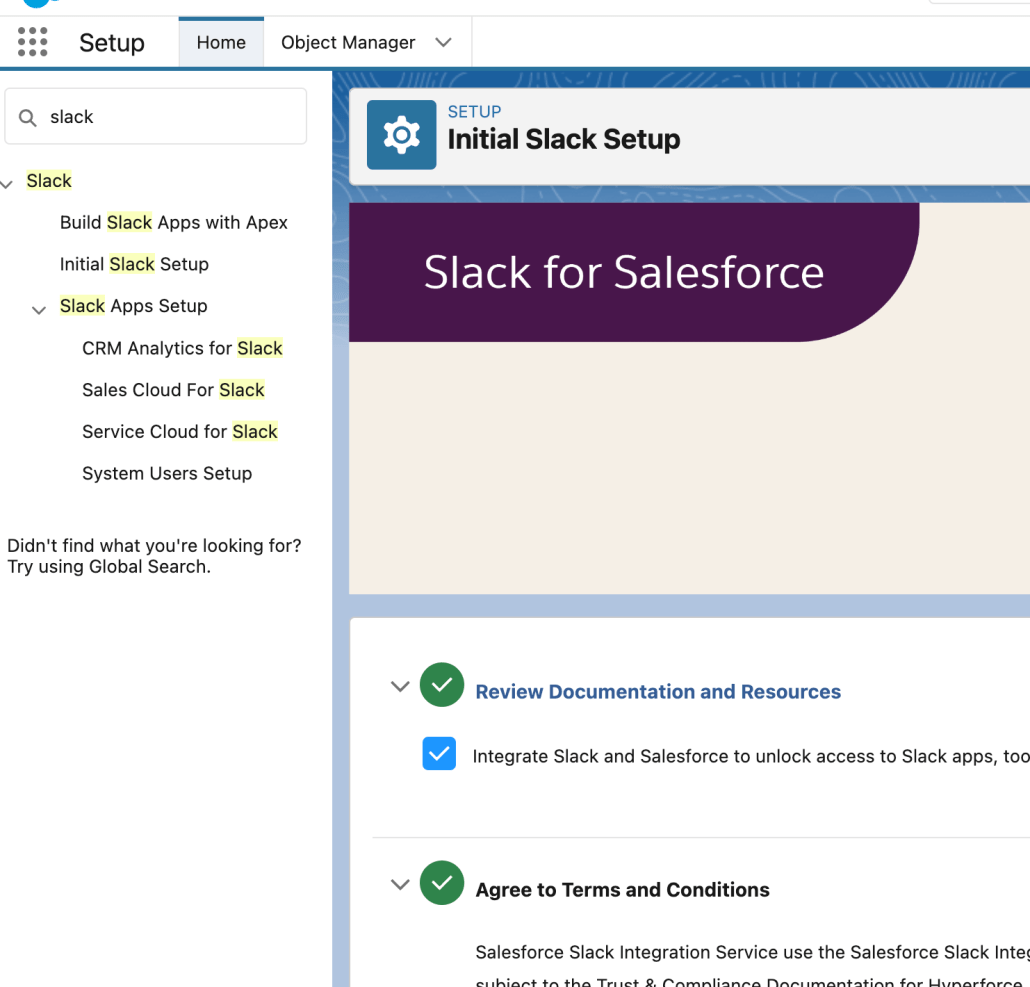
1. Salesforce for Slack, the main Salesforce Slack App, is visible in the App list of any user who wants to run screen flows from Slack
If you don’t see this? Look around the Slack App Directory. Here are a couple of places it lives:
and also take a look at the Initial Slack Setup page in Salesforce Setup:
2. When you click on the Home tab of Salesforce for Slack app in your Slack desktop, you do NOT see a Connect button like the example on the right:
If you see that button, and you want to enable the logged-in Slack account to work with screen flows, you need to set up the connection. Keep in mind that simply installing Salesforce for Slack does not automatically register all of the Slack users on that workspace. They each have to individually log into a salesforce org and approve a connection between Slack and Salesforce.
3. Once the connection is created, verify in User Settings (NOT Setup) that a mapping exists between a Salesforce User and a Slack Account, like this:
From a Flow point of view, you target a Slack account for a flow by having a mapping from that Slack account to a Salesforce User, as shown above, and taking that user’s recordID (you DON’T use username or the channel IDs)
How to Build
With that taken care of, we can can start using screen flows in Slack
Part 1: Creating a Slack-Ready Screen Flow
Create a Screen Flow and check the ‘Make available in Slack (Beta)’ checkbox, available in the Advanced section of Flow Settings
Checking the ‘Make available in Slack (Beta)’ checkbox filters the Screen Builder to show only the elements that currently can be rendered in Slack:
Expect more components to be available in future releases.
Save the screen flow and don’t forget to activate it.
Part 2: Setting Up Your Dispatch
The initial paradigm for Flow in Slack is that you ‘dispatch’ or ‘send’ the screen flow to a specific Slack channel from a flow. Later there will be ways to start screen flows from the Slack side via shortcuts and the like.
Every time you create a Slack-enabled screen flow, a unique ‘SendMessageToLaunchFlow action is generated to send it into Slack.
This is similar to how special actions are generated for each Email Alert and each Quick Action your org defines.
Configuring the Dispatch Action
Here’s what a configured Send Message To Launch Flow action looks like:
Input Property
Notes
Slack App
If your org has properly enabled Slack Integration you should see a choice ‘Salesforce for Slack’. Choosing anything other than that is for experts.
Slack Workspace
This will show the workspaces that have 1) installed the specified Slack App and 2) connected it to your org
Execute Action As
This should generally be set to Slack App. If a flow is running in User Context and not System Context, you can choose to have the message sent to Slack by the running User, as opposed to the App.
Slack Conversation ID
This label is in the process of being renamed because you only use Conversation ID’s if you want to send the flow to a group channel. If you’re sending to an individual, use the recordID of their Salesforce User account (example: 005B0000003c7pNIAQ)
Slack Message
Allows you to customize the initial launch message.
Button Label
Allows you to customize the initial launch message.
Slack Bot Name
This will change the label that posts the launch message. See Slack Bot Name, below.
Slack Timestamp
Slack timestamps act as unique identifiers for messages. If you pass in a valid message timestamp, the Flow launch message will show up as a response to that message.
Slack Bot Name
If no value is provide, the App Name (“Salesforce for Slack”) is used
Let Us Know
Have you built a Slack solution using Flow? Share it with us here in the comments!
https://unofficialsf.com/wp-content/uploads/2022/09/largeUCSF-300x133.png00Alex Edelsteinhttps://unofficialsf.com/wp-content/uploads/2022/09/largeUCSF-300x133.pngAlex Edelstein2022-09-22 14:14:492022-09-29 14:37:10Running Screen Flows in Slack