Some while back, the Detect and Launch component opened up a new frontier by making it possible to pop a screen flow from a record page automatically when the record is edited or deleted. Andy Haas has extended this component with some valuable new capabilities.
Previously, you could pop a screen flow either 1) when the underlying record is updated/edited or 2) when the record is deleted.
This update adds two features:
Launching a screen flow when a record is edited can now be further configured to make the launch dependent on a particular field value change. Example: you need an agent to fill in specific details when they close a case or your sales reps need to send a quote to the customer you can launch a flow after a specific field has changed and, for example, is equal to true.
You can now trigger screen flows to run on the Load of a record page, and not just on an Edit or a delete
This demo was produced for V2.0 and shows Conditional Launch Based on a Field Edit:
Triggering a screen flow when a record page loads
Perform this with the new input field ‘Flow Name (when the record is loaded)’. You can use this to launch the flow when the record is opened. Note that if you are using Launch Mode = Modal, you will need to build a close function within the flow, as the modal doesn’t have a close function, yet.
Conditional Screen Flow Launch Based on a field edit
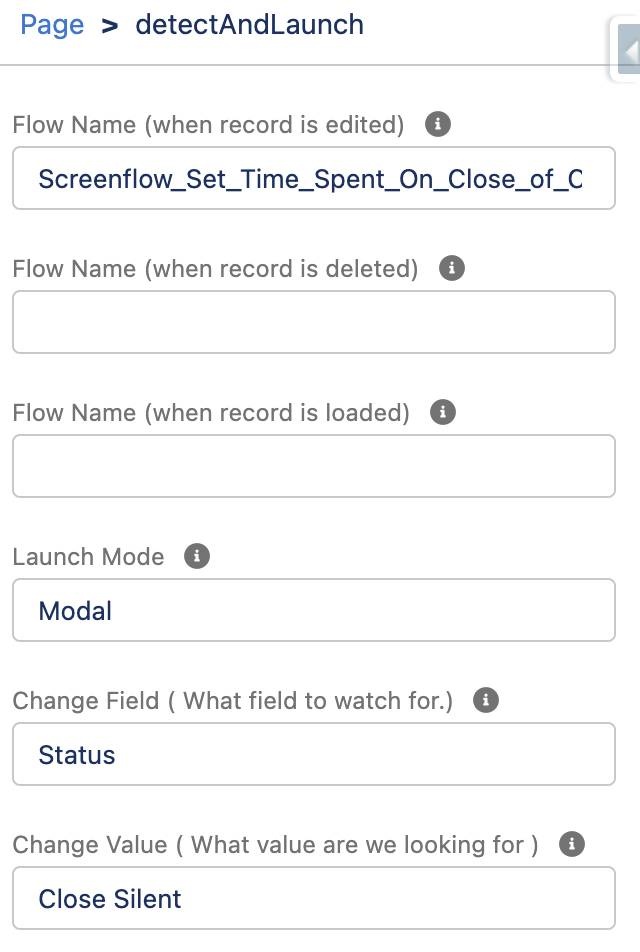
Let’s say you have a case record that you want to launch a flow when the case is closed to get the user to enter the amount of time that they spent on the case. To configure this within Detect and Launch, enter the flow name you want in ‘Flow Name ( when the record is edited )’, set Change Field to ‘Status’, and set Change Value to ‘Closed’.
Want to check multiple fields and launch different flows based on them? Or run different flows depending on the value of the field? Add multiple Detect and Launches with different criteria to launch different flows.
New Fields
Field
Description
Change Field
Is used to signify what field you want to watch when a record has been edited.
Change Value
Used to be the comparison value when the record has been edited.
Flow Name (when the record is Loaded)
use this to launch the flow when the record is opened.
Component Configuration Example:
Limitations:
At this time, the component does not support cross-field comparisons. Change Value must be a static value. We suggest utilizing formula fields to do complex comparisons that evaluate true or false.
Conditional Field-Based Launch only works when editing a record. It does not work on deleting or loading a record.
These features are available in V2.0+ of Detect & Launch
https://unofficialsf.com/wp-content/uploads/2022/09/largeUCSF-300x133.png00Alex Edelsteinhttps://unofficialsf.com/wp-content/uploads/2022/09/largeUCSF-300x133.pngAlex Edelstein2022-09-10 13:12:432022-09-10 13:12:48From Andy Haas: Trigger Screen Flows with Record Changes using ‘Detect and Launch’
Step 1: Generating a Client ID and Client Secret on the target non-Salesforce web service
To retrieve calendar events from Google, we start by logging into Google Cloud Platform and generating some credentials that we can use to make API calls into Google using our Google account.
When we generate what Google calls an ‘OAuth 2.0 Client ID’, we’re given a client ID and client secret provided by Google.
Here’s my Google Cloud Platform credentials page where I’ve created a Client ID:
When I click on it for details, I can access both the client Id and client Secret:
Each web service will have a slightly different process, but they all will end up generating a Client ID and Client Secret (note: a few services, like AWS, have additional or different security protocols).
The next step is to take this identifying information and add it to our Salesforce org via an Auth. Provider.
Step 2: Creating the Auth. Provider for the target Web Service
Each time you want to enable a particular service and service configuration to be called programmatically from your Salesforce org, you need to create an Auth. Provider. Now, Auth. Provider is a pretty unfriendly name. I would have gone with something like ‘Web Service Access Definition’. You create one on your org to tell Salesforce that properly permissioned Users on your org are allowed to connect to the non-Salesforce web site via its apis. You can set up different Auth. Providers that connect to the same non-Salesforce web service but provide different amounts of access, and then assign usage rights to different permissions sets or profiles.
2.1 Select the Provider Type
There are different types of Auth.Providers. Each type represents a different style of authentication. Take a look at the list of available types:
A few of these, like the Apple authentication protocol, are truly unique, but most of these look very similar because they’re all basically using the OAuth industry standard. The most general purpose provider type is Open ID Connect, which is the general purpose solution that works for almost all web services. That’s the one we’ll use for our Auth. Provider. (Why not use the Google Auth Provider type? You’d think it would be more fitting for a Google connection. However it turns out to require some extra fiddly work to get it to work properly. You need to add an extra openId scope in and you need to override the authorization URL to enable refresh tokens. Ultimately, it’s more pain than its worth. Also, the process shown here for Open ID Connect will work smoothly with other web services besides Google. So we’ll use the general purpose solution)
After selecting provider type, fill in the client ID and secret fields.
2.2 Providing Authorization URLs
Automatic authorization between two sites requires them to have a conversation with each other via URLs, so you need to specify the right URLs for them to use.
The required fields are Authorize Endpoint URL and Token Endpoint URL. In our case, because we’re calling from Salesforce to Google, these are going to be Google URLs. The first one will be used to start the authorization process and the second one will be used to get tokens.
These URLs are generally found near where you generated your client ID and secret. However, with Google, there were some oddities. Google no longer provides clear documentation for setting up an oAuth session directly, instead recommending that you use a higher level client library:
Google’s concern is laudable, but that doesn’t help us Salesforce users much, as we still need to determine the low-level URL’s to configure our Auth. Provider. To solve this, I had to dig up this good article by Piotr Gajek.
Google’s tokens only last 1 hour, so you can only deploy something useful to production if you add automatic token refresh. This is done by adding ‘access_type=offline&approval_prompt=force’ to the authorization URL, as shown above. (More on that here and here)
Another troubleshooting note: In my own experience, the v1 version of Google’s authorization endpoint, which is shown above, correctly enables automatic token refresh:
The Google docs will tend to steer you towards the more recent version, but keep these points in mind.
2.3 Setting the Scopes
The Default Scopes field is used to specify which parts of the target web service are accessible to this authentication provider. I actually set these when I generated the credentials on the google site. Here they are:
Associating some specific scopes over on my Google account is only the first part. In order to enable my Salesforce app to access my calendar, I need to similarly add these scopes to the Auth. Provider I’m creating in my org and the Named Credentials that I’ll be using.
Here’s what my configured Auth. Provider looks like
3. Locate the Org-Specific Callback URL and Provide It To Google
When actual authentication happens, you start in Salesforce and get a pop up that lets you log into Google. You’ve done this ‘OAuth dance’ hundreds of times, most likely. This forces you to actually log in properly to Google which makes Google comfortable enough to trust future API calls. At the end of this dance, Google needs to send you back to Salesforce. This is done via the ‘Callback URL’ (or sometimes ‘Redirect URL). Each Salesforce org has a different base URL so each of your orgs will have its own unique Callback URL, and you need to let Google know what it is. So we collect it here, from our Auth. Provider:
…and paste it into the Google authorization here:
4. Creating a Named Credential for our Callouts
We also need to create a Named Credential, and at this point a lot of people (including myself, routinely) start to struggle to distinguish all of these abstract objects.
Why shouldn’t we be able to simply assign to a permission set the ability to use the Auth Provider? My layman’s explanation, which is unquestionably not the most technically precise answer, is that organizations generally want a way to create authorizations that provide access to some of a service but not all of a service. It’s true that we focused down the reach of this authorization via scopes, but you might want to limit things further. The Named Credential sits on top of the Auth. Provider and provides a complete authorization and authentication package that can be associated with Permission Sets. One key element of Named Credentials is the endpoint URL that the Credential is authorized to call. Usually these URLS represent API endpoints. Notice that until now, the only URL’s that we’ve been using have been special authentication URLs with words like ‘auth’ and ‘token’. But when I call the Google Calendar API, I’m going to call an endpoint designed for general calls. For Google Calendar, the endpoint is https://www.googleapis.com, and the rest of the URL is /calendar/v3/calendars/[mycalendarid]/events. You find these URL’s in the API documentation of your target web service.
And if you look in the Permission Set section, you’ll see a specific section where you can associate Named Credential with a permission set:
Here’s my configured Named Credential:
Note that I again provide the scopes that I want my action to have access to, and that I select the Auth Provider that I created above.
The URL provided here is the main URL for calling the Google API, and this is therefore is the only URL this credential will be able to call.
5. Authenticate to your Google Account From Salesforce
That final checkbox ‘Start Authentication Flow on Save’ is important because, even though I’ve copied my Google id and secret into my org, that’s not enough to get Google to trust API calls from my org. I have to do an actual authentication, and the final checkbox causes it to start. Here’s the first thing you’ll see:
Once you successfully connect to the Google account linked to this particular client ID and secret, your Named Credential will show ‘Authenticated’ and you can now use it in your callouts:
Remember above where we talked briefly about refresh tokens? If you don’t include those extra parameters on your authorization call, you’ll succeed, but you’ll get this warning, and you can expect your token to expire after a brief period of time:
6. Using Your Named Credential With a Flow Action
Actions that make web callouts will generally have an input for a token of some sort. Here, it’s labelled ‘credName’ to emphasize that what we want is the name of a Named Credential:
Not all callout actions support Named Credentials, however. For this action that retrieves weather, the api token doesn’t expire and is easily generated without oAuth, so the action simply asks for it:
And that’s all that has to be done. As you can see, if you have access to use a Named Credential, you have the ability make calls. When I run this action, I get back Calendar events:
And that’s the story on authenticating with Auth. Providers and Named Credentials.
Developer Notebook
Callouts are represented in URLs by the prefix ‘callout:’. You generally connect a Named Credential to an action by passing in the name of the action. You incorporate the name of the Named Credential into the URL of your API call, and Salesforce handles the incorporation of necessary elements into the actual API call. In our case, with Google Calendar, the API expects a token to be provided in the header of the API call. This is the most common approach. If you were bypassing Named Credentials, you’d manually insert the token into your call like this:
When we use a named credential, Salesforce handles that for us. Here’s how it looks:
https://unofficialsf.com/wp-content/uploads/2022/09/largeUCSF-300x133.png00Alex Edelsteinhttps://unofficialsf.com/wp-content/uploads/2022/09/largeUCSF-300x133.pngAlex Edelstein2022-09-08 21:50:022022-11-13 14:53:12Using Google Data in Flows – Authenticating to Google from Salesforce
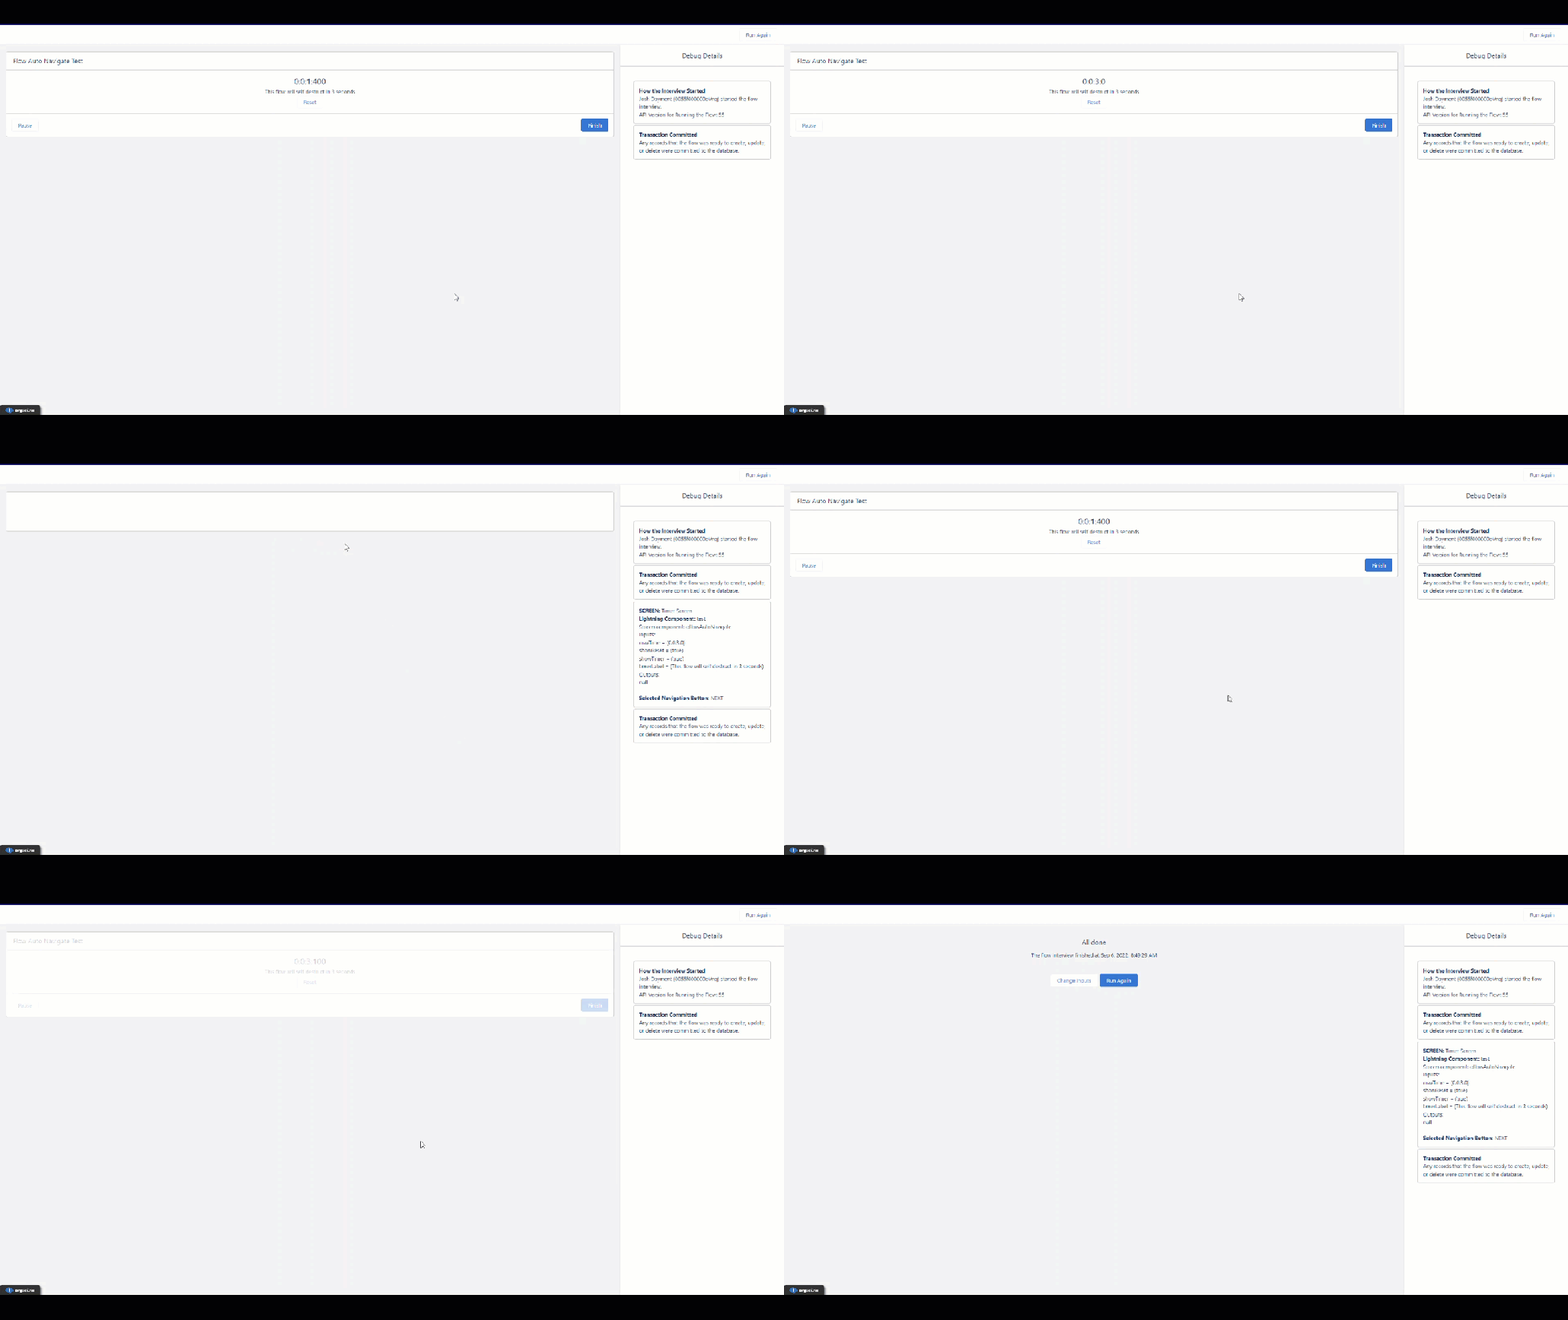
Flow Auto Navigate is a great way to auto-advance or finish a screen flow after a set amount of time. I have seen several posts in various Trailblazer groups or various Slack workspaces where admins have asked if there is a way to automatically complete a screen flow if a user just leaves on the final screen. We all know that users get busy or forget and might leave a flow interview abandoned if they don’t hit that finish or next button. What if instead, we gave them a timer they can reset or not even show them and set a time for how long they have to complete that specific screen? Now we can.
SetupProperties
Maximum Time: This is the max time the user has to complete their actions before the flow will auto advance the format should be in H:M:S:MS
Message to Users: If Show Time is set to true you have the option of displaying a message underneath the timer for the users to keep them aware.
Show Timer: When this is true it shows the timer on the flow screen counting up.
Show Timer Reset: When this is set to true it shows a reset button that when clicked resets the time on the clock.
https://unofficialsf.com/wp-content/uploads/2022/09/largeUCSF-300x133.png00Josh Daymenthttps://unofficialsf.com/wp-content/uploads/2022/09/largeUCSF-300x133.pngJosh Dayment2022-09-07 15:55:012022-09-09 09:41:53Automatically Finish and Navigate Screen Flows with Flow Auto Navigate
The Winter ’23 Salesforce release caused a few bugs to pop up in the Datatable component. Those along with a few others have been addressed in the latest (4.0.9) release.
Get correct clickable links for LWR Experience Sites
Fixed intermittant error with isDisableSuppressBottomBar
Winter 23 – Fixed clickable links while running in the Flow Builder
Winter 23 – numberOfRowsEdited now outputs the correct value
Winter 23 – Fixed datetime columns not displaying any values
Test Class fix for ers_DatatableController
Multiple date field edits will no longer clear the edited rows output when the bottom bar is suppressed
Find the latest install links and all of the documentation here:
https://unofficialsf.com/wp-content/uploads/2022/09/largeUCSF-300x133.png00Eric Smithhttps://unofficialsf.com/wp-content/uploads/2022/09/largeUCSF-300x133.pngEric Smith2022-09-07 08:59:202022-09-07 08:59:23Latest Update for Datatable addresses some new bugs from Winter ’23
We recently built a demo that highlights how Flow can be used to personalize emails, and we picked weather as a good example of the kind of real-time data that you have to make a call out for. As part of that demo, we built the action that’s packaged here. The service we use is called Visual Crossing:
…and they have a nice free tier. Sign up and you get issued a token that you can paste into this action.
Here’s a video:
How it Works
In the first version of this action, you can configure these inputs:
Inputs
Key
Provided by Visual Crossing with your account
locations
One or more address, partial address or latitude, longitude values for the required locations . Addresses can be specified as full addresses. The system will also attempt to match partial addresses such as city, state, zip code, postal code and other common formats. When specify a point based on longitude, latitude, the format must be specified as latitude,longitude where both latitude and longitude are in decimal degrees. latitude should run from -90 to 90 and longitude from -180 to 180 (with 0 being at the prime meridian through London, UK). Data for multiple locations can be requested in a single request by concatenating multiple locations using the pipe (|) character.
Format
either csv or json. csv is good for downloading data. json is what you should stick with if you want to use individual values later in your flow
Interval
The interval between weather forecast data in the output. 1 represents an hourly forecast, 24 represents a daily forecast. As the source data is calculated at the hourly level, records calculated at 12 or 24 hours are aggregated to indicate the predominant weather condition during that time period. For example the maximum temperature, total precipitation, maximum windspeed etc. Supported values 1, 12 or 24.
Unit Group
Set to ‘us’, ‘metric’,’uk’, or ‘base’. Default is ‘us’. More info.
Working With the Return Values
This is the kind of action where calling it is simple, but dealing with the deluge of data you get back can be challenging. We’ve configured the action to provide some tools, however.
The easiest way to consume the weather data is to reference the SingleLocationReport object that gets returned. Note that if you pass in more than one Location, singleLocationReport will simply use the first Location you provide.
There are some useful pieces of information in singleLocationReport (this is also a great way to get longitudes and latitudes and time zones), but the most valuable stuff is one level deeper, in currentConditions:
‘wspd’ is wind speed and ‘wdir’ is wind direction. For more information on these weather concepts, see this.
As an example, here’s how I’d make a decision based on the amount of rainfall
More complete output is available via the responseBody (which is the unmodified response JSON) and the FullLocationsReport, which is a List of the WeatherLocation object that is returned as the singleLocationReport.
Developer Notes: How It’s Done
To get the weather to show up in an easily referenceable format, we took advantage of a powerful Flow capability called Apex-Defined Types, also known as Custom Types. If you look inside the package that this action is part of, you’ll see several data structures. Here’s one of them, which we called WeatherLocation:
The @auraEnabled annotations tell Flow that this is an object that has fields that should be exposed in Flow Builder.
Customers with Marketing Cloud can use the Transaction Messaging API to send email, and this new SendEmailViaMC Flow Action enables Marketing Cloud customers to craft personalized content with flows before sending to email templates. This leverages the richness of Marketing Cloud email templates while providing a no-code way to do personalization.
In our demonstration here, we also add Salesforce CDP into the mix, and show how personalized emails can be generated that meld:
Data from CDP profiles
Data from web callouts driven by Apex invocable actions
Data from core CRM records
Flow enables a lot of interesting combinations. In this demo, a Flow action calls out to a weather API and uses the results to recommend warm clothing in some email but not others. Flow also examines the salutation field of the CDP profiles and uses flow decision logic to decide which of several Marketing Cloud email templates to use.
Here’s the Flow that forms the core of the messaging personalization:
Two new invocable actions are available for installation as an unmanaged package.
SendEmailViaMC Flow Action
Example of Merge Field Usage:
token
This authorization token is generated by Marketing Cloud. See ‘Authorization’ below.
toRecipient
an email address. Multiple recipients aren’t supported in this initial release.
contactKey
Unique identifier for a subscriber in Marketing Cloud. If you don’t provide an existing subscriber key , one will be generated at send time by using the recipient’s email address.
definitionKey
Note that this is a Transaction Send Definition that has to get created programmatically. You can attach this definition to a journey that has a Send Email action.
mergeKeys and mergeValues
These provide a way to pass up to 5 distinct merge values. If the email template specified in definitionKey has a merge variables that corresponds to a merge key, the corresponding value will be inserted into the email.
messageKey
A unique identifier used to track message status. If you do not pass one in, a timestamp is generated by the action and provided to the MC API. Note that this messageKey is then returned with the output if the send is successful. Can be up to 100 characters, and there are no restricted characters. Each recipient in a request must have a unique messageKey. If you use a duplicate messageKey in the same send request, the message is rejected.
Authorization
In the screen shot above, a specific token is pasted into the Send Email action. However, Marketing Cloud tokens only last 20 minutes, so this is not a deployable solution. Fortunately, it’s easy to generate tokens using the GenerateMarketingCloudToken Flow Action, also available in this package.
To generate tokens, follow the guidance here and generate a specific API Integration:
The token generation action requires the Client Id and Client Secret that you generate, along with the Authentication Base URI, which is custom to your MC instance. It also will require your accountId:
You can place this action immediately before your send to efficiently refresh your token on an as-needed basis:
Troubleshooting Authorization Issues
A couple of troubleshooting notes:
Don’t forget to add the Authentication Base URI as a Remote Site Setting
Make sure to use ‘Server-to-Server Integration Type
Merging Flow Values into Marketing Cloud Templates
Marketing Cloud users will be familiar with MC templates, which look like this:
The template shown here demonstrates simple string templates but also shows a merge field that interprets the incoming string as HTML.
If you go back to the example configuration of the SendEmailUsingMC, notice that mergeKey1 is ‘FirstName’. That matches the %%FirstName%% in the template above, so when the email is sent, Marketing Cloud will merge in the value of mergeValue1. In this case, that’s a record lookup. In the video, you’ll see that the record comes from a CDP profile, but it could also come from a CRM record.
The customized weather makes use of Flow’s own Text Template resource. Here’s the one that’s used in the sample flow:
Flow uses the Assignment element to conditionally populate WeatherWarning.
Installation
v1.1 9/3/22 ProductionSandbox added messageKey as an input. Fixes to use of contactKey
A subset of invocable actions are now callable from Apex code. This capability was previously Developer Preview and is now GA in the Winter ‘23 release.
Customer Benefit
Apex developers now have the ability to call a subset of standard and custom actions directly from their Apex code, bringing the diverse capabilities of invocable actions to Apex developers.
Capabilities and Usage
Invocable actions that do their own commit operations cannot be called from Apex.
The following standard actions are callable from Apex in Winter ‘23:
apex, flow
chatterPost
runExpressionSet, runDecisionMatrix
activateSessionPermSet, deactivateSessionPermSet
getAssessmentSummary
Additional standard actions will be callable from Apex in future releases!
This Apex code snippet uses the standard invocable action “chatterPost” to post a message to the current user’s feed:
Invocable.Action action = Invocable.Action.createStandardAction('chatterPost');
action.setInvocationParameter('text', 'This is a test.');
action.setInvocationParameter('type', 'User');
action.setInvocationParameter('subjectNameOrId', UserInfo.getUserId());
List<Invocable.Action.Result> results = action.invoke();
if (results.size() > 0 && results[0].isSuccess()) {
    System.debug('Created feed item with ID: ' +
results[0].getOutputParameters().get('feedItemId'));
This code snippet calls a custom invocable action named “Doubler” that returns a number that is double the input value:
Building on the great sneak preview that Adam White published, here’s the official feature overview. This set of slides introduces all of the innovations in the upcoming Winter ’23 release.
If you’ve been in the Salesforce ecosystem for long enough, you’ll eventually find yourself working with Record IDs that could be multiple types of objects, and you need to build a report or automation that needs to know what kind of object it is. A common example of this might be a task or activity report grouped by the Type of object each Task is related to. It usually involves adding a Formula(Text) field to the Activity object that translates the record Id in the Related To field on Task/Activity to the name of the Type of Object it is:
That kind of formula gives you a field on the Activity object that will tell you what kind of object it is related to! You can imagine all of the nifty reports this could enable, or Flow-based automation you could build that may be specific to Activities that are related to a particular kind of object.
For many years, it was really the best we could do without writing Apex code. In this post, we will walk through the limitations of this approach, and how to build a better version of this in a Record-Triggered Flow.
A better approach with Flows
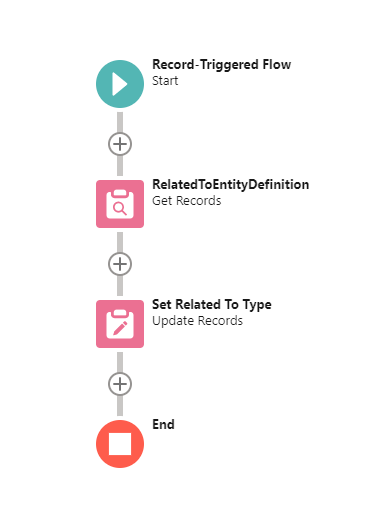
With today’s automation tools, and Flow Builder in particular, we can account for any object, without any hardcoding, and without a single line of Apex. The Flow itself is simple: just two elements in a Record-Triggered Flow. So if you’re short on time and want to skip the explanations, jump on ahead to “Let’s Build”, and be on your way. But I think its helpful to know the how and the way, so let’s dive in.
Secret Sauce Ingredient 1: Key Prefix
Record ID values are 15 or 18 digit values that uniquely identify Salesforce records. We won’t go into everything that goes into constructing them, except for one crucial bit of information: the first three characters of every ID identifies the object type of that ID! This is called the Key Prefix. Each object – standard or custom – has a unique 3 character Key Prefix and *every record* in that object starts with those three characters. That’s why the formula above takes the first three characters of the ID LEFT(WhatId,3) and then uses the CASE() function to translate that to an object name.
There are some important things to know about the Key Prefix:
Standard Salesforce Objects (objects that don’t have a suffix like __c at the end) all each have the same key prefix in every org in every environment across all of Salesforce. Account is always 001, Opportunity is always 006, etc
Custom Objects are not guaranteed to be the same across orgs. Even though you may find some of your custom objects are the same between Production and Sandbox, this is not guaranteed and should not be relied upon.
Given this information, have you caught the limitations of the formula approach yet? There’s two huge red flags:
It requires you to hardcode the 3 digit key prefix to object translations! If you build this formula field in Sandbox (which you should definitely be doing!) to include a Custom Object, there is no guarantee that the same object will have the same key prefix when you move it to production, leaving you scratching your head, then needing to make a change directly in Production (which you should definitely NOT be doing!)
It requires you to explicitly write out each object you want to translate from key prefix into an object name. This means writing out a /massive/ formula to account for all your objects, or lots of maintenance when someone inevitably asks why it doesn’t work for their favorite custom object that wasn’t included.
There is a better way. Enter Flows, and Secret Sauce Ingredient 2.
Secret Sauce Ingredient 2: EntityDefinition
When building automation in Flow Builder, we all know you can retrieve a record, or collections of records, from every day objects like Account and your Custom Objects, but did you know there are a whole host of system objects you can retrieve records from using a simple Get element? One of these objects is what is going to help us today: EntityDefinition. This object contains metadata and configuration information about each of the Standard and Custom Objects in your org. Each object has a record in this EntityDefinition object. Information like Label, API Name, Plural Label, and more.
And – you guessed it – EntityDefinition has a field with each object’s Key Prefix.
Let’s build!
Now that we’ve got our two ingredients, let’s build a better alternative to that formula above. Let’s take one moment to ask ourselves what we need first:
We want a field on Activity that contains the name of the Object Type for the record it has in its WhatId field (the label for the WhatId field is “Related To”).
Add a Text Field to Task
Instead of a formula field, we’re going to add a regular Text field to the Activity object, and we’re going to call it something like “Related To Type” (that label is my preference, but whatever makes sense to you and your team)
Add a Record-Triggered Flow on Task
Entry Criteria
Next we’re going to build some automation to populate this field. We’ll add a Record-Triggered Flow on the Activity Object to do this. Since an existing Task could be updated to change which record is in the Related To field, we’ll want this Flow to run when records are Created and Updated
And we’ll want to configure Entry Criteria so we’re only running this Flow when we need to, and not when we don’t. We can use the (new as of Summer 22 release) Entry Criteria Formula feature to do this.
In short, this Entry Criteria formula will ensure this Flow only runs if its a newly created Task record that has a WhatId value, or if its an update on an existing Task and this update includes a change to the WhatId value, which are the scenarios we’ll need to set or change our Related To Type field.
Lastly for the Start Configuration, don’t forget to take advantage of our ability to run this as a Fast Field Update, since all we are doing is setting a value in a field on the same object that triggered the flow.
Get the Related EntityDefinition
Without further ado, let’s use our secret sauce ingredients to build this Flow. The Flow has our $Record variable with the WhatId, and the EntityDefinition object is what has the link we need between the KeyPrefix from that $Record.WhatId and the Object’s name.
So we want a Get on EntityDefinition, and we’ll add filter conditions to match the KeyPrefix against a Formula Resource that returns the first 3 characters of $Record.WhatId field
Formula Resource (named relatedToKeyPrefix):
LEFT({!$Record.WhatId},3)
GOTCHA ALERT: There are a handful of standard, system objects listed in EntityDefinition that have no KeyPrefix value. They cannot be associated with Tasks, so we don’t really need to worry about needing to match on them. But, we do want to clear our field if a task gets its related to field cleared to be empty, we want to avoid accidentally matching on one of these “empty KeyPrefix” objects. Its a simple condition we need to add to the Get:
KeyPrefix Does Not Equal {!$GlobalConstant.EmptyString}
Next, in the Flow Builder after the Get, we’ll add an Update element that sets the Related To Type field on our Taskrecord using the result of this Get! It really is that easy. The field from the EntityDefinition that we’ll use here is MasterLabel.
Back in the Flow Builder Canvas, our resulting flow is just two elements!
Now, you’re going to build a Flow Test for this before deploying to production, aren’t you?
⚠ Consider Existing Data ⚠
One difference from the formula approach, and consideration you’ll have to account for with this approach, is your existing data. With a formula field, you don’t have to make any data changes- its just a formula that is evaluated anytime someone or something looks at the record. With this approach, once the Record-Triggered Flow is in place, all records *moving forward* will have your new field populated, but your existing records won’t. This means you’ll need to backfill them, or tweak the entry criteria and run a one-time “backfill” update. Use whichever data tool you’re most comfortable using to do this.
Take it further
Add a Related To API Name
The object’s Label was useful for human-readable outputs like the reports we discussed in the beginning, but you may find a lot of use cases where its better to have a unique-and-still-human-readable value, which is what the API name is designed to be. So, add aRelated To Type API Name text field to the Activity object, and simply add it alongside the Update element we already have for the Related To Type field.
Ultimate Picklist Approach
If you’re really clever, and you have a stable set of objects, you could instead use a picklist. If you have a picklist with values that equate to your object labels and api names, then your Flow just needs to update it with the EntityDefinition’s QualifiedApiName value, and then you get the best of both worlds in one field. Reports and Record Views show the label (and can even be translatable!), while can manage it using api name.
Decision Branching
This becomes very powerful if you’ve got different actions you’ll need to take based on different objects, because you can simply add Outcomes to the decision for each object type, and configure its path with Object Type-specific actions accordingly.
https://unofficialsf.com/wp-content/uploads/2022/09/largeUCSF-300x133.png00Jeff Kranzhttps://unofficialsf.com/wp-content/uploads/2022/09/largeUCSF-300x133.pngJeff Kranz2022-08-24 04:57:072022-08-24 04:57:11Find The Object Type Of Any Id Value Using Flows
In Winter ’23, you can now drop an LWC version of the Flow component into your own LWC’s, allowing you to build components that embed screen flows. Here’s an early look at the documentation. Let us know if find any bugs!
A lightning-flow component represents a flow interview in Lightning runtime. To use this component, build a flow with the Salesforce Flow Builder first.
To create a flow in your component, set the lightning-flow component’s flowApiName attribute to the name of the flow that you want to use. The component includes navigation buttons (Back, Next, Pause, and Finish), for users to navigate within the flow.
This example creates and starts the Survey Customers flow.
You can provide initial inputs for the interview by setting the flowInputVariables attribute to an array of input values.
This example creates and starts an interview by passing in initial values for the flow. It handles a change in the interview using the onstatuschange event handler.
get inputVariables() {
    return [
        {
            name: 'OpportunityID',
            type: 'String',
            value: '<Opportunity.Id>'
        },
        {
            name: 'AccountID',
            type: 'String',
            value: '<Opportunity.AccountId>'
        }
    ];
}

handleStatusChange(event) {
    if (event.detail.status === 'FINISHED') {
        // set behavior after a finished flow interview
    }
}
Usage Considerations
Thelightning-flow component only supports active flows for the flowApiName attribute.
The onstatuschange event returns these parameters.
Parameter
Type
Description
activeStages
Object[]
The current value of the $Flow.ActiveStages variable in the flow. Available in API version 42.0 and later.
currentStage
Object
The current value of the $Flow.CurrentStage variable in the flow. Available in API version 42.0 and later.
flowTitle
String
The flow’s label.
helpText
String
The help text for the current screen. Available in API version 42.0 and later.
guid
String
The interview’s GUID. Available in API version 42.0 and later.
outputVariables
Object[]
The current values for the flow’s output variables.
status
String
The current status of the interview.
These are the valid status values for a flow interview.
STARTED: The interview is started and ongoing.
PAUSED: The interview is paused successfully.
FINISHED: The interview for a flow with screens is finished.
FINISHED_SCREEN: The interview for a flow without screens is finished.
ERROR: Something went wrong and the interview failed.
Customizing a Flow’s Finish Behavior
By default, a finished flow without screens displays the message “Your flow finished.” A finished flow with screens returns users to the first screen for a new interview.
Change this behavior with the flowFinishBehavior attribute to manage whether a new interview should restart or only run once.
These are the valid flowFinishBehavior values.
NONE: The flow only runs once.
RESTART: The flow restarts once it has finished.
To customize what happens when the flow finishes, add an event handler for the onstatuschange action when the status value contains FINISHED.
https://unofficialsf.com/wp-content/uploads/2022/09/largeUCSF-300x133.png00Alex Edelsteinhttps://unofficialsf.com/wp-content/uploads/2022/09/largeUCSF-300x133.pngAlex Edelstein2022-08-22 12:19:412022-08-22 12:19:44Developer Topic: An Early Look at the Interface for the New LWC Flow Component