I’ve updated the Import/Export Flows utility to use the current version of the Flow Base Packs. I’ve also updated the Installation to use unlocked packaging links.
https://unofficialsf.com/wp-content/uploads/2022/09/largeUCSF-300x133.png00Eric Smithhttps://unofficialsf.com/wp-content/uploads/2022/09/largeUCSF-300x133.pngEric Smith2023-03-18 10:28:272023-03-18 10:28:33Import/Export Flows Has Been Updated
Flow and Process Builder List View and Batch Delete has been updated so that it can now be installed into Production orgs. Find the latest install links and instructions here:
https://unofficialsf.com/wp-content/uploads/2022/09/largeUCSF-300x133.png00Eric Smithhttps://unofficialsf.com/wp-content/uploads/2022/09/largeUCSF-300x133.pngEric Smith2023-03-15 10:37:082023-03-15 10:37:14Flow and Process Builder List View and Batch Delete has a new Update
https://unofficialsf.com/wp-content/uploads/2022/09/largeUCSF-300x133.png00Alex Edelsteinhttps://unofficialsf.com/wp-content/uploads/2022/09/largeUCSF-300x133.pngAlex Edelstein2023-02-26 16:38:462026-02-05 14:25:17From Streamscript, a scripting environment that runs inside your flows
You can enable users to make ChatGPT queries from within a screen flow:
Andre writes:
When at the end of 2022 ChatGPT became all the hype, I wondered what could be done with it when integrated with Salesforce? Could you unlock new ways CRM data would be utilized when an integration is done? What would be potential use cases?
So, where did I start? A few weeks back I asked GPT3 to create some code for me integrating Salesforce with its API. The code looked good but took some time to fine tune. After all, I finally made it, writing an integration into OpenAI’s API. What were the main guidelines I was following when architecting the solution?
1. It should be suitable for low-code and no-code tools inside Salesforce
2. Although ChatGPT is great, it lacks some freedom when it comes to training your own model or even choosing which model you would like to use. There are differences in OpenAI models all along the road.
3. It should be as secure as you are used to working with Salesforce. So you should be able to define an organization and other parameters to have full control over the integration and data flow.
I set to work writing some APEX class that does exactly that – creating an invocable action so that GPT could be utilized from flow.
With that developed, I created a simple use case that will help service experts: decent knowledge management is one of the hardest things to achieve in a servicecenter. So, why not ask GPT about something you might not have in your knowledge base as of now?
With the integration of OpenAI API, one could start training a bespoke model with your company’s manuals and documentation frequently used at your service centers – without the need to write a knowledge article about it. Since the integration is being built in flow, you could even add additional record data to it. I. e.: “how to start a generator of series 3000?” -> After all, this will speed up things and may make your knowledge base so much more powerful.
I have provided a sample flow called OpenAI Connect Template. [NOTE: the flow is not included in the package because it requires the creation of a custom object and custom field. However, the flow is available in the source repository and can be deployed if you create those objects. See Virginia Leandro’s comments below). You can place it on every lightning record page you like. You can see how it is utilized in the short screencast below.
Establishing a connection to ChatGPT
Go to https://openai.com/ and register. Head over to your account, click “Settings”. Copy your Organization ID to some keyvault of your choice.
Next, head over to API Keys and create an API key. Copy that to the keyvault of your choice. We will need both values later when setting up credentials to connect to OpenAI API.
What you need to get started with flow:
Create a permission set. We will need that to store the credentials. I haven’t added one in the package, feel free to provide information of your liking with it.
Create an external credential (i.e. named “OpenAI”) to provide the configuration for your authentication. Make sure to define “Authentication Protocol” as “Custom”
Use the created permission set to map the credentials to that are needed for your (company) account with OpenAI. Next to permission set in external credential, click new. Provide 2 parameters. One for API Key, one for organization. Value will be the keys we have fetched from OpenAIs site, stored in your keyvault before (or you copy them across on the fly). Make sure to define the mapping for identity type “Named Principal”.
Once the external credential and permission set mapping is created, make sure to provide the right custom headers:
Now, set up a named credential to access the right endpoint. You could actually define more than one named credential and access other endpoints. For now, the only endpoint supported is the “completions” endpoint by OpenAI. Head over to “Named Credentials” and click “new”. Fill in the values as stated below. Important, check “Allow Formulas in HTTP Header” and uncheck “Generate Authorization Header”. That is being done by our external credential using formulas. Therefore, relate the external credential we just created.
Set up a remote site to allow access to openAI.
DONE! You are done setting up the background configuration. Now, let’s configure the flow to finally go with the flow 😉 .
Now, let’s head over to flows and make some final configurations in the sample flow. That will help you get started as soon as possible.
—-Sample Flow not included in package.
Make sure the Open AI Endpoint Name matches the named credential you defined the completions endpoint with (there is one predefined, if you use the same values, it will work).
Once all those steps are done, you can save the flow, activate it and start your first debug!
In conclusion, by integrating OpenAI’s API with Salesforce, you can unlock new possibilities in utilizing CRM data. The integration, developed as a low-code or no-code solution within Salesforce, ensures security and allows you to control the data flow and parameters with ease. The integration allows you to utilize GPT directly from Salesforce flows, opening up new opportunities to enhance the capabilities of your CRM system. With the set up of external credentials, named credentials, and remote sites, you can connect to the OpenAI API and start utilizing the power of GPT within your Salesforce environment.
https://unofficialsf.com/wp-content/uploads/2022/09/largeUCSF-300x133.png00Alex Edelsteinhttps://unofficialsf.com/wp-content/uploads/2022/09/largeUCSF-300x133.pngAlex Edelstein2023-02-08 20:35:442023-02-20 15:31:19From Andre Tawalbeh: Tap into the Power of ChatGPT via Flow
Over on the official Salesforce Developer Blog the team published a critical addition to Salesforce’s compendium of best practices knowledge. While there’s plenty of articles out there that outline LWC best practices, very few talk about LWCs within screen flows.With the upcoming Reactive Screens effort going Beta (and GA this year), it is more important than ever to understand how to handle navigation events and properly tracking changes within your custom components.
Let us know what you think in this LinkedIn post or the comments below.
https://unofficialsf.com/wp-content/uploads/2022/09/largeUCSF-300x133.png00Adam Whitehttps://unofficialsf.com/wp-content/uploads/2022/09/largeUCSF-300x133.pngAdam White2023-02-02 07:38:162023-02-02 07:38:23Developer Blog: LWC Best Practices for Screen Flows
Kevin is arguably the world leader in integrating Flow and Slack!
This post is dual-purpose: 1) to educate on how to make a screen flow available in slack and 2) to provide a downloadable example of a real world use case.
This previous blog post (https://unofficialsf.com/running-screen-flows-in-slack/) provides exceptional detail into how Salesforce screen flows can be sent into Slack, including the required permissions and initial setup steps. This post assumes you have authorized Slack to connect with Salesforce and focuses on the flows and use cases themselves.
In short, Slack screen flows depend on _two_ flows being created:
the first, the actual screen flow that serves as the modal UI for end users in slack.
This flow must be activated before the second flow
and the second, the “dispatching” flow that sends the screen flow to the Slack channel/user of your choice.
Example Use Case and Demo Component:
If you have not yet begun to leverage Swarming in your customer service operations, it is an incredibly effective way for customer service agents to get answers faster by bringing in the right team of experts to collaborate and work toward a resolution. Rather than using chatter for that collaboration, Slack allows that team of experts to communicate in near real time in slack channels connected to Swarms, a new standard Salesforce object.
The general premise of a swarm is simple: an agent is working on a case (or problem, incident or change request!) in Salesforce and needs help. The out of the box “Begin Swarming” flow allows the agent to create a channel in Slack directly from the Service Console, invite team members to the slack channel, and creates a Swarm and Swarm Member object(s) related to the case. The channel in slack serves as the collaborative hub for the team to solve the issue, and contains a button with the option to “Finish Swarming”. The bidirectional aspect of this scenario is unfortunately limited. Clicking Finish Swarm merely closes the swarm object record. A subsequent Salesforce release included a second flow which would auto close the case as well; however, this process is lacking the ability for members of the slack channel to make additional edits to the case or make free text commentary to summarize their findings.
This packaged solution aims to supplement the swarming experience by providing a more ample wrap up opportunity. It hinges upon two flows: a record triggered flow on the Swarm object that “dispatches” a separate screen flow to slack.
Upon closure of the swarm, a message is sent into the swarm channel with a button to open a screen flow. The recipient, message, and button are cofnigured within the dispatching flow. The screen flow contains multiple input fields which will then update the record related to the swarm. Once installed, the screen flow is configured to update the following fields:
Case
Status
Case Reason
Close Summary Notes (a custom field included in the package; give your users access via the Swarm Wrap Up Slack Flow permission set and add to page layout as desired)
Problem
Status
Root Cause Summary
Change Request
Status
Close Summary (a custom field included in the package; give your users access via the Swarm Wrap Up Slack Flow permission set and add to page layout as desired)
Incident
Status
Resolution Summary
The fields available for input and update can be configured by updating the “wrap up screen” and “update records” elements within the screen flow. See attached video.
Pre install steps
Assumes you’ve enabled the slack to Salesforce integration, swarming, and your user has authenticated the service cloud for slack app
Post install steps
Assign “Swarm Wrap Up Slack Flow” Permission Set to swarming users so that they may edit the Case.Close Summary Notes and Change Request.Close Summary fields
Add these fields to page layouts if desired
Edit the “Swarm Wrap Up Slack Dispatching Flow” so that it points to your authenticated Slack workspace
https://unofficialsf.com/wp-content/uploads/2022/09/largeUCSF-300x133.png00Alex Edelsteinhttps://unofficialsf.com/wp-content/uploads/2022/09/largeUCSF-300x133.pngAlex Edelstein2023-01-19 17:52:142024-07-08 13:08:19From Kevin Luptowski: Tips and Use Cases for Running Screen Flows in Slack
Some Flow extensions use Salesforce public API’s. They basically go out from your org, into the Internet, and then back into Salesforce. When they do this, they run into some of the web security that Salesforce uses to protect your org. These registrations are called Remote Site Setting. For API’s on the public surface of your org, you have to register the URL of your own org onto your org. (If this sounds strange, you’re not alone.)
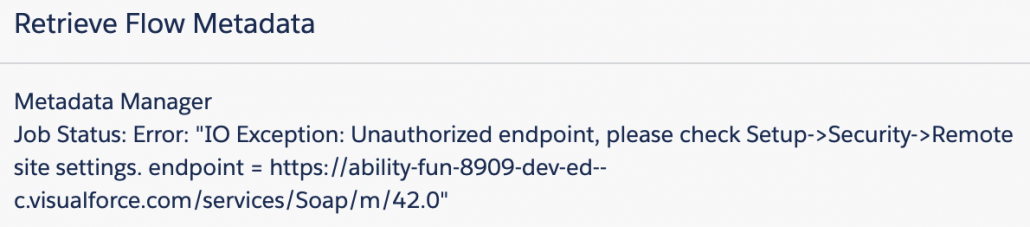
If you haven’t done this and you try to run a Flow with an extension that uses these apis, you’ll see an error. Here are a couple of examples of how this error might show up:
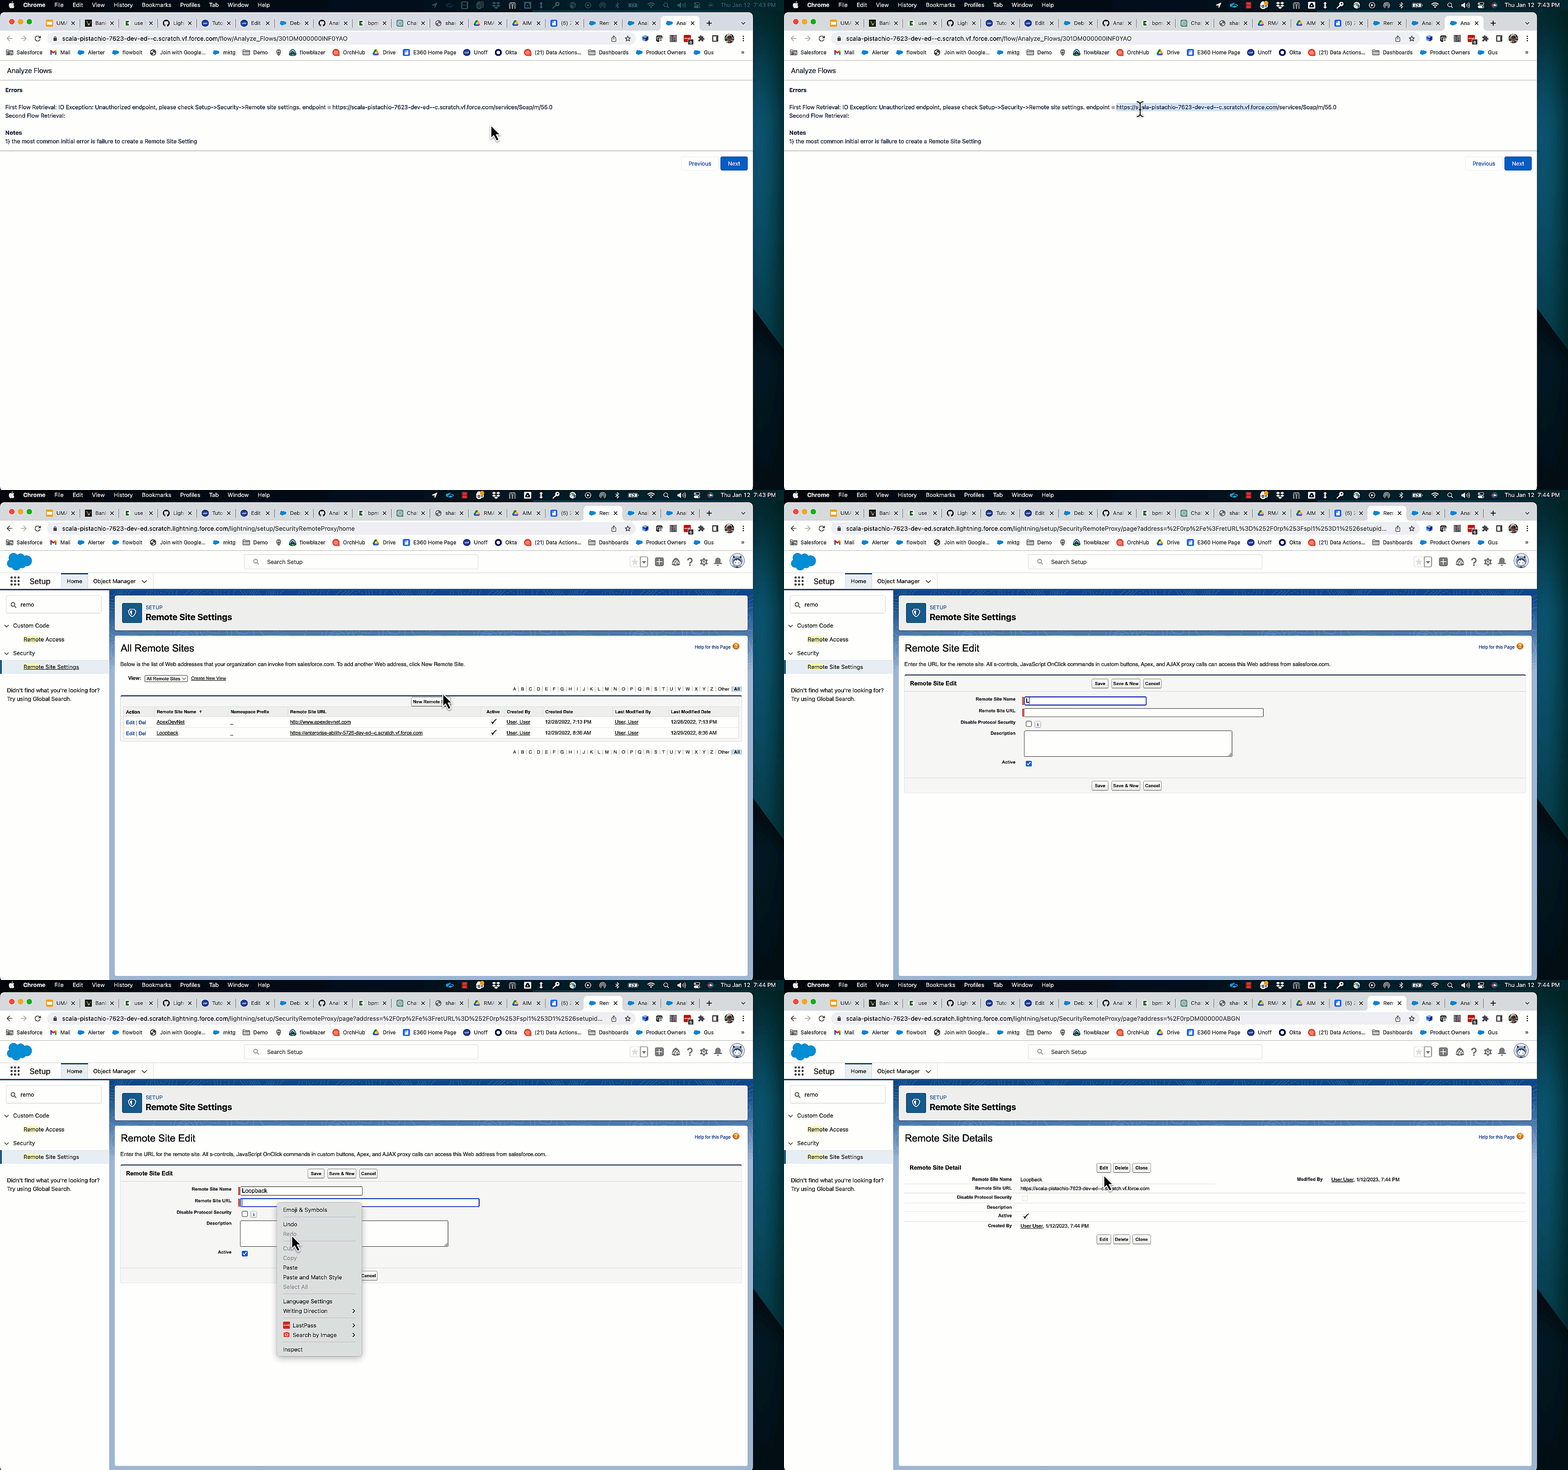
To address this, copy the initial part of the endpoint in the error message to the clipboard. in the example above on the right, that would be
To address this, copy the root url from the error message and go to Setup –> Remote Site Settings. Create a new setting and paste the URL there:
This configures your org to essentially allow applications to run that call out to the internet and then back into the same org via its api endpoints.
https://unofficialsf.com/wp-content/uploads/2022/09/largeUCSF-300x133.png00Alex Edelsteinhttps://unofficialsf.com/wp-content/uploads/2022/09/largeUCSF-300x133.pngAlex Edelstein2023-01-12 19:49:442023-01-12 19:49:49Working with Remote Site Settings
For a long time, we’ve wanted to address the manageability gap that Flow has regarding version control: There has never been a practical way to compare two versions. This new Flow application provides a set of comparison tools.
Here’s an example of the kind of report that gets generated when two versions are compared:
The initial release includes several useful analysis modules, but hopefully that’s just the start. Analyze Flows is designed as a framework so that additional analysis plugins can be added to it. Right now, it doesn’t have 100% coverage for all possible changes, but if there’s interest in this, we should be able to keep adding coverage.
To use the Analyze Flows tool, install this package, and run the Analyze Flows flow. Select two versions of the same flow. As an example, we’ll analyze this flow:
Let’s compare version 3 to version 2:
Note that you need to set up a Remote Site Setting to authorize Flow to make use of your org’s external API’s.
Here’s the report that’s generated:
The report points out that an Update Record element called Update Case was removed. Let’s visually verify that. Here’s version 2 and version 3, side by side:
Now let’s compare version 3 to version 4:
There are a couple of new Assignment elements. Let’s run the analysis:
There’s a bunch of information here:
The first two rows report the presence of two completely new Assignment elements. These are the ones in the red box, above.
The next three rows, however, refer to a different element. It’s also an Assignment element, but it’s the one called ‘Assign to Variable:
This ‘Assign to Variable’ element is present in both Version 3 and Version 4. However, it’s configuration has changed. And here some of the power of Analyze Flows is displayed. The fifth line of our report draws attention to an ‘AssignmentItem’ that now has a value of 67. This turns out to be the right-hand-side of one of the Assignment Rows. Let’s compare version 3 and version 4, but focus on the property editor of that one element:
In V1, this configuration-level comparison is supported for: Create Records, Delete Records, Update Records, Screen, Action, Start, Subflow, Decision, Assignment
Not Yet Supported
Wait, Loop, Formula, Choice, Text Template, Steps and Stages (Orchestration), Process Metadata Values, Rollback Records
This new lwc enables the selection of two specific versions of two flows:
It returns the names of the selected flows. Note that it appends the selected version number to the apiName, like this: Test_Flow-1. This is how you request a particular version when retrieving Flow metadata.
It’s available for reuse.
https://unofficialsf.com/wp-content/uploads/2022/09/largeUCSF-300x133.png00Alex Edelsteinhttps://unofficialsf.com/wp-content/uploads/2022/09/largeUCSF-300x133.pngAlex Edelstein2023-01-10 21:56:112023-04-03 12:36:43‘Analyze Flows’ Compares Two Flow Versions and Reports on the Differences
Check out these early introductions from Josh Dayment, Andy Utkan, and Daryl Moon. This is a truly disruptive feature because every time someone makes a new Action using the official HTTP Callout tool, it generates a piece of External Service metadata that’s packageable and redistributable. So, for example, if 3 or 4 of the Flowhana get together on a Friday afternoon and divide up the, say, JIRA API, and generate actions for all of its calls, the results can be put in a package that can be put on App Exchange and installed anywhere.
https://unofficialsf.com/wp-content/uploads/2022/09/largeUCSF-300x133.png00Alex Edelsteinhttps://unofficialsf.com/wp-content/uploads/2022/09/largeUCSF-300x133.pngAlex Edelstein2023-01-08 09:12:512023-01-10 21:34:25Tutorials for the New ‘Action Builder’ (HTTP Callout) in Flow Spring ’23
Editor’s Note: UnofficialSF is pleased to enable commercial creators of Flow extensions like Drive Connect to introduce their products and demonstrate useful use cases. One of our goals is to see a rich tier of commercial solutions in addition to the many free extensions that will continue to be available.
Content provided by Drive Connect
Drive Connect leverages Salesforce flows to automate the creation of files and folders in Google Drive and associate them to the appropriate Salesforce records by storing their url links as content version records. Now users can create intricate folder structures within seconds rather than wasting time in Google Drive, without any code!
Drive Connect was built to work natively in Salesforce. The Automate Drive Flow action has a custom property editor that simplifies the process of building your Drive operations. Some common use cases include:
Automating the creation of folders for your accounts upon record creation, then creating folders for the opportunities that will live under the account folder
Automation of quotes, orders, or proposals using our merge field based templates on Opportunity Closed Won stage
Linking existing account folders to new opportunities upon record creation
Understanding Automate Drive Options
The Automate Drive action allows you to execute a wide variety of functions from Salesforce. Drive Connect requires a record ID to know what is the record initiating the operations, and the most common means of getting this ID is to trigger the flow via a record change. Multiple actions can be built to execute in a specific sequence and hierarchically all from within the custom property editor. Let’s get familiar with what each operation does at a high level.
New Drive Folder – The ability to create new folders in Google Drive. You are able to leverage native Salesforce merge fields to create custom folder names (example: you can create a folder with the same name as the record triggering your flow). You are also able to choose the destination of where the folders will live in Google Drive.
New Folder Link – Link an existing folder from either a lookup relationship on the object or from selecting a folder in Google Drive
New File Link – Link an existing file from either a lookup relationship on the object or from selecting a file from your Google Drive.
Update Drive Folder – Choose a folder to update the name or the location of. This is useful when you want to move an opportunity folder to a different location once the stage has hit Closed Won or Closed Lost.
Update Drive File – Choose a file to update the name or location of.
New File from Template – This operation will generate a document leveraging Drive Connect’s document generation functionality. You’ll need to choose a template, the file format it will be formatted as (PDF, Google format, or Microsoft equivalent), and the resulting file will be created in Google Drive.
Additionally, you can add child operations to many of the operations listed above without having to add a new flow action. Examples of these are:
Save a copy of the file to Salesforce
Create a shortcut of the file in a different location
Link the file to a parent record via lookup relationships
Update a field on the record with either an ID or URL of your choice
Take a look at our help documentation for a full overview of our drive operations.
Use Case Example 1: Automatic Folder Creation for Accounts and Opportunities Based on the Stage field.
Let’s take a look at a common use case where a Salesforce org needs proper naming conventions for their Google Drive folders for Accounts and Opportunities. Everyone is familiar with a cluttered and unorganized drive, thankfully Drive Connect can provide order to how your folders are structured so employees can always find what they are looking for.
First off, you’ll need to install the Drive Connect app. We offer a 14 day free trial so you can set up this entire automation and see it in action before purchasing.
Alright, let’s move on to our first use case. MarvelPoint Real Estate is using Salesforce to keep track of its sales pipeline. Currently the sales team is manually creating folders for their accounts in a “Clients” folder in a shared drive. When a new opportunity arises, they manually create a folder in Google Drive under that account. Ideally the name of that folder is the same as the Opportunity name.
In this opportunity folder, 2 folders need to be created. One is for “Legal” and one is for “Pictures”.
In order to keep track of the right folder in Salesforce, they created a custom URL field on the object. The salesperson needs to remember to copy the Drive Folder URL and paste it into the field, otherwise there would be 0 connection between the two systems.
This needed to be done for every Account that was created in Salesforce and is a tedious task to do manually. MarvelPoint was seeking a better way in organizing their folders and files as the team often forgot to create the folders in the right naming structure, which led to duplicate folders.
This is where Drive Connect and Salesforce Flows come into play. MarvelPoint wants to create a flow that will automate the creation of their folders.
The first thing they do is create a new flow. Since MarvelPoint wants to create a new folder for all new accounts being created, let’s start there.
Drive Connect leverages Record Triggered Flows in Salesforce to run automations.
Let’s choose the Account object to trigger this flow. Since MarvelPoint wants folders to be created for all new accounts created, let’s leave the other options as default.
Next, we will add an action and search for the Automate Drive action. For this flow, we will use the New Drive Folder action. Here we will create a folder using the account name. You can select a field from the Account object or one that is related to the account object via lookup.
Next, we will choose a destination for the folders to live under. MarvelPoint desired to place their account folders under a shared drive called “Clients”.
Linking the folder to the record simply requires you to check the checkbox. We’ll also want to upload files to this folder so checking it as the default record folder will have any new files and folders created from that record default to live under that folder.
An additional request from MarvelPoint was to create an “Opportunities” folder under this account folder to house all of their opportunities. In order to do so, a child operation must be created under the folder we just created where you will use the New Drive Folder operation again. Multiple child folders can be created under a parent folder and child folders can even be created under those child folders if desired.
Here is a demo video showing you how to set up a similar flow we just described.
Alright, so we’ve completed our folder structure for the accounts folder. Once that’s activated, we can go ahead and create another flow for our Opportunities.
Use Case Example 2: Creating and Linking a Child Folder Conditionally
This use case will behave similarly to the last, but the stipulation for this flow is that we only want to create a folder if the stage has hit “Qualification” as Marvelpoint does not want to create folders for unqualified records. We also only want this to run once so we should only allow the flow to run when the record is updated to meet this specific condition.
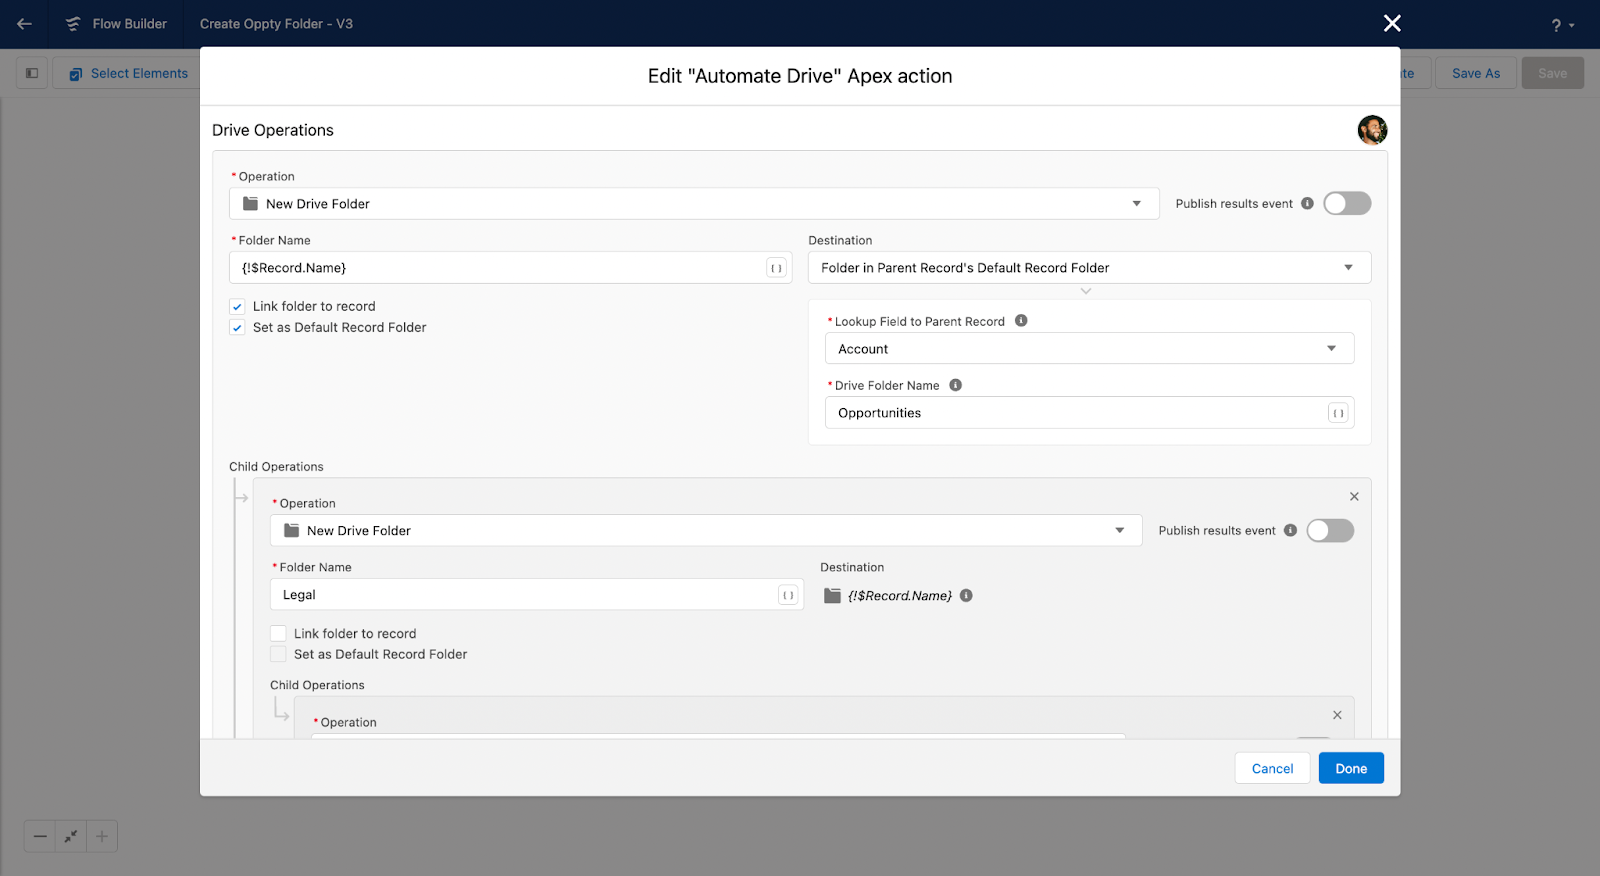
Now let’s add an Automate Drive action. We will create a New Drive Folder with the name of the opportunity using a merge field. We want the destination of this folder to live under the Account folder’s subfolder called “Opportunities”, so we will choose the option “Folder in Parent Record’s Default Record Folder”. Next we need to choose which lookup field from the opportunity record to be the parent folder, which in this case is the account lookup field. Then we will type in the name of the subfolder, which is “Opportunities”.
We will also create two child folders, one named “legal” and one named “photos”.
Use Case Example 3: Creating a Document in a Folder
Finally, let’s create a child operation under the legal folder and place a document in it. The action we will choose is the File from Template option. From here we will choose a template from our templates folder that can be created using Drive Connect’s Document Generation technology. We will create an NDA document as part of this automation. This document will live in the legal folder as every opportunity will need its own NDA.
That’s all that MarvelPoint needs to get their sales team going so let’s save and activate this flow as well.
Now that our flows are activated, let’s see it in action. First, let’s create a new account. Once the account is created, we’ll see the Google Drive folder with the name of the account linked to the record.
When clicking on the folder, notice that our “Opportunities” folder lives within it.
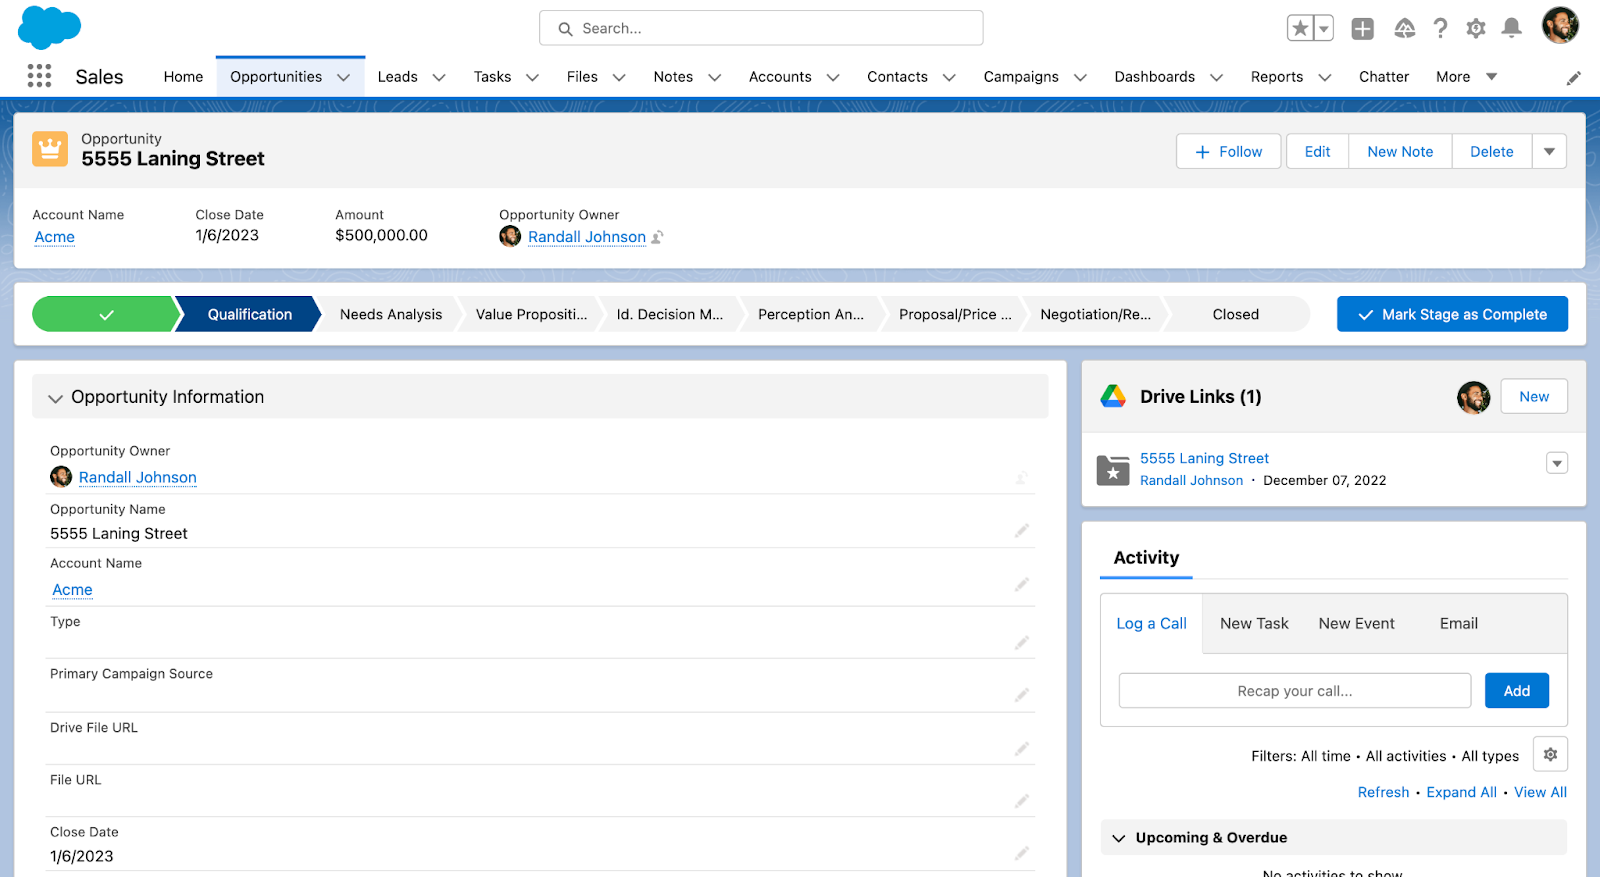
If we create an Opportunity record in Salesforce and change the status to “Qualified”, we’ll see files and folders created in Google Drive.
Clicking on the folder will show you your subfolders and if we click on the legal folder, you’ll see the NDA document in there and ready to be sent off.
Now MarvelPoint’s sales people will never be confused about where to upload their documents when working on their deals. On top of that, MarvelPoint is experiencing significant cost savings since they moved all their files to Google Drive from Salesforce.
Learn more about DriveConnect at https://driveconnect.me/, or check out our AppExchange listing! We offer a 14 day free trial of the app, no credit card required.
https://unofficialsf.com/wp-content/uploads/2022/09/largeUCSF-300x133.png00Alex Edelsteinhttps://unofficialsf.com/wp-content/uploads/2022/09/largeUCSF-300x133.pngAlex Edelstein2023-01-03 06:52:252023-01-03 07:17:48From Drive Connect: Automate the Creation of Google Drive Folders using Salesforce Flow