The newest feature is Pagination. You can now specify how many records to show at a time and allow the user to page back and forth through the table.
A reactive Table Header is another new addition to this release. You can use a Text Temple, Formula or any other reactive component as part of your table header.
Based on feedback on how users were configuring the component, I moved the Configure Columns button from the top to the bottom of the Table Formatting section of the Property Editor.
Bug Fixes
The following bugs have been addressed in this release.
Fixed a bug where the maximum number of rows to be displayed gets cleared
Fixed a bug where an invalid link would show when an Apex Defined Lookup field was empty (@spyros-michailidisspyros-michailidis PR#1524)
Fixed an install issue with ers_DatatableController.cls if the target org has a class named “Test”
Fixed a bug where Date fields from External Objects would show as blank (@philipnovak-pentair PR#1529)
Notes
If you also update the FlowActionsBasePack to v3.16 or later and the FlowScreenComponentsBasePack to v3.3.3 or later, the object selector for Datatable and many other USF components will now support standard objects released since API version 53.0. The most recent supported version is now API 60.0.
This release of Datatable will not yet retain selected rows when changing Search Terms, Column Filters, Sorting or Pagination. This support is planned for a future release.
https://unofficialsf.com/wp-content/uploads/2024/04/Pagination.png2981002Eric Smithhttps://unofficialsf.com/wp-content/uploads/2022/09/largeUCSF-300x133.pngEric Smith2024-04-10 08:04:192024-04-10 08:04:25New Datatable Features
This Post was most recently updated on: 4/7/24 Current Version: 1.0.0
Recently I was trying to convert a JavaScript button from Salesforce Classic to Lightning that was designed to take the user to an external link for the DocuWare application.
Normally, for this type of link, I like to create a Screen Flow with a custom button and the Navigate Everywhere component and use a Text Template to define the URL to navigate to.
This project was a bit trickier because the button was referencing a deprecated JavaScript function (btoa) that’s designed to encode a String as a Base64 representation.
There is no standard function in Flow that will handle this type of conversion so I created a new Invocable Flow Action that will convert any Text to Base64. With this new action I was able to create my Text Template URL for the navigation action.
My input to the ConvertTextToBase64 action was a text template which identified the string I needed to convert.
ttCaseNumber
[FIELD_10] = “{!recordId.CaseNumber}”
The URL text template used as the input to the Navigate Everywhere action was then able to reference the output of the ConvertTextToBase64 action.
I was able to join with Eric Smith and Rubin Roy to do a 40 minute breakout on Invocable Actions at TDX24. It gave us the chance to really put some fresh updated content together. Check out the video and the deck, below.
https://unofficialsf.com/wp-content/uploads/2022/09/largeUCSF-300x133.png00Alex Edelsteinhttps://unofficialsf.com/wp-content/uploads/2022/09/largeUCSF-300x133.pngAlex Edelstein2024-04-05 10:50:522024-04-07 08:14:20Invocable Actions – A Great New Overview Presentation and Video
This article will go through examples in-depth on creating a Data Table with multiple levels of complexity:
Single Dimension
Multidimensional
Multidimensional Criteria With Reactive Components
Extending Our Criteria With SOSL
Before We Start – How Data Fetcher and Reactivity Work Together
The solutions discussed here make use of and require the Data Fetcher component. Data Fetcher enables you to dynamically query Salesforce records using SOQL and SOSL to return records in a collection variable based on user interaction on a screen flow. For example, a user can select a specific query from a picklist and return those records to a data table.
As a project manager, I need to be able to identify which consultants are a good fit for the project that I am staffing using the individual’s department..
Data Fetcher Eliminates Steps
Prior to this package, this would have to be built using separate screens with a GET RECORDS between them. With reactive screen flow components we could dynamically show the criteria on the first screen, but the GET RECORDS would still be in between.
Note that in this scenario, to adjust the Department we had to go back to change the value then repeat the GET RECORDS.
When we add the Data Fetcher component to the screen, we’re able to query for our record data without leaving the screen. To do this we tap into screen reactivity and so need to use reactive components. , I have switched the Picklist component to Quick Choice for the reactivity with Data Fetcher and the Data Table.
Building Simple Formulas for Data Fetcher
To connect our QuickChoice component to our DataTable, we’ll load Data Fetcher with this formula:
Formula
“SELECT Id, Name, Department, Tenure__c FROM Contact WHERE Department= ” + {!DepartmentQuickChoice.value}
See the components that were used below as well as a video walking through the logic for this.
Multidimensional
Sub Use-Case
As a project manager, I need to be able to identify which consultants are a good fit for the project that I am staffing using a list of different types of criteria.
Now we have our single-screen experience to identify the best resource. Our sub-use case requires another dimension for different types of criteria.
In this version we are using two different types of input fields, Quick Choice and Slider. We are using these because we need to be able to pull the “value” into the formula.
Now we have two dimensions in our query for Data Fetcher and thus the Data Table. Note in the formula that we couldn’t just use the value from the Tenure input, but had to convert it to TEXT first.
Formula
“SELECT Id, Name, Department, Tenure__c FROM Contact WHERE Department= ” + {!DepartmentQuickChoice.value} + “AND Tenure__c>=” +TEXT({!Tenure.value})
Aggregated Queries
Data Fetcher is not only great for managing the queries for a Data Table, but also for getting aggregations such as SUM or COUNT.
With what is available OOTB today with Flows, you are not able to do any sort of aggregation for search results. At best, we use assignments to handle a similar count, but this would require splitting up this experience into multiple screens/sections.
This is another reason why SOQL and SOSL are so powerful to use with Data Fetcher as part of our user experience.
Below you can see the Total Results reacting as the Tenure slider moves up and down.
Formula
“SELECT Count(Id) FROM Contact WHERE Department= ” + {!DepartmentQuickChoice.value} + “AND Tenure__c>=” +TEXT({!Tenure.value})
Multidimensional Criteria With Reactive Components
Our original use-case was: As a project manager, I need to be able to identify which consultants are a good fit for the project that I am staffing using a list of different types of criteria.
Now with a combination of reactive components, we have the following all embedded in a single experience:
“SELECT Id, Name, Department, Tenure__c, Notes__c, Title,Ptnr_Onbd_Fmwk__Onboarding_Status__c FROM Contact WHERE Department= ” + {!DepartmentQuickChoice.value} + “AND Tenure__c>=” +TEXT({!Tenure.value})
Extending Our Criteria With SOSL
Suppose you want to solve for multiple attributes within a single criteria. This could be multiple skills for a contact, where skills are stored as a custom object and are based on records.
With SOQL statements, we would require the data to be structured to the point where each skill would require its own lookup to map to a specific field on the contact. This is not an optimal experience.
With SOSL, you would be able to extend the search capabilities across multiple attributes within the criteria and not need the data to reside in specific mapped fields.
Here, I wanted to build a way to use a list of skills that our Project Manager in the original use-case can use to further filter their talent.
So, how do we do this with SOSL and Data Fetcher?
First, we need a multi-select option to select our skills that will output all of the records in a consistent format. Enabling multi-select for the standard lookup input will work well as a simple UI for a user to interact with.
Once we have the output, then we need to be able to do a query off of it.
The output of the lookup component looks like:
a7cHs0000006Bp8IAE,a7cHs0000006BpDIAU
The challenge with this is that a SOSL statement requires the use of “ OR” in order to add multiple search terms. So we need to clean the output before passing it to the actual SOSL statement. To do this, I used the Substitute formula.
Original SUBSTITUTE function:
SUBSTITUTE({!Skills.recordIds}, “,”, ” AND “)
The next challenge with this is that this will only substitute the first “ ,” and not any subsequent. So we need to iterate on this to match the number of records we allow the user to search for in the lookup.
The first iteration of the clean-up for the SUBSTITUTE is:
SUBSTITUTE({!CleanSkillsList1}, “,”, ” AND “)
Now our output from the lookup component is formatted the way we need it for our SOSL statement.
Specifically for the SOSL query, we have:
“Find {” + {!CleanSkillsList} +”} IN ALL FIELDS RETURNING Contact(id,name)”
Now, I can write a simple query to get the right contacts with the right skills (there is a separate flow that when a skill is added to the contact, we stamp the ID onto the record detail directly for this search).
New Use Case: Multiple Data Tables & Related Lists For A Consumer Goods Brand
Let’s look at another use-case that can be built with formulas and Data Fetcher. This solution also uses Flow Button Bar by David Fromstein.
As a Campaign Manager for a consumer goods brand, I want to make sure that every store (example Loblaws, Whole Foods, etc) has the right promotional setup so that we know that they are in compliance.
Effectively, this role wants to see images from a Promotion and compare it to the images from multiple store Visits.Note that visits are related to the account and the account represents the store.
SOQL query for Promotions
“SELECT Id, Name, Image_1_Preview__c, Image_1_View__c, Image_2_Preview__c, Image_2_View__c FROM Promotion WHERE Name =” + {!PromotionChoice.value}
SOQL query for Visits
“Find {” + {!DynamicStoreId} +”} IN ALL FIELDS RETURNING Visit(id,name,AccountId,cgcloud__Subject__c, Image_1__c ,Image_1_Preview__c,Image_1_View__c, Image_2__c, Image_2_Preview__c, Image_2_View__c WHERE cgcloud__Completed_Date__c > “+{!FromCleanDate}+” AND cgcloud__Completed_Date__c < “+{!ToCleanDate}+”)”
Example substitute formula to clean the lookup records
Thank you so much for following along with this article. I hope that it helped give some great ideas for how you can be leveraging Data Fetcher and Reactive Screen Flow Components.
If you have any questions or feedback, please comment down below.
https://unofficialsf.com/wp-content/uploads/2022/09/largeUCSF-300x133.png00Alex Edelsteinhttps://unofficialsf.com/wp-content/uploads/2022/09/largeUCSF-300x133.pngAlex Edelstein2024-03-25 14:38:512024-03-25 14:59:43From James Barker: Using Formulas with Data Fetcher to Reactively Push the Envelope’s Edge
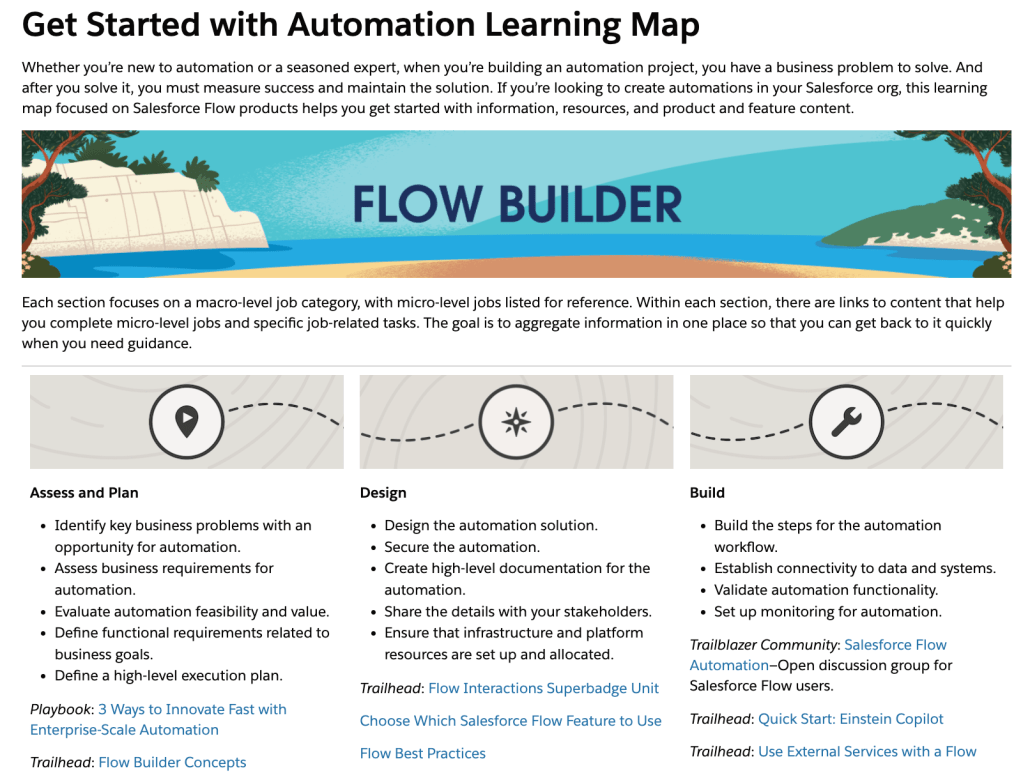
The Automation Roadmap breakout session has become a fixture at Dreamforce and TDX. It’s unquestionably the best view into work underway on Flow and Actions.
https://unofficialsf.com/wp-content/uploads/2022/09/largeUCSF-300x133.png00Alex Edelsteinhttps://unofficialsf.com/wp-content/uploads/2022/09/largeUCSF-300x133.pngAlex Edelstein2024-03-19 14:08:422024-03-19 14:08:48Check out the new Automation Learning Map
Editor’s Note: UnofficialSF is pleased to enable commercial creators of Flow extensions like Titan to introduce their products and demonstrate useful use cases. One of our goals is to see a rich tier of commercial solutions in addition to the many free extensions that will continue to be available.UnofficialSF receives no compensation for this.
Salesforce automation tools can help you stay ahead of the pack in today’s competitive business environment. They enable organizations to streamline operations, increase efficiency, reduce costs, improve accuracy, and focus on strategic initiatives.
Salesforce Flow is the silver bullet when it comes to streamlining business processes and automating tedious manual tasks. Salesforce Flow can automate various business processes across different departments and functions, such as marketing and sales, customer services and operations, and finance and human resources. With Salesforce Flow, you can streamline actions such as sending emails and custom notifications, executing business logic, manipulating data, and editing records in your CRM. Salesforce Flow empower you to create interactive and guided experiences by defining and automating a series of steps.
If you want to extract data from various files using the power of Salesforce Flow, you can get Salesforce Einstein AI for your Enterprise or Unlimited edition. Alternatively, you can harness the power of Titan and OCR.
In this use case, we will show you how to trigger Titan’s OCR (Optical Character Recognition feature) from within a Salesforce Flow. Combining Salesforce Flow and Titan OCR will allow you to seamlessly extract data from a variety of file types. Leverage the power of Salesforce Flow and Titan’s OCR feature to easily create and update records in Salesforce using AI functionalities.
Before getting started, you will need to have an API-enabled edition of Salesforce and to have installed your Titan package. Install Titan on the Salesforce AppExchange by clicking Get It Now, and following the prompts. Once Titan is installed, it’s also a good idea to read up on how to connect Titan to Salesforce.
Now you are good to go!
What is Titan OCR?
Titan’s OCR feature gives you the power to parse and extract data from documents automatically using Titan Vision AI. Customers can upload documents such as passports, driver’s licenses, and certificates, which are read by Titan. Data from these documents is then pushed to Salesforce in real time. Subsequently, a record is either updated or created in Salesforce using the OCR feature. In addition, native Salesforce files can be used to create or update records using Titan Flow. This gives you the opportunity to convert a file to data that can be used later to update information in Salesforce.
In this use case, we look at how you can trigger Titan OCR from within a Salesforce Flow to automatically read information from important files and push the information to Salesforce.
How Does Salesforce Flow Work with Titan OCR?
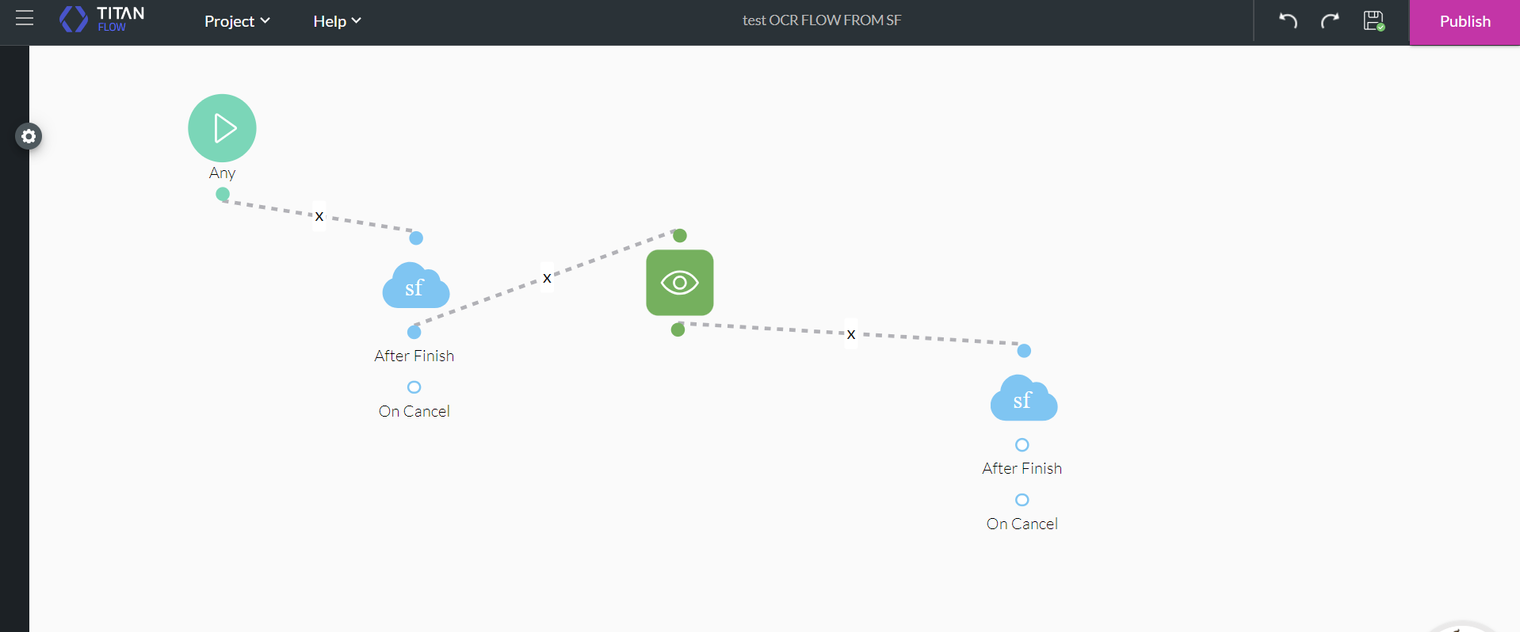
In this article, we examine a Salesforce Flow triggered by a record in Salesforce that then, in turn, triggers a Titan Flow. The Titan Flow gets the file related to the triggering record to the OCR of the file. Then the JSON of the OCR is pushed back to Salesforce to the triggering record. This is useful if you want to go beyond using a static file format (which Titan OCR can do) to create or update records in Salesforce.
In many cases, such as this, the customer works with multiple different formats that are also continually changing. So, in this instance, Titan OCR will extract this data to the JSON or plain text format and push this to Salesforce. This gives the Salesforce admin the ability to create a Salesforce automation (Apex) that will parse the data and create or update records accordingly.
Note: For those of you who are not familiar with Titan Flow, it is Titan’s process management tool. Not to be confused with Salesforce Flow, this tool enables you to combine different processes in the Titan platform, manage integrations to third-party systems, and perform unique actions that extend the Titan platform.*
Salesforce Flow & Titan OCR: Use Case Unpacked
Before using Salesforce Flow and Titan OCR, you need to make sure Titan Flow is set up to run a Get from the file related to the Account record.**
Let’s take a closer look at how this use case works by checking out the steps below:
Salesforce Flow
For this use case, our Salesforce Flow is triggered by an Account Object:
2. If we open up this trigger, you can see that the Salesforce Flow is triggered every time that it’s updated or created to meet the condition “field trigger_titan_flow_ocr_c equals True”.
3. Now that the Salesforce Flow trigger is set, an Action can be added. In the Action window, you need to run the “Form_Builder_TitanFlow” Action. This Action (and many more) comes with Titan’s AppExchange managed package.
In order to run this action, you need to paste the Titan Flow ftFormHash (which is copied after setting up Titan Flow) as well as the recordId of the Account that triggers the flow:
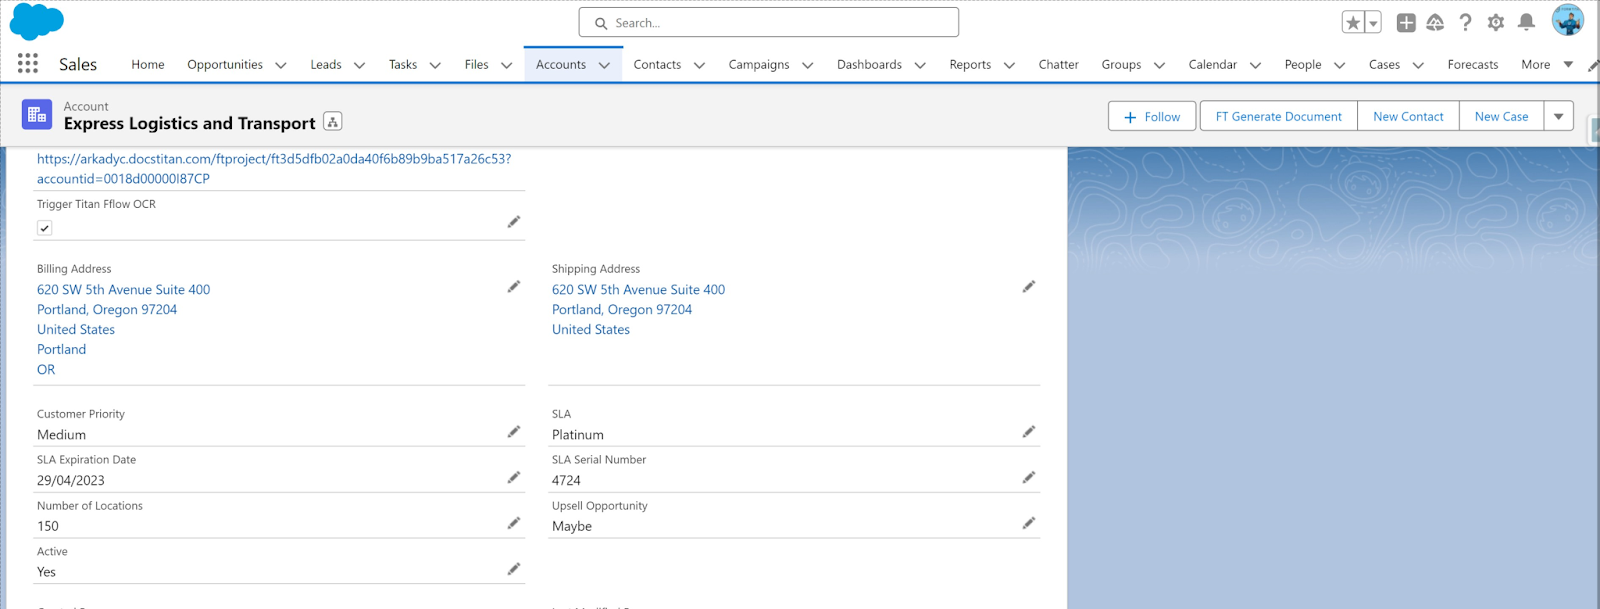
4. You will be able to browse to Salesforce and open the Account record, then find the Trigger Titan Flow OCR checkbox and click the Edit icon.
Note: There are other parameters that can be passed to the Titan Flow if needed. For this, you will need to toggle on “Don’t Include” and add parameters.
5. Click the Titan Flow OCR checkbox on the Account record and then the Save button.
6. Then in Salesforce Flow, which triggers Titan Flow, OCR is performed. And you will be able to see your piece of JSON in the Account record field:
Note: Here, we show you how to get this JSON and send it to Salesforce. You could also send it as a related file or a Flow Transform utility.
Bear in mind that if the format of your file is static, you can skip pushing JSON (as demonstrated above) and do straightforward creation or updating of fields and records in Salesforce.
Salesforce Flow + Titan OCR: Wrapped
And that’s a wrap on how you can trigger Titan OCR via a Salesforce Flow using no code and minimal configuration. Work with multiple and changing formats without breaking a sweat. This is only one example of how you can combine Titan and Salesforce Flow and there are many other cool actions you can perform with this no-code software.
Footnotes:
*See an example of Titan Flow set up for this use case:
Titan Flow gets the Account Record ID and then the file that is related to this account
Here are some examples of Salesforce and non-Salesforce actions and integrations you can run with Titan Flow:
** Set up OCR in Titan Flow:
Note: In this example, we use only one related file but there can be multiple files related to the record. If you choose, there can be multiple logic conditions added to this Get action. This determines the file/s the Get needs to fetch from Salesforce.
OCR is configured for this file by adding the Titan Vision AI node:
3. Then a Salesforce Action node is added to update the triggering record, in our case, the Account, and push the JSON into a Salesforce field or as a file attached to the Salesforce record.
4. For this use case to work in Salesforce Flow, we need the FormHash of the Titan Flow that has just been set up. Copy and save it by clicking “Publish” in the Titan Flow project:
https://unofficialsf.com/wp-content/uploads/2022/09/largeUCSF-300x133.png00Alex Edelsteinhttps://unofficialsf.com/wp-content/uploads/2022/09/largeUCSF-300x133.pngAlex Edelstein2024-03-06 10:38:252024-03-06 11:02:08From Titan: Combine Titan OCR with the Power of Salesforce Flow
Copilot is available for beta use as part of the Einstein SKU. Check out Adam’s Linked In post for more info.
https://unofficialsf.com/wp-content/uploads/2022/09/largeUCSF-300x133.png00Alex Edelsteinhttps://unofficialsf.com/wp-content/uploads/2022/09/largeUCSF-300x133.pngAlex Edelstein2024-02-28 10:31:582024-02-28 10:32:02From Adam White: Info on the new Copilot and how it works with Flow
The OOTB Flow available in Salesforce Scheduler makes it easy and fast to manage reservations/appointments on Salesforce. However, there are several things that cannot be achieved with the standard functionality.
This article introduces a LWC to solve the things that cannot be done with the standard functions in the Review Inbound or Outbound Service Appointment component (it is used in the appointment review screen, see the Salesforce help) that can be used in the Salesforce Scheduler Flow.
What the standard OOTB Flow cannot archive:
In the Scheduler OOTB Flow, when allowing end-users to enter data for custom fields on Service Appointment object, which are not displayed as populated values on the Review Inbound or Outbound Service Appointment component (e.g., custom reference field for Asset).
Service Appointment layout is synchronized with the fields displayed in the [Review Inbound or Outbound Service Appointment] component, so if you delete the above custom fields from the layout, it will also be deleted from the record layout (if the custom field is important for your appointment, you will not be able to understand what the appointment is for).
In order to save custom field values in the Service Appointment record entered during the Scheduler Flow, a JSON variable must be created in the Flow with using a formula (see this Chris’s article in What if I wanted to set the values for the serviceAppointmentFields variable myself? section)
Certain fields cannot be removed from the [Review Inbound or Outbound Service Appointment] component (e.g. Work Type, Parent record, Address)
Therefore, if you want to utilize the OOTB Flow, but do not want to develop all appointment screens and have issues with the standard appointment review screen, the LWC presented here may work for you.
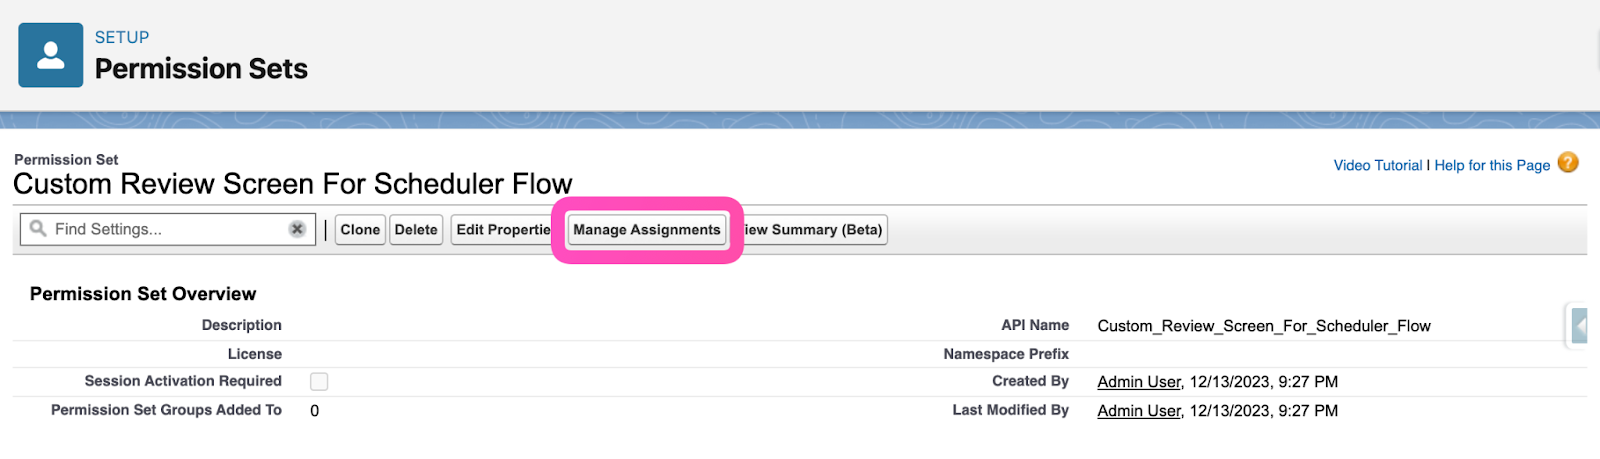
After installing the package, assign the Permission Set to the Flow execution user.
Note: This Permission Set gives only Apex Class access that is used by LWC, there is no problem with granting Apex Class (FieldLabelController) access directly to the target user profile.
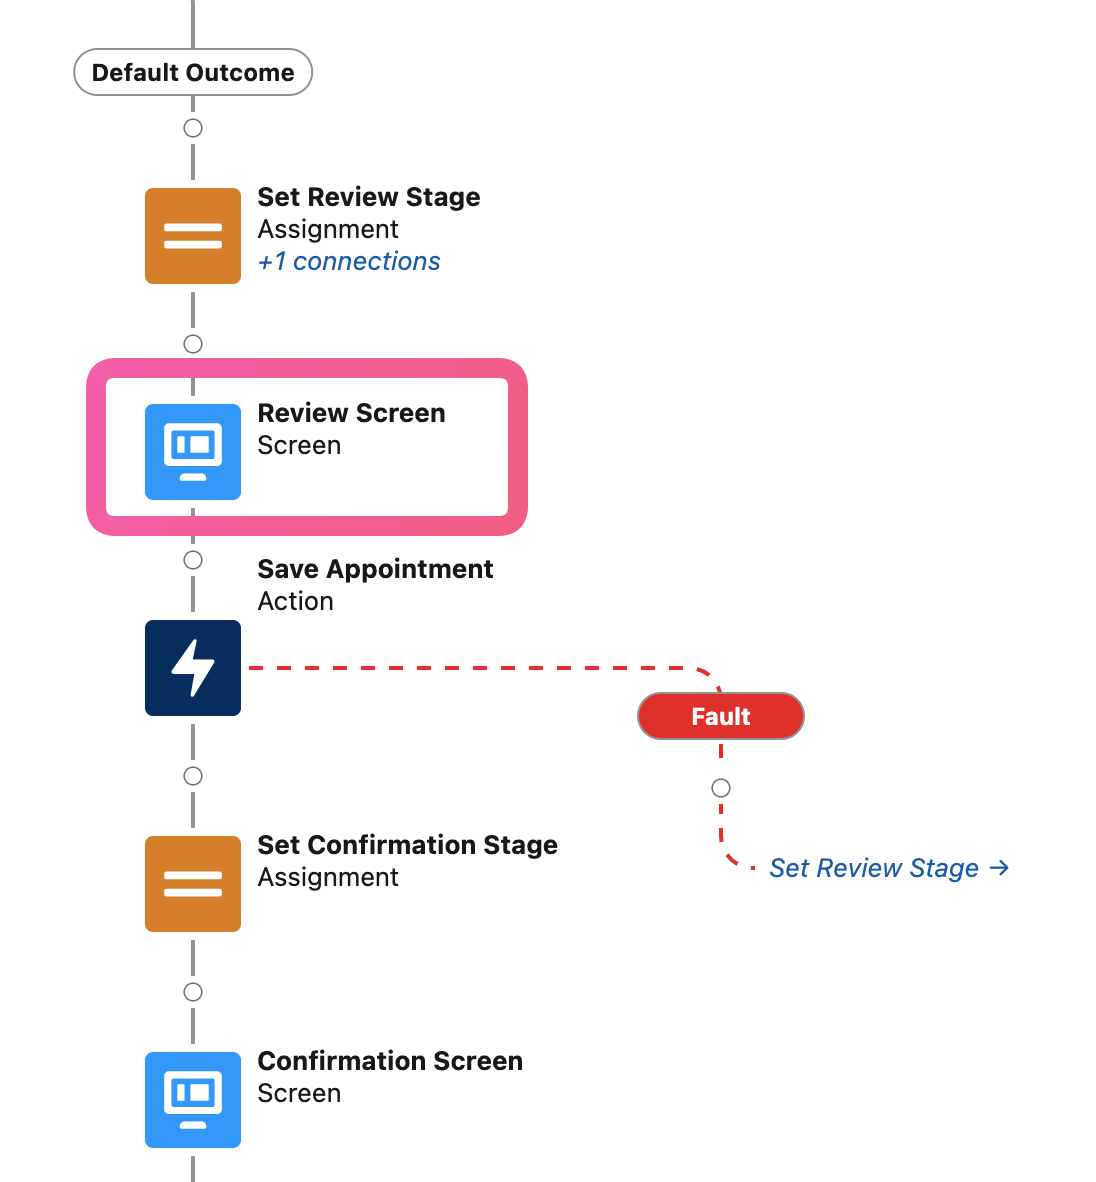
Click on the Review Screen element of the Scheduler Flow you want to use.
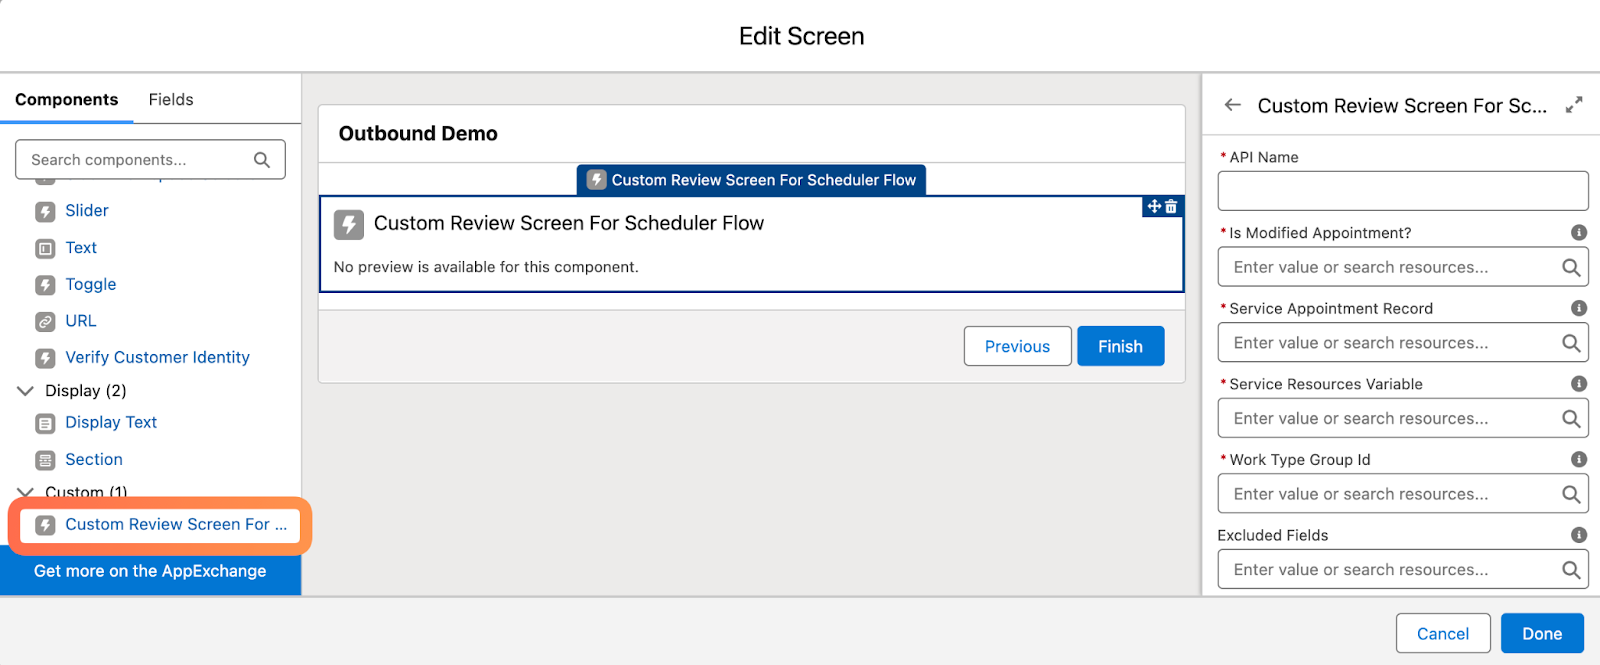
Replace standard [Review Inbound or Outbound Service Appointment] component to Custom Review Screen For Scheduler Flow from the Custom section as shown below.
There are 8 parameters to configure:
Is Modified Appointment? (Required)
Set to False for new appointments. Set to True for modified appointments.
Service Appointment Record (Required)
Set the record variable ServiceAppointment.
Service Resources Variable (Required)
For anonymous booking: set serviceResourceId text variable.
For multi-resource booking: set serviceResources text variable.
Work Type Group Id (Required)
Set WorkTypeGroupId text variable.
Excluded Fields
Specify field API names that you do not want to display on the appointment review screen, separated by comma.
Required for guest user booking. Set the Lead Record variable.
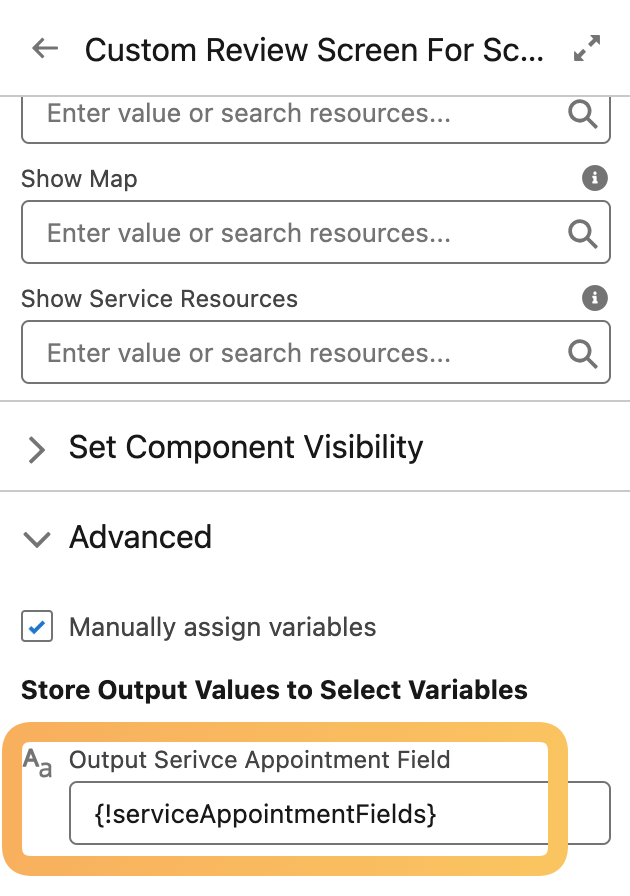
Show Map
Specify whether to show Google Map for the appointment address. Default is False.
Show Service Resources
Whether or not to show service resource information on the review screen. Default is False.
As per Chris’ article (From Chris Albanese: Build your own appointment review screen), a JSON variable must be set on the “Save Appointment” element in order to create/modify a Service Appointment record, Set serviceAppointmentFields variable to the output.
That’s it for the setup!
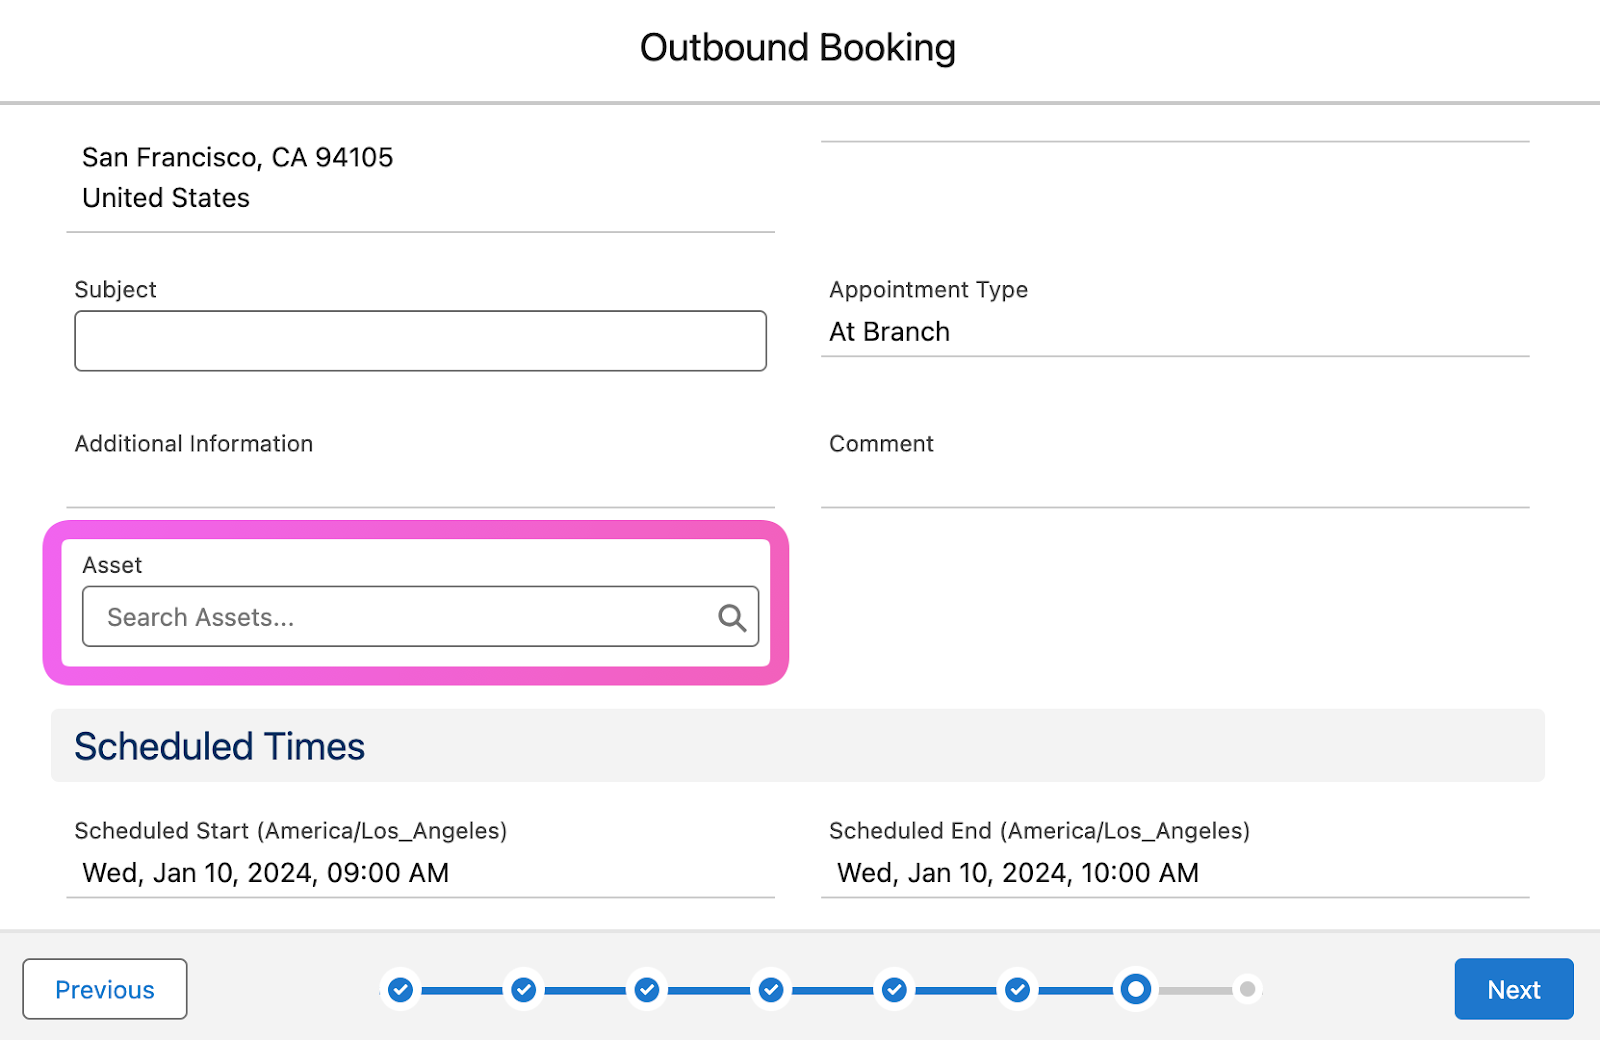
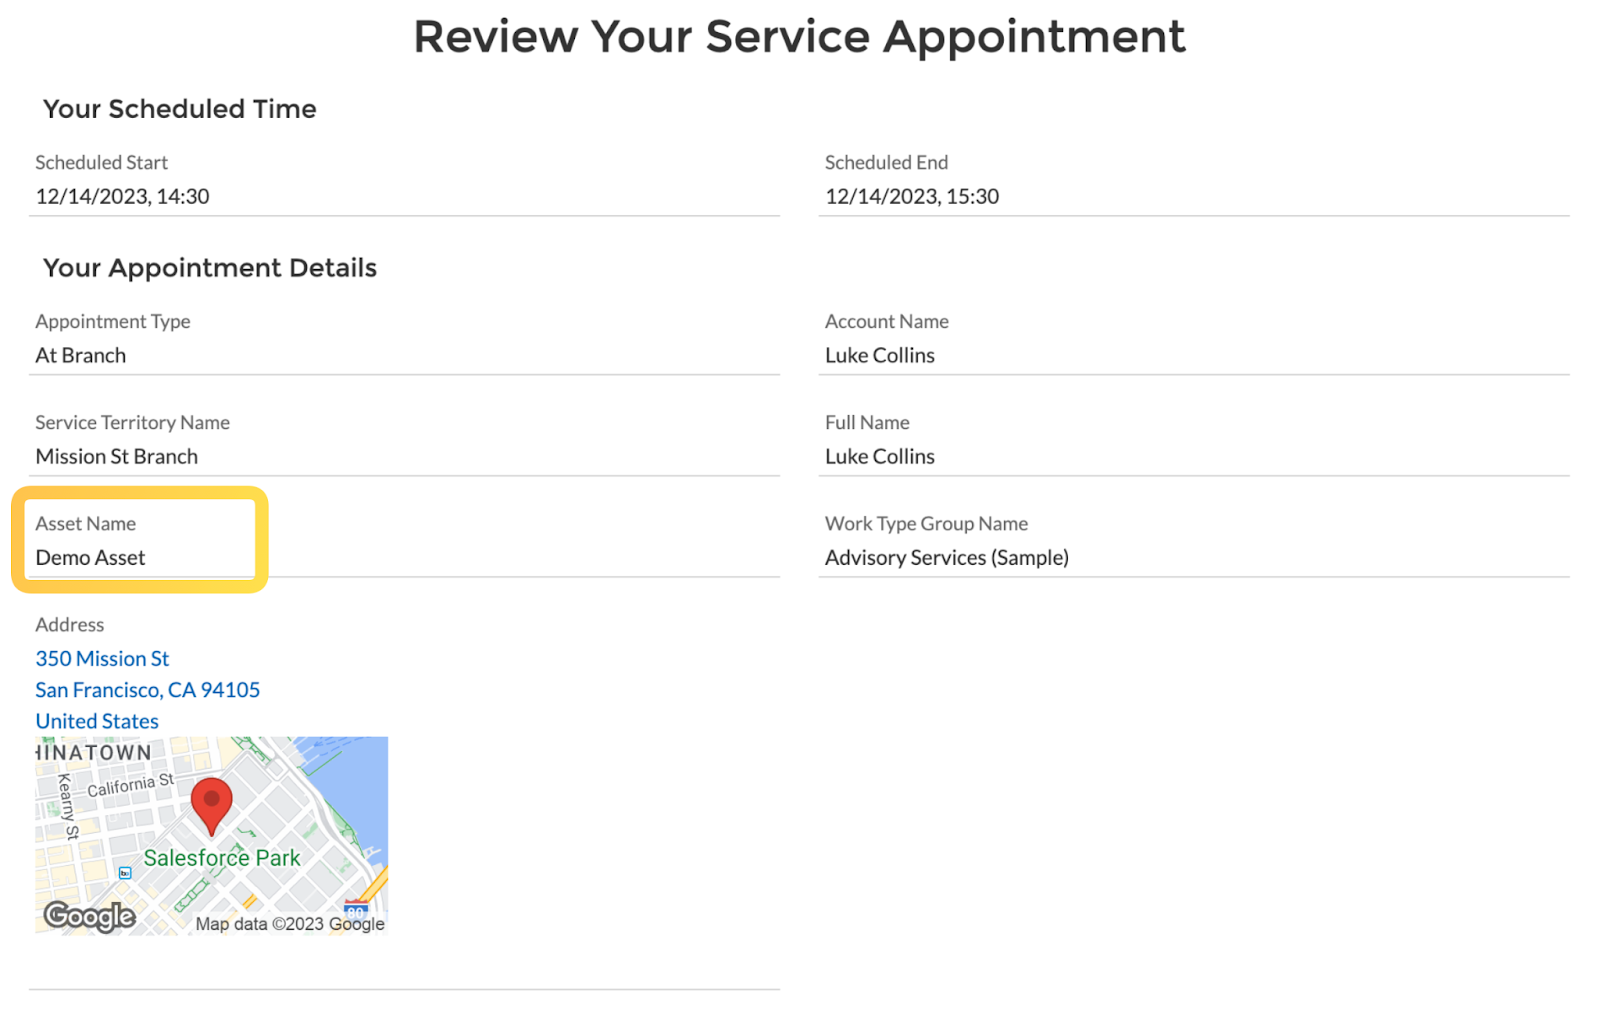
What does this LWC look like?
As shown below, it is possible to display only the fields you really want to display, or to set up an appointment review screen with the populated values for the custom fields in the Service Appointment object. Needless to say, this will not be synchronized with the Service Appointment layout.
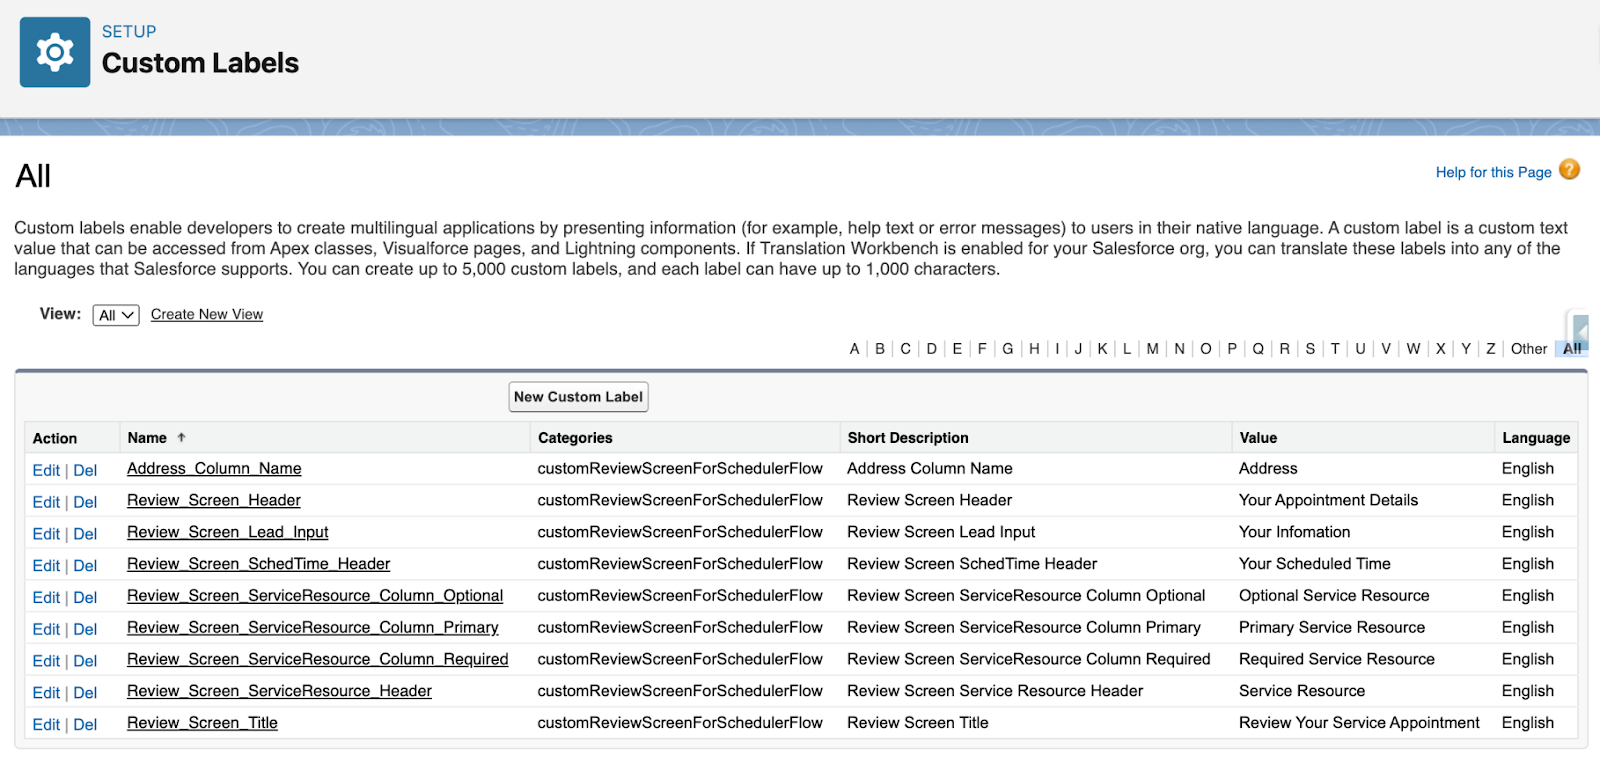
In addition, since Custom Labels are used for header items in LWC, they can be freely changed, and translations can be added.
P.S.
This LWC does not have a feature of sorting fields. Although It can be added as a parameter to sort by API name in ascending or descending order, I want to make this LWC simple, so I decided not to consider it at this time.
This LWC is an unmanaged package and is treated as open source. Any bugs and pull requests can be sent to this GitHub repository, and you are free to Fork and modify it as you wish.
予約完了時に入力されたサービス予定のカスタム項目をサービス予定レコードに保存するためには、別途フロー内で数式でJSON変数を作成する必要がある (Chrisのこちらの記事のWhat if I wanted to set the values for the serviceAppointmentFields variable myself?を参照)