Version 1.8 for Text Area Plus adds help text and a new Text Input option for standard Text Input. I’ve also added a height option for the Rich Text and Text Area modes to allow you to set a specific height in pixels for the text input box for a better UI. For full details and the install link visit the main post here.
https://unofficialsf.com/wp-content/uploads/2022/09/largeUCSF-300x133.png00Josh Daymenthttps://unofficialsf.com/wp-content/uploads/2022/09/largeUCSF-300x133.pngJosh Dayment2023-07-05 08:28:092023-07-05 08:28:17Text Area Plus Adds Text Input and Help Text
Salesforce has just launched Pay Now, a new product that embeds commerce everywhere. It’s a faster, simpler way to collect payments without the need for a full commerce storefront.
Pay Now allows you to generate payment links in a snap, attach them to any Salesforce object, and send them off to your customers wherever they are. Voila, you’ve just created a revenue-generating transaction that can be dispatched across any channel.
Pay Now makes any object in Salesforce “payable”. Therefore, Pay Now is designed to be an embeddable building block for Salesforce Admins to embed into their workflows.
Thanks to its embeddable nature, the sky’s the limit for potential use cases of Pay Now. Here are a few key use cases of Pay Now:
Collect payments for quotes to cash workflows (Invoices, Quotes, etc.).
Send payment links via your social channels like WhatsApp or Facebook Messenger.
Incorporate payments right into your Field Service Reports.
Push out payment links through those handy chatbots.
Encourage payments within your marketing email campaigns.
In this article, we’re going to zero in on the Quote to Cash example, showcasing just how powerful Pay Now can be when used with Flow.
Pay Now comes with two building blocks out of the box. These building blocks are the defining factors of your Salesforce user and buyer experiences.
Payment Link Object
The Payment Link Object creates your Payment Links. You are able to specify the Amount, Currency Code, Payment Method Set (Credit Card, Apple Pay, etc.), Title and Description.
Once you create a Payment Link record, it is available within the Payment Links list view. From here, the Payment Link record displays all relevant information regarding the Payment Link.
Pay Now Experience Cloud Template
Once the Payment Link Record is created, the buyer must access the page to complete their payment.
Once the payment is completed, the buyer is directed to the Payment Confirmation page.
Use Case: Quote to Cash Workflow
Here’s a demo to show how Pay Now can be neatly embedded into Quote to Cash workflows. This will allow you to collect payments without straying from the Salesforce platform.
The Flow works by embedding the Screen Flow into a Quick Action on the Quote Record Page Layout.
The first step of the Flow is to get the context of the Quote from which it is being called. This is done by using a “Get Records” in which the Quote Id is the Id of the Record from which the Screen Flow is triggered.
Next, we collect the necessary information from the user. We use some default values from the Quote object to save time here.
Next, we use Get and Create Records actions to do the following tasks: Retrieve the Payment Method Set ID, Generate the Payment Link Record, and retrieve the URL from the newly created Payment Link.
Next, we display the Payment Link URL on the screen to the user, giving them the option to copy the URL to their clipboard using the UnofficialSF Copy to Clipboard extension.
If the user decides to send an email containing the Payment Link, then we leverage the UnofficialSF Send Better Email action. After retrieving the Quote PDF associated with the Quote Record, we send an email to the Quote contact including the Payment Link with the Quote PDF attached.
How to Access Pay Now
If you have any questions or are interested in learning more about Pay Now, reach out to your Account Executive.
https://unofficialsf.com/wp-content/uploads/2022/09/largeUCSF-300x133.png00Alex Edelsteinhttps://unofficialsf.com/wp-content/uploads/2022/09/largeUCSF-300x133.pngAlex Edelstein2023-06-27 13:43:212023-06-27 13:56:32From Justin Condren: Use Flow with Salesforce ‘Pay Now’ to Collect Payments Anywhere on Salesforce
Editor’s Note: UnofficialSF is pleased to enable commercial creators of Flow extensions like Centro to introduce their products and demonstrate useful use cases. One of our goals is to see a rich tier of commercial solutions in addition to the many free extensions that will continue to be available.
The Avonni Flow Screen Components library is a managed package that contains over 50+ customizable UI components to enhance Salesforce Flows. This library facilitates the creation of user-friendly interfaces, improving the user experience.
Flow Screen Components
The Avonni Flow Screen Components library offers various reactive UI components for Salesforce screens, catering to various needs like inputs, displays, indicators, pickers, and interactions for improved user experience. The components are designed to be “Reactive,” ensuring seamless interactions and real-time updates based on user input.
Input Components for Easy Data Collection
Rating: Gather user feedback effortlessly with a star rating system.
Dual Listbox: Let users move options between two lists.
Color Picker: Enable intuitive color value selection for your users.
Presentation Components for Engaging Interfaces
Calendar: Boost data management with a visually organized component.
Tabs: Organize content effectively.
QR Code: Generate QR codes for easy scanning.
Special Input Components for Advanced Functionality
Barcode Scanner: Scan and easily process barcodes.
Slider: Allow users to adjust values using a draggable slider.
DateTime Picker: Combine date and time selection in one component.
Data Display Components for Effective Visualization
List: Display collections of items in a structured format.
Data Table: Enhance tabular data with sorting, filtering, and pagination.
Map: Showcase records on an interactive map for better context.
Progress Components for Visual Feedback
Progress Bar: Provide a visual indication of progress with percentage values.
Progress Indicator: Track task progress with clear step indicators.
Carousel: Rotate images to highlight important information.
Illustration: Include eye-catching illustrations.
Buttons: Add clickable buttons for seamless interactions.
Interaction Components to Enhance User Experience
Flow Navigation: Control the flow of navigation in your app.
Show Toast: Display toast notifications for real-time user feedback.
Navigate: Direct users to specific locations within your app.
This is just a glimpse of the components within the Avonni Flow Screen Components library. To view the complete list of components available in the Avonni Flow Screen Components library, visit https://avonni-templates-dev-ed.develop.my.site.com/.
Custom Property Editor
The Avonni Flow Screen Components library has a built-in Custom Property Editor that seamlessly integrates with the Flow Builder. This editor makes it easy to customize and configure your components in various ways:
Drag-and-drop functionality: Effortlessly rearrange fields within a component by dragging and dropping them.
Dynamic customization: Adjust component settings to fit your specific requirements.
Live preview: See changes to the component in real time.
Interaction configuration: Personalize the user experience by adding custom interactions.
Style Editor: Fine-tune the component’s look to match your brand or design preferences.
The Custom Property Editor streamlines adapting Avonni Components to meet your unique needs.
Use Case example: Create an accounts management component with Flow Builder
Let’s dive into a practical use case where we create a comprehensive account management component. This detailed guide will lead you through designing an account management component.
Install the managed package to begin using the Avonni Flow Screen Components library. It’s free to use within a sandbox environment, and for production organizations, you can utilize it for up to 10 users at no cost. This allows you to create and test Avonni components within Salesforce Flows without any initial investment.
Quickly search, filter, and sort accounts using the Avonni Data Table
Review onboarding process stages for selected accounts using the Avonni Path
Access and edit account-specific information, such as contact details, billing information, and notes, using the Avonni Tabs component
Visualize the geographical location of an account using the Avonni Map component.
Account Management component built with Flow Builder
We’re using the following Avonni Components to create this specific use case:
Avonni Header: Provides a customizable header section
Avonni Data Table: Displays a list of accounts, allowing users to select an account and view various associated information.
Avonni Path: Showcase the onboarding process stage upon account selection.
Avonni Tabs: Organizes additional account information into accessible sections.
Avonni Map: Provides a visual representation of the location for the selected account.
The main steps to build this component are:
Define a header using the Avonni Header Component
Think about adding the Avonni Header at the top of your screen flow. This will give all the following components a uniform look and feel and improve the overall design and harmony of the Account Management component. It’s a small change that can make a big difference in your layout.
Screen flow settings
Add a screen element and name it: Main Screen
Hide the Header and Footer Section
Avonni Header configuration
Drag the Avonni Header Components
Configure the Avonni Header properties
Open the Component Builder
In the Title field, enter: “Accounts Management”
Check the toggles “Is Joined” and “Pull to Boundary” – to make this component more consistent with the subsequent component.
Expand the Avatar Section to set the Account icon as an avatar next to the title.
Expand the Actions Section to create a “New” button action to let end-users create a new account on the fly.
Avonni Header Styling Configuration
Set the Header background color to white
Avonni Header interaction configuration
Now, let’s configure an interaction for the ‘New’ button present on our Avonni Header Component. Clicking this button will allow users to create a new account. Here’s how we proceed:
Add a “New” action button
Click on the interaction tab to create an Action click interaction:
Target Name: New
Type: Navigate
Page reference type: Object Page
Object API Name: Account
Action name: New
Adding the Section component
Adding a ‘ Section ‘ element is important before incorporating the Avonni Data Table component into our screen flow. This element is crucial because it allows us to create two distinct sections within our screen element. These separate sections allow us to easily organize and drag the desired components into their respective places. This ensures a well-structured and logical layout, paving the way for a smooth integration of the Avonni Data Table component.
Utilize the Avonni Data Table to display a list of records
Here we will configure the Avonni Data Table for our Accounts management use case. We’ll customize row selections, data source connections, column layouts, and actions and define specific interactions. Additionally, we will set filters and designate searchable fields to optimize the user experience. Let’s dive into these steps to create a robust, user-friendly table.
Configuration steps
Set the settings “Maximum row selection value” to 1 to permit a maximum row selection of just one. This way, users can concentrate on one account at a time.
Data Source configuration steps
Let’s set up the Data Source on the Avonni Data Table. We’ll link the source to our ‘Get Records’ collection, customize the table layout by adding columns, and add ‘Row Actions’ for user interactivity. Let’s get started.
In the Data Source section: Link the data source to the previously created ‘Get Records’ collection that fetches account records information.
Adding columns by dragging and dropping fields from the collection allows a customized data table layout.
Adding a Row Actions column: Edit, Change Account Owner.
Create the interactions on Row actions
Let’s delve into setup the interactions on row actions. We’ll establish an interaction for the “Change Account Owner” action, triggering another flow for effortless account owner changes. You’ll also learn to pass the Record ID input variable to access the corresponding record in the new flow.
Configuration steps
Create an interaction on the Change Account Owner action to open another flow allowing users to change the account owner
Pass the Record ID input variable to open the other flow to the corresponding record.
Set filters: Set the Account Type and Industry fields as filterable.
Searchable Field: Set the account name field as searchable.
Display the selected account name using the Avonni Header
Now, we’ll integrate another Avonni Header component at the top of the right section of our screen flow. This will act as a gateway to manage account-specific information, operating with the Avonni Data Table. Upon account selection, the Header will dynamically display the account name. Let’s configure it.
Configuration steps
Drag the Avonni Header component on the right section
Open the Component Builder
Map the Title to the Avonni Data Table component to display the account name value of the first selected row: Title > Mapped > Avonni Data Table > First Selected Row > Account Name
Showcase the account’s status using the Avonni Progress Indicator.
We’ll incorporate the Avonni Progress Indicator, a key component to present the account’s status visually. This component represents progress, giving users clear insights about the account’s status.
Configuration steps
Drag the Avonni Progress Indicator component under the Avonni Header added on the right section
Open the Component Builder
Select the Progress indicator type to Path
Map the Current Steps value to the Avonni Data Table component to display the Onboarding Progress value of the first selected: Current Step > Mapped > Progress > First Selected Row > Onboarding Process
Manually input the values for the Path Progress Indicator, ensuring they match those from your corresponding Salesforce field.
Organizing account information with the Avonni Tabs
Moving forward, the next component we’ll introduce is Avonni Tabs. This component helps organize various account information into separate, manageable tabs. By implementing Avonni Tabs, we’ll enhance user navigation, making finding and updating specific account details easier.
Configuration steps
Drag the Avonni Tabs Component
Open the Component Builder
For each tab, assign a manual label by entering a descriptive name in the “Label” field. This label will be displayed on the tab when users interact with your flow.
Use the Avonni Formatted Value to display a field information
As we continue to enhance our account management component, the next component we use is the Avonni Formatted Value. This component is designed to provide a visually appealing display of field information. In this use case, using the Avonni Formatted Value will make the field presentation more user-friendly and intuitive.
Configuration steps
Drag the Avonni Formatted Value Component
Open the Component Builder
Map the Formatted Value to the Avonni Data Table component to display the account type value of the first selected row. Value > Mapped > Formatted Value > First Selected Row > Account Type
Visibility Configurations: Your Key to a Dynamic Screen Flow
Remember to configure component visibility settings for each component in your screen flow to ensure they are displayed based on specific criteria. For example, set the component visibility of the Avonni Header to only show when the first selected row key value in the Avonni Data Table is not false. Effectively handling component visibility will lead to achieving the final result.
Upcoming Developments: Our Objectives and Request for Ideas
Our goal with the Avonni Flow Screen Components library is to improve the Salesforce end-user experience through a no-code approach, offering a broad selection of fully customizable UI components that can be tailored to specific needs.
Our Vision:
Enhance the Salesforce end-user experience with no-code solutions
Supply a wide array of customizable UI components for Salesforce Admins
Leverage Flow Builder for seamless user experience and no-code custom business processes
The Avonni Flow Screen Components library enhances the Salesforce end-user experience by offering a comprehensive range of customizable UI components. These components are integrated into Flow Builder, enabling you to create more user-friendly interfaces and custom business processes without coding.
To elevate your Salesforce Flows, we encourage you to install the Avonni Flow Screen Components library from the AppExchange today. Remember, it’s free for up to 10 users in a production organization. Start exploring the potential of the Avonni Flow Screen Components library and transform your Salesforce experience!
https://unofficialsf.com/wp-content/uploads/2022/09/largeUCSF-300x133.png00Alex Edelsteinhttps://unofficialsf.com/wp-content/uploads/2022/09/largeUCSF-300x133.pngAlex Edelstein2023-06-26 12:33:172023-06-26 12:33:29ISV Spotlight: Avonni Flow Screen Components Provides More than 50 UI Components
How Playworks used Flow to replace multiple Visualforce pages and 1000s of lines of Apex code
The use case comes from a pro bono project for Playworks. Playworks is the leading national nonprofit leveraging the power of play to transform children’s social and emotional health. They’re a great organization, and I encourage you to learn more about what they do and consider supporting their work.
The Old Architecture
Playworks has a custom object called NCES Data, which contains information about 115,000 schools and 15,000 districts in the United States. The data is released by the National Center for Education Statistics each year, which the Playworks team then loads into their Salesforce org.
As Playworks establishes their presence at a new school, reps use a wizard to create an account for the school, along with a child record that stores the school’s current demographic information. The demographic information is important for various grants and funding. Districts are also represented with account records. School accounts, district accounts, and their respective demographic information records are created from data residing in the NCES Data object.
Reps interact with a Visualforce page embedded in a custom tab called Create New School, or they click an Add School button on the partner organization related list. Partner Organization is a junction object that allows Playworks to attach multiple account records to opportunities, where appropriate. A separate Visualforce page with its own controller is launched from the Add School button. When this occurs, a partner organization record is created in addition to the school or district account record.
The rest of the logic remains the same. The search functionality is handled by Apex classes, and an Apex trigger creates the demographic information. Whether invoked by the Create New School tab or the Add New School button, each Visualforce page finishes with a redirect handled by a third Visualforce page with its own controller.
That’s a lot of custom dev work, and a lot of tech debt.
9 Apex classes
8 Apex test classes
3 Visualforce pages
1 Apex trigger
The good news is the code was written by highly competent developers, and has held up for nearly a decade. The bad news is that even a minor update requires the code to be modified.
The New Architecture
Speaking in terms of business logic, there are 5 possible outcomes when a user searches the NCES Data for a school or district.
NCES record is a school or district that already has an account record.
NCES record is a district that does not have an account record.
NCES record is a school that not have an existing account record. The school has an NCES record for the district, but there is no account record for the district.
NCES record is a school that not have an existing account record. There is no NCES record for the district. (This can happen with some private schools.)
NCES record is a school that not have an existing account record. There is an account record for the district.
Each of these outcomes has slightly different requirements, depending on if it was invoked by the Add New School button or the Create New School tab.
Regardless of the eventual path for each of the 5 possible outcomes, all flows begin the same way.
First, since there are multiple account record types, the school record type is retrieved. Next, a flow screen gathers the necessary information to perform the search.
After failed attempts to recreate the Apex search functionality using a Get Records element with filter logic, a decision is made to go with code. A small portion of the existing code base is refactored into an invocable method. The method accepts the search parameters from the previous screen, and returns a list of NCES records.
public class CreateNewSchoolOrDistrictSearch {

    private static String maxresults = '25';

    @InvocableMethod(label='Search for NCES Data')
    public static List<Results> searchForNCESData(List<Requests> requests){

        Requests request = Requests[0];

        String queryString = generateNCESDataQuery(request.schoolNCESId, request.schoolName, request.schoolCity, request.schoolState, request.schoolZip);

        Results result = new Results();
        result.ncesRecords = Database.query(queryString);
        System.debug('NCES Records: ' + result.ncesRecords);
        List<Results> results = new List<Results>();
        results.add(result);

        return results;
    }

    public static String generateNCESDataQuery(String schoolNCESId, String schoolName, String schoolCity, String schoolState, String schoolZip){
        return generateNCESDataQuery(schoolNCESId, schoolName, schoolCity, schoolState, schoolZip, false, false);
    }

    public static String generateNCESDataQuery(String schoolNCESId, String schoolName, String schoolCity, String schoolState, String schoolZip, Boolean exactIdMatch, Boolean isDistrict){

        String ncesDataQuery = 'SELECT Id, Existing_Organization_in_Salesforce__c, School_Level__c, NCES_Id__c, School_Name__c, School_Mailing_Street__c, School_Mailing_City__c, School_Mailing_State__c, School_Mailing_Zip__c, School_Physical_Street__c, School_Physical_City__c, School_Physical_State__c, School_Physical_Zip__c, NCES_District_ID__c, District_Name__c, District_Mailing_Street__c, District_Mailing_City__c, District_Mailing_State__c, District_Mailing_Zip__c FROM NCES_Data__c ';

        if(!isDistrict){
            ncesDataQuery += ' WHERE NCES_ID__c != NULL AND NCES_ID__c != \'0\' ';
        }else{
            ncesDataQuery += ' WHERE NCES_ID__c = NULL AND NCES_District_ID__c != NULL AND NCES_District_ID__c != \'0\' ';
        }

        if(!String.isBlank(schoolNCESId)){
            if(!isDistrict){
                if(exactIdMatch){
                    ncesDataQuery += ' AND (NCES_ID__c = \'' + schoolNCESId + '\') ';
                }else{
                    ncesDataQuery += ' AND (NCES_ID__c = \'' + schoolNCESId + '\' OR NCES_ID__c LIKE \'%' + schoolNCESId + '%\') ';
                }
            }else{
                if(exactIdMatch){
                    ncesDataQuery += ' AND (NCES_District_ID__c = \'' + schoolNCESId + '\') ';
                }else{
                    ncesDataQuery += ' AND (NCES_District_ID__c = \'' + schoolNCESId + '\' OR NCES_District_ID__c LIKE \'%' + schoolNCESId + '%\') ';
                }
            }
        } else {
            if(!String.isBlank(schoolName)){
                ncesDataQuery += ' AND (School_Name__c LIKE \'%' + encodeForQuery(schoolName) + '%\')';
            }
            if(!String.isBlank(schoolCity)){
                ncesDataQuery += ' AND (School_Mailing_City__c LIKE \'%' + encodeForQuery(schoolCity) + '%\')';
            }
            if(!String.isBlank(schoolState)){
                ncesDataQuery += ' AND (School_Mailing_State__c LIKE \'%' + encodeForQuery(schoolState) + '%\')';
            }
            if(!String.isBlank(schoolZip)){
                ncesDataQuery += ' AND (School_Mailing_Zip__c LIKE \'%' + encodeForQuery(schoolZip) + '%\')';
            }
        }

        ncesDataQuery += ' ORDER BY Name LIMIT ' + maxresults;

        return ncesDataQuery;
    }

    private static String encodeForQuery (String inputVal) {
        return String.escapeSingleQuotes(inputVal.trim());
    }

    public class Requests{

        @invocableVariable(label='NCES Id')
        public String schoolNCESId;

        @invocableVariable(label='School Name')
        public String schoolName;

        @invocableVariable(label='School City')
        public String schoolCity;

        @invocableVariable(label = 'School State')
        public String schoolState;

        @invocableVariable(label='School Zip Code')
        public String schoolZip;
    }

    public class Results{

        @invocableVariable(label = 'NCES Records')
        public List<NCES_Data__c> ncesRecords;
    }
}
Next, the search results are displayed in a table, and a school or district is selected. Remember the results are a list of NCES data records returned by the invocable Apex. The selected NCES data record is used to create the necessary school account, district account, and corresponding demographic information record. If the school account or district account record already exists, the user is redirected.
Recall the 5 possibilities.
NCES record is a school or district that already has an account record.
NCES record is a district that does not have an account record.
NCES record is a school that not have an existing account record. The school has an NCES record for the district, but there is no account record for the district.
NCES record is a school that not have an existing account record. There is no NCES record for the district. (This can happen with some private schools.)
NCES record is a school that not have an existing account record. There is an account record for the district.
Each one of these is represented by a path in the flow. For example, if a school or district already exists as an account record, the user is redirected to that record. Before that happens, if the flow is launched from the Add School button, a partner organization is created. If the flow is launched from the Create New School tab, then it simply redirects to the school or district.
Each of the 5 possibilities is accounted for, in different branches of the flow. The programmatic complexity of the Visualforce and Apex are replaced by the flow. While complicated in its own right, the solution is now declarative.
Conclusion
While we fell short of a completely declarative solution, the logic of the search functionality is unlikely to change. By refactoring the Visualforce pages and 95% of the Apex logic into flow, the Playworks team can safely make changes in the future, without having to hire a developer.
https://unofficialsf.com/wp-content/uploads/2023/06/channels4_profile.jpg900900Andy Andersonhttps://unofficialsf.com/wp-content/uploads/2022/09/largeUCSF-300x133.pngAndy Anderson2023-06-23 07:58:352023-06-26 17:17:11Replacing Programmatic Tech Debt with Flow
from Alex: In internal conversations and conversations with customers, one of the posts I find myself sharing the most is the ‘Thousands of Screens’ post on how flow can drive record-based decision trees that are easy to edit and manage. Teo has extended the design with some clever enhancements and shares them here.
A Practical Application of the “Thousands of Screens” Flow Pattern with Enhancements for Supporting Multiple Troubleshooter Tools-in-One, Pathway Continuation without Selection, and Exit and Return-to-Start Functionality
The “Thousands of Screens” flow pattern (aka: the “Troubleshooter” pattern) is useful for providing a way for end-users to do more than just search a knowledge base for solutions based on keyword matches. It enables end-user guidance and can be applied to a multitude of contexts (i.e. service, sales, etc.).
Think of the “guessing game”, wherein one person thinks of a person, place, or thing in their mind, and another person asks them a series of elimination questions until they can deduce exactly what the first person is thinking. With every response, the person asking the questions is able to collect more information from the person with the solution and apply that information to adjust the questions they ask.Throughout the process, they inevitably work their way closer to the solution.The provision of a pathway to enable “guessing” in this game is the critical component to obtaining the solution. Without it, arriving at a solution is infinitely more difficult, if not–impossible. This pathway provision is what the “thousands of screens” flow pattern brings to Salesforce.
By providing the “thousands of screens” pattern through flow you’re able to utilize the native functionality of the Salesforce platform to provide a “skeleton” for building out “troubleshooting” pathways, while empowering your end-users to manage the actual building, configuration, and content management of these pathways themselves.
The example below provides a sample application of the “thousand of screens” flow pattern as applied to an organization that currently uses multiple service agent “troubleshooting” tools scattered throughout several powerpoint files housed on a common server. Pain points in this use case include:
The troubleshooter files are cumbersome for service agents to locate and access daily from the server.
When all opened and kept ready for immediate service agent use, the troubleshooter files take up valuable screen real estate from other applications.
When all opened and minimized, the troubleshooter files cause confusion and waste service agent time when they are trying to locate the applicable file to maximize and use.
The troubleshooter file contents have grown to hundreds of slides and are difficult for service managers to modify contents/pathways/configuration as information changes are needed over time.
The troubleshooter file sizes continue to grow and impact each file performance.
The troubleshooter file search functionality and pathway visualization is limited.
Supporting Multi-Troubleshooter-Tools-in-One
To begin utilizing the “thousands of screens” flow pattern to replace multiple existing powerpoint-based troubleshooter tools with a single Salesforce-based troubleshooter tool, we can combine the contents of the multiple powerpoint tools into a single troubleshooter tool in which the first question of the tool is, essentially, ”Which tool do you need?” (see Image 1). From this single flow screen, we can now support launching into multiple tool pathways. Additionally, we can use native Salesforce functionality to embed the single troubleshooter flow into the utility bar of the service console for easy, recurring access by service agents and pop-out ability.
These two actions combined 1) eliminate the need for multiple powerpoint files, 2) reduce the amount of screen real-estate dedicated to tools so that the agent can focus on case documentation, and 3) reduce the amount of minimized windows to comb through when searching for a tool.
Image 1: Multi-Pathway Utility Bar Troubleshooter Tool Using “Thousands of Screens” Flow Pattern
Using DiagnosticNode (the front-end accessible record representation of a flow screen’s contents and configuration) and DiagnosticOutcome records (the front-end accessible record representation of a flow screen’s picklist selection values) within Salesforce, we can create a series of pathways for each tool, which in turn, can contain a series of branching pathways based on outcomes themselves, and so on–all stemming from a single starting screen. Additionally, we can establish record naming conventions and ordering mechanisms that help us leverage native Salesforce search functionality and listviews to find, manage, modify, and visualize our troubleshooter tool pathways and content (see Image 2).
Image 2: Naming Convention and Ordering Examples for a Multi-Pathway Troubleshooter Tool
Pathway Continuation without Selection
The original “thousands-of-screens” flow pattern provided through unofficialsf.com, assumed the end user would select a response from the picklist values provided on every screen the agent passed through. However, in practice, instances do arise where end users need to be provided with information (i.e. an instructive statement) without necessarily being asked a question that warrants making a selection in order to move forward (see Image 3).
Image 3: Example of Necessary Pathway Continuation without Selection
To achieve this configuration for a particular DiagnosticNode screen, we can utilize the:
“Continuation Node” checkbox, and;
“ContinuationDiagnosticNode” lookup field.
Together, these identify 1) a DiagnosticNode record as a screen in a pathway that does not require a selection from the end user in order to move forward, and 2) which screen should be displayed next upon clicking the “Next” button (see Image 4).
Image 4: Marking a Diagnostic Node (Flow Screen) for Selection Exemption and Continuation
Exit and Return-to-Start-Screen Functionality
We can add more robust functionality to our multi-tool “troubleshooter” tool by recognizing when a tool pathway ends and handling these “endings” in an end-user-friendly manner. Essentially, once a pathway ending is reached 1) the end-user should be notified that no more action is required of them regarding the issue they are troubleshooting, and 2) the multi-tool “troubleshooter” tool should reset so that it is ready for our end users to troubleshoot the wide variety of issues that could occur with the next case (see Image 5).
Image 5: Example of a Pathway Ending
To solve for both of these desired outcomes when a pathway ending is reached, we can use the “End Node” checkbox to identify a DiagnosticNode that marks the end of a pathway (see Image 6). When the end-user encounters the flow screen represented by this End Node DiagnosticNode record, upon clicking “Next” on this screen, they will be routed to the flow “Finish” screen, instead of another DiagnosticNode record. From this standard flow “Finish” screen, they can click “Finish” to reset the tool back to the initial start screen.
Image 6: Marking a Diagnostic Node (Flow Screen) for Pathway Ending
Installation
There isn’t a straightforward installation package, but sample code is available in the repo here.
https://unofficialsf.com/wp-content/uploads/2022/09/largeUCSF-300x133.png00Alex Edelsteinhttps://unofficialsf.com/wp-content/uploads/2022/09/largeUCSF-300x133.pngAlex Edelstein2023-06-11 14:38:502023-06-11 14:39:00From Teo Popa: Powerful Enhancements to the Decision Tree Sample App
I’ve added reactivity for Apex-Defined objects and fixed a bug where the results of the DataFetcher component weren’t being reactive on the initial load of the flow screen. I also made the placeholder text “Enter search term …” for the Search Bar a translatable label.
You can find the latest installable package links here:
I recently built an invocable action that uses the Tooling API. I had been hoping to handle authentication automatically using SessionId, but this action needs to be able to work in background flows like record-change triggered flows, and there’s no obvious SessionId in those cases. So I ended up setting what I’ll call ‘proper’ authentication. This incorporates three elements: a Connected App, an Auth. Provider, and a Named Credential.
It’s a little counter-intuitive to have to set up this kind of authentication because we’re trying to use a Flow on an org to call other apis on the same org. Ideally, we’d be able to make that call directly. But some APIs like Tooling API treat even the calls from the same org as public incoming calls. That means we have to create this authorization to allow our flow actions to loop back into our own org.
The relationship between the different security entities has been discussed in some previous posts.
Here’s the approach I used.
1. The invocable action should be designed to take a Named Credential.
There are some new requirements for providing access to Named Credentials. You need to explicitly authorize a profile or permission set to use the Named Credential:
Additionally, you now need to create a personal setting for each Named Credential:
https://unofficialsf.com/wp-content/uploads/2022/09/largeUCSF-300x133.png00Alex Edelsteinhttps://unofficialsf.com/wp-content/uploads/2022/09/largeUCSF-300x133.pngAlex Edelstein2023-06-03 12:08:152023-06-03 12:08:27Using Named Credentials with Flow Actions
It’s been a few months, but I hope it has been worth the wait for some of the fixes and enhancements you’ll see in the latest version of Datatable.
I squashed a couple of bugs including:
An invalid format error when entering a filter value for a Name column when it was being displayed as a hyperlink to the record
Occasional Daylight Savings Time issues with Time fields
A few of the minor enhancements are:
A spinner rather than an empty table message will be shown while records are being processed
A Clear All Filters button will be displayed when any column filters are applied
This avoids the issue of getting stuck when a filter value causes an empty datatable
The button can still be disabled by selecting the Hide Clear Selection/Filter Buttons option in the Table Behavior section
When the number of displayed records are filtered and/or reduced based on a search term, the header will show both the filtered count and the total record count
I switched the Column Wizard setup flow to be loaded by a LWC component rather than an Aura component
This provides cleaner exit behavior and eliminates conflicts with development mode and clickjack protection
NOTE: You do now need to activate the Datatable Configuration Wizard flow after installing this version
The maximum displayed record count has been increased from 1000 to 2000 records
The two big enahancements are the addition of an optional Search Bar and the ability to set a Column Width as Fixed or Floating.
The Datatable will simultaneously support both a Search term as well as individual Column Filters.
With the new Flexible Column Width enhancement, you can now fix some columns to be wide or narrow and allow the remaining columns to flex their width to expand or contract to fill the available space for the Datatable.
Before this option, if the column widths were too wide for the screen, the user would have to horizontally scroll back and forth or manually change column widths to see the full Datatable.
Now, the Column Wizard lets you select all or none of the columns to flex or you can specify individual columns to have their width flexed to fit the screen.
Check out the updated documentation and get the latest installation links here.
https://unofficialsf.com/wp-content/uploads/2022/09/largeUCSF-300x133.png00Eric Smithhttps://unofficialsf.com/wp-content/uploads/2022/09/largeUCSF-300x133.pngEric Smith2023-05-23 12:19:592023-05-23 12:20:11Check out the Latest Datatable Enhancements
The community has built some powerful tools that enable flow metadata to be retrieved, modified and deployed. These tools were used, for example, in the unofficial Convert Process Builder tools. However, these tools make direct use of the metadata api, which is asynchronous. That means that they have to be deployed in the form of a screen flow that fires off the request and then sits there and polls for a result. That’s not useful if you’re running an autolaunched flow on the server.
Server-side flows can retrieve Flow metadata synchronously, via the Tooling API. This powerful interface is not as well known as the Metadata API, but has a lot of capabilities. One powerful facet of this API is that it returns the Flow metadata as a Metadata Apex object that can be manipulated via direct references in code:
This is, for many use cases, a lot nicer than parsing XML, which is what the Metadata api serves up.
I had a use case (involving the training of GPT models to generate flows) where I wanted the synchronous immediacy of the Tooling API (so I can trigger it on background events) and the XML return values that the Metadata API returns. It turns out that this is trivially easy, but it’s not well documented, and I had to consult a senior engineer to learn about it.
You can retrieve XML via the Tooling API, but you need to use the Accept header
The Tooling API is used via REST, and in REST calls to Salesforce, you can set the ‘Accept’ header like so:
req.setHeader(‘Accept’, ‘application/xml’);
This will not be done by default. Most Tooling API calls do not return a traditional SObject and the developers using those calls are happy to skip the XML and work with JSON. If you leave this header out and try to carry out XML parsing with what comes back, you’ll just get odd errors like this:
Error Occurred: An Apex error occurred: System.XmlException: Failed to parse XML due to: only whitespace content allowed before start tag and not { (position: START_DOCUMENT seen {… @1:1)
The Retrieve Flow Metadata action that’s installable below does this work for you, so you can simply insert it into a flow to retrieve flow xml synchronously, by flow name. Here’s where I set the REST header:
Querying by Flow Name is Not Intuitive
The second tricky bit I ran into involved my goal to query on the flowName. I didn’t have the ID. That’s a problem because the Tooling API has two modes and neither directly uses a name. ‘Easy Mode’ is focused on requesting records by their ID. Here’s an example:
If you want to use anything other than a recordId, the good news is that the Tooling API gives you the full power of SOQL queries. Here’s an example of how you query for a piece of metadata that’s confusingly named MetadataContainer:
At this point, I thought I was all set. I posted up this tooling query that queries by Flow Name :
When I did this, though, I got this error message:
INVALID_FIELD Select id from Flow Where FullName='Test_MetadataRetrieval' ^ ERROR at Row:1:Column:27 field 'FullName' can not be filtered in a query call
A closer look at the documentation revealed that FullName is indeed explicitly disallowed in Tooling queries:
Thinking it through, this has to do with the fact that there are actually as many as 50 versions of metadata tied to a single flowName. The flowName is thus less unique than it might first appear.
The documentation does not make it clear just how you’re supposed to use multiple queries if you can’t query on name. However, the answer turns out to be to use Definition.DeveloperName:
FlowDefinition is a special object that basically stores which flow version is active. It isn’t used much these days.
With these new learnings, I was able to create Retrieve Flow Metadata action.
Considerations
This action so far is unaware of version numbers. It’s just going to grab whatever is handed to it, which is going to be either the Active version or the Latest.
Authentication Considerations
This action provides a way to provide the name of a Named Credential. If you do that, it will use the NC. If one is not provided, it will try to use the SessionId. Be aware though that SessionId will only work for screen flows.
Install
Version 1.0.2 6/5/23 ProductionSandbox added Named Credential support
When Winter ’23 release arrived, it brought with it Data Table and IN operator. I was excited to use them and wrote a blog on how it helped me solve a use case that was not possible to achieve with standard reports. I was happy with the 7 steps flow I created to achieve this Now, a few releases later, Summer ‘23 is around the corner, and with it comes reactive screens and reactive formulas. I went back to my solution and was able to get the same result and reduce a 7 step flow to 1 screen. How awesome is that!!!
Reactive screens are currently in beta and you can try them out in a prerelease org running Summer ‘23 (don’t forget to opt in to the reactive screens beta under process automation settings in setup)
Here is how I did it
Reminder use case: display all open opportunities where the selected user is on the account team. Then display the account team role this user has for these accounts.
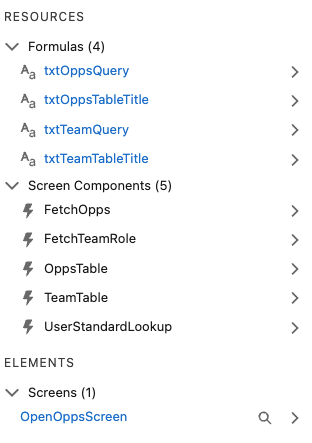
I used the new Data Fetcher component from Josh Dayment, and combined it with some complex SOQL queries that output the results into a Data Table.
To select the user, I added a lookup to the screen. This is currently the only reactive lookup element available. In order to get a list of users, you can point the component to any CreatedById lookup field from any object. I used the Account object.
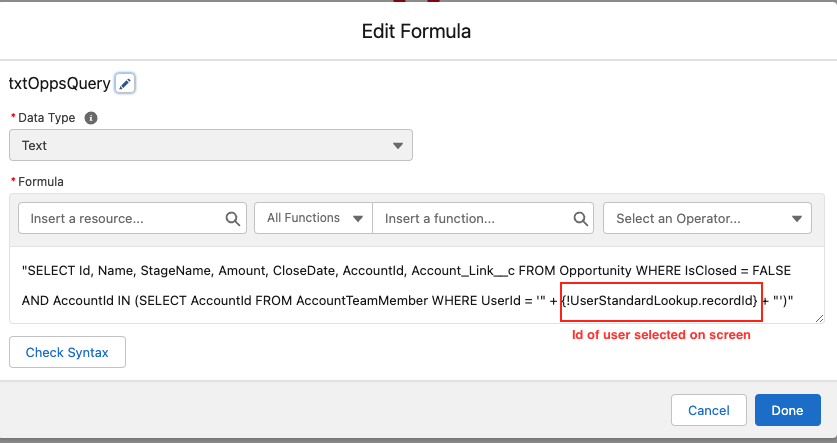
My first formula (and make sure to use a formula resource, and not a variable or text template for this, as only formulas are reactive. Don’t ask me how I know 😉) queried the records for open opportunities
I fed this formula into the first data fetcher, and used a merge field to get the currently selected user from the screen.
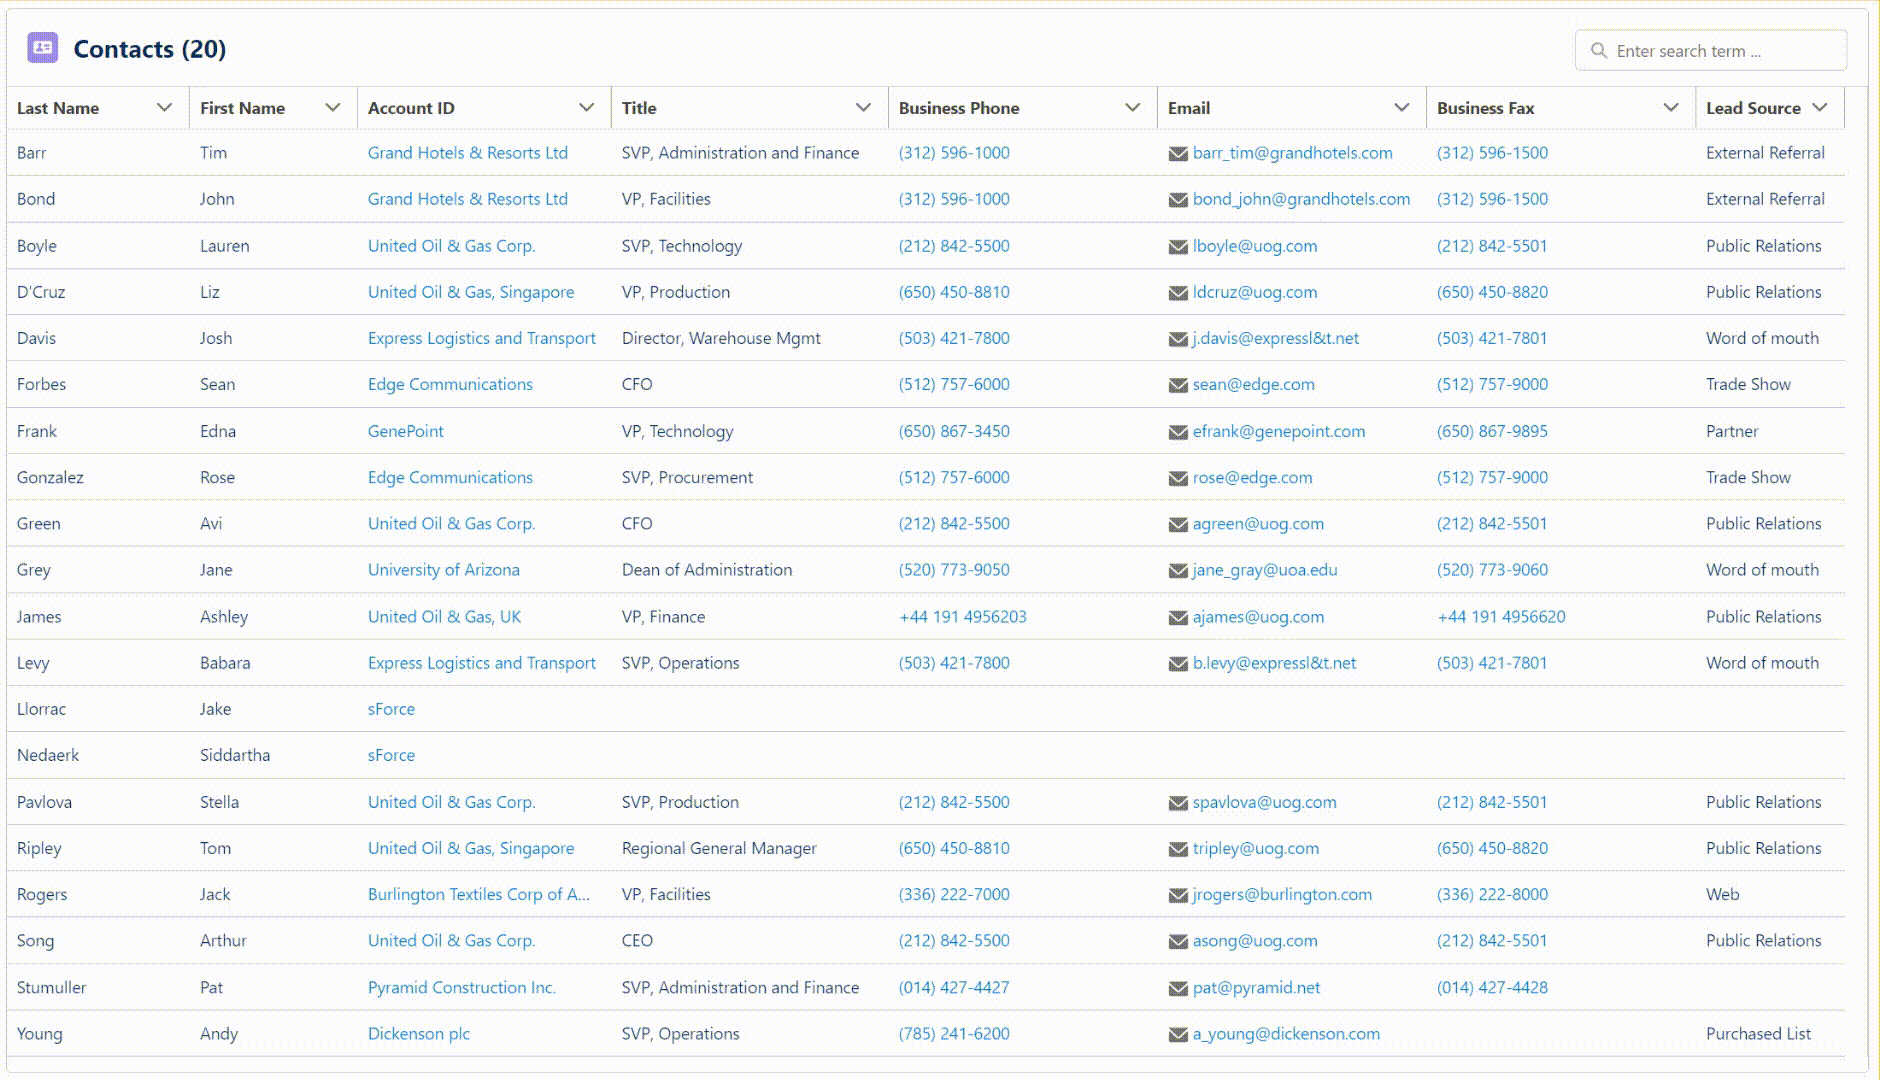
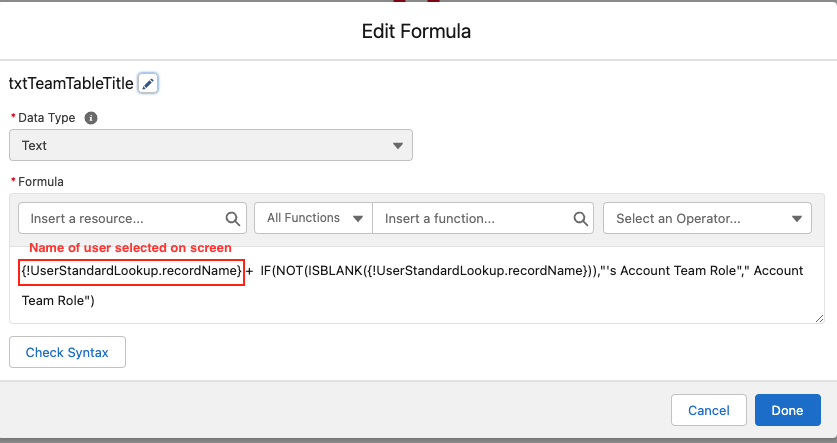
The data fetcher queried records are displayed on screen using the Data Table component (Data Table is now GA, and also got some new enhancements in the summer release). The lookup component outputs the selected value and the selected label so I used another little formula to dynamically display the selected user name in the table title.
A similar process followed for the second table and showing the account team role
Look what I could achieve with just 4 formulas and one screen. Here is a demo of the finished flow and reactive functionality.
I can’t wait for this to be generally available to help us simplify multiple flows. For now this is only available in prerelease orgs and soon in sandboxes.
https://unofficialsf.com/wp-content/uploads/2022/09/largeUCSF-300x133.png00Tamar Erlichhttps://unofficialsf.com/wp-content/uploads/2022/09/largeUCSF-300x133.pngTamar Erlich2023-05-01 05:17:162023-05-01 05:17:23Reactive Screens: How to Turn a 7 Element Flow Into 1