From Andy Haas: Use Analytics Management Actions to Show Report Subscribers and Assignments

Author: Andy Haas

Have a user(s) subscribed to five reports and can’t subscribe to any other reports? Or do you have users that don’t know which reports they are subscribed to and want to be removed? This component allows you to achieve just that. Utilizing the Analytics Notifications API returns APEX-defined records, and utilizing the Datatable by Eric, you can show the records and see who is assigned to specific reports. Added to the last action, you can remove users or remove a subscription from the report. 

Take a look at how you can set up this action and utilize it below.

Video Walkthrough 

Overview

Ever had a user state that they can’t subscribe to a report, or you want to see who is subscribed to which reports in a quick view. The Analytics Notification API is the key but is not accessible from the flow builder. That is where this component comes into play. This APEX invocable action will allow you to call the Analytics Notifications API to view report subscriptions, dashboard subscriptions, or wave notifications; not only that, you can get all notifications for a user or a record. 

The best use of this component is with the Data Table Eric created, where you can use APEX Defined classes. Below are examples of what I came up with. All multi-dimensional objects have their own APEX class so that you can get deep into the details of the response. Lastly, this component will allow you to delete specific users from a subscription. 

Basic Flow Setup

Advanced Flow Setup

Remote Site Settings

You will need to add a remote site setting that loops back to your salesforce domain for this to work correctly.

Component Details:

Get Subscription Data 

Uses the Analytics Notification List API Documentation, which can be found here:

https://developer.salesforce.com/docs/atlas.en-us.api_analytics.meta/api_analytics/analytics_api_notifications_reference_list.htm#Action

Attributes:

Inputs
sourceRequired for GET calls. Specifies what type of analytics notification to return. Valid values are:lightningDashboardSubscribe — dashboard subscriptionslightningReportSubscribe — report subscriptionswaveNotification — Analytics notifications
ownerIdOptional for GET calls. Allows users with Manage Analytics Notifications permission to get notifications for another user with the specified ownerId. If you don’t enter a value the running users id is used.
recordIdOptional. Return notifications for a single record. Valid values are:reportId— Unique report IDlensId— Unique Analytics lens ID

Outputs:

definition_stringA stringified version of the Get Response Body
definitionAn APEX defined class of the Definition Response
definitionDetailsA subclass that pulls out some key details from sub classes. This class also pulls in the Report Name which is not included in this API
definitionDetails_stringA stringified version of definitionDetails to be used within the data table

Parse Recipient Data

This is a helper class that will parse the selected row and gets the recipients that are subscribed to the selected record.

Attributes:

Inputs
definition_stringA string array of a single definition string record. This is normal output of a record selection from a data table

Outputs:

recipients_stringGets a collection of recipients that follows the Recipient class that can be used within the data table
recipientsAn APEX defined class of the recipients that were parsed
notificationIdThe specific ID of the notification that was selected
definitionAn APEX defined class of the Definition Response

Delete Selected Recipients 

Uses the Analytics Notification API with the Method PUT if you are adjusting users or delete if you are removing all users. That documentation can be found here:

https://developer.salesforce.com/docs/atlas.en-us.api_analytics.meta/api_analytics/analytics_api_notifications_reference_notification.htm#d2928e157-d2964e1340

Attributes:

Inputs
definitionA string array of a single definition string record. This is the normal output of a record selection from a data table
deletedRecipientsThe recipients we want to remove from the notification. This is in a string array. This is the normal output of a record selection from a data table
notificationIdThe ID of the notification we are updating or deleting
recipientsAll of the recipients that were parsed from Parse Recipient Data action

Outputs: None

Get User Subscription Limit

https://developer.salesforce.com/docs/atlas.en-us.api_analytics.meta/api_analytics/analytics_api_notifications_reference_notification_limits.htm

Attributes:

Inputs
sourceRequired for GET calls. Specifies what type of analytics notification to return. Valid values are:lightningDashboardSubscribe — dashboard subscriptionslightningReportSubscribe — report subscriptionswaveNotification — Analytics notifications
ownerIdOptional for GET calls. Allows users with Manage Analytics Notifications permission to get notifications for another user with the specified ownerId. If you don’t enter a value the running users id is used.
Outputs
maxHow many analytics notifications of the type specified by source the user is allowed to create.
remainingHow many more analytics notifications of the type specified by source the user can create before hitting the limit.

Install

This extension requires FlowActionsBasePack version 3.8 or higher

1.0 12/2 Production Sandbox Initial Version

Source

View Source

Limitations:

You can only see subscriptions from a particular user. If you subscribe another user to a report and you pass in their Id into ownerId you will not see that subscription, you would need to pass in the person who subscribed the user to the report.

From Ryan Mercer: “Validate Shipping Addresses with The USPS Address API”, a Salesforce Flow Action

Ryan Mercer has contributed some fantastic extensions. When he took his modest new role as the Director of Salesforce Development at the Executive Office of the President over in the White House, most of us assumed he wouldn’t have time to publish any new extensions for a while. But I’m pleased to report that the has created a flow action that taps the main USPS Address API.

Check it out!

Screen Flow Inception (Launching a Screen Flow in Modal from a Lightning Web Component in a Screen Flow)

The significant part of the story in the movie Inception is about going inside of a dream; inside of a dream. This kind of what I am doing now with the Flow Flex Card component we are launching a screen flow from a screen flow a little bit like Inception.

I used to handle this functionality using a combination of two Lightning Web components, along with an apex page and an aura app in one of those LWC’s. This is no longer the case with the added functionality of lightning-flow in the Salesforce Winter 23′ release we can now launch a screen flow directly from an LWC. With the new functionality, I am able to handle this now with a single child LWC in Flow Flex Card. 

Why fix what’s not broken? A couple of things here I think good developers and architects always want to build something that is easily maintained and scalable Flow Flex Card has had a lot of evolution since I volunteered to be on the project it has experienced my own learning journey so I wanted to make it easier for other developers to contribute to the component as well as make it easier on myself when troubleshooting issues with users. It also moves the component to be based all on LWC versus a combination of Aura and LWC improving performance and expanding the possibility to do more in the future. There were also some issues when Flow Flex Card was deployed on an Experience Cloud Site with enhanced domains that required some changes in the fsc_ScreenFlow component that could become an annoying maintenance task in the future if Salesforce were to change domain behavior again. 

Let’s break down the before and after of what this looks like. 

As you can see in the diagram above I was able to significantly reduce the amount of code and components needed to launch a screen flow from within the Flow Flex Card component. I replaced the need for fsc_screenFlow with the standard OOTB lightning-flow delivered as part of the Salesforce Winter 23′ release. With just a simple update to the HTML file and a few items in the js, I was able to greatly reduce my tech debt and open up for further capabilities in the future i.e. custom finish and navigation behavior (more to come on that in a couple of months)

Resources and Learn More

Flow Flex Card

Lightning Flow

Invoke a MuleSoft RPA Process from Flow using External Services

MuleSoft Robotic Process Automation (RPA) gives you the power to automate business processes that usually require human input and interact with systems that don’t have an API, extending the reach of Salesforce’s process automation capabilities by integrating these RPA processes into flows in Salesforce as of Winter ’23!

Use MuleSoft RPA Manager to publish REST APIs for your RPA processes to Anypoint Exchange, which you can then register as External Services in Salesforce and invoke from low-code tools like Flow Builder.

This post describes the configuration steps necessary to invoke a MuleSoft RPA Process in Flow Builder. It assumes familiarity with MuleSoft RPA, Named Credentials and External Credentials, Permission Sets, External Services, and Flow Builder.

Step 0: MuleSoft RPA Pre-requisites

  • Configure the connection between MuleSoft Anypoint platform and your org to import MuleSoft RPA APIs.
    • In MuleSoft RPA Manager, publish the RPA process as a REST API to Anypoint Exchange.
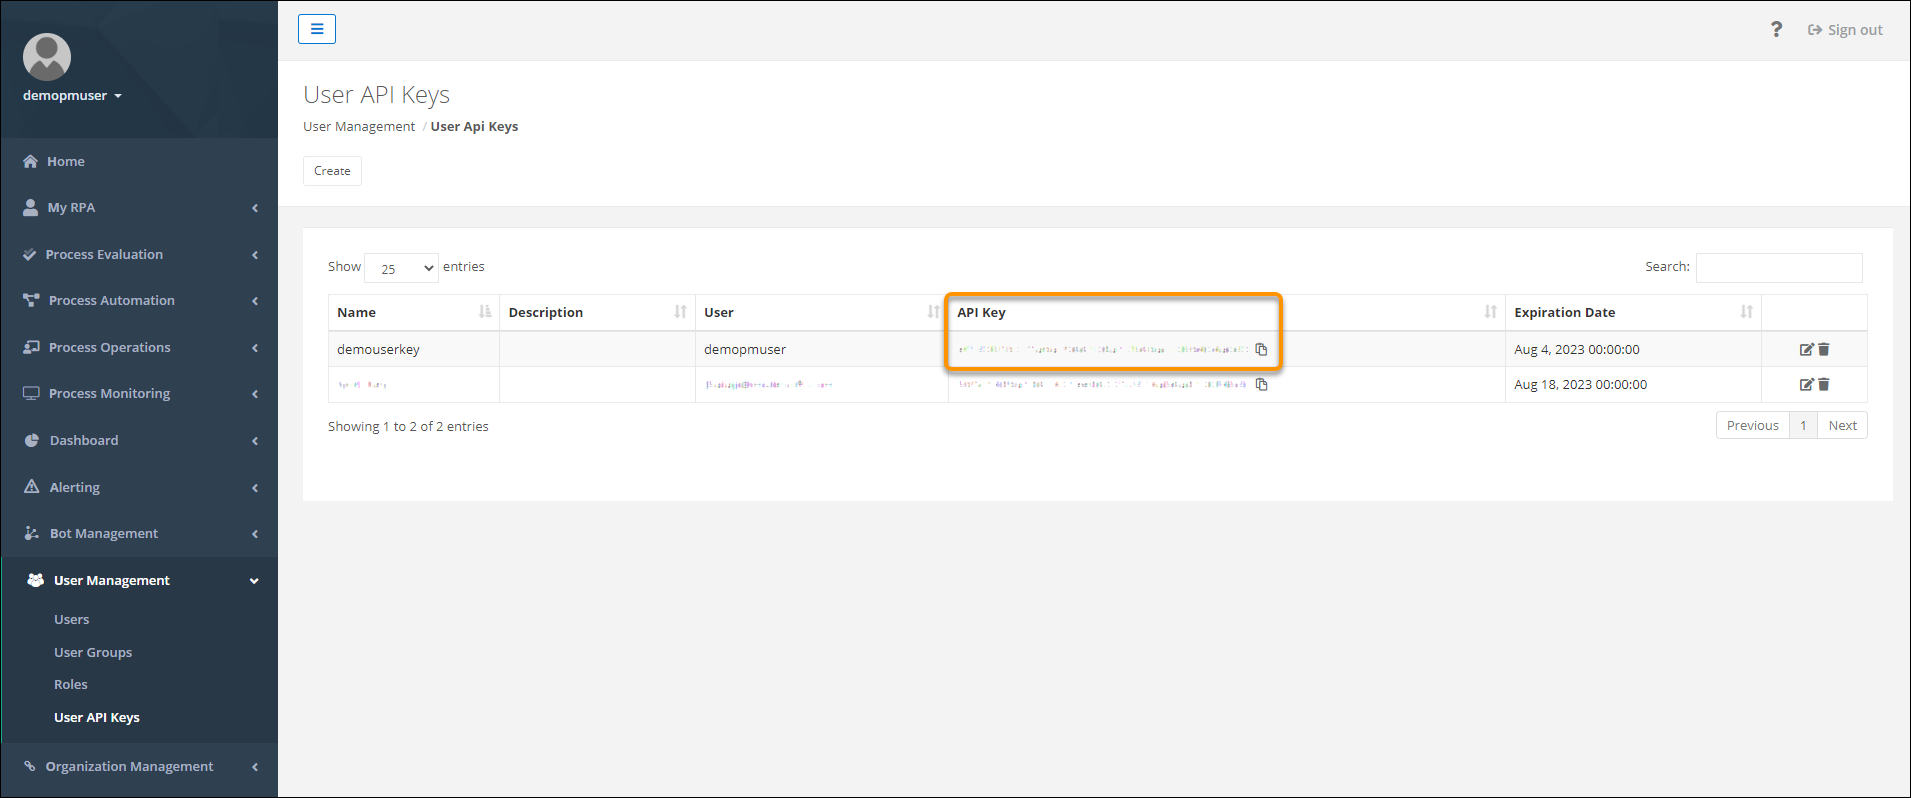
    • In MuleSoft RPA Manager, copy the API key from the User Management | User API Keys page.

MuleSoft RPA Manager: User Management page

Steps 1-3: Connect Salesforce to MuleSoft Anypoint Platform

These steps create the initial connection between MuleSoft Anypoint platform and your org:

  • Step 1: Create a Connected App in MuleSoft Anypoint PlatformA connected app in MuleSoft Anypoint platform allows Salesforce to call MuleSoft APIs.
  • Step 2: Create an Authentication ProviderUse the ID and the secret from your MuleSoft Anypoint Platform connected app to create an authentication provider.
  • Step 2b: Update Your MuleSoft Anypoint Platform Connected App – Use the Salesforce authentication provider callback URL to update your MuleSoft Anypoint Platform connected app.
  • Step 3: Create a Legacy Named Credential (Retrieve APIs) – Create a legacy named credential to access/authenticate into your MuleSoft Anypoint Platform connected app from Salesforce and retrieve the APIs published to MuleSoft Anypoint Exchange. The legacy named credential stores the URL for MuleSoft Anypoint Platform. External Services uses the legacy named credential when listing the MuleSoft APIs available for import.

Note: the ability to create a ‘Legacy’ named credential is still supported, although it will be discontinued in a future release, at which point, this portion of the instructions will be updated to reflect the new capability.

Salesforce: Named Credentials Home Page

Step 4: Create a Named Credential (Runtime) and External Credential

Note: MuleSoft RPA authenticates clients invoking RPA processes through API keys. The Salesforce Winter ’23 release includes new functionality in Named Credentials and External Credentials that supports this type of authentication.

  • Create an external credential, permission set mapping and custom header
    • Overview
      • Create a second named credential that stores the endpoint for MuleSoft RPA Manager. External Services uses the second named credential when invoking “runtime” the MuleSoft RPA process in a flow.
    • External credential:
      • Before creating a second named credential, first create an external credential.
        • Create an external credential to capture the API key and other authentication details.
        • Then create a named credential to store the actual endpoint.
        • This allows for multiple endpoints to be addressed with the same authentication configuration.
      • After entering the details for the external credential, click Save. You’re taken to the Named Credentials screen. Now you need to create a permission set mapping for this new external credential. This mapping ensures that only the correct users get access to these credentials.
    • Permission set mappings:
      • Click External Credential and select the external credential you created.
      • Scroll to Permission Sets Mappings so you can link the external credential to a user’s permission set.
      • Click New to create a permission set mapping for this external credential using the details below for an external credential that uses ‘Custom’ as the authentication protocol.
    • Custom headers:
      • Lastly, create a custom header for this external credential using the the details below as guidance for how to create a custom header.

Example
Salesforce: External Credentials Detail Page

  • Create a named credential
    • Now that you have an external credential, create a named credential and then link it to the external credential you just created in the previous step. As mentioned before, this second named credential stores the endpoint for MuleSoft RPA Manager. External Services uses the second named credential when invoking “runtime” the MuleSoft RPA process in a flow. Use the details below for how to create a named credential.

Example

Salesforce: New Named Credential Window

  • Verify that the external credential and the named credential you just created are linked
    • From the Named Credentials page, click External Credentials.
    • Click the name of the external credential from this list and confirm that the named credential you just created appears in the Related Named Credentials area shown in the example below.
    • As a reminder:
      • The Named Credential stores the MuleSoft RPA Endpoint
      • The External Credential stores the MuleSoft RPA API Key + Authentication details

Example
Salesforce: External Credentials Detail Page

Step 5: Register the MuleSoft RPA API as an External Service

As you are configuring the external service, recall that you created two named credentials.

  • Legacy named credential (Retrieve APIs) – this named credential stores the MuleSoft Anypoint platform URL and is used to retrieve the APIs published to MuleSoft Anypoint Exchange. Use this named credential in the “Select a MuleSoft Anypoint Platform Account” screen.

Example

  • Named credential (Runtime) – this named credential stores the MuleSoft RPA Manager URL and is used when invoking “runtime” the MuleSoft RPA process in a flow. Use this named credential in the “Configure your MuleSoft Anypoint Platform Service” screen.

Example

Example

Step 6: Invoke a MuleSoft RPA Process in a Flow

  • Now you are ready to start and check the status of the MuleSoft RPA process from a flow.
  • If you follow the steps outlined in the help docs Invoke a MuleSoft RPA Process in a Flow, listed below are a few additional tips to help guide you through the flow configuration.

Create Resource for RPA Process Input Variables

Tip: In step 2, when creating a New Resource to store the input variables for the RPA process, you can obtain the External Service Name and Apex Class Name from the External Services Detail Page to help configure the New Resource

Salesforce: External Services Detail Page

Assign Values to RPA Process Input Variables

Tip: In step 3, you can obtain the information about each variable/input parameter that needs to be defined in the above Apex class from the External Services Detail Page as well as the OpenAPI specification (a few examples shown below).

RPA Process OpenAPI Specification

OperationId: startProcess > ProcessExecutionWithExecutionId

ProcessExecutionWithExecutionId > ProcessExecution

ProcessExecution > inputArguments

Flow and Process Builder List View with Batch Delete V2

Are you tired of having to delete inactive versions of Flows and Process Builders one at a time?

I’ve refactored my Flow and Process Builder List View with Batch Delete Application to use the latest versions of Datatable and the Flow Base Packs.

Taking advantage of the Datatable’s ability to select multiple records and pass them along in a Flow to be acted upon, I created a Flow Action that interfaces with the Metadata API and handles the batch deletion of selected inactive Flows and/or Process Builders. 

Using data pulled from three different Salesforce internal objects, I’m able to display details about Flows and Process Builders.  The full power of the Datatable component comes into play by offering a List View with sorting, highlighting, filtering and more.

I’ve bundled all of this together in an App that includes a configurable List View, List View with batch selection for delete and a Flow Picker where you can select a single Flow or Process Builder and then work with a List View of all of its active and inactive versions.

Get all of the details here.

New Version of Datatable

If you have a Sandbox that has been updated to Winter 23 Patch 12 you may run into an issue with the Datatable component where you will get an error if you edit any rows or if you select just a single row. Salesforce is working on an underlying issue in Version 3 of the Flow Runtime, but in the meantime you can update Datatable to avoid this issue and fix a couple of other minor bugs.

The error message you’ll see could be similar to one of these:

The Lightning Component c:datatable generated invalid output for field outputSelectedRow. Contact your administrator with these details: Flow encountered an error when processing and converting between data types. Please check the flow and ensure all data types are matched correctly.

The Lightning Component c:datatable generated invalid output for field outputEditedRows. Contact your administrator with these details: Flow encountered an error when processing and converting between data types. Please check the flow and ensure all data types are matched correctly.

Get the latest version here: https://unofficialsf.com/datatable-lightning-web-component-for-flow-screens-2/#Installation

From Munawrrahman: Trigger Screen Flows with Backend Events

Being able to pop up a screen flow when something happens can be very useful. Previous explorations include the Detect and Launch component, which focuses on being on a record page and detecting changes to that record. Mun’s solution uses platform events as a transport mechanisms, so it’s a more broadly applicable solution.

Check it out!

From Renato Oliveira: New Business Hours Actions

Renato has built a package that exposes the main Business Hours functions that are normally only available to Apex developers:

Here are the actions:

Install

V1.0.0 10/23/22 Production Sandbox – First release

Old Versions

View Source

Source

Known Issue Workaround: Email Alert Misbehaves with Queues

This is in regard to this known issue.

This bug is in very old Email Alert code and Salesforce is not prioritizing work in that part of the code base. Here’s a fairly straightforward workaround that replaces the Email Alert with a Send Email action in a flow.

For this workaround, we’ll use the exact starting conditions found in the Known Issue. However you can apply this to other scenarios where Email Alert is showing this unwanted behavior.

Let’s assume that you want your Approval Process to Set the Owner of a Case to a Queue. You want email to go out to the Queue Email but not the full set of Queue members. Email Alert is broken here. It sends too many emails out. So, instead of adding an Email Alert to your Approval Process, Create this Record-Triggered Flow:

Note the checkbox outlined in red. In order to call actions like Send Email on a Record-Triggered Flow, you need to use the ‘Asynchronous’ path.

Next, place a Send Email Action on that path:

However, we’re not quite done. We need to do a Get Records on the Queue to extract the Queue Email:

Here’s the final flow:

Now we can set the recipient of the Send Email action to be the Queue Email field from the Queue:

In the above example, I just threw some placeholder text into Body and Subject, but you can create a Text Template in Flow and add merge fields to add useful information into the Email. You can also add a URL that takes the user back to the case.