Being able to pop up a screen flow when something happens can be very useful. Previous explorations include the Detect and Launch component, which focuses on being on a record page and detecting changes to that record. Mun’s solution uses platform events as a transport mechanisms, so it’s a more broadly applicable solution.
Renato has built a package that exposes the main Business Hours functions that are normally only available to Apex developers:
Here are the actions:
BusinessHoursAddAction (businessHoursId, startDate, intervalMilliseconds) Adds an interval of time from a start Datetime traversing business hours only. Returns the result Datetime in the local time zone.
BusinessHoursDiffAction (businessHoursId, startDate, endDate) Returns the difference in milliseconds between a start and end Datetime based on a specific set of business hours.
BusinessHoursIsWithinAction (businessHoursId, targetDate) Returns true if the specified target date occurs within business hours. Holidays are included in the calculation.
BusinessHoursNextStartDateAction (businessHoursId, targetDate) Starting from the specified target date, returns the next date when business hours are open. If the specified target date falls within business hours, this target date is returned.
Salesforce Scheduler provides a precision scheduling experience, powered by flow that allows your prospective customers, customers, and employees to schedule appointments with ease and allows you to build stronger relationships with your customers.
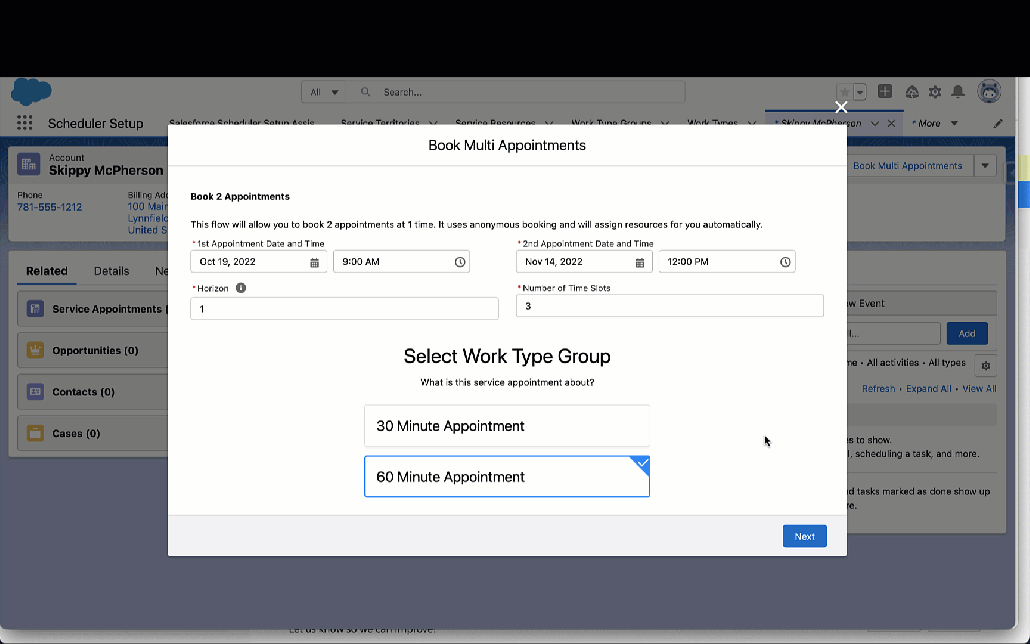
Often times, a customer would like to schedule or is required to schedule more than 1 appointment. For example, in one scheduling session, a customer might want to schedule an initial consultation and a follow up appointment 2 weeks later – in other words, schedule the 2 appointments together.
The .gif above depicts scheduling 2 appointments during 1 scheduling session using the customized flow described in this document
Current Situation / Challenge
Product Capability
Scheduler only schedules 1 appointment at a time. Your customer might schedule the first appointment only to find out that the second appointment is not available. Or they might forget to schedule the second appointment.
Complexity of Custom Development
The good news is that Salesforce Scheduler has a robust API available, allowing customers to create their own scheduling experiences to meet their needs. The not so good news in this is that if you use the API to find available appointments, you need to build your own screen to display those to the user. In other words, the Time Slot Selection screen that comes with Scheduler cannot be customized.
The screen above cannot be customized. For example, you cannot allow a user to select 2 time slots.
A Lower Complexity Custom Solution
You can build a custom scheduling solution which can provide options to select two timeslots by leveraging a few things which are mentioned below.
And this solution really has a basic UI. In its current form it is best suited for an internal user. For external use, you should extend the solution to provide more natural calendar controls (like the out of the box timeslot selection component that Scheduler provides). That, of course, will require more complexity, but certainly worth if to deliver a superior user experience.
Scheduler LX namespace / Apex Methods
Use the Scheduler LX namespace to easily get available time slots. For example, call the GetAppointmentCandidates method to get 2 lists of available times slots. Create an @invocableMethod that will allow you to call this from a Flow.
Use the power and flexibility of Flow to connect both of these together as well as leverage existing Scheduler flow screen components such as Select Territory to create a custom scheduling experience.
Installation / Technical Details
Using the above mentioned custom options, here is a version of the custom solution that we built to attain the experience we discussed.
You can Install this package in your sandbox and check it out for yourselves. Use it to jump start your own custom scheduling solution for booking more than 1 appointment at the same time.
Flow Datagrid Pack – this solution uses the DataGrid Pack – Tiles screen component to provide a user interface for selecting a time slot. The package link above contains the Tiles component already and does not need to be installed from the appexchange.
Apex Classes
LXGetSlots – a class with an @invocableMethod. This class calls the getAppointmentCandidates API to fetch available time slots. This class will format the results so they can be rendered in the DataGrid Pack – Tiles component.
schedulerCandidates – represents a time slot returned from the API
LXGetSlotsTest, TestUtility – Test class and test class helper
Flows
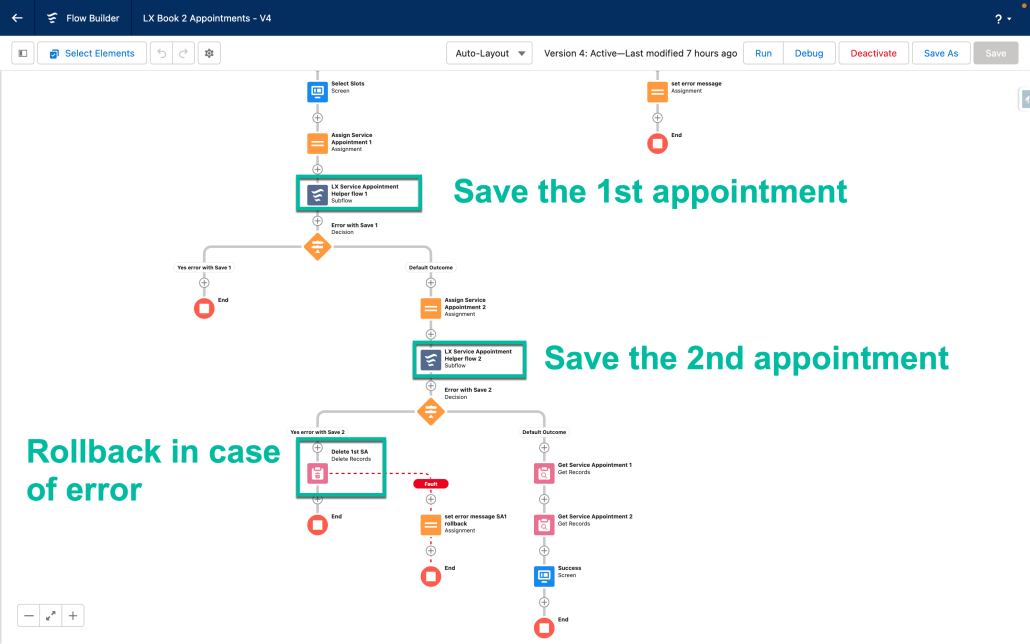
LX Book 2 Appointments – this flow is set up to allow booking of 2 appointments
LX Get Slots Helper Flow – this flow is called by LX Book 2 Appointments. It calls the LXGetSlots apex class to get time slots
LX Service Appointment Helper flow – this flow is called by LX Book 2 Appointments. Its purpose is to create a service appointment for a selected time slot. It uses the Scheduler Save action and it has a formula field to construct the JSON needed for the Save action
LX Book 2 Appointments flow – calling the API
LX Book 2 Appointments flow – creating 2 appointments
Customize it!
If you want to book 3 or more appointments instead of 2, add additional steps to the LX Book 2 Appointments Flow.
Any variable that ends with a ‘2’ should be replicated and end with a ‘3’
Formula fields that you replicate should also have 2’s replaced with 3’s
Replicate the pattern you see in the flow to find slots for the 3rd appointment
Add a Datagrid Pack – Tiles screen component for the 3rd appointment to the Select Slots screen
Replicate the pattern you see in the flow for the saving of the appointment
Replicate the LX Get Slots Helper Flow 2 step. Note the pattern to determine if slots were found and replicate those
Replicate the LX Service Appointment Helper Flow 2 step and related steps. Note the pattern to determine if slots were found and replicate those
When replicating a step, make sure to update any input/output variables from ‘2’ to ‘3’.
Add Datagrid Pack – Tiles component for the 3rd appointment, make sure to update any input/output variables from ‘2’ to ‘3’.
https://unofficialsf.com/wp-content/uploads/2022/09/largeUCSF-300x133.png00Sunilhttps://unofficialsf.com/wp-content/uploads/2022/09/largeUCSF-300x133.pngSunil2022-10-20 00:40:172022-10-24 22:41:09From Chris Albanese: Scheduler – Book multiple appointments using Flow and the LxScheduler namespace
In recent releases there have been some big changes to Omni Supervisor setup to make life easier and more efficient for Supervisors. In the Winter ’23 release it has been taken a step further, by adding the ability to create your own Custom Actions using Salesforce Flow – this puts the power in your Salesforce Administrators hands to add the most impactful actions for your supervisors to each Omni Supervisor screen.
This configuration is all setup through ‘Supervisor Configurations’ – some of the key benefits of using these are:
Only see the agents that are most relevant to each Supervisor
Only see the work that is relevant to each Supervisor (through Queues or Skills)
Have custom actions that are most relevant to each Supervisor
The goal of this post is to walk you through setting up Omni Supervisor in the most optimal way in Salesforce.
Setup guide
First, I want to cover the basics – getting and setting access to Omni Supervisor and some of the Omni Supervisor settings available, before we move onto optimizing the Supervisor experience.
Access to Omni Supervisor
Included with Service Cloud (or any other way you have gained access to Omni-Channel) is the ability to monitor agents and work in real-time with the Omni Supervisor tool. Once Omni-Channel is enabled, it will become available – however we recommend that you limit who has access to it. You can do this by:
Editing all of your profiles to set ‘Omni Supervisor’ to ‘Tab Hidden’ under Tab Settings (or Object Settings) for your profiles
Create a Permission Set that grants access to this tab – similar to the screenshot below. You can then assign this permission set to your managers, supervisors and team leaders. Ideally you may want to include this option with other Supervisor settings, or create a Permission Set Group which includes this access.
On the ‘Supervisor Settings’ admin screen, there are various options you can enable – we recommend you enable all of them (learn more about each setting here), unless your country has particular restrictions on these items (the sneak-peek options need to be disabled in some countries due to privacy concerns).
Optimizing Omni Supervisor
Now that you have Omni Supervisor showing up for your Supervisors, let’s improve their experience. All of the configuration for optimizing Omni Supervisor can be done on one screen, the ‘Supervisor Configurations’ admin screen. We recommend that you create a Supervisor Configuration for each team or department in your organization – this will allow your supervisors to just see the agents and work that is relevant to them, removing any extra noise from other teams or departments.
Configure which Users Supervisors can see
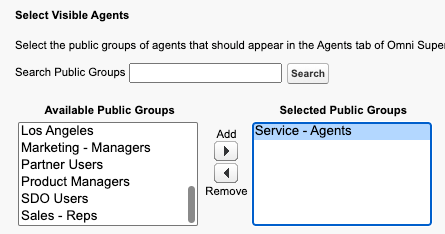
The first part of Supervisor Configuration is restricting which agents the Supervisor with this configuration will be able to see in Omni Supervisor – this is done through Public Groups. There are many other benefits to assigning your agents to Public Groups on top of using them with Supervisor Configurations – you can even nest Public Groups, so this is a great practice even without using them here.
As we suggest a Supervisor for each team and department, we also suggest you have a Public Group setup for each of your teams or departments. Once created, it is as simple as assigning the public group(s) to a Supervisor Configuration, this will mean that Supervisors assigned this configuration will only see agents within the assigned public group(s), reducing the noise in Omni Supervisor.
Configure which Work Supervisors can see
The next step is to filter the amount of work that the Supervisor sees in the Queue Backlog, Assigned Work and Skills backlog Tabs. For queue based work, this is as easy as assigning the appropriate queue(s) to the Supervisor Configuration – this will once again reduce the noise, and ensure the assigned Supervisor(s) only see the queues and work most relevant to them.
If you are using Skills based routing, it is a little more complex as you have the option to either display work with ANY of the skills you add to the configuration, or only display work that includes at least ALL of the assigned skills. The ‘ALL’ setting can be particularly helpful if you split your work by particular departments and/or countries or languages, and assign skills to work in this way. For instance, if you could add ‘French’ & ‘Tech Support’ to this list, and all work assigned at least the ‘French’ and ‘Tech Support’ skills would show up, but not any with only ‘France’ & ‘Finance Support’ skills assigned.
Configure which Actions Supervisors can take
This part is so exciting we have created out own blog about it! Check it out here.
However at a minimum, we recommend that you add the standard buttons to the screens – these are ‘Change Queues’ & ‘Change Skills’ (if you are using Skills based routing) on the ‘All Agents’ tab, and add the ‘Assign Agents’ button to the ‘Queues Backlog’ tab.
Assign Supervisor Configuration
Now you have created a configuration for each team and department, you can assign them to the appropriate supervisors and/or team leaders, and watch their productivity soar!
https://unofficialsf.com/wp-content/uploads/2022/09/largeUCSF-300x133.png00Craig Patersonhttps://unofficialsf.com/wp-content/uploads/2022/09/largeUCSF-300x133.pngCraig Paterson2022-10-17 12:37:162022-10-17 12:37:19How to Optimize Omni Supervisor with Supervisor Configurations
In the Winter ’23 release, an exciting new feature was shipped allowing admins to put more power in the hands of Supervisors to run their teams’ with a new configurable action framework from Omni Supervisor.
You can leverage the power of live data on Omni Supervisor, across all of the tabs (lists of Agents, Queues, Skills, work items in a given Queue, etc.) to execute contextual Screen Flow actions.
Make changes to agents configurations, Re-route work from a Queue, Order a Pizza for your team! The possibilities are endless – I’ve created a few examples that you can try out to get you started, you can find the details, including the installation link in this post.
To get the most our of this great new feature, you will want to find out what are some of the common actions Supervisors need to take on users or work items which require many clicks or manual steps today – these going to be perfect candidates to create new custom actions for, which can speed up their day tremendously (making you a hero). There may also be common actions IT or admins need to make, that could be delegated down to Supervisors, which are also great candidates (e.g. reset a users password).
To make use of these actions, you will need to assign Supervisors a ‘Supervisor Configuration’ – more details on those here.
Creating Custom Actions
A Custom Action is just a Screen Flow – however, the powerful part of these custom actions is the context you can pass to them – that is the list of records users select before invoking the action. That list of records gets converted to a list of IDs and put into an input variable for the flow, called ‘ids’, which the Flow can then take action on.
Each page passes in different types of data to the Flow – you can find more information in our help docs about each, but they fall into 1 of these 3 options:
User(s)
Queue(s)
Work Record IDs (i.e. the ID of the work item being routed – so a Case or Voice Call for instance)
Once you have your use case, creating the custom action is pretty straight forward and is outlined in our help docs, but here are the quick steps:
Create a new Flow of type ‘Screen Flow’
Create an input variable called ‘ids’ that is a Text Collection variable and is ‘Available for Input’
Now perform the action(s) on the records that are passed in as appropriate, looping where required
Save & Activate, giving it a sensible label as this is what will show up to your Supervisors as the button label
How easy is that??!! However, I want to help you out even more by diving into a few extra hints and tips when creating these:
Use a Toast to display success or failure instead of an extra screen to reduce clicks for the supervisor. You can find a package with this component on this site, here: https://unofficialsf.com/show-toast-flow-action/
Use the ‘Collection Filter’ element to quickly create a list of record IDs of all the same type (e.g. Cases), by checking the IDs in the list all start with the same 3 character prefix. You can then iterate each list independently with the Loop element
You can use the Flow feature of running Flows in System Context to delegate down extra powers to the Supervisors, so that the actions they run can manipulate admin data (such as Presence Configurations or Routing Configurations), or even objects/fields that they otherwise wouldn’t have access to – within the guardrails of the Flow that restricts what they can and can’t do to those objects.
You can add Emoticons 👍🙏❗️ to the Label of the Flow, which will then show up on the Supervisor screen to stand out more
The order you assign these is important – the first 4 will be shown on the page, while you can have up to 6 more in the dropdown (for a total of 10).
To test your actions, create a test Screen Flow that calls your new Flows as sub-flows, passing in the list of appropriate IDs to each.
I’m excited to see how our customers will make use of this exciting new feature! Don’t forget, to get you started I have created some examples of some common Flows you may want to use, and even packaged them up – details can be found in this page.
https://unofficialsf.com/wp-content/uploads/2022/09/largeUCSF-300x133.png00Craig Patersonhttps://unofficialsf.com/wp-content/uploads/2022/09/largeUCSF-300x133.pngCraig Paterson2022-10-17 12:36:482022-11-08 06:56:44Add super powers to supervisors with new Configurable Flow Actions
In the Winter ’23 release, an exciting new feature was shipped allowing admins to put more power in the hands of Supervisors to run their teams’ with a new configurable action framework from Omni Supervisor. I’ve gone into some details on creating your own actions in this post, but this page is here to describe a package of custom actions that I’ve created that you can install and use make use of as you see fit.
You can install these Supervisor Flow Actions as a standalone package from this link (unmanaged) – Updated Jan 13th 2026 – will slightly differ from what is shown below
Ensure that Omni Channel is enabled before installing
Ensure that your ‘Service Channel’ for the ‘Case’ object has the developer name of ‘Case’. With Version 2 of our Flow actions, installing this package without an exact match on the Service Channel developer name will fail with a permissions issue. We’re looking into how we can resolve this so it at least installs without an error when this happens, but for this to work right away it needs to match.
Once installed – check for each flow below as to whether you need to make updates, before adding it to a Supervisor Configuration (as detailed in the help docs) – all Flows that reassign work will need updating.
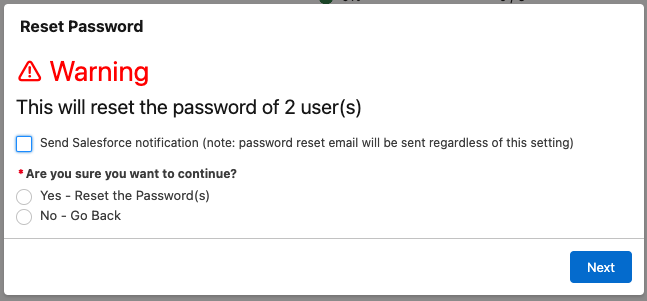
Description: This flow is designed to be used on the ‘Agent Summary’ tab of Omni Supervisor, and expects a list of User record Ids to be passed in (to the input variable ‘ids’ – this is done by default from Omni Supervisor). This will show the above screen – where you can choose to send a notification to the affected Users – choosing to send the notification will result in the users getting a Salesforce notification (bell icon), informing them that their password has been reset. They will also get the standard password reset email (whether you select the checkbox or not).
Note – this Flow is set to ‘Run as System’ as it is calling Apex, and the ‘system.resetPassword()’ function.
Required Updates
Add this action to the appropriate ‘Supervisor Configurations’ (or create one) that you want this to appear for.
Ensure you have a ‘Custom Notification’ in the Setup screens which is active, and applies for at least Desktop
Ensure the user has access to the ‘ResetUserPassword’ Apex Class (via Permission set or Profile)
Optional Updates None
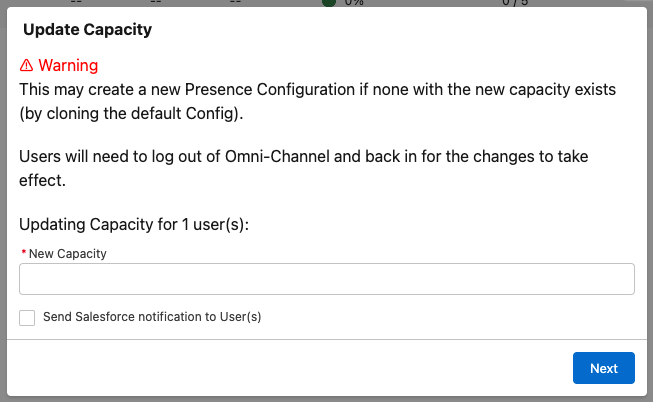
Update Capacity
Description: This flow is designed to be used on the ‘Service Reps’ tab of Omni-Supervisor, and expects a list of User record Ids to be passed in (to the input variable ‘ids’ – this is done by default from Omni-Supervisor). This will show the above screen – where you can enter the new capacity to use for the selected user(s).
This will update the capacity on the
Required Updates
Add this action to the appropriate ‘Supervisor Configurations’ (or create one) that you want this to appear for
Ensure you have a ‘Custom Notification’ in the Setup screens which is active, and applies for at least Desktop
Optional Updates
You can change this to create a Presence Configuration per agent – this creates a lot of overhead, but means that their capacity change can take effect right away and only affect them, rather than potentially lots of users.
(this one has been removed from the latest package – but simple to implement)
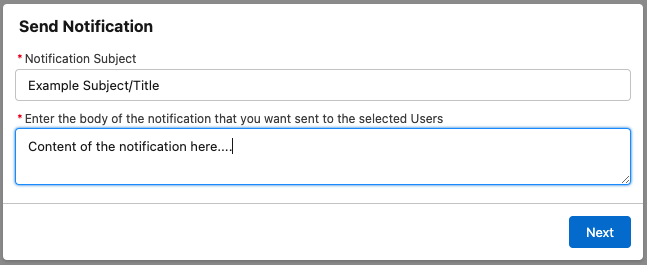
Send Notification
Description: This flow is designed to be used on the ‘Agent Summary’ tab of Omni-Supervisor, and expects a list of User record Ids to be passed in (to the input variable ‘ids’ – this is done by default from Omni-Supervisor). This will show the above screen – where you can enter the subject and body of the notification you want to send the selected User(s).
Sending the notification will result in the users getting a Salesforce notification (bell icon), with the entered values. Clicking on this notification will take them to their ‘Home’ screen
Required Updates
Add this action to the appropriate ‘Supervisor Configurations’ (or create one) that you want this to appear for.
Ensure you have a ‘Custom Notification’ in the Setup screens which is active, and applies for both Desktop and Mobile (for the checkbox to send a notification to work)
Optional Updates
You can copy/clone this Flow to send a message in your appropriate messaging platform (e.g. Slack, Teams or SMS) or to send an Email, using the various Flow actions available (either OOB, or via install).
You can update the navigation from the ‘Send Navigation’ action to go to a different location as appropriate for you (but a navigation target of some sort must be defined).
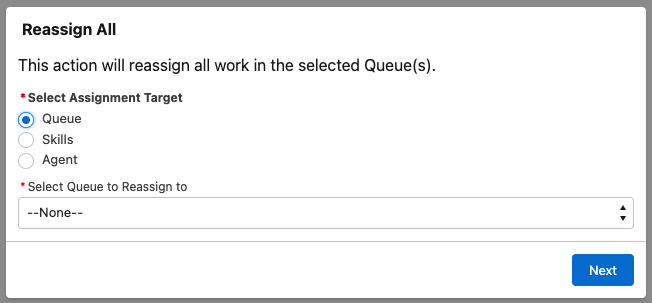
Reassign All
Description: This flow is designed to be used on the ‘Queues Backlog’ tab of Omni-Supervisor, and expects a list of Queue (Group) record Ids to be passed in (to the input variable ‘ids’ – this is done by default from Omni-Supervisor). This will show the above screen – where you can select the appropriate Queue or User you want to assign all of the work in the selected Queue(s) to. Today, this only supports Queues, Skills and Agents.
Required Updates
Each of the Route Work actions need to be updated for your Org – select the appropriate channel and routing configuration (where appropriate) to a valid value.
For any other types of work you have in your org, you will need to add another ‘Collection Filter’ element to filter for that work, and loop through it.
Optional Updates None
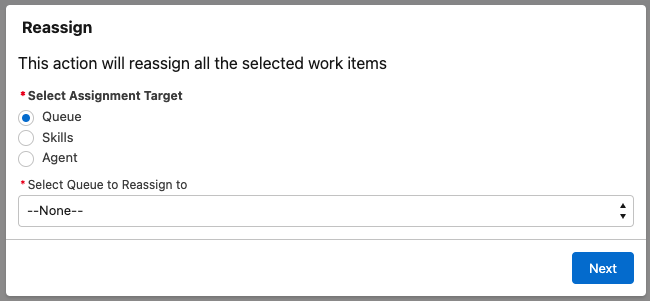
Reassign
Description: This flow is designed to be used on any of the tabs in Omni-Supervisor that lists work – such as the Skills Backlog, or any of the sub-tabs of each page. The Flow expects a list of record Ids to be passed in (to the input variable ‘ids’ – this is done by default from Omni-Supervisor) – these could be of many different types. This will show the above screen – where you can select the appropriate Queue, Skills or User you want to assign all of the selected work items to.
Warnings
Reassigning work that is currently assigned directly to an agent to a Queue will fail – workaround is to assign to a skill first, before assigning to the queue (can be added to the Flow)
Using this action on the ‘Assigned Work’ page may have unexpected consequences – as that work is currently with an agent, and will be re-routed while they are still working on it, potentially leading to multiple people working on the same work item.
Required Updates
Each of the Route Work actions need to be updated for your Org – select the appropriate channel and routing configuration (where appropriate) to a valid value.
For any other types of work you have in your org, you will need to add another ‘Collection Filter’ element to filter for that work, and loop through it.
Optional Updates
Assign to Me
Description: This flow is designed to be used on any of the tabs in Omni-Supervisor that lists work – such as the Skills Backlog, or any of the sub-tabs of each page. The Flow expects a list of record Ids to be passed in (to the input variable ‘ids’ – this is done by default from Omni-Supervisor) – these could be of many different types. This will show the above screen – where you can select the appropriate Queue or User you want to assign all of the selected work items to. Today, this only supports Queues and Agents, due to limitations with the setup of dynamically adding skills in Flow – it is on the near term roadmap to resolve this short-coming.
This is the same as the Reassign Flow above, but a faster way to assign to yourself if you want to quickly grab a work item out of the backlog.
Warning – using this action on the ‘Assigned Work’ page may have unexpected consequences – as that work is currently with an agent, and will be re-routed while they are still working on it, potentially leading to multiple people working on the same work item.
Required Updates
Each of the Route Work actions need to be updated for your Org – select the appropriate routing configuration to a valid value.
For any other types of work you have in your org, you will need to add another ‘Collection Filter’ element to filter for that work, and loop through it.
Optional Updates None
https://unofficialsf.com/wp-content/uploads/2022/09/largeUCSF-300x133.png00Craig Patersonhttps://unofficialsf.com/wp-content/uploads/2022/09/largeUCSF-300x133.pngCraig Paterson2022-10-17 12:35:452026-01-13 09:03:36Example Custom Flow Actions for Omni Supervisor
This bug is in very old Email Alert code and Salesforce is not prioritizing work in that part of the code base. Here’s a fairly straightforward workaround that replaces the Email Alert with a Send Email action in a flow.
For this workaround, we’ll use the exact starting conditions found in the Known Issue. However you can apply this to other scenarios where Email Alert is showing this unwanted behavior.
Let’s assume that you want your Approval Process to Set the Owner of a Case to a Queue. You want email to go out to the Queue Email but not the full set of Queue members. Email Alert is broken here. It sends too many emails out. So, instead of adding an Email Alert to your Approval Process, Create this Record-Triggered Flow:
Note the checkbox outlined in red. In order to call actions like Send Email on a Record-Triggered Flow, you need to use the ‘Asynchronous’ path.
Next, place a Send Email Action on that path:
However, we’re not quite done. We need to do a Get Records on the Queue to extract the Queue Email:
Here’s the final flow:
Now we can set the recipient of the Send Email action to be the Queue Email field from the Queue:
In the above example, I just threw some placeholder text into Body and Subject, but you can create a Text Template in Flow and add merge fields to add useful information into the Email. You can also add a URL that takes the user back to the case.
All API calls into Salesforce endpoints require an authorization. Generally, the SessionId will suffice for this, allowing you to avoid having to set up Auth Providers and Named Credentials just to make an API call to your own org. However, for security reasons, it’s tricky to get the SessionId from Apex.
I’m not sure why the following mechanism works, when all other mechanisms do not work, but I believe this mechanism is here to stay.
First, I’ll give you the most direct way to use this solution.
FlowActionsBasePack isn’t actually doing much work here, and you don’t need to use it; you can simply replicate what it does. To do that you have to first understand what’s really going on.
If you look at the line of code, you can see that the main function is a call to Page.usf3__GenerateSessionIdForLWC
As you can see in this screen shot of FlowActionsBasePack, ‘GenerateSessionIdForLWC’ is a tiny Visualforce page:
It took a surprising amount of web searching to find documentation on using ‘Page’ in Apex. I finally found it here. Page is used to instantiate a PageReference, which is how Apex interacts with Visualforce pages. ‘usf3__’ is the namespace used by all the code in FlowActionsBasePack. So our code basically calls getContent() on the page you can see in the image above. And the only content on the page is a reference to the SessionID.
So, another way you can attack this problem is to create your own Visualforce page on your org. You could name it GenerateSessionIdforLWC but of course you don’t need to. Use the <apex:page> block as shown above and save your page. From then on, any of your apex code can get the SessionId with a single line of code.
https://unofficialsf.com/wp-content/uploads/2022/09/largeUCSF-300x133.png00Alex Edelsteinhttps://unofficialsf.com/wp-content/uploads/2022/09/largeUCSF-300x133.pngAlex Edelstein2022-10-11 19:45:502022-10-11 19:45:56Developer Note: How to Get the SessionId to Use When Calling from An Action Back to Salesforce
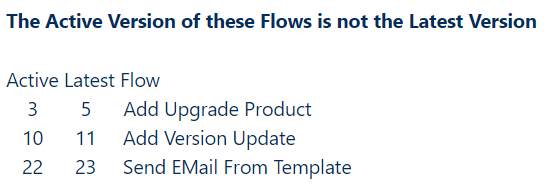
Why would one want to know if the active version of a flow is the most recent version?
There are a couple of reasons why I need to know this information.
I am deploying a large Project from a Sandbox to a Production org where by default, active flows are deployed as inactive. I then have to manually reactivate each of the new flow versions and at some point I need to confirm that I have reactivated each of the deployed flows.
I use subflows and I’m affected by a Salesforce bug* where the latest version of a subflow is executed instead of the currently active version of the subflow. This can cause issues for users in an environment where testing is occurring at the same time updates are being developed and applied.
Read the full article here to find out how this is done and get the link to install the flow that does this into your org.
https://unofficialsf.com/wp-content/uploads/2022/09/largeUCSF-300x133.png00Eric Smithhttps://unofficialsf.com/wp-content/uploads/2022/09/largeUCSF-300x133.pngEric Smith2022-10-10 06:09:062022-10-10 06:09:12How to find out if the active versions of your flows are the most recent versions