https://unofficialsf.com/wp-content/uploads/2022/09/largeUCSF-300x133.png00Alex Edelsteinhttps://unofficialsf.com/wp-content/uploads/2022/09/largeUCSF-300x133.pngAlex Edelstein2022-09-19 09:36:392022-09-19 09:36:43Guides to Flow and Flow Orchestration at DF ’22
This new ChangeOwner action provides advanced automation control over how related objects get handled when a records owner is changed.
Flow already makes short work of changing the owner of a record; a single Update Record is all it takes. But elsewhere in Salesforce, there’s support for more sophisticated ownership change control. For example, when you change the owner of a Case or an Opportunity, you get an additional choices and two related changes:
When you change the owner of an Account from a list view, you get a large number of choices:
Change Owner in Style is a Flow Action that gives you the full power of all of those Salesforce “Owner Change Options”. One of the best ways to see what you can do is to run the test flow that comes packaged with the action. Here’s the main screen:
Now, the screen above is somewhat artificial because it’s designed to show every possible option. In practice, you’ll usually know which object type you’re dealing with, and won’t need to expose all of the possibilities that the action supports. In many cases, you won’t need to expose any UI at all.
How It Works
You need to pass in at least one of:
a record
a record collection
a recordId
Those are set here:
You need to pass in a User Id to the newOwnerId input. You can use a Lookup component for this (see the video above)
You need a Remote Site Setting (The Change Owner action calls a public Salesforce API endpoint so you need to allow your org to essentially call itself.)
Most of the rest of the inputs are boolean inputs that take either true or false, but a few take specific values
Note that Send Email Notification, which shows up in the Change Owner modal dialogs in the LIghtning UI is not supported here, as it is not exposed in the API for unknown reasons. Use another action to generate an email if you need this capability.
“Also transfer Notes, Attachments and Google Docs” doesn’t seem to be working at the API level.
There are a couple of inputs where, if you want to set them to true, you need to also set some other input to true. Those are:
TransferOtherOpenOpportunities
In order for this to work TransferOwnedOpenOpportunities must ALSO be true
TransferAllOwnedCases
In order for this to work TransferOwnedOpenCases must ALSO be true
Using This Action Directly From Apex
All invocable actions, like the one demonstrated here, can now be invoked directly from Apex code, without requiring any flows, as of Winter ’23. Learn more.
This action constructs a SOAP call from within Apex, allowing access to properties that exist only in SOAP headers. This is the full list:
This approach can be used to create invocable actions for these other SOAP use cases.
https://unofficialsf.com/wp-content/uploads/2022/09/largeUCSF-300x133.png00Alex Edelsteinhttps://unofficialsf.com/wp-content/uploads/2022/09/largeUCSF-300x133.pngAlex Edelstein2022-09-17 14:54:432022-09-17 15:31:41Advanced ‘Change Owner’ Configuration Now Available In Flow and Apex
Update January 25, 2025: install links updated to latest version Update October 15, 2022: install links updated to latest version Update September 26, 2022: install links updated to latest version
Next week is the year’s big Main Event: Dreamforce. For some of us, that means packing our things and scrambling to fill our session schedules, make meetup plans, and find the perfect dinner spot. For others, like me, an sense of impending FOMO.
Fortunately, the announcements made at Dreamforce, and the Winter 23 release just a few weeks after, will be for everyone, whether you make it in to San Francisco or not. If you’ve reviewed the release notes or scoped out your preview sandbox, one item you may notice is that the Dynamic Fields feature for Screen Flows will be Generally Available, and with that, picklist fields will be Record Type-aware. This means you can simply place a record variable’s picklist field on a screen, and if you’ve set the Record Type for that record, it will correctly display only the picklist values that are active for that Record Type. However, that Record Type must be set on the record variable before the Flow arrives on that Screen with the picklist. So, then: what options do we have today for letting a user select a Record Type?
Today’s Options for RecordType Selection in Flows
You could build a Choice for each Record Type. That might work, but what if different users have a different permissions to different Record Types. Sounds like a pretty hairy mess to try to get right, and to maintain moving forward. Not a great option.
You could do a Record Choice Set or a Collection Choice Set based on the RecordType object. Of course! Perhaps by setting the Screen Flow to run in User Mode, which respects a user’s access to records, we’ll only get the Record Types that the user has permissions for. If you’ve tried this, you’ll quickly learn that the RecordType object, which holds all each object’s Record Types, is not limited by the user’s permissions. If a user has read access to an object, they’ll have access to every RecordType for that object, even if they don’t have permission to create a record for that Record Type.
The closest I could find is the GetRecordTypeInfo action in the UnofficialSF Flow Action Pack. Its a nifty action! But its a bit incomplete, as it requires you to pair it with another screen component, it won’t give you the Record Type Descriptions, and the Record Type information is provided in separate text collections, making it challenging to be able to use the selected option downstream in the Flow.
🎉 Welcome to the team, Record Type Picker 🎉
The Record Type Picker is an open-source, free-to-use component that can be used in Screen Flows to give users selectable choices of Record Types, automatically filtered to just the Record Types that the running user has access to!
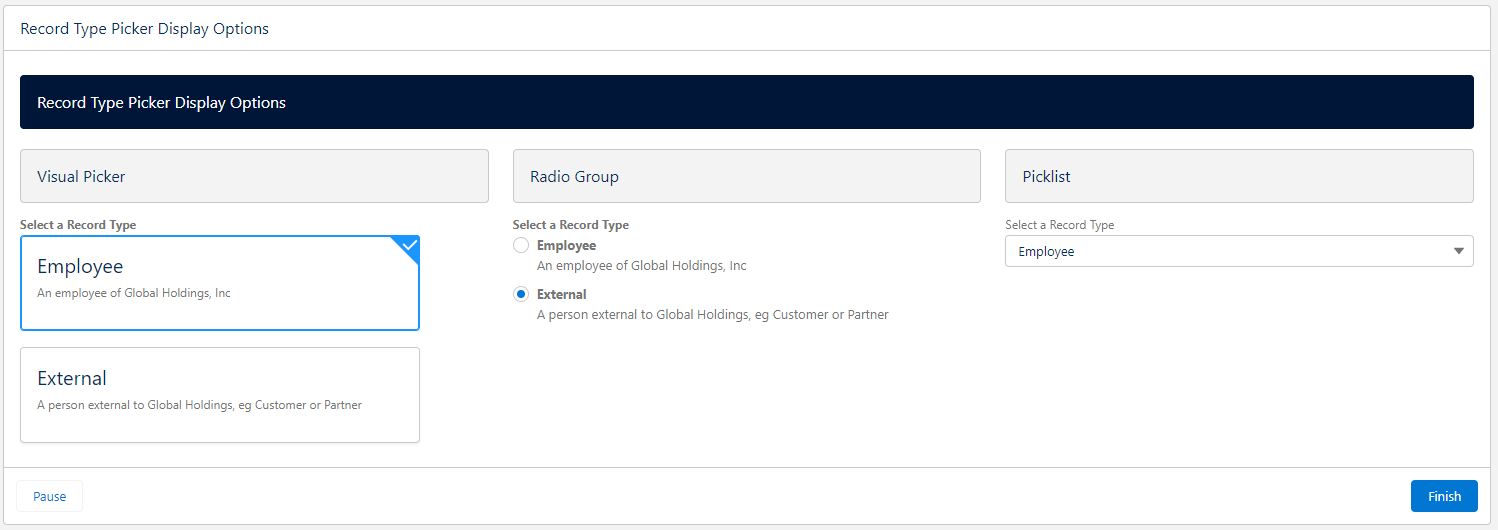
Three display types
Visual Picker, Radio Group, Picklist, each with optional Show or Hide Descriptions
Optional Auto-Next Navigation on Select
Auto navigate on selection works best with the Visual Picker on a screen that doesn’t have any other inputs and has the footer and/or Next button hidden. When the user clicks on a selection, the Flow will automatically navigate to the next screen. It is also recommended to provide a “Previous” button on the next screen so that the user has a chance change their selection if they’ve made a mistake.
Easy configuration with a Custom Property Editor that has a Preview mode
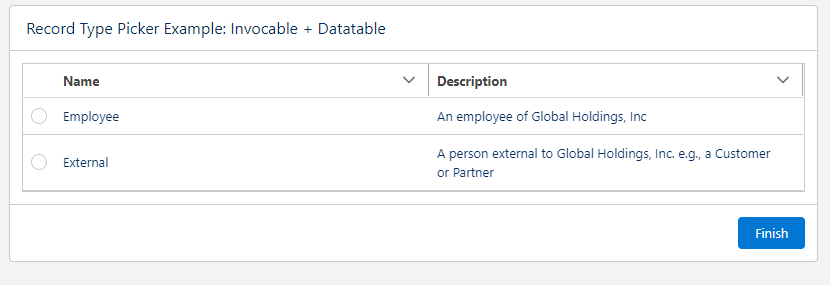
Bonus Invocable Action
The package also comes bundled with an Invocable Action to get a Collection of RecordTypes available to the running user, in case you’d prefer to use other screen components like Collection Choices or Data Table
Install with Ease
This component does not depend on any other packages, and can be installed with an unlocked, namespaced package using the links below. The namespace means you don’t have to worry about conflicts with anything you’ve already got in your org, and being unlocked gives you the confidence that what you see in the source repo is what you get in the package.
There are a handful of features that I’d like to add, but its at the point now that it should be pretty useful for anyone that needs this kind of thing. Take a look, and please add any issues or feature requests to the Issues log in the GitHub repo!
Jeff Kranz
Platform Product Manager for Riskonnect, a Salesforce OEM Partner since 2007.
Opinions and statements made on this platform do not represent those of my employer.
https://unofficialsf.com/wp-content/uploads/2022/09/RecordTypePickerDisplayOptions-3.png5301498Jeff Kranzhttps://unofficialsf.com/wp-content/uploads/2022/09/largeUCSF-300x133.pngJeff Kranz2022-09-16 10:22:002025-01-25 06:25:31Introducing: User-aware Record Type Picker for Flows
UPDATE: Salesforce has added official support to Flow Orchestration for this functionality. Learn more.
Work Guide Plus (“WG+”) is a custom Work Guide component that you can add to record and home pages, similar to how the Orchestration Work Guide works. In addition to being able to display an individual work item, it can show a list of all the work items currently assigned to the running user.
Consider this example, where I have two work items assigned to me that are associated with the Jones Pharma account:
The Out of The Box Work Guide will simply display one of the two, but WG+ will show a list:
Select a work item and click Open Work Item to work on it.
If there’s only 1 work item assigned to the running user, WG+ will simply execute it and not bother with the list.
Screen flows used as step flows MUST have an input text variable named recordId to receive the record Id as context information, if you use Work Guide Plus.
When the screen flow is finished, WG+ will return to the list of Work Items. It has a two second delay to allow Orchestration to update the status of your work items, and this value can be overridden (the idea here is that if you return to your list too quickly, you might still see the work item you just finished work on because orchestration is still in process).
As a side note, this component features the new official Datatable component, which is Beta in Winter ’23. Because of that, however, it requires a Winter ’23 org. We’ll publish an installable package as soon as Winter ’23 becomes generally available. In the meantime, you can grab the component from the repository below and add it directly to a Winter ’23 org.
https://unofficialsf.com/wp-content/uploads/2022/09/largeUCSF-300x133.png00Alex Edelsteinhttps://unofficialsf.com/wp-content/uploads/2022/09/largeUCSF-300x133.pngAlex Edelstein2022-09-16 07:44:532024-05-08 14:53:50Work Guide Plus adds a work list to the Flow Orchestration Work Guide
UPDATE: I TESTED POSITIVE FOR COVID THE NIGHT BEFORE DREAMFORCE, SO I WON’T BE AT THIS MEETUP. you might want to go anyways and see who shows, however.
Alex here…. If you’re coming to Dreamforce, drop by and say hello and tell me how you’re using Salesforce Automation and what you want to see in the future. I’ll be hanging out at Moscone West on the 2nd floor in back behind the session rooms, where they serve lunch, on Tuesday between 2:30-3:30pm. Would love to chat!
https://unofficialsf.com/wp-content/uploads/2022/09/largeUCSF-300x133.png00Alex Edelsteinhttps://unofficialsf.com/wp-content/uploads/2022/09/largeUCSF-300x133.pngAlex Edelstein2022-09-14 19:59:442022-09-20 06:22:09At Dreamforce: The 1st Unofficial Unofficial SF SF Meetup
I love it when we get some of those official Salesforce Flow videos with those sweet, sweet production values. This latest set of bite-sized videos is a definite new Must Watch for new Flow creators, drilling down on specific topics like Scheduled Paths and Variables.
The videos are short, but there’s some nice focus: one of them focuses purely on introducing variables, using a lunchbox and thermos metaphor:
And another one focuses purely on Before Save vs After Save triggers:
Check it Out! And find other Flow tutorials here.
https://unofficialsf.com/wp-content/uploads/2022/09/largeUCSF-300x133.png00Alex Edelsteinhttps://unofficialsf.com/wp-content/uploads/2022/09/largeUCSF-300x133.pngAlex Edelstein2022-09-14 10:18:222022-09-14 10:18:27From Salesforce: 6 New Flow Builder Videos for Beginners
I tend to get distracted and either miss or forget the meeting alerts that Google Calendar generates, and recent changes to Mac OS notification have made the problem worse, so I decided to build a louder, more insistent alerting application using Flow. When the flow runs, it queries my Google Calendar account every minute, and when a new meeting start time gets close, it starts tracking the meeting and emitting progressively louder and longer alarms. The package provided here installs the Alerter flow but also a new Get Google Calendar Events invocable action that takes a Google Calendar identifier and a named credential that authorizes access to that calendar’s events, and returns a data structure of events.
Here’s an example of the action configuration:
Authentication & Authorization
Figuring out how to configure a Salesforce org with the necessary credentials to make API calls to Google Calendar apis was an adventure in itself. You can read about that here.
Note that this package will install an Auth. Provider called ‘GoogleAuth2’ and a Named Credential called ‘Google Named Cred 3’. Using these will save you time. You’ll have to:
first, replace the clientID and client secret placeholder with values from your own Google Cloud Client IDs
Over in your Google Cloud account, replace the Authorized Redirect URI value with the Callback URL shown at the bottom of your Auth. Provider
Edit the Named Credential and Save it to start the authentication process.
Working with the event results
On this output screen, the raw data returned from Google is displayed on the left:
In order to make it easier for the flow to work with the data returned in this big json blob of text, this package defines three new custom types (aka ‘Apex Types’) called GoogleCalendarEventSet, GoogleCalendarEvent, and GoogleDateTime. The action does returns the data from Google as raw JSON but it also passes back a far more practical GoogleCalendarEventSet object that contains a list of GoogleCalendarEvent objects. In the image above, the data on the right looks a little similar, but what you’re actually seeing is the readout of a collection that can be looped over in the flow.
Inputs
calendarIdentifier
the main identifier for a Google Calendar. See ‘Calendar Identifier’ below
credName
the name of a Named Credential that has authenticated to a Google account. See this article.
endTime
String End Time – requires RFC3339 timestamp with mandatory time zone offset, for example, 2011-06-03T10:00:00-07:00. This is optional. If you don’t include it, the number of events you get will be solely determined by Max Results
startTime
String – requires RFC3339 timestamp with mandatory time zone offset, for example, 2011-06-03T10:00:00-07:00. If left null or empty, the current time will be used
maxResults
The number of results to return. Defaults to 3
orderBy
The sort order of the returned results. Allowable values are ‘start time’ and ‘updated’. Updated referes to last modification time (ascending).
queryString
this will do a free text search on summary, description, location, attendee’s displayName, attendee’s email
https://unofficialsf.com/wp-content/uploads/2022/09/largeUCSF-300x133.png00Alex Edelsteinhttps://unofficialsf.com/wp-content/uploads/2022/09/largeUCSF-300x133.pngAlex Edelstein2022-09-11 19:40:082022-11-13 14:43:06Using Flow to Retrieve Google Calendar Events and create a great Alerter App
Some while back, the Detect and Launch component opened up a new frontier by making it possible to pop a screen flow from a record page automatically when the record is edited or deleted. Andy Haas has extended this component with some valuable new capabilities.
Previously, you could pop a screen flow either 1) when the underlying record is updated/edited or 2) when the record is deleted.
This update adds two features:
Launching a screen flow when a record is edited can now be further configured to make the launch dependent on a particular field value change. Example: you need an agent to fill in specific details when they close a case or your sales reps need to send a quote to the customer you can launch a flow after a specific field has changed and, for example, is equal to true.
You can now trigger screen flows to run on the Load of a record page, and not just on an Edit or a delete
This demo was produced for V2.0 and shows Conditional Launch Based on a Field Edit:
Triggering a screen flow when a record page loads
Perform this with the new input field ‘Flow Name (when the record is loaded)’. You can use this to launch the flow when the record is opened. Note that if you are using Launch Mode = Modal, you will need to build a close function within the flow, as the modal doesn’t have a close function, yet.
Conditional Screen Flow Launch Based on a field edit
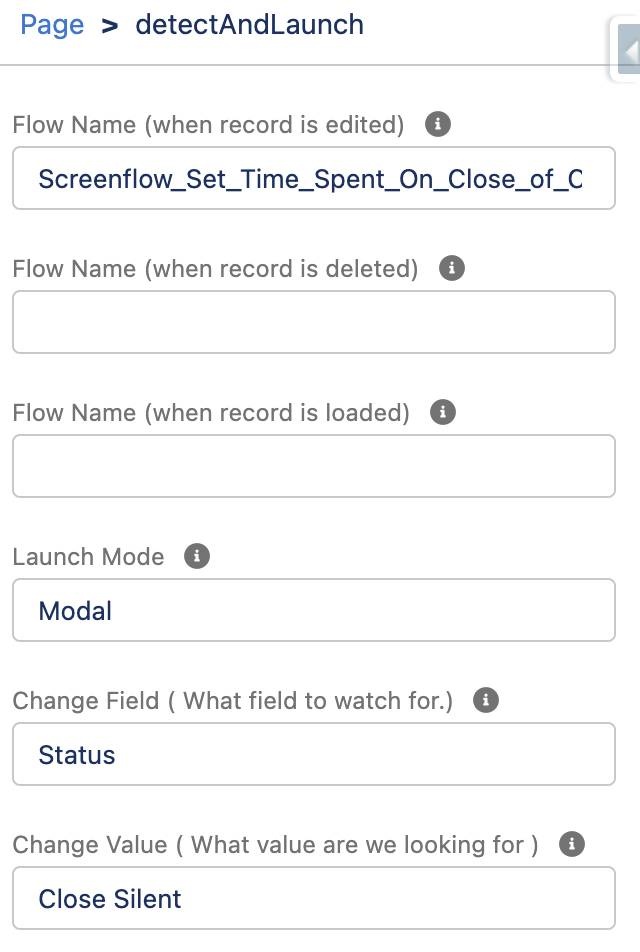
Let’s say you have a case record that you want to launch a flow when the case is closed to get the user to enter the amount of time that they spent on the case. To configure this within Detect and Launch, enter the flow name you want in ‘Flow Name ( when the record is edited )’, set Change Field to ‘Status’, and set Change Value to ‘Closed’.
Want to check multiple fields and launch different flows based on them? Or run different flows depending on the value of the field? Add multiple Detect and Launches with different criteria to launch different flows.
New Fields
Field
Description
Change Field
Is used to signify what field you want to watch when a record has been edited.
Change Value
Used to be the comparison value when the record has been edited.
Flow Name (when the record is Loaded)
use this to launch the flow when the record is opened.
Component Configuration Example:
Limitations:
At this time, the component does not support cross-field comparisons. Change Value must be a static value. We suggest utilizing formula fields to do complex comparisons that evaluate true or false.
Conditional Field-Based Launch only works when editing a record. It does not work on deleting or loading a record.
These features are available in V2.0+ of Detect & Launch
https://unofficialsf.com/wp-content/uploads/2022/09/largeUCSF-300x133.png00Alex Edelsteinhttps://unofficialsf.com/wp-content/uploads/2022/09/largeUCSF-300x133.pngAlex Edelstein2022-09-10 13:12:432022-09-10 13:12:48From Andy Haas: Trigger Screen Flows with Record Changes using ‘Detect and Launch’
Step 1: Generating a Client ID and Client Secret on the target non-Salesforce web service
To retrieve calendar events from Google, we start by logging into Google Cloud Platform and generating some credentials that we can use to make API calls into Google using our Google account.
When we generate what Google calls an ‘OAuth 2.0 Client ID’, we’re given a client ID and client secret provided by Google.
Here’s my Google Cloud Platform credentials page where I’ve created a Client ID:
When I click on it for details, I can access both the client Id and client Secret:
Each web service will have a slightly different process, but they all will end up generating a Client ID and Client Secret (note: a few services, like AWS, have additional or different security protocols).
The next step is to take this identifying information and add it to our Salesforce org via an Auth. Provider.
Step 2: Creating the Auth. Provider for the target Web Service
Each time you want to enable a particular service and service configuration to be called programmatically from your Salesforce org, you need to create an Auth. Provider. Now, Auth. Provider is a pretty unfriendly name. I would have gone with something like ‘Web Service Access Definition’. You create one on your org to tell Salesforce that properly permissioned Users on your org are allowed to connect to the non-Salesforce web site via its apis. You can set up different Auth. Providers that connect to the same non-Salesforce web service but provide different amounts of access, and then assign usage rights to different permissions sets or profiles.
2.1 Select the Provider Type
There are different types of Auth.Providers. Each type represents a different style of authentication. Take a look at the list of available types:
A few of these, like the Apple authentication protocol, are truly unique, but most of these look very similar because they’re all basically using the OAuth industry standard. The most general purpose provider type is Open ID Connect, which is the general purpose solution that works for almost all web services. That’s the one we’ll use for our Auth. Provider. (Why not use the Google Auth Provider type? You’d think it would be more fitting for a Google connection. However it turns out to require some extra fiddly work to get it to work properly. You need to add an extra openId scope in and you need to override the authorization URL to enable refresh tokens. Ultimately, it’s more pain than its worth. Also, the process shown here for Open ID Connect will work smoothly with other web services besides Google. So we’ll use the general purpose solution)
After selecting provider type, fill in the client ID and secret fields.
2.2 Providing Authorization URLs
Automatic authorization between two sites requires them to have a conversation with each other via URLs, so you need to specify the right URLs for them to use.
The required fields are Authorize Endpoint URL and Token Endpoint URL. In our case, because we’re calling from Salesforce to Google, these are going to be Google URLs. The first one will be used to start the authorization process and the second one will be used to get tokens.
These URLs are generally found near where you generated your client ID and secret. However, with Google, there were some oddities. Google no longer provides clear documentation for setting up an oAuth session directly, instead recommending that you use a higher level client library:
Google’s concern is laudable, but that doesn’t help us Salesforce users much, as we still need to determine the low-level URL’s to configure our Auth. Provider. To solve this, I had to dig up this good article by Piotr Gajek.
Google’s tokens only last 1 hour, so you can only deploy something useful to production if you add automatic token refresh. This is done by adding ‘access_type=offline&approval_prompt=force’ to the authorization URL, as shown above. (More on that here and here)
Another troubleshooting note: In my own experience, the v1 version of Google’s authorization endpoint, which is shown above, correctly enables automatic token refresh:
The Google docs will tend to steer you towards the more recent version, but keep these points in mind.
2.3 Setting the Scopes
The Default Scopes field is used to specify which parts of the target web service are accessible to this authentication provider. I actually set these when I generated the credentials on the google site. Here they are:
Associating some specific scopes over on my Google account is only the first part. In order to enable my Salesforce app to access my calendar, I need to similarly add these scopes to the Auth. Provider I’m creating in my org and the Named Credentials that I’ll be using.
Here’s what my configured Auth. Provider looks like
3. Locate the Org-Specific Callback URL and Provide It To Google
When actual authentication happens, you start in Salesforce and get a pop up that lets you log into Google. You’ve done this ‘OAuth dance’ hundreds of times, most likely. This forces you to actually log in properly to Google which makes Google comfortable enough to trust future API calls. At the end of this dance, Google needs to send you back to Salesforce. This is done via the ‘Callback URL’ (or sometimes ‘Redirect URL). Each Salesforce org has a different base URL so each of your orgs will have its own unique Callback URL, and you need to let Google know what it is. So we collect it here, from our Auth. Provider:
…and paste it into the Google authorization here:
4. Creating a Named Credential for our Callouts
We also need to create a Named Credential, and at this point a lot of people (including myself, routinely) start to struggle to distinguish all of these abstract objects.
Why shouldn’t we be able to simply assign to a permission set the ability to use the Auth Provider? My layman’s explanation, which is unquestionably not the most technically precise answer, is that organizations generally want a way to create authorizations that provide access to some of a service but not all of a service. It’s true that we focused down the reach of this authorization via scopes, but you might want to limit things further. The Named Credential sits on top of the Auth. Provider and provides a complete authorization and authentication package that can be associated with Permission Sets. One key element of Named Credentials is the endpoint URL that the Credential is authorized to call. Usually these URLS represent API endpoints. Notice that until now, the only URL’s that we’ve been using have been special authentication URLs with words like ‘auth’ and ‘token’. But when I call the Google Calendar API, I’m going to call an endpoint designed for general calls. For Google Calendar, the endpoint is https://www.googleapis.com, and the rest of the URL is /calendar/v3/calendars/[mycalendarid]/events. You find these URL’s in the API documentation of your target web service.
And if you look in the Permission Set section, you’ll see a specific section where you can associate Named Credential with a permission set:
Here’s my configured Named Credential:
Note that I again provide the scopes that I want my action to have access to, and that I select the Auth Provider that I created above.
The URL provided here is the main URL for calling the Google API, and this is therefore is the only URL this credential will be able to call.
5. Authenticate to your Google Account From Salesforce
That final checkbox ‘Start Authentication Flow on Save’ is important because, even though I’ve copied my Google id and secret into my org, that’s not enough to get Google to trust API calls from my org. I have to do an actual authentication, and the final checkbox causes it to start. Here’s the first thing you’ll see:
Once you successfully connect to the Google account linked to this particular client ID and secret, your Named Credential will show ‘Authenticated’ and you can now use it in your callouts:
Remember above where we talked briefly about refresh tokens? If you don’t include those extra parameters on your authorization call, you’ll succeed, but you’ll get this warning, and you can expect your token to expire after a brief period of time:
6. Using Your Named Credential With a Flow Action
Actions that make web callouts will generally have an input for a token of some sort. Here, it’s labelled ‘credName’ to emphasize that what we want is the name of a Named Credential:
Not all callout actions support Named Credentials, however. For this action that retrieves weather, the api token doesn’t expire and is easily generated without oAuth, so the action simply asks for it:
And that’s all that has to be done. As you can see, if you have access to use a Named Credential, you have the ability make calls. When I run this action, I get back Calendar events:
And that’s the story on authenticating with Auth. Providers and Named Credentials.
Developer Notebook
Callouts are represented in URLs by the prefix ‘callout:’. You generally connect a Named Credential to an action by passing in the name of the action. You incorporate the name of the Named Credential into the URL of your API call, and Salesforce handles the incorporation of necessary elements into the actual API call. In our case, with Google Calendar, the API expects a token to be provided in the header of the API call. This is the most common approach. If you were bypassing Named Credentials, you’d manually insert the token into your call like this:
When we use a named credential, Salesforce handles that for us. Here’s how it looks:
https://unofficialsf.com/wp-content/uploads/2022/09/largeUCSF-300x133.png00Alex Edelsteinhttps://unofficialsf.com/wp-content/uploads/2022/09/largeUCSF-300x133.pngAlex Edelstein2022-09-08 21:50:022022-11-13 14:53:12Using Google Data in Flows – Authenticating to Google from Salesforce
Flow Auto Navigate is a great way to auto-advance or finish a screen flow after a set amount of time. I have seen several posts in various Trailblazer groups or various Slack workspaces where admins have asked if there is a way to automatically complete a screen flow if a user just leaves on the final screen. We all know that users get busy or forget and might leave a flow interview abandoned if they don’t hit that finish or next button. What if instead, we gave them a timer they can reset or not even show them and set a time for how long they have to complete that specific screen? Now we can.
SetupProperties
Maximum Time: This is the max time the user has to complete their actions before the flow will auto advance the format should be in H:M:S:MS
Message to Users: If Show Time is set to true you have the option of displaying a message underneath the timer for the users to keep them aware.
Show Timer: When this is true it shows the timer on the flow screen counting up.
Show Timer Reset: When this is set to true it shows a reset button that when clicked resets the time on the clock.
https://unofficialsf.com/wp-content/uploads/2022/09/largeUCSF-300x133.png00Josh Daymenthttps://unofficialsf.com/wp-content/uploads/2022/09/largeUCSF-300x133.pngJosh Dayment2022-09-07 15:55:012022-09-09 09:41:53Automatically Finish and Navigate Screen Flows with Flow Auto Navigate