I’ve written an article on the Flow Launcher from the App Exchange and included a few use cases showing how to use Datatable Row Actions to launch pop-up screen flows to do things like edit records or add new records to a Datatable.
The Flow product team wants to hear from you on making flows even better with Application Lifecycle Management (ALM) processes.
We’ve created a short 3-5 minute survey that will give you the opportunity to rank what is keeping you from adopting it more widely in organizations with strict compliance, CI/CD, or development needs.
If you like, you can also opt-in to Salesforce Research to provide even more input 1 on 1 with our researchers.
I’ve released a new version of the Datatable component (4.3.5).
In addition to the Remove Row Action, I’ve added a new Standard Row Action and improved reactivity with a new single “Actioned Row” output. When a row is “actioned”, you can fire off other reactive screen components like Flow Launcher or Screen Actions. This lets you now do almost anything you want when clicking on a row action.
The action can be configured as a clickable icon or a full button and can be put in the first or last column of the datatable.
Some flow elements such as Transform and Filter are still not directly referenceable in the resource picker so I’ve updated the picker and the Datatable CPE to allow manual entry of flow attributes for the record and pre-selected record collections. For example: “{!MyFilter}”
Other Datatable changes include increasing the maximum column width from 1000px to 1500px.
I’ve addressed a few bugs as well.
Date field values that get adjusted by the timzoneoffset now are stored as YYYY-MM-DD. Prior versions stored these as a datetime which caused issues with collection processors and action buttons.
The SelectedRowKeyValue output now gets cleared when no rows are selected.
When both pagination and single row selection are enabled, the prior selection will be cleared before setting the new selection.
Fixed search/filter errors when using special characters by escaping special characters in filter and search terms.
The correct url for record hyperlinks will be generated when running in a playground org.
Edited ApexDefined rows will be output as soon as changes are saved. (Issue #1565)
If multiple preselected rows are provided and single row selection is enabled, only the first record in the collection will be marked as preselected.
I released an Auto-Navigate component for flow screens and added some new reactive collection processors. By adding reactive conditional visibility to the Auto-Navigate component you gain full control over navigating between flow screens without the user needing to click a Next or Previous button. The UpsertRecordByKey action lets one upsert a record into a record collection by matching the value of a key field.
For certain types of reactive screens, some components are designed to react to the outputs of other components on the same screen. However, the first time a screen loads, these components may not have a value available. The Reactive Record and Reactive Record Collection components are designed to “seed” a component with a starting value before it can react to a change in another component. Think of these like the flow formula function BLANKVALUE where you can assign an optional value to use if the primary value is null or blank.
Updates to the Flow Screen Components Base pack include an updated combobox which means that Action Button and Screen Action outputs can now be directly referenced by other custom components from unofficialsf.com. CPE developers can take advantage of a new feature that lets users manually reference flow attributes that can’t be selected natively by the component. QuickChoice was updated to support default values for dependent picklists on initial screen load. A Master Label and a Required attribute were added to the Object and Field picker. The Rich Text Input screen component is now reactive.
The Flow Actions Base Pack and the Collection Actions were updated to have all entries be at API 45.0 or later which avoids any issues enabling the ICU Locale Formats which is being enforced in Spring ‘25.
Be sure to Subscribe to updates by clicking on any Blog post on this page and entering your email address and clicking Subscribe.
https://unofficialsf.com/wp-content/uploads/2022/09/largeUCSF-300x133.png00Eric Smithhttps://unofficialsf.com/wp-content/uploads/2022/09/largeUCSF-300x133.pngEric Smith2025-01-28 13:17:442025-01-28 13:17:47What’s new for Datatable and other UnofficialSF components
Recently I created a Flow Component that extacts text from an image called Flow Document Scanner that Salesforce API used for the text extraction also outputs a Base64 string of the image file after extracting the text and I wanted a way to store that image as a file in Salesforce so I created the Base64 to File Converter Invocable action that takes that Base64 string and creates a ContentVersion and relates to a record. After some feedback I heard that there was a need for this outside of my use case so I am releasing it on Unofficialsf as a stand alone Invocable Action. Let’s take a look at another use case and how the action is used.
Use Case Overview: Uploading User-Generated Content
Imagine a scenario where your organization collects user-generated content—such as images or documents—through a web form. This content, once submitted it is stored in a raw Base64 format in a database, but you have a requirement now that the images also need to be stored in Salesforce for future access and management. However, the challenge lies in converting this content into a format that Salesforce can handle effectively. This is where Base64 to File Converter comes into play.
The Solution
In our scenario we already have a developer who has an integration setup that is creating a platform event in Salesforce when a file is uploaded into our companies database. So to help keep things simple we are going to create a platform event triggered flow to handle the Base64 conversion and file relationship.
Step-by-Step Implementation
1. Create a Platform Event triggered flow. Our flow is going to Get an Account record with a matching external Id then it will convert our Base64 String to a File and attach it to the Account. Then to save us some work later it is going to create a Content Delivery record based on the ContentVersion output by the Base64 to File Converter action.
2. Let’s take a deeper look at how we configure Base64 To File Converter. The first thing I need to enter is the file name including the file extension i.e. myfile.jpg in our use case we are getting that from our Platform Event. Next I need to enter my Base64 String and finally the Related Record Id.
3. Base64 to File Converter outputs the ContentVersionId of the file that gets created so if I need to do other things with the file like in our example create a ContentDistribution record we can do that without having to go find the file we just created.
Finally
As an flownatic I now have a quick and easy way to convert Base64 to files without having to code it all myself I just drop it into a flow and I am done.
Attributes
Attribute
Type
Notes
INPUT
File Name
Base64 Encoded File Content
Related Record Id
String
String
String
The name of your file with the appropriate extension i.e. myfile.jpg
Datatable with Row Actions calling a pop-up Screen Flow
Recently I wrote an article on how datatable row actions could be used to execute a Screen Action. This is a great feature if you need to perform some unattended actions on a record in the datatable.
But what if you need to provide some additional input or interact with the data in the actioned record? Action Buttons and Screen Actions can only run auto-launched flows, not screen flows.
I was able to work with Josh Dayment to enhance his new Flow Launcher action to launch a screen flow reactively instead of just from a button. We also added the capability of passing records and record collections in and out of the launched flow.
There will be many different use cases for this new capability, but this article highlights how you could combine Datatable and Flow Launcher to edit fields that aren’t natively supported for inline editing such as Lookup and Multi-Select Picklist fields.
Here’s the flow in action. Each time the row action button is clicked, a screen flow pops up allowing the user to edit some of the fields in the actioned record. When they click Save Changes, the datatable gets refreshed with the changed record.
This is a simple flow where you get a collection of Account records and present them in a Datatable on a reactive screen.
The reactive screen displays a Datatable with row actions enabled. 4 additional reactive actions are added to handle the additional processing. Each of these will be explained in more detail later.
CP – Get First Record Extract the single record from the collection of actioned rows provided by the datatable.
Flow Launcher – Sobject Launch a screen flow that will allow the user to edit fields in the record provided by the Get First Record action.
CP – Upset Record By Key Upsert the updated record from the screen flow into the current record collection.
CP – Reactive Record Collection Provide the active record collection to be displayed in the Datatable and used by the Upsert action. If nothing has been processed yet, seed the flow with the original Get Records collection. Otherwise, return the collection provided by the Upsert Record By Key action.
When you first build this flow, set the input collection for the Datatable to be the collection of Accounts from the Get Records. You will come back later and update this once you add the other reactive actions to the screen.
Next, define the Row Action for the Datatable. Currently, there is only a Remove Row action so select that and restrict the number of actioned rows to 1.
The Remove Row action in the Datatable outputs a collection of records actioned by the user. In this case, the Datatable is configured to restrict the user to a single action at a time. The Get First Record component extracts the first record from the collection of Removed (Actioned) Rows from the Datatable so you have the single record you need to pass to the screen flow.
The Flow Launcher will fire by reacting to any changes in the record output by the Get First Record action which fires any time a new record is provided by the Datatable row action.
To configure the Flow Launcher component to launch the flow reactively, set the “Hide Launch Button” attribute to True (1). To have the flow pop-up in front of the Datatable, set the “Show Flow in Modal” attribute to True (2). You can select the size of the modal with the “Modal Size” attribute (3). Identify the flow to be launched by providing the active flow’s API name in the “Flow API Name” attribute (4). Identify which resource in the launched flow to pass the record to with the name of the input variable in “Subflow Input Variable Name” (5) and the record you are passing to that variable in “Launched Flow Input Attribute – Record” (6). You can force the user to complete the called flow instead of closing the modal manually, by setting the “Disable Close Icon” attribute to True (7).
The flow being launched takes the values in the input record and displays a screen with inputs for some of the record’s fields.
The field values from the input record are used as defaults for the inputs on the screen.
The Flow Launcher action is looking for an output attribute from the flow with a special name of OUTPUT_Record. You should create that as an output attribute in your screen flow and assign the values from the screen inputs to the OUTPUT_Record fields.
NOTE: You still want the calling flow to refresh even if the user doesn’t make any changes. You can force this by having a custom checkbox field on your record. The called flow will always change this value by setting it using this formula (fToggleChange).
The Upsert Record By Key component takes the modified record from the screen flow and upserts it back into the record collection by replacing the matching record in the collection with the new record values from the screen flow. The key field API name defaults to Id. Like you did with Datatable, you first need to configure this by referencing the original Get Records collection. This will be changed after you add the Reactive Record Collection component to the screen.
Finally, the Reactive Record Collection component acts like a reactive BLANKVALUE function for record collections. If the Input Record Collection hasn’t been populated yet, it uses the Alternate Record Collection to “seed” the original output from the component. In this flow, the collection is first seeded with the results of the Get Records flow element. After that, the record collection is the output from the Upsert Record By Key component. This output is used to provide the reactive record collection to both the Datatable component and the Upsert Record By Key component.
Now that the Reactive Record Collection component has been added to the screen, go back to the Datatable and Upsert Record By Key and change the Get Records collection to the output collection from the Reactive Record Collection component.
NOTE: CP – Get First Record, CP – Upsert Record By Key and CP – Reactive Record Collection are new actions I created and are available in version 1.0.3 or later of Reactive Screen Components. These also require version 3.2.4 or later of the Collection Processors.
I hope this example gives you some ideas for some other use cases for components like Datatables with Row Actions or Autolaunched Screen Flows or Reactive Collection Processors. Add your ideas to the comments.
https://unofficialsf.com/wp-content/uploads/2025/01/Datatable-Row-Action-to-Screen-Action.gif7201280Eric Smithhttps://unofficialsf.com/wp-content/uploads/2022/09/largeUCSF-300x133.pngEric Smith2025-01-09 15:47:082025-01-09 15:47:16Datatable with Row Actions calling a pop-up Screen Flow
I thought I would take the time to do a writeup about Screen Actions just in case anybody has missed the latest innovation in Screen Flows.
When my team started the journey to create more dynamic screen flows with reactivity, we knew that when we were done, we’d be unlocking a staggering amount of power for people at a development speed unheard of elsewhere in the industry.
Reactivity Couldn’t Get Data When Needed Without Help from LWCs
After many years in development and a long pilot, we finally launched reactivity in the Winter ’24 release. With it, you could for the first time watch formulas calculate in real time and create more modular LWCs thanks to inter-component communication. Woot!
What it lacked, though, was the ability to retrieve data from outside of the screen. This meant you couldn’t do things like search for records and display the results in real time, show dependent records, perform complex validation against other records, or make callouts to external systems and display the results in the same screen.
Below is an illustration I put together for Dreamforce that shows our reactivity journey so far.
Screen Actions Use Autolaunched Flows to Bring Data Into Your Screen
Action Buttons (GA in Winter ’25)
The Action Button component, first introduced as a beta in the Summer ’24 release, allows you to run autolaunched flows directly from flow screens at the press of a button. This means you can perform actions, like retrieving data or making calculations, without navigating away from the current screen. It vastly simplifies the user experience by keeping everything in one place – reducing cognitive load and making form completion a breeze.
But what if you didn’t want to have to press a button? Enter Reactive Screen Actions.
Reactive Screen Actions (Beta in Spring ’25)
Thanks in large part to the wild success of Josh Dayment’s Data Fetcher screen component, we decided to prioritize a buttonless variant of our powerful Action Button feature.
Coming soon, you will no longer need a button to trigger these powerful screen actions!
How to Add a Reactive Screen Action in the Upcoming Spring ’25 Release
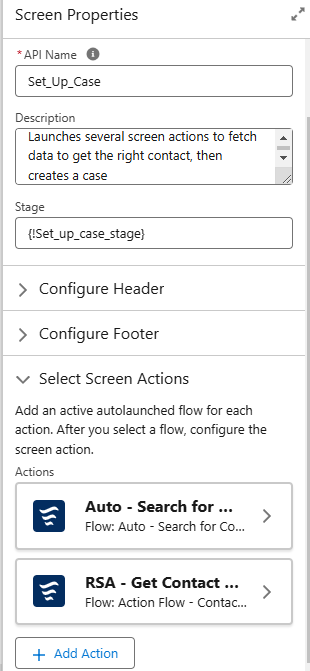
If you’ve set up an Action Button, the process for creating a buttonless flavor of this will be nearly identical. You will find your screen action list in the Screen Properties panel.
From here, the process will be nearly identical to action buttons. Salesforce Support put together a great little video showing it off: https://www.youtube.com/watch?v=GS5GAFHpVGk
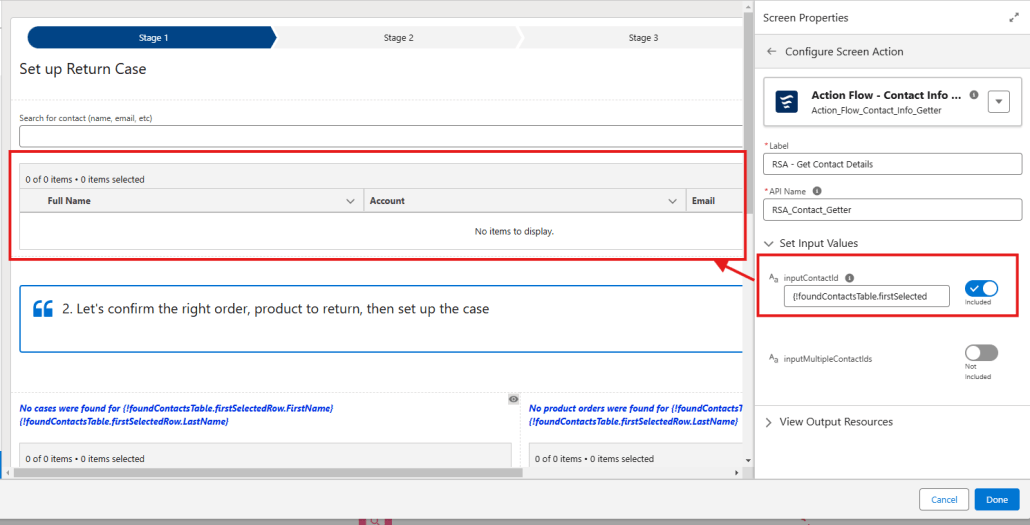
Below you can see a configured screen action that uses a text input as its input. Whenever a user types into the text input, it will trigger the flow to run.
Here you can see a configured screen action that uses a text input as its input. Whenever a user types into the text input, it will trigger the flow to run.
Similarly in the example below, when a change in a data table’s selected row happens, the reactive screen action fires off and its outputs are then available anywhere in the screen to be used.
Reactive Screen Actions GA Feature Target List
Below are some things we are targeting for GA (safe harbor, of course):
Conditions for Firing: Currently these actions will always fire whenever an input into the action changes values. That’s not always desirable, so we will be adding the ability for you to set when these should be allowed to fire using the same condition-building experience UI as Conditional Visibility.
Revisited Screen Behavior Config: Currently when you go back a screen, then forward, reactive screen actions are fired when the screen loads. This new setting will allow you to configure whether to fire the action when this new setting is checked.
Chaining of Actions: We’ll be adding better support for chaining reactive screen actions together – having the output for one reactive screen actions be the input of another
Error Messaging: Displaying a toast message and an error at the top of the screen when an error is encountered. The goal is to also be able to configure whether you want to show an error or not.
Descriptions for Screen Actions: For both Action Buttons and these new reactive screen actions, we’ll be adding a description field to enable you to describe the role each of these actions has on your screen. As many of you know, descriptions are also critical for AI training so this is an important addition.
When to use Action Buttons vs Reactive Screen Actions
Use Action Buttons when:
You need to conditionally execute screen actions, typically through disabling the button until the expected inputs are ready or by using conditional visibility on the button itself
Perform callouts or execute flows that may take an unknown amount of time to complete
Use Reactive Screen Actions when:
Form completion speed is top priority (i.e. you don’t want a button)
You expect execution time will be quick, typically less than 2 seconds
You don’t need progress indicators shown to your user
Data Safety in Reactive Screens
We worked hard to put together thorough documentation on good data safety practices when working with screen flows – especially screen actions. Make sure you read through these two articles, ESPECIALLY if you are enabling system context:
There are far too many use cases for screen actions to list here, but here are just a small, small sample of use cases to inspire you.
Search for Records
Automatically search for records a Data Table of knowledge base articles, contacts, or cases based on somebody typing in a search term or selecting filter criteria (i.e Case status or Case Owner)
Perform Complex Validation Based on Records
Run an action to compare and validate the user-entered data to data outside of the screen. Common examples include scanning for duplicates on a provided email address or validating addresses.
Run an action to compare and validate the user-entered data to data outside of the screen. Common examples include scanning for duplicates on a provided email address or validating addresses.
Create Your Own Dependent Picklists Based on Records
Automatically retrieve and display related records when a parent or parent records are selected in a Data Table or Choice component.
Make Callouts to External Systems and Keep People on the Same Screen
Trigger an autolaunched flow that makes a callout using our standard HTTP Callout action, transform it, then put the results back into the same screen.
Summarize Selections in a Data Table
Perform math, logic, or honestly anything you want based on the selected rows in a data table. Watch as we calculate an amount, the earliest date selected, and even related records for the retrieved opportunities – all in a single flow.
https://unofficialsf.com/wp-content/uploads/2022/09/largeUCSF-300x133.png00Adam Whitehttps://unofficialsf.com/wp-content/uploads/2022/09/largeUCSF-300x133.pngAdam White2024-12-18 12:32:352024-12-19 09:41:38Screen Actions: The Final Piece of the Screen Flow Reactivity Journey
Have you ever wanted to have your screen flows automatically navigate to the next screen without needing the user to click a button?
This new component is designed to be used on a Flow Screen to automatically navigate to the previous or next screen. The navigation is controlled by making the component conditionally visible so the navigation will only occur when the conditional visibility is true. The conditional visibility can be reactive to other logic on the screen or elsewhere in your flow thereby providing reactive navigation without requiring the user to click a button.
The component can also be used to refresh the current tab when the flow is running on a page in a console app. Updates made in the flow can be reflected elsewhere on the page without having to wait for the flow to complete.
A
See all the details and get the install links here.
https://unofficialsf.com/wp-content/uploads/2022/09/largeUCSF-300x133.png00Eric Smithhttps://unofficialsf.com/wp-content/uploads/2022/09/largeUCSF-300x133.pngEric Smith2024-12-09 19:12:562024-12-09 19:12:59New Auto Navigate Component for Screen Flows
While running some tests with my latest version of the Datatable component, I came across an interesting inconsistency in how sorting is handled in flow. Salesforce List Views, sorting in flow elements like Get Records and sorting in a SOQL query in DataFetcher provide case insensitive sorting for text based fields.
Example: AbCdE
However, the flow Sort element and column sorting in my Datatable component do case sensitive sorting.
Example: ACEbd
To support both methods, I added a new configuration option to Datatable to ignore character case when sorting. The default remains the case sensitive sorting like we’ve always had in Datatable, but the new attribute allows you to configure the Datatable to have the same behavior as List View sorting.
Along with this update, I changed the API version from 60.0 to 62.0 and addressed a bug where there could be an error when a Remove Row action was configured to be in the first column.
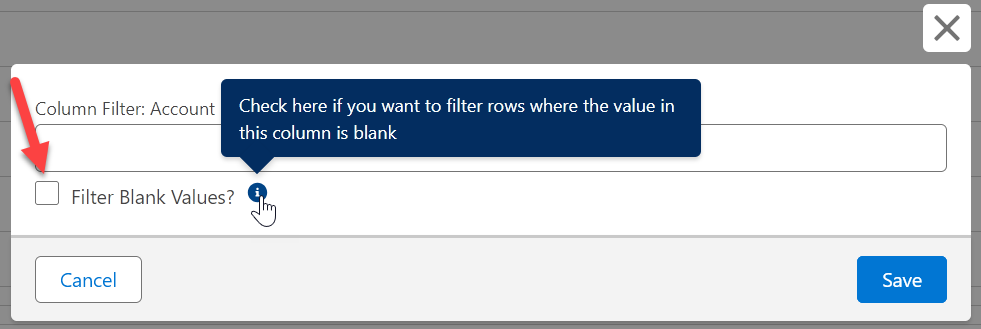
I have released a new version (4.3.3) of the Datatable component that adds a new feature and squashes some outstanding bugs. The latest addition lets you specify column filters that will match records with blank values in the filtered column.
T
Also, the number of characters required in the Search Term box before the search will start has been reduced from 2 to 1.
T
The following bugs have been resolved in this latest version.
Removed processing from v4.3.1 and v4.3.2 related to the Winter 25 base component bug for flexible width columns
Fixed bug where lookup field columns were not holding the flex attribute
Fixed bug where changing or clearing a search or filter value after an edit wouldn’t display all of the original records
Fixed bug where record selections would be cleared when filters were cleared
Fixed bug where wrong record links could be generated in a developer org
Fixed reactivity bug where an error could occur when a previously selected record was no longer included in the current record collection
Fixed bug where reactive collection processors would fail trying to read the selected rows collection when a lookup field was included
PR#1575 – Fernando-Fernandez – If the keyfield attribute is a field that doesn’t actually exist, don’t identify every record as selected
https://unofficialsf.com/wp-content/uploads/2022/09/largeUCSF-300x133.png00Eric Smithhttps://unofficialsf.com/wp-content/uploads/2022/09/largeUCSF-300x133.pngEric Smith2024-11-22 09:20:352024-11-22 09:23:55A new version of Datatable has been released (v4.3.3)
Check out Phil’s powerful combination of recent Flow technologies. He even uses AI to modify old open source code!
https://unofficialsf.com/wp-content/uploads/2022/09/largeUCSF-300x133.png00Alex Edelsteinhttps://unofficialsf.com/wp-content/uploads/2022/09/largeUCSF-300x133.pngAlex Edelstein2024-11-10 19:36:522024-11-10 19:38:07From Phil Ryan: Combine Direct Access Path Header with Reactive Screens