CommitTransaction is a simple Flow Action that works in Screen Flows and simply causes any open DML transaction to close. This is the same thing that happens whenever a Screen element executes or when a Flow ends. Having it in the form of this action allows you to close transactions in places where you might otherwise violate limits.
Consider this Flow:
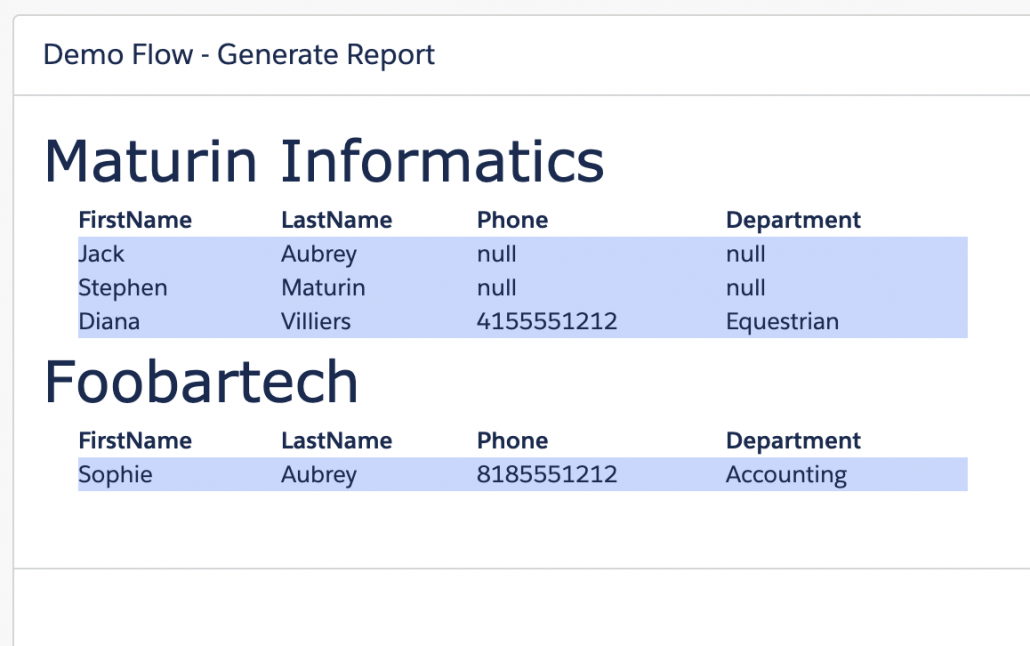
This Flow highlights the ability of the Flow Action Generate Collection Report to create attractive output out of lists of records:
Note that in order to generate this report, the set of related Contacts has to be queries for each Account. This is done in a Loop, and if the initial set of Accounts is near or over 100, you’ll get this error:
This is happening because the 100 passes through the Loop are all being aggregated into a single transaction. This makes sense in general as a system efficiency technique, but it’s not what we want here.
If we insert a CommitTransaction action into this loop, it becomes 100 individual transactions, and the flow finishes properly:
Here’s where I inserted it:
You can see this in action in the video on this post. Keep in mind that the grouping of activities into a single transaction makes slow things run more quickly, so if you place Commit Transaction into big, busy loops, it may take a lot longer than you’re used to.
FAQ
How does this work? If you look at the code, you’ll see that this action is actually an empty Local Action. Local Actions, by dint of their architecture, close open transactions.
How is this different from the ‘zero-duration Wait element’ approach?
Probably nothing. This is just a little more straightforward to implement, at least once you have it installed in your org.
Does this work in Autolaunched Flows?
Sadly, no. For those, use a Pause element and give it a time of 0 to get the transaction to close.
https://unofficialsf.com/wp-content/uploads/2022/09/largeUCSF-300x133.png00Alex Edelsteinhttps://unofficialsf.com/wp-content/uploads/2022/09/largeUCSF-300x133.pngAlex Edelstein2020-06-13 16:45:462020-06-16 19:51:32Use the ‘Commit Transaction’ Action to Get More From Your Screen Flow Limits
Starting with Summer ’20, some Process Builder processes (which are technically Flows with process type ‘Workflow) can be converted to Flows of process type ‘Autolaunched’. The new flow shows up in Flow Builder and takes advantage of the new Record Change trigger that Flow Builder now supports.
The package here will install into your org a flow called Convert Processes to Flows. it allows you to select a Workflow:
It will then retrieve the workflow metadata from your org using the new Transfer Metadata screen component, then pass the metadata to a flow action called ConvertFlowMetadata.
Here’s a video:
Flow Builder’s ability to do the things Process Builder does is a little limited in Summer ’20. Most notably:
Flow doesn’t have Scheduled Action support
Flow doesn’t support related field references like myVar.Owner.FirstName
Flow doesn’t support the ISCHANGED, ISNEW, PRIORVALUE functions
If you select a workflow with any of these characteristics, the Flow will report the error and stop.
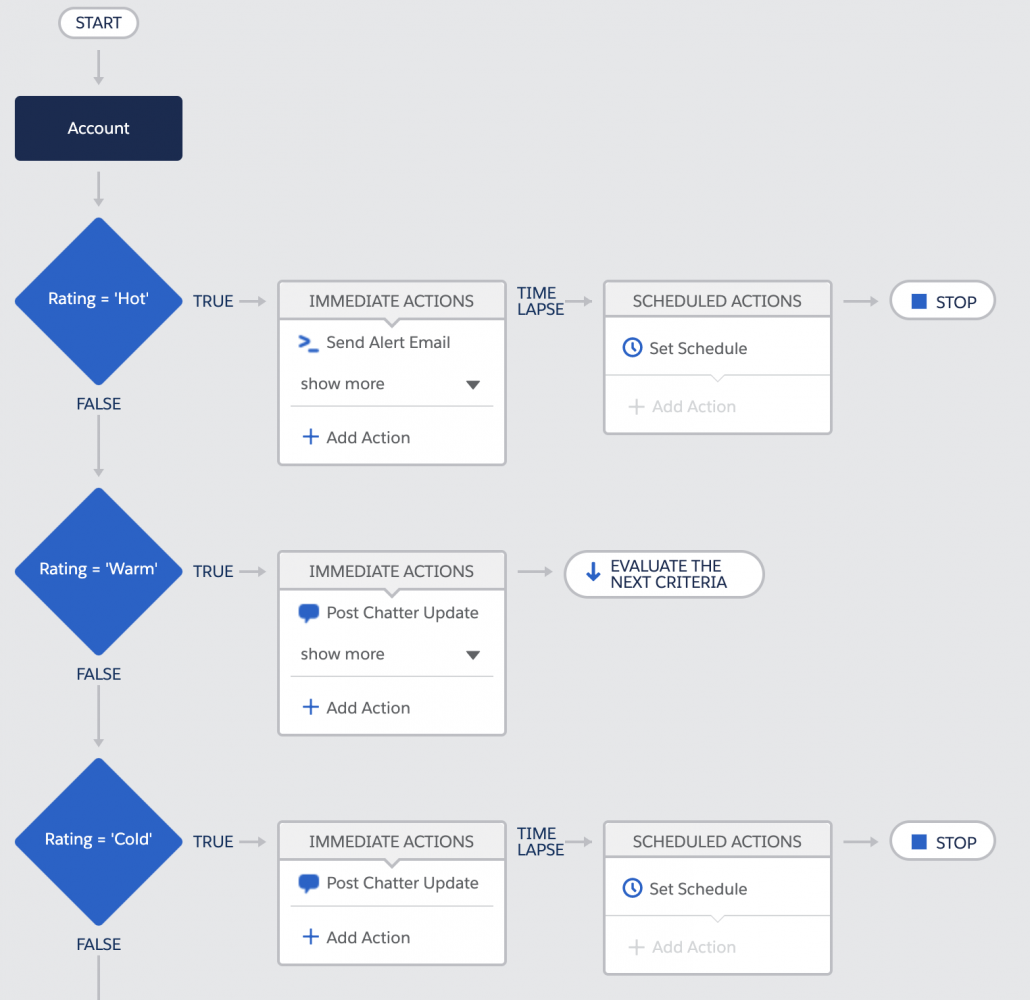
Here’s an example of a Process Builder workflow:
And here’s what it looks like after conversion:
It’s recommended that you only run this on Sandboxes for the time being.
Considerations
The converter automatically creates a unique name for the new flow by taking the Process Builder name and adding ‘-Converted’. It does not change the label or interviewLabel (used for paused flows). Keep in mind that you’ll now have two processes, one in Process Builder lists and one in Flow lists, with the same Label. If this turns out to be a problem we can add logic to automatically create a modified label.
See this post for the latest version of this Application. It has been refactored to use the most recent versions of the prerequisite components. Eric Smith 11/5/2022
Flow and Process Builder List View with Batch Delete
I don’t know about you, but I get pretty frustrated trying to view and keep track of all of my Flows and Process Builders. A better List View would certainly be appreciated.
When it comes to trying to clean things up and delete some old inactive versions, it becomes downright painful.
Find the Process Builder,
Expand the list,
Find the old version,
Click Delete,
Click Confirm,
Wait,
Wait some more,
Go to select the next one —
Oh ^#%$@ I have to start all over again!!!
I decided to put my Datatable component to work and updated it to support Apex-Defined object variables. Using data pulled from three different Salesforce internal objects, I’m able to display details about Flows and Process Builders. The full power of the Datatable component comes into play by offering a List View with sorting, highlighting, filtering and more.
Taking advantage of the Datatable’s ability to select multiple records and pass them along in a Flow to be acted upon, I created a Flow Action that interfaces with the Metadata API and handles the batch deletion of the selected inactive Flows and/or Process Builders.
I’ve bundled all of this together in an App that includes a configurable List View, List View with batch selection for delete and a Flow Picker where you can select a single Flow or Process Builder and then work with a List View of all of its active and inactive versions.
https://unofficialsf.com/wp-content/uploads/2022/09/largeUCSF-300x133.png00Eric Smithhttps://unofficialsf.com/wp-content/uploads/2022/09/largeUCSF-300x133.pngEric Smith2020-06-11 11:18:482022-11-05 09:14:01Flow and Process Builder List View with Batch Delete
With the advent of System-context screen flows I can’t help but think of the famous phrase ‘With great power comes great responsibility’. When running screen flows in system context, you could inadvertently grant Read or Edit access to a critical system field to the wrong audience. Let’s say you wanted to do some cool stuff like in Jen Lee’s recent post about Community User Management, and you want to ensure the person running the flow has the ‘Manage External User’ permission. Her flow does this check using a custom permission, which is totally fine, this just checks the system permissions directly.
All of that is possible with some straightforward SOQL queries against the Permission Set Assignment object. You may or may not be aware, but the PermissionSet object actually contains Profile permissions as well so it’s a one-stop shop for getting Field and System permissions!
Run an action to check a field permission
The following example will run you through a VERY basic scenario where a Flow presents a screen to update a given field and the flow is running in System context – God mode.
We let the user pick an Account Rating in a basic Flow screen with a picklist radio button
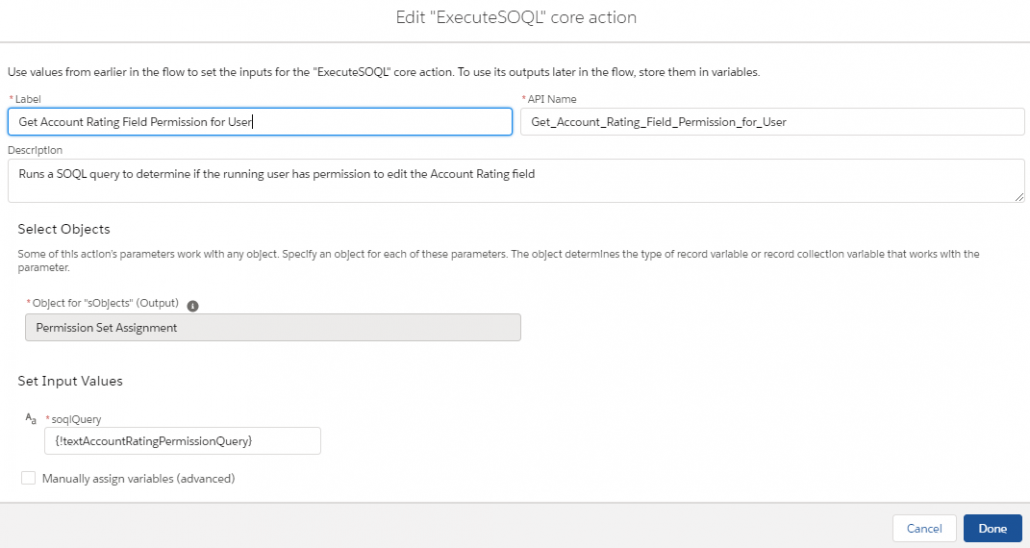
We run the ExecuteSOQL action to check if the running user has ‘Edit’ permission for the Account Rating field.
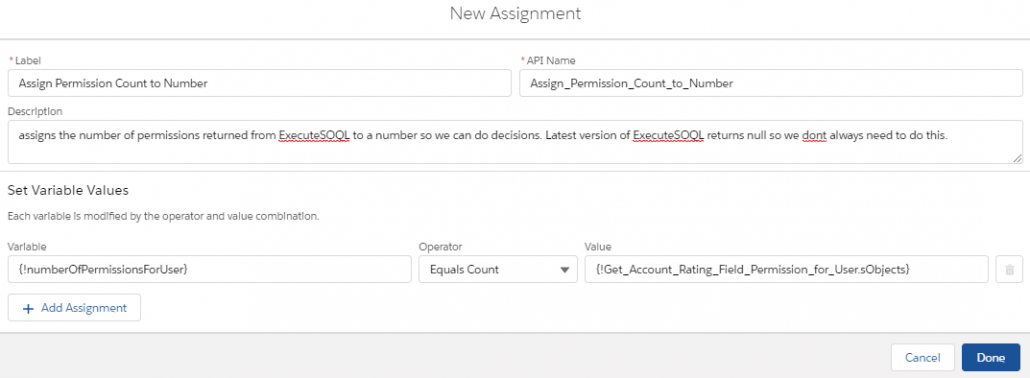
For older versions of ExecuteSOQL that return an ’empty’ collection we assign the count of the results to a number field
We then do a decision to see if the number of permissions assigned to the user is > 0.
We then either show a screen that says you cant edit it or we move on with updating the field.
Flow Overview
Most of you can probably handle the beginning and end – so I’ll provide some more color on the middle part that does the permission checking.
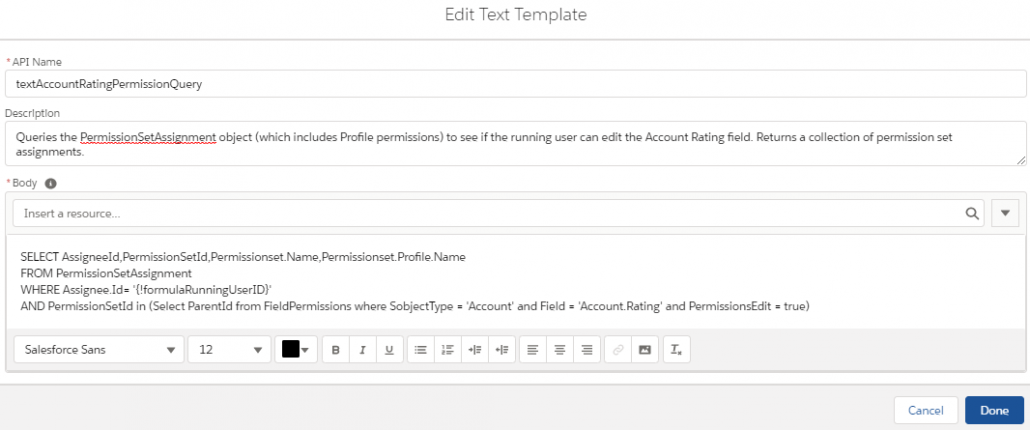
You’ll want to construct your query using a Plain Text text template variable:
SELECT AssigneeId,PermissionSetId,Permissionset.Name,Permissionset.Profile.Name FROM PermissionSetAssignment WHERE Assignee.Id= ‘{!formulaRunningUserID}’ AND PermissionSetId in (Select ParentId from FieldPermissions where SobjectType = ‘Account’ and Field = ‘Account.Rating’ and PermissionsEdit = true)
*WARNING* If you make any edits to the text template variable, a Flow bug will revert the template back to rich text and it will break the action! Make sure you revert it to Plain Text after every edit.
Next up is to make the ExecuteSOQL action:
Here’s an example result from the action above that returns the permission granted by the System Admin profile when run as myself.
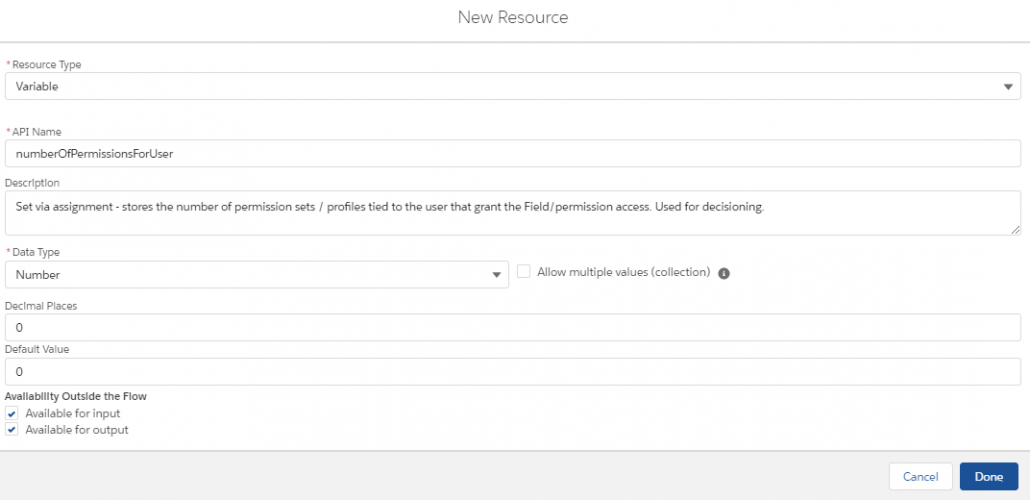
(For older versions of ExecuteSOQL only) You’ll then want to assign the results to a number since older versions of ExecuteSOQL return an empty collection if no results are found. Make sure you set the default value to 0 when making the variable.
Use an ISNULL check if you’re using the latest and greatest.
Create your decision and you’re done!
Checking multiple fields
You could of course extend this to multiple fields in one query by modifying the SOQL query, for example:
SELECT AssigneeId,PermissionSetId,Permissionset.Name,Permissionset.Profile.Name FROM PermissionSetAssignment WHERE Assignee.Id= ‘0051I000000UB4LQAW’ AND PermissionSetId in (Select ParentId from FieldPermissions where SobjectType = ‘Account’ and Field in (‘Account.Rating’,’Account.Type’) and PermissionsEdit = true)
System permission checks
You can also check for specific system permissions! Let’s say you wanted a Flow embedded on the Case layout that manages the Contact’s community user record. The query below could be used to check if the user handling the case has permissions to manage the external user account:
SELECT AssigneeId,PermissionSetId,Permissionset.Name,Permissionset.Profile.Name FROM PermissionSetAssignment WHERE Assignee.Id= ‘{!formulaRunningUserId}’ AND PermissionSetId in (Select Id from PermissionSet where PermissionsManagePartners = true)
https://unofficialsf.com/wp-content/uploads/2020/06/FlowOverview.png497955Adam Whitehttps://unofficialsf.com/wp-content/uploads/2022/09/largeUCSF-300x133.pngAdam White2020-06-09 10:00:592020-06-09 10:19:31Tutorial: Check field and system permissions in screen flows when using System Context using ExecuteSOQL
The Transfer Metadata component will retrieve or deploy a single piece of metadata to the org that the Flow is running on. It’s designed as a Flow Screen Component.
Provide it the name of the metadata type (“Flow”) and the name of item (“MyFlowApiName”) and it will return the metadata as a zip file. From there, you can do a couple of different things:
pass the zipfile string to Extract Metadata From Zipfile, a Flow Action that returns the metadata as a readable xml string
download the zipfile using the File Download Flow Action
You can deploy metadata by simply passing the xml string and the type and name of the metadata.
This component uses standard metadata apis. They’re asynchronous, so the component will poll once per second to get the status of the transfer. Make sure you don’t transition away from the flow screen while it’s checking. Standard Metadata save-time validation is carried out, so if you try to deploy a invalid piece of metadata, you’ll get back an error message.
This component pairs well with the Flow Picker screen component that lets the user pick a Flow from a picklist. If there’s interest, it won’t be hard to this component to be made more generic so that other kinds of metadata can be selected from lists.
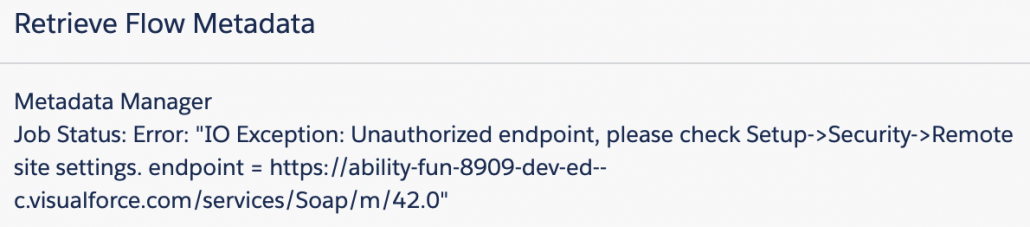
Because this component uses Metadata apis, you’ll need to have a Remote Site Setting on the org. If you don’t, you’ll see an error like this:
To address this, copy the root url from the error message and go to Setup –> Remote Site Settings. Create a new setting.
This configures your org to essentially allow applications to run that call out to the internet and then back into the same org via its api endpoints.
In this application, we want to get the XML displayed on a Flow screen where we can select it and copy it to the clipboard. To do that, we’re going to use this Flow:
After the retrieval is done, the result is an encoded zipfile string that looks like this:
This represents a zipped package that can theoretically contain more than one piece of metadata. In our case, we know that we have a single piece of metadata, so we want to convert this to make it readable. To do that we first pass this encoded zip string to an ExtractMetadataFromZipfile action, which provides a readable string. Then, because we want to show it in a flow screen, we filter it through an Escape XML String action.
Ultimately you have a nice string version of the metadata suitable for further handling:
Big attribution credit to Andy Fawcett. This component stands upon the shoulders of the giant MetadataService, which solved all the hard parts years ago.
Deployment
To deploy metadata, set the transferMode attribute to ‘deploy’ and pass in a viable piece of XML.
Install
This component is part of the Flow Base Packs package libraries.
FBC Version 1.2.2 – Eric Smith – 7/26/20 The Flow will now navigate to the next node upon a successful deploy or retrieve. Added help text to all attributes
https://unofficialsf.com/wp-content/uploads/2022/09/largeUCSF-300x133.png00Alex Edelsteinhttps://unofficialsf.com/wp-content/uploads/2022/09/largeUCSF-300x133.pngAlex Edelstein2020-06-07 10:36:442020-12-31 12:46:33Retrieve and Deploy Metadata with Flow using Transfer Metadata as a Screen Component
I have posted my official version of the datatable component for Summer ’20 orgs. Check out the Product Page for updated instructions, new see-it-in-action VIDEOS and links for installation and source code.
datatableV2 is a Flow Screen Component that allows you to configure and display a datatable on a flow screen. All you need to do is drag it onto the flow screen in the Flow Builder and give it a collection of records and a list of field names. The field label, type, and numeric formatting will default to what is defined in the object. Lookup fields are supported and will display the referenced record’s name field as a clickable link. The data being displayed can be filtered on a column by column basis. The user can manually resize the columns, wrap or clip text, and sort the rows by most any column.
Starting in Summer ’20 the Salesforce Object is specified at the time of configuration allowing just one version of this component to be used for all Salesforce Objects. I have also added support for user created Apex-Defined objects as well. See Flow & Process Builder List View with Batch Delete for an example.
https://unofficialsf.com/wp-content/uploads/2022/09/largeUCSF-300x133.png00Eric Smithhttps://unofficialsf.com/wp-content/uploads/2022/09/largeUCSF-300x133.pngEric Smith2020-06-04 08:26:102020-12-14 07:48:31datatableV2 for Summer ’20 Updated!
iDialogue, from Pacific Apps, is a new AppExchange solution that provides powerful document generation tools for efficient communication with customers. They just published a 50 minute tutorial on how to use Flow and their Flow Action to automate these processes:
Source Code (coming soon to the UnofficialSF repo)
I strongly recommend you reading up on Salesforce Files before tackling this, it will make the SOQL queries a lot easier to grasp.
One of the limitations (as many of you are aware) of the standard ‘Get’ elements of Flow is you that you cannot reference related fields like you can in SOQL. This usually isn’t a huge problem for standard and custom objects since you could in theory just create a formula field as a workaround. But what about objects you can’t create formula fields for like ContentDocumentLink?
Enter ExecuteSOQL. With this action you’ll be able to do the same things those fancy Apex guys and gals can do to manipulate and work with Files.
One “fun” limitation of querying ContentDocument is that you can’t use handy relationship queries for what you need – you have to get to them indirectly through ContentDocumentLink. The below example will not work:
SELECT Id FROM ContentDocument WHERE Id in (Select ContentDocumentID from ContentDocumentLink where LinkedEntityId in (blah blah blah)
What you’ll see developers frequently do is construct a List of ContentDocumentLinks and grab the ContentDocumentIds tied to each of them. Then they re-query ContentDocument to get their ContentDocument list which they can then update/delete/do whatever with. That’s what we’ll be doing in our second Flow!
View All Files Permission
Spring ’19 enabled the ‘View All Files’ permission which finally allows us to directly query all files in ContentDocument and ContentVersion. This is extremely handy – if you simply want to archive or delete ANY old file, you can now do that using simple SOQL queries or even a Get in Flow. You will need this enabled in Scenario 1.
Scenario 1 – Delete Old Files Posted by Community Users
Suppose you wanted to schedule a cleanup flow to delete old files posted by Community users – check out how you’d do this below!
NOTE: Always have fault paths on your actions! I skipped that for example-sake.
Step 1 – Use the ExecuteSOQL action with the below query to grab all Files that are > 2 years old and created by the Community User profileStep 1 Continued – See above for the SOQL statementStep 2 – For older versions of ExecuteSOQL you will need to assign the results to a number. The latest version of ExecuteSOQL posted this week does not need this step.Step 3 – Do a decision on the number field you just assigned.Step 4 – Delete the returned ContentDocuments from the ExecuteSOQL action
Scenario 2 – Delete Old Files Posted in Certain Accounts
A bit more advanced here – let’s say you wanted to clean up some files on a subset of records. In this case it would be a set of Accounts based on a Type field, but it could be any object. Check out the steps below on how you’d accomplish that.
NOTE: Always have fault paths on your actions! I skipped that for example-sake.
Step 1 – Set up your ExecuteSOQL action storing it in a ContentDocumentLink record collection variable. See below for the queryStep 2 – Create your SOQL statement. Fill in whatever Day value you want for grabbing old files.Step 3 – For older versions of ExecuteSOQL you will need to assign the query results to a number to do your null check. Step 4 – Do your null check decision on the number value we just set in the previous step.Step 5 – Run the latest and greatest version of ‘ExtractStringsFromCollection‘ actionto get a comma-separated text variable of all of the ContentDocumentIdsStep 6 – Run the new ‘AddQuotesToFields’ action to wrap each ID in quotes so that we can easily throw it into the next ExecuteSOQL action.
NOTE: If you don’t want to install this action you could still create a Loop to create your own ContentDocument collection.Step 7 – Run the last ExecuteSOQL action using the query below to generate your ContentDocument collection you will be deleting. Step 7 Continued – Here’s the query you will run. Notice how we throw in the output of the ‘AddQuotesToFields’ action into the query itself.Step 8 – Delete your files!
https://unofficialsf.com/wp-content/uploads/2022/09/largeUCSF-300x133.png00Adam Whitehttps://unofficialsf.com/wp-content/uploads/2022/09/largeUCSF-300x133.pngAdam White2020-05-27 17:25:102020-05-27 17:25:12Tutorial: Schedule a Flow to Delete Old Files (ContentDocuments) – Featuring New ‘AddQuotesToFields’ Action, ExecuteSOQL, and ExtractStringsFromCollection v2
Updated: 1/11/25 – Eric Smith – (FlowScreenComponentsBasePack v3.3.8 or later)
Flow Combobox now supports Action Buttons and Screen Actions in Custom Property Editors
CPE developers can allow manual entry of attributes in Flow Combobox to support outputs from standard components like Transform and Filter
Flow Combobox is a combobox that’s intended for use by developers who are building custom property editors. It’s not something you’d drop onto a flow screen.
What it does is provide a ready-to-use combobox that’s smart enough to extract from the information provided by Flow Builder all of the available mergefields. You can use this as a CPE developer to enable admins configuring your extension to apply references that will be dynamically resolved when the flow is run.
In doing this, Flow Combobox is simply emulating, as best as possible, the functionality provided in Flow’s native property editors .
Here’s the native Flow version:
and here’s the Flow Combobox:
Using Flow Combobox The flow designer can enter a literal value, or choose a mergefield from the list. Literals are always reported back to Flow Builder in dispatched events as having type = String. values chosen from the list will always be reported back to Flow Builder as references (mergefields). All reference variables are surrounded by {!variableName} in edit mode, if user removes {! }, value will be converted in a literal automatically. If user types in a value that is surrounded by {! }, component will perform an attempt to find this variable in builderContext, and in case of failure will render an error and return false via reportValidity . If selected parameter is valid builderContext variable it will be rendered as a pill with no errors.
Attributes
name (required) – unique String, that represents name of the component, used as a key in “valuechange” events.
label (required) – String used to display a label above the combobox
builderContext (required) – this attribute gets populated with information about the underlying Flow, including its input attributes, current values previously provided by the user, and more.
The value and valueType attributes represent the selected current value. Inspect the underlying input attribute in the passed in builderContext when initializing to determine whether there’s an existing value that needs to be loaded into the combobox.
value (optional) – String, determines the value the component will be initialized with. Must be a valid value from builderContext. This value can be a reference to an SObject or a literal value. Whenever this is set to an SObject reference, flowCombobox will enable traversal of the object’s fields
valueType (optional) – String(valid values are ‘reference’ or ‘String’). This instructs Flow Builder whether to treat the value as a literal string or a reference to an SObject. Default is “String”
builderContextFilterType (optional) – String. Use this to filter the contents of the combobox to show only a specified type of object. Note that this is different from the type in valueType.
builderContextFilterCollectionBoolean (optional) – Boolean, if true, flowCombobox will show only collection variables from the builderContext
New Attributes by Eric Smith disabled (optional)– Boolean, set this attribute to true when you want to show the combobox as disabled in the CPE
allow-hard-code-reference (optional) – Boolean, set this attribute to true when you want to allow the user to manualy enter an attribute. This is useful for specifying resources that aren’t currently supported by the combobox such as outputs from Transform or Filter elements. Entry format is {!attributeName}
placeholder-text (optional) – Show placeholder text in the combobox input. Example: "Manual Entry Allowed"
New Attributes by egolden-tc autocomplete (optional) – this maps to the standard autocomplete field on lightning-input. By default it is set to “off”. This ensures browser autocomplete dropdown doesn’t cover or conflict with the combobox options. It can be changed to “on” to revert to the original behavior.
field-level-help (optional) – this maps to the standard field-level-help on the lightning-input. If a value is provided it will show as help text on the combobox to give users context on what they are selecting and/or why.
automaticOutputVariables (optional) – this can be used to pass through the automaticOutputVariables data structure that Flow Builder makes available to Custom Property Editors, similar to how you pass builderContext through to this component. Learn more here.
Methods
reportValidity – returns false in case if component has any validation errors
Search behavior
Typing into the combobox input field will search on the apiNames of available mergefields. This search will respect filters put in place by the search string,flowContextFilterType, and flowContextFilterCollectionBoolean. If the type is “String”, however, it will also shows SObject records with a traversable “>” to allow users to traverse to fields of the SObject.
Default Behavior
The only default behavior change is the disabling of the autocomplete. This is probably desirable but the behavior can be reverted to the previous default per the above options.
Install
This component is part of the Flow Base Packs package libraries.