Josh Dayment along with David Fromstein have built and added a Custom Property Editor to Flow Flexcard along with the CPE support we have moved the component HTML to use visual-picker as the base to allow for a better UI/UE of the component. Also included were enhancements to how actions are displayed inside of the cards as well you can choose between a list or menu as options now. For more details visit the original post here.
https://unofficialsf.com/wp-content/uploads/2022/09/largeUCSF-300x133.png00Josh Daymenthttps://unofficialsf.com/wp-content/uploads/2022/09/largeUCSF-300x133.pngJosh Dayment2022-01-07 12:28:562022-01-07 12:28:59Flow Flexcard now has CPE Support
This video shows how to use Flow Builder to create a Recommendation Strategy flow that filters recommendations that can be displayed in the Next Best Action component.
https://unofficialsf.com/wp-content/uploads/2022/09/largeUCSF-300x133.png00Alex Edelsteinhttps://unofficialsf.com/wp-content/uploads/2022/09/largeUCSF-300x133.pngAlex Edelstein2022-01-05 09:27:212022-01-05 09:27:27Video: Building NBA Recommendation Strategies with Flow Part 1
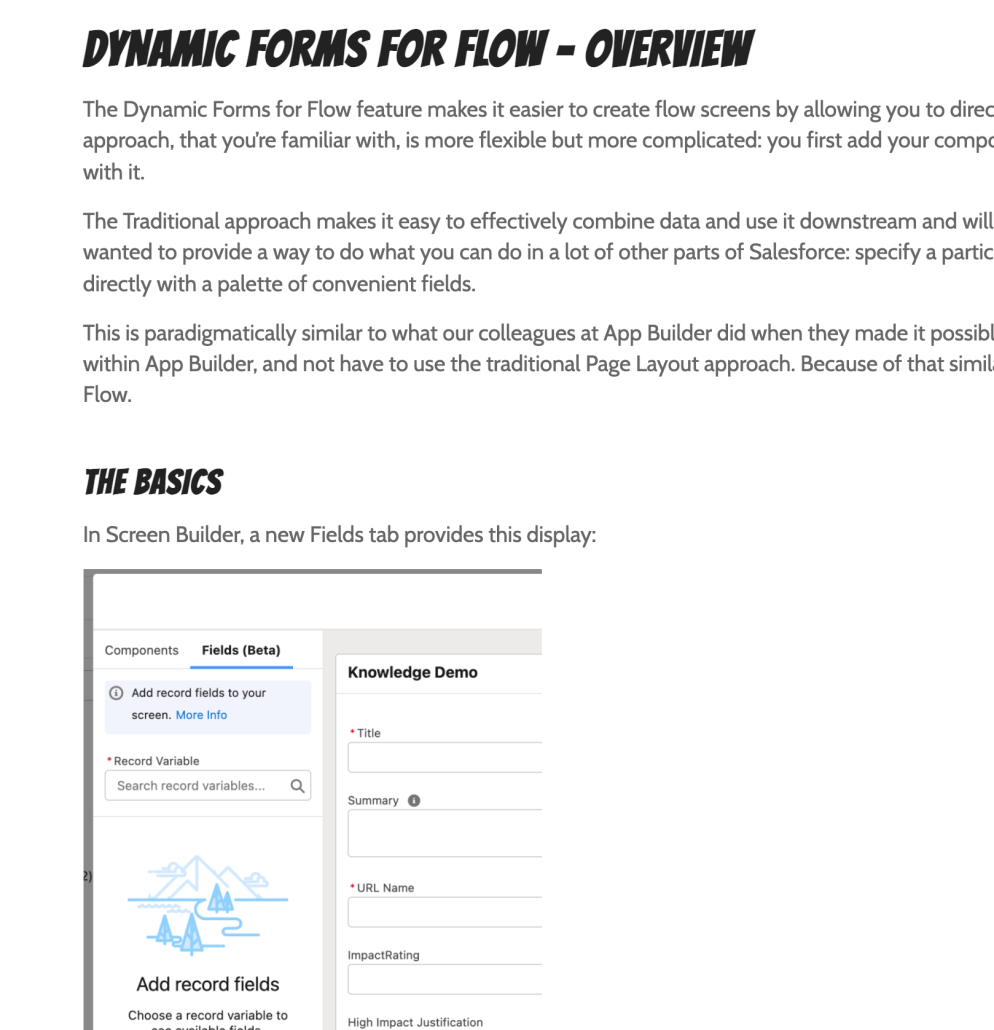
A new page has been created to aggregate information about Dynamic Forms for Flow. Now that picklist support has been added, many objects can now be created and updated purely with easy-to-configure fields and without using the traditional flow components. Learn more:
https://unofficialsf.com/wp-content/uploads/2022/09/largeUCSF-300x133.png00Alex Edelsteinhttps://unofficialsf.com/wp-content/uploads/2022/09/largeUCSF-300x133.pngAlex Edelstein2021-12-28 10:32:572021-12-28 10:33:49New Wiki Home Page: Dynamic Forms for Flow
Note that an org can only have 100 of these scheduled events at a single time. Also note this warning: Use extreme care if you’re planning to schedule a class from a trigger. You must be able to guarantee that the trigger won’t add more scheduled classes than the limit. In particular, consider API bulk updates, import wizards, mass record changes through the user interface, and all cases where more than one record can be updated at a time. Using this with Flow, you can definitely schedule events from a trigger! More detail on scheduling is available here.
https://unofficialsf.com/wp-content/uploads/2022/09/largeUCSF-300x133.png00Alex Edelsteinhttps://unofficialsf.com/wp-content/uploads/2022/09/largeUCSF-300x133.pngAlex Edelstein2021-12-28 06:29:172021-12-28 06:29:24From Munawirrahman: Improve the Granularity of Your Flow Scheduling
Validation refers to checking values before proceeding, to validate that the values meet the flow’s requirements. Validation logic is executed when a user runs a flow, but it can be created in a couple of different places.
Creating Validation in Flow Builder at ‘Design-Time’
Currently, validation support is uncomfortably inconsistent in Flow. The original set of components, such as the Checkbox component below, come with an elegant Validate Input section that allows for a formatted error message and the full use of formulas.
However, these standard components, which are also sometimes referred to as the ‘native’ components, were implemented in the early days of lightning in a somewhat proprietary manner. The Flow team is transitioning to use standard LWC screen components. However, Flow has not yet implemented the ‘Validate Input’ section shown above for standard LWC screen components, so when you add one, you won’t see any validation support, as shown in this Email component:
Then there are fields generated via Dynamic Forms for Flow, which is currently in Beta. These fields can be added by clicking on the Fields tab in Screen Builder and specifying the object you want via a record variable:
When you use fields directly on a Flow screen, you tap into traditional, classic field configuration. In this case, the standard field Validation Rules:
Developers can add validation logic to custom Flow screen components
Custom Components don’t automatically carry out validation but it’s easy for a developer to add code that will get called when the user attempts to close the components property editor.
The LWC logic is described here, and the older Aura approach can be found here.
Here’s a new presentation that reviews the new way to build NBA strategies. This is the recommended path, going forward, and there won’t be additional improvements to the original Strategy Builder.
Here’s a list of some of the new features that NBA Recommendation Strategies inherit when they are built in Flow Builder
https://unofficialsf.com/wp-content/uploads/2022/09/largeUCSF-300x133.png00Alex Edelsteinhttps://unofficialsf.com/wp-content/uploads/2022/09/largeUCSF-300x133.pngAlex Edelstein2021-12-22 08:55:172021-12-30 11:13:28Building NBA Recommendation Strategies with Flow Builder in Spring ’22
Which came first: the record or the files? Unlike the age old egg or chicken riddle, I can definitely say that the record comes before the files. This can be a challenge for admins to navigate, however, given the fact that File Upload Improved (and the standard File Upload Screen Component for that matter) ask for the Related Record Id by the time the component renders. In other words, in order to upload files to a particular record using either component, the record must already exist in Salesforce prior to getting to the screen with the File Upload component.
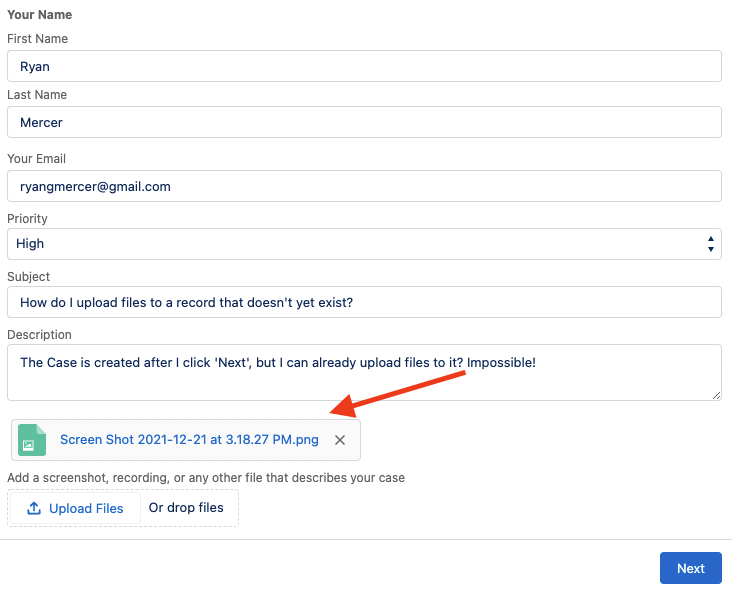
What happens if the record (and Related Record Id) doesn’t yet exist? Let’s say you have a Screen Flow to allow users to submit Cases to your team for support. You’d like the option for those users to upload files to provide additional context – maybe a screenshot of an error message? – but the Case record isn’t created until after they click ‘Next’.
This is impossible, you say? Version 1.6 of File Upload Improved makes this a cinch! Before we dive in, let’s take a crash course on the Salesforce Files object architecture.
Content documents and versions and links, oh my!
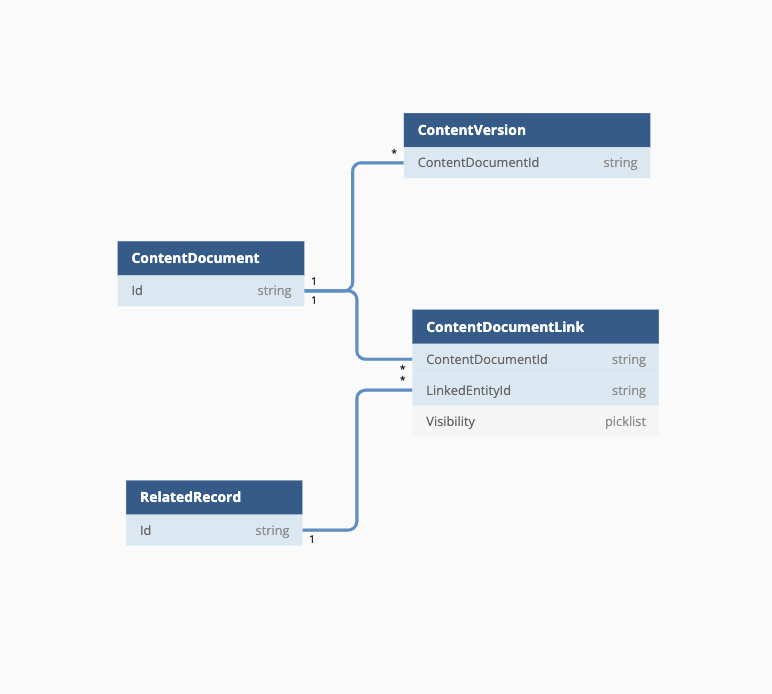
There are three main objects when dealing with files in Salesforce:
ContentDocument which “represents a document that has been uploaded”;
ContentVersion which “represents a specific version of a document”; and
ContentDocumentLink which “represents the link between a document and where it’s shared”.
Whenever you upload files using File Upload Improved, we automatically create a ContentVersion and a ContentDocument for each file. If you also specify a Related Record Id, we automatically create a ContentDocumentLink from the ContentDocument to the related record. A ContentDocumentLink is a junction object that allows a single file to be ‘uploaded’ (though technically the more accurate word is ‘related’) to many different records in Salesforce.
ContentDocumentLinks are simple records – you really only need two pieces of data:
the Id from the ContentDocument, aka the ContentDocumentId; and
the Id from the Related Record, aka the LinkedEntityId.
If you want to get fancy, a third data point (aka the Visibility) will make the file more (or less) visible to users.
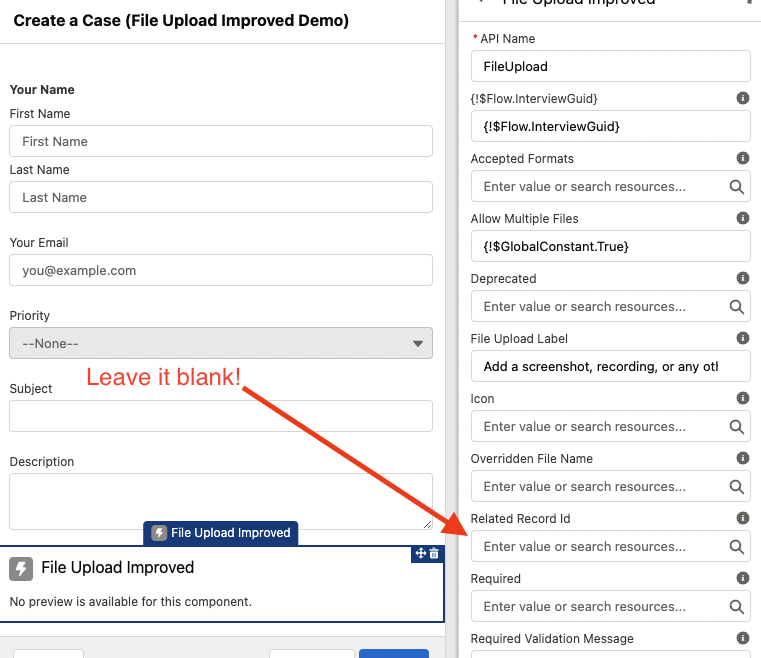
Now, what happens if you leave the Related Record Id field on the File Upload Improved configuration screen blank? We still create the ContentVersion and the ContentDocument, but we do NOT create the ContentDocumentLink (because there’s no related record to which to relate it).
Soooo… in order to upload files to a record that doesn’t yet exist, all we have to do is create the ContentDocumentLinks… which is easily done with flow! How? Let’s take a look.
How to Create ContentDocumentLinks in Flow
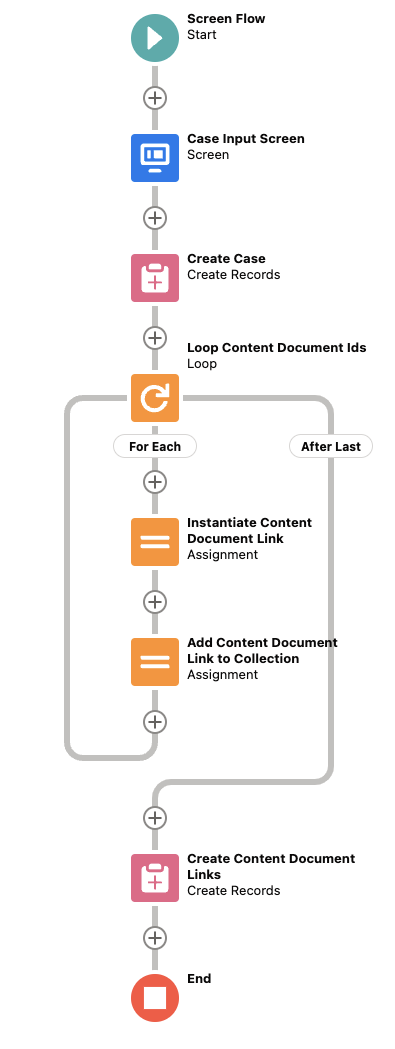
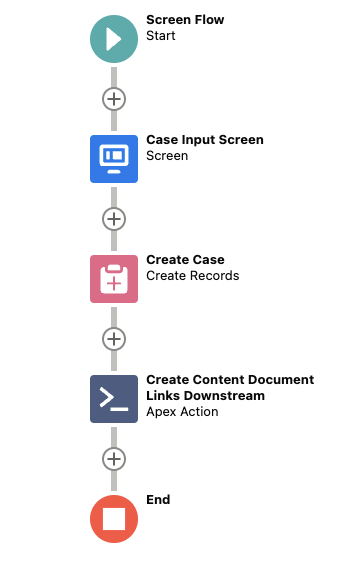
Obligatory screenshot of the finished flow first.
The first element of this Screen Flow is the Case Input screen, which allows your users to specify their name, email, and case priority, subject, description. There’s also a File Upload Improved component to allow your users to upload a file to their Case. Remember to leave the Related Record Id blank on the configuration screen!
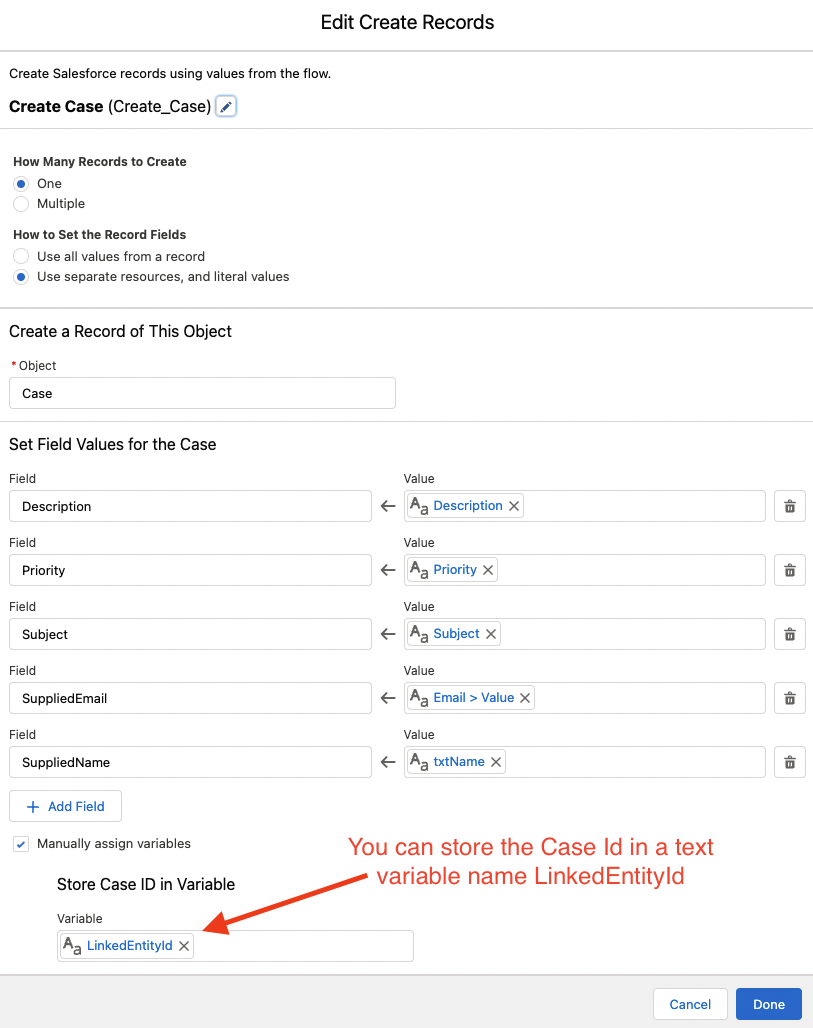
Next, create the Case. You can store the Case Id in a text variable named LinkedEntityId, which we’ll use in a second.
One of the features of File Upload Improved is that once you upload files, we return a collection of all of the newly created ContentDocument Ids. This collection can be used in a flow loop, which is the third element of this screen flow.
Now we get the fun part of actually creating the ContentDocumentLinks. We do so by creating a ContentDocumentLink record variable and assigning the ContentDocumentId as the current item in the loop and the LinkedEntityId as the Case Id text variable.
It’s best practice to never put a CREATE, GET, UPDATE, or DELETE element in a loop to avoid hitting pesky governor limits, so in the fifth element of this screen flow we add the single ContentDocumentLink record variable to a collection of ContentDocumentLinks.
In the sixth, and final, element of this Screen Flow, we exit the loop and create all of the ContentDocumentLinks in one fell swoop.
Boom! Wasn’t that easy? But wait… version 1.6 of File Upload Improved will make your life even easier!
How to create ContentDocumentLinks with version 1.6 of File Upload Improved
Version 1.6 of File Upload Improved introduces a nifty Apex Action that allows you to create ContentDocumentLinks downstream in flow. Essentially, this invocable method does the exact same thing that element three onwards does in the previous example. As such, you can skip creating a loop, building single ContentDocumentLink record variables, adding them to a collection, and finally creating them.
The configuration of the first screen is exactly the same as the previous example (Related Record Id on the File Upload Improved configuration screen should still be blank).
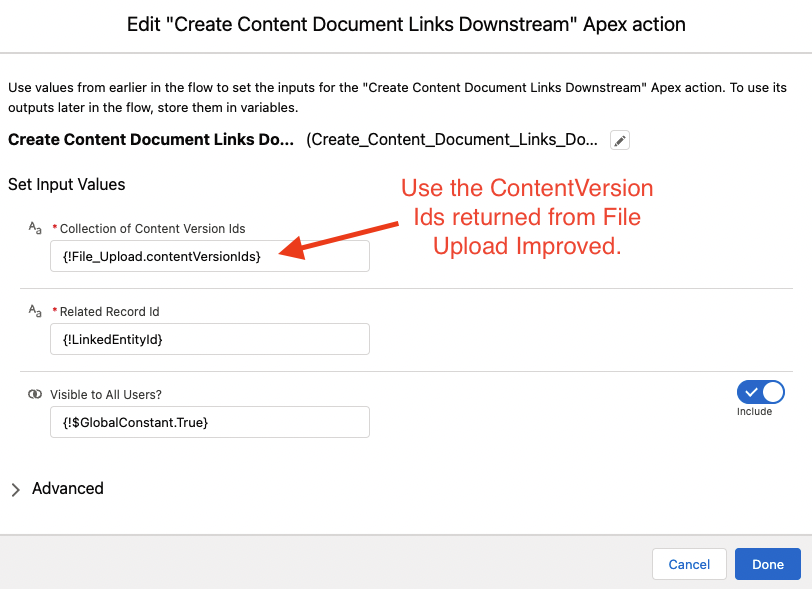
After the Create Case element, drop in the Create Content Document Links Downstream Apex Action. Be sure to use the ContentVersion Ids returned from File Upload Improved in the input (you looped through the ContentDocument Ids in the previous example, which is different than what needs to be used in the Action. Why? More on that soon…)!
Wasn’t THAT easy?
What are the benefits of using the Apex Action?
The most obvious benefit of using the new Apex Action provided by version 1.6 of File Upload Improved is the ease of configuration. Configuring one element on the canvas replaces the need to create four elements. We all know our time is stretched thin as is, so let’s celebrate any opportunity to put some time back in the bank!
The second benefit is less obvious, but arguably more important. If you remember, when configuring the Apex Action we use the ContentVersion Ids returned from File Upload Improved as the input value rather than the ContentDocument Ids. We do this because whenever a Community User uploads a file using File Upload Improved, the ContentDocument Id is NOT visible to them – that collection is returned empty (or ‘[]’ when you debug it).
File Upload Improved DOES return the ContentVersion Ids to Community Users, however. So the Apex Action grabs the ContentDocumentId from the ContentVersion in order to create the ContentDocumentLinks. This logic makes File Upload Improved the easiest and most efficient way Improve the File Upload experience for Community Users. Talk about magical!
In summary…
Please use the brand new Create Content Document Links Downstream action to upload Files to Records that don’t (yet) exist in Salesforce.
How can you download it? Hop over to the main post of File Upload Improved and install the latest version.
The collection of ContentVersion Ids returned from File Upload Improved.
Related Record Id
Text
The Id of the record to which you want to upload the Files.
Visible to All Users?
Boolean
By default, when an internal user uploads a file, the file is only visible to other internal users (meaning community users can’t see it). If you’d like to make the uploaded file visible to all users, set this to TRUE. When a community user uploads a file, the file is already visible to all users. From a technical perspective, this sets ContentDocumentLink.Visibility = AllUsers.
https://unofficialsf.com/wp-content/uploads/2022/09/largeUCSF-300x133.png00Ryan Mercerhttps://unofficialsf.com/wp-content/uploads/2022/09/largeUCSF-300x133.pngRyan Mercer2021-12-21 17:13:352021-12-22 06:37:57From Ryan Mercer: Enabling File Uploads Without Having To Pre-Create Records
This great-looking component provides an expandable collapsible list view:
It’s optimized to show children of a common parent. So you pass in the recordId of the parent, and the name of the child object. you want to display, and it will show all the children. You can also pass in the names of the columns you’d like to show.
Suppose you want to navigate all the children cases of a particular parent case. Starting with the parent case, you can use this component to easily explore all of the children.
Features The data table has following features.
Show records for both custom and standard object.
Specify visible columns
No limit for level of hierarchy
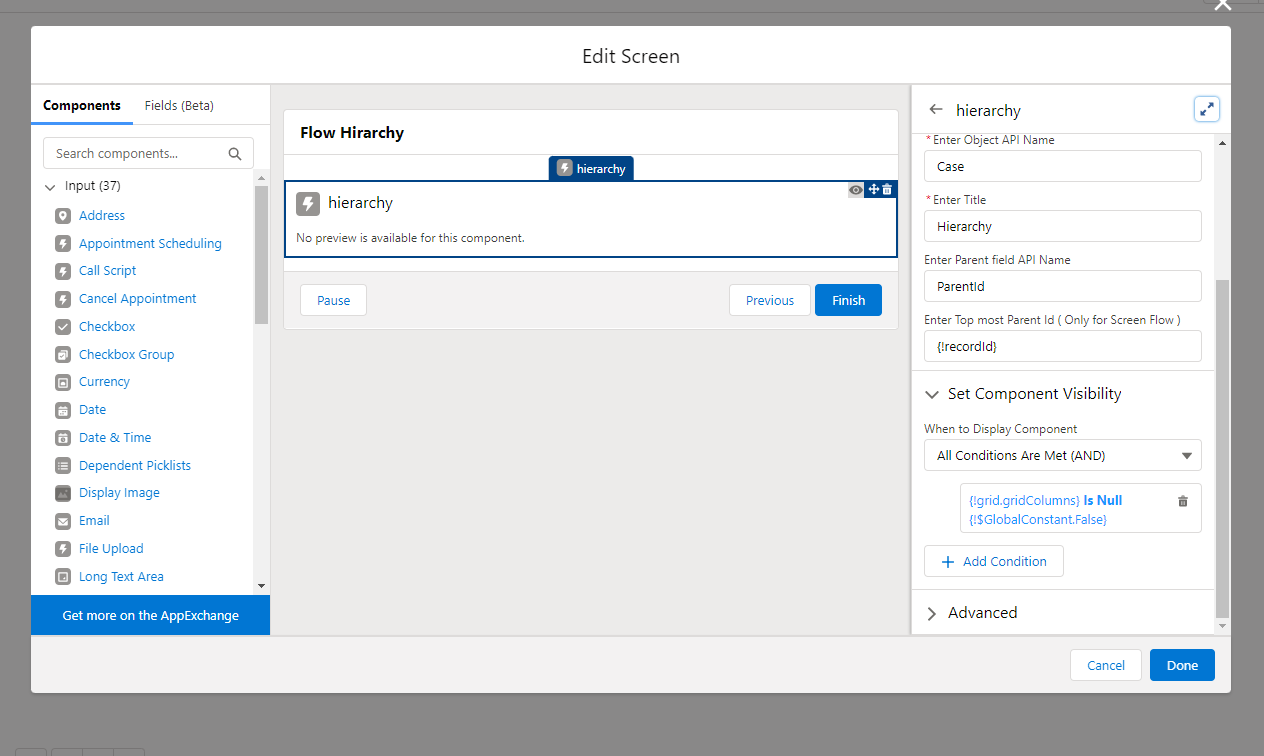
Here’s an example configuration:
Note that selection is not currently output for use downstream in the flow.
About
This is a generic lighting hierarchy component , which is built in lwc using the tree grid base component. The customization are done by design attributes. At onload of page the component shows only first level of record, next level of record in hierarchy are shown on click of expandable button action, and make the call to server via async, There is no limit of any level in hierarchy. If record has no children then expendable option not visiable.
Configuration
Select hierarchy component from left side components drag to Screen
Inputs
Label
Type
Value
Example
Enter Icon Name
String
provide slds icon name
standard:hierarchy For diffrent icons options visit slds-icons
Enter Title
String
provide table title
Hierarchy ( Any heading value can be enter)
Enter Object API Name
String
provide object custom or standard API name
Case
Enter Columns API Name (comma seprated)
String
CaseNumber,Subject,Origin
CaseNumber,Subject,Origin
Enter Parent field API Name
String
Enter Parent field API Name
Example: ParentId field is determine parent of Case record.
https://unofficialsf.com/wp-content/uploads/2022/09/largeUCSF-300x133.png00Alex Edelsteinhttps://unofficialsf.com/wp-content/uploads/2022/09/largeUCSF-300x133.pngAlex Edelstein2021-12-11 12:36:392021-12-11 12:36:44From Sarvesh Kumar: A Hierarchical List Screen Component for Flow
Assignment to Queues and Groups Work Items can be assigned to multiple users
Reassignment of Work Items Allow users to reassign Work Items to others
Cancel a running orchestration A run can be canceled from the list of runs
API access to trigger Orchestrations Initiate an Orchestration via the Flow REST API
API access to monitor Orchestrations (Connect API) Inspect running Orchestration instances
CI/CD & SFDX All Orchestrator components can be deployed
Flow Support Has Been Extended to Standard Support Customers
Until now, technical support for Flow required Premium or Signature support. As of 12/1/21, it is now available to Standard support. This is, needless to say, a big deal.
Generate Next Best Action Recommendations Using Flow
You can now use Flow Builder to craft recommendation strategy flows that generate actionable recommendations that work with the specialized Next Best Action lightning component on Lightning Pages and the Suggested Actions in Community Pages. Previously, doing this required the use of a separate builder
Create recommendation strategies from the New Flow window:
Automatically Migrate your Workflow Rules to Flows
A New Element Joins the Fray – Collection Filter!
A new way to filter and find records in a collection joins the growing number of out of the box collection processors. Instead of looping to find a set of records within a collection, you’ll now be able to specify record criteria or create a formula to filter down an existing collection into a smaller one. This opens up a world of possibilities as it will allow you to handle greater amounts of records without hitting the ‘Iteration Limit Exceeded’ error that plagues transactions with bigger loops. Need to filter down a collection of 500 contacts? Collection Filter can do that for you!
Check out the separate post about Filter here on USF!
View All of an Object’s Record-Triggered Flows with Flow Explorer…
Flow explorer shows an ordered list of all the flows affected by a specific triggering event.
You will also get a nice side panel that allows you to open the flow directly and view all of the versions associated with the Flow. Notice how you’ll also be able to activate previous versions in the same place.
…AND Control the Order of Your Triggered Flows
You can apply numeric values to order your triggered flows.
Flows with the same trigger (before- or after-save) on the same object with trigger order values from 1 to 1,000 run in ascending order (1, 2, 3, and so on). Multiple flows with the same trigger order value run in alphabetical order based on the flows’ API nam
Flows without trigger order values run next and in the order of their created dates. Flows in Winter ’22 and before run and continue to run in this order, unless you define a trigger order value for them.
Flows with trigger order values from 1,001 to 2,000 run next and in ascending order. Any ties are settled using the flows’ API names.
(Note that the team does expect, in a future release, to marry this ordering process to the Flow Explorer shown above for a drag and drop reordering capability.)
Dynamic Forms for Flow (Beta) Supports Additional Field Types
You can now additionally add Email, Phone, and Picklist fields by simply dragging the fields onto the screen:
This features remains in Beta. Keep in mind that if you want to create an easy form to enable the creation of a new record using this feature, create a new record variable to contain it and select it in the ‘Record Variable’ field in the upper right. (later the team plans to make that step automatic and unnecessary)
Auto-Layout Improvements
Autolayout Mode has gone GA and filled in a couple of coverage gaps:
Perhaps the best new Auto-Layout feature is…
Open Subflows Directly from the Canvas in Auto-layout
An often requested quality of life feature, you can now open subflows directly from the canvas and when creating a Subflow! In the future (safe harbor) we plan to add the Subflow description to the canvas as well.
Shortcuts provide faster access to preconfigured elements
In Record-Triggered Flows in Autolayout Mode, shortcuts will appear to facilitate email sending and record updating:
Accessibility Enhancements
1) Flow Achieves Full WCAG 2.0 Accessibility Support
2) Create and Edit Flows with Your Keyboard
3) Screen Flows launched via a URL-based method now meet the contrast requirements of Web Content Accessibility Guidelines (WCAG) 2.1 Level AA
Flow’s accessibility services have been improved. Keyboard traversal is fully supported in Screen Builder as wells as the Flow runtime. You can navigate between sections of Flow Builder, and screen readers work across the full product.
Custom Footer Labels are Translatable
The Custom Footer Labels that became available last release are now fully translatable.
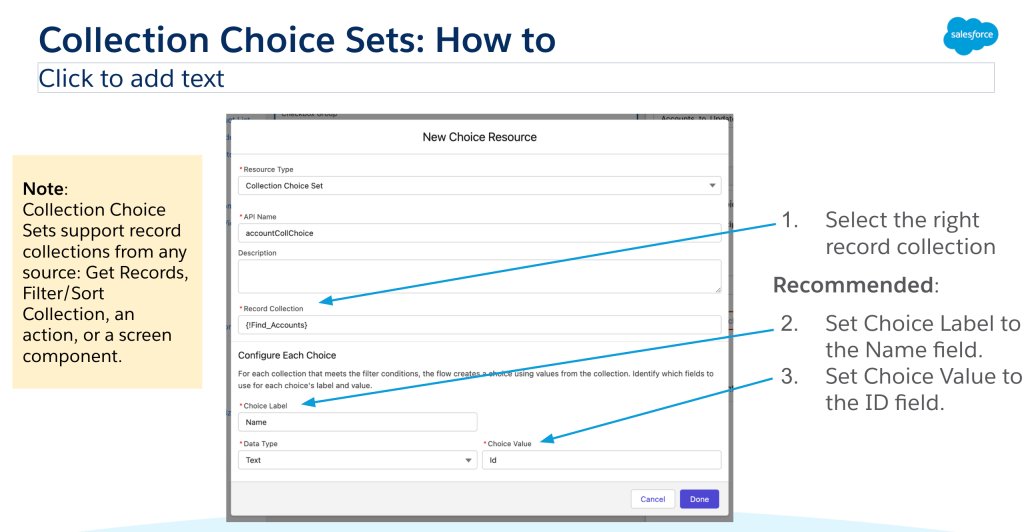
Choices Enhancements: Use a Record Collection to Generate Your Choices
If you have a collection of records or strings from earlier in your flow, you can now use that to generate a set of radio buttons, checkboxes, or picklist items.
Supercool Pilot Updates – Reactive Screens
See this post for an example of how reactive screens allow powerful dynamic effects on Flow screens. If you want to join the pilot, go here.
New Ordering Changes take effect for flows configured to run on the latest API version (54.0)
After-Save Record-Triggered Flows Now Run Before Entitlements are Executed
Entitlements can now include any updates made by traditional after-save flows.
Approval and Time-Based Workflow Field Updates Now Execute Before-Save and After-Save Record-Triggered Flows
This change allows field changes made by approval processes to trigger flows.
Keep in mind that this will not affect any existing flows unless you choose to click Save As and ‘upgrade’ the flow to use version 54 or higher.
Enhanced Einstein Discovery Flow Action supports Multiclass Models
Multiclass models predict the most likely outcome among up to ten possible outcomes. For example, if you offer seven insurance products, use a multiclass model to predict which insurance product a new customer will likely purchase. When you run the flow, the output of this action is the predicted value (the predicted winning insurance product, for example), along with a bar chart of ranked probabilities by value (all insurance products). Optionally, you can include top predictors.
Order Management: New Flow Actions, and Rollback
The Order Management flows are updated to use the Roll Back Records element, which cancels pending record changes when a flow exits due to an error. In addition, the following new actions are available:
Find Routes With Fewest Splits Using OCI Find inventory availability using Omnichannel Inventory and identify the fulfillment routes with fewest splits for an order summary. This action combines the existing Omnichannel Inventory Service Get Availability and Find Routes With Fewest Splits actions.
Add Order Item Summary Add order item summaries to an order summary
In addition, you’ll enjoy improved order throughput with the flows in the DOM Routing Flow package. We’ve updated them to use multithreaded processing with scheduled paths.
Additionally, an Even Exchange standard flow is now available.
Easily Keep Track of your Flows in your Browser Tabs
The flow’s name and version now appear on your browser tab titles, so you can quickly scan your workspace and find your flow.
More Places Where You Can Use a Flow to Override Standard Behavior
More Salesforce product teams are implementing functionality using standard flows and allowing users to override the functionality with custom flows.
Health Cloud: Adding Patient Medication
Event Monitoring enables flows to be created that respond to Security Events
ApiAnomalyEvent, CredentialStuffingEvent, ReportAnomalyEvent, and SessionHijackingEvent are exposed as selectable platform events in Platform-Event triggered flow start elements.
Salesforce Surveys now ships Sentiment Analysis flows out-of-the-box
To process text responses in bulk, use a flow: • Perform Survey Sentiment Analysis for User-Selected Question: Screen flow. Lets you define custom values, such as survey, questions, type of operation to perform on the responses, and date range to process responses in the selected timeline. • Perform Survey Sentiment Analysis: Autolaunched flow. Lets you schedule bulk processing of responses. Use the invocable action in the flow to define the operation to perform on the responses and the date range.
https://unofficialsf.com/wp-content/uploads/2022/09/largeUCSF-300x133.png00Alex Edelsteinhttps://unofficialsf.com/wp-content/uploads/2022/09/largeUCSF-300x133.pngAlex Edelstein2021-12-10 14:12:132021-12-22 08:08:44Spring 22 Sneak Preview: Flow, Orchestrator & Next Best Action
Salesforce Labs has published a new flow screen component that has 6 different indicator types to let users know where they are in your Flow-based process. In the spirit of Salesforce Labs, they are also allowing access to the source code. Here are the installation and configuration instructions
https://unofficialsf.com/wp-content/uploads/2022/09/largeUCSF-300x133.png00Tamar Erlichhttps://unofficialsf.com/wp-content/uploads/2022/09/largeUCSF-300x133.pngTamar Erlich2021-12-07 12:10:512021-12-07 12:10:55Progress Bar component for flow screens